1
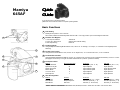
Quick
Guide
Mamiya
645AF
To get the most from your Mamiya 645AF,
please refer to the instruction book for complete operating details.
Basic Functions
A
C
B
F
A
Film Handling
Rotate pressure plate for 120 or 220 film.
The roll-film holder will automatically detect film frame No. 1 from any position up to and including the Start Mark.
B
Set ISO on Film Magazine
1. Hold "Up" Arrow Button
2. Press Up or Down Arrow
3. ISO stops blinking
"ISO" blinks
Change ISO to desired setting
ISO is set
C
Set Metering Mode
Using the Exposure Metering Mode Selector Lever, choose “A” for Average, “S” for Spot, or “A-S AUTO” for Average/Spot Auto
Switching.
D
Set Auto Focus Function
Using the Focus Mode Selector Lever, choose “S” for Single Focus, “C” for Continuous Focus, or “M” for Manual.
E
Set Shutter Release Mode
Using the Shutter Release Mode Selector, choose “S” to advance film one frame at a time (Single-Frame Mode), choose “C” to take
photographs continuously as long as the shutter release button is pressed. (Continuous Mode)
F
Set Exposure Modes
Feature
Program Mode AE
Aperture Priority AE
Shutter Priority AE
Manual Mode
1/125 sec. Flash
Time Exposure
Exposure Mode Dial
P
Av
Tv
M
X
T
Front Dial
Set Program (PH - P - PL)
Adjust Aperture
Adjust Shutter Speed
Adjust Shutter Speed
Adjust Aperture
Adjust Aperture
Rear Dial
Set Program (PH - P - PL)
Adjust Aperture
Adjust Shutter Speed
Adjust Aperture
Adjust Aperture
Adjust Aperture
Other Shooting Modes
Feature
Mode Button
Mode Button
Mode Button
Function
Auto Bracketing
Multiple Exposure
Self Timer
Front Dial
Select Bracket (1/ 3 -1 stops)
Set add'l exposures (1 - 5)
Set timer (3 - 60 seconds)
Rear Dial
Select Bracket (1/ 3 -1 stops)
Set add'l exposures (1 - 5)
Set timer (3 - 60 seconds)
H
G
E
D
G
MAMIYA AMERICA CORPORATION 8 Westchester Plaza, Elmsford, NY 10523 • Phone: 914-347-3300 • Fax: 914-347-3309
Advanced Functions
H
Superimposing Data
Feature
Function
Set DAY
Day/Date/Time
Set DATA
Index Number from 000 - 999
Action
1. Hold F2 button
2. Press F2 again
3. Turn front dial
4. Turn rear dial
5. Hold SET button
Effect
"Set 1" appears
DAY / YEAR APPEAR
Select Month, Date, Year, Hr.,Min.
Change Month, Date, Year, Hr., Min.
Saves Adjustments
1. Hold F2 button
2. Turn front or rear dial
3. Press F2 again
4. Turn front dial
"Set 1" appears
Select "Set 2"
Index number appears
Select one of three digits to
5. Turn rear dial
6. Hold SET button
Change digit from 0 - 9
Saves Adjustments
1. Hold F1 button
2. Press F1 again
3. Turn front or rear dial
4. Hold SET button
"Func" appears
"OF" or "DATA" or "DAY" appears
Select "OF" or "DATA" or "DAY"
DATA, DAY or OF is now set
Action
1. Hold F1 button
2. Turn front or rear dial
3. Press F1 again
4. Turn front or rear dial
5. Hold SET button
Effect
"Func" appears
turn until "dLoc" appears
"OF" or "ON" appears
Select "OF" or "ON"
Lock OF or ON is now set
Action
1. Hold F1 button
2. Turn front or rear dial
3. Press F1 again
4. Turn front or rear dial
5. Hold SET button
Effect
"Func" appears
turn until "Fd" appears
"OF" or "ON" appears
Select "OF" or "ON"
Lock OF or ON is now set
adjust
Data Imprint
Select type On
or OFF
Data / Exposure / Index Number
Day/Date
OFF
H
To Lock the Adjustment Dials
Feature
Function
Dial Lock (dLoc)
Av - aperture adjustment locked
Dial Lock (dLoc)
Tv - shutter speed adjustment locked
Dial Lock (dLoc)
M - both shutter and aperture locked
H
Changing Viewfinder Display=
Feature
Function
Viewfinder Display
Works in "M" Manual Mode only
On or Off
shuts off exposure information
(Finder Display)
infinder, focus confirmation only
is displayed.