1
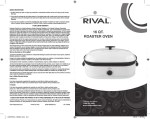
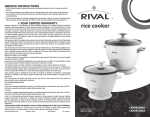
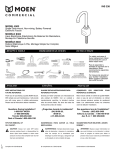
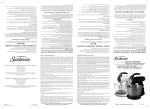
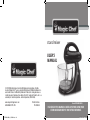
stand mixer
USER’S
MANUAL
© 2012 CNA International, Inc. d/b/a MC Appliance Corporation. All rights
reserved. Magic Chef® logo is a registered trademark of CNA International, Inc.
used under license. Distributed by Sunbeam Products, Inc. doing business as
Jarden Consumer Solutions, Boca Raton, FL33431. Sunbeam Products, Inc. is a
subsidiary of Jarden Corporation. Jarden Corporation (NYSE: JAH).
www.magicchefappliance.com
Printed in China
GCDS-MGC25776-VW
P.N. 160649
FPRVMCSM02_12ESM1.indd 1-2
Model FPRVMCSM02
PLEASE READ THIS MANUAL CAREFULLY BEFORE USING YOUR
STAND MIXER AND KEEP IT FOR FUTURE REFERENCE.
5/31/12 11:47 PM
CONTENTS
IMPORTANT SAFEGUARDS . . . . . . . . . . . . . . . . . . . . . . . . . . . . . . . . . E1
LEARNING ABOUT YOUR STAND MIXER . . . . . . . . . . . . . . . . . . . . . .E4
HOW TO USE YOUR STAND MIXER . . . . . . . . . . . . . . . . . . . . . . . . . . .E5
ASSEMBLING THE UNIT. . . . . . . . . . . . . . . . . . . . . . . . . . . . . . . . . . . . . E6
OPERATING INSTRUCTIONS . . . . . . . . . . . . . . . . . . . . . . . . . . . . . . . . E8
CARE AND CLEANING. . . . . . . . . . . . . . . . . . . . . . . . . . . . . . . . . . . . . . E11
WARRANTY INFORMATION. . . . . . . . . . . . . . . . . . . . . . . . . . . . . . . . . . . . E13
READ THIS MANUAL
Inside you will find many helpful hints on how to use and
maintain your stand mixer properly. Just a little preventive care on
your part can save you a great deal of time and money over the
life of your stand mixer.
IMPORTANT SAFEGUARDS
To reduce the risk of fire, electric shock and/or injury to persons,
basic safety precautions should always be followed when using
electrical appliances, including the following:
1. READ ALL INSTRUCTIONS BEFORE USING THE STAND MIXER.
2.To protect against risk of electrical shock, do not put mixer in
water or other liquid. This may cause personal injury or damage
to the product.
3. Close supervision is necessary when mixer is used by or near
children or incapacitated persons.
4. Unplug electrical cord from outlet while not in use, before
putting on or taking off parts, and before cleaning.
5. Avoid contacting moving parts. Keep hands, hair, clothing, as
well as spatulas and other utensils away from beaters during
operation to reduce the risk of injury to persons and/or
damage to the mixer.
6. Do not operate mixer with a damaged electrical cord or plug
or after the appliance malfunctions, or is dropped or damaged
in any manner. If the mixer becomes damaged please contact
Consumer Services for assistance.
7. The use of attachments not recommended or sold by Jarden
Consumer Solutions may cause fire, electrical shock or injury.
8. Do not use mixer outdoors or for commercial purposes.
9. Do not let electrical cord hang over edge of table, countertop,
or touch hot surfaces, including the stove.
10.Remove beaters from mixer before washing.
E1
FPRVMCSM02_12ESM1.indd 3-4
5/31/12 11:47 PM
11. Do not place mixer or bowl on or near a hot gas or electric
burner, in a heated oven (microwave, convection, etc.) or on any
other heated surface.
12.Do not use mixer for other than intended use.
13.Do not leave mixer unattended while it is operating.
14.Any servicing, other than cleaning and user maintenance
should be performed by any authorized service representative.
15.When mixing liquids, especially hot liquids, use a tall container
or make small quantities at a time to reduce spillage.
16.Do not abuse electrical cord. Never carry the mixer by the cord or
yank it to disconnect from an outlet; instead, grasp the plug and
pull to disconnect.
THIS UNIT IS INTENDED
FOR HOUSEHOLD USE ONLY
SAVE THESE INSTRUCTIONS
The motor of your mixer is protected by a heat cured insulation.
This is a standard process. Due to the heat curing of the insulation,
you may experience an odor and possibly a slight wisp of smoke
from your mixer’s motor. This effect will disappear after the first
few uses.
E2
FPRVMCSM02_12ESM1.indd 5-6
This appliance is for HOUSEHOLD USE ONLY. No user-serviceable
parts inside. Power unit never needs lubrication. Do not attempt to
service this product.
A short power supply cord is provided to reduce the risk resulting
from becoming entangled in or tripping over a longer cord. An
extension cord may be used if care is exercised in its use. If an
extension cord is used, the marked electrical rating of the extension
cord should be at least as great as the electrical rating of the stand
mixer.
The cord should be arranged so that it will not drape over the
countertop or tabletop where it can be pulled on by children or
tripped over unintentionally. Do not immerse in water or other
liquids. No liability can be accepted for any damage cause by noncompliance with these instructions or any other improper use or
mishandling.
POLARIZED PLUG
This appliance has a polarized plug (one blade is wider
than the other). To reduce the risk of electric shock,
this plug is intended to fit into a polarized outlet only
one way. If the plug does not fit fully into the outlet,
reverse the plug. If it still does not fit, contact a qualified electrician. Do
not attempt to modify the plug in any way. If the plug fits loosely into
the AC outlet or if the AC outlet feels warm, do not use that outlet.
E3
5/31/12 11:47 PM
LEARNING ABOUT YOUR
STAND MIXER
i
a
k
b
c
h
g
f
e
d
a Attachment Eject Button – The eject button, located on the
top of the handle, releases the beaters or dough hooks for
easy cleaning.
b Off-Center Head and Beaters – The head of the stand mixer
and beaters is positioned off-center to the bowl to make it
easier to add ingredients during mixing.
c Glass Mixing Bowl – 4.0 quart mixing bowl is ideal for mixing.
d Turntable – The turntable allows the bowl to turn while mixing.
e Tilt Back Locking Head Button – The head of the stand
mixer tilts back and locks securely into position to allow easy
removal of mixing bowl and attachments.
f Mixer-Release Trigger – Remove the mixer head from the base
for convenient cleaning and storage.
g Power/Speed Indicator Light – The ON/OFF light is also
used to indicate speed setting.
h 12 Variable Speeds – The 12 variable speeds with soft-start
ensure superior mixing control and maintain speed regardless
of the mixing load.
i Burst of Power® Button or Feature – Press down on button to
automatically increase the beater speed for an immediate burst
of power.
j Chrome Beaters – For creaming butter and sugar, as well as
mixing heavy cake mixes.
k Handle – For holding and moving stand mixer.
HOW TO USE YOUR STAND MIXER
Left
j
E4
FPRVMCSM02_12ESM1.indd 7-8
Right
Before preparing the mixer for use, be sure the speed control dial
is in the OFF position and the electric cord is unplugged. Be sure
to wash mixing bowl and attachments before initial use.
E5
5/31/12 11:47 PM
ASSEMBLING THE UNIT
ATTACHING THE TURNTABLE
Place the revolving turntable into the base of the stand by
pressing the turntable into the center hole of the adjustable slot
until it snaps into place.
ATTACHING AND REMOVING
THE MIXING HEAD
To attach the mixing head, press in on the
A
mixer-release trigger, located at the rear
of the stand. Place the mixer head on the
stand so that the metal pivot on the
bottom of the mixer head goes into the
latched opening on top of the stand. As
you release pressure from the
Figure 1A
mixer-release trigger, the top of the
Mixer-Release Trigger
latch should clamp around the metal
pivot. Once the mixing head is lowered into position, it will lock
into place (See Figure 1A).
RAISING AND LOWERING THE MIXING HEAD
Press the head lock button, located on the neck of the stand
mixer. While the button is depressed, hold the handle and ease
the head of the stand mixer back. The stand mixer head will lock
into this position. To lower the mixing head, press the head lock
button. While the button is depressed, hold the handle and ease
the head of the stand mixer down. A “click” sound will indicate
when the mixer head has locked into position (See Figure 1B). Be
sure the mixer head is securely locked in position before using.
E6
FPRVMCSM02_12ESM1.indd 9-10
NOTE: This mixer is NOT intended for use
away from the stand.
INSTALLING THE ATTACHMENTS
B
Be sure the speed control dial is in the OFF
position and unplug electrical cord from the
electrical outlet. Lift mixer head up and back
Figure 1B
to move it away from of the bowl Tilt Back Locking
(See Figure 1B).
Head Button
NOTE: It is important that the beaters or
other separately purchased accessories, such as dough hooks, go
into the correct sockets, otherwise the mixer will not give you
the proper mixing action. Do not risk ruining a recipe or damaging
your mixer. Read the following instructions carefully.
Insert the beaters or other separately purchased accessories, such
as dough hooks, one at a time, using a combination pressing and
twisting motion, until they snap into position. If an attachment
does not properly snap into place, pull it out of the socket and
rotate it one quarter turn. Reinsert the attachment into the
socket until it snaps into position.
BEATERS
One of the beaters is shaped like a
cone and has a nylon button on the
bottom. It goes into the socket on
the side of the mixer nearest the
side of the bowl. The other beater
goes into the socket nearest the
center of the bowl (See Figure 2).
See beater symbols located on the
bottom of the mixer head.
Figure 2
Cone Beater
E7
5/31/12 11:47 PM
ADDING THE MIXING BOWL
MIXING GUIDE
Place mixing bowl directly onto the turntable, making sure the
bowl sits properly on the turntable.
NOTE: Mixing bowls should NEVER be used in a conventional oven,
microwave oven, on top of the range or on any other heated surface.
If mixing bowls are scratched or chipped, do not use the mixer.
Please keep in mind that the various mixing tasks and related speeds
listed in the following table may vary slightly from recipe to recipe.
For most recipes, it is better to begin your mixing on a slower speed
until the ingredients begin combining, then move to the appropriate
speed range for the particular task.
When mixing larger quantities you may need to increase the speed
due to the amount of mixing required and the larger load on the
machine.
When building up a recipe that requires the addition of dry
ingredients, such as flour, slow the speed down while these
ingredients are being added to avoid a snow storm effect. Once the
extra ingredients begin combining, slowly increase the speed setting
to the appropriate speed for the particular mixing task.
Use the chart below to determine the best setting to use when
preparing your favorite recipes.
Speed Mixing Guide Example
Setting
1
Fold-Knead
Use when mixing dry ingredients
or when folding two portions of a
recipe together, such as a beaten
egg white into a batter or when
directions call for LOW speed. Use
for kneading bread.
OPERATING INSTRUCTIONS
ABOUT THE SPEED CONTROL DIAL
The speed control dial is used for turning
the mixer ON/OFF and for selecting its 12
mixing speeds (See Figure 3).
Rotate the speed control dial in a
clockwise direction to increase mixing
speed, and in a counterclockwise
direction to decrease mixing speed.
As you rotate the speed control dial,
notice that a numbered speed is aligned
with the indicator light on the side
Figure 3
of the mixer head. This numbered
Speed Control Dial
speed indicates the speed at which Power/Speed Indicator Light
the mixer is operating.
Rotate the speed control dial until the indicator is opposite the
numbered speed you wish to use.
HINT: During normal operation, the mixer may automatically
adjust speeds as the consistency of your dough or mixture
changes: This is for optimum performance. It is not recommended
to operate the mixer without contents in the bowl.
E8
FPRVMCSM02_12ESM1.indd 11-12
E9
5/31/12 11:47 PM
Speed Mixing
Setting Guide
2
Stir
Example
Use when stirring liquid ingredients or when
gentle action is needed to moisten dry
ingredients.
Use when quick breads require a brisk
action, just enough to blend ingredients but
not enough to develop a smooth batter.
3
Blend
4
Mix
5
Combine Use when recipe calls for combining
ingredients together.
6
Cake
Mixes
Cream
Whip
7
8
9
10
11
12
Use when mixing dry ingredients and liquid
ingredients together alternately in a recipe.
Use when preparing packaged cake mixes or
when directions call for MEDIUM speed.
Use when creaming sugar and butter together.
Use to whip potatoes or to develop a
smooth batter.
Whip/ Use to whip cream or to develop a light,
Cream
fluffy texture.
Desserts Use to beat air into whipped desserts.
Frostings Use when preparing light, fluffy frostings
and candies.
Egg
Use when aerating eggs and egg whites. Use
Whites when directions call for HIGH speed.
E10
FPRVMCSM02_12ESM1.indd 13-14
NOTE: Due to variations in ingredient temperatures and
quantities, the Mixing Guide speeds are only suggestions. If
necessary, adjust speeds as needed to achieve desired results.
SERVICE INSTRUCTIONS
1. D
o NOT attempt to repair or adjust any electrical or mechanical
functions on this unit. Doing so will void the Warranty.
2. If you need to exchange the unit, please return it in its original
carton, with a sales receipt, to the store where you purchased it.
If you are returning the unit more than 30 days after the date of
purchase, please see the enclosed Warranty.
3. If you have any questions or comments regarding this unit’s
operation or believe any repair is necessary, please call our
Consumer Service Department at 1-888 474-3178 or visit our
website at www.magicchefappliance.com.
CARE AND CLEANING
CLEANING YOUR MIXER
To clean the mixer, turn off, unplug, wipe the mixer head, stand
and turntable with a damp cloth, then dry. DO NOT IMMERSE
THE STAND MIXER IN WATER. Avoid the use of abrasive cleaners,
as they may damage the finish of the mixer. Wash the beaters
and bowls in hot, soapy water after each use. Rinse thoroughly
and dry. Beaters and bowls may also be washed in an automatic
dishwasher. If mixing bowl is scratched or chipped, do not use mixer.
STORING YOUR MIXER
Store the mixer in a dry location, such as on a countertop or table
top, or in a closet or cupboard. Insert the beaters into the proper
E11
5/31/12 11:47 PM
sockets. Place the dough hooks and other attachments in the
mixing bowl. Store the bowl(s) on the turntable. Wind the electric
cord into a coil, then secure it with a twist fastener.
MAINTENANCE
The motor of your stand mixer has been carefully lubricated at
the factory and does not require any additional lubricant. Other
than the recommended cleaning, no further user maintenance
should be necessary. For servicing or repairs please contact
Consumer Services for assistance.
HELPFUL HINTS
•When mixing liquids, especially hot liquids, use the large mixing
bowl and make small quantities at a time to reduce spillage.
•Ingredients should be added to the mixing bowl as they are
specified in the recipe.
•Use the mixing speed that is recommended in the recipe.
•If times are specified in the recipe, use them! BE CAREFUL NOT
TO OVER MIX. Over mixing can cause the mixture to become
very tough.
•Should an object, such as a spatula, fall into the bowl while the
mixer is operating, turn the mixer OFF immediately then remove
the object.
•For easier cleanup remove beaters and rinse immediately with
warm water.
•Before beginning, make sure the bowl lever is in the correct
position for the bowl size you are using, such as for the large
bowl.
•Mixer is designed to be off-center.
E12
FPRVMCSM02_12ESM1.indd 15-16
WARRANTY INFORMATION
1-YEAR LIMITED WARRANTY
Sunbeam Products, Inc. doing business as Jarden Consumer Solutions or if in Canada, Sunbeam
Corporation (Canada) Limited doing business as Jarden Consumer Solutions (collectively “JCS”)
warrants that for a period of one year from the date of purchase, this product will be free from defects
in material and workmanship. JCS, at its option, will repair or replace this product or any component of
the product found to be defective during the warranty period. Replacement will be made with a new or
remanufactured product or component. If the product is no longer available, replacement may be made
with a similar product of equal or greater value. This is your exclusive warranty. Do NOT attempt to
repair or adjust any electrical or mechanical functions on this product. Doing so will void this warranty.
This warranty is valid for the original retail purchaser from the date of initial retail purchase and is
not transferable. Keep the original sales receipt. Proof of purchase is required to obtain warranty
performance. JCS dealers, service centers, or retail stores selling JCS products do not have the right to
alter, modify or any way change the terms and conditions of this warranty.
This warranty does not cover normal wear of parts or damage resulting from any of the following:
negligent use or misuse of the product, use on improper voltage or current, use contrary to the operating
instructions, disassembly, repair or alteration by anyone other than JCS or an authorized JCS service
center. Further, the warranty does not cover: Acts of God, such as fire, flood, hurricanes and tornadoes.
What are the limits on JCS’s Liability?
JCS shall not be liable for any incidental or consequential damages caused by the breach of any
express, implied or statutory warranty or condition.
Except to the extent prohibited by applicable law, any implied warranty or condition of merchantability or
fitness for a particular purpose is limited in duration to the duration of the above warranty.
JCS disclaims all other warranties, conditions or representations, express, implied, statutory or
otherwise. JCS shall not be liable for any damages of any kind resulting from the purchase, use or
misuse of, or inability to use the product including incidental, special, consequential or similar damages
or loss of profits, or for any breach of contract, fundamental or otherwise, or for any claim brought
against purchaser by any other party.
Some provinces, states or jurisdictions do not allow the exclusion or limitation of incidental or
consequential damages or limitations on how long an implied warranty lasts, so the above limitations or
exclusion may not apply to you.
This warranty gives you specific legal rights, and you may also have other rights that vary from province
to province, state to state or jurisdiction to jurisdiction.
How to Obtain Warranty Service
In the U.S.A.
If you have any question regarding this warranty or would like to obtain warranty service,
please call 1-888 474-3178 and a convenient service center address will be provided to you.
In Canada
If you have any question regarding this warranty or would like to obtain warranty service,
please call 1-888 474-3178 and a convenient service center address will be provided to you.
In the U.S.A., this warranty is offered by Sunbeam Products, Inc. doing business Jarden Consumer
Solutions located in Boca Raton, Florida 33431. In Canada, this warranty is offered by Sunbeam
Corporation (Canada) Limited doing business as Jarden Consumer Solutions, located at 20B Hereford
Street, Brampton, Ontario L6Y 0M1. If you have any other problem or claim in connection with this
product, please write our Consumer Service Department.
PLEASE DO NOT RETURN THIS PRODUCT TO ANY OF THESE ADDRESSES OR
TO THE PLACE OF PURCHASE.
E13
5/31/12 11:47 PM
Batidora de
Pedestal
MANUAL
DEL
USUARIO
© 2012 CNA International, Inc. realiza negocios bajo el nombre de MC
Appliance Corporation. El logotipo Magic Chef® es una marca registrada de CNA
International, Inc. utilizada bajo licencia. Distribuido por Sunbeam Products, Inc.
operando bajo el nombre de Jarden Consumer Solutions, Boca Raton, Florida
33431. Products, Inc. es una subsidiaria de Jarden Corporation (NYSE: JAH).
www.magicchefappliance.comImpreso en China
FPRVMCSM02_12ESM1.indd 17-18
Modelo FPRVMCSM02
LEA ESTE MANUAL ANTES DE UTILIZAR SU BATIDORA DE
PEDESTAL Y GUÁRDELO PARA FUTURA REFERENCIA.
5/31/12 11:47 PM
CONTENIDO
PRECAUCIONES IMPORTANTES . . . . . . . . . . . . . . . . . . . . . . . . . . . . . . . . . S1
APRENDA ACERCA DE SU BATIDORA DE PEDESTAL . . . . . . . . . . . . . . . . . . . . . . S4
COMO USER SU BATIDORA DE PEDESTAL . . . . . . . . . . . . . . . . . . . . . . . . . . . S6
ENSAMBLANDO SU BATIDORA. . . . . . . . . . . . . . . . . . . . . . . . . . . . . . . . . . . . . . S6
INSTRUCCIONES DE OPERACIÓN. . . . . . . . . . . . . . . . . . . . . . . . . . . . . . . . S9
CUIDADO Y LIMPIEZA . . . . . . . . . . . . . . . . . . . . . . . . . . . . . . . . . . . . . . .S13
INFORMACION DE LA GARANTIA. . . . . . . . . . . . . . . . . . . . . . . . . . . . . . S15
LEA ESTE MANUAL
En el encontrará muchos consejos útiles sobre el uso y mantenimiento
correctos de su batidora de pedestal. El cuidado preventivo
pueden ahorrarle mucho tiempo y dinero durante la vida útil de
su batidora de pedestal.
PRECAUCIONES IMPORTANTES
Para disminuir el riesgo de un incendio, descarga eléctrica y/o
lesión a las personas, se deben seguir las precauciones básicas
de seguridad al utilizarse equipos eléctricos, incluyendo las
siguientes:
1. LEA TODAS LAS INSTRUCCIONES ANTES DE USAR SU
BATIDORA DE PEDESTAL.
2.Para protegerse contra peligros de electricidad no sumerja
la batidora en agua u otros líquidos ya que podría ocasionar
lesiones personales o daños al producto.
3. Es necesario contar con supervisión continua cuando
la Batidora es usada o está cerca de niños o personas
incapacitadas.
4. Desconecte el cable eléctrico del tomacorriente cuando el
aparato no está en uso, antes de poner o quitar partes y antes
de limpiarla.
5. Evite el contacto con las partes en movimiento. Mantenga
las manos, cabello, ropa, así como también espátulas y otros
utensilios lejos de los batidores durante el funcionamiento del
aparato, para reducir el riesgo de lesiones personales o daños a
la batidora.
6. No opere la batidora si tiene el cable eléctrico o enchufe
dañado, ni después de haber detectado un mal funcionamiento
o si se cae o está dañada de modo alguno. Si la batidora
está dañada, comuníquese con Servicios al Consumidor para
solicitar asistencia.
7. El uso de accesorios no recomendados o vendidos por Jarden
Consumer Solutions puede causar incendios, descargas
eléctricas o lesiones.
S1
FPRVMCSM02_12ESM1.indd 19-20
5/31/12 11:47 PM
8. No use la batidora al aire libre o para propósitos comerciales.
9. No deje el cable eléctrico colgado sobre el borde de la mesa ni
que toque superficies calientes, incluyendo el horno.
10.Quite los batidores de la batidora antes de lavarlos.
11. No coloque la batidora o el tazón sobre o cerca de hornillas de
estufas de gas o de hornillas eléctricas, o dentro de un horno
caliente.
12.No use la Batidora más que para lo que ha sido diseñada.
13.No opere la batidora sin continua supervisión.
14.La batidora tiene una seguridad interna que evita el
sobrecalentamiento. Si la batidora deja de funcionar por
sobrecalentamiento, lleve el disco de control de velocidades a la
posición OFF y desenchufe la batidora. Espere 1 minuto y vuelva a
enchufarla. Aseguriese que el selector de velocidades este en OFF.
15.Cualquier reparación, que no sea limpieza y mantenimiento de
usuario, la debe realizar un representante técnico autorizado.
16.Al mezclar líquidos, especialmente calientes, utilize un tazón alto
fuente que se mezcla grande o haga contidades pequeñas a la vez
para reducir derramamiento.
17.No abuse del cable electical. Nunca jale el mezclador por la cuerda
ni dé tirones para desenchufar del tomacorriente; más bien, agarre
del enchufe para jalar y desenchufar.
ESTE APARATO ESTÁ DISEÑADO
SOLAMENTE PARA USO DOMÉSTICO
CONSERVE ESTAS
INSTRUCCIONES
S2
FPRVMCSM02_12ESM1.indd 21-22
El motor de su batidora está protegido con un aislante curado por
calor. Éste es un proceso estándar. Debido al curado por calor del
aislante, es posible que perciba un olor y posiblemente un poco
de humo saliendo del motor de la batidora. Estos inconvenientes
desaparecerán después de las primeras veces que utilice la batidora.
Este aparato es para USO DOMESTICO SOLAMENTE. En el interior
no hay piezas a las que el usuario les pueda dar mantenimiento. El
motor de la unidad no necesita lubricación.
Se provee un cordón eléctrico corto para reducir el riesgo de
enredos o tropiezos que pueda causar un cordón largo. Se puede
utilizar un cable de extensión si lo hace con cuidado. Si usa un cable
de extensión, la capacidad nominal eléctrica del cable de extensión
deber ser al menos del mismo valor que la capacidad eléctrica del
cuchillo eléctrico.
El cordón debe colocarse de manera que no cuelgue del mostrador
o mesa donde los niños puedan jalarlo o tropezarse con él
accidentalmente. No lo sumerja en agua ni en otro líquido. No se acepta
responsabilidad por cualquier daño causado por el incumplimiento de
estas instrucciones o cualquier otro uso o manejo indebido.
ENCHUFE POLARIZADO
Este aparato tiene un enchufe polarizado (una pata
es más ancha que la otra). Para reducir el riesgo de
descarga eléctrica, este enchufe está diseñado para
ajustarse sólo de una forma en un tomacorriente
polarizado. Si el enchufe no se ajusta completamente en el
tomacorriente, dé vuelta al enchufe. Si todavía no se ajusta, contacte a
un electricista calificado. No intente modificar el enchufe de ninguna
manera. Si el enchufe está flojo en el tomacorriente de CA, o si el
tomacorriente se siente caliente, no utilice ese tomacorriente.
S3
5/31/12 11:47 PM
APRENDA ACERCA DE SU
BATIDORA DE PEDESTAL
i
a
k
b
c
h
g
f
e
d
Izquierda
S4
FPRVMCSM02_12ESM1.indd 23-24
j
Derecha
a Botón de Expulsión de Accesorios – El botón de expulsión,
ubicado en la parte superior de la agarradera, libera las
paletas o los ganchos de amasar para poder limpiarlos
fácilmente.
b Paletas y Cabezal Laterales – El cabezal de la batidora de
pedestal y las paletas están colocados a un lado del bol para
que los ingredientes se puedan añadir fácilmente durante la
mezcla.
c Bol de vidrio para batido – Bol de 4.0 cuartos es ideal para el
batido.
d Plato giratorio – El plato giratorio permite que el bol de vueltas
mientras bate.
e Seguro para el inclinado hacia atrás – La batidora se inclina
hacia atrás y se asegura firmemente en posición para permitir
el removido fácil del bol y de los accesorios de batido.
f Gatillo de Liberación de la Batidora – Retire el cabezal
de la base de la batidora para limpiarla y guardarla en forma
conveniente.
g Luz indicadora de Encendido/Velocidad – La luz de ON/
OFF (encendido/apagado) también se utiliza para indicar el
ajuste de velocidad.
h 12 velocidades variables – Las 12 velocidades variables con
arranque suave aseguran un control superior del batido y
mantienen la velocidad independientemente de la carga de la
mezcla.
i Burst of Power® Funcion – Presione este botón para aumentar
automáticamente la velocidad de la batidora y obtener
inmediatamente una velocidad máxima.
j Batidoras de Cromo – Para batir manteca y azúcar, también
para mezclas densas de tortas.
k Mango – Para sujetar y mover la batidora.
S5
5/31/12 11:47 PM
CÓMO USAR SU BATIDORA DE
PEDESTAL
Antes de usar su batidora asegúrese de que este apagado,
desenchufado, y el control de velocioades este en “OFF”. Lave el
bol y las paletas antes de usar por primera vez..
ENSAMBLANDO SU BATIDORA
MONTAJE DE LA BATIDORA DE PEDESTAL
Coloque el plato giratorio en la base del soporte presionando el
plato giratorio en el orificio central de la ranura de ajuste hasta
que encaje en su lugar.
COLOCACIÓN DEL PLATO GIRATORIO
Ponga el plato giratorio en la base del pedestal presionándolo en el
orificio central de la ranura de ajuste hasta que se acomode en su lugar.
COLOCACIÓNY RETIRO DEL CABEZAL DE LA BATIDORA
Para colocar el cabezal de la batidora,
presione el gatillo de liberación ubicado
en la parte trasera del pedestal. Ponga el
cabezal de la batidora sobre el pedestal
de modo que el pivote de metal de la
parte inferior del cabezal de la batidora
se inserte en el orificio con traba que se
encuentra en la parte superior del
pedestal. Al soltar el gatillo para retirar la
batidora, la parte superior de la traba
debe cerrarse alrededor del pivote de
metal. Al bajar el cabezal de la batidora a
su posición, el cabezal se traba en su lugar
(Vea la Figura 1A).
S6
FPRVMCSM02_12ESM1.indd 25-26
ELEVACIÓNY DESCENSO DEL CABEZAL DE LA
BATIDORA
Presione el botón de seguro del cabezal que está ubicado en el
cuello de la batidora de pedestal. Mientras presiona el botón,
sostenga la agarradera y mueva hacia atrás
el cabezal de la batidora de pedestal. El
cabezal se ubicara en su lugar. Para bajar el
cabezal de la batidora, presione el botón de
B
seguro del cabezal. Mientras presiona el
botón, sostenga el asa y baje el cabezal de
la batidora de pedestal. Escuchará un “clic”,
el cual indicará cuándo el cabezal de la
Figura 1B
batidora se encuentre en su posición (Vea la Botón del Cabezal
de Bloqueo de
Figura 1B). Asegúrese que el cabezal de la
Inclinación Trasera
batidora esté firmemente asentado en su
posición antes de usar la batidora.
NOTA: Esta batidora NO puede usarse fuera del pedestal.
INSTALACIÓN DE LOS ACCESORIOS
A
Figura 1A
Gatillo de Liberación
de la Batidora
Asegúrese que la perilla de control de velocidad esté en posición
“OFF” (APAGADA) y desenchufe el cable de alimentación del
tomacorriente. Levante el cabezal de la batidora hacia arriba y
hacia atrás para retirar del bol (Vea la Figura 1B).
NOTA: Es importante que las aspas y los otros accesorios comprados
separadamente, como aspas para batido de masa, vayan en los
orificios correctos, de lo contrario, la batidora no le dará la acción
adecuada de batido. Lea cuidadosamente las siguientes instrucciones.
Inserte las aspas u otros accesorios comprados separadamente,
como aspas para batido de masa, uno a la vez, usando una
combinación de movimiento de presión y rotación, hasta que
S7
5/31/12 11:47 PM
queden en posición. Si un accesorio no
se acomoda correctamente en su lugar,
retírelo del conector y gírelo un cuarto.
Vuelva a colocar el accesorio en el
conector hasta que quede acomodado
en su posición.
PALETAS
Uno de los batidores tiene forma de
cono y tiene un botón de nylon en la
parte inferior. Debe insertarse en el
Figura 2
conector del lado de la batidora que
Batidor Cónico
está más cerca del costado del bol. El
otro batidor tiene forma cuadrada y debe insertarse en el
conector que está más cerca del centro del bol. (Vea la Figura 2)
Vea los símbolos de los batidores que están ubicados en la parte
inferior del cabezal de la batidora.
COLOCACIÓN DEL BOL
Coloque el bol para batido directamente sobre el plato giratorio,
asegurándose de que el bol quede correctamente sentado sobre
el plato.
NOTA: Nunca use un bol para batido en un horno convencional,
horno microondas, sobre la estufa u otra superficie caliente. Si el
bol para batido está arañado o partido, no use la batidora.
INSTRUCCIONES DE OPERACIÓN
ACERCA DE LA PERILLA DE CONTROL DE VELOCIDAD
La perilla de control de velocidad se usa para encender “ON” y
apagar “OFF” la batidora, y para seleccionar sus 12 velocidades de
batido (Vea la Figura 3).
Gire la perilla de control de velocidad
hacia la derecha para aumentar la
velocidad de mezcla y hacia la izquierda
para reducir la velocidad de mezcla.
A medida que gira la perilla de control de
velocidad, observe que una velocidad
numerada se alinea con la luz indicadora
que está a un lado del cabezal de la
batidora. Esta velocidad numerada indica
Figura 3
la velocidad a la cual está
Perilla de control
funcionando la batidora.
de velocidad
Gire la perilla de control de
Luz indicadora de
velocidad hasta que el indicador
Potencia/Velocidad
esté frente a la velocidad que
desee usar.
SUGERENCIA: Durante el funcionamiento normal, la batidora
puede ajustar la velocidad, de manera automática, a medida que
la consistencia de la masa o mezcla cambia. Esto es para óptimo
rendimiento. No se recomienda usar la batidora con el tazón vacío.
GUÍA DE BATIDO
No olvide que las diversas tareas de batido y velocidades
relacionadas que aparecen en la siguiente tabla pueden variar
ligeramente de una receta a otra.
S8
FPRVMCSM02_12ESM1.indd 27-28
S9
5/31/12 11:47 PM
Para la mayoría de recetas, es mejor comenzar a batir a una
velocidad lenta hasta que los ingredientes se mezclen y luego
cambiar al rango de velocidad adecuado para esa tarea específica.
Cuando mezcle cantidades más grandes, es posible que tenga que
aumentar la velocidad debido a la cantidad de mezcla requerida y a
la carga mayor de la batidora.
Cuando realice una receta que requiere añadir ingredientes secos,
como harina, reduzca la velocidad mientras estos ingredientes se
agregan para evitar un efecto de tormenta de nieve. Una vez que los
ingredientes adicionales comienzan a mezclarse, aumente
lentamente la velocidad a una apropiada para la tarea de batido
específica.
Utilice la tabla que aparece a continuación para determinar el
mejor ajuste que se utilizará en el momento de preparar sus
recetas favoritas.
Ajuste de Guía de
Ejemplo
Velocidad Batido
1
AmasarPara batir ingredientes secos o
cuando mezcle dos partes de
Mezclar
una receta, como claras de huevo
batidas en una paleta o cuando se
especifica que se utilice velocidad
BAJA. Para amasar pan.
2
Revolver
Para revolver ingredientes
líquidos o cuando se requiere una
acción suave para humedecer los
ingredientes secos.
S10
FPRVMCSM02_12ESM1.indd 29-30
Ajuste de Guía de Ejemplo
Velocidad Batido
3
4
5
6
7
8
9
Mezclar Para panes rápidos que requieren una acción
rápida, justo lo suficiente para mezclar
ingredientes pero no para amasar una
mezcla homogénea.
Batir
Para mezclar ingredientes secos e
ingredientes líquidos a la vez en una sola
receta.
Revolver Cuando una receta requiere que se
revuelvan los ingredientes.
Mezclas
para
Pasteles
Crema
Batir
10
Batir/
Crema
Postres
11
Baños
12
Claras
de
Huevo
Para preparar pasteles con mezclas
empacadas o cuando las instrucciones
indiquen velocidad MEDIA.
Para hacer una crema con azúcar y mantequilla.
Para batir papas o preparar una masa
homogénea.
Para batir cremas o preparar una textura
ligera y esponjosa.
Para incorporar aire en postres batidos.
Para preparar baños o dulces ligeros y
esponjosos.
Para incorporar aire cuando se baten huevos
o claras de huevo. Utilícela cuando las
instrucciones indiquen velocidad ALTA.
S11
5/31/12 11:47 PM
NOTA: Debido a las variaciones en las temperaturas y a las
cantidades de ingredientes, las velocidades de la Guía de Batido
son sólo sugerencias. En caso necesario, ajuste la velocidad para
lograr los resultados deseados.
INSTRUCCIONES DE REPARACIÓN
1. N
O intente reparar o ajustar ninguna función eléctrica o
mecánica de esta unidad. El hacerlo invalidará la garantía.
2. Si necesita cambiar la unidad, devuélvala en su caja original, con el
recibo de compra, al negocio donde la haya comprado. Si devuelve
la unidad más de 30 días después de la fecha de compra, vea la
garantía adjunta.
3. Si tiene algún comentario o pregunta acerca del funcionamiento
de la unidad, o cree que debe ser reparada, Llame a nuestro
Departamento de Servicio al Cliente al 1-888 474-3178 o visite
nuestro sitio de Internet en www.magicchefappliance.com.
CUIDADO Y LIMPIEZA
CÓMO LIMPIAR SU BATIDORA
Limpie el cabezal de la batidora, apagar, desenchufar la base y la
plataforma giratoria con un paño húmedo; después, séquelos. NO
SUMERJA LA BATIDORA EN AGUA. Evite el uso de limpiadores
abrasivos porque pueden dañar el acabado de la batidora. Lave
los batidores y tazones en agua caliente y jabonosa después de
cada uso. Enjuague bien y deje secar. También puede lavarlos en el
lavaplatos. Si el bol para batido está arañado o partido, no utilice
la batidora.
DÓNDE GUARDAR LA BATIDORA
Guarde la batidora en un lugar seco, como por ejemplo sobre
la mesa o superficie de trabajo, en un gabinete. Inserte los
batidores en los receptáculos correspondientes. Coloque los
ganchos para amasar y demás accesorios en el tazón de mezclado.
Guarde el(los) tazón(tazones) en la superficie giratoria. Enrolle
el cable eléctrico en una bobina; después, fíjelo al portacables.
MANTENIMIENTO
El motor de su batidora ha sido cuidadosamente lubricado en
la fábrica y no necesita lubricación adicional. No es necesario
realizar ninguna tarea de mantenimiento además de la limpieza
recomendada.
Si necesita servicio técnico o reparaciones, comuníquese con
Servicios al Consumidor para recibir asistencia.
S12
FPRVMCSM02_12ESM1.indd 31-32
S13
5/31/12 11:47 PM
CONSEJOS ÚTILES
•Cuando bata líquidos, especialmente líquidos calientes, use el
bol para batido grande y haga pequeñas cantidades a la vez para
reducir el derrame.
•Debe agregar los ingredientes al tazón de mezclado según lo
especificado en la receta.
•Use la velocidad de mezclado recomendada en la receta. Utilice
la guía de mezclado del dial de control de velocidades de la
batidora para ayudarlo a encontrar la velocidad correcta.
•Si se especifican tiempos en la receta, ¡úselos! TENGA CUIDADO
DE NO MEZCLAR EN EXCESO, pues podría endurecer la mezcla.
•En caso de que un objeto, como por ejemplo una espátula, caiga
en el tazón con la batidora en funcionamiento, apague ésta de
inmediato para retirar el objeto.
•Para una limpieza más fácil, retire los batidores y enjuáguelos
inmediatamente con agua tibia.
•Antes de empezar, asegúrese de que la palanca del bol esté en la
posición correcta para el tamaño de bol que va a usar, como por
ejemplo para el bol grande.
•La batidora está diseñada para estar fuera del centro.
INFORMACION DE LA GARANTIA
GARANTÍA LIMITADA DE 1 AÑO
Sunbeam Products, Inc. operando bajo el nombre de Jarden Consumer Solutions, o en Canadá, Sunbeam Corporation
(Canada) Limited operando bajo el nombre de Jarden Consumer Solutions, (en forma conjunta, “JCS”), garantiza que
por un período de un año a partir de la fecha de compra, este producto estará libre de defectos de materiales y mano de
obra. JCS, a su elección, reparará o reemplazará este producto o cualquier componente del mismo que presente defectos
durante el período de garantía. El reemplazo se realizará por un producto o componente nuevo o reparado. Si el producto
ya no estuviera disponible, se lo reemplazará por un producto similar de valor igual o superior. Ésta es su garantía
exclusiva. No intente reparar o ajustar ninguna función eléctrica o mecánica de este producto. Al hacerlo elimínará ésta
garantía.
La garantía es válida para el comprador minorista original a partir de la fecha de compra inicial y la misma no es
transferible. Conserve el recibo de compra original. Para solicitar servicio en garantía se requiere presentar un recibo
de compra. Los agentes y centros de servicio de JCS o las tiendas minoristas que venden productos de JCS no tienen
derecho a alterar, modificar ni cambiar de ningún otro modo los términos y las condiciones de esta garantía.
Esta garantía no cubre el desgaste normal de las piezas ni los daños que se produzcan como resultado de uso negligente
o mal uso del producto, uso de voltaje incorrecto o corriente inapropiada, uso contrario a las instrucciones operativas,
y desarme, reparación o alteración por parte de un tercero ajeno a JCS o a un Centro de Servicio autorizado por JCS.
Asimismo, la garantía no cubre actos fortuitos tales como incendios, inundaciones, huracanes y tornados.
¿Cuál es el límite de responsabilidad de JCS?
JCS no será responsable de daños incidentales o emergentes causados por el incumplimiento de alguna garantía o
condición expresa, implícita o legal.
Excepto en la medida en que lo prohíba la ley aplicable, cualquier garantía o condición implícita de comerciabilidad o
aptitud para un fin determinado se limita, en cuanto a su duración, al plazo de la garantía antes mencionada.
JCS queda exenta de toda otra garantías, condiciones o manifestaciones, expresa, implícita, legal o de cualquier otra
naturaleza.
JCS no será responsable de ningún tipo de daño que resulte de la compra, uso o mal uso del producto, o por la
imposibilidad de usar el producto, incluidos los daños incidentales, especiales, emergentes o similares, o la pérdida de
ganancias, ni de ningún incumplimiento contractual, sea de una obligación esencial o de otra naturaleza, ni de ningún
reclamo iniciado contra el comprador por un tercero.
Algunas provincias, estados o jurisdicciones no permiten la exclusión o limitación de los daños incidentales o emergentes
ni las limitaciones a la duración de las garantías implícitas, de modo que es posible que la exclusión o las limitaciones
antes mencionadas no se apliquen en su caso.
Esta garantía le otorga derechos legales específicos y es posible que usted tenga otros derechos que varían de un estado,
provincia o jurisdicción a otro.
Cómo solicitar el servicio en garantía
En los Estados Unidos
Si tiene alguna pregunta sobre esta garantía o desea recibir servicio de garantía, llame al 1-888 474-3178 y podrá
obtener la dirección del centro de servicio que le resulte más conveniente.
En Canadá
Si tiene alguna pregunta sobre esta garantía o desea recibir servicio de garantía, llame al 1-888 474-3178 y podrá
obtener la dirección del centro de servicio que le resulte más conveniente.
En los Estados Unidos, esta garantía es ofrecida por Sunbeam Products, Inc. operando bajo el nombre de Jarden
Consumer Solutions, Boca Ratón, Florida 33431. En Canadá, esta garantía es ofrecida por Sunbeam Corporation (Canada)
Limited operando bajo el nombre de Jarden Consumer Solutions, 20 B Hereford Street, Brampton, Ontario L6Y 0M1. Si
usted tiene otro problema o reclamo en conexión con este producto, por favor escriba al Departamento de Servicio al
Consumidor.
POR FAVOR NO DEVUELVA ESTE PRODUCTO A NINGUNA DE ESTAS DIRECCIONES NI AL
LUGAR DE COMPRA.
S14
FPRVMCSM02_12ESM1.indd 33-34
S15
5/31/12 11:47 PM