1
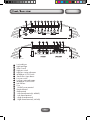
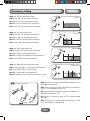
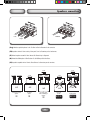
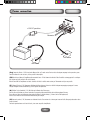
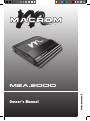
Owner’s Manual
www.macrom.it
M2A.2000
Front/Rear view
1
2
12
1
2
3
4
5
6
7
8
9
10
11
12
13
14
15
16
17
18
19
3
4
13
5
6
14
7
15
Low Level Input
High Level Input
Gain Controll
High pass switch
High pass cutting adjustment
Multiplayer x1/x10 switch
Steroe Mono input selector
Low pass switch
Low pass cutting adjustment
Multiplayer x1/x10 switch
Led indicator
Fuse
12V (DC) power terminal
Remote terminal
GND terminal
+ Left channel terminal (+ MONO)
- Left channel terminal
+ Rigth channel terminal
- Rigth channel terminal (- MONO)
01
8
9
10
16 17
11
18 19
Features
•
•
•
•
•
•
•
•
•
•
•
Two channel power amplifier
90 x2 watts into 2 ohms load
60 x2 watts into 4 ohms load
TO3P transistor on amplifier stage
Variable Low-High-Band pass x-over at 18/12dB/oct
Multiplier x1/x10 Frequency cutting
Adjustable x-over from 30Hz to 600Hz (x1), 300Hz to 6000Hz (x10)
Stereo/Mono mode selector (ST/mono Out)
PWM Mos-Fet power supply
High level Input (booster In)
Mos-Fet power sup
Technical data
RMS Power at 4 ohm Stereo load at 14,4 volts
RMS Power at 2 ohm Stereo load at 14,4 volts
RMS Power at 4 ohm Bridged load at 14,4 volts
THD (total Harmonic Distortion)
Frequency response (+0/-1 dB)
Signal to noise ratio
Low Input sensitivity
High Input sensitivity
Input impedance
Crossover type
Crossover frequency & filter slop (High-pass)
Crossover frequency & filter slop (Low-pass)
Dimension (w * h * d) mm
60 x 2 watts
90 x 2 watts
180 x 1 watts
< 0,1%
10 - 30,000Hz
> 95dB
200-8,000mV
1-10V
22k /100 ohm
Variable 18/12 dB/octave
30 to 600Hz (x1) 300 to 6,000Hz (x10)
30 to 600Hz (x1) 300 to 6,000Hz (x10)
244 x 54 x 190
06
Crossover setting
1
1
2
2
3
3
4
4
5
5
6
6
7
7
8
8
9
9
10
10
11
11
12
12
13
13
14
14
15
15
16
16
17
17
18
18
19
19
(Eng) Select “FLAT” for a compleate frequency range.
(FR) Choisir la position “Flat” pour déconnecter le filtre actif .
(IT) Selezionare “FLAT” per una completa risposta in frequenza.
(D) Wählen Sie “FLAT” für eine Übertr. des ges. Frequenzbereichs.
(SP) Seleccione “FLAT” para una gama de frecuencia del compleate.
(Eng) Select “LOW” for a low frequency range.
(FR) Choisir la position “Low” pour utiliser le filtre actif passe bas.
(IT) Selezionare “LOW” per la risposta delle frequenze basse.
(D) Wählen Sie “LOW” für eine Übertr. des Bass-Frequenzbereichs.
(SP) Seleccione el “LOW” para una gama de la frecuencia baja.
(Eng) Select “HIGH” for a high frequency range.
(FR) Choisir la position “High” pour utiliser le filtre actif passe haut.
(IT) Selezionare “HIGH” per la risposta delle frequenze alte.
1
(D) Wählen Sie “HIGH” für eine Übertragung des Hochton-Frequenzbereichs.
2
(SP) Seleccione el “HIGH” para una gama de alta frecuencia
3
4
(Eng) Select “LOW and High” for a band pass frequency range.
(FR) Choisir les positions “High” et “Low pour utiliser le filtre actif passe bande.
1
(IT) Selezionare
“LOW e HIGH” per la risposta passa banda.
2
3
(D) Wählen
Sie “LOW und HIGH” für einen Bandpassbereich.
4
(SP) “LOW y HIGH selectos” para una gama de frecuencia del paso de la venda.
1
5
2
6
3
7
4
8
5
9
Low &High pass cutting adjustment
1
7 11
10 14
11 15
12 16
13 17
���� 4
�
1
5
6
3
7
4
8
14 18
5
9
15 19
6 10
16
7 11
17
8 12
18
9 13
19
10 14
11 15
12 16
13 17
14 18
Low pass switch
7
8
9
10
11
12
���� ����
�����
13
1
14
2
15
3
16
4
17
5
18
6
�����
High pass switch
19
7
8
6
10
7
11
12
����
�����
�����
Low &High pass switch
13
14
15
16
17
����
18
�����
19
16
9
(Eng) The cut frequency is selectable between
30 to 600 Hz with Multiplayer “X1” and
17
300 to 6000Hz with multiplier “X10” 10
13
���
2
6
5
8
1
9
2
10
3
11
4
12
5
13
6
14
7
�����
5
18
11
3
�
3
4
����
(FR) La fréquence de coupure est variable
de 30 à 600Hz avec le multiplicateur en
19
position “x1” et de 300 à 6000Hz en12
position “x10”.
2
8 12 ����
�
9 13
1
2
9
����
15
8
6 10
Flat switch
(IT) La frequenza di taglio è selezionabile
14 fra 30 a 600 Hz con moltoplicatore “X1” e
300 a 6000 Hz con moltiplicatore “X10”
15
(D) Die Trennfreq.(x1) ist zwischen 3016- 600 Hz, bei ”X10” zwischen 300 - 6000Hz
mit einstellbar.
17
18
Multiplayer x1/x10 switch
(SP) La frecuencia del corte es seleccionable entre 30 a 600 hertzios con “X1 multi19
player” y 300 a 6000Hz con el multiplicador
“X10”
03
Speakers connection
S
pe
S
pe
ak
e
ak
r
�
�
����
er
�
�
����� �
����
�
(Eng) Minimal acceptable Impedance 2 ohm. To adhere itself to the illustrations for the connections.
(FR) Impédance minimale 2 ohm en stéréo, 4 ohm ponté. Suivre les illustrations pour les branchements.
(IT) Minima Impedenza accettabile 2 ohm. Attenersi alle illustrazioni per i collegamenti
(D) Minimale Anschlußimpedanz 2 Ohm. Beachten Sie die Abbildungen für die Anschlüsse.
(SP) Impedancia aceptable mínima 2 ohmios. Para adherirse a las ilustraciones para las conexiones.
�����
�����
���������� ����������
�
�
�
�
���������������
���
�����
�
�
�
��������������
���
������������������
��������
���������
�������
��
��
�����
�����
�
�
�
�
�
���������������
���
����������������
������������������
��������
��
04
�
�
�
��������������
���
�����
�����
�����
�
�
�
�
���������������
���
���������
�������
���������
��������������
������
������
�
Power connection
����������������
������
+
-�
CAR CHASSIS
CAR CHASSIS
(Eng) Connect the Positive (+12V) directly to the Battery of the car. To make sure itself to insert a fuse of adequate amperage in order protect the system.
Connect the Ground in to the car chassis, close as possible to the amplifier.
(FR) Relier la borne +Battery de l’amplificateur directement à la borne +12V de la batterie du véhicule à l’aide d’un câble de section appropriée. Il est indispensable de placer un fusible à moins de 30 cm de la batterie.
Relier la borne -GND de l’amplificateur au châssis du véhicule à l’aide d’un câble de même section que l’alimentation et le plus court possible.
(IT) Collegare il Positivo (+12V) direttamente alla Batteria dell’auto. Assicurarsi di inserire un fusibile di adeguato amperaggio per proteggere il sistema.
Collegare il Negativo al telaio dell’automobile, più vicino possibile all’amplificatore.
(D) Schließen Sie das Stromkabel (+12V, Rot) direkt an die Batterie ihres Fahrzeugs an.
Um sich selbst und die Geräte zu schützen verwenden Sie entsprechend dimensionierte Kabel und eine dafür ausgelegte Sicherung.
Diese sollte max. 20cm nach der Batterie verbaut werden.Verbinden Sie die Masseleitung (-, Schwarz) mit der Fahrzeugkarosserie.
Achten Sie auch hierbei auf eine ausreichende Dimensionierung der Leitungen.
(SP) Conecte el positivo (+12V) directamente con la batería del coche. Para cerciorarse de sí mismo para insertar un fusible del amperaje adecuado en orden
proteja el sistema.
Conecte la negativa adentro con el chasis del coche, cierre como sea posible al amplificador.
05
Input setting
1
Low Level Input
2
3
�
6
7
8
9
����
�
�
4
5
����
�
�In
pu
t
(Eng) Connect the output Audio coming from the car radio, in to the Low level input of the amplifier.
(FR) Relier par un câble RCA de bonne qualité les sorties RCA de l’autoradio aux entrées “Input” RCA
de l’amplificateur.
�
�
(IT) Collegare l’uscita Audio proveniente dall’autoradio, all’ingresso Low level dell’amplificatore.
(D) Verbinden Sie den Audioausgang (RCA) des Autoradios mit dem RCA Eingang des Verstärkers.
(SP) Para conectar venir audio de la salida de la radio de coche, entrar el nivel bajo del amplificador.
10
11
12
13
14
(Eng) Low level OR High level - (FR) Avec des RCA ou avec des câbles haut-parleur (IT) Basso livello O Alto livello (D) Niedriges Niveau ODER hohes Niveau - (SP) Nivel bajo O alto nivel
15
1
16
(Eng)
Connect the Loudspeakers output coming from the
17 in to the High level input of the amplifier.
car radio,
2
High Level Input
3
18
4
(FR)19Relier les sorties haut-parleur de votre autoradio aux
entrées haut niveau de l’amplificateur
5
(IT) Collegare l’uscita Altoparlanti provenienti
dall’autoradio, all’ingresso Alto livello dell’amplificatore.
��
8
���
6
7
9
10��
(D)Verbinden Sie den Audioausgang (HI-Level) des Autoradios mit dem High-Level Eingang des Verstärkers.
(SP) Conecte venir hecho salir los altavoces de la radio
de coche, adentro con la entrada del alto nivel del amplificador
���
11
���
12
13
14
�
�� �
�
��
15
+ L (WHITE)
16
- L (WITHE-BLACK)
17
+ R (GREY)
18
- R (GREY-BLACK)
19
GND (BLACK) connect in to the Chassis.
��
��
���
���
��
���
1
2
(Eng) Adjust the gain control, according to the Audio level output.
3
Gain Control
4
(FR) Ajuster le niveau d’entrée “Gain” de l’amplificateur.
��
5
(IT) Regolare il controllo di guadagno, in funzione del segnale Audio in uscita.
6
7
8
(D) Passen Sie mit dem Gainregler die Eingangsempfindlichkeit an.
9
10
(SP) Ajuste el control del aumento, según la salida llana audio.
11
12
13
02
14
15
16
17
18
19
��
��
����
����