1
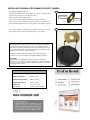
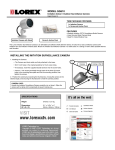
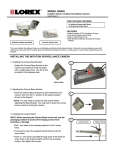
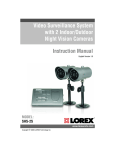
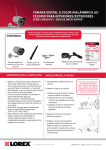
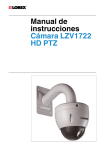
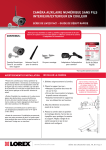
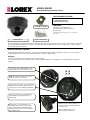
MODEL SG620R
Simulated (Dummy) Security Camera
THIS PACKAGE CONTAINS:
1 x Dummy Camera
1 x Ceiling Mount Bracket
1 x Screw and Anchor Pack
Ceiling Mount Bracket
FEATURES
• Excellent Economical Deterrent
• Flashing Indicator Light Provides Real
Authentic Look*
* Flashing indicator light function requires 2 x ”C” type batteries.
Not included.
Dummy Camera
Screw & Anchor Pack
The Lorex Simulated Security Dome Camera is an affordable and effective theft deterrent device. It looks like a real surveillance camera with
its flashing red indicator, imitation lens and dome construction. Mount the simulated security camera in a visible area on a ceiling or wall to
deter possible thieves and intruders.
INSTALLING BATTERIES
The Simulated Security Camera requires two “C” batteries (not supplied) if using the flashing red LED. The dome is also effective without
the flashing LED as some models of actual Security Cameras do not have a flashing LED.
Cautions:
• Use only fresh batteries of the required size and recommended type.
• Do not mix old and new batteries, different types of batteries (standard, alkaline, or rechargeable), or rechargeable batteries of different
capacities
1. Remove the four (4) black Holding screws
from the Dome Cover, and remove the cover.
NOTE: The simulated security screws are for
show only, and are not removable.
1.
2. Remove the two (2) silver screws holding the
Simulated Lens to the Base. Remove the Lens
component to access the Battery Compartment.
4.
3. Place the batteries in the compartment as
indicated by the polarity symbols(+ and -)
marked inside.
4. Reattach the Lens Compartment to the
base with the two (2) silver screws. Set the
switch to ON to start the RED LED blinking.
Replace the Dome Cover, and secure with the
four (4) black screws.
3.
2.
NOTE: Fresh batteries will power the
simulated security camera’s indicator for
about 4 months (if the flashing LED is left
on continuously).
When the indicator dims or stops
flashing, replace the batteries
INSTALLING THE SIMULATED (DUMMY) SECURITY CAMERA
1. Installing the Wall Mount Bracket:
1.
• Using the mounting base plate as a template, use a pencil to mark the position
of the three (3) screw holes on the mounting location.
Ceiling / Wall
• Drill 1 inch holes in the marked positions.
Camera
• If necessary, insert the supplied drywall anchors into the screw holes
• Insert a 1 inch screw (provided) through each of the three (3) screw holes in
the mounting base plate and into the mounting surface, then tighten the screws.
2. Position the camera onto the base plate using the two (2) silver screws as a
guide. Twist the dome camera onto the base plate to secure in place.
CAMERA CARE:
Keep the simulated security camera dry. If it gets wet wipe it dry immediately.
Use and store the simulated security camera only in normal temperature
environments. Handle the simulated security camera carefully; do not drop it.
Keep the simulated security camera away from dust and dirt, and wipe it with
a damp cloth occasionally to keep it looking new
Modifying or tampering with the simulated security camera’s internal
components can cause a malfunction and might invalidate its warranty
BATTERIES:
Warning: Dispose of old batteries properly. Do not burn or bury them.
Caution: If you do not plan to use the simulated security camera with batteries
for a month or more, remove the batteries. Batteries can leak chemicals that
can destroy electronics parts
SPECIFICATIONS
Power Source:
DC 3V ( 2 “C” batteries)
Alkaline Battery Life:
About 4 months
Weight (without batteries)
0.60 lbs / 0.27 kg
Weight (with batteries)
0.95 lbs / 0.45 kg
Dimensions:
(W x H x D )
5.2“ x 5.2”x ” x 3.9”
132mm x 132mm x 100mm
2.