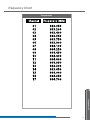
1
Dear Valued Customer, Thank you for choosing Listen! All of us at Listen are dedicated to providing you with the highest quality products available. We take great pride in their outstanding performance because we care that you are completely VDWLVÀHG7KDW·VZK\ZHLQGHSHQGHQWO\FHUWLI\WKHPWRWKHKLJKHVWTXDOLW\ standards and back them with a limited lifetime guarantee. We stand ready to answer any questions you might have during installation or in the operation of our products. Should you experience any problems whatsoever with your Listen products, we are ready to help you in any way we can with prompt, HIÀFLHQWFXVWRPHUFDUH%HFDXVHDW/LVWHQLW·VDOODERXW\RX$QGVKRXOG\RX have any comments on how we might improve our products or our VHUYLFHZH·UHKHUHWROLVWHQ +HUH·VKRZWRUHDFKXV +1.801.233.8992 +1.800.330.0891 North America +1.801.233.8995 Fax [email protected] www.listentech.com Listen Technologies GmbH Jasminstr. 16 905 22 Oberasbach, Germany +49 911 955159 0 Tel +49 911 955159 40 Fax www.listentech.de [email protected] Thank you and enjoy your listening experience! %HVWUHJDUGV Russell Gentner and the Listen Team Lifetime Warranty – the best in the business! /LVWHQ·VIXOOWLPHWHFKQLFDOVXSSRUWLVSDVVLRQDWHDERXWZKDWWKH\GRDQG\RXFDQGHSHQG RQWKHPWRVROYHDQ\HTXLSPHQWLVVXHVZLWKFRQÀGHQFH,QWKHIHZLQVWDQFHVZKHUHUHSDLUV were needed, 99% of all clients indicated that they were happy with repair WXUQDURXQGWLPHVDQGRIWKHWLPHFOLHQWVZHUHZLWKRXWWKHLUSURGXFWIRU less than 10 days! Overall client satisfaction of working with Listen was rated 4.8 out of 5. The Word Around Listen “Please continue with your excellent attitude toward customer satisfaction. You guys are great!” ´,·YHQHYHUKDGVXFKJRRGVHUYLFHIURPDQ\FRPSDQ\.HHSXSWKHJRRGZRUNµ “You stand behind your product wonderfully.” $VVLVWLYH/LVWHQLQJ/DQJXDJH,QWHUSUHWDWLRQ6RXQGÀHOG7RXU*URXS&RQIHUHQFLQJ Design Guide FM Technology Overview System Overview .H\&RQFHSWVLQ'HVLJQLQJDQ)06\VWHP Notes /5)05HFHLYHUV 6SHFLÀFDWLRQV %ORFN'LDJUDP Quick Reference 6HWXS,QVWUXFWLRQV 2SHUDWLQJ,QVWUXFWLRQV 3URJUDPPLQJ,QVWUXFWLRQV/5RQO\ Accessories Notes 40 52 53 61 63 65 68 LR-400/500 6XSSOHPHQWDU\,QIRUPDWLRQ Frequency Chart %DWWHU\&KDUJLQJ,QIRUPDWLRQ Troubleshooting Frequently Asked Questions &RPSOLDQFH:DUUDQW\DQG&RQWDFW,QIRUPDWLRQ Notes 19 28 29 LT-700 /73RUWDEOH)07UDQVPLWWHU 6SHFLÀFDWLRQV %ORFN'LDJUDP Quick Reference 6HWXS,QVWUXFWLRQV 2SHUDWLQJ,QVWUXFWLRQV 3URJUDPPLQJ,QVWUXFWLRQV Accessories Notes 5 6 10 Design Guide Portable FM Table of Contents Supplementary FM Technology Overview System Overview .H\&RQFHSWVLQ'HVLJQLQJDQ)06\VWHP Notes Design Guide Portable FM Design Guide Table of Contents 5 6 10 3 Design Guide Frequency Modulation (FM) Technology Overview )UHTXHQF\PRGXODWLRQ)0LVDPHDQVRIWUDQVPLWWLQJDXGLRXVLQJHOHFWURPDJQHWLFZDYHV This same technology is used by local FM radio stations to broadcast voice and music. FM signals can travel WKURXJKPRVWEDUULHUV²ZDOOVÁRRUVDQGFHLOLQJV7KHGLVWDQFHDVLJQDOWUDYHOVKDVPDQ\GLIIHUHQWYDULDEOHV VXFKDV5DGLR)UHTXHQF\5)RXWSXWSRZHUWKHW\SHDQGSODFHPHQWRIWKHDQWHQQDDQGWKHEURDGFDVWHG frequency. This section of the manual will help you design a system that will get the best range with the least amount of interference. Microphone FM Transmitter Receiver :KHQGHVLJQLQJDQ)0V\VWHPLWLVLPSRUWDQWWRNHHSWKHIROORZLQJLQPLQG • Multipath Multipath interference is a form of RF interference that occurs when radio signals have more than one path between the receiver and the transmitter causing the two RF signals to add out of phase. This could occur in areas ZLWK5)UHÁHFWLYHVXUIDFHVVXFKDVIXUQLWXUHZDOOVRUÁRRUV7KHUHVXOWRIPXOWLSDWKLVWKHUHFHLYHUDXGLRFRPLQJLQ and out of squelch when the receiver is moved. Portable applications are much more susceptible to multipath than those that are stationary. Multipath distortion is often worse as the distance between transmitter and receiver LQFUHDVHV5)SRZHUGHFUHDVHV0XOWLSDWKFDQGHFUHDVHWKHDXGLRTXDOLW\RIWKHWUDQVPLVVLRQUHIHUWRSDJHIRU VWUDWHJLHVRQHOLPLQDWLQJPXOWLSDWK • Antenna Positioning )RUIXOO5)IXQFWLRQDOLW\RIWKHSRUWDEOHV\VWHPWKHDQWHQQDRQERWKWKH/7WUDQVPLWWHUDQGUHFHLYHU/5 PXVWEHLQWKHXSULJKWSRVLWLRQVKRZQEHORZ 5 Design Guide System Overview 7KHUHDUHWKUHHPDLQSDUWVWRD3RUWDEOH)06\VWHP²,QSXWVRXUFHWUDQVPLWWHUDQGUHFHLYHU /$ %HKLQGWKH+HDG0LFURSKRQH RWKHUPLFURSKRQHVDYDLODEOH /7 Portable Display FM 7UDQVPLWWHU0+] /5 Portable Display FM 5HFHLYHU0+] /5 Portable Programmable 'LVSOD\)05HFHLYHU0+] Input Source $PLFURSKRQHLVWKHPRVWFRPPRQLQSXWVRXUFHIRUWKH/7WUDQVPLWWHUDOWKRXJKWKH/7FDQWUDQVPLW WZRDXGLRLQSXWVDWRQFHRQRQHWUDQVPLVVLRQFKDQQHO:LWKWKHXVHRIWKH/$ERWKWKHLQSXWVZLOOEHPL[HG Thus, a person can use a line input source and mic source. 3.5mm Phone Wiring Unbalanced + Tip + Ring Mic input Line input - Sleeve 6 - Design Guide System Overview Transmitter 7KH/7PRGXODWHVWKHDXGLRRQDQ)0FDUULHUDQGWUDQVPLWVWKHVLJQDOYLDDQDQWHQ na on the unit. /7 Portable Display FM 7UDQVPLWWHU0+] Receivers Listen offers two different portable receivers. /5 Portable Display FM 5HFHLYHU0+] /5 Portable Programmable 'LVSOD\)05HFHLYHU0+] Design Guide Key concepts in designing a portable FM system Channel Selection Use this section of the guide to choose the channel settings for the transmitter and receivers. 7KHJRDOLVWRÀQGDWUDQVPLVVLRQFKDQQHOVWKDWLVIUHHIURPLQWHUIHUHQFH,QWHUIHUHQFHRULJLQDWHVIURP RWKHUWUDQVPLWWHUVDQGIURPRWKHUHTXLSPHQWVXFKDVDFRPSXWHU /LVWHQSURGXFWVRIIHUGLIIHUHQWFKDQQHOVWRFKRRVHIURP7KLVLQFUHDVHVWKHFKDQFH\RX·OOÀQGDQ interference free channel. 7KHEHVWZD\WRFKHFNIRULQWHUIHUHQFHLVWRXVHWKH´6((.µEXWWRQRQWKHUHFHLYHU%HVXUHDOO/LVWHQ WUDQVPLWWHUVKDYHEHHQWXUQHGRIILIWKHUHLVLQWHUIHUHQFHWKHUHFHLYHUZLOOÀQGWKHVHFKDQQHOV ,IWKHUHFHLYHUÀQGVDIUHTXHQF\LQXVHGRQRWXVHWKLVFKDQQHO ,QJHQHUDOPRVWRIWKHFKDQQHOVZLOOEHIUHHIURPLQWHUIHUHQFH ,QWHUIHUHQFHFDQEHRYHUFRPHE\PD[LPL]LQJWKHWUDQVPLVVLRQSRZHUDQGE\XVLQJWKHUHFHLYHUVFORVHWR the transmitting antenna. ,IPRUHWKDQRQHFKDQQHOLVLQXVHVSDFHWKHFKDQQHOVIXUWKHUIURPHDFKRWKHU8VHWKH/LVWHQIUHTXHQF\ chart on page 61 to determine the appropriate channels. EXAMPLE: 2 channel system use channels 01 & 11 3 channel system use channels 01, 06 & 11 Range The range of a portable transmission will vary from one application to another. There are many different REVWUXFWLRQVWKDWFRXOGPLQLPL]HWKHUDQJH,QPRVWDSSOLFDWLRQVWKHUDQJHZLOOEHDSSUR[LPDWHO\DVVKRZQ EHORZ3 3RZHU/HYHOUHIHUWRSDJHIRUSURJUDPPLQJSRZHUOHYHOVRIWKH/7 3²PHWHUVIW 3²PHWHUVIW 3²PHWHUVIW Range varies depending on environment. 0D[LPL]LQJ5DQJH +HUHDUHVRPHWLSVWRPD[LPL]HWKHWUDQVPLVVLRQUDQJH (OLPLQDWHRUPLQLPL]HREVWUXFWLRQVEHWZHHQWKHWUDQVPLWWHUDQGUHFHLYHUV 0LQLPL]HWKHGLVWDQFHEHWZHHQWKHWUDQVPLWWHUDQGUHFHLYHUV • Move transmitter and receivers away from metal objects. • Orient both transmitting and receiving antennas vertically. 8 Design Guide Key concepts in designing a portable FM system Eliminating Multipath As mentioned on page 5, multipath can occur with portable RF systems. The audio quality of the transmission can decrease with the occurrence of multipath. Here are a few potential improvements that FDQKHOSLIPXOWLSDWKWDNHVSODFH Squelch Squelching the receiver will mute the audio output when the signal from the transmitter is turned off or the signal is too weak to be received. Without squelch you would hear radio noise in your earphone with no RF signal present. “Tightening” the squelch will turn the receiver off if it is chattering because of PXOWLSDWKUHIHUWRSDJHIRUSURJUDPPLQJVTXHOFK.HHSLQPLQG´WLJKWHQLQJµVTXHOFKZLOOOLPLWWKH range between transmitter and Receiver. Transmitter power level 7KH5)SRZHUOHYHOFDQEHDGMXVWHGRQWKH/7UHIHUWRSDJHIRUSURJUDPPLQJ/7SRZHUOHYHOV The lower the power setting, the less range the transmitter will broadcast. Decreasing the broadcast range will force the receivers to remain closer to the transmitter. To maintain an RF signal, the higher power settings will increase range between transmitter and receiver thus introducing a higher probability of multipath. Multiple Portable Systems ,QVRPHDSSOLFDWLRQVWKHUHZLOOEHPRUHWKDQRQH5)WUDQVPLVVLRQLQWKHVDPHJHQHUDOYLFLQLW\ ,QWHUPRGXODWLRQLQWHUIHUHQFHFDQRFFXULIWKHWUDQVPLVVLRQIUHTXHQFLHVDUHWRRFORVHWRJHWKHU+HUHDUH VRPHZD\VWRHOLPLQDWHWKHFKDQFHRI5)LQWHUIHUHQFH Squelch Much like a multipath situation, “tightening” the squelch on the receiver will mute the audio output when the signal is too weak to be received. Tightening the squelch will help with force the receiver to squelch ZKHQVLJQDOEHFRPHVWRRZHDNUHIHUWRSDJHIRUSURJUDPPLQJVTXHOFK Transmitter power level $VPHQWLRQHGDERYHWKH5)SRZHUOHYHOFDQEHDGMXVWHGRQWKH/7UHIHUWRSDJHIRUSURJUDPPLQJ /7SRZHUOHYHOV7KHORZHUWKHSRZHUVHWWLQJWKHOHVVUDQJHWKHWUDQVPLWWHUZLOOEURDGFDVW/RZHULQJWKH power could help decrease the amount of interference if there are many frequencies being used in the vicinity. Spacing of channels 8VHD/LVWHQIUHTXHQF\FKDUWRQSDJHWRGHWHUPLQHWKHFKDQQHOVIUHTXHQF\DQGVSDFHWKHQXPEHURI channels further from each other. DX/Local 7KHUHFHLYHUFDQEHDGMXVWHGWRUHFHLYHRQO\WKHVWURQJHVWVLJQDOVUHIHUWRSDJHIRU';/RFDO LQIRUPDWLRQ$';VLJQDOZLOOEHOHVVVHQVLWLYHEHFDXVHGLVWDQFHLVWKHXOWLPDWHJRDO)RUDSSOLFDWLRQVZKHUH \RXZDQWWRPLQLPL]HWKHGLVWDQFHORFDOPRGHZLOORQO\VHDUFKIRUVWURQJVLJQDOV/RFDOPRGHLVPXFK PRUHVHQVLWLYHWKDQ'; 9 Design Guide Notes 10 Design Guide Notes 11 LT-700 User’s Manual Table of Contents 6SHFLÀFDWLRQV %ORFN'LDJUDP Quick Reference 6HWXS,QVWUXFWLRQV 2SHUDWLQJ,QVWUXFWLRQV 3URJUDPPLQJ,QVWUXFWLRQV Accessories Notes 19 28 29 LT-700 LT-800 LT-700 Package Contents /7 • Quick Reference Card • Warranty Card • FM Manual Card /7 Portable Display FM 7UDQVPLWWHU0+] /LVWHQ&RQÀJXUDWLRQV /7 15 /76SHFLÀFDWLRQV $UFKLWHFWXUDO6SHFLÀFDWLRQ 7KH/7SRUWDEOH)07UDQVPLWWHUVKDOOEHFDSDEOHRIEURDGFDVWLQJRQFKDQQHOV&KDQQHOWXQLQJVKDOOEHFDSDEOHRIEHLQJ ORFNHG7KHWUDQVPLWWHUVKDOOKDYHD615RIGERUJUHDWHU7KHRXWSXWSRZHUVKDOOEHDGMXVWDEOHWRTXDUWHUKDOIRUIXOO7KHGHYLFH VKDOOKDYHDQDXGLRIUHTXHQF\UHVSRQVHRI+]WRN+]G%7KHGHYLFHVKDOOLQFRUSRUDWHDPLFURSKRQHVHQVLWLYLW\VZLWFK 7KHGHYLFHVKDOOLQFRUSRUDWHDPXWHVZLWFK7KHXQLWVKDOOXWLOL]HWZR$$EDWWHULHV7KHEDWWHU\GRRUVKDOOEHFDSDEOHRIEHLQJ mechanically locked. The device shall incorporate an LCD display that indicates battery level, channel, channel lock, low battery, battery charging, programming, and RF signal strength. The portable transmitter shall incorporate automatic battery charging FLUFXLWU\IRUUHFKDUJLQJRI1L0+EDWWHULHV7KH/LVWHQ/7LVVSHFLÀHG RF LT-700-863 863.050 - 864.950 MHz ZLGHEDQG VWDELOLW\WRWR& 50 PPM IWPWRIWP P:PD[LPXPDGMXVWDEOH 8VHVPLFURSKRQHFDEOH PPFRQQHFWRU &((76,5R+6 6\VWHP)UHTXHQF\ 5HVSRQVH 6\VWHP6LJQDOWR1RLVH 5DWLR 6\VWHP'LVWRUWLRQ +]N+]G% 0LFURSKRQH,QSXW 0LFURSKRQH6HQVLWLYLW\ /LQH,QSXW 0LFURSKRQH3RZHU &RQWUROV 8VHU&RQWUROV 6HWXS&RQWUROVEDWWHU\ FRPSDUWPHQW 3URJUDPPLQJ 'LVSOD\ 3K\VLFDO WRWDOKDUPRQLFGLVWRUWLRQ7+'DWGHYLDWLRQ 8QEDODQFHGWLSRIPPFRQQHFWRUG%XQRPLQDOG%X PD[LPXPLPSHGDQFHRKPV 7KUHHSRVLWLRQVZLWFKKLJKPLGGOHDQGORZG%LQFUHPHQWV 8QEDODQFHGULQJRIPPFRQQHFWRUG%XQRPLQDOLQSXW OHYHOG%XPD[LPXPLPSHGDQFH.RKPV 9'&%LDV 3RZHUPXWHFKDQQHO83'2:1 0LFVHQVLWLYLW\1L0+DONDOLQHEDWWHU\64HQDEOHGLVDEOH &KDQQHO/RFNRXW&KDQQHOORFN %DWWHU\7\SH %DWWHU\/LIH /LVWHQEDWWHULHV %DWWHU\&KDUJLQJ 1L0+RQO\ 7ZR$$EDWWHULHVDONDOLQHRU1L0+ KRXUVDONDOLQH/$KRXUV1L0+UHFKDUJHDEOH/$ )XOO\DXWRPDWLFKRXUV 'LPHQVLRQV+[:[' &RORU 8QLW:HLJKW 8QLW:HLJKWZLWKEDWWHULHV 6KLSSLQJ:HLJKW [[LQ[[FP 'DUN*UH\ZLWKZKLWHVLONVFUHHQLQJ R]J R]J OEVNJ 0DQXDOO\/RFNDEOH8SGRZQDQGSRZHUEXWWRQVWKURXJK GRRU2WKHUFRQWUROVEHKLQGGRRUVHHFRQWUROV 'RRU (QYLURQPHQWDO G%$:HLJKWHG 5HGLOOXPLQDWHGZKHQXQLWLVRQ)ODVKHVZKHQEDWWHULHVDUH ORZRUWRLQGLFDWHFKDUJLQJ)ODVKHVZKHQPXWHG &KDQQHO'HVLJQDWLRQORFNVWDWXVVLJQDOVWUHQJWKLQGLFDWLRQ EDWWHU\OLIH5)3RZHU /(' ,QGLFDWRUV 3RZHU LT-700 LT-800 $XGLR 6SHFL¿FDWLRQV 5))UHTXHQF\5DQJH 1XPEHURI&KDQQHOV )UHTXHQF\$FFXUDF\ 7UDQVPLWWHU6WDELOLW\ 7UDQVPLVVLRQ5DQJH 2XWSXW3RZHU $QWHQQD $QWHQQD&RQQHFWRU &RPSOLDQFH 7HPSHUDWXUH2SHUDWLRQ 7HPSHUDWXUH6WRUDJH +XPLGLW\ WR)WR& WR)WR& WRUHODWLYHKXPLGLW\QRQFRQGHQVLQJ 6SHFL¿FDWLRQVDUHVXEMHFWWRFKDQJHZLWKRXWQRWL¿FDWLRQ LT-700 Block Diagram Up LCD Display Down Power Supply CPU Module 115/230VAC 50/60 Hz Universal Power Supply (not included) Power 7.5 VDC Power charge indicator Red LED Alkaline NiMH LT-700 LT-800 (2) AA Batteries ALkaline or NiMH ANTENNA RF Modulation Pre-emphasis 3 VDC Tip Mic Sleeve Line Ring 18 Companding Q-Technology LT-700 Quick Reference PP,QSXW-DFN&RQQHFWD/LVWHQPLFURSKRQHKHUH /(':KHQOLWLQGLFDWHVXQLWKDVSRZHU ZKHQÁDVKLQJXQLWLVPXWHGFKDUJLQJ 0XWH2Q2IIVZLWFK Articulating Flexible Antenna 3RZHU&KDUJLQJ3RUt 3RZHU%XWWRQ7XUQV SRZHU2Q2II Front Door Lock %DWWHU\6HOHFW6ZLWFK&KRRVH the type of batteries being used. &KDQQHO6HOHFW%XWWRQV &KDQQHO'LVSOD\'LVSOD\VWKH FKDQQHOWKH/7LVFXUUHQWO\RQ. RF Output ,QGLFDWRU,QGLFDWHV the RF transmit level. 3URJUDP function is in process. %DWWHU\&RPSDUWPHQW3ODFH $$EDWWHULHVLQFRPSDUWPHQW %HVXUHWRIROORZSRODULW\ pattern. %DWWHU\/HYHO,QGLFDWRU /2,QGLFDWHVZKLOHLQ SURJUDPPLQJPRGHWKHVSHFLÀF channel has been locked out. /RFN,FRQ,QGLFDWHVWKHXQLWLV locked on current channel. 19 LT-700 LT-800 /RRN/LVWHQ'LVSOD\6KRZV transmit level, channel, programming, battery status, and lock status. LT-700 Setup Instructions 1 Unpack the Product 5HPRYHRXWHUSDFNDJLQJDQGSODVWLFFRYHU,QVSHFWIRUSK\VLFDOGDPDJH,IGDPDJHLVDSSDUHQWSOHDVH contact the dealer from which the product was purchased or Listen Technologies &RUSRUDWLRQWHFKQLFDOVXSSRUWIRUDVVLVWDQFHUHIHUWRSDJHIRUFRQWDFWLQIRUPDWLRQ 2 Open the front access door LT-700 LT-800 ,IORFNHGXVHDSRFNHWNQLIHRUVPDOOVFUHZGULYHUWRXQORFNWKHGRRUORFNVRQERWKVLGHVRIWKHXQLW To unlock the door, rotate the lock ¼ turn counterclockwise. Grip the two tabs with your thumb and index ÀQJHUDQGSXOOWKHGRRUGRZQZDUG'2127SODFHEDWWHULHVLQWKHXQLWDWWKLVWLPH 3 Select Battery Type 7ZRW\SHVRIEDWWHULHVPD\EHXVHG1L0+RU$ONDOLQH7KHXQLWLVVKLSSHGZLWKWKHVZLWFKLQWKH$ONDOLQH position. Use a pen or small screwdriver to select the battery type. WARNING: Do not place the BATTERY switch in the NiMH position if you are not using Nickel Metal Hydride Batteries. The NiMH position will attempt to charge any batteries in the unit, even if they are not the proper type. Charging non-Nickel Metal Hydride (NiMH) batteries will result in physical KDUPGHVWUXFWLRQRISURSHUW\DQGRUÀUH CAUTION: If you are using any battery type other than rechargeable Nickel Metal Hydride (NiMH) batteries, make sure the BATTERY selection switch is in the alkaline position. %DWWHU\VHOHFWVZLWFK 20 LT-700 Setup Instructions 4 Set Mic Sensitivity Switch The microphone sensitivity switch is located inside the battery compartment, to the left of the %$77(5<VHOHFWLRQVZLWFK7KH/7LVVKLSSHGZLWKWKLVVZLWFKLQWKHFHQWHU0('SRVLWLRQ/LVWHQ UHFRPPHQGVWKHIROORZLQJVHWWLQJVIRURXUPLFURSKRQHV,I\RXDUHXVLQJDPLFURSKRQHIURP another vendor, you may need to experiment with different settings. Part # Description Setting LT-700 LT-800 5 /$ /DYDOLHU0LFURSKRQH /$ 2YHUWKH+HDG0LFURSKRQH /$ 2YHUWKH+HDG0LFURSKRQHZ(DUSKRQH /$ +DQG+HOG0LFURSKRQH /$ &ROODU0LFURSKRQH /$ %HKLQGWKH+HDG0LFURSKRQH /$ &RQIHUHQFH0LFURSKRQH Place Batteries in Unit Place two AA batteries in the compartment, making note of the battery polarity shown in the EDWWHU\FRPSDUWPHQWDQGDJDLQYHULI\LQJWKDWWKH%$77(5<6(/(&7VZLWFKLVLQWKHFRUUHFWSRVLWLRQ IRUWKHEDWWHULHV\RXDUHXVLQJ$ONDOLQHVKRXOGEHVHOHFWHGIRUDOOEDWWHU\W\SHVRWKHUWKDQ1L0+ + - - + -- + + 21 LT-700 Setup Instructions 6 Connect the Microphone LT-700 LT-800 The microphone jack is located on top of the unit. 7 Connect the Line Input Cable (Optional) 7KLVFDEOHDOORZV\RXWRFRQQHFWD79&'SOD\HURURWKHUHTXLSPHQWWRWKH/77RGRWKLV\RXPXVW RUGHUWKH/LVWHQ/$/LQH,QSXW&DEOHQRWLQFOXGHGZLWK\RXUXQLW7KLVFDEOHDOORZV\RXWRFRQQHFW ERWKDPLFURSKRQHDQGOLQHLQSXWWRWKHMDFNRQWRSRIWKH/76HHWKHGLDJUDPEHORZIRUFRQQHFWLRQ information. You can use the microphone and the line input at the same time. NOTE: The MUTE switch mutes only the microphone; the line source will continue transmitting when the switch is in the MUTE position. 22 LT-700 Operating Instructions 1 Turn Unit On 1A Power On/Off Button When you press the power button, the unit turns on. The LED on top of the unit will be illuminated and the LCD display will be visible. 2 Antenna Positioning Raise the antenna to the upright position. When the antenna if fully upright, it will click into position. LT-700 LT-800 NOTE: Be aware that the transmission range could decrease if the antenna is not in an upright position. 3 Select the channel for transmitting 0+]RSHUDWHVRQZLGHEDQGFKDQQHOV&KDQQHOVDUHGLVSOD\HGQXPHULFDOO\LH UHIHUWR&KDQQHO6HOHFWLRQLQGHVLJQJXLGHSDJHIRUJXLGHOLQHVRQFKRRVLQJDQ interference free channel. 23 LT-700 Operating Instructions 7 Using the MUTE / TALK switch LT-700 LT-800 Slide the switch to the mute position and the microphone audio is muted. When the PLFURSKRQHDXGLRLVPXWHGWKH/('RQWRSRIWKHXQLWÁDVKHVUDSLGO\6OLGHWKHVZLWFKEDFNWRWKHWDON SRVLWLRQDQGWKHPLFURSKRQHDXGLRZLOOUHWXUQWRWKHWUDQVPLVVLRQ,I\RXDUHXVLQJWKHOLQHOHYHOLQSXWLWZLOO QRWEHDIIHFWHGE\WKHPXWHWDONVZLWFK Locking the Transmitter on One Channel The unit can be electronically locked on one channel so that it will not change channels even if the channel select EXWWRQVDUHSUHVVHG,WLVUHFRPPHQGHGWRORFNWKHWUDQVPLWWHURQDFKDQQHOWKDWLVEHLQJXVHGLQDVLQJOHFKDQQHOV\VWHP or when multiple systems are in the same area. 1 To lock on a channel 1A Press and hold the DOWN button for 5 seconds Press and hold the DOWN button for 5 seconds to lock the transmitter onto the desired channel. Press and hold the button again to unlock. NOTE: On the LT-700, when the channel is locked, a lock icon will appear underneath “Listen” on the display. 24 LT-700 Programming Instructions Program Mode Overview 7KH/7FDQEHSURJUDPPHGWRWUDQVPLWRQDOLPLWHGQXPEHURIFKDQQHOV)RUDSSOLFDWLRQVZKHUHXVHUVDUH UHTXLUHGWRVHOHFWDFKDQQHOVXFKDVFODVVURRPVRUODQJXDJHLQWHUSUHWDWLRQDSSOLFDWLRQDQG\RXGRQ·WZDQW WKHPWRKDYHWRVFUROOWKURXJKDOORIWKHDYDLODEOHFKDQQHOVWKLVIHDWXUHLVLGHDO7KH/7FDQDOVREHFKDQJHG from high to low power levels. Adjusting the power settings allows you to set the range of the transmission. Entering Program Mode While the unit is ON, press and hold the channel down and up buttons simultaneously for 3 seconds. 2 The “PGM” icon on the LCD will appear indicating program mode is entered. LT-700 LT-800 1 25 LT-700 Programming Instructions 3 2QFHLQWKHSURJUDPPRGHDIXQFWLRQPHQXLVGLVSOD\HG)XQFWLRQ)LVGLVSOD\HGDVGHIDXOW3UHVVLQJWKH channel up or down buttons will scroll through the functions. Pressing the power button will enter that function. LT-700 LT-800 )&KDQQHO/RFNRXW1RFKDQQHOVDUHORFNHGRXWDVGHIDXOW3UHVVLQJWKHXSDQGGRZQEXWWRQVZLOOVFUROOWKURXJK FKDQQHOV3UHVVLQJWKHSRZHUEXWWRQZLOOWRJJOHEHWZHHQORFNORFNRXWIRUWKDWFKDQQHO:KHQDFKDQQHOLV ORFNHGRXWWKH/2RQWKH/&'VKDOOEHGLVSOD\HG )7UDQVPLWWHU3RZHU+LJKWUDQVPLWSRZHU3LVWKHGHIDXOW3UHVVLQJWKHFKDQQHOXSEXWWRQZLOOWRJJOH WKURXJKWKHIROORZLQJVHWWLQJV D/RZSRZHU/&'GLVSOD\V´3µ E0HGSRZHU/&'GLVSOD\V´3µ F+LJKSRZHU/&'GLVSOD\V´3µ 4 When no button is pressed for 10 seconds, the program menu is exited altogether, regardless of whether a IXQFWLRQLVHQWHUHGRUQRW7RH[LWRXWRIWKHSURJUDPPHQXRUIXQFWLRQPDQXDOO\ 4A 4B 4C 26 :KHQLQWKHSURJUDPPLQJPHQX3UHVVDQGKROGSRZHUIRUVHFRQGV7KLVH[LWVWKHSURJUDPPRGH :KHQLQDSURJUDPPLQJIXQFWLRQ3UHVVDQGKROGSRZHUIRUVHFRQGV7KLVH[LWVWKHIXQFWLRQDQGJRHVEDFNWR the programming menu. Pressing and holding power for a full 4 seconds will exit both programming function and programming menu. LT-700 Programming Instructions Resetting to defaults 7RUHVHWWKHWUDQVPLWWHUWRGHIDXOWVHWWLQJVIROORZWKHVHLQVWUXFWLRQV 3 Reset to default settings 4A Press and hold the Up and Down channel buttons while turning the unit on. Press and hold the Up and Down channel buttons while turning the unit on. This will light up all segments of the display. 4B After the transmitter has been reset After the transmitter has been reset, the display will return with defaults present. NOTE: The defaults are • Power Level: P3 • Channel: 01 * Channel lockout: All channels active LT-700 LT-800 Accessories for LT-700 Accessories /$ /$ 2YHUWKH+HDG0LFURSKRQH Z(DUSKRQH LT-700 LT-800 Lavalier Microphone /$ 2YHUWKH+HDG0LFURSKRQH /$ Hand Held Microphone /$ %HKLQGWKH+HDG Microphone /$ Collar Microphone /$ Assistive Listening 1RWLÀFDWLRQ6LJQDJH.LW /$8QLW3RUWDEOH&KDUJLQJ&DUU\LQJ&DVH /$8QLW3RUWDEOH&DUU\LQJ&DVH /$8QLW3RUWDEOH&KDUJLQJ&DUU\LQJ&DVH /$8QLW3RUWDEOH&DUU\LQJ&DVH /$&RQÀJXUDEOH&DUU\LQJ&DVH /$8QLW3RUWDEOH&KDUJLQJ&DUU\LQJ&DVH /$8QLW3RUWDEOH&DUU\LQJ&DVH /$8QLW3RUWDEOH&KDUJLQJ&DUU\LQJ&DVHZ5HPRYDEOH/LG /$8QLW3RUWDEOH&KDUJLQJ&DUU\LQJ&DVHZ5HPRYDEOH/LG /$8QLW3RUWDEOH&KDUJLQJ&DUU\LQJ&DVHZ5HPRYDEOH/LG 28 /$ Conference Microphone /$ High Capacity AA Alkaline %DWWHULHV /$ Rechargeable AA NiMH %DWWHULHV Notes LT-700 LT-800 29 LT-700 LT-800 Notes 30 LR-400/500 User’s Manual Table of Contents 6SHFLÀFDWLRQV %ORFN'LDJUDP Quick Reference 6HWXS,QVWUXFWLRQV 2SHUDWLQJ,QVWUXFWLRQV 3URJUDPPLQJ,QVWUXFWLRQV/5RQO\ Accessories Notes 40 52 53 LR-400/500 Package Contents /5 • Quick Reference Card • Warranty Card LR-400/500 /5 Portable Display FM Receiver 0+] /5 Portable Programmable Display FM Receiver 0+] /LVWHQ&RQÀJXUDWLRQV /5 /5 35 /56SHFLÀFDWLRQV $UFKLWHFWXUDO6SHFLÀFDWLRQ 7KH/5)0UHFHLYHUVKDOOEHFDSDEOHRIUHFHLYLQJRQZLGHEDQGFKDQQHOVZLWKD615RI G%RUJUHDWHU7KHGHYLFHVKDOOEHDEOHWREHORFNHGRQDVLQJOHFKDQQHO7KHUHFHLYHUVKDOOEH capble of seeking channels. The device shall have an adjustable squelch. The device shall have an DXGLRIUHTXHQF\UHVSRQVHRI+]WR.+]G%7KHGHYLFHZLOOLQFRUSRUDWHDVWHUHRKHDGVHWMDFN that allows the user to plug in either a mono or stereo headset. The device shall incorporate an LCD display that indicates channel, battery level, low battery, battery charging, and RF signal strength. 7KHUHFHLYHUVKDOOEHDEOHWRIXQFWLRQLQERWK';DQG/RFDOPRGH7KHXQLWVKDOORSHUDWHRIIRI$$ batteries. The receiver shall incorporate automatic battery charging circuitry for recharging of NiMH EDWWHULHV7KH/LVWHQ/5LVVSHFLÀHG RF $XGLR 6SHFL¿FDWLRQV 5))UHTXHQF\5DQJH 1XPEHURI&KDQQHOV 6HQVLWLYLW\ )UHTXHQF\$FFXUDF\ $QWHQQD 6TXHOFK &RPSOLDQFH LR-400-863 863.050 - 864.950 MHz :LGHEDQG X9W\SLFDOX9PD[LPXPIRUG%VLQDG VWDELOLW\WRWR& ,QWHJUDWHG([WHUQDO$QWHQQD 3URJUDPPDEOHLQVWHSVDXWRPDWLFRQORVVRI5)VLJQDO &((76,5R+6 6\VWHP)UHTXHQF\5HVSRQVH 6\VWHP6LJQDOWR1RLVH5DWLR 6\VWHP'LVWRUWLRQ +]N+]G% G%$:HLJKWHG WRWDOKDUPRQLFGLVWRUWLRQ7+'DWGHYLDWLRQ PPFRQQHFWRUXQEDODQFHGG%XQRPLQDORXWSXWOHYHO P:PD[LPXPLPSHGDQFH2KPV 2XWSXW &RQWUROV 8VHU&RQWUROV 6HWXS&RQWUROVEDWWHU\FRPSDUWPHQW 3URJUDPPLQJ 5HGLOOXPLQDWHGZKHQXQLWLVRQ)ODVKHVZKHQEDWWHULHVDUH ORZRU&KDUJLQJ)ODVKHVZKHQORFNHGDQG6((.LVSXVKHG &KDQQHO'HVLJQDWLRQORFNVWDWXVVLJQDOVWUHQJWKLQGLFDWLRQ EDWWHU\OLIH /(' ,QGLFDWRUV /&''LVSOD\ %DWWHU\/LIH/LVWHQEDWWHULHV %DWWHU\&KDUJLQJ1L0+RQO\ 3K\VLFDO 'LPHQVLRQV+[:[' &RORU 8QLW:HLJKW 8QLW:HLJKWZLWKEDWWHULHV 6KLSSLQJ:HLJKW 'RRU 7HPSHUDWXUH2SHUDWLRQ (QYLURQPHQWDO 7HPSHUDWXUH6WRUDJH +XPLGLW\ LR-400/500 %DWWHU\7\SH 3RZHU &KDQQHOXSGRZQ6((.YROXPH $ONDOLQH1L0+EDWWHU\VZLWFK &KDQQHO/RFN';/RFDOVTXHOFK 7\SH$$EDWWHULHVDONDOLQHRU1L0+ KRXUVDONDOLQH/$KRXUV1L0+UHFKDUJHDEOH /$ )XOO\$XWRPDWLFKRXUVPD[LPXP [[LQ[[FP 'DUN*UH\ZLWKZKLWHVLONVFUHHQLQJ R]J R]J OEVNJ 0DQXDOO\/RFNDEOH8SGRZQDQGSRZHUEXWWRQVWKURXJK GRRU2WKHUFRQWUROVEHKLQGGRRUVHHFRQWUROV &)WR&) &)WR&) WR5HODWLYH+XPLGLW\QRQFRQGHQVLQJ 6SHFL¿FDWLRQVDUHVXEMHFWWRFKDQJHZLWKRXWQRWL¿FDWLRQ /56SHFLÀFDWLRQV $UFKLWHFWXUDO6SHFLÀFDWLRQ 7KH/5)0UHFHLYHUVKDOOEHFDSDEOHRIUHFHLYLQJRQZLGHEDQGFKDQQHOVZLWKD615RI G%RUJUHDWHU7KHUHFHLYHUVKDOOEHSURJUDPPDEOHWRHOHFWURQLFDOO\ORFNRXWXQQHHGHGFKDQQHOV The receiver shall be capable of seeking channels. The device shall be able to be locked on a single channel. The device shall have an adjustable squelch. The device shall have an audio frequency UHVSRQVHRI+]WR.+]G%7KHGHYLFHZLOOLQFRUSRUDWHDVWHUHRKHDGVHWMDFNWKDWDOORZVWKH user to plug in either a mono or stereo headset. The device shall incorporate an LCD display that indicates channel, battery level, low battery, battery charging, and RF signal strength. The receiver VKDOOEHDEOHWRIXQFWLRQLQERWK';DQG/RFDOPRGH7KHXQLWVKDOORSHUDWHRIIRI$$EDWWHULHV7KH receiver shall incorporate automatic battery charging circuitry for recharging of NiMH batteries. The /LVWHQ/5LVVSHFLÀHG RF 6SHFL¿FDWLRQV 5))UHTXHQF\5DQJH 1XPEHURI&KDQQHOV 6HQVLWLYLW\ )UHTXHQF\$FFXUDF\ $QWHQQD LR-500-863 863.050 - 864.950 MHz :LGHEDQG X9W\SLFDOX9PD[LPXPIRUG%VLQDG VWDELOLW\WRWR& ,QWHJUDWHG([WHUQDO$QWHQQD 3URJUDPPDEOHLQVWHSVDXWRPDWLFRQORVVRI5)VLJQDO 6TXHOFK $XGLR &RPSOLDQFH &((76,5R+6 6\VWHP)UHTXHQF\ 5HVSRQVH 6\VWHP6LJQDOWR1RLVH 5DWLR 6\VWHP'LVWRUWLRQ +]N+]G% 2XWSXW &RQWUROV 8VHU&RQWUROV 6HWXS&RQWUROVEDWWHU\ FRPSDUWPHQW 3URJUDPPLQJ LR-400/500 LT-800 ,QGLFDWRUV /&''LVSOD\ 3K\VLFDO &KDQQHOXSGRZQ6((.YROXPH $ONDOLQH1L0+EDWWHU\VZLWFK &KDQQHO/RFN2XW&KDQQHO/RFN';/RFDOVTXHOFK %DWWHU\7\SH %DWWHU\/LIH/LVWHQ EDWWHULHV %DWWHU\&KDUJLQJ1L0+ RQO\ 7\SH$$EDWWHULHVDONDOLQHRU1L0+ KRXUVDONDOLQH/$KRXUV1L0+UHFKDUJHDEOH/$ 'LPHQVLRQV+[:[' &RORU 8QLW:HLJKW 8QLW:HLJKWZLWKEDWWHULHV 6KLSSLQJ:HLJKW [[LQ[[FP 'DUN*UH\ZLWKZKLWHVLONVFUHHQLQJ R]J R]J OEVNJ 0DQXDOO\/RFNDEOH8SGRZQDQGSRZHUEXWWRQVWKURXJKGRRU 2WKHUFRQWUROVEHKLQGGRRUVHHFRQWUROV 'RRU (QYLURQPHQWDO WRWDOKDUPRQLFGLVWRUWLRQ7+'DWGHYLDWLRQ PPFRQQHFWRUXQEDODQFHGG%XQRPLQDORXWSXWOHYHOP: PD[LPXPLPSHGDQFH2KPV 5HGLOOXPLQDWHGZKHQXQLWLVRQ)ODVKHVZKHQEDWWHULHVDUHORZRU &KDUJLQJ)ODVKHVZKHQORFNHGDQG6((.LVSXVKHG &KDQQHO'HVLJQDWLRQORFNVWDWXVVLJQDOVWUHQJWKLQGLFDWLRQSURJUDPPLQJ /(' 3RZHU G%$:HLJKWHG 7HPSHUDWXUH2SHUDWLRQ 7HPSHUDWXUH6WRUDJH +XPLGLW\ )XOO\$XWRPDWLFKRXUVPD[LPXP &)WR&) &)WR&) WR5HODWLYH+XPLGLW\QRQFRQGHQVLQJ 6SHFL¿FDWLRQVDUHVXEMHFWWRFKDQJHZLWKRXWQRWL¿FDWLRQ 38 LR-400/500 Block Diagram Up LCD Display Down Power Supply CPU Module 115/230VAC 50/60 Hz Seek Universal Power Supply (not included) Alkaline Power charge indicator Red LED NiMH (2) AA Batteries ALkaline or NiMH POWER On Off ANTENNA RF de-modulation de-emphasis Companding Q-Technology VOLUME Tip 3.5 mm Connector Sleeve Ring LR-400/500 39 LR-400-863 Quick Reference Articulating Flexible Antenna PP2XWSXW-DFN&RQQHFWDOLVWHQHDUSLHFHKHUH /(':KHQOLWLQGLFDWHVXQLWKDVSRZHU 2Q2IIDQG9ROXPH&RQWURO'LDO /RRN/LVWHQ'LVSOD\6KRZV receive level, channel, battery status, and lock status. 3RZHU&KDUJLQJ3RUW 6((.%XWWRQ$OORZVWKH user to change channels or lock on a channel. Front Door Lock %DWWHU\6HOHFW6ZLWFK&KRRVH the type of batteries being used. %DWWHU\&RPSDUWPHQW3ODFH $$EDWWHULHVLQFRPSDUWPHQW %HVXUHWRIROORZSRODULW\ pattern. LR-400/500 LT-800 &KDQQHO6HOHFW%XWWRQV &KDQQHO'LVSOD\'LVSOD\VWKH FKDQQHOWKH/5LVFXUUHQWO\RQ 5),QSXW,QGLFDWRU ,QGLFDWHVWKH5)UHFHLYH level. %DWWHU\/HYHO,QGLFDWRU /RFN,FRQ,QGLFDWHVWKHXQLWLV locked on current channel. 40 LR-500-863 Quick Reference PP2XWSXW-DFN&RQQHFWDOLVWHQHDUSLHFHKHUH /(':KHQOLWLQGLFDWHVXQLWKDVSRZHU 2Q2IIDQG9ROXPH&RQWURO'LDO Articulating Flexible Antenna /RRN/LVWHQ'LVSOD\ Shows receive level, channel, programming, battery status, and lock status. 3RZHU&KDUJLQJ3RUt 6((.%XWWRQ$OORZVWKH user to change channels or lock on a channel. Front Door Lock %DWWHU\6HOHFW6ZLWFK&KRRVH the type of batteries being used. &KDQQHO6HOHFW%XWWRQV %DWWHU\&RPSDUWPHQW3ODFH $$EDWWHULHVLQFRPSDUWPHQW %HVXUHWRIROORZSRODULW\ pattern. LR-400/500 &KDQQHO'LVSOD\'LVSOD\VWKH FKDQQHOWKH/5LVFXUUHQWO\RQ 5),QSXW ,QGLFDWRU ,QGLFDWHVWKH RF receive level. 3URJUDP Function is in process. %DWWHU\/HYHO,QGLFDWRU /2,QGLFDWHVZKLOHLQSURJUDPPLQJ PRGHWKHVSHFLÀFFKDQQHOKDV been locked out. /RFN,FRQ,QGLFDWHVWKHXQLWLV locked on current channel 41 LR-400/500 Setup Instructions 1 Remove the product 5HPRYHRXWHUSDFNDJLQJDQGSODVWLFFRYHU,QVSHFWIRUSK\VLFDOGDPDJH,IGDPDJHLVDSSDUHQW please contact the dealer from which the product was purchased or Listen Technologies Corpora WLRQWHFKQLFDOVXSSRUWIRUDVVLVWDQFHUHIHUWRSDJHIRUFRQWDFWLQIRUPDWLRQ 2 Open the front access door ,IORFNHGXVHDSRFNHWNQLIHRUVPDOOVFUHZGULYHUWRXQORFNWKHGRRUORFNVRQERWKVLGHVRI the unit. To unlock the door, rotate the lock ¼ turn counterclockwise. Grip the two tabs with \RXUWKXPEDQGLQGH[ÀQJHUDQGSXOOWKHGRRUGRZQZDUG'2127SODFHEDWWHULHVLQWKH unit at this time. 3 Select Battery Type LR-400/500 LT-800 7ZRW\SHVRIEDWWHULHVPD\EHXVHG7KHXQLWLVVKLSSHGZLWKWKHVZLWFKLQWKH$ONDOLQHSRVLWLRQ Use a pen or small screwdriver to select the battery type. %DWWHU\VHOHFWVZLWFK WARNING: Do not place the BATTERY switch in the NiMH position if you are not using Nickel Metal Hydride Batteries. The NiMH position will attempt to charge any batteries in the unit, even if they are not the proper type. Charging non-Nickel Metal Hydride (NiMH) batteries will result in physical harm, GHVWUXFWLRQRISURSHUW\DQGRUÀUH CAUTION: If you are using any battery type other than rechargeable Nickel Metal Hydride (NiMH) batteries, make sure the BATTERY selection switch is in the alkaline position. 42 LR-400/500 Setup Instructions 4 Place Batteries in Unit Place two AA batteries in the compartment, making note of the battery polarity shown in the battery FRPSDUWPHQWDQGDJDLQYHULI\LQJWKDWWKH%$77(5<6(/(&7VZLWFKLVLQWKHFRUUHFWSRVLWLRQIRUWKH EDWWHULHV\RXDUHXVLQJ$ONDOLQHVKRXOGEHVHOHFWHGIRUDOOEDWWHU\W\SHVRWKHUWKDQ1L0+ NOTE: Listen provides industrial strength AA alkaline batteries (part number LA-361) and high performance AA Nickel Metal Hydride batteries (part number LA-362). These may be purchased from your Listen dealer. + + - - -- + + 5 Connect an Earphone or Headset Your headset or earphone will connect to the jack on the top of the unit. Either mono or stereo connectors may be used with a Listen receiver. Make certain you push the plug all the way into the jack. LR-400/500 43 LR-400/500 Setup Instructions 6 Turn the Unit On LR-400/500 LT-800 Receivers are turned on by rotating the volume dial counterclockwise. The red LED on top of the unit will LOOXPLQDWHDQGWKH/&'GLVSOD\VKRXOGLOOXPLQDWH,IWKH\GRQRWPDNHVXUH\RXKDYHLQVWDOOHGWKHEDWWHU ies correctly and that you are using fully charged batteries. 44 LR-400/500 Operating Instructions 1 Turn Unit On 1A Volume knob Rotate the volume knob counterclockwise with an earphone or headset connected to the unit. WARNING: Excessive volume may result in hearing damage. 2 Antenna Placement 2A Antenna Position Raise the antenna to the upright position. When the antenna if fully extended, it will click into position. NOTE: Be aware that the transmission range could decrease if the antenna is not in an upright position. LR-400/500 3 Select a Channel 3A Select the channel using channel select buttons Select the channel to match the transmission channel by pressing the UP and DOWN buttons on the receiver. 45 LR-400/500 Operating Instructions 3A Select the channel using SEEK $QRWKHUZD\WRÀQGDFKDQQHORQWKH/5LVWRXVHWKH6((.EXWWRQ When you do this, the Listen receiver looks for the next active channel. 6RPHWLPHVWKHXQLWZLOOPLVWDNHLQWHUIHUHQFHIRUDUHDOEURDGFDVWVLJQDO,I\RX JHWLQWHUIHUHQFHSUHVVWKH6((.EXWWRQDJDLQ7KHXQLWPD\VWRSRQD channel that is close to the actual broadcast channel, in which case the FKDQQHOZLOOVRXQGQRLV\RUGLVWRUWHG6LPSO\SUHVV6((.DJDLQXQWLO\RXÀQGWKH clearest operating channel. 4 Adjust the volume control LR-400/500 LT-800 Use the control dial on the top of the unit to adjust the volume to a comfortable level. 46 LR-400/500 Operating Instructions Locking the Receiver on One Channel 7KHXQLWFDQEHHOHFWURQLFDOO\ORFNHGRQRQHFKDQQHOVRWKDWLWZLOOQRWFKDQJHFKDQQHOVHYHQLIWKH´6((.µEXWWRQLV SUHVVHG,WLVUHFRPPHQGHGWRORFNWKHUHFHLYHURQDFKDQQHOWKDWLVEHLQJXVHGLQDVLQJOHFKDQQHOV\VWHPRUZKHQPXO tiple systems are in the same area. 1 To lock on a channel 1A Press and hold the SEEK button for 5 seconds 3UHVVDQGKROGWKH6((.EXWWRQIRUVHFRQGVWRORFNDUHFHLYHURQWRWKHFXUUHQWO\WXQHG channel. Press and hold the button again to unlock. When locked the LED on top of WKHXQLWZLOOÁDVKZKHQ\RXSUHVVWKH6((.EXWWRQ NOTE: On the LR-400/500, when the channel is locked, a lock icon will appear underneath “Listen” on the display. Also if the unit is locked, the red LED on top of the receiver will ÁDVKZKHQWKH6((.EXWWRQLVSUHVVHG. LR-400/500 LR-400/500 Operating Instructions Squelch Programming Entering Squelch Program Mode 1 2 3 Turn unit off 3UHVVDQGKROGWKH6((.EXWWRQZKLOHKROGLQJ6((.EXWWRQGRZQWXUQWKH212))92/80(GLDOWRWXUQ the unit on. 5HOHDVHWKH6((.EXWWRQZKHQWKH/LVWHQQDPHGLVDSSHDUVDSSUR[LPDWHO\VHFRQGVDQGDWZRGLJLW display is seen. Adjusting the Squelch level 1 8VHWKH&KDQQHO83DQG'2:1EXWWRQVWRUDLVHRUORZHUWKHVTXHOFKVHQVLWLYLW\VHWWLQJVUHIHUWRWKHFKDUWRQ page 49 for settings. 2 Lower numbers mean that a less powerful and possibly noisy signal will be heard, but you can have a longer range before the unit will squelch. 3 2QFHWKHGHVLUHGVTXHOFKVHWWLQJLVIRXQGSUHVV6((.WRH[LWWKHVTXHOFKSURJUDPPLQJPRGH NOTE: Keep in mind, low squelch may allow multipath and squelch chattering at long distances. 6TXHOFKVHWWLQJLVQRVTXHOFKWKLVVHWWLQJGLVDEOHVWKHVTXHOFKLQJFDSDELOLWLHVRIWKHUHFHLYHU6TXHOFK VHWWLQJLVPD[LPXPVTXHOFKVHQVLWLYLW\ZKHQRQWKLVVHWWLQJWKHUHPXVWEHDYHU\VWURQJDQGVWDEOH RF signal for the unit to not engage the squelch feature. LR-400/500 LT-800 NOTE: For squelch settings 1-3, the squelch function is slow which allows for maximum transmission range. For squelch settings 4-20 the squelch function is fast to ensure little radio noise is heard during the squelch function. 48 LR-400/500 Operating Instructions Squelch The purpose of squelch is to mute the audio output of your receiver when the signal from the transmitter is turned off or is too weak to be received. Without squelch you would hear radio noise in your earphone. The squelch on your receiver can be adjusted so that it will mute the audio on GLIIHUHQW5)VLJQDOVWUHQJWKV7KLVLVXVHIXODVIROORZV Squelch Setting Squelch Set the squelch setting to the highest level 0 1 No Squelch 7RHQVXUHWKDWXVHUVGRQ·WKHDUWUDQVPLVVLRQVIURPRWKHU transmitters, set the squelch setting to the highest level that GRHVQ·WVTXHOFKWKHUHFHLYHU 2 If the receiver is close to the transmitter, set the squelch high 3 GHIDXOW 4 5 6 If in an area that has a lot of interference, set the squelch high ,I\RXDUHLQDQDUHDWKDWKDVDORWRILQIHUHQFH\RXPD\ZDQWWR set the squelch setting to a high setting to ensure the interference is not picked up by the receiver. Loose Squelch 0RVW5DQJH ,IWKHUHFHLYHULVJRLQJWREHFORVHWRWKHWUDQVPLWWHULHLQ DFODVVURRPVHWWKHVTXHOFKVHWWLQJKLJKVRWKDWZKHQWKH transmitter is turned off it immediately squelches and ignores transmitters in other rooms. 8 9 10 For maximum amount of range, set the squelch to a low level 11 LR-400/500 ,I\RXQHHGWKHPD[LPXPDPRXQWRIUDQJH\RXPD\ZDQWWR FRQVLGHUVHWWLQJWKHVTXHOFKVHWWLQJWRDORZOHYHORU 12 NOTE: Default squelch setting is 3 13 CAUTION: When setting the squelch level low the reliability of squelch function is compromised. This will cause radio noise to be heard in the earphone and there is a possibility of hearing damage. 14 15 16 19 20 Tight Squelch /HDVW5DQJH 18 49 LR-400/500 Operating Instructions DX/Local ';LVWKHQRUPDORSHUDWLRQDOPRGH/RFDOPRGHFDQHIIHFWLYHO\OLPLWDQ\LQWHUPRGXODWLRQDQGRU interference in a busy RF environment. This is done by limiting the amount of RF gain in the receiver. When local mode is selected, the range of the receiver is compromised. Depending on your application DQGHQYLURQPHQW/RFDOPRGHPD\EHQHFHVVDU\IRUEHWWHUSHUIRUPDQFH';PRGHLVGHIDXOW DX Mode (default) ';LVQRUPDORSHUDWLRQ7KHORFDOPRGHIHDWXUHFDQEHXVHG when many frequencies are being used. Local mode Only strong channels will be automatically tuned in 1 To change to DX/Local mode 1A While the unit is OFF, press and hold the channel down button and turn the unit on. 1B The LCD shall indicate the current setting “D” or “L”. 1C 3UHVVLQJWKHGRZQEXWWRQZLOOWRJJOHEHWZHHQ/RFDODQG';0RGH´'µRU´/µ 1D Pressing seek will enter the setting and return to normal operational mode. LR-400/500 LT-800 '; Local Resetting to defaults 7RUHVHWWKHUHFHLYHUWRGHIDXOWVHWWLQJVIROORZWKHVHLQVWUXFWLRQV 1 Reset to default settings 1A Press and hold the Up and Down channel buttons while turning the unit on. Press and hold the Up and Down channel buttons while turning the unit on. This will light up all segments of the display. 1B After the receiver has been reset After the receiver has been reset, the display will return with defaults present. NOTE: The defaults are • Channel: 01 * Channel lockout: All channels active 50 LR-500 Programming Instructions (LR-500 only) Programming Instructions 7KH/5FDQEHSURJUDPPHGWRUHFHLYHRQDOLPLWHGQXPEHURIFKDQQHOV:KHQDQ DSSOLFDWLRQUHTXLUHVWKHXVHRIPRUHWKDQRQHFKDQQHOLHDFODVVURRPRUODQJXDJH LQWHUSUHWDWLRQWKHUHFHLYHUFDQEHSURJUDPPHGWRYLHZRQO\WKHQHFHVVDU\FKDQQHOV Entering Program Mode 1 To enter program mode 1A While the unit is ON, press and hold the channel down and up buttons simultaneously for 3 seconds. 1B The “PGM” icon on the LCD will appear indicating program mode is active. 2 To program 2A LR-400/500 2QFHLQWKHSURJUDPPRGHDIXQFWLRQPHQXLVGLVSOD\HG)XQFWLRQ)LVGLVSOD\HGDVGHIDXOW 3UHVVLQJWKHFKDQQHOXSRUGRZQEXWWRQVZLOOVFUROOWKURXJKWKHIXQFWLRQV) Pressing the seek button will enter that particular function. )&KDQQHO/RFNRXW1RFKDQQHOVDUHORFNHGRXWDVGHIDXOW3UHVVLQJWKHXSDQGGRZQEXWWRQVZLOOVFUROOWKURXJK channels. Pressing the seek button will toggle between available and locked out for that channel. When a chan QHOLVORFNHGRXWWKH/2RQWKH/&'VKDOOEHGLVSOD\HG NOTE: Although it is possible to display an F2 function while in program mode, there is no F2 function at this time. Listen may add another programming function in the future, but there is only one programming function (F1) on the 863 MHz receivers. 3 When no button is pressed for 10 seconds, the program menu is exited altogether, regardless of whether a IXQFWLRQLVHQWHUHGRUQRW7RH[LWRXWRIWKHSURJUDPPHQXRUIXQFWLRQPDQXDOO\ 3A 3B 3C :KHQLQWKHSURJUDPPLQJPHQX3UHVVDQGKROGSRZHUIRUVHFRQGV7KLVH[LWVWKHSURJUDPPRGH :KHQLQDSURJUDPPLQJIXQFWLRQ3UHVVDQGKROGSRZHUIRUVHFRQGV7KLVH[LWVWKHIXQFWLRQDQGJRHVEDFNWR the programming menu. Pressing and holding power for a full 4 seconds will exit both programming function and programming menu. 51 Accessories for LR-400/500 Accessories /$ Ear Speaker Stereo Headphones /$ Assistive Listening 1RWLÀFDWLRQ6LJQDJH.LW LR-400/500 LT-800 /$ %HKLQGWKH+HDG Stereo Headphones /$ /$ Neck Loop /$ High Capacity AA Alkaline %DWWHULHV /$ Rechargeable AA NiMH %DWWHULHV /$8QLW3RUWDEOH&KDUJLQJ&DUU\LQJ&DVH /$8QLW3RUWDEOH&DUU\LQJ&DVH /$8QLW3RUWDEOH&KDUJLQJ&DUU\LQJ&DVH /$8QLW3RUWDEOH&DUU\LQJ&DVH /$&RQÀJXUDEOH&DUU\LQJ&DVH /$8QLW3RUWDEOH&KDUJLQJ&DUU\LQJ&DVH /$8QLW3RUWDEOH&DUU\LQJ&DVH /$8QLW3RUWDEOH&KDUJLQJ&DUU\LQJ&DVHZ5HPRYDEOH/LG /$8QLW3RUWDEOH&KDUJLQJ&DUU\LQJ&DVHZ5HPRYDEOH/LG /$8QLW3RUWDEOH&KDUJLQJ&DUU\LQJ&DVHZ5HPRYDEOH/LG 52 Notes LR-400/500 53 LR-400/500 LT-800 Notes 54 LR-400/500 Supplementary Information Table of Contents Frequency Chart %DWWHU\&KDUJLQJ,QIRUPDWLRQ Troubleshooting Frequently Asked Questions &RPSOLDQFH:DUUDQW\DQG&RQWDFW,QIRUPDWLRQ Notes 61 63 65 68 Supplementary 59 Frequency Chart Frequencies Supplementary 61 Battery Charging Information 7KH/7DQG/5UHFHLYHUVDUHXQLTXHEHFDXVHWKH\KDYH6PDUW&KDUJHFKDUJHUVEXLOWLQ:KHQDQ\RIWKHVHXQLWVDUHSODFHG into a Listen charging case, NiMH batteries will be charged. 6PDUW&KDUJHXVHVDSXOVHFKDUJLQJZKLFKJUHDWO\H[WHQGVWKHOLIHRI1LFNHO0HWDO+\GULGH1L0+EDWWHULHV7KHHQWLUHFKDUJLQJSURFHVV takes about 13 hours. Listen recommends that you allow the charger to complete its full cycle every time for maximum battery life. 'XULQJWKHFKDUJHF\FOHWKHUHG/('RQWRSRIWKH/LVWHQSURGXFWZLOOÁDVKVORZO\:KHQFKDUJLQJLVFRPSOHWHGWKH/('ZLOOWXUQRII,WLVQRW QHFHVVDU\WRXQSOXJWKHFKDUJHUKRZHYHULI\RXXQSOXJWKHXQLWIURPWKHFKDUJHUDQGWKHQSOXJLWEDFNLQLWZLOOEHJLQWKHKRXUFKDUJH cycle over again. When not using the receiver, it is recommended to leave the unit on the charger. The charger provides a “maintenance” FKDUJHWKDWNHHSVWKHEDWWHU\DW,IWKHXQLWLVQRWRQWKHFKDUJHUWKHEDWWHU\ZLOOORVHXSWRRILWVFKDUJHSHUPRQWK NOTE: Listen provides 2300 mAH (milli-Amp-hour) constant current (NiMH Nickel Metal Hydride) batteries. These may be purchased from Listen (part number LA-362). Charging with a drop-in charger 7RFKDUJHWKHEDWWHULHVXVLQJDGURSLQFKDUJHUVLPSO\SODFHWKHXQLWLQWRDVORWLQWKHFKDUJHUDQGFRQQHFW the charger to power. Make sure the unit is fully seated in its slot. IMPORTANT: DO NOT ATTEMPT TO CHARGE ANY TYPE OF BATTERY OTHER THAN NiMH (NICKEL METAL HYDRIDE) with your Listen equipment. Alkaline batteries may explode when connected to a charger. Other risks of FKDUJLQJQRQ1L0+EDWWHULHVLQFOXGHGHVWUXFWLRQRISURSHUW\RUÀUH IMPORTANT: In order to charge NiMH batteries, the BATTERY SELECT switch in your Listen product must be set to the NiMH setting. Use a pen or small screwdriver to move the switch (located in the battery compartment) to the proper position. Supplementary LT-800 WARNING: The case lid MUST be open or removed while the units are charging. The charging process generates heat. Air ventilation is required. It is best to store your charging case at room temperature away from heat sources and direct sunlight 62 Troubleshooting Troubleshooting The unit has no power. 0DNHVXUHWKHXQLWKDVIXOO\FKDUJHGEDWWHULHV3UHVVWKH32:(5EXWWRQ,IWKLVGRHVQRWZRUNWU\D different set of batteries. Make sure the batteries are installed correctly. There is no audio. 0DNHVXUHWKH087(7$/.VZLWFKLVLQWKH7$/.SRVLWLRQ0DNHVXUH\RXKDYHWKHPLFURSKRQHSOXJJHG DOOWKHZD\LQWRWKHLQSXWMDFN0DNHVXUH\RXDUHXVLQJD/LVWHQDSSURYHGPLFURSKRQHVHHOLVWRQ SDJH,I\RXDUHXVLQJWKHOLQHLQSXWPDNHVXUH\RXKDYHFRQQHFWHGDOLQHOHYHOXQEDODQFHGLQSXW at the “ring” of the connector. Also,be sure the receiver is on, volume is turned “up”, and headphones DUHSODFHGÀUPO\LQWKHMDFN The audio is distorted. Make sure you are using an approved Listen microphone. Try using a different mic sensitivity switch VHWWLQJWKHVZLWFKLVORFDWHGLQVLGHWKHEDWWHU\FRPSDUWPHQWRIWKHXQLW,I\RXDUHXVLQJDOLQHOHYHO input, try turning down the level of the input. Make sure the receiver is “ON” and receiving the appropriate channel. There is hum in the audio. The microphone may be too close to a transformer. Try moving away from the transformer and see if the hum goes away. The microphone level is low. 7KHPLFVHQVLWLYLW\VZLWFKPD\EHRQWKHZURQJVHWWLQJVHHSDJH7U\DGLIIHUHQWVHWWLQJWKHVZLWFK LVORFDWHGLQVLGHWKHEDWWHU\FRPSDUWPHQW6RPHPLFURSKRQHVKDYHGLUHFWLRQDOSLFNXSVHQVXUHWKDW WKHPLFURSKRQHLQXVHLVRULHQWHGDQGSRVLWLRQHGSURSHUO\SRLQWLQJDWWKHVSHDNHUVPRXWK 7KHPLFURSKRQHPXVWEHLQFORVHSUR[LPLW\WRWKHSHUVRQZKRLVVSHDNLQJ,IWKLVGRHVQRWZRUNWU\XVLQJ DKHDGZRUQPLFURSKRQH There is too much noise. 7KLVLVPRVWOLNHO\EHFDXVHWKHPLFURSKRQHLVQRWFORVHHQRXJKWRWKHWDONHU·VPRXWKDQGLWLVSLFNLQJXS background noise. Try positioning the microphone closer or try using a microphone that is directional VXFKDVDKHDGZRUQPLF7U\DQRWKHUVHWWLQJRQWKHPLFVHQVLWLYLW\VZLWFKORFDWHGLQVLGHWKHEDWWHU\ FRPSDUWPHQW There is interference. 7U\GLIIHUHQWIUHTXHQFLHVWRÀQGDFOHDUFKDQQHO8VHDUHFHLYHUWRVZHHSWKHDUHDZLWKRXWDQ\ transmitters “on”. The receiver will stop on any channels that are being broadcasted in the area. Avoid the channels that the receiver detects having a signal. I cannot pick up the signal on the receiver. Make sure the transmitter and the receiver are on the same frequency channel. It’s confusing for users to have 17 available channels. 8VHWKH352*5$0IXQFWLRQ/7DQG/5RQO\WRORFNRXWXQZDQWHGFKDQQHOV8VHUVZLOORQO\EH able to scroll through available channels. Supplementary I cannot change the channel. 7KHWUDQVPLWWHURUUHFHLYHUPD\EHORFNHGRQDFKDQQHOFKHFNIRUWKHSDGORFNLFRQ7RXQORFNSUHVV and hold the UP or DOWN button for 5 seconds. 63 Troubleshooting Troubleshooting My batteries are not charging 0DNHVXUH\RXDUHXVLQJ1L0+EDWWHULHVDQGWKDWWKH%$77(5<6(/(&7VZLWFKLQVLGHWKHEDWWHU\ FRPSDUWPHQWLVVHWWRWKH1L0+SRVLWLRQ0DNHVXUHWKHEDWWHULHVDUHLQVWDOOHGFRUUHFWO\0DNHVXUH you are using a Listen charging case. Make sure the charging case is connected to power and the unit is securely pushed into its slot in the case. Supplementary LT-800 NOTE: Listen uses 2300 mAh (milli-Amp-hour) constant current NiMH (Nickel Metal Hydride) batteries. These may be purchased from a Listen dealer (ask for part number LA-362). 64 Frequently Asked Questions Frequently Asked Questions Q 'R,QHHGDWUDQVPLWWHUIRUHDFKDXGLRVRXUFH" Yes. To transmit two different frequencies, there must be two separate transmitters. A Q :KDWLVWKHUDQJHRIWKH/77UDQVPLWWHU" 7KHUDQJHRIWKH/7ZLOOGHSHQGXSRQWKHSRZHUVHWWLQJDQGLQWHUIHUHQFHUHIHUWRSDJH A *HQHUDOO\WKHUDQJHLVXSWRPIW Q ,VWKHUHDOLPLWWRWKHQXPEHURIWUDQVPLWWHUV,FDQXVHLQRQHURRP" <HV/LVWHQUHFRPPHQGVWKDWQRPRUHWKDWFKDQQHOVDUHLQXVHGVLPXOWDQHRXVO\UHIHUWRSDJHRQ A XVLQJPXOWLSOHFKDQQHOVLQWKHVDPHURRP Q :KDWUHFLHYHUVKRXOGEHXVHGZLWKPXOWLSOHWUDVPLWWHUV" :HUHFRPPHQGWKH/5IRUXVHZLWKPXOWLSOHWUDQVPLWWHUVEHFDXVHWKH/5LVSURJUDPPDEOH A and can lock out unused channels. Q +RZPDQ\FKDQQHOVFDQ,SURJUDPLQWRWKH/5" WR7KHUHFHLYHUKDVFKDQQHOVDQG\RXFDQSURJUDPLWWRKDYHMXVWWKHFKDQQHOV\RXZDQW A WRKDYHDFFHVVWR,WFDQEHDWZRFKDQQHOUHFHLYHUDFKDQQHOUHFHLYHURUNHHSDOO Q +RZPDQ\UHFHLYHUVFDQ,KDYHLQDV\VWHP" As many as you need, the number is endless. A Q :KDWDUHWKHPDMRUGLIIHUHQFHVEHWZHHQWKH/5DQGWKH/5" %RWKUHFHLYHUVFDQWXQHWREURDGEDQGFKDQQHOV+RZHYHUWKH/5KDVWKHEXWWRQVXQGHU A WKHEDWWHU\FRPSDUWPHQWGRRUDQGWKH/5LVQRWSURJUDPPDEOHWRORFNRXWFKDQQHOV,I\RX SODQWRXVHRQHUHFHLYHUZLWKPXOWLSOHWUDQVPLWWHUV\RXVKRXOGXVHWKH/5ZKLFKLV programmable to just those channels you need. Q :KDWLVWKHEDWWHU\OLIHRIWKH/77UDQVPLWWHU" Fifteen hours alkaline. Eight hours NiMH. A Supplementary 65 Frequently Asked Questions Frequently Asked Questions Q &DQWKHUHFHLYHUEH´ORFNHGµRQDFKDQQHOLIQHHGHG" Yes. All Listen receivers can be locked on a single channel. A Q :KDWLVWKHEDWWHU\OLIHRIDUHFHLYHU" 20 hours using alkaline batteries. 10 hours using NiMH batteries. Supplementary LT-800 A 66 Compliance, Warranty and Contact Information Compliance Information 7KHIROORZLQJFRPSOLDQFHLQIRUPDWLRQDSSOLHVWRWKH/7/7/5DQG/5 7KHVHGHYLFHVFRPSO\ZLWK(76,(1 These devices are CE compliant. These devices are RoHS compliant. Warranty /LVWHQ7HFKQRORJLHV&RUSRUDWLRQ/LVWHQZDUUDQWVLWVWUDQVPLWWHUVDQGUHFHLYHUVPRGHOV/7/7/5/5 /5/5/5/5DQG/5WREHIUHHIURPGHIHFWVLQZRUNPDQVKLSDQGPDWHULDOXQGHUQRUPDOXVH and conditions for the useful lifetime of the product from date of purchase. /LVWHQZDUUDQWVLW·V6WDWLRQDU\,55DGLDWRUV/$WREHIUHHIURPGHIHFWVLQZRUNPDQVKLSDQGPDWHULDOXQGHUQRU mal use and conditions for three years from the date of purchase. /LVWHQZDUUDQWVLWV1RLVH&DQFHOLQJ0LFURSKRQH/$WREHIUHHIURPGHIHFWVLQZRUNPDQVKLSDQGPDWHULDOXQGHU normal use and conditions for one year from date of purchase. All other products and accessories are warranted for 90 days from date of purchase. This warranty is only available to the original end purchaser of the product and cannot be transferred. Warranty is only valid if warranty card has been returned, or online warranty registration, has been completed within 90 days of purchase. This warranty is void if damage occurred because of misuse or if the product has been repaired or PRGLÀHGE\DQ\RQHRWKHUWKDQDIDFWRU\DXWKRUL]HGVHUYLFHWHFKQLFLDQ:DUUDQW\GRHVQRWFRYHUQRUPDOZHDUDQG tear on the product or any other physical damage unless the damage was the result of a manufacturing defect. Warranty does not include inbound freight costs. Listen is not liable for consequential damages due to any failure of equipment to perform as intended. Listen shall bear no responsibility or obligation with respect to the manner of XVHRIDQ\HTXLSPHQWVROGE\LW/LVWHQVSHFLÀFDOO\GLVFODLPVDQGQHJDWHVDQ\ZDUUDQW\RIPHUFKDQWDELOLW\RUÀWQHVV of use of such equipment including, without limitation, any warranty that the use of such equipment for any purpose will comply with applicable laws and regulations. The terms of the warranty are governed by the laws of the state of Utah. ,QWKHÀUVWQLQHW\GD\VDIWHUSXUFKDVHDQ\GHIHFWLYHSURGXFWZLOOEHUHSODFHGZLWKDQHZXQLW$IWHUGD\V/LVWHQ will, at its own discretion either repair or replace transmitters and receivers with a new unit or a unit of similar type and condition. Product that is not covered under warranty shall be repaired or replaced with a unit of similar type DQGFRQGLWLRQEDVHGRQDÁDWIHH 7KLVOLPLWHGZDUUDQW\SULFHVDQGWKHVSHFLÀFDWLRQVRISURGXFWVDUHVXEMHFWWRFKDQJHZLWKRXWQRWLFH Contacting Listen 14912 Heritagecrest way 6DOW/DNH&LW\8WDK86$ +1.801.233.8992 +1.800.330.0891 North America +1.801.233.8995 Fax [email protected] www.listentech.com Supplementary ,IWHFKQLFDOVHUYLFHLVQHHGHGSOHDVHFRQWDFW/LVWHQ3UHDXWKRUL]DWLRQLVUHTXLUHGEHIRUHUHWXUQLQJ/LVWHQSURGXFWV,ISURGXFWVZHUH damaged in shipment, please contact the carrier, then contact Listen for replacement or repair requirements payable by the carrier. $OO/LVWHQ(XURSHDQPDUNHWVDUHVXSSRUWHGWKURXJKWKH/LVWHQ7HFKQRORJLHV*PE+RIÀFHORFDWHGLQ2EHUDVEDFK*HUPDQ\)RU more information on Listen solutions, contact Listen Technologies at +1.801.233.8992, +1.800.330.0891 North America, /LVWHQ7HFKQRORJLHV*PE+DWRUYLVLWZZZOLVWHQWHFKFRP)RU(XURSH0LGGOH(DVW$IULFDDQG,QGLDRIÀFHYLVLW www.listentech.de. Listen Technologies GmbH Jasminstr.16, 90522 Oberasbach, Germany +49 911 955 159 0 Europe +49 911 955 159 40 Fax [email protected] www.listentech.de Supplementary LT-800 Notes 68 Listen Technologies Corporation 14912 Heritagecrest Way %OXIIGDOH8WDK86$ +1.801.233.8992 +1.800.330.0891 North America +1.801.233.8995 Fax www.listentech.com [email protected] Listen Technologies GmbH Jasminstr. 16 905 22 Oberasbach, Germany +49 911 955159 0 (0($, +49 911 955159 40 Fax www.listentech.de [email protected] Printed in the United States of America /LVWHQ7HFKQRORJLHV&RUSRUDWLRQ® $OO5LJKWV5HVHUYHG