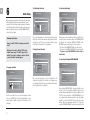
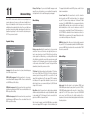
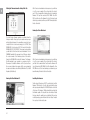
1
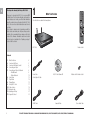
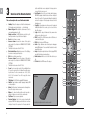
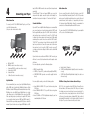
USER GUIDE
English
High Definition
Media Player
EN
Thank you for choosing the Linksys KiSS 1600
Thank you for choosing the KiSS 1600 as your new DVD
& Media Player. This User Guide will guide you through the
simple setup process. Inside, you will also find information
about the extensive line-up of features that the KiSS 1600
has to offer as well as detailed instructions about how to
use them.
Since Linksys is always devoted to providing you with the
latest features and making sure that your player operates
optimally, it is recommended that you always use the latest
version of the firmware. Information about how to obtain
the latest version is available in the “Updating your player”
section of this User Guide.
1
What's in the box
Check that the box contains the following items:
KiSS 1600
Remote Control
Contents
1
2
3
4
5
6
7
8
9
10
11
12
13
What's in the box
Overview of the Player
Overview of the Remote Control
Connecting your Player
Connecting your Player to a Network
- Wired Network
- Wireless Network
Quick Setup
Player Menu
Playing Media
Using KiSS PC-Link
Online Services
Advanced setup
Updating your Player
Support & Contact
4
5
6
7
8
8
10
12
14
15
17
18
19
21
23
KiSS PC-Link
For PC and Mac
Installation CD
Windows ver. 3.0.5
Macintosh ver. 3.0.5
Power Cable
Country Specific Cable
SCART Cable
4
KiSS PC-Link Software CD
Batteries for the Remote Control
Composite Video
THE LATEST VERSION OF THIS MANUAL IS AVAILABLE FROM WWW.LINKSYS.EU; SELECT YOUR COUNTRY, GO TO SUPPORT, THEN GO TO DOWNLOADS
Stereo Audio Cable
a.
b.
b.
b.
c.
c.
c.
d.
e.
f.
g.
h.
i.
j.
Overview of the Player
DVD Drive.
Eject: Opens or closes the disc tray.
Stop: Stops playback or exits a menu.
Activate the player when in Standby.
Play: Starts playback of the disc currently inserted in the player.
Pause: Pauses playback.
Activate the player when in Standby.
AC Power - 230 Volts
Wireless Antennas
k. Return to Factory Settings
Composite Video Output.
l. HDMI Output
Component Video Output.
m. SCART Output
Analog Stereo Output.
n. S-Video Output
Coaxial Digital Audio Output.
o. Optical Digital Audio Output
Reset Player
p. Ethernet 10/100
q. USB 2 Connector
a
b
c
Rear Panel
This section shows the Inputs and Outputs of the Rear Panel
Powering up the Player
d
Connect your KiSS 1600 to the mains power outlet to
start it.
e
f
g
h
i
e
o
p
Wait up to 20 seconds for the KiSS 1600 to start
loading. The message “PLS WAIT” appears. Wait
another 20 seconds for loading to complete.
Wireless Antenna
For an optimal wireless
transmission, remember
to turn the antennas
upwards.
j
k
l
m
n
q
5
EN
2
Front Panel
This section explains the use of the front panel
EN
3
Overview of the Remote Control
r.
This section explains the use of the Remote Control
a.
Standby: Start up the player or activate the standby mode.
(The standby mode is denoted by --- on the display)
b. Numeric Keypad: Enter digits in certain menus. Select a
corresponding number in a list.
c. Chapter selection: On DVD Playback, press this key followed by a number to go to the desired chapter.
d. Back: Go back from one menu.
e. Increase volume: Increase the volume of the player’s
audio output. (if activated in ADVANCED SETUP/AUDIO
SETTINGS)
f. This Button is not used on the KiSS 1600.
g. Directional buttons: Navigate in menus. Left or Right, go
to previous or next page in long lists.
h. OK: Enter or activate a menu item.
i. Decrease volume: Decrease the volume of the player’s
audio output. (if activated in ADVANCED SETUP/AUDIO
SETTINGS)
j. This Button is not used on the KiSS 1600.
k. Zoom: Zoom in on picture content. Press additional times
to 'zoom in' even more. Reset to default zoom after pressing five times. The five zoom modes are: 200%, 300%,
400%, 500% and back. Press OK to apply the chosen
zoom mode.
l. Title Menu: Exit to Title Menu during DVD playback.
m. Subtitle: Toggle between subtitle languages during DVD
or video playback.
n. Menu: Enter the player’s main menu where all major functions of the player can be accessed.
o. Options: A context-sensitive button which presents a
number of options on screen for the current mode.
p. Play/Pause: Plays or pauses playback.
q. Previous Chapter: Skip to the previous chapter while
playing a DVD. While playing content that does not have
chapters, it skips to the previous file. Pressing and hold-
6
s.
t.
u.
v.
w.
x.
y.
z.
ing the button fast reverses playback. Pressing again increases the fast reverse speed.
Next Chapter: Skip to the next chapter while playing a
DVD. While playing content that does not have chapters, it
skips to the next file. Pressing and holding the button fast
reverses the playback. Pressing again increases the fast
forward speed.
Stop/Eject: Stops playback or exits a menu. Pressing and
holding the button for a second, ejects or closes the disc
tray of the player.
Setup: Enter the player’s Advanced Setup menu where
settings can be altered or reset.
HDD: Shortcut to the USB file menu, when a USB device is
connected to the player.
DVD: Enters the player’s DVD menu.
Audio: Toggle between audio tracks/spoken languages
during DVD playback. Press and hold the button to mute/
unmute the player.
Angle: Change the angle/video track of the playing DVD (if
present). Rotate when viewing pictures
Online Services: Direct access to the Online Services portal.
PC-Link: Enter the DVD menu of the player.
a
b
c
d
e
f
g
f
j
k.
m
l
n
q
o
p
r
t
u
w
y
s
f
v
x
z
Batteries
Inserting the batteries into the remote control
h
i
Connecting your Player
Video Connection
To connect your KiSS 1600 DVD & Media Player to your TV, use
one of the following cables:
(Only one cable can be used at a time)
a.
a.
b.
c.
c.
d.
e.
b.
c.
d.
e.
RGB via SCART
HDMI (the cable is an extra accessory)
Component RCA (the cable is an extra accessory)
Composite via SCART
Composite Video
S-Video (the cable is an extra accessory)
High Definition
We recommend that you connect your High Definition Display
with a HDMI cable to obtain High Definition Playback of High
Definition Content. HDMI supports Standard, Enhanced, or HighDefinition video, plus Multi-Channel Digital Audio in a single
cable. Many sources of High Definition Video (as well as DVDVideo upscaling) require your display to support HDCP, which
is an encryption format used on HDMI and DVI-D signals. To
find out whether your display supports HDCP, please consult its
manual. If your television does not support HDMI but has a DVI-
Standard Definition
If you do NOT own a High Definition Display, we recommend that
you connect your player to your television using the SCART cable
that is supplied with your player. The SCART cable is the thickest
cable and has large connectors at the ends. The SCART cable
is suitable for various analog video formats up to RGB quality,
and analog Stereo audio. Connect one end of the SCART cable to
“SCART OUT” on your player. Connect the other end to the SCART
input on your television. Connect the power cable to the mains.
You may have to select a specific SCART connector on your TV
or change your television settings to RGB in order to obtain RGB
Video Quality.
If your television does not have an HDMI or SCART connector, you
will have to connect both audio and video with separate cables
as follows:
For connecting video, you have the following options:
Audio Connection
EN
4
input, a DVI-to-HDMI converter can be used (Item to be purchased
separately).
If your HD-ready TV does not support HDMI, you can use the
component video output connection (cables not included). See
description of rear panel in chapter 2: “Overview of the Player”.
You can connect the audio to either the television or your Hi-Fi
Stereo or Audio/Video Surround System. The KiSS 1600 provides
analog as well as digital audio. Analog stereo audio is the most
common format, and in practice, is supported by all devices.
For Surround setup, Digital Audio Output is recommended for
connection to all Surround Amplifiers and A/V-Receivers.
To connect your KiSS 1600 DVD & Media Player to your amplifier
or TV, use one of the following cables:
a.
b.
c.
• VIDEO (Composite Video)
• S-VIDEO (or “Super-VHS”, provides better quality than VIDEO)
• COMPONENT VIDEO (provides even better quality than the
above)
a. Audio Output, 2 Channels
b. S/PDIF Coaxial Digital Audio Output (the cable is an extra accessory)
c. S/PDIF Optical/Toslink Digital Audio Output (the cable is an
extra accessory)
For connecting the audio, you have the following options:
USB Mass Storage Device Connection and Usage
• Connect ANALOG AUDIO OUT to your television using phono
(RCA) jacks
• Connect ANALOG AUDIO OUT to your HiFi stereo using phono
(RCA) jacks
• Connect COAXIAL or OPTICAL digital audio output to your Surround Amplifier or A/V-Receiver
KiSS 1600 does support external USB Mass Storage Devices
like hard drives, USB memory sticks, MP3 Players or Cameras
for storing your personal content such as music and photos. To
connect such a device, simply plug the device into the USB port
on the rear of your player using a standard USB Cable (cable not
included with this product). See the Chapter entitled “Overview of
the Player” if you are not sure where this port is located.
7
EN
5
Equipment required
Connecting your Player to a
Network
Connecting your player to your home network and the Internet will
enable you to access Online Services, and will also enable you
to share your computer audio, video and picture files with your
player using KiSS PC-Link or Windows Media Connect.
After you have correctly connected your device, you can access its
files on your device by pressing the MENU button of your remote
control to enter the Player menu. Go to the USB section and select
the type of content you would like to browse.
Note: The KiSS 1600 supports the following file systems on mass
storage devices: FAT16, FAT32 and NTFS. Some variant USB file
systems may not be supported.
Note: If you do not know which file system your mass storage
device is using, please consult the User Guide for the device or
contact the manufacturer for this information. Please also note
that the KiSS 1600 only supports mass storage devices in “read
only” mode. This means that you cannot rename, delete or alter
your files (in any way) on the drive from the KiSS 1600.
Note: Streaming video from a USB device depends on the
maximum bit rate, and a very high bit rate may not always be
supported.
Note: Although the KiSS 1600 USB connector supplies enough
power to supply standard low-power devices (like USB memory
sticks), some devices, like USB Hard Disk Drives may require too
much energy to be self-powered by the KiSS 1600. These devices
therefore have to use their own power supply.
There are several ways to connect your KiSS 1600 to your
home network and/or the Internet. The most common ways are
described below, starting with Wired Networking, then Wireless
networking.
Please note that you do not need to connect your KiSS
1600 to a network or to the Internet to start playing
CD/DVD or USB files. Connection can be done at a later
stage. Read the end of this chapter for more details.
WIRED CONNECTIONS
WIRED Connection using a Router
• A router, with a built-in switch or a separate switch/hub.
• 2 or 3 straight Ethernet cables.
• A Windows PC or a Macintosh with an Ethernet connection.
Step-by-Step Guide
1. Check that your Internet connection or home network is
currently working with your computer. If you experience a problem
with your Internet connection, contact your ISP (Internet Service
Provider).
2. If it is not already connected, connect your Computer to the
router’s built-in switch or to an external switch that is connected
to the router.
3. Connect the player to the router’s built-in switch or to an
external switch/hub that is connected to the router.
4. Plug your KiSS 1600 into the electrical socket to start it.
5. Wait up to 20 seconds for the KiSS 1600 to start loading.
During this period, the display will remain black until the message
“PLS WAIT” appears. Wait another 20 seconds for loading to
complete.
6. When loading is complete the message “NET IS UP” displays
on the KiSS 1600, signaling that your player is connected.
7. Proceed to the Quick Setup to finish setting up your player.
See Chapter 6 of this user guide.
8. If the message “NO NET” is displayed and you encounter
a problem whilst connecting, check your cables or the FAQ on
our website (www.linksys.eu; select your country, then Support,
Technical Support and Easy Answers).
WIRED Network with a Computer using Internet connection sharing
Equipment required
• Switch/hub and 2 straight cables or a crossed cable.
• A Windows PC or a Macintosh with an Ethernet connection.
8
WIRED Network using a direct Internet connection
6. Proceed to the Quick Setup to finish setting up your player.
See Chapter 6 of this user guide.
7. If the message “NO NET” displays and you experience a
problem connecting, check your cables or the FAQ on our website
(www.linksys.eu; select your country, then Support, Technical
Support and Easy Answers).
Equipment required
• One straight or crossed cable.
WIRED Network using a direct connection to the
Computer
Equipment required
• Switch/hub and 2 straight cables or a crossed cable.
• A Windows PC or a Macintosh with an Ethernet connection.
Step-by-Step Guide
1. Check that your Internet connection or home network is
currently working with your computer. If you experience any
problem with your Internet connection, contact your ISP (Internet
Service provider).
2 If you have not already done this, connect the Computer to the
Internet (LAN/Modem/ADSL).
3a On the Windows PC running Windows XP, select Network
Connection in the Control Panel. Open Properties for the network
connection that is connected to the Internet. Select Advanced
where you enable Internet connection sharing.
3b On the Macintosh, go to System Preferences, select Sharing.
Under sharing, select the Internet tab and then click Start to
enable Internet Connection Sharing.
4 Connect the player to the Computer with a crossed cable or to
a switch/hub.
5. Plug your KiSS 1600 into the electrical socket to start it.
6. Wait up to 20 seconds for the KiSS 1600 to start loading.
¨During this period the display will remain black until the message
“PLS WAIT” appears. wait another 20 seconds for loading to
complete.
7. When loading has finished, the message “NET IS UP”
is displayed on the KiSS 1600, denoting that your player is
connected.
8. Proceed to the Quick Setup to finish setting up your player.
See Chapter 6 of this user guide.
9. If the message “NO NET” displays and you have any problem
Step-by-Step Guide
Note: With a direct Internet connection, you can only access
Online Services. KiSS PC-Link CANNOT be enabled.
1. Check that your Internet connection is currently working with
your computer. If you experience a problem with your Internet
connection, contact your ISP (Internet Service Provider).
2. Connect your KiSS 1600 to the Internet (LAN/Modem/ADSL).
3. Plug your KiSS 1600 into the electrical socket to start it.
4. Wait up to 20 seconds for the KiSS 1600 to start loading.
During this period the display will remain black until the message
“PLS WAIT” appears. wait another 20 seconds for loading to
complete.
5. When loading has finished, the message “NET IS UP”
is displayed on the KiSS 1600, denoting that your player is
connected.
Step-by-Step Guide
Note: With a direct computer connection, you can only share
multimedia files between your player and a PC with KiSS PCLink or Windows Media Connect. Online Services CANNOT be
enabled.
1. Connect your KiSS 1600 to your computer.
2a. On the PC running Windows XP, select Network Configuration
in the Control Panel. Open Properties for the network connection
that is connected to the Player. Select Properties for the Internet
Protocol (TCP/IP). Select “Use the following address´.
9
EN
connecting, check your cables or the FAQ on our website (www.
linksys.eu, choose your country, then Support, Technical Support
and Easy Answers).
EN
2b. On the Macintosh, go to System Preferences and select
Network. Click on Configure, go under the TCP/IP Pane.
Under Configure IPv4, select: Manually.
3. Enter the IP Address below:
IP Address: 192.168.1.1
Subnet Mask: 255.255.255.0
4. Plug your KiSS 1600 into the electrical socket to start it.
5. Wait up to 20 seconds for the KiSS 1600 to start loading.
During this period, the display will remain black until the message
“PLS WAIT” appears. Wait another 20 seconds for loading to
complete.
6. When loading is finished, the message “NO NET” is displayed
on the KiSS 1600.
7. Proceed to the Quick Setup to finish setting up your player.
See Chapter 6 of this user guide. Make sure that you select
WIRED NETWORK at the end of the Quick Setup.
8. Press SETUP on your remote control, and go to NETWORK
SETTINGS, select NETWORK PROTOCOL, and turn off DHCP by
selecting NO.
9. Enter the following addresses:
IP Address: 192.168.1.2
Netmask: 255.255.255.0
Gateway: 192.168.1.1
Primary DNS: 192.168.1.1
Secondary DNS: 0.0.0.0
Press OK to exit.
Your player is now connected to your computer.
10. Accessing your computer files is described in the Media
Server chapter of this user guide.
11. If you experience a problem whilst connecting, check your
cables or the FAQ on our website (www.linksys.eu; select your
country, then Support, Technical Support and Easy Answers).
Setting up your WIRED connection at a later stage
If you decide to set-up your wired connection at a later stage,
proceed as follows:
1. Connect your player using one of the methods described
above
10
2. Start your KiSS 1600.
3. Press SETUP on your remote control to access the SETUP
MENU.
4. Go down to NETWORK SETTINGS.
5. Select NETWORK INTERFACE, then select WIRED NETWORK.
6. Your player should be connected.
7. If you experience a problem whilst connecting, check your
cables or the FAQ on our website (www.linksys.eu; select your
country, then Support, Technical Support and Easy Answers).
WIRELESS CONNECTIONS
WIRELESS Connection using a router or an access
point
Step-by-Step Guide
1. Check that your Internet connection or home network is
currently working with your computer. If you experience a problem
with your Internet connection, contact your ISP (Internet Service
Provider).
2. If it is not already connected, connect your Computer to the
wireless router or to an external wireless access point that is
connected to the router.
3. Deploy the player’s antennas (for better reception)
4. Plug your KiSS 1600 into the electrical socket to start it.
5. Wait up to 20 seconds for the KiSS 1600 to start loading.
During this period, the display will remain black until the message
“PLS WAIT” appears. Wait another 20 seconds for loading to
finish.
6. Proceed to the Quick Setup to set up the wireless connection
to your player. See Chapter 6 of this user guide.
7. If you experience a problem during connecting, check the
FAQ on our website (www.linksys.eu; select your country, then
Support, Technical Support and Easy Answers).
WIRELESS Network using a direct Internet connection
Equipment required
• A wireless router with a built-in switch or an access point and
a separate switch/hub.
• A Windows PC or a Macintosh with a wireless card. The
Computer can also be connected to the wireless router via
Ethernet (wired).
Equipment required
Step-by-Step Guide
Note: With a direct Internet connection, you can only access
Online Services. KiSS PC-Link CANNOT be enabled.
1. Check that your Internet connection is currently working with
your computer. If you experience a problem with your Internet
connection, contact your ISP (Internet Service Provider).
2. Deploy the player’s antennas (for better reception)
3. Plug your KiSS 1600 into the electrical socket to start it.
4. Wait up to 20 seconds for the KiSS 1600 to start loading.
During this period, the display will remain black until the
message “PLS WAIT” appears. Wait another 20 seconds for
loading to finish.
5. Proceed to the Quick Setup to set up the wireless connection
to your player. See Chapter 6 of this user guide.
6. If you experience a problem connecting, check the FAQ on
our website (www.linksys.eu; select your country, then Support,
Technical Support and Easy Answers).
Setting up your WIRELESS connection at a later stage
After you have physically set up your player, you must configure
your wireless network in the player Setup menu in order to communicate with the rest of your network. To do this, start your KiSS
1600 and press the SETUP button to enter the SETUP MENU,
select the NETWORK SETTINGS tab in the menu and change the
settings according to the procedure described below:
Network Interface: Press this menu item to define how your
player is connected to your local network. Select WIRELESS.
Network protocol: For automatic configuration of the network
settings, it is recommended that this option is left enabled. With
the DHCP option enabled, you do not need to know how to set up
a network. Your player will have all its parameters (IP address,
Search for Wireless Access Points: Use this menu option
to select one of the wireless networks available. The wireless
networks on the list may be labelled as either “Unlocked” (nonencrypted networks) or “Locked” (networks that are available,
but require an encryption key). Select the network of your choice
to establish a connection. If you select a “Locked” network,
your player will display a Wireless Details Screen, prompting
you to select your associated WIRELESS ENCRYPTION and your
associated ENCRYPTION KEY.
Wireless Encryption: The Wireless Encryption menu item allows
you to set the type of encryption used on your wireless network.
Encryption is used to encrypt communication on your wireless
network. This prevents other wireless users in the vicinity from
gaining access to personal or confidential information.
For the player to be able to communicate with your wireless
network, the encryption settings in the player must be identical
to the settings on the wireless router or access point you will
be connecting to. If the wireless router/access point is operating
without encryption, your player must be set accordingly. However,
we recommend that you always use encryption on your wireless
network, so that (if possible) your router is set to WEP or WPA
encryption, and enable WEP or WPA/PSK TKIP (Personal), WPA/
PSK AES (Enterprise) encryption on your player accordingly. If you
do not know which encryption is enabled (if any) in your wireless
router/access point, please refer to the configuration instructions
in its manual. Encryption key: If you are running an encrypted
wireless network, all devices on your network must share the
same encryption key so that they can communicate. Please enter
this menu item to display the on-screen keyboard where you
will be able to enter the key that you are currently using in your
wireless router/access point. If you do not know which encryption
key is used on your wireless router/access point, please refer to
the configuration instructions in its manual.
Refer to point 5b SELECTING THE NETWORK (WIRELESS
NETWORK), of the QUICK SETUP Chapter for more information
about how to select your Wireless Access Point.
EN
• A wireless ADSL modem.
subnet mask, DNS) automatically set by the router/PC point you
have connected it to.
Disabling the DHCP option will enable you to manually configure
the network details for your player. Go to the ADVANCED SETUP
Chapter to find out how to do this.
Wireless Network Configuration: Use this menu to manually
configure your Wireless Network Settings. See the above section
SEARCH FOR WIRELESS ACCESS POINT for more details.
Linksys Wireless PassPhrase: If you are using WEP and a
PASSPHRASE to connect to your wireless network, you can use
this menu to select your PassPhrase and get connected. Select
the type of key that you have set: 64-bit or 128-bit. After you have
selected the key type, go to WIRELESS PASSPHRASE. A keypad
will appear on your screen; simply use it to write your PassPhrase.
Press OK when you are finished. A list of 4 Passphrases will be
displayed on your screen, select the one that matches your
wireless computer settings, then press OK. If you are not sure
of your PassPhrase and PassPhrase Keys, please check your
wireless router settings on your computer.
Note: Video playback quality via wireless depends on the actual
bandwidth locally available and the bit stream of the video file.
11
EN
2. Video Output Selection
6
Quick Setup
After powering up your player for the first time, the Quick Setup
will be displayed so that you can perform the basic setup of
your player. The Quick Setup is simple and largely self-explanatory. Should you wish to go through it again or alter some more
advanced settings later, please consult the ADVANCED SETUP
section of this User Guide.
Powering up the Player
Connect your KiSS 1600 to the mains power outlet to
start it.
Wait up to 20 seconds for the KiSS 1600 to start
loading. The message “PLS WAIT” appears. Wait
another 20 seconds for loading to complete. The first
screen of the Quick Setup will appear:
QuickSetup
4. Selecting the Network
QuickSetup
Network Type
Video Output
Please select the cable type you have used to connect your
player to your TV.
Please select the type of network you wish to use with your
player. For wired network, please make sure that your player
is properly connected first.
Composite Video
S-Video
SCART RGB
Component SD
No Network
Wired Network
Wireless Network
SCART RGB Help
This screen will prompt you to select the video output you will be
using. Please select the same cable type that you used to connect
your player to your TV. If you are uncertain of which cable you
connected, the pictures will act as a rough guide.
3. Display Format Selection
QuickSetup
Display Format
After you have connected an Ethernet cable to your KiSS 1600 or
are ready to set up your network, either select WIRED NETWORK
(for ethernet cable connection), WIRELESS NETWORK, or NO
NETWORK if you are not yet ready to connect your player.
- If you have selected WIRED NETWORK, proceed to item 5a.
- If you have selected WIRELESS NETWORK, proceed to item 5b.
- If you have selected NO NETWORK, the Quick Setup is
now finished.
5a. Selecting the Network WIRED NETWORK
Please select the format of your Display
1. Language Selection
16:9 Automatic
4:3 Letterbox
4:3 Pan & Scan
QuickSetup
Network Configuration Found
QuickSetup
Please select the type of network you wish to use with
your player. For wired network, please make sure that
your player is properly connected first.
Language
Please select your preferred language.
English
Dansk
Deutsch
Español
This first screen will tell you to select the language you wish
to use on your DVD Player. Use the directional buttons on your
remote control to navigate, and press the OK button to select
a language.
12
This screen will prompt you to select the format of the TV
connected to your player. The selections are: 16:9 widescreen,
or conventional 4:3 format. If you are not what your television is,
select the picture that is closest match.
IP address
Use This
64 103
54
187
Configure Manually
After selecting WIRED NETWORK, the player will take a few
seconds to look for your network configuration. When found, a
message will appear with the details of your configuration, Select
USE THIS if you are satisfied, or CONFIGURE MANUALLY if you
are an advanced user and you would like to enter the settings
yourself. If you have selected USE THIS, the Quick Setup is now
finished, and you can start using your KiSS 1600. If you have
selected CONFIGURE MANUALLY, you will be prompted to enter
6. Setting the Wireless Network Encryption Key
5b. Selecting the Network (Wireless Networks)
Provided you have a wireless network setup at home, you can
select WIRELESS NETWORK. The player will take a few seconds
to look for the available wireless networks. When found, the list
of available wireless networks will appear on your television
screen. Select the name of the network that you wish to use.
If your network is not encrypted (No encryption key needed to
access it), just select its name from the list. Note that a small
icon (a lock next to the network name) will show you whether or
not the network is encrypted. The player will take a few seconds
to look for your network configuration. When found, a message
will appear with the details of your configuration, Select USE
THIS if you are satisfied, or CONFIGURE MANUALLY if you are an
advanced user and you would like to enter the settings yourself.
If you have selected USE THIS, the Quick Setup is now finished,
and you can start using your KiSS 1600. If you have selected
CONFIGURE MANUALLY, you will be prompted to enter your
configuration details using the numeric keypad on the remote
control. After you have done this, the Quick Setup is finished. If
your network is encrypted, please go to step 6.
If your network is encrypted, select its name from the list. A
window will pop up asking to provide the network encryption
details. Select WIRELESS ENCRYPTION, and then select the
type of encryption that is used on your wireless network: WEP,
WPA/PSK TKIP (Personal) or WPA/PSK AES (Enterprise). If your
network is set as WPA2, please use WPA/PSK AES. If you are not
sure of which type of encryption you are using, please check your
wireless router settings on your computer. After you have selected
the wireless encryption, go to ENCRYPTION KEY. A keypad will
appear on your screen, simply use it to write your wireless
encryption key. This encryption key is the same one that you are
using to connect to your wireless network. Press OK when you
are finished. It will take a few seconds for the player to connect
to your wireless network. When this has been done, a message
will appear with the details of your configuration, Select USE
THIS if you are satisfied, or CONFIGURE MANUALLY if you are an
advanced user and you would like to enter the settings yourself.
If you have selected USE THIS, the Quick Setup is now finished,
and you can start using your KiSS 1600. If you have selected
CONFIGURE MANUALLY, you will be prompted to enter your
configuration details using the numeric keypad on the remote
control. After you have done this, the Quick Setup is finished.
on your remote and go to the NETWORK SETTINGS Menu. Select
LINKSYS WIRELESS PASS PHRASE, then select the type of key
that you have set: 64-bit or 128-bit. After you have selected the
key type, go to WIRELESS PASSPHRASE. A keypad will appear
on your screen; simply use it to write your PassPhrase. Press OK
when you are finished. A list of 4 Passphrases will be displayed on
your screen, select the one that matches your wireless computer
settings, then press OK. If you are not sure of your Passphrase
and Passphrase Keys, please check your wireless router settings
on your computer.
Congratulations!
You have successfully set up your player!
If you experience a problem connecting, check the FAQ on our
website (www.linksys.eu; select your country, then Support,
Technical Support and Easy Answers).
7. Wireless Network Encryption with PassPhrase
If you are using WEP and a PASSPHRASE to connect to your
wireless network, just select WEP from the list of Wireless
Encryption. You do not need to write an encryption key, so press
OK. The menu will take you out of the Quick Setup. Press SETUP
13
EN
your configuration details using the numeric keypad on the
remote control. After you have done this, the Quick Setup is now
finished.
EN
7
Online Services
Player ID: The Player ID is only used for authentication and storing your unique preferences, and you will hardly ever be asked
to enter this anywhere. Linksys would like to advise you NOT to
disclose this ID to anyone, except when requested by the Linksys
Customer Service in order to resolve specific issues.
Player Menu
This section guides you through each section of the main menu
of the player giving you access to all of its primary functions like
DISK PLAYBACK, ONLINE SERVICES, USB STORAGE and MEDIA
SERVER. To exit or re-enter the menu, simply press the MENU
button on your remote control.
Disc Playback
third party developers, and are in no way affiliated to Linksys.
DivX Registration String: The DivX Registration String is used
to certify that this player can play the DivX format. If you register
to download movies on www.divx.com, you will be asked to provide this number in order to play the movie on your KiSS 1600.
This menu section deals with the online capabilities and features
of the KiSS 1600. Accessing Online Services or KML pages
requires the player to have Internet access through either a wired
or wireless network. For more information about connecting the
player to a network, see the CONNECTING YOUR PLAYER TO A
NETWORK section of this User Guide.
USB Media
Online Services: This menu option gives you access to the
Online Services portal, where you will have direct access to a
portfolio of online applications.
Play: Play the disc currently inserted in the player.
Continue: If you have previously exited playback of a DVD,
or a disc is still in the player, select this command to resume
playback.
Video files: Browse and play video files on the inserted disc.
Audio files: Browse and play audio files on the inserted disc.
Picture files: Browse and view pictures on the inserted disc.
Eject: This opens the disc tray of the player.
14
Note: Online services are subject to availability and may be
changed or removed without prior notice or replacement.
My KML page: This menu item brings you directly to your
personally specified KML page. See the next paragraph for
information about how to add one. KML is a Media Language
essentially developed for correctly presenting online content
like text, images and video on a TV screen, in the same way
as websites are displayed on a computer monitor. Developing
KML pages requires some basic programming skills, but is fairly
simple to understand.
Customize "My KML" Page: Entering this menu item allows
you to define an IP address pointing to a KML page of your
choice. Linksys does not maintain or keep track of third party
pages. We do not therefore currently provide a repository of
available pages. Instead, we recommend that you perform an
Internet search. Please note that pages are provided “as is” by
This menu contains options for browsing and playing files residing
on an USB storage device connected to the player. In order to
use them, please connect a USB storage device (hard drive, USB
memory dongle, MP3 Player, Camera or other device) to the USB
port at the rear of the player. See the pictures in the USB MASS
STORAGE DEVICE CONNECTION section (under CONNECTING YOUR
PLAYER) of this User Guide.
Video files: Browse and view the video files on the connected
USB storage device.
Audio files: Browse and view audio files on the connected USB
storage device (e.g. an MP3 player).
Picture files: Browse and view JPG-format pictures on the
as follows:
Media Server
Video files: Browse and view video files located on your computer
and selected in KiSS PC-Link or Windows Media Connect.
Media Server
Video Files
Audio Files
Picture Files
The Media Server menu is used to view and play files (via
a network) that are located on a separate device such as a
computer. Three types of software can be used to select the files
that need to be shared: KiSS PC-Link, Windows Media Connect on
Windows XP, or Windows Media Player 11 on Windows Vista.
The full explanation about how to use KiSS PC-Link can be found
later in this user guide in the KiSS PC-LINK Chapter.
Windows Media Connect (on Windows XP) and Windows Media
Player 11 (on Windows Vista) are one way of sharing media
content between a Windows PC Computer and supported devices
such as your KiSS 1600 player. To take advantage of this function,
you will need to install Windows Media Connect on your Windows
PC running Windows XP, or to use Windows Media Player 11 on
Windows Vista. The latest versions of both types of software can
also be obtained as a download from Microsoft’s website.
When KiSS PC-Link (on your PC/Mac), Windows Media Connect
or Windows Media Player (on your PC) is launched, the KiSS
1600 will automatically locate the computer. First select the type
of file that you wish to play (Video, Audio, or Pictures). The servers
will then be detected and their name will become available (You
can select the server name in KiSS PC-Link or Windows Media
Connect/Windows Media Player 11. KiSS PC-Link's default
Server Name is MY PC-LINK). On your player, the menus work
Audio files: Browse and view Audio files located on your computer
and selected in KiSS PC-Link or Windows Media Connect.
8
EN
connected USB storage device (e.g. a photo camera).
Playing Media
Playing DVDs
Picture files: Browse and view Picture files located on your
computer and selected in KiSS PC-Link or Windows Media
Connect.
Note: For Windows XP users: you may need to download and
install Windows Media Connect on your PC for this function to
work. Windows Media Connect can be found in the download
section of the Microsoft website or alternatively at the following
link: http://www.microsoft.com/wmconnect.
For Windows Vista users: Windows Media Connect is now a
function of your Windows Media Player software. All you need to
do is to link your files from Windows Media Player 11.
Press the EJECT button on the front of the player or on the remote
control to open the disc tray. Place the DVD in the tray and press
either the PLAY or EJECT button again to automatically start it.
After a few seconds, the DVD menu will appear. You can navigate
through it using the arrow buttons on your remote control, and
press OK to enter a menu item.
When a DVD is already inserted into the KiSS 1600, you can start
it by pressing PLAY on your remote control. From the menu, you
can also access it by selecting the Disc menu and then selecting
PLAY DISC.
Options: At any time during playback, you can press the OPTIONS
button on the remote control for a list of additional DVD playback
related options.
Repeat: This option can be toggled between repeating the whole
disc, only the current chapter, or none.
Angle: Change the angle of the movie you are watching. This
function is only available on some movies.
Audio: Toggle between available audio tracks/languages. If none
are available, you cannot use this option. You can also press the
15
EN
AUDIO button on the remote control to obtain a quicker shortcut
to this function. You can press this button again to cycle through
the available audio tracks.
Subtitle: Toggle between available subtitles for the video playing.
You can also press the SUBTITLE button on the remote control to
obtain a quicker shortcut to this function. You can press this button again to cycle through the available subtitles.
OK: Exit the Options menu.
Playing Video Files, MPEG 2/4, DivX, XviD, Nero Digital,
H.264, WMV
wish to see, and press OK.
Options: At any time during playback, you can press the OPTIONS
button on the remote control for a list of additional video playback
related options.
CD-Rom
Repeat: This option can be toggled between repeating the whole
disc, only the current chapter, or none.
Shuffle: Enabling this option will shuffle the order in which video
files are played. Disable it to playback video files in their correct
order.
Green Hill
Angle: Change the angle of the movie you are watching. This
function is only available on some movies.
Audio: Toggle between available audio tracks/languages. If none
are available, you cannot use this option. You can also press the
AUDIO button on the remote control to obtain a quicker shortcut
to this function. You can press this button again to cycle through
the available audio tracks.
In addition to DVD-Video discs, the KiSS 1600 is also capable of
playing a wide variety of other video formats. Video files in these
formats may not look as good as DVD-Video material since these
formats were originally created for higher compression of video
and audio. However, the advantage is that you can store more
video on a disc, with only a slight reduction in terms of quality.
Other restrictions also apply, as some of them will not support
interactive menus, subtitles, multiple soundtracks and spoken
languages.
To play discs containing files in the above mentioned formats,
press EJECT to open the disc tray, and then place a disc with
supported video content into the tray. Press EJECT again to close
the tray. After the disc has been recognized, you will be presented
with the content of the disc on screen. Select the video that you
Subtitle: Toggle between available subtitles for the video playing.
You can also press the SUBTITLE button on the remote control
to obtain a quicker shortcut to this function. You can press this
button again to cycle through the available subtitles.
Change CodePage: If your language needs special characters,
change the character code that is the best match.
0:02:39
0:03:18
The Greens
The Greens
In addition to audio CD’s, the KiSS 1600 is also capable of playing
a number of different compressed audio formats. Compressing
audio will enable you to store more songs on a single disc with
an almost inaudible decrease in quality depending on the amount
of compression used.
When a CD is already inserted into the KiSS 1600, you can start
it by pressing PLAY on your remote control . From the menu, you
can also access it by selecting the Disc menu and select “Play
disc”.
Options: While viewing the track list, you can press the OPTIONS
button on the remote control for a list of additional CD playback
related options such as REPEAT and SHUFFLE.
OK: Exit the Options menu.
Repeat: This option can be toggled between repeating the whole
disc, only the current chapter, or none.
Note: Video playback quality via wireless depends on the actual
bandwidth locally available and the bit stream of the video file.
Shuffle: Enabling this option will shuffle the order in which tracks
are played. Disable it to play back tracks in their correct order.
OK: Apply settings, then exit the Options menu.
Playing Audio CDs, MP3, Ogg Vorbis, WMA 9, WMA 9
Pro, AAC-LC, AC3, WAV
Viewing JPEG, PNG or BMP pictures
Press the EJECT button on the front of the player or on the remote
control to open the disc tray. Place the Audio CD in it and either
16
press the PLAY or EJECT button again to automatically start it.
After a few seconds the CD track list will appear. You can navigate
it using the arrow buttons on your remote control, and press OK
to play a track.
Press EJECT to open the drawer, and place a CD with picture
9
Sharing content
EN
content into the drawer. Press EJECT again to close the drawer.
After a few seconds, the menu DISC will appear on your screen.
Select PICTURE FILES to view the list of images on the CD, select the one that you want to watch, and press ENTER. Use the
NEXT/PREVIOUS arrow to view other pictures from the CD. You
can enlarge the picture by pressing ZOOM on your remote control.
To eject the CD, press STOP to exit the menu and return to the
DISC section. Select EJECT.
Using KiSS PC-Link
KiSS PC-Link is a sharing application that shares the audio, video
and picture files located on your PC or Mac with your KiSS 1600.
The software is provided in your retail box. All you need to do is
to add the files you would like to share into the application's main
window. To share content between your computer and your Player,
you must make sure that both devices are connected on your
home network (via Ethernet or Wireless).
Requirements
PC: Windows PC computer running at least Windows XP
Mac: Macintosh computer running at least Mac OS X 10.3
Installation
Options: While viewing the pictures, you can press the OPTIONS
button on the remote control for a list of additional playback-related options such as REPEAT and SHUFFLE.
Repeat: This option can be toggled between repeating the whole
picture disc, the current picture, or none.
Shuffle: Enabling this option will shuffle the order in which the
pictures are shown. Disable it to view pictures in their correct
order.
OK: Apply settings, then exit the Options menu.
On a Windows PC Computer: Just load the KiSS PC-Link CD in
your PC. View the CD content, locate the "Windows" folder and
open it. Double click the "KiSS PC-Link.exe" file to run the installer wizard. Follow the steps to finish the installation. When the
installer has finished, you may start using KiSS PC-Link.
On a Macintosh Computer: Just load the KiSS PC-Link CD in
your PC. View the CD content, locate the "Macintosh" folder and
open it. Double click the "KiSS PC-Link.dmg" file to open the disk.
Copy the KiSS PC-Link file to your application folder. Double click
the file to start the software.
First of all, you must select the type of file that you wish to share:
Video, Audio or Picture files. Select the tab by clicking "Video",
"Audio" or "Pictures" from the top of the main KiSS PC-Link window. There are three different ways to add content; each way
corresponds to a button at the bottom of the main KiSS PC-Link
window:
Add Files: Click this button to select the files that you would like to
share with your media player.
New Folder: Click this button if you would like to create a folder
within your KiSS PC-Link main window. After the folder has been
created, you will be able to add files within that specific folder
Add Live Folder: Click this button to link an existing folder (located
anywhere on your computer) to KiSS PC-Link. All the files added
to this folder will automatically be updated with the KiSS PC-Link
main window later.
The "Remove" button removes the selected linked files from the
KiSS PC-Link list, but does not delete them from your computer.
Settings
To select KiSS PC-Link/Preferences, open a new window where
you can access the various settings that you may wish to edit. By
default, the "Pictures" tab is selected. This gives you access to:
Using KiSS PC-Link
Color Correction: Click this button so that KiSS PC-Link can calibrate the pictures by itself in order to match television screen renderings. Clicking this option will provide you with a better picture
The first time that you open the software, you will be prompted
to specify your TV Format and TV System. This ensures that your
pictures are displayed optimally on your television. If you do not
yet wish to provide an answer, you can always go back to the KiSS
PC-Link Settings menu, under File/Settings/Pictures (PC) or under
KiSS PC-Link/Preferences/Pictures (Mac).
Scaling: Click this button to allow your computer to scale your picture for better and faster viewing on your television. Compensate
for non-square pixels: Click this button to allow your computer to
stretch your picture in order to display it in the correct aspect ratio
on your television. This option must be clicked to ON on older KiSS
Players, but it does not have to be ON on a KiSS 1600.
17
EN
TV Format and TV System: Select your television Format and
System
10
Click the Server tab to access:
Online Services
Click the Extension tab to access:
Online services are a set of special Internet applications that
can be accessed from your KiSS 1600. These applications are
constantly updated, and they will not be described in this user
guide.
File extensions: Edit the list of file types you wish to share with
your media player. The list is used as a filter. KiSS PC-Link will
only display the files located in a live folder that ends with one of
the extensions from the list.
To be able to use the ONLINE SERVICES, your KiSS 1600 must
be connected to the Internet via your home network. If you are
not sure, please read the CONNECTING YOUR PLAYER TO A
NETWORK Chapter.
Accessing the shared files
You can access the ONLINE SERVICES in two different ways:
Either by pressing the KiSS ONLINE button on your remote control
to obtain direct access to the ONLINE SERVICES Portal, or by
pressing MENU on your remote control, and then scrolling down
to ONLINE SERVICES and selecting KiSS ONLINE.
Server name: Write the server name as it will appear on your
television when you will access your shared files
If your network has been correctly set between your media player
and your computer, you will be able to access the files from your
KiSS 1600 .Make sure that your media player is turned ON, and
that your television is on the video channel. Just press the "Menu"
button on your remote control, then scroll down to go to the "Media Server" tab. Select the type of file(s) that you wish to access
(Audio, Video, or Pictures). The name of your PC-Link server will
appear on your TV screen, select it to access and play the files you
have added to KiSS PC-Link on your computer.
Windows PC Version
Examples of Online Services could be ONLINE ELECTRONIC
PROGRAM GUIDE (a service that allows you to set the TV
Channels you want and be able to view what's on TV tonight).
ONLINE NEWS (a service that allows you to read the news on your
TV screen). WEBRADIO (a service that allows you to select and
listen to Internet radio stations). ONLINE GAMES (a service that
allows you to play some board games).
Note: Online services are subject to availability and may be
changed or removed without prior notice or replacement.
Macintosh Version
18
Advanced Setup
Press SETUP on the remote control to access your player’s advanced setup menu. You can access this menu to modify the settings selected during the Quick Setup process as well as many
additional options explained in this section. Please note that some
menu items may not be available, depending on the physical configuration of your player. To exit or re-enter the setup menu, press
SETUP on your remote control.
Video Settings
Setup menu
Display Connection
TV System
Video Mode
Screen Format
HDMI Auto Sence
SCART RGB
NTSC/60Hz
16:9 automatic
yes
Regional Settings
Setup menu
Language
DVD Subtitle Language
DVD Audio Language
DVD Menu Language
Change Codepage
Language: Enter this menu item to set your preferred language
for all of the player’s menus.
DVD Subtitle Language: Enter this menu item to set your preferred default subtitle language in DVDs. Please be advised that
not all DVDs respect this setting.
DVD Audio Language: Enter this menu item to set your preferred
default spoken language in DVDs. Please be advised that not all
DVDs respect this setting.
DVD Menu Language: Enter this menu item to set your preferred
default language in DVD menus. Please be advised that not all
DVDs respect this setting.
Display connection: Enter this menu item to set up your video
connection. Please select the video cable type that you are using to connect your player to your TV. Note that each cable type
carries signals in a different way, so selecting a different cable
other than the one physically connected to your player may result
in picture loss. If this happens, please do not press any buttons
on the remote control and wait 15 seconds. The player will then
automatically return to the previous selection.
TV System: Enter this menu item to switch between TV Systems.
You can select PAL/50Hz or NTSC/60Hz. PAL is the system most
commonly used in Europe, while NTSC is used in the US and
Japan. While most American TVs only support NTSC, nowadays
most European TVs support both standards. If you are not sure
which format to use, we recommend that you try PAL/50Hz and
change it if it is incorrect.
Video Mode: Enter this menu item to switch between standard
definition and high definition video output. High definition output
is only available for TV’s that support it, and is connected to the
player via an HDMI or Component Cable.
TV supports high definition and HDCP, please consult its User
Guide or manufacturer.
Screen Format: Enter this menu item to select the format in
which you wish your DVD content and video to be displayed
on your TV. If you are using a widescreen 16:9 format TV with
your player, 16:9 WIDESCREEN is the recommended setting for
watching DVD’s and other video content in their correct aspect
whilst making full use of the screen for widescreen content. If
you are using a conventional 4:3 format TV with your player, select LETTERBOX to obtain the full view of widescreen content, or
PAN&SCAN for a cropped view of the image filling up the entire
screen while sacrificing some of the picture.
HDMI Auto Sense: Enter this menu to select whether you would
like your KiSS 1600 to automatically switch to the HDMI Output as
soon as an HDMI Cable is inserted in the connector and the TV/AV
Receiver is powered ON.
Audio Settings
Setup menu
Audio Mode
WMAPro 5.1 Decoding
Disable Volume Control
Stereo
yes
Audio mode: Enter this option to select between STEREO and
SURROUND speaker setup for your system. If you select STEREO,
SURROUND media playback will be mixed to 2 channel Stereo
output for TV or Hi-Fi Stereo systems. If you select SURROUND
and connect an A/V-Receiver, the digital outputs will be
dependent on the media format during playback and the Audio
Encoding selection.
Note: In order to upscale content like DVD-Videos, your display
device must support HDCP encryption. To find out whether your
19
EN
11
Change Code Page: If your selected Subtitle Language needs
support for special characters, you can configure this support by
selecting from the list of codes that support your language.
EN
WMAPro 5.1 Decoding: When selecting SURROUND Audio
Mode, you can select whether you would like the decoding of
WMAPro 5.1 files (Windows Media Audio Pro) to be done by
the KiSS 1600 (INTERNAL), or to be done by the amplifier it is
connected to (EXTERNAL).
Volume Control: Enable, if you wish to adjust the DVD playback
volume from the KiSS 1600 remote control on Analog Output.
Note: If you use the volume adjustment on the KiSS 1600 together
with your TV Volume Control or Hi-Fi Volume Control, you may
unintentionally obtain large differences in the level to other
sources or increase the noise or distortion on your system.
Network Settings
Setup menu
Network Interface
Please select the type of network you wish to use with your
player. For wired network, please make sure that your player
is properly connected first.
No Network
Wired Network
Wireless Network
Network Interface: Press this menu item to define how your
player is connected to your local network. If your player is
connected to your hub/switch/router through a cable, select
WIRED. If you have a wireless access point and prefer to use this
for connection, select WIRELESS.
View Current Settings: Enter this menu item to see the current
network configuration.
Network protocol: For automatic configuration of the network
settings, it is recommended that this option is left enabled. With
the DHCP option enabled, you do not need to know how to set
up a network. You also do not have to type in anything. All of the
parameters (IP address, subnet mask, DNS) for your player will
be automatically set by the router/switch/access point you have
20
connected it to.
Disabling the DHCP option will enable you to manually configure
the network details for your player. This is only recommended
for networks without a DHCP compliant switch/router/access
point or a network without Internet access. In the event that the
player is connected to a router/switch/access point without DHCP
support or directly to a PC, enter this to manually configure the
parameters used on your network. The IP address is the unique
address of your player on the network. Do not use the same
address as your PC or other devices connected to the network.
We recommend that you use 192.168.1.2. If another device on
the network has been configured with the same address, simply
increment the final digit (“2”) to a number that is not used by
other devices. Subnet mask should be set to 255.255.255.0.
Default gateway should be set to the same address as the device
acting as your gateway to the Internet (usually 192.168.1.1). DNS
should set to the same address as the default gateway unless
your Internet Service Provider has supplied you with a different
address. Alternative DNS should only be filled in if provided by
your Internet Service Provider.
please ensure that your router is set to WEP, WPA or WPA 2
encryption and enable WEP or WPA/PSK TKIP (Personal), WPA/
PSK AES (Enterprise) encryption on your player accordingly. If you
do not know which encryption is enabled (if any) in your wireless
router/access point, please refer to the configuration instructions
in its manual. Encryption key: If you are running an encrypted
wireless network, all devices on your network must share the
same encryption key so that they can communicate. Please enter
this menu item to obtain the on-screen keyboard where you will
be able to enter the key you are currently using in your wireless
router/access point. If you do not know which encryption key is
used on your wireless router/access point, please refer to the
configuration instructions in its manual.
Refer to paragraph 5b SELECTING THE NETWORK (WIRELESS
NETWORK), of the QUICK SETUP Chapter for more information
about how to select your Wireless Access Point.
Search For Wireless Access Points: Use this menu option to
select one of the available wireless networks. The wireless networks
on the list may be labelled as either “Unlocked” (available for free)
or “Locked” (networks that are available but require an encryption
key). Select the network of your choice to establish a connection. If
you select a “Locked” network, your player will display a Wireless
Details Screen, prompting you to select your associated WIRELESS
ENCRYPTION and your associated ENCRYPTION KEY.
Wireless Encryption: The Wireless Encryption menu item allows
you to set the type of encryption used on your wireless network.
Encryption is used to keep the data exchange between your player
and the rest of your network scrambled. This prevents other
wireless users in the vicinity from gaining access to personal or
confidential information.
So that the player can communicate with your wireless network,
the encryption must be set to exactly the same in the player as on
the wireless router or access point you will be connecting to. If the
wireless router/access point is operating without encryption, your
player must be set accordingly. However, we recommend that you
always use encryption on your wireless network, so (if possible)
Linksys Wireless PassPhrase: If you are using WEP and a
PASSPHRASE to connect to your wireless network, you can use
this menu to select your PassPhrase and get connected. Select
the type of key you have set: 64-bit or 128-bit. After you have
selected the key type, go to WIRELESS PASSPHRASE. A keypad
will appear on your screen; simply use it to write your PassPhrase.
Press OK when you are finished. A list of 4 Passphrases will be
displayed on your screen, select the one that matches your
wireless computer settings and press OK. If you are not sure
of your PassPhrase and PassPhrase Keys, please check your
wireless router settings on your computer.
Wireless Network Configuration: Use this menu to manually
manage your Wireless Network Settings. See the above section
SEARCH FOR WIRELESS ACCESS POINT for more details.
Network Services: Enter this menu item to select whether you
would like to enable UPnP (Universal Plug and Play). UPnP is
used to allow devices to connect seamlessly and to simplify the
implementation of networks in the home.
Miscellaneous Settings
12
EN
Setup menu
Updating your Player
Screensaver
Use this menu to select the period of inactivity before the
screensaver starts. You can also disable it completly by
selecting “Disabled”.
Disabled
Linksys is dedicated to improving its products and to ensuring
that you are always able to obtain the latest features and improvements via firmware updates. This section explains how to do this.
60 sec
5 min
30 min
Obtaining new firmware with the player connected
Screen Saver: Entering this option enables you to set the number
of minutes that the player will remain idle before the screen saver
is activated.
Front Panel Brightness: Enter this option to set the brightness
of the light in the front panel display as well as the two front
buttons.
Firmware Version: This menu displays the version of the
current firmware installed on the player. A Firmware is a software
package that contains performance improvements or new
features, therefore it is recommended that the player always uses
the latest available version.
Firmware Update: If your player has access to the Internet via
either a wired or wireless network connection, you will also be
able to automatically update your firmware from this menu if a
later version exists. Please read the next chapter about how to
update your player
Quick Setup: Enter this option to access the Quick Setup that
guides you through the same basic and easy setup procedure as
when you powered ON the player for the first time.
Reset To Factory Defaults: Resets the player to its default
settings. By selecting this item, you will lose all of the settings
that you have entered.
If your player is connected to the Internet via a network, obtaining
and installing a new firmware update has never been easier.
To check for updates, simply enter the setup menu by pressing SETUP on your remote control, go to the MISCELLANEOUS
SETTINGS section, and select FIRMWARE UPDATE. A message
will appear telling you whether a Firmware update is available. If
new firmware is available, simply follow the steps On-Screen. The
Firmware will automatically download and be written to the KiSS
1600. This step takes a few minutes depending on your connection. A REBOOT message will appear when the update has been
installed. After you have restarted your player, you will return to
the Quick Setup. Complete the easy steps to start using it again.
Whenever updates are available, they are also posted to the
Linksys website in the support section, so that even when your
player is not connected to the Internet and you have access to
our website from elsewhere, you will still be able to obtain the
latest updates
21
EN
Getting the Firmware from the Linksys Web Site
After it has been downloaded and decompressed, you will have
a .iso file on your computer. Place a blank disc in the drive of
your PC. We recommend Nero Burning Rom v.6 for burning the
firmware CD. Open Nero and select DISC IMAGE. Select ALL
FILES, and then select the firmware file. Select the lowest speed
allowed by your burner, and then press NEXT. Burning of data to
the disc then starts.
Burning the CD on Macintosh
The latest Linksys firmware updates are available from the
Linksys.eu website. Simply go to your computer and open your
preferred Internet browser. Go to www.linksys.eu and select your
country. After the site has loaded, simply go to SUPPORT, then
DOWNLOADS. Select a product: KiSS 1600 and click the button
DOWNLOADS FOR THIS PRODUCT. A new page loads providing
you with the list of the items that can be downloaded. Click on
FIRMWARE, and wait for the new page to load. This page contains
the version number of the firmware posted on the website.
Simply click DOWNLOAD to obtain the firmware. The firmware
file will download to your computer as a compressed .zip file.
Decompress it to obtain the firmware .iso file. If you do not have
the necessary software to decompress the file, you can download
decompressor software such as Winzip (for Windows PC) or StuffIt
Expander (for Macintosh).
After it has been downloaded and decompressed, you will have
a .iso file on your computer. Place a blank disc in the drive of
your Mac. We recommend Roxio Toast to burn the firmware CD.
Open Toast and select DISC IMAGE. Select the firmware file. Press
RECORD and select the lowest burning speed allowed by your
burner. Burning of the data to the disc then starts.
Burning the CD on Windows PC
Installing the firmware
Turn the player ON, and press EJECT to open the drive. Insert the
firmware CD in the drive. Close the drive and restart the player
while pressing and holding the PLAY/PAUSE button on the front
of the player. The firmware CD will automatically boot and start
the firmware update. This step will take a few minutes. Restart
the player when the update has been installed. After you have
restarted your player, you will return to the Quick Setup. Complete
the easy steps to start using it again.
22
Support
Important safety information
• Read these instructions carefully and pay attention to all
warnings and guidelines.
• Do not overload electrical sockets or extension cables.
Overloading can result in a fire or electric shock.
• Never insert objects into the cabinet door of the DVD player.
These objects can come into contact with live points (dangerous
voltages), or can short-circuit components, thus causing fire or
electric shock.
• Do not spill liquids on the DVD player.
• If the DVD Player does not operate normally, or if it emits
unusual sounds or odors, pull out the plug immediately and
contact an authorized technician.
• Do not attempt to service the DVD player yourself. If you open
or dismantle the shielding, you can expose yourself to dangerous
voltage and other hazards. All maintenance must be carried out
by qualified service technicians.
Environmental information
• The system is manufactured from recyclable materials that can
be reused if they are disassembled by authorized personnel.
• Please observe local regulations for the disposal of packaging
materials, used batteries, and discarded units.
Copyright
This product contains copyright technology that is protected
pursuant to the patents that are the property of Macrovision
Corporation and other copyright holders. Any use of this copyright
technology must be approved by Macrovision Corporation. The
technology is intended for use in the home unless otherwise
approved by Macrovision Corporation. Disassembly is prohibited.
Manufactured under license from Dolby Laboratories. “Dolby”
and the double “D” symbol are trademarks of Dolby Laboratories.
Warranty Information
Limited Warranty
Linksys guarantees that, for a period of two years (the “Warranty
Period”), your Linksys Product will be substantially free of defects
in materials and workmanship under normal conditions of use.
Your exclusive remedy and the entire liability of Linksys under this
warranty will be for Linksys to (at its discretion) repair or replace
the product or refund your purchase price less any rebates. This
limited warranty only extends to the original purchaser.
If the Product proves defective during the Warranty Period, call
Linksys Technical Support in order to obtain a Return Authorization
Number (if applicable). MAKE SURE THAT YOU HAVE YOUR PROOF
OF PURCHASE AT HAND WHEN CALLING. If You are requested to
return the Product, clearly mark the Return Authorization Number
on the outside of the package and include a copy of your original
proof of purchase. RETURN REQUESTS CANNOT BE PROCESSED
WITHOUT PROOF OF PURCHASE. You are responsible for shipping
defective Products to Linksys. Linksys only pays for UPS Ground
shipping from Linksys back to you. Customers located outside of
the United States of America and Canada are responsible for all
shipping and handling charges.
ALL IMPLIED WARRANTIES AND CONDITIONS OF
MERCHANTABILITY OR FITNESS FOR A SPECIFIC PURPOSE ARE
LIMITED TO THE DURATION OF THE WARRANTY PERIOD. ALL
OTHER EXPRESS OR IMPLIED CONDITIONS, REPRESENTATIONS
AND WARRANTIES, INCLUDING ANY IMPLIED WARRANTY OF
NON-INFRINGEMENT, ARE DEEMED TO BE INVALID. Some
jurisdictions do not allow limitations in relation to how long an
implied warranty lasts, so the above limitation may not apply to
you. This warranty gives you specific legal rights, and you may
also have other rights that vary according to the jurisdiction. This
warranty does not apply if the Product (a) has been altered, except
by Linksys, (b) has not been installed, operated, repaired, or
maintained in accordance with instructions supplied by Linksys,
or (c) has been subjected to abnormal physical or electrical
stress, misuse, negligence, or an accident. In addition, due to the
ongoing development of new techniques for intruding upon and
attacking networks, Linksys does not warrant that the Product will
be free of vulnerability to intrusion or attack.
TO THE EXTENT NOT PROHIBITED BY LAW, LINKSYS WILL, IN NO
EVENT, BE LIABLE FOR ANY LOST DATA, REVENUE OR PROFIT,
OR FOR SPECIAL, INDIRECT, CONSEQUENTIAL, INCIDENTAL OR
PUNITIVE DAMAGE, REGARDLESS OF THE TYPE OF LIABILITY
(INCLUDING NEGLIGENCE), ARISING OUT OF OR RELATED TO
THE USE OF OR INABILITY TO USE THE PRODUCT (INCLUDING
ANY SOFTWARE), EVEN IF LINKSYS HAS BEEN ADVISED OF
THE POSSIBILITY OF SUCH DAMAGE. IN NO EVENT WILL THE
LIABILITY OF LINKSYS EXCEED THE AMOUNT PAID BY YOU
FOR THE PRODUCT. The foregoing limitations will apply even if
any warranty or remedy provided under this Agreement fails to
achieve its essential purpose. Some jurisdictions do not allow
the exclusion or limitation of incidental or consequential damage,
therefore the above limitation or exclusion may not apply to you.
For more information, please contact us
www.linksys.eu
Select your country, and then select SUPPORT/TECHNICAL
SUPPORT/TECHNICAL SUPPORT CONTACTSCall the KiSS
TECHNICAL SUPPORT number
If a specific KiSS number is not provided, call the INTERNATIONAL SUPPORT NUMBER:+44 207 660 0121 (only in
English)
23
EN
13
“DTS” and “DTS Digital Out” are trademarks of Digital Theater
Systems, Inc.
Slotsmarken 10
2970 Høsholm
Denmark
www.linksys.eu
PN: 710300330