1
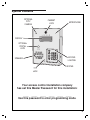
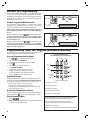
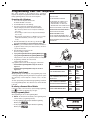
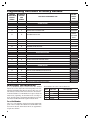
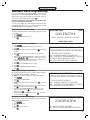
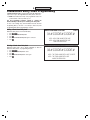
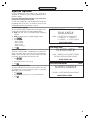
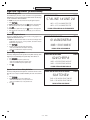
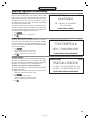
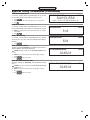
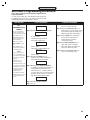
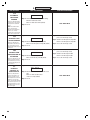
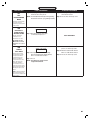
PRINTER’S INSTRUCTIONS:
INSTR,AE-100,FACILITY MANAGER - LINEAR P/N: 227354 B - INK: BLACK - MATERIAL: 20 LB. MEAD BOND - SIZE: 8.500” X 11.000” - SCALE: 1-1 - FOLDING: ALBUM-FOLD - BINDING: SADDLE-STITCH
AE-100
Commercial
Telephone Entry
System
Facility Manager’s Guide
(760) 438-7000
USA & Canada (800) 421-1587 & (800) 392-0123
Toll Free FAX (800) 468-1340
www.linearcorp.com
Contents
Operation
Introduction ............................................................................................. 2
Operation ................................................................................................ 2
Database Overview ................................................................................ 2
System Features .................................................................................... 3
Programming from the Keypad............................................................... 4
Multi-unit Installations ............................................................................. 4
Programming Over the Telephone .......................................................... 5
Programming Reference & Factory Defaults .......................................... 6
Resident Data Programming .................................................................. 7
Stand-alone Entry Code Programming................................................... 8
System Options ...................................................................................... 9
System Options (Continued) ................................................................ 10
System Options (Continued) ................................................................ 11
System Utility Commands .................................................................... 12
System Utility Commands (Continued)................................................. 13
Alternate Programming Section............................................................ 14
Alternate Programming Reference ....................................................... 15
AE-100 Operation ................................................................................. 22
Troubleshooting .................................................................................... 23
Linear Limited Warranty........................................................................ 23
FCC Notice ........................................................................................... 23
In a typical installation, the unit’s memory is programmed with each
resident’s Directory Code, Name, Telephone Number, and Entry Code.
Arriving visitors use the
or
keys to view the Name and Directory
Code for the desired resident. Upon entering the Directory Code, or
pressing the
button, the AE-100 will automatically dial the resident’s
Telephone Number and establish two-way voice communication between
the visitor and the resident. The resident will then have the option to
grant or deny access to the visitor by pressing a digit on their telephone.
Residents simply enter their Entry Code for access.
In addition to the telephone entry, the AE-100 can grant access at
the keypad using up to 125 Stand-alone Entry Codes not assigned to
residents (each Stand-alone Entry Code used reduces the number
of available Directory Entries by one).
For ADA compliance for the hearing impaired, a visitor can connect their
TTY device to the jack in the face of the system. The visitor will be able
to use their TTY device to communicate with the resident’s TTY device
during the telephone call.
Introduction
Resident Directory Data
The Model AE-100 Commercial Telephone Entry System is designed
for use as an access control device for small apartments or gated
communities with up to 125 residents. The system can be used in a
lobby or outside. Surface, recessed, and pedestal mounting options
are supported. The system utilizes hands-free, full duplex telephone
communications between visitors and residents for granting access.
Housed in a locked, rugged stainless steel faced enclosure, the AE-100
features a lighted 12-key telephone style keypad and four operation
buttons all with bright, easy-to-see graphics. The backlit two-line directory
LCD display scrolls a programmable welcome message and shows the
directory Names and Directory Codes. The system contains a built-in
microphone, tamper resistant speaker, and a TTY connector for the
hearing impaired.
Multi-lingual display programming prompts and voice help is available with
a choice of English, Spanish, French-Canadian, or Portuguese language
selection for the system. The system can be programmed locally using
the keypad, or remotely with a touch tone telephone.
Instruction manuals and other support documents in Spanish,
French-Canadian, and Portuguese are available on the
Linear Web site’s AE-100 product page at www.linearcorp.com.
Optional features that the AE-100 supports are provisions for postal lock
and color CCTV camera installation.
Up to 125 resident Names, Telephone Numbers, and Entry Codes can be
set. Each resident entry is assigned a Directory Code. Directory Codes
can be two or three digits in length (all will be the same length). The
Directory Code is the number a visitor would enter to have the system call
the resident (the resident currently displayed can also be contacted using
the
button). Each resident data entry also includes the resident’s
Telephone Number and a unique Entry Code for that resident.
Database Overview
Programming the AE-100 involves entering installation information into
the system’s memory. The system uses this information as a reference
“database” to control the operation of the system.
RESIDENT DIRECTORY DATA (UP TO 125 RESIDENTS)
FOR EACH RESIDENT: DIRECTORY CODE (2 OR 3 DIGITS)
NAME (UP TO 16 CHARACTERS)
TELEPHONE # (UP TO 14 DIGITS)
ENTRY CODE (4 DIGITS)
Stand-alone Entry Code Data
Up to 125 Stand-alone Entry Codes (“Entry Codes” are called “Access
Codes when using the alternate programming method) that are not
assigned to a resident’s directory listing can be set. These types of
Entry Codes are useful for service and maintenance personnel. Each
Stand-alone Entry Code programed reduces the available number
of resident directory entries by one. Stand-alone Entry Codes are four
digits in length. When a Stand-alone Entry Code is entered at the keypad,
it will activate the access relay.
STAND-ALONE ENTRY CODE DATA (UP TO 125 CODES)
FOR EACH CODE: STAND-ALONE ENTRY CODE (4 DIGITS)
NOTE: EACH STAND ALONE ENTRY CODE REDUCES THE
AVAILABLE NUMBER OF RESIDENT DIRECTORY ENTRIES BY ONE
2
System Features
OPTIONAL
CCTV
CAMERA
CABINET
LOCK
MICROPHONE
DISPLAY
OPTIONAL
POSTAL
LOCK
KEYPAD
LIGHTING
SPEAKER
KEYPAD
TTY
JACK
Your access control installation company
has set this Master Password for this installation:
____ ____ ____ ____ ____ ____
Use this password to enter programming mode.
3
Access to Programming
To make it easy for installers familiar with Linear’s and other manufacturer’s
access control systems, two methods of programming are available.
Programming Position Numbers (or Function Codes) that match other
equipment help the installer to make quick programming changes with
keystrokes they’ve used before.
PRESS
AND
TOGETHER
FOR
Automatic Programming Method Selection
The Programming Position Numbers (or Function Codes) change
depending on the programming method used. Refer to the table on
Page 13 for the numbers used for each programming method.
The keys used to enter programming from the unit’s keypad select
which programming method is used for the current programming
session.
&
keys together will select the
Entering programming by pressing
Standard Programming Method (Linear Access style). Details of each
programming step when using the Standard Programming Method
are shown on Pages 7-13.
Entering programming by pressing
&
keys together will select
the Alternate Programming Method (other manufacturer’s style). Details
of each programming step when using the Alternate Programming
Method are shown on Pages 15-21.
STANDARD PROGRAMMING METHOD
PRESS
AND
TOGETHER
FOR
ALTERNATE PROGRAMMING METHOD
Programming from the Keypad (Standard Method)
The system can be programmed using the keypad on the faceplate of the
AE-100. The display will show the programming information.
KEYPAD ALPHANUMERIC ENTRY
(FOR PROGRAMMING STEPS REQUIRING TEXT)
Accessing Programming from the Keypad
1.
2.
3.
4.
5.
Press
&
keys at the same time, then release.
The display will show [PASSWORD:].
Enter the Master Password (factory setting is 123456).
Press:
If the password is correct, the display will
show [ENTER FUNCTION:].
6. Programming commands can now be entered on
the keypad. Refer to the following sections of this
manual for programming step details. Also refer to the
figure for alphanumeric entry using the keypad.
Keypad Audio Prompts
abc
jkl
pqr
stu
yz,
backspace
or erase
entire line
finish
entry
vwx
• 3RD PRESS IS 3RD LETTER
Re-entering a Command After a Mistake
• 4TH PRESS IS THE KEY NUMBER
If an incorrect entry, or an incorrect key is pressed during programming, to
clear the keypad press
and start the programming step over again.
• 5TH PRESS IS 1ST LETTER AGAIN
1. Press:
✦ NOTE: The AE-100 will automatically exit Programming Mode after
two minutes of programming inactivity.
ghi
mno
When programming using the keypad, each programming step consists of
entering programming data. With the Standard Programming Method,
the system will sound beeps to indicate correct or incorrect entries.
• After a correct entry, two short beeps will sound.
• After an incorrect entry, one long beep will sound.
• After the complete programming step has been entered correctly,
three short beeps will sound.
Exiting Programming Mode
def
space, minus sign, dot
• 1ST PRESS IS 1ST LETTER
• 2ND PRESS IS 2ND LETTER
• WAIT 3 SECONDS FOR THE NEXT CHARACTER (A BEEP WILL SOUND
AFTER THE 3 SECOND DELAY TIME) OR PRESS ANOTHER KEY
• THE FIRST LETTER OF EACH WORD WILL BE UPPER CASE,
TO MAKE AN ENTIRE WORD UPPER CASE TEXT, ENTER # FIRST
• FINISH ENTRY BY ENTERING #
• PRESS STAR KEY TO BACKSPACE, PRESS STAR AGAIN TO ERASE LINE
4
Programming Over the Telephone
Most system commands can be programmed using a TouchTone™
telephone. The telephone’s keypad will act similar to the AE-100’s keypad.
Both programming methods can be used over the telephone.
1. CALL THE SYSTEM
Connecting with a Telephone
2. SYSTEM ANSWERS ON THIRD RING
1. Place a call to the telephone number of the
line that the AE-100 is connected to.
2. The AE-100 will answer on the third ring.
3. The system sounds beeps indicating the current system
status (including any other units in a multi-unit installation):
• One short beep sounds if all access relays are activated (all
doors open).
• Two short beeps sound if all access relays are deactivated (all
doors closed).
• One long beep sounds if there is a combination of access relays
activated and deactivated (some doors open, some doors
closed).
4. Enter the unit number (1-4) of the unit to log onto then press
In a single-unit installation, use the default unit number 1.
✦ NOTE: Log on to the Master Unit #1 in a multi-unit installation to
program the master’s memory. The master’s memory can then be
copied to the other units.
5. Enter the Master Password for the unit
(the factory setting is 123456).
6. To program using the Standard Programming Method press
To program using the Alternate Programming Method press
If the password is correct, the system will sound two short beeps.
7. Programming commands can now be entered
from the telephone’s keypad.
To program the system, refer to the following pages of this manual.
• The Standard Programming Method steps are shown on
Pages 7-13.
• The Alternate Programming Method steps are shown on
Pages 15-21.
Telephone Audio Prompts
When programming over the telephone, each programming step consists
of entering programming data using the telephone’s keypad. The system
will sound beeps over the telephone to indicate correct or incorrect
entries.
The audio prompts that give feedback during programming are different
for each programming method. Those differences are shown in the table
to the right.
CONNECTING WITH A TELEPHONE
3. SYSTEM SOUNDS THE CURRENT STATUS:
> ONE SHORT BEEP - ALL RELAYS ON
> TWO SHORT BEEPS - ALL RELAYS OFF
> ONE LONG BEEP - RELAYS MIXED ON & OFF
4. ENTER THE UNIT NUMBER (1-4) AND PRESS #
FOR SINGLE-UNIT INSTALLATIONS ENTER 1#
5. ENTER THE MASTER PASSWORD
(DEFAULT PASSWORD IS 123456)
6. TO USE STANDARD PROGRAMMING PRESS #
TO USE ALTERNATE PROGRAMMING PRESS STAR
7. BEGIN PROGRAMMING, ENTER STEP NUMBER
FOLLOWED BY #
AUDIO PROMPTS FOR EACH PROGRAMMING METHOD
CONDITION
AFTER AN INCORRECT ENTRY
TWO
LONG
BEEPS
ONE
LONG
BEEP
AFTER A CORRECT ENTRY OF AN
INTERIM STEP
ONE
SHORT
BEEP
TWO
SHORT
BEEPS
AFTER A COMPLETE COMMAND
HAS BEEN ENTERED CORRECTLY
TWO
SHORT
BEEPS
THREE
SHORT
BEEPS
EXITING PROGRAMMING MODE
THREE
SHORT
BEEPS
NO
BEEPS
SOUND
Re-entering a Command After a Mistake
If an incorrect entry, or an incorrect key is pressed during programming,
press
and start the programming step over again.
ALTERNATE STANDARD
METHOD
METHOD
SOUND
SOUND
Exiting Programming Mode
After programming, be sure to exit Programming Mode.
✦ NOTE: The AE-100 will automatically exit Programming Mode
after two minutes of programming inactivity.
• To exit programming when using the Standard Programming
Method, press:
• To exit programming when using the Alternate Programming
Method, press:
TO EXIT PROGRAMMING
STANDARD PROGRAMMING METHOD
PRESS
ALTERNATE PROGRAMMING METHOD
PRESS
5
Programming Reference & Factory Defaults
STANDARD
PROGRAMMING
POSITION
NUMBER
ALTERNATE
FUNCTION
CODE
NUMBER
99
91
FACTORY
DEFAULT
VALUE
FUNCTION OF PROGRAMMING STEP
EXIT PROGRAM MODE
SYSTEM OPTIONS
38
38
SYSTEM DISPLAY LANGUAGE
ENGLISH
51
72
KEYPAD LOCKOUT COUNT
52
71
ACCESS RELAY ACTIVATION TIME
4 SECONDS
LINEAR
ACCESS
TELEPHONE
ENTRY
3 TRIES
57
10
WELCOME DISPLAY TEXT
61
74
AUTOMATIC TELEPHONE ANSWER
ON
62
75
SPEAKER CHIRP ON KEYSTROKES
ON
63
76
SPEAKER TONE ON ACCESS RELAY ACTIVATION
ON
64
70
MAXIMUM VISITOR TALK TIME
77
77
RESIDENT CONTROL OF ACCESS RELAY
ON
95
95
RESIDENT CALL-BACK
OFF
60 SECONDS
ACCESS DATA CONTROL
21
01
ADD A DIRECTORY ENTRY FOR A RESIDENT
22
02
MODIFY AN EXISTING DIRECTORY ENTRY
23
03
DELETE AN EXISTING DIRECTORY ENTRY
31
31
ADD A STAND-ALONE ENTRY CODE
33
33
DELETE A STAND-ALONE ENTRY CODE
SYSTEM UTILITIES
30
30
COPY ACCESS DATA ONLY FROM MASTER TO SUB-UNITS
34
34
COPY ALL DATA FROM MASTER TO SUB-UNITS
80
05
TIMED ACCESS RELAY LATCH
81
05
LATCH ACCESS RELAY
83
05
RELEASE ACCESS RELAY
92
04
DELETE ALL RESIDENT DATA
93
93
DELETE ALL STAND-ALONE ENTRY CODES
Multi-unit Installations
Up to four AE-100 units may be connected to the same dedicated
telephone line to form a simple network. Connecting multiple units allows
transferring programming data (either the directory entries only or the
entire memory’s contents) from the “master” unit to the other sub-units.
In multi-unit installations each AE-100 must be assigned a unique unit
number before programming. The unit number allows connecting to a
specific unit when calling for programming and identifies the other units
to the master unit. One unit must be assigned as “Master Unit #1”.
Pre-set Unit Numbers
Your access control installation company has already programmed this
system. If this is a multiple unit installation, the sub-unit numbers have
been set in the sub-units, and the master unit was also programmed to
recognize those numbers.
6
The unit numbers and locations for this installation are:
UNIT #
UNIT TYPE
1
MASTER UNIT
2
SUB-UNIT
3
SUB-UNIT
4
SUB-UNIT
UNIT LOCATION
STANDARD PROGRAMMING METHOD
Resident Data Programming
Up to 125 resident Names and Telephone Numbers can be set. Each
resident entry is assigned a Directory Code. The Directory Code is the
number visitors enter to have the system call the resident. Visitors can
key.
also contact a resident displayed by pressing the
Use the programming worksheet supplied to organize the resident
data prior to entering it into the system.
For each of the following steps, enter the Master Password and enter
Programming Mode (if the unit is not already in that mode). Exit
Programming Mode when all programming is complete.
Changing the Directory Code Length
The factory setting for the Directory Code length is 3 digits. It can be set
to 2 or 3 digits.
1. Press
2. Enter the Directory Code length (2 or 3).
3. Press
DIRECTORY CODE LENGTH
PPN 02
02#LENGTH#
LENGTH = NUMBER (2-3) OF DIRECTORY CODE DIGITS
FACTORY SETTING: 3 DIGITS
Adding a Directory Entry for a Resident
1.
2.
3.
✦
4.
5.
6.
7.
8.
9.
10.
11.
Press
Enter the Directory Code that will be displayed for the resident.
Press
NOTE: To add the name using all capital letters, press
before entering
the name.
Enter the Name of the resident to be displayed (up to 16 characters).
Press
Enter the resident’s Telephone Number (up to 14 digits). Press and hold
down the
key to enter 1-4 two-second pauses. Hold
,
,
, or
down the key for about two seconds. Note: Each pause entered counts as
one of the 14 digits allowed in the telephone number.
Press
Enter a unique four-digit Entry Code for this resident.
Press
Enter the four-digit Entry Code again for verification.
Press
ADDING A DIRECTORY ENTRY FOR A RESIDENT
PPN 21
21#DIR#NAME#PHONE#CODE#CODE#
DIR = DIRECTORY CODE FOR THE RESIDENT
NAME = THE RESIDENT'S NAME (UP TO 16 CHARACTERS)
PHONE = THE RESIDENT'S TELEPHONE NUMBER (UP TO 14 DIGITS)
CODE = ENTRY CODE FOR THIS RESIDENT (4 DIGITS)
CODE = ENTRY CODE ENTERED AGAIN FOR VERIFICATION
Modifying an Existing Directory Entry
Once a Directory Entry has been set, it can be modified to change a
resident’s Name, Telephone Number, or Entry Code.
✦
1.
2.
3.
✦
NOTE: This step cannot be performed remotely through the telephone.
Press
Enter the resident’s Directory Code.
Press
NOTE: To modify the name using all capital letters, press
before entering
the name.
4. Modify the Name of the resident to be displayed (up to 16 characters) and
press
, or to keep the same name just press
.
5. Modify the resident’s Telephone Number (up to 14 digits, see how to
enter pauses above) and press
, or to keep the same Telephone
Number just press
.
6. Modify the resident’s four-digit Entry Code and press
, or to keep the
same Entry Code just press
.
Deleting an Existing Directory Entry
Directory Entries can be deleted individually (to delete all Directory
Entries, see programming Step 92).
1.
2.
3.
4.
5.
Press
Enter the Directory Code.
Press
Enter the Directory Code again.
Press
MODIFYING AN EXISTING DIRECTORY ENTRY
PPN 22
22#DIR#NAME#PHONE#CODE#
DIR = DIRECTORY CODE FOR THE RESIDENT
NAME = THE RESIDENT'S NAME (UP TO 16 CHARACTERS)
PHONE = THE RESIDENT'S TELEPHONE NUMBER (UP TO 14 DIGITS)
CODE = THE RESIDENT'S ENTRY CODE (4 DIGITS)
DELETING AN EXISTING DIRECTORY ENTRY
PPN 23
23#DIR#DIR#
DIR = DIRECTORY CODE FOR THE RESIDENT
DIR = DIRECTORY CODE ENTERED AGAIN FOR VERIFICATION
7
STANDARD PROGRAMMING METHOD
Stand-alone Entry Code Programming
A Stand-alone Entry Code is a number entered at the AE-100 keypad to
request access. Up to 125 4-digit Stand-alone Entry Codes can be set.
✦ NOTE: Each Stand-alone Entry Code programmed reduces the
possible number of Directory Entries by one.
Use the programming worksheet supplied to organize the
Stand-alone Entry Code data prior to entering it into the system.
For each of the following steps, enter the Master Password and enter
Programming Mode (if the unit is not already in that mode). Exit
Programming Mode when all programming is complete.
Adding a Stand-alone Entry Code
Stand-alone Entry Codes are entered individually.
1.
2.
3.
4.
5.
Press
Enter the new Stand-alone Entry Code.
Press
Enter the new Stand-alone Entry Code again for verification.
Press
Deleting a Stand-alone Entry Code
Stand-alone Entry Codes can be deleted individually (to delete all
Stand-alone Entry Codes, see programming Step 93).
1.
2.
3.
4.
5.
8
Press
Enter the Stand-alone Entry Code to delete.
Press
Enter the Stand-alone Entry Code to delete again.
Press
ADDING A STAND-ALONE ENTRY CODE
PPN 31
31#CODE#CODE#
CODE = NEW STAND-ALONE ENTRY CODE
CODE = NEW STAND-ALONE ENTRY CODE
AGAIN FOR VERIFICATION
DELETING A STAND-ALONE ENTRY CODE
PPN 33
33#CODE#CODE#
CODE = THE STAND-ALONE ENTRY CODE TO DELETE
CODE = THE STAND-ALONE ENTRY CODE
AGAIN FOR VERIFICATION
STANDARD PROGRAMMING METHOD
System Options
For most installations the factory settings for the system will be
appropriate. To customize the system, enter programming mode via
telephone or keypad.
Use the programming worksheet supplied to log any system option
changes prior to entering it into the system.
For each of the following steps, enter the Master Password and enter
Programming Mode (if the unit is not already in that mode). Exit
Programming Mode when all programming is complete.
System Display Language
The factory default language is English. Three other languages can be
selected as the language for the user and programming displays.
✦ NOTE: This step cannot be performed remotely through the
telephone.
✦ NOTE: The system supports one display language at a time.
1. Press
2. Choose a language:
• Enter 1 for English
• Enter 2 for Spanish
• Enter 3 for French
• Enter 4 for Portuguese
3. Press
Keypad Lockout Count
The system counts the number of invalid Entry Codes entered at the
keypad. If the invalid entries exceeds the lockout count number, the
keypad is locked out for 90 seconds. The factory setting for the lockout
count is three. The lockout value can be from one to nine.
SYSTEM DISPLAY LANGUAGE
PPN 38
38#LANG#
LANG = SYSTEM DISPLAY LANGUAGE
1 = ENGLISH 2 = SPANISH
3 = FRENCH 4 = PORTUGUESE
FACTORY SETTING: ENGLISH
KEYPAD LOCKOUT COUNT
PPN 51
51#COUNT#
COUNT = NUMBER (1-9) OF INCORRECT ENTRIES
THAT WILL CAUSE A 90 SECOND LOCKOUT
1. Press
FACTORY SETTING: 3 TRIES
2. Enter the number for the lockout count (1-9).
3. Press
Access Relay Activation Time
The factory setting will cause the access relay to activate for 4 seconds.
The activation time can be set from 4-99 seconds to accommodate
different types of access control devices.
1. Press
2. Enter the time (in seconds) for access relay to stay activated (04-99)
3. Press
ACCESS RELAY ACTIVATION TIME
PPN 52
52#SECONDS#
SECONDS = ACTIVATION TIME (04-99 SECONDS)
FACTORY SETTING: 4 SECONDS
9
STANDARD PROGRAMMING METHOD
System Options (Continued)
Welcome Display Text
The AE-100 display will show a visitor a welcome message alternating
with instructions on how to find and call a resident. The welcome message
can be customized to suit the installation.
WELCOME DISPLAY TEXT
57#LINE 1#LINE 2#
✦ NOTE: This step cannot be performed remotely through the telephone.
1.
✦
2.
3.
✦
4.
5.
PPN 57
Press
NOTE: To enter capital letters only, press
first before entering the text.
Enter the new text for the top line of the display (up to 16 characters).
Press
NOTE: To enter capital letters only, press
first before entering the text.
Enter the new text for the bottom line of the display (up to 16 characters).
Press
LINE 1 = UP TO 16 CHARACTERS TEXT
LINE 2 = UP TO 16 CHARACTERS TEXT
FACTORY SETTING: LINEAR ACCESS TELEPHONE ENTRY
Automatic Telephone Answer
The factory setting will allow the system to detect a ring signal on the
telephone line and answer the call.
AUTOMATIC TELEPHONE ANSWER
PPN 61
61#ANSWER#
✦ NOTE: The automatic answer feature can be turned off, although remote
programming, remote access control by residents, and resident call-back
features will no longer function.
ANSWER = 0 FOR AUTO ANSWER OFF
ANSWER = 1 FOR AUTO ANSWER ON
1. Press
2. Select the option for automatic telephone answering:
• Enter 0 to turn OFF automatic telephone answering.
• Enter 1 to turn ON automatic telephone answering.
3. Press
FACTORY SETTING: AUTO ANSWER ON
Speaker Chirp on Keystrokes
SPEAKER CHIRP ON KEYSTROKE
The factory setting will cause the speaker to chirp when each key on the
keypad is pressed. Alternately, the speaker chirp can be turned off.
PPN 62
62#CHIRP#
1. Press
2. Select the option for keystroke speaker chirps:
• Enter 0 to turn OFF the keystroke speaker chirps.
• Enter 1 to turn ON the keystroke speaker chirps.
3. Press
CHIRP = 0 FOR KEYSTROKE CHIRP OFF
CHIRP = 1 FOR KEYSTROKE CHIRP ON
FACTORY SETTING: KEYSTROKE CHIRP ON
Speaker Tone on Access Relay Activation
SPEAKER TONE ON ACCESS RELAY ACTIVATION
The factory setting will cause the speaker to sound a tone for two seconds
when the access relay is activated. Alternately, the tone can be turned
off.
63#TONE#
1. Press
2. Select the option for access relay activation tone:
• Enter 0 to turn OFF the access relay activation tone.
• Enter 1 to turn ON the access relay activation tone.
3. Press
TONE = 0 FOR ACCESS RELAY TONE OFF
TONE = 1 FOR ACCESS RELAY TONE ON
FACTORY SETTING: RELAY TONE ON
10
225787
IMAGE 10
PPN 63
STANDARD PROGRAMMING METHOD
System Options (Continued)
Maximum Visitor Talk Time
Visitors will converse with residents over the telephone until the resident
grants or denies access. If the resident responds to the visitor’s request
by pressing their telephone key, the system will hang up and release
the telephone line. If for some reason the resident does not press
the telephone key or does not hang up, the system will automatically
disconnect the visitor after 60 seconds.
At ten and five seconds before the disconnect, a tone will sound on the
telephone to remind the resident of the pending disconnect. The resident
can extend the talk time by pressing the # key on their telephone. The
disconnect time can be adjusted from 10-180 seconds.
MAXIMUM VISITOR TALK TIME
PPN 64
64#TIME#
TIME = TIME UNTIL AUTO-DISCONNECT
(010-180 SECONDS)
FACTORY SETTING: 60 SECONDS
1. Press
2. Enter the disconnect time in seconds (010-180):
3. Press
Resident Control of Access Relay
The factory setting allows the resident to activate the access relay by
pressing the 9 key on their telephone when a call from the AE-100 is
received. This feature can be disabled. Disabling this feature will only
allow access by using resident Entry Codes and Stand-alone Entry
Codes at the unit’s keypad.
RESIDENT CONTROL OF ACCESS RELAY
PPN 77
77#CONTROL#
CONTROL = 0 TO DISABLE RESIDENT CONTROL
CONTROL = 1 TO ENABLE RESIDENT CONTROL
1. Press
2. Select the option for resident access relay control:
• Enter 0 to turn OFF resident access relay control.
• Enter 1 to turn ON resident access relay control.
3. Press
FACTORY SETTING: RESIDENT CONTROL ENABLED
Resident Call-back
The resident call-back feature allows the AE-100 to answer the telephone
and switch to speakerphone mode if the telephone call is within
60 seconds of the last use of the AE-100. This feature gives residents the
capability to call a visitor back in case of a recently missed call.
This feature can only be used in single unit installations.
The factory setting disables the resident call-back feature. Alternately,
this feature can be enabled.
✦ NOTE: The Automatic Telephone Answer feature (PPN #61) must also be
enabled for the resident call-back feature to function.
RESIDENT CALL-BACK
PPN 95
95#CALL-BACK#
CALL-BACK = 0 TO DISABLE RESIDENT CALL-BACK
CALL-BACK = 1 TO ENABLE RESIDENT CALL-BACK
FACTORY SETTING: RESIDENT CALL-BACK DISABLED
1. Press
2. Select the option for resident call-back:
• Enter 0 to turn OFF the resident call-back feature.
• Enter 1 to turn ON the resident call-back feature.
3. Press
11
225787 IMAGE 11
STANDARD PROGRAMMING METHOD
System Utility Commands
Several utility commands are available for the system. Utility commands
can be used to copy data to other units in a multi-unit installation, clear
memory, and control the relays.
For each of the following steps, enter the Master Password and enter
Programming Mode (if the unit is not already in that mode). Exit
Programming Mode when all programming is complete.
Copy Access Data Only from Master to Sub-units
To synchronize programming in multi-unit installations, the Directory
Entries and Stand-alone Entry Codes can be copied from the master unit
to selected sub-units.
✦ NOTE: The installer must setup the system as a multi-unit installation before
this command will operate.
✦ NOTE: This utility command can only be performed from the “master” unit.
CAUTION: This utility command will overwrite ALL the access data in the
selected sub-units.
1. Press
2. Enter the unit number(s) of all of the sub-units to receive the access data.
Examples:
• To copy to unit two only enter
• To copy to unit three only enter
• To copy to units two & three enter
• To copy to units two, three, and four enter
or enter
to exit (any other
3. To execute the command, enter
entry will abort the command).
COPY ACCESS DATA ONLY FROM MASTER TO SUB-UNITS
PPN 30
30#SUB-UNITS#5#
SUB-UNITS = EACH SUB-UNIT NUMBER (2-4) TO COPY
ACCESS DATA TO IN A MULTI-UNIT INSTALLATION
NOTE:
TO ALLOW FOR MULTI-UNIT NETWORK COMMUNICATIONS,
WHEN EXECUTING THIS COMMAND REMOTELY OVER THE
TELEPHONE, THE SYSTEM WILL DISCONNECT YOUR CALL
AFTER STEP #3 THEN COPY THE DATA FROM THE MASTER
UNIT TO THE SUB-UNITS.
Copy All Data from Master to Sub-units
To synchronize programming in multi-unit installations, all system
data can be copied from the master unit to selected sub-units. This data
includes the Directory Entries, Stand-alone Entry Code data, and all
system option settings (except the sub-unit number and password).
✦ NOTE: The installer must setup the system as a multi-unit installation before
this command will operate.
✦ NOTE: This utility command can only be performed from the “master” unit.
CAUTION: This utility command will overwrite ALL the data in the selected
sub-units.
1. Press
2. Enter the unit number(s) of all of the sub-units to receive the full data set.
Examples:
• To copy to unit two only enter
• To copy to unit three only enter
• To copy to units two & three enter
• To copy to units two, three, and four enter
or enter
to exit (any other
3. To execute the command, enter
entry will abort the command).
12
COPY ALL DATA FROM MASTER TO SUB-UNITS
PPN 34
34#SUB-UNITS#5#
SUB-UNITS = EACH SUB-UNIT NUMBER (2-4) TO COPY
ALL DATA TO IN A MULTI-UNIT INSTALLATION
NOTE:
TO ALLOW FOR MULTI-UNIT NETWORK COMMUNICATIONS,
WHEN EXECUTING THIS COMMAND REMOTELY OVER THE
TELEPHONE, THE SYSTEM WILL DISCONNECT YOUR CALL
AFTER STEP #3 THEN COPY THE DATA FROM THE MASTER
UNIT TO THE SUB-UNITS.
STANDARD PROGRAMMING METHOD
System Utility Commands (Continued)
Timed Access Relay Latch
For servicing or testing, while in Programming Mode, the access relay
can be latched manually from the keypad for a period of hours.
1. Press
2. Enter the amount of time in hours (01-98) for the access relay to latch.
3. Press
TIMED ACCESS RELAY LATCH
PPN 80
80#HOURS#
HOURS = RELAY LATCH TIME IN HOURS (01-98)
Latch Access Relay
For servicing or testing, while in Programming Mode, the access relay
can be latched manually from the keypad for an indefinite period of time.
LATCH ACCESS RELAY
✦ NOTE: This command will reset and override and timed access relay latch
set by PPN 80.
PPN 81
81#
1. Press
Release Access Relay
For servicing or testing, while in Programming Mode, this command
will release the access relay if it has been manually latched (timed or
indefinite).
RELEASE ACCESS RELAY
PPN 83
83#
1. Press
Delete All Directory Entries
This utility command will permanently erase all Directory Codes, Names,
Telephone Numbers, and resident’s Entry Codes.
CAUTION: This utility command will erase ALL the Directory Entries in the
unit.
✦ NOTE: This step cannot be performed remotely through the telephone.
1. Press
2. Press
DELETE ALL DIRECTORY ENTRIES
PPN 92
92#92#
again for verification.
Delete All Stand-alone Entry Codes
This utility command will permanently erase all Stand-alone Entry
Codes.
CAUTION: This utility command will erase ALL the Stand-alone Entry
Codes in the unit.
✦ NOTE: This step cannot be performed remotely through the telephone.
1. Press
2. Press
DELETE ALL STAND-ALONE ENTRY CODES
PPN 93
93#93#
again for verification.
13
ALTERNATE PROGRAMMING METHOD
Alternate Programming Section
To make it easy for installers familiar with Linear’s and other manufacturer’s
access control systems, two methods of programming are available.
Function Codes that match other equipment help the installer to make
quick programming changes with keystrokes they have used before.
PRESS
AND
FOR
Alternate Programming Method Selection
The Programming Position Numbers (or Function Codes) change
depending on the programming method used. Refer to the table on
Page 13 for the numbers used for each programming method.
The keys used to enter programming from the unit’s keypad select
which programming method is used for the current programming
session.
&
keys together will select
Entering programming by pressing
the Alternate Programming Method (other manufacturer’s style). Details
of each programming step when using the Alternate Programming
Method are shown on Pages 15-21.
ALTERNATE PROGRAMMING METHOD
AUDIO PROMPTS FOR EACH PROGRAMMING METHOD
ALTERNATE STANDARD
METHOD
METHOD
SOUND
SOUND
CONDITION
AFTER AN INCORRECT ENTRY
TWO
LONG
BEEPS
ONE
LONG
BEEP
AFTER A CORRECT ENTRY OF AN
INTERIM STEP
ONE
SHORT
BEEP
TWO
SHORT
BEEPS
AFTER A COMPLETE COMMAND
HAS BEEN ENTERED CORRECTLY
TWO
SHORT
BEEPS
THREE
SHORT
BEEPS
EXITING PROGRAMMING MODE
THREE
SHORT
BEEPS
NO
BEEPS
SOUND
Alternate Audio Prompts
The audio prompts that give feedback during programming at the unit’s
keypad or over the telephone are different for the Alternate Programming
Method. Those differences are shown in the table to the right.
Alternate Alphanumeric Entry
When the keypad is used for alphanumeric data entry in the alternate
programming mode, each key enters data differently than the standard
interface mode. See the keypad figure to the right.
Alternate Programming Access from the Keypad
1.
2.
3.
4.
5.
Press
&
keys at the same time, then release.
The display will show [Master Code:].
Enter the master code (factory setting is 123456).
The display will show asterisks as the code is entered.
If the master code is incorrect, the system will sound two
long beeps and return to normal operating mode.
6. If the password is correct, the display will
show [SELECT FUNCTION:].
7. Programming commands can now be entered on the
keypad. Refer to the following pages in this manual
for Alternate Programming Method step details.
Re-entering a Command After a Mistake
If an incorrect entry, or an incorrect key is pressed during programming, to
clear the keypad press
and start the programming step over again.
Exiting Alternate Programming Mode
1. Press:
✦ NOTE: The AE-100 will automatically exit Programming Mode after
five minutes of programming inactivity.
TOGETHER
ALTERNATE INTERFACE KEYPAD ALPHANUMERIC ENTRY
(FOR PROGRAMMING STEPS REQUIRING TEXT)
QZ-,.'*
qz0123
456789
ABCabc
DEFdef
JKLjkl
GHIhgi
TUVtuv
PRSprs
MNOmno
WXYwxy
move to
next letter
or finish
erase
entire entry
space
• ENTER # AFTER EACH LETTER TO MOVE TO THE NEXT CHARACTER
• FINISH COMPLETE ENTRY BY ENTERING ##
• PRESS 8 THEN 0 TO BACKSPACE
• PRESS STAR TO ERASE ENTIRE ENTRY
14
ALTERNATE PROGRAMMING METHOD
Alternate Programming Reference
Refer to the following pages when programming using the Alternate
Programming method.
For each of the following steps, enter the Master Password and enter
Programming Mode (if the unit is not already in that mode). Exit
Programming Mode when all programming is complete.
FUNCTION CODE
01
PROGRAM A NEW
TENANT
There are four different fields
that need to be programmed:
Directory Code, Name, Telephone
Number, and Access Code.
Directory Code: A unique 2 or
3 digit code assigned to each
tenant for identification.
LOCAL PROGRAMMING
Step 1 Enter Function Code 01, then press #.
E N T E R
D I R :
Step 2 Enter the new 2 or 3 digit Directory Code.
E N T E R
N A M E :
Proceed to Step 3.
If the Directory Code has already
been used the display shows:
Name: Up to 16 characters.
D i r
#
i s
u s e d !
Telephone Number: Up to 14
digits.
Access Code: 4-digit code
assigned to tenant for obtaining
access with the keypad.
Return to Step 2.
If the memory is full the display shows:
E R R O R
NOTES:
1. Directory Codes can be set
for 2 or 3 digits. All Directory
Codes will be the same length.
2. A Directory Code cannot be
duplicated.
3. Each Directory Code
represents one tenant.
4. Delete unused Directory Codes
to avoid running out of memory.
5. Tenant Names can be entered
in any order. The system
will display the Names in
alphabetical order.
6. The same Name, Telephone
Number, and Access Code can
exist with different Directory
Codes.
TELEPHONE PROGRAMMING
Step 1 Enter Function Code 01 and
press #, one short beep sounds.
Step 2 Enter the new Directory Code (2 or 3
digits) and press #, one short beep sounds.
(If you hear two long beeps, the Directory
Number already exists, return to Step 1.)
Step 3 Enter the Name (up to 16 characters)
press # after each character, then
# again after the last character,
one short beep sounds.
Step 4 Enter Telephone Number (up to 14
digits), press # after each number,
then # again after the last number and
press #, one short beep sounds.
Step 5 Enter the 4-digit Access Code, then
press #, two short beeps sound.
D A T A
Return to Step 2.
Step 3 Enter the tenant Name (up to 16
characters), press # after each character,
then # again after the last character.
T E L E P H O N E
# :
Step 4 Enter the tenant’s Telephone Number (up
to 14 digits), press # after each number, then
# again after the last number. Press and
hold down the 1, 2, 3, or 4 key for about two
seconds to enter 1-4 two-second pauses. Note:
Each pause entered counts as one of the 14
digits allowed in the telephone number.
A C C E S S
C O D E :
Step 5 Enter the 4-digit Access Code,
Step 6 Press #.
15
ALTERNATE PROGRAMMING METHOD
FUNCTION CODE
02
MODIFY AN
EXISTING TENANT
DIRECTORY ENTRY
Choose a tenant’s Directory
Code to modify (you must know
the tenant’s Directory Code to
modify).
LOCAL PROGRAMMING
TELEPHONE PROGRAMMING
Step 1 Enter Function Code 02, then press #.
M O D I F Y
D I R :
Step 2 Enter the new 2 or 3 digit Directory Code.
E N T E R
T H E
N A M E :
Then the tenant’s current Name is displayed:
( C U R R E N T
N A M E )
Step 3 To keep the Name press # and skip to Step 5.
Step 4 To change the Name press ✱ then enter a new
Name (up to 16 characters), press # after each
character, then # again after the last character:
P h o n e n u m b e r
( c u r r e n t P H # )
NOT AVAILABLE
Step 5 To keep the Telephone Number
press # and skip to Step 7.
Step 6 To change the Telephone Number press ✱ then
enter a new Telephone Number (up to 14 digits),
press # after each number, then # again after the
last number. Press and hold down the 1, 2, 3, or 4
key for about two seconds to enter 1-4 two-second
pauses. Note: Each pause entered counts as one
of the 14 digits allowed in the telephone number.
A C C E S S C O D E :
( c u r r e n t C O D E )
Step 7 To keep the Access Code press #.
Step 8 To change the Access Code, enter a new
4-digit Access Code, then press #.
03
DELETE AN
EXISTING TENANT
DIRECTORY ENTRY
Deletes a single existing Directory
Entry. This command frees up
memory occupied by an unused
Directory Entry.
Step 1 Enter Function Code 03, then press #.
D E L E T E
D I R :
Step 2 Enter the 2 or 3 digit Directory
Code to delete, then press #:
( D I R C O D E )
I S D E L E T E d
Step 2 Enter the Directory Code (2 or 3 digits)
to delete and press #, two short beeps
sound. (If you hear one long beep
followed by two short beeps, the Directory
Code did not exist, return to Step 1.)
If the Directory Code does not exist, the
display will show an error, return to Step #1.
E R R O R
04
!
Step 1 Enter Function Code 03 and
press #, one short beep sounds.
O N
D E L E T E
Step 1 Enter Function Code 04, then press #.
D E L E T E A L L ? 1 3
CLEAR ALL TENANT
DIRECTORY
Step 2 Enter the number displayed, then press #:
ENTRIES
Deletes all existing Directory
Entries. This command will
erase all Directory Codes,
Names, Telephone Numbers and
directory-linked Access Codes.
CAUTION: This utility
command will erase ALL the
Directory Entries in the unit.
16
A R E
Y O U
S U R e ?
5
Step 3 Enter 5 for verification, then press #
(or press ✱ to cancel).
NOT AVAILABLE
ALTERNATE PROGRAMMING METHOD
FUNCTION CODE
05
MANUAL ACCESS
RELAY CONTROL
This command can be used to
latch the access relay indefinitely
or for a period of time, and to
unlatch the access relay.
LOCAL PROGRAMMING
Step 1 Enter Function Code 05, then press #.
O P E N : 0 0
H O U R S
Step 2 Enter the number of hours from 01-98 to
energize the access relay, then press #.
- OR Enter the 99 to energize the access
relay indefinitely, then press #.
- OR Enter the 00 to de-energize the
access relay, then press #.
- OR -
TELEPHONE PROGRAMMING
Step 1 Enter Function Code 05 and
press #, one short beep sounds.
Step 2 Enter the number of hours from 01-98 to
energize the access relay, then press #.
- OR Enter the 99 to energize the access
relay indefinitely, then press #.
- OR Enter the 00 to de-energize the
access relay, then press #.
Two long beeps and two
short beeps will sound.
Enter ✱ to cancel this command.
06
DIRECTORY CODE
LENGTH
Selects 2 or 3 digits for the
Directory Code length (factory
default is 3 digits).
NOTE: In multi-unit installations, if
sub-units are being updated with
access data that has Directory
Codes with more digits than the
sub-unit is set for, the sub-unit’s
Directory Code length number will
be automatically adjusted to fit.
10
WELCOME DISPLAY
TEXT
The AE-100 display will show
a visitor a welcome message
alternating with instructions on
how to find and call a resident.
The welcome message can be
customized to suit the installation.
30
COPY ACCESS
DATA ONLY FROM
MASTER TO
SUB-UNITS
To synchronize programming
in multi-unit installations, the
Directory Entries and Stand-alone
Entry Codes can copied from the
master unit to selected sub-units.
CAUTION: This utility
command will overwrite ALL the
access data in the sub-unit(s)
selected.
Step 1 Enter Function Code 06, then press #.
D I R
D I G I T S :
3
Step 2 The display shows the current value.
Enter 2 or 3, then press #.
NOT AVAILABLE
- OR Enter ✱ to cancel this command.
Step 1 Enter Function Code 10, then press #.
( B L A N K
D I S P L A Y )
Step 2 Enter the new welcome message. A total of 32
characters are allowed. The display will advance
to the lower line after the 16th character is
entered on the upper line. Enter # after each
character, enter ## after the last character.
Step 1 Enter Function Code 30, then press #.
U N I T S :
Step 2 Enter the number(s) (2, 3, and/or 4) of all the
sub-units to copy the data to, then press #.
A R E
Y O U
S U R E
?
5
Step 3 Enter 5 for verification, then press #.
- OR Enter ✱ to cancel this command.
NOTE: The installer must setup the system as a multi-unit
installation before this command will operate.
NOT AVAILABLE
Step 1 Enter Function Code 30 and
press #, one short beep sounds.
Step 2 Enter the number(s) (2, 3, and/or 4)
of all the sub-units to copy the data to,
then press #, one short beep sounds.
Step 3 Enter 5 for verification, then press #,
two short beeps sound. (Any entry other
than 5# will cancel the command.)
NOTE: To allow for multi-unit network
communications, when executing this
command remotely over the telephone,
the system will disconnect your call
after Step #3 then copy the data from
the master unit to the sub-units.
17
ALTERNATE PROGRAMMING METHOD
FUNCTION CODE
31
ADD A
STAND-ALONE
ACCESS CODE
A Stand-alone Access Code is
a number entered at the AE-100
keypad to request access. Up to
125 4-digit Stand-alone Access
Codes can be set.
NOTE: Each Stand-alone Access
Code programmed reduces the
possible number of Directory
Entries by one.
33
DELETE A
STAND-ALONE
ACCESS CODE
Deletes a single existing
Stand-alone Access Code.
LOCAL PROGRAMMING
Step 1 Enter Function Code 31, then press #.
A C C E S S
C O D E :
Step 2 Enter the new 4-digit Stand-alone
Access Code, then press #.
A C C E S S
C O D E :
TELEPHONE PROGRAMMING
Step 1 Enter Function Code 31 and
press #, one short beep sounds.
Step 2 Enter the new 4-digit Stand-alone Access
Code, press #, one short beep sounds.
Step 3 Enter the new 4-digit Stand-alone
Access Code again for verification.
Step 4 Press #, two short beeps sound.
Step 3 Enter the new 4-digit Stand-alone
Access Code again for verification
Step 4 Press #.
Step 1 Enter Function Code 33, then press #.
A C C E S S
C O D E :
Step 2 Enter the 4-digit Stand-alone Access
Code to delete, then press #.
A C C E S S
C O D E :
Step 1 Enter Function Code 33 and
press #, one short beep sounds.
Step 2 Enter the 4-digit Stand-alone Access Code
to delete, press #, one short beep sounds.
Step 3 Enter the 4-digit Stand-alone Access
Code to delete again for verification.
Step 4 Press #, two short beeps sound.
Step 3 Enter the 4-digit Stand-alone Access
Code to delete again for verification
Step 4 Press #.
34
Step 1 Enter Function Code 34, then press #.
U N I T S :
COPY ALL MASTER
MEMORY TO
Step 2 Enter the number(s) (2, 3, and/or 4) of all the
SUB-UNITS
sub-units to copy the data to, then press #.
To synchronize programming
in multi-unit installations, all
system data can copied from the
master unit to selected sub-units.
This data includes the Directory
Entries, Stand-alone Access
Codes, and all system option
settings (except the sub-unit
number).
NOTE: This utility command
can only be performed from the
“master” unit
A R E
Y O U
S U R E
?
5
Step 3 Enter 5 for verification, then press #.
- OR Enter ✱ to cancel this command.
NOTE: The installer must setup the system as a multi-unit
installation before this command will operate.
Step 1 Enter Function Code 34 and
press #, one short beep sounds.
Step 2 Enter the number(s) (2, 3, and/or 4)
of all the sub-units to copy the data to,
then press #, one short beep sounds.
Step 3 Enter 5 for verification, then press #,
two short beeps sound. (Any entry other
than 5# will cancel the command.)
NOTE: To allow for multi-unit network
communications, when executing this
command remotely over the telephone,
the system will disconnect your call
after Step #3 then copy the data from
the master unit to the sub-units.
CAUTION: This utility
command will overwrite ALL
data in the sub-unit(s) selected.
38
SYSTEM DISPLAY
LANGUAGE
The factory default language is
English. Three other languages
can be selected as the language
for the user and programming
displays.
NOTE: The system supports one
display language at a time.
Step 1 Enter Function Code 38, then press #.
L A N G U A G E :
Step 2 Enter:
1 for English (Default).
2 for Spanish.
3 for French.
4 for Portuguese.
Step 3 Press #.
18
1 - 4
NOT AVAILABLE
ALTERNATE PROGRAMMING METHOD
FUNCTION CODE
70
MAXIMUM VISITOR
TALK TIME
If for some reason the resident
does not press the telephone
keys to grant or deny access or
does not hang up, the system
will automatically disconnect the
visitor after 60 seconds.
LOCAL PROGRAMMING
Step 1 Enter Function Code 70, then press #.
T A L K
T I M E :
0 6 0
Step 2 The display will show the current talk time setting.
Enter the new talk time (010-180 seconds).
TELEPHONE PROGRAMMING
Step 1 Enter Function Code 70 and
press #, one short beep sounds.
Step 2 Enter the new talk time (010-180 seconds)
and press #, two short beeps sound.
Step 3 Press #, two short beeps sound
Step 3 Press #.
At ten and five seconds before
the disconnect a tone will sound
on the telephone to remind
the resident of the pending
disconnect. The resident can
extend the talk time by pressing
the # key on their telephone. The
disconnect time can be adjusted
from 10-180 seconds.
71
ACCESS RELAY
ACTIVATION TIME
The factory setting will cause
the access relay to activate for
4 seconds. The activation time
can be set from 4-99 seconds to
accommodate different types of
access control devices.
72
KEYPAD LOCKOUT
COUNT
The system counts the number
of invalid Access Codes entered
at the keypad. If the invalid
entries exceeds the lockout count
number, the keypad is locked
out for 90 seconds. The factory
setting for the lockout count is
three. The lockout value can be
from one to nine.
Step 1 Enter Function Code 71, then press #.
O P E N
T I M E :
4
Step 2 The display will show the current access relay
activation time setting. Enter the new access
relay activation time (04-99 seconds).
Step 1 Enter Function Code 71 and
press #, one short beep sounds.
Step 2 Enter the new access relay
activation time (04-99 seconds).
Step 3 Press #, two short beeps sound.
Step 3 Press #.
Step 1 Enter Function Code 72, then press #.
L O C K - O U T
C O U N T : 3
Step 1 Enter Function Code 72 and
press #, one short beep sounds.
Step 2 Enter the new lockout count (1-9 tries).
Step 2 The display will show the current lockout count.
Enter the new lockout count (1-9 tries).
Step 3 Press #, two short beeps sound
Step 3 Press #.
19
ALTERNATE PROGRAMMING METHOD
FUNCTION CODE
74
AUTOMATIC
TELEPHONE
ANSWER
The factory setting will allow the
system to detect a ring signal on
the telephone line and answer
the call.
LOCAL PROGRAMMING
TELEPHONE PROGRAMMING
Step 1 Enter Function Code 74, then press #.
A U T O - A N S W E R = 1 :
Step 2 The display will show the auto answer setting.
Enter 0 to disable auto answer.
Enter 1 to enable auto answer (default).
Step 3 Press #.
NOT AVAILABLE
NOTE: The automatic answer
feature can be turned off,
although remote programming,
remote access control by
residents, and resident call-back
features will no longer function
75
SPEAKER CHIRP
ON KEYSTROKES
The factory setting will cause
the speaker to chirp when each
key on the keypad is pressed.
Alternately, the speaker chirp can
be turned off.
76
SPEAKER TONE
ON ACCESS RELAY
ACTIVATION
The factory setting will cause the
speaker to sound a tone for two
seconds when the access relay
is activated. Alternately, the tone
can be turned off.
77
RESIDENT
CONTROL OF
ACCESS RELAY
The factory setting allows the
resident to activate the access
relay by pressing the 9 key on
their telephone when a call from
the AE-100 is received. This
feature can be disabled. Disabling
this feature will only allow access
by using resident Access Codes
and Stand-alone Access Codes
at the unit’s keypad.
20
Step 1 Enter Function Code 75, then press #.
B E E P
O N = 1
O F F = 0
Step 2 Enter 0 to turn the keystroke chirps OFF.
Enter 1 to turn the keystroke chirps ON (default).
Step 1 Enter Function Code 75 and
press #, one short beep sounds.
Step 2 Enter 0 to turn the keystroke chirps OFF.
Enter 1 to turn the keystroke chirps ON.
Step 3 Press #, two short beeps sound.
Step 3 Press #.
Step 1 Enter Function Code 76, then press #.
U N L O C K
B E E P ( 1 , 0 )
Step 2 Enter 0 to turn the relay tone OFF.
Enter 1 to turn the relay tone ON (default).
Step 1 Enter Function Code 76 and
press #, one short beep sounds.
Step 2 Enter 0 to turn the relay tone OFF.
Enter 1 to turn the relay tone ON.
Step 3 Press #, two short beeps sound.
Step 3 Press #.
Step 1 Enter Function Code 77, then press #.
E N A = 1
D I S A = 0 :
Step 2 Enter 0 to disable resident control of the access
relay.
Enter 1 to enable resident control
of the access relay (default).
Step 3 Press #.
NOT AVAILABLE
ALTERNATE PROGRAMMING METHOD
FUNCTION CODE
91
EXIT
PROGRAMMING
MODE
LOCAL PROGRAMMING
TELEPHONE PROGRAMMING
Step 1 To exit programming mode, enter
Function Code 91, then press #.
Step 1 To exit programming mode,
enter Function Code 91.
NOTE: The AE-100 will automatically exit Programming
Mode after five minutes of programming inactivity.
Step 2 Press #, three short beeps sound.
Entering this command number
will cause the unit to exit
programming mode and return to
normal operation.
93
DELETE ALL
STAND-ALONE
ACCESS CODES
This utility command will
permanently erase all
Stand-alone Access Codes.
Step 1 Enter Function Code 93, then press #.
E N T E R
F U N C T I O N :
Step 2 Enter the Function Code 93 again
for verification, then press #.
NOT AVAILABLE
CAUTION: This utility
command will erase ALL the
Stand-alone Access Codes in
the unit.
95
TENANT
CALL-BACK
The tenant call-back feature
allows the AE-100 to answer
the telephone and switch to
speakerphone mode if the
telephone call is within 60
seconds of the last use of the
AE-100. This feature gives
residents the capability to
call a visitor back in case of a
recently missed call. The factory
setting has this feature disabled.
Alternately, this feature can be
enabled.
Step 1 Enter Function Code 95, then press #.
T E N A N T
C A L L
B K = 0
Step 2 The display will show the current setting.
Enter 0 to disable tenant call-back (default).
Enter 1 to enable tenant call-back.
Step 1 Enter Function Code 95 and
press #, one short beep sounds.
Step 2 Enter 0 to disable tenant call-back.
Enter 1 to enable tenant call-back
Step 3 Press #, two short beeps sound.
Step 3 Press #.
NOTE: This feature can only be used in
single unit installations.
NOTE: The Automatic Telephone
Answer feature (Function Code
#74) must also be enabled for this
feature to function.
21
AE-100 Operation
VISITOR ACCESS
Requesting Access with a Visitor Call
• If the visitor already knows the resident’s Directory Code number,
they can press
first, then enter the Directory Code number to
call the resident.
• If the visitor doesn’t know the residents Directory Code number,
they can scroll through the alphabetical directory entries by
pressing
or
.
➙ Pressing
scrolls from A-Z.
➙ Pressing
scrolls from Z-A.
➙ Holding down the
or
keys will scroll the display faster.
• When the visitor finds the resident’s name and Directory Code
number, they can press
to call the resident.
• The system dials the resident’s Telephone Number to establish
2-way communications.
✦ NOTE: The resident’s Telephone Number will never be displayed to
the visitor.
• The resident answers the call and converses with the visitor to
determine if access should be granted.
• The resident can use their telephone’s keypad to grant access
activating the access relay by pressing . After access is granted,
the system will disconnect the visitor and resident call.
• The resident can disconnect the visitor without granting access by
pressing
or by hanging up.
✦ NOTE: Disconnecting by hanging up is not recommended. The
system will keep the telephone line seized until the maximum visitor
talk time timer runs out (the factory default is 60 seconds).
• The length of time the visitor is allowed to talk can be programmed
from 10-180 seconds. At ten and five seconds before the
disconnect a tone will sound on the telephone to remind the
resident of the pending disconnect. To restart the talk timer, the
resident can press
on their telephone.
Requesting Access with an Entry Code
Residents and authorized personnel have up to 40 seconds to key in
their Entry Code.
1. Press
first to clear the keypad (optional),
then enter the Entry Code.
2. When a correct code is entered, the access relay will activate.
• Directory Entry Codes or Stand-alone Entry Codes can be used.
• Up to eight seconds are allowed between each keystroke.
• All digits of the Entry Code must be entered.
➙ Example: The Entry Code length is four digits, and the code is
0042, the user must enter “0 0 4 2”.
• If a mistake is made, pressing the
key will reset the keypad.
The correct code can then be re-entered.
• If the number of incorrect codes entered exceeds the keypad
lockout count, the keypad will be locked and not accept any entries
for 90 seconds.
Resident Call-back
If the resident call-back feature is enabled, resident’s can call the AE-100
to talk to a visitor and grant access. The call-back must be made within
60 seconds after the visitor’s missed call.
1. The resident dials the telephone number of the
system within 60 seconds of its last use.
2. The system answers, and sounds one short beep.
3. After talking to the visitor, the resident can press their entry code
to grant access, or the resident can press star to deny access.
22
1. IF THE VISITOR ALREADY KNOWS THE
RESIDENT'S DIRECTORY CODE, PRESS #
AND ENTER THE RESIDENT'S DIRECTORY
CODE, THE SYSTEM WILL CALL THE
RESIDENT
- OR 1. PRESS UP OR DOWN BUTTONS TO VIEW
THE NAMES IN THE DIRECTORY (HOLDING
DOWN THE BUTTON MAKES THE
DIRECTORY SCROLL FASTER)
2. WHEN NAME IS FOUND, PRESS THE
CALL BUTTON
- THEN 1. AFTER THE CALL IS ANSWERED, THE
VISITOR CONVERSES WITH THE RESIDENT
2. THE RESIDENT GRANTS OR DENIES ACCESS
TO GRANT ACCESS, PRESS
- OR TO DENY ACCESS, PRESS
ENTRY CODE ACCESS
PRESS STAR FIRST TO CLEAR THE KEYPAD
(OPTIONAL), THEN KEY IN A DIRECTORY
ENTRY CODE OR STAND-ALONE ENTRY CODE
UP TO 8 SECONDS ARE ALLOWED BETWEEN
EACH KEYSTROKE
UP TO 40 SECONDS ARE ALLOWED TO
KEY IN THE ENTIRE ENTRY CODE
ALL FOUR DIGITS MUST BE ENTERED,
INCLUDING LEADING ZEROS
IF A MISTAKE IS MADE,
PRESS STAR KEY TO START OVER
THE KEYPAD WILL LOCKOUT AFTER TOO MANY
INCORRECT ENTRIES
WHEN A CORRECT CODE IS ENTERED,
THE ACCESS RELAY WILL ACTIVATE
RESIDENT CALL-BACK
1. CALL THE SYSTEM WITHIN
60 SECONDS OF A VISITOR'S
MISSED CALL
2. THE SYSTEM ANSWERS AND
SOUNDS ONE SHORT BEEP
3. CONVERSE WITH THE VISITOR
4. TO GRANT ACCESS, KEY IN AN
ENTRY CODE
- OR TO DENY ACCESS, PRESS
Troubleshooting
System will not answer an incoming call
1. Automatic telephone answer disabled.
2. AE-100 telephone line trouble.
Keypad will not activate a relay
1. Entry code is not assigned.
2. Keypad may be in lockout from too many incorrect attempts. Wait
90 seconds for lockout to clear and try again.
Resident’s Telephone does not ring when a visitor
calls
1. Resident’s Telephone Number programmed incorrectly.
2. Check AE-100 telephone line.
3. Call resident from another line or cell phone to determine if the
resident’s telephone is working.
Linear Limited Warranty
This Linear product is warranted against defects in material and
workmanship for twenty-four (24) months. This warranty extends only
to wholesale customers who buy direct from Linear or through Linear’s
normal distribution channels. Linear does not warrant this product to
consumers. Consumers should inquire from their selling dealer as to
the nature of the dealer’s warranty, if any. There are no obligations
or liabilities on the part of Linear LLC for consequential damages
arising out of or in connection with use or performance of this
product or other indirect damages with respect to loss of property,
revenue, or profit, or cost of removal, installation, or reinstallation.
All implied warranties, including implied warranties for merchantability
and implied warranties for fitness, are valid only until the warranty expires.
This Linear LLC Warranty is in lieu of all other warranties express
or implied.
All products returned for warranty service require a Return Product
Authorization Number (RPA#). Contact Linear Technical Services at
1-800-421-1587 for an RPA# and other important details.
FCC Notice
Changes or modifications not expressly described in this manual or
approved by the manufacturer could void the user’s authority to operate
the equipment.
This equipment has been tested and found to comply with the limits for
a Class B digital device, pursuant to Part 15 of the FCC Rules. These
limits are designed to provide reasonable protection against harmful
interference in a residential installation. This equipment generates, uses
and can radiate radio frequency energy and, if not installed and used in
accordance with the instructions, may cause harmful interference to radio
communications. However, there is no guarantee that interference will not
occur in a particular installation. If this equipment does cause harmful
interference to radio or television reception, which can be determined by
turning the equipment off and on, the user is encouraged to try to correct
the interference by one or more of the following measures:
• Reorient or relocate the receiving antenna.
• Increase the separation between the equipment and receiver.
• Connect the equipment into an outlet on a circuit different from that
to which the receiver is connected.
• Consult the dealer or an experienced radio/TV technician for help.
23
Copyright © 2007 Linear LLC
227354 B