Transcript
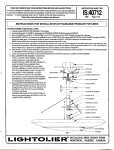
READAND UNDERSTANDTHESEINSTRUCTIONSBEFOREINSTALLINGFIXTURE
sfixtureis intendedfor installationin acmrdanmwiththe NationalElectrical Code and IOCSIregulations.
assure full mmpfiance with local @ales and regulations,
,allation. To prevent electrical shock, turn off electrify
deck with your Iocsl electrical inspector before
at fuse box before proceeding.
INSTRUCTION SHEET NO.
IS:5543
1292
Retain these instructions for maintenance reference,
Page 1 of 1
INSTRUCTIONS FOR INSTALLATION
XTURE ASSEMBLY AND INSTALLATION:
1, Thread MOUNTING SCREWS intoOUTLET BOX.
2, Wtile supportingCEILING PAN make electrical connections black fixture lead or fixlure lead withouttracer marks to (hot) blacksupplylead; white fixturelead
or fixturelead with tracer mark 10 (neutral)white supplylead. Uninsulatedwire is a groundand must be connectedto groundhg tarminal or groundlead inside
OUTLET BOX, Use WIF?ENUTS (local hardware item). Push supply wires and wirenutmnnecfions back into OUTLET BOX.
3. PositionCEILING PAN over MOUNTING SCREWS and allowheads of MOUNTING SCREWS tocome throughthe KEYHOLE SLOTS in CEILING PAN. Secure
in place by tightening MOUNTING SCREWS,
4, Using the thrae AUXILIARY MOUNTING HOLES in CEILING PAN, secure CEILING PAN to ceiing using wood screws, toggle bolls, or alternate fasleners (not
provided) depending on ceiling material,
5, lnstdl recommend lamps by inseiling base of lamp into SOCKET and snapping lamp into LAMP SUPPORT CLIP,
CAUTION Use lamp waftage and type as marked on fixture,
RINGASSEMBLY
withMOUNTING
STUDSonCEILINGPANandallowSTUDStopasslhroughlhe
holes.Secure in place bylhreadhg
6, Align holes in DIFFUSER
KNOBS onto each MOUNTING STUDS,
)IFFUSER CLEANING AND REMOVAL:
)iffusercan be cleaned using a soft damp cloth, Should DIFFUSER need to be removed
.om diffuser ring for cleaning, follow steps below.
Whie gently pving back on one RETAINING SPRING (use a slotted screw diver)
push upon OIFFUSER allowing DIFFUSER to snap away from three RETAINING
SPRING (Ffg, 2).
!.’ Clean DIFFUSER.
1,’ Reinsfdl DIFFUSER bygeotly pushing DIFFUSER down into DIFFUSER RING until
all three RETAfNING SPRINGS engage on the edge of Ihe DIFFUSER and
DIFFUSER sits flush inside DIFFUSER RING.
NOTE: If supply wires are located within three inches of
ballast, use wire rated for at least 90° C.
WARNING-(RISK
OF FIRE) MOST DWELLINGS
BUILT BEFORE 1985 HAVE SUPPLY WIRE RATED
60” C. CONSULT A QUALIFIED ELECTRICIAN
BEFORE INSTALLATION.
DIFFu
FIG. i
1.1<5
I“ITC>I.I
E la”
EWH’,!W%YU