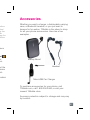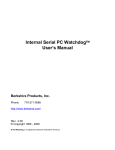
1
welcome
user guide
TM1827
LG OPTIMUS L9
MBM63817905 (1.0) W Printed in Korea
TABLE OF CONTENTS
INTRODUCTION...............................................4
Support............................................................................. 4
Service.............................................................................. 5
Your Phone.......................................................6
Conta
Front view......................................................................... 6
Side/Rear view................................................................. 7
Searchi
Adding
Favorite
Getting Started..................................................8
Messa
Google Account Setup...................................20
Acces
Safety
Installing the Micro SIM card and battery........................ 8
Charging your phone..................................................... 10
Inserting a microSD card............................................... 12
Removing the microSD card.......................................... 13
Formatting the microSD card......................................... 14
Switching between and exiting applications.................. 14
Switching between applications.................................... 15
To stop/exit an application............................................. 15
Home screen.................................................................. 15
Notifications Panel.......................................................... 16
Quick Settings................................................................ 16
QuickMemo.................................................................... 17
Viewing the saved QuickMemo .................................... 18
QSlide function............................................................... 18
Live Zooming.................................................................. 19
To set up your Google account:..................................... 20
Connecting to Networks and Devices...........21
Wi-Fi............................................................................... 21
Bluetooth®...................................................................... 22
Tethering......................................................................... 24
Mobile Hotspot............................................................... 24
Wi-Fi Direct . .................................................................. 25
Calls................................................................26
Making a call.................................................................. 26
Calling your contacts..................................................... 26
Answering and rejecting a call....................................... 27
Adjusting the in-call volume........................................... 27
Making a second call..................................................... 27
2
Ending
Ending
Viewing
Call set
Messag
Conver
Sending
Using s
Changi
Email....
Managi
Working
Compo
Visual V
Slacker
T-Mobil
T-Mobil
Scout...
Consid
Drive sa
Inform
Emerg
Caring
Additi
.......4
........ 4
........ 5
.......6
Ending a Call.................................................................. 28
Ending a Call from the Status Bar.................................. 28
Viewing your call logs..................................................... 28
Call settings.................................................................... 29
Contacts..........................................................29
........ 6
........ 7
Searching for a contact.................................................. 29
Adding a new contact.................................................... 30
Favorite Contacts........................................................... 30
.......8
Messaging/Email............................................31
....20
Accessories....................................................37
Safety Tips......................................................38
........ 8
...... 10
...... 12
...... 13
...... 14
...... 14
...... 15
...... 15
...... 15
...... 16
...... 16
...... 17
...... 18
...... 18
...... 19
...... 20
....21
...... 21
...... 22
...... 24
...... 24
...... 25
.....26
Messaging...................................................................... 31
Conversation view.......................................................... 31
Sending a message....................................................... 31
Using smilies.................................................................. 32
Changing your message settings.................................. 32
Email............................................................................... 32
Managing an email account.......................................... 33
Working with account folders......................................... 33
Composing and sending email...................................... 33
Visual Voicemail............................................................. 34
Slacker Radio................................................................. 35
T-Mobile Name ID........................................................... 35
T-Mobile TV..................................................................... 35
Scout.............................................................................. 36
Consider device compatibility........................................ 38
Drive safely..................................................................... 38
Information About Safeguarding Handsets....39
Emergency Dialing.........................................40
Caring For Your Phone...................................41
Additional Information....................................41
...... 26
...... 26
...... 27
...... 27
...... 27
3
INTRODUCTION
Support
This guide provides you with the information you
need to get started.
For more information and additional support, please
visit www.T-Mobile.com/support where you can:
• Register at My.T-Mobile.com to check your
minutes, pay your bill, upgrade your phone, and
change your rate plan.
• Review your phone’s User Manual and
troubleshooting FAQs.
• View the latest troubleshooting solutions in the
Support Forums or ask a question of your own.
You can also access account and device
information from your phone.
1 From the Home screen, tap Apps .
2 Under the Apps tab, tap T-Mobile My Account
.
Serv
If you a
service
Care a
represe
You wi
activat
• Serv
Agre
• Your
and
NOTE
For bus
provide
agency
• Your
licen
purp
• Your
www
• Micr
on th
NOTE
By acti
read, u
T-Mobi
Agreem
4
ou
lease
an:
and
Service
If you are a new T-Mobile® customer and your
service has not yet been activated, call Customer
Care at 1-800-937-8997 and a T-Mobile Activations
representative will assist you.
You will need the following information when
activating service:
• Service Agreement and agent code on your
Agreement.
• Your name, home address, home phone number,
and billing address.
NOTE
he
wn.
For business and government accounts, please
provide the name of your company or government
agency, address, and tax ID.
unt
• Your Social Security number, current driver’s
license number, and date of birth for credit check
purposes.
• Your choice of T-Mobile rate plan and services (see
www.T-Mobile.com for latest plan information).
• Micro SIM serial number and IMEI number (located
on the box barcode label).
NOTE
By activating service, you acknowledge that you have
read, understand, and agree to be bound by each of
T-Mobile’s Terms and Conditions, and your Service
Agreement.
5
Your Phone
Side
1
Front view
1
4
7
2 3
5
Earpiece
ront Camera Lens
F
Proximity Sensor
Back Key
Home Key
Menu Key
6
8
9
6
1
2
3
4
5
6
10
7 3
.5mm Headset Jack
8 Microphone(Sub)
9 Charger/Accessory
Port
10 Microphone(Main)
1
2
3
4
Side/Rear view
1
2
1 Volume Keys
TIP: QuickMemo
Press and hold the Volume Up and
Volume Down Keys for one second to
access QuickMemo (See on page 17).
ns
Jack
)
ory
in)
2 Power/Lock Key
1
5
6
2
3
7
4
1
2
3
4
Back Cover
Fingertip Cutout
Battery
External Speaker
5 Back Camera Lens
6 Flash
7 MicroSD Card Slot
7
Getting Started
Installing the Micro SIM card and
battery
Before you can start exploring your new phone, you’ll
need to set it up. To insert the Micro SIM card and
battery:
1 Hold the phone in your hand firmly. With the other
hand, lift the back cover using the fingertip cutout
located at the bottom of the cover and pull it up to
remove it.
Fingertip Cutout
2 Slide the Micro SIM card into the Micro SIM card
slot. Make sure the gold contact area on the card is
facing downwards and the notched side is inserted
first (see image below).
8
3 Inser
conta
the b
4 Align
an
and
3 Insert the battery into place by aligning the gold
contacts on the phone and the battery and press
the battery down until it clicks into place .
, you’ll
and
other
utout
up to
4 Align the back cover over the battery compartment
and press it down until it clicks into place .
card
card is
serted
9
Charging your phone
A rechargeable Li-ion battery is used to power your
phone.
A USB Adapter, which is included with your phone, is
used to charge the battery. Ask your T-Mobile sales
representative for further details regarding approved
batteries and chargers.
Before using your phone for the first time, make sure
the battery is fully charged. An uncharged battery will
fully recharge after 4 hours.
1 Conn
show
2 Plug
into t
sure
upwa
USB Adapter
USB Cable
NOTE
Make sure the battery is installed before connecting
the USB Adapter. If the battery is not installed and
the USB Adapter is connected, the phone will not
operate properly due to prolonged power cycling.
Also, removing the battery with the USB Adapter
connected may damage the device. Please unplug
the USB Adapter before removing the battery.
Warning!
If the touch screen does not function while the
phone is in the process of charging, it may be due
to an unstable power supply. As a result, disconnect
the USB cable from the device or unplug the USB
Adapter from the power outlet.
10
NOTE
The ba
battery
NOTE
Your ph
next pa
rear are
When c
battery
chargin
battery
chargin
charge
your
one, is
sales
roved
1 Connect the USB Adapter and USB cable (as
shown on the previous page).
2 Plug the USB cable (as shown on the next image)
into the phone’s Charger/Accessory Port. Make
sure the ‘B’ side on the USB cable is facing
upwards.
e sure
ery will
cting
nd
not
ng.
er
plug
due
nnect
SB
NOTE
The battery must be fully charged initially to improve
battery lifetime.
NOTE
Your phone has an internal antenna (as shown on the
next page). Be careful not to scratch or damage this
rear area, as that will cause loss of performance.
When charging your phone with a fully discharged
battery, the keypad LED will briefly flash indicating
charging is occurring in a mode designed to prevent
battery damage. The blinking will stop and normal
charging will commence once a sufficient minimum
charge has been established.
11
2 Then
sure
Internal Antenna
Inserting a microSD card
Insert a microSD™ card to use the camera and other
multimedia features. Multimedia contents can be
saved in the microSD card.
NOTE
This device supports up to a 32GB microSD card.
1 Remove the back cover as previously described.
Rem
To safe
first you
1 From
tap S
card
2 Remo
micro
Warnin
Fingertip Cutout
12
Do not
it first. O
as well
microS
2 Then insert the microSD card into the slot. Make
sure the gold contact area is facing downwards.
nna
d other
be
ard.
bed.
Removing the microSD card
To safely remove the microSD card from your phone,
first you need to unmount it.
1 From the Home screen, tap the Menu Key
and
tap System settings > Storage > Unmount SD
card > OK.
2 Remove the back cover and gently pull the
microSD card from the slot.
Warning
Do not remove the microSD card without unmounting
it first. Otherwise, it may damage the microSD card
as well as your phone, and the data stored on the
microSD card may be corrupted.
13
Formatting the microSD card
Swit
Warning
All files stored on your microSD card are deleted
when you format the card.
Touch
recentl
the app
NOTE
NOTE
To format the microSD card, you must first unmount
it.
1 From the Home screen, tap the Menu Key
and
tap System settings > Storage.
2 Tap Erase SD card (twice).
3 If you set an unlock pattern, enter it and tap Erase
everything. The card will then be formatted and
ready to use.
NOTE
If there is content on your microSD card, the folder
structure may be different after formatting since all
the files will have been deleted.
Switching between and exiting
applications
Multi-tasking is easy with Android because open
applications keep running even when you open
another application. There is no need to quit an
application before opening another. Use and switch
among several open applications. Android manages
each application, stopping and starting them as
needed, to ensure that idle applications don’t
consume battery power unnecessarily.
14
Swipe
apps s
list.
To st
1 From
tap A
2 Tap t
Hom
Simply
the diff
custom
which a
NOTE
On the
bottom
one-tou
To add
bar, tou
move i
Switching between applications
Touch and hold the Home Key
. A list of
recently used applications will be displayed. Then tap
the application you want to access.
d
NOTE
mount
and
Erase
and
lder
e all
en
n
n
witch
nages
s
Swipe an application preview on the recently used
apps screen to the left or right to remove it from the
list.
To stop/exit an application
1 From the Home screen, tap the Menu Key
and
tap App settings and select the Running tab.
2 Tap the desired application and tap Stop to stop it.
Home screen
Simply swipe your finger to the left or right to view
the different Home screen canvases. You can also
customize each canvas with folders and widgets,
which are shortcuts to your favorite applications.
NOTE
On the Home screen, you can view quick keys at the
bottom of the screen. The quick keys provide easy,
one-touch access to the functions you use the most.
To add or remove an application to the quick keys
bar, touch and hold the desired application icon and
move it to or from the quick keys bar.
15
Notifications Panel
Quic
Notification icons on the Status Bar report the arrival
of new messages, calendar events, alarms, as well as
ongoing events, such as when you are on a call. You
can view and edit a list of all recent notifications. The
Notifications Panel runs across the top of your screen.
The Qu
capture
Captur
family a
1 Enter
Volum
want
and t
1 Touch and drag the Status Bar to the bottom of the
screen to open the Notifications Panel.
2 Tap the desired notification to access the
associated application.
Quick Settings
The top of the Notifications Panel includes the Quick
Settings. These icons allow quick and easy access
to set modes, including QuickMemo, Sound, Data,
Wi-Fi, Bluetooth, Rotation, Sync, Power saver and
Airplane. Tap
, then
to to edit the options
you want to be displayed. Touch and drag
to
rearrange the order of the items.
16
2 Selec
Colo
3 Tap
the m
Back
QuickMemo
rival
well as
. You
. The
creen.
The QuickMemo allows you to create memos and
capture screen shots.
Capture screens, draw on them, and share them with
family and friends with QuickMemo.
OR
1 Enter the QuickMemo screen by pressing both the
Volume Keys for one second on the screen you
want to capture. Or open the Notifications Panel
and tap .
of the
Quick
cess
Data,
and
s
to
2 Select the desired menu option from Pen type,
Color, and Eraser. Then create a memo.
3 Tap
in the Edit menu and select
to save
the memo. To exit QuickMemo at any time, tap the
Back Key
.
17
TIP
Tap
to keep the current memo on the screen and use
the phone while keeping the memo in the background.
Tap
to select whether to use the current screen or
a note image as the background screen. Tap
to
share the memo with others via any of the available
applications.
Viewing the saved QuickMemo
From the Home screen, tap Apps
and select the QuickMemo album.
> Gallery
QSlide function
The QSlide function enables an overlay on your
phone’s display for easy multi-tasking.
OR
– Tap to exit the QSlide function and return to
full window.
– Slide to adjust transparency.
– Tap to exit the QSlide function.
NOTE
The QSlide function can support up to two windows at
the same time.
18
1 Open
app f
- or While
tap
as a
2 Slide
Live
Live Zo
a portio
desired
When v
thumb
in or ou
nd use
ound.
n or
o
le
ry
ur
1 Open the Notifications Panel and tap the desired
app from the QSlide apps section.
- or While using an application that supports QSlide,
tap . The function will be displayed continuously
as a small window on your screen.
2 Slide
to adjust the transparency level.
Live Zooming
Live Zooming allows you to zoom in or zoom out on
a portion of a video that is being played to make the
desired scan appear larger or smaller.
When viewing the video, use your index finger and
thumb in a pinching or spreading motion to zoom
in or out.
n to
ws at
19
Do not to press too hard; the touch screen is sensitive
enough to pick up a light, firm touch.
Con
Dev
Google Account Setup
Wi-F
NOTE
When you first turn on your phone, you have the
opportunity to activate the network, to sign into your
Google Account and select how you want to use
certain Google services.
To set up your Google account:
• Sign into a Google Account from the prompted
set-up screen.
OR
• From the Home screen, tap Apps
> Settings
> Accounts & sync > ADD ACCOUNT >
Google.
If you have a Google account, tap Existing, enter
your email address and password, then tap .
Otherwise, tap New and enter the necessary
information to create a Google Account.
Once you have set up your Google account on your
phone, your phone automatically synchronizes with
your Google account on the Web.
Your contacts, Gmail messages, Calendar events
and other information from these applications and
services on the Web are synchronized with your
phone. (This will depend on your synchronization
settings.)
After signing in, you can use Gmail™ and take
advantage of Google services on your phone.
20
With W
within t
Enjoy w
charge
Conn
To use
a wirele
points
Others
configu
Turn of
life of y
NOTE
If you a
OFF, ad
mobile
Turnin
Wi-Fi
1 From
> Se
NETW
2 Tap
availa
3 Tap S
Wi-Fi
• Sec
sitive
e
your
se
t:
ed
ttings
T>
ter
.
n your
with
nts
and
ur
on
Connecting to Networks and
Devices
Wi-Fi
With Wi-Fi, you can use high-speed Internet access
within the coverage of the wireless access point (AP).
Enjoy wireless Internet using Wi-Fi, without extra
charges.
Connecting to Wi-Fi networks
To use Wi-Fi on your phone, you need to access
a wireless access point or ‘hotspot’. Some access
points are open and you can simply connect to them.
Others are hidden or use security features; you must
configure your phone to be able to connect to them.
Turn off Wi-Fi when you’re not using it to extend the
life of your battery.
NOTE
If you are out of the Wi-Fi zone or have set Wi-Fi to
OFF, additional charges may be applied by your
mobile operator for mobile data use.
Turning Wi-Fi on and connecting to a
Wi-Fi network
1 From the Home screen, tap Apps
> Apps tab
> Settings
> Wi-Fi from the WIRELESS &
NETWORKS section.
2 Tap
to turn it on and start scanning for
available Wi-Fi networks.
3 Tap SEARCH to see a list of active and in-range
Wi-Fi networks.
• Secured networks are indicated by a lock icon.
21
4 Touch a network to connect to it.
• If the network is secured, you are prompted to
enter a password or other credentials. (Ask your
network administrator for details)
5 The Status Bar displays icons that indicate Wi-Fi
status.
Bluetooth®
You can use Bluetooth to send data by running a
corresponding application, but not from the Bluetooth
menu as on most other mobile phones.
TIP
• LG is not responsible for the loss, interception or
misuse of data sent or received via the Bluetooth
wireless feature.
• Always ensure that you share and receive data
with devices that are trusted and properly secured.
If there are obstacles between the devices, the
operating distance may be reduced.
• Some devices, especially those that are not
tested or approved by Bluetooth SIG, may be
incompatible with your device.
Turning on Bluetooth and pairing up your phone
with a Bluetooth device
You must pair your device with another device before
you connect to it.
1 From the Home screen, tap Apps
> Apps tab
> Settings
> Bluetooth from the WIRELESS
& NETWORKS section.
2 Tap
to turn Bluetooth on. You will see the
option to make your phone visible and option to
search devices. Then tap Search for devices to
view the devices in the bluetooth Range.
22
3 Choo
list.
Once t
connec
NOTE
Some d
kits, ma
If the o
enter it
Send d
1 Open
- or Touch
- or Open
Shar
2 Tap B
NOTE
The me
type.
3 Searc
devic
Receiv
1 From
> Se
2 Tap
phon
searc
NOTE
To sele
visible,
d to
your
Wi-Fi
ga
uetooth
n or
ooth
ta
cured.
he
e
hone
before
ps tab
LESS
e
n to
s to
3 Choose the device you want to pair with from the
list.
Once the paring is successful, your device will
connect to the device.
NOTE
Some devices, especially headsets or hands-free car
kits, may have a fixed Bluetooth PIN, such as 0000.
If the other device has a PIN, you will be asked to
enter it.
Send data using the Bluetooth wireless feature
1 Open the item and tap .
- or Touch and hold the item and select Share.
- or Open the item and tap the Menu Key
>
Share.
2 Tap Bluetooth to share via Bluetooth.
NOTE
The method for selecting an option may vary by data
type.
3 Search for and pair with a Bluetooth-enabled
device.
Receive data using the Bluetooth wireless feature
1 From the Home screen, tap Apps
> Apps tab
> Settings
> Bluetooth.
2 Tap
to turn Bluetooth on and tap the Make
phone visible checkbox to allow other devices to
search for yours.
NOTE
To select the length of time that your device will be
visible, tap the Menu Key
> Visibility timeout.
23
3 Pair the devices and tap Accept when you receive a
Bluetooth Authorization Request to accept the file(s).
Tethering
You can use your phone to provide a data
connection to a computer by activating data tethering
and connecting the phone and computer with a USB
cable.
To tether your phone with your computer using
the USB
1 Connect your phone to your computer with a USB
cable.
2 From the Home screen, tap the Menu Key
> System settings > More > USB tethering &
Mobile HotSpot > USB tethering. A checkmark
indicates that the function is active.
NOTE
- To use your phone’s tethering capability, you must
have the Smartphone Mobile HotSpot service
added to your rate plan. Performance may vary
depending on the number of devices connected
and other factors.
- You cannot access your phone’s microSD card on
your computer when using USB tethering.
Mobile Hotspot
You can also use your phone to provide a mobile
broadband connection for up to 8 other devices.
Create a hotspot and share your connection.
To create a portable hotspot, from the Home screen,
tap the Menu Key
> System settings > More
> USB tethering & Mobile HotSpot > Mobile
24
HotSp
active.
hotspo
and ch
hotspo
NOTE
To use
have th
to your
Mobile
time as
prior to
depend
other fa
unauth
Hotspo
Wi-F
Wi-Fi D
devices
are fou
to shar
NOTE
Wi-Fi D
Wi-Fi fu
1 From
> Se
NETW
2 Tap
>W
3 Selec
devic
ceive a
file(s).
HotSpot. A checkmark indicates that the function is
active. Then set the desired configuration for your
hotspot. You can tap Configure Mobile HotSpot
and change any options after initially configuring the
hotspot.
thering
a USB
NOTE
ing
USB
g&
mark
must
ry
ed
d on
bile
s.
creen,
More
e
To use your phone’s HotSpot capability, you must
have the Smartphone Mobile HotSpot service added
to your rate plan. In addition, your Smartphone
Mobile Hotspot service cannot be used at the same
time as Wi-Fi. Please close your Wi-Fi connection
prior to launching this service. Performance may vary
depending on the number of devices connected and
other factors. If you do not use a password, other
unauthorized devices will be able to use your Mobile
Hotspot connection.
Wi-Fi Direct
Wi-Fi Direct automatically scans nearby Wi-Fi Direct
devices and the searched devices are listed as they
are found. This allows you to select a specific device
to share multimedia data with through Smart Share.
NOTE
Wi-Fi Direct cannot be enabled while using other
Wi-Fi functions.
1 From the Home screen, tap Apps
> Apps tab
> Settings
> Wi-Fi from the WIRELESS &
NETWORKS section.
2 Tap
to turn it on and touch the Menu Key
> Wi-Fi Direct.
3 Select a device to connect with from the scanned
device list.
25
CREATE GROUP – Touch to activate group owner
mode, which enables the legacy Wi-Fi devices to
connect by scanning your phone.
Calls
Making a call
1 From the Home screen, tap Phone
to open
the keypad.
2 Enter the number on the keypad. To delete a digit,
tap Clear
.
3 Tap Call
to make a call.
4 To end a call, tap End
.
TIP
To enter “+” to make international calls, touch and
hold
.
Calling your contacts
1 From the Home screen, tap Apps
and then tap
Contacts
to open your contacts.
2 Scroll through the contact list or tap the Search
contacts box and enter the first letter(s) of the
contact you want to call. You can also tap a letter
along the right side of the screen to access names
starting with the chosen letter.
3 In the list that is displayed, tap the contact you
want to call.
4 In the Contact Info screen, tap the phone number
you wish to call.
26
Answ
Locked
To answ
swipe A
in any d
Unlock
To answ
unlocke
Declin
TIP
Declin
You ca
This is
during
Adju
To adju
Volume
Mak
1 Durin
selec
2 Dial t
3 Tap C
4 Both
initial
5 Tap t
active
calls.
6 To en
active
wner
to
pen
digit,
and
en tap
ch
e
etter
names
ou
mber
Answering and rejecting a call
Locked screen
To answer an incoming call when the screen is locked,
swipe Answer
in any direction. Swipe Decline
in any direction to decline an incoming call.
Unlocked screen
To answer an incoming call when the screen is
unlocked, tap Answer
. To decline the call, tap
Decline
.
TIP
Decline with message
You can send a message quickly using this function.
This is useful if you need to reject a call with message
during a meeting.
Adjusting the in-call volume
To adjust the in-call volume during a call, use the
Volume Keys on the left side of the phone.
Making a second call
1 During your initial call, tap the Menu Key
and
select Add call.
2 Dial the number or search your contacts.
3 Tap Call
to connect the call.
4 Both calls will be displayed on the call screen. Your
initial call will be put on hold.
5 Tap the call entry on the screen to toggle between
active calls or tap Merge calls
to merge the
calls.
6 To end active calls, tap End
. If there is no
active call, it will end the call on Hold.
27
Ending a Call
Tap End
to end a call.
TIP
Tap the
entries
NOTE
To redial recent numbers, touch Redial
at the
end of the call or find the number within the Call logs
and tap Call
to the right of the entry.
If you end the current call screen and return to the
Home screen, you will be notified that you are still
on an active call by the green phone icon within the
Status Bar.
Active Call Notification
Call
Ending a Call from the Status Bar
1 Touch and drag the Status Bar down to open the
Notifications Panel .
2 Tap End call
to end the currently active call .
Viewing your call logs
From the Home screen, tap Phone , then tap the
Call logs
tab.
View a complete list of all dialed, received, and
missed voice calls.
TIP
Tap any single call log entry to view the date, time,
and duration of the call.
28
You ca
forward
T-Mobi
1 From
tap S
2 Tap C
Con
You ca
them w
other a
Sear
1 From
Cont
2 Tap t
TIP
Tap the Menu Key
, then tap Clear to delete
entries individually or Clear all to delete all.
he
ll logs
the
still
n the
Call settings
Bar
the
call
.
p the
me,
You can configure phone call settings, such as call
forwarding, and other special features offered by
T-Mobile.
1 From the Home screen, tap the Menu Key
and
tap System settings.
2 Tap Call and set any desired options.
Contacts
You can add contacts on your phone and synchronize
them with the contacts in your Google Account or
other accounts that support syncing contacts.
Searching for a contact
1 From the Home screen, tap Apps
and then tap
Contacts
to open your contacts.
2 Tap the Search contacts box and enter the contact
29
name using the keypad. You can also tap a letter
along the right side of the screen to access names
starting with the chosen letter.
Adding a new contact
1 From the Home screen, tap Phone
and enter
the new contact’s number.
2 Tap the Menu Key
> Add to Contacts >
Create new contact. Select the desired account (if
applicable).
3 If you want to add a picture to the new contact,
tap
. Choose from Take photo to take a picture
using the camera or Select from Gallery. Then
browse for an image and select it.
4 Tap
to enter more specific name information.
5 Enter the details about your contact.
6 Tap Save to save the contact entry.
Favorite Contacts
You can classify frequently called contacts as
favorites.
To add a contact to your favorites
1 From the Home screen, tap Apps
and then tap
Contacts
to open your contacts.
2 Tap a contact to view its details.
3 Tap the star to the right of the contact’s name. The
star turns gold and the contact is added to your
favorites.
To remove a contact from your favorites list
1 From the Home screen, tap Apps
and then tap
Contacts
to open your contacts.
30
2 Tap th
3 Tap a
4 Tap t
The s
from
Mes
Mess
Your ph
into on
Conv
Messa
display
conven
Send
1 From
tap C
2 Enter
field.
conta
recip
3 Tap t
4 Tap t
Choo
5 Tap S
etter
names
2 Tap the Favorites tab to view your favorite contacts.
3 Tap a contact to view its details.
4 Tap the gold star to the right of the contact’s name.
The star turns grey and the contact is removed
from your favorites.
enter
>
ount (if
Messaging/Email
Messaging
ct,
picture
en
Your phone combines text and multimedia messages
into one intuitive, easy-to-use menu.
on.
Messages exchanged with another party are
displayed in chronological order so that you can
conveniently see an overview of your conversations.
en tap
e. The
our
Conversation view
Sending a message
1 From the Home screen, tap Messaging , then
tap Compose
to create a new message.
2 Enter a contact name or phone number in the To
field. As you enter the contact name, matching
contacts appear. You can tap a suggested
recipient. You can also add multiple contacts.
3 Tap the text field to start entering your message.
4 Tap the Menu Key
to open the options menu.
Choose from any of the available options.
5 Tap Send to send your message.
en tap
31
Warning
The 160-character limit may vary from country to
country depending on how the text message is
coded and the language used in the message.
Liven up your messages using smilies.
When writing a new message, tap the Menu Key
, then tap Insert smiley.
The firs
wizard
After th
of your
accoun
To add
• Open
>
To cha
• Open
>
To dele
• Open
> Ac
tap a
Changing your message settings
Work
Warning
If an image, video, or audio file is added to a text
message, it will be automatically converted into a
multimedia message and your service plan will be
decremented accordingly.
NOTE
When you get a text message during a call, there will
be an audible notification.
Using smilies
Your phone’s message settings are predefined,
so you can send messages immediately. You can
change the settings based on your preferences.
► From the Home screen, tap Messaging
>
Menu Key
> Settings.
Email
You can use the Email application to read emails
from services like Gmail. The Email application
supports the following account types: POP3, IMAP
and Exchange.
Your service provider or system administrator can
provide you with the account settings you need.
32
Man
Open t
and
Each a
folder.
accoun
folders
Com
To com
1 While
2 Enter
recip
will b
o
xt
oa
be
re will
ey
ngs
,
can
s.
>
ils
MAP
an
d.
Managing an email account
The first time you open the Email application, a set-up
wizard opens to help you to set up an email account.
After the initial setup, Email displays the contents
of your inbox. If you have added more than one
account, you can switch among accounts.
To add another email account:
• Open the Email application and tap the Menu Key
> Accounts > Menu Key
> Add account.
To change an email account’s settings:
• Open the Email application and tap the Menu Key
> Accounts > Menu Key
> Entire settings.
To delete an email account:
• Open the Email application and tap the Menu Key
> Accounts > Menu Key
> Remove account >
tap an account you want to delete > Remove > Yes.
Working with account folders
Open the Email application and tap the Menu Key
and select Folders.
Each account has an Inbox, Outbox, Sent and Drafts
folder. Depending on the features supported by your
account’s service provider, you may have additional
folders.
Composing and sending email
To compose and send a message
1 While in the Email application, tap Compose .
2 Enter an address for the message’s intended
recipient. As you enter text, matching addresses
will be proposed from your Contacts. Separate
33
multiple addresses using semicolons.
3 Tap the Cc and Bcc fields to copy contacts and
tap Attach
to attach files, if required.
4 Enter the subject and your message.
5 Tap Send
to send the message.
If you aren’t connected to a network, for example,
if you’re working in airplane mode, the messages
that you send will be stored in your Outbox folder
until you connect to a network again. If it contains
any pending messages, the Outbox will be
displayed on the Accounts screen.
Slac
TIP
Slacke
1 From
Slack
2 If pro
pass
– or –
Tap C
acco
3 Begin
When a new email arrives in your Inbox, you will
be notified by a sound or vibration. Tap the email
notification to stop receiving notifications.
T-Mo
Visual Voicemail
The Visual Voicemail application allows users to
view a list of people who left voicemail messages on
your phone. You can listen to your message without
being limited by the date.
1 From the Home screen, tap Apps
> Visual
Voicemail
.
2 A list of the voicemail messages will be displayed.
Important!
If this is the first time accessing Visual Voicemail, you
may be prompted to enter a new PIN code and touch
Next to activate Visual Voicemail.
Note
To use your phone’s Visual Voicemail capability, you
must have the Visual Voicemail service added to your
rate plan.
34
3 Tap a
Lets yo
Name
and Sta
1 From
Nam
2 Choo
T-Mo
This ap
Deman
1 From
TV
will b
2 Tap A
– or –
Tap E
3 Set y
and
mple,
ages
older
tains
l
ail
to
es on
thout
3 Tap an on-screen voicemail message to play it back.
Slacker Radio
Slacker® offers Internet radio for mobile devices.
1 From the Home screen, tap Apps Key
>
Slacker Radio
.
2 If prompted, enter your email address and
password.
– or –
Tap Create Account if you have not created an
account.
3 Begin selecting the music you want to listen to.
T-Mobile Name ID
Lets you modify the on-screen Caller ID information.
Name ID identifies unknown callers by Name, City,
and State.
1 From the Home screen, tap Apps
> T-Mobile
Name ID
.
2 Choose an on-screen option.
ual
T-Mobile TV
ayed.
This application lets you watch live TV and Video on
Demand on your phone.
1 From the Home screen, tap Apps
> T-Mobile
TV
. The T-Mobile Terms and Conditions page
will be shown.
2 Tap Accept if you accept the Terms and Conditions.
– or –
Tap Exit to close the application.
3 Set your location settings.
il, you
d touch
, you
o your
35
4 Tap any of the available categories to begin
viewing.
Acc
Note
Whethe
case, a
browse
for all y
examp
T-Mobile TV must be configured over network before
first use. 30-days free offer is available for a limited
time and subject to change. Unsubscribe during the
first 30 days to avoid any charges; access to free
content will remain available. See T-Mobile TV app for
details. Qualifying data plan and/or Wi-Fi connection
required.
Scout
TeleNav GPS Navigator provides driving assistance
that offers both visual and voice navigation
instructions for GPS navigation.
1 From the Home screen, tap Apps
> Scout .
2 If prompted, read the GPS Settings notification,
tap OK and enable the necessary GPS location
features.
3 Read the agreement and tap Accept to accept the
terms, or tap Exit to close the window. Allow some
time for the application to load the required firsttime user files.
4 Select to either upgrade to the premium application
or select to use basic navigation.
5 Use the available on-screen functions.
To purc
T-Mobi
neares
Access
by loca
36
Accessories
efore
ited
g the
ee
app for
ection
Whether you want a charger, a fashionable carrying
case, a Bluetooth headset, or you just want to
browse for fun extras, T-Mobile is the place to shop
for all your phone accessories. Here are a few
examples…
ance
ut
on,
on
.
ept the
some
rst-
ication
Battery Boost
Headset
MicroUSB Car Charger
To purchase accessories for your phone, visit
T-Mobile.com, call 1.800.204.2449, or visit your
nearest T-Mobile store.
Accessory selection subject to change and may vary
by location.
37
Safety Tips
Consider device compatibility
If you have a pacemaker or hearing aid, check
with your doctor to make sure it is safe for you to
use a cell phone. In some cases, cellular radio
frequencies can disrupt the performance of other
electronic equipment. If you have questions about
the interaction between your phone and any other
piece of electronic equipment, ask the equipment
manufacturer.
Drive safely
When you are driving, T-Mobile encourages you to
use your phone in a safe and sensible manner. Here
are a few tips:
• Assess road conditions before answering your
phone. Your safety is more important than any call.
• Prepare your hands-free headset, if you have one,
or turn on your speakerphone, before you
start moving.
• Keep your phone close. If it rings and you discover
it’s in the back seat, do NOT crawl over the seat to
answer it while driving.
• Pre-program frequently used numbers into your
phone for easy, one-touch dialing.
• Remember that laws prohibiting or restricting the
use of a cell phone while driving may apply in your
area.
38
Info
Safe
T-Mobi
measu
to take
handse
unauth
locking
that ca
unauth
Preload
to track
severa
capabi
that ha
service
insuran
or stole
to T-Mo
to prote
www.tcom/C
Note
Mobile
Mobile
to
her
out
her
ent
u to
Here
ur
ny call.
e one,
scover
seat to
our
Information About
Safeguarding Handsets
T-Mobile encourages customers to take appropriate
measures to secure their handsets and invites them
to take advantage of the features available on this
handset to help secure it from theft and/or other
unauthorized access and use. This handset has a
locking function (e.g., user-defined codes or patterns)
that can serve as a first line of defense against
unauthorized use or access to stored information.
Preloaded security applications that allow customers
to track or locate misplaced devices can be found on
several T-Mobile devices. Remote locking and wiping
capabilities are also available to T-Mobile customers
that have elected to subscribe to the Mobile Security
service offered by our partner, Asurion, along with
insurance to help replace lost or stolen devices. Lost
or stolen devices should be immediately reported
to T-Mobile so that proper measures can be taken
to protect accounts. For additional information, visit:
www.t-mobile.com/devicesecurity and www.t-mobile.
com/Company/PrivacyResources.aspx
Note
Mobile Security is a service provided by Asurion
Mobile Applications and is not an insurance product.
g the
n your
39
Emergency Dialing
Although all phones are equipped with 9-1-1
emergency calling, this phone may or may not permit
its location to be approximated during a 9-1-1 call.*
* Availability of this feature depends on upgrades
to the (a) wireless network and (b) 9-1-1 calling
system that are required to be installed by the local
9-1-1 response agency or public safety answering
point (PSAP); these upgrades may not be available
everywhere within our wireless coverage area or your
roaming area. This approximation of the phone’s
location and the transmittal of location information are
subject to emergency situations, transmission limits,
network problems/limitations, interconnecting carrier
problems, your phone, buildings/tunnels, signal
strength and atmospheric/topographical conditions,
and may be curtailed, interrupted, dropped or
refused. The phone’s approximate location is
transmitted to the local 9-1-1 response agency or
PSAP while the call is in progress; this approximation
is intended solely to aid the PSAP in dispatching
emergency assistance or to limit the search area
for emergency services personnel. You should not
rely solely on a phone for essential communications
(such as a medical or other emergency). Please see
T-Mobile’s Terms and Conditions and Privacy Policy
for additional service restrictions and details.
40
Car
Your ph
as a m
extend
Do not
your ph
moistu
Protec
touch s
by usin
protect
Use th
and ac
access
Do not
to char
sharp b
doing s
any oth
to a qu
Add
Use of
separa
data pl
Wi-Fi:
and the
connec
attemp
the dev
connec
devices
permit
call.*
es
ocal
ing
able
or your
’s
ion are
imits,
carrier
al
tions,
or
mation
g
ea
not
tions
e see
olicy
Caring For Your Phone
Your phone is a complex electronic device; think of it
as a mini-computer. Here are some tips to help you
extend the life of your new device:
Do not get your device wet. Water will damage
your phone and accessories. Even a small amount of
moisture can cause damage.
Protect your phone’s touch screen. Your phone’s
touch screen is delicate. Guard against scratches
by using a screen protector or by keeping it in a
protective case.
Use the original manufacturer’s batteries
and accessories. Non-approved batteries and
accessories can harm you and damage your phone.
Do not use damaged accessories. Do not attempt
to charge your phone if the charger has received a
sharp blow, been dropped, or is otherwise damaged;
doing so may damage your phone. If your charger or
any other accessory is damaged, replace it or take it
to a qualified service dealer.
Additional Information
Use of some content, features, or services may incur
separate, additional charges, require a qualifying
data plan and/or access to a Wi-Fi connection.
Wi-Fi: Device will not transition between Wi-Fi
and the cellular network. Devices using wireless
connections may be vulnerable to unauthorized
attempts to access data and software stored on
the device. Plan data allotment applies to use by
connected devices sharing Wi-Fi. Use of connected
devices subject to T-Mobile Terms and Conditions.
41
Smartphone Mobile HotSpot/Tethering: Qualifying
plan required. Plan data allotment applies. Use of
connected devices subject to T-Mobile’s terms and
conditions.
Mobile Security: Capable phone required; technical
limitations may prevent certain features (e.g., LOCK)
from working on certain phones. For a list of eligible
devices, visit www.T-Mobile.com/mobilesecurity.
Enabling the location history features of Mobile
Security can cause your phone’s battery life to
diminish more quickly. Device must be powered on,
have text messaging capability, and be within the
T-Mobile coverage area for Mobile Security features
to function. Data usage applies for download and
use of Mobile Security. As with other software,
Mobile Security may be disabled or uninstalled by
other applications, software, devices or hacking. In
this event the protective features of Mobile Security
may not function properly. In addition, even though
installed, Mobile Security may not function properly
due to other prior installed software on your device.
Mobile Security is a service provided by Asurion
Mobile Applications and is not an insurance product.
Messaging/Data: You will be charged for all
messaging and data sent by or to you through
the network, regardless of whether or not data is
received. Character length/file size of messages/
attachments may be limited. T-Mobile is not liable
for content of messages/attachments or for any
failures, delays or errors in any T-Mobile generated
alerts or notifications. Your data session, plan, or
service may be slowed, suspended, terminated,
or restricted if you use your service in a way that
interferes with or impacts our network or ability to
42
provide
for a si
a dispr
billing c
prohibi
Downl
respon
you ma
Additio
availab
downlo
downlo
phone.
lost du
for App
transm
party a
using a
functio
that m
billing,
to acce
Device
See bro
(includ
for rate
service
import
of 9-1calling
The Blu
the Blu
under l
lifying
e of
and
hnical
OCK)
gible
y.
d on,
he
tures
and
by
g. In
urity
ough
perly
vice.
n
oduct.
is
s/
ble
y
ated
or
d,
at
to
provide quality service to other users, if you roam
for a significant portion of your usage, or if you use
a disproportionate amount of bandwidth during a
billing cycle. You may not use your plan or device for
prohibited uses.
Downloads/Applications: T-Mobile is not
responsible for any third party content or Web site
you may be able to access using your phone.
Additional charges may apply; not all downloads
available on all phones. You obtain no rights in
downloads; duration of use may be limited and
downloads may be stored solely for use with your
phone. T-Mobile is not responsible for any download
lost due to your error. T-Mobile is not responsible
for Apps, including download, installation, use,
transmission failure, interruption or delay, third
party advertisements you may encounter while
using an App, alterations any App may make to the
functionality of your device, including any changes
that may affect your T-Mobile plan, service, or
billing, or any content or website you may be able
to access through an App.
Device, screen and accessory images simulated.
See brochures and the Terms and Conditions
(including arbitration provision) at T-Mobile.com,
for rate plan information, charges for features and
services, and restrictions and details, including
important limitations on availability and reliability
of 9-1-1 emergency service when using Wi-Fi
calling.
The Bluetooth® word mark and logo are owned by
the Bluetooth SIG, Inc. and are used by T-Mobile
under license. T-Mobile and the magenta color are
43
registered trademarks of Deutsche Telekom AG.
The Visual Voicemail and T-Mobile TV icons are
trademarks, of T-Mobile USA, Inc. Android, Google,
Google Play Store, Google Maps, Picasa, and
Gmail are trademarks of Google Inc. TeleNav is a
registered trademark of TeleNav, Inc. ©2013 T-Mobile
USA, Inc.
44
G.
e
ogle,
sa
Mobile