1
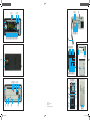
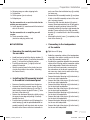
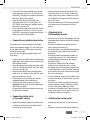
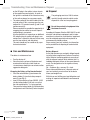
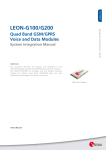
 Operation manual
GB / IE Operation and Safety Notes............................................... Page 5
KH 2391
KH2391_Cover_UK.indd 5-8
31.08.2006 15:31:28 Uhr
A
12
D
34
gngo
5
6
7
8
9
cp
co
glfuftfs fr
cncmclbubtbsbrbqbpbobnbmbl
gm
B
E
elemeo eq es
cr
cq
et ir
er
fp
eu gp
cq
C
cs ctcu dl dm
dn
dt
do
ds
KH2391_Cover_UK.indd 9-12
dr
dq
du
dp
Kompernaß GmbH
Burgstraße 21 · D-44867 Bochum (Germany)
www.kompernass.com
Last Information Update · Ident.-No.: KH2391-082006-1 / UK
en epfnfo fqfmfl
F
gqgrgugthn gs
hl
hm
hs
hr
im
ho
il
hu
ht
hp
hq
iriq
G
ipioin
31.08.2006 15:31:35 Uhr
Content
Introduction
For your safety..................................................................
Proper Use........................................................................
Equipment.........................................................................
Scope of Supply................................................................
Technical Data..................................................................
Audio Storage Media.........................................................
Page 6
Page 6
Page 6
Page 7
Page 7
Page 8
Safety
Important Safety Instructions . ......................................... Page 8
Preparation. ................................................................... Page 10
Installation
emoving the control panel from the car radio . ...............
R
Installing the DIN assembly bracket in the vehicle‘s
instrument panel...............................................................
Connecting to the loudspeakers of the vehicle..................
Connecting to the vehicle‘s 12 V DC power supply ...........
Connecting an amplifier....................................................
Connecting a portable audio device..................................
Connecting to the aerial of the motor vehicle ..................
Attaching to the DIN assembly bracket.............................
Attaching the control panel...............................................
Operation
Switching on.....................................................................
Switching off . ..................................................................
Selecting and adjusting the sound.....................................
Selecting and adjusting playback functions.......................
Setting the volume ...........................................................
Setting the 3-Band PLL Tuner...........................................
Playing Back Audio Storage Media....................................
Page 11
Page 11
Page 11
Page 12
Page 12
Page 13
Page 13
Page 13
Page 13
Page 14
Page 14
Page 14
Page 15
Page 16
Page 16
Page 18
Remote Control............................................................ Page 21
Troubleshooting........................................................... Page 21
Care and Maintenance............................................. Page 22
Disposal........................................................................... Page 22
Information
Important Guarantee Information...................................... Page 23
Importer............................................................................ Page 23
GB/IE
KH2391_Content_UK.indd 5
05.09.2006 14:49:08 Uhr
Introduction
Car Radio KH 2391
L Introduction
L
For your safety
Please read these instructions through carefully and
fold out the page with the illustrations while doing so.
You should follow the instructions closely when you
operate the device. If you have any further questions
concerning the use of this device, please contact the
service centre for your country (see guarantee card).
It is advisable to store the operating instructions in a
safe place and to pass them on if you give the radio
to anyone else.
L
Proper Use
The KH 2391 car radio is suitable for private use for
receiving radio stations in the FM/MW/LW range and
for playing back CD, CD-R, CD-RW, USB MemoryStick, MP3 Player, SD and MMC audio storage media.
The car radio has a removable control panel and an
IR remote control device which can only be supplied
with electricity by means of 1 lithium battery of type
CR2025, 3VDC. The car radio may only be connected
to the 12VDC supply. The device is suitable for connecting to four loudspeakers with an impedance of
4-8 Ohm, a maximum of four power amplifiers (to
the four speaker output channels).
Any careless use or use other than for the intended
purpose will result in the guarantee becoming invalid.
L
Equipment
Front of the Control Panel (Fig. A)
1Control panel
2Plastic frame
3Sensor (remote control)
4“Open“ button
5 TA “TA“ button
6 9 “Skip” button (back)
7 : “Skip” button (forwards)
8 AF “AF” button
9Display window
bl BAND “BAND” button
bm PTY “PTY” button
bn DISP “DISP” button
boMU/DIM “MU / DIM” button
bp 6 “6” button
bq 5 “5” button
br4 RDM “4 / RDM” button
bs3 RPT “3 / RPT” button
bt 2 INT “2 / INT” button
bu1 PAU “1/ PAU” button
cl A/PS “A / PS” button
cm SCAN “SCAN” button
cn MODE “MODE” button
co
“SEL / VOL” control knob
cp “POWER” button
•
•
•
•
Reverse of the Control Panel (see Fig. B)
cqUnlock mechanism
crPlug-in connection strip
Front of the Car Radio
(Control Panel removed) (see Fig. C)
csLED (red) / CD compartment
ctFront
cuCD compartment
dlConnection socket
dmOpening mechanism
dnSD and MMC port
doUSB port
dpControl panel attachment point
dqLED (red) / power supply
drReset button
dsControl panel attachment point
dtCD eject button
Reverse of the Car Radio (see Fig. D)
duMetal housing with vents
elISO plug jack for loudspeaker connection
emPlug-in for rear right loudspeaker (+)
enPlug-in for rear right loudspeaker (-)
eoPlug-In for front right loudspeaker (+)
epPlug-in for front right loudspeaker (-)
eqPlug-in for front left loudspeaker (+)
erPlug-in for front left loudspeaker (-)
esPlug-in for rear left loudspeaker (+)
GB/IE
KH2391_Content_UK.indd 6
05.09.2006 14:49:09 Uhr
Introduction etPlug-in for rear left loudspeaker (-)
euFlat blade fuse socket
f lFlat blade fuse 10 A
fmISO plug jack to the 12 V DC power connection
Rear of the Remote Control (see Fig. G)
inBattery compartment
ioBattery holder
ipUnlock button
(including connection of an automatic aerial)
fnPlug-in for 12 V DC constant current
Installation Accessories (see Fig. E)
foPlug-in for electric aerial
iqDIN assembly bracket
fpPlug-in for 12 V DC ignition current
irInstallation key
fqPlug-in for minus / earth connection in the vehicle
frAttachment screw (including M5 nut and washer)
fsOUT / REAR cinch R plug jack (loudspeaker
L S
cope of Supply
connection [red / rear right])
ftLINE IN R cinch plug jack (red / right)
fuLINE IN L cinch plug jack (white / left)
glOUT / REAR cinch L plug jack (loudspeaker
connection [white / rear left])
gmAerial socket
gnOUT / FRONT cinch plug jack (loudspeaker
connection [white / front left])
goOUT / FRONT cinch plug jack (loudspeaker
1 x Car radio (including control panel)
1 xIR remote control (including 1 x lithium battery
of type CR2025, 3 V DC)
1 x Plastic box (for control panel)
1 x DIN assembly bracket
2 x Installation key
1 x Anchoring plate (including attachment material)
1 x Operation manual
connection [red / front right])
Top of the Car Radio (see Fig. E)
gpTransport safety screw 2 x
Front of the Remote Control (see Fig. F)
gq POWER “POWER” button
gr ENTER SEL “ENTER / SEL” button
VOL
gs
9
TUNE/
SEEK
“TUNE / SEEK” multifunction button:
:
L
Technical Data
Car Radio
Rated voltage: 12 V DC (minus pole negative,
connected to the body within the vehicle)
Power consumption: max. 10 A
Power output: max. 4 x 20 W active power factor
Distortion: - 40 dB (1%)
VOL
gt
gu
hl
hm
hn
ho
hp
hq
hr
hr
ht
hu
il
im
MODE
MP3
AS/PS
-10
5
+10
6
DISP
BAND
RDM
4
RPT
3
INT
2
PAU
1
“VOL+” button (upper)
Skip button (back)
: Skip button (forwards)
VOL “VOL” button (lower)
“MODE” button
“MP3 / AS / PS” button
“-10 / 5” button
“+10 / 6” button
“DISP” button
“BAND” button
“RDM / 4” button
“RPT / 3” button
“INT / 2” button
“PAU / 1” button
VOL
9
Amplifier (TDA 7386)
4-band preset EQ
Electronic master level for: bass and treble, loudness,
fade control, balance
Preamplifier Input (LINE IN)
Power output: 775 m V = 0 dB
Impedance: 47 k Ohm
Preamplifier Output (LINE OUT)
Power output: max. 5 V
Impedance: 10 k Ohm
Tone control
Bass frequency: 100 Hz ± 10 dB
Treble frequency: 10 kHz ± 10 dB
GB/IE
KH2391_Content_UK.indd 7
05.09.2006 14:49:10 Uhr
Introduction / Safety
Possible Connections
ISO: 12 V DC
ISO: loudspeaker (max. 2 pairs) (4 - 8 Ohm)
MP3 player or USB memory stick
(USB 1.1 and 2.0)
SD or MMC
Max. four amplifiers
Display
Liquid crystal screen
(8-digit alpha-numerical
dot-matrix LCD display)
Background illumination
(colour blue, 2 dimming levels)
3 Band PLL Tuner
Display: frequency band, radio stations, mono or
stereo reception, pre-sets, activated EON, AF,
TA / TP and mute function
FM-Band (FM 1, FM 2, FM 3)
Frequency band: 87.5 - 108 MHz
Channel increments: 50 kHz
Intermediate frequency: 10.7 MHz
Stereo separation: 30 dB
Noise suppression: 55 dB
Preset stations: 18
MW Band (MW)
Frequency band: 530 - 1600 KHz
Interim frequency: 450 kHz
Available sensitivity: 32 dB µV
Pre-sets: 6
LW Band (LW)
Frequency band: 144 - 290 KHz
Interim frequency: 450 KHz
Available sensitivity: 32 dB µV
Pre-set stations: 6
IR Remote Control
Rated voltage: 3 V DC
Power supply: 1 x lithium battery
type CR2025, 3 V DC
Current consumption: approx. 30 mA
Wavelength range: near infrared 0.7 - 1.4 µm
Dimensions: 85 x 6 x 52 mm (L x H x B)
L
Audio Storage Media
Playback
Data formats: MP3 with ID3, WAV compatible
Media: CD, CD-R, CD-RW, SD, MMC, USB 1.1 and
2.0 (stick or plug-in connection)
Noise suppression: > 60 dB
Channel separation: > 50 dB
Frequency range: 20 Hz - 20 kHz
Display: directory, file, track, album, artist, duration
Search function: file, track, first letter are displayed
L Safety
Important Safety Instructions
The following instructions are provided for your
safety and satisfaction when operating the device.
Please note that non-compliance with the safety instructions may lead to a substantial risk of accident.
Explanation of the symbols and terms used:
cWarning! Danger of death!
m Caution! Risk of injury and damage to materials!
Tip! What course of action you should follow!
cWarning!
·Do not leave small children unsupervised near
the packaging material! Otherwise there is a
danger of death through suffocation!
·Do not leave small children unsupervised in the
vicinity of the device!
·Protect yourself against electric shock! Avoid
any short circuits during connection:
- to the 12 V DC power supply of the vehicle
-to the max. 2 pairs of loudspeakers with an
impedance of 4 - 8 Ohm
- to an amplifier
·Before connecting to the 12 V DC supply of a car,
obtain information on how to maintain electrical
safety from the vehicles operation manual!
·When connecting to the 12 V DC power supply
of a vehicle, ensure that there is no voltage in
the vehicle’s connection cables. Equip the connection cables with fuse holders (2 x 15 A)!
GB/IE
KH2391_Content_UK.indd 8
05.09.2006 14:49:10 Uhr
Safety
· When installing in a motor vehicle please ensure
that the vehicle cannot be operated and has
been securely immobilised!
Turn off the ignition and park the vehicle with
the handbrake applied.
·Complete the connection to the 12 V DC power
supply with full protection against moisture!
·Ensure that the 12 V DC power supply is disconnected when carrying out installation, maintenance and servicing!
·Do not place the device in the vicinity of moisture, fire, heat and prolonged temperatures
above 50° C!
·Do not damage any lines required for fuel,
electricity, brakes, hydraulics, water or data
transmission when attaching the screws!
·Ensure that the plug-in for 12 V DC constant
current fn, the plug-in for 12 V DC ignition current fpand - if applicable - the plug-in electric
aerial fodo not come into contact with a fuel
line (e.g. petrol pump)!
·Do not allow yourself to become distracted
from the road traffic when operating or reading
the displays of the car radio! Acquaint yourself
with operation of the radio before starting your
journey and practise how to use the radio‘s
features safely! You should also adjust the
volume in such a way that you can hear the
sirens of emergency vehicles.
mCaution!
·Ensure that you do not injure or damage the
sensitive hearing of your passengers (particularly
infants, children and pets) in the vehicle! Adjust
the volume and balance of the loudspeakers to
a safe and comfortable level for all passengers!
Note: Adjust the volume such that you can
always hear the warning signals of other road
users.
·Before operating the radio, check that all components have been installed in accordance with
the instructions!
·Before assembling and operating the radio,
check that the supplied parts are complete and
not damaged!
·Use the car radio only with the original supplied
parts!
·Do not cover the metal housing duwith other
objects!
·Protect all electrical contact surfaces against
short circuits, moisture, damage and dirt!
·Do not place the device on or next to the battery
of a motor vehicle!
·Prevent short circuits and damage! Please
ensure that no foreign bodies or objects get
inside the radio!
·In case of malfunctions or damage please
disconnect the car radio immediately from the
12 V DC power supply!
·Connect to the loudspeakers, CD changer,
amplifier and audio storage media (CD, CD-R,
CD-RW, USB memory stick, MP3 player, SD and
MMC) in accordance with the respective
operating instructions!
·The car radio should only be repaired by authorised and trained specialists! If your radio
needs repairing, please contact the service
centre for your country (see guarantee card)!
·Do not subject the device to any mechanical
loads!
·Prevent theft and unauthorised use in particular
when the device is installed in a motor vehicle!
Before leaving a parked vehicle remove the
control panel from the car radio and store it in
the plastic box to protect it.
·Damaged fuses should only be replaced by
new fuses of the same type and with the same
ampere value!
·If you are not going to use the remote control for
a prolonged period, please take out the battery!
Tip! What course of action you should follow!
·Take your time when familiarising yourself with
operation of the car radio! Ensure a tidy and
undisturbed environment for the work required
and carry it out with maximum concentration.
·Plan the installation location with care.
Ensure that when the car radio is installed it
does not cause any obstacles to the driver.
·The very sensitive CD-R, CD-RW discs should
be used in accordance with their instructions!
·Ensure that audio storage media can be played
back unhindered! Clean CDs, CD-Rs and CD-RWs
before use with a dry, antistatic cloth, beginning
GB/IE
KH2391_Content_UK.indd 9
05.09.2006 14:49:10 Uhr
Safety / Preparation
in the centre and moving towards the outside
edge!
·Please ensure that audio storage media used
for playback are not exposed to condensation!
Remove CDs, CD-Rs and CD-RWs from the
device if the humidity is high and the ambient
temperatures low.
All audio storage media that are used should
have completely dry surfaces.
·Store audio storage media outside the device in
an appropriate protective sleeve.
·Here is an overview of the most important
technical terms:
i Receiver: An electronic device for receiving
radio programmes and sound data from storage
media - also a preamplifier.
i Tuner: A device that receives and plays back
radio signals.
i PLL (Phase locked loop): An electronic
switch which enables precise reception of radio
frequencies.
i FM (Frequency Modulation): A reception
band for radio programmes (frequency range:
87.5 - 108 MHz).
i MW (Medium Wave): A reception band for
radio programmes (frequency range:
530 - 1600 KHz).
i LW (Long Wave): A reception band for radio
programmes (frequency range: 144 - 290 KHz).
i CD / CD-R / CD-RW (Compact Disc): A storage
medium for sound and picture data (disc-shaped
ø approx. 120 mm).
i USB (Universal Serial Bus): A universal interface for data transmission.
i SD (Secure Digital Card): A storage medium
for sound and picture data (rectangular, approx.
24 x 1 x 32 mm).
i MMC (Multimedia Card): A storage medium
for sound and picture data (rectangular, approx.
24 x 1 x 32 mm).
i MP3 (Moving Picture Experts Group Layer 3):
A compressed audio format.
i ID3: Additional information which states the
names of tracks and artists in audio files (e.g.
MP3).
i LINE IN: Connection for feeding audio data into
a hi-fi device.
10
i LINE OUT: Connection for delivering audio data
from a hi-fi device.
i Cinch: A standardised plug-in connection for
transmitting electrical signals.
i RDS (Radio Data System): Additional coded
information transmitted by the radio stations in
addition to conventional music and language
broadcasts.
i AF (Alternative Frequency): A function which
automatically receives the optimum frequency
for the station being listened to.
i TA / TP (Traffic Announcement / Traffic
Program): A function which allows channels
with traffic information to be received.
i EON (Enhanced Other Networks): With the
TA / TP function activated the radio switches
automatically to another station of the same
radio company as soon as traffic information is
transmitted.
The traffic information is then played back at a
preset volume.
i PTY (Program Type): This function enables
the reception of specific types of program (e.g.
rock music).
i HiFi (High Fidelity): A quality standard for
audio playback equipment.
i ISO plug: An adapter for connecting electronic
hi-fi equipment in accordance with the International Organization for Standardization.
L Preparation
For connection and installation you require the following components and tools that are not included
in the scope of supply:
1 xISO plug for connecting the loudspeakers of a
motor vehicle
1 x ISO plug for the 12 V DC connection
1 x Car aerial connection with plug-in connection
1 xA pair of loudspeakers, impedance 4-8 Ohm
(including supply line)
3 x Fuse holder with 15 A fuse
1 xDIN assembly cut-out in the instrument panel
of the vehicle
9 x Biscuit connectors
GB/IE
KH2391_Content_UK.indd 10
05.09.2006 14:49:11 Uhr
Preparation / Installation
For the connection of an amplifier you will
require: 2 xCinch connection cables
(insulation and plug: white / red)
each case. Store the installation keys ircarefully
for future use.
•Remove the DIN assembly bracket iqand place
it flush in the DIN assembly cut-out of the vehicle‘s instrument panel.
•Secure the DIN assembly bracket iqagainst
removal. Bend approximately ten tin dog points
on both the upper and lower side of the DIN
assembly bracket iqfrom the inside towards the
outside. Please ensure that the DIN assembly
bracket iqis installed flush in the DIN assembly
cut-out.
•Attached the plastic frame 2completely to the
front of the device ct.
L Installation
L C
onnecting to the loudspeakers
1 x Stripping tongs or cable stripping knife
1 x Screwdriver
1 x SW 8 spanner (jaw size 8 mm)
1 x Ballpoint pen
For the connection of an aerial installed in the
vehicle you may require :
1 xAerial adapters (in accordance with the technical
data of the aerial)
LRemoving the control panel from
the car radio
•Avoid hard contact with the display window 9.
•Press the “Open” button 4and allow the control
panel 1to reach the horizontal position.
•Push the control panel 1slightly to the left
and pull it forwards.
•Store the control panel in the plastic box (see
also the illustration in the section „Attaching
the Control Panel“).
LInstalling the DIN assembly bracket
in the vehicle‘s instrument panel
•Remove all packing material from the device.
•Unscrew the safety transport screws gpcompletely from the metal housing du(see Fig. E)
and carefully release the plastic frame 2from
the front of the device ct.
•Release the attachment points by slightly raising
the upper frame edge and pulling it carefully
towards the front.
•Push the two installation keys irbetween the
metal housing duand the preassembled DIN assembly bracket iquntil they clearly lock in place.
Ensure that the convex side faces outwards in
of the vehicle
Tip! Use an ISO plug.
•Guide the connection cables of the loudspeakers
mounted in the vehicle carefully out of the front
of the DIN assembly bracket iq.
•Establish the connection between the connection
cables of the ISO plug and the connection cables
of the loudspeakers fitted to the vehicle with
the help of biscuit connectors, ensuring that
the connections in the biscuit connectors do
not cause any short circuits and that the fixing
screws are firmly tightened.
•Connect the lead of the plug-in emto the lead (+)
for the rear right loudspeaker.
•Connect the lead of the plug-in ento the lead (-)
for the rear right loudspeaker.
•Connect the lead of the plug-in eoto the lead (+)
for the front right loudspeaker.
•Connect the lead of the plug-in epto the lead (-)
for the front right loudspeaker.
•Connect the lead of the plug-in eqto the lead (+)
for the front left loudspeaker.
•Connect the lead of the plug-in erto the lead (-)
for the front left loudspeaker.
•Connect the lead of the plug-in esto the lead (+)
for the rear left loudspeaker.
•Connect the lead of the plug-in etto the lead (-)
for the rear left loudspeaker.
GB/IE
KH2391_Content_UK.indd 11
11
05.09.2006 14:49:11 Uhr
Installation
LConnecting to the vehicle‘s
12 V DC power supply
cWarning!
·Before connecting to the 12 V DC power supply of
a motor vehicle, consult the vehicle‘s operation
manual on how to maintain electrical safety!
·Ensure that when you establish the connection
to the 12 V DC power supply the connection
leads of the vehicle are not carrying any voltage.
Do not damage any safety equipment such as
the on-board computer or the alarm system of
the vehicle.
·Establish the connection to the 12 V DC power
supply with 3 x 15 A fuse holders!
·When installing in a motor vehicle you should
ensure that the vehicle cannot be operated and
is completely immobilised! Turn off the ignition
and park the vehicle with the handbrake applied!
·During installation you should use tools with a
double insulated handle!
·Avoid electrical short circuits when connecting
to the 12 V DC power supply.
·When establishing the connection between the
car radio and the 12 V DC power supply make
sure it is completely protected against moisture!
Tip! Use an ISO Plug.
•Please ensure that the intact 10 A flat blade
fuse f lis inserted into the flat the blade fuse
socket euas far as it will go.
•Guide the connection cables for the 12 V DC
power supply carefully out of the front of the
DIN assembly bracket iq.
•Establish the connection between the connection
cables of the ISO plug and the connection cables
of the 12 V DC power supply with the 3 x 15 A
fuse holders. Ensure that the connections of
the 3 x 15 A fuse holders do not cause any short
circuit and that the fixing screws are firmly
tightened.
•Using a 15 A fuse holder, connect the cable for
the 12 V DC constant current plug-in fnto the
connection cable for the 12 V DC constant current
of the motor vehicle.
•Optional - only if an electric aerial is connected:
12
Using one 15 A fuse holder each, connect the
cables for the 12 V DC ignition current fpand
electric aerial foplug-ins to the connection
cable for 12 V DC ignition current of the vehicle.
In this manner the car radio and an electric aerial
can only use current from the vehicle when the
ignition is switched on.
•Using a biscuit connector, connect the cable for
the minus / earth connection plug-in in the
vehicle fqto the minus pole connection cable of
the vehicle (minus pole of the battery, which is
connected to the bodywork of the motor vehicle
as standard).
L
Connecting an amplifier
Tip! Use two cinch connection cables (insulation
and plug: white / red).
You can connect an amplifier to the device for
each loudspeaker channel (LINE OUT).
•Install the two cinch connection cables in the
vehicle according to their operating instructions.
•Pass two cinch connection cables to the amplifier
and carefully out of the front of the DIN assembly
bracket iq.
•Insert the red plug of the first cinch connection
cable as far as it will go into the OUT / REAR
cinch R plug jack (amplifier connection
[red / rear right]) fs.
•Then insert the two red plugs of the first cinch
connection cable as far as it will go into the
REAR cinch R plug jack (amplifier connection
[red / rear right]) of the amplifier.
•Insert the white plug of the first cinch connection
cable as far as it will go into the OUT / REAR
cinch L plug jack (amplifier connection
[white / rear left]) gl.
•Then insert the second white plug of the first
cinch connection cable as far as it will go into
the REAR cinch L plug jack (amplifier connection
[white / rear left]) of the amplifier.
•Insert the red plug of the second cinch
connection cable as far as it will go into the
OUT / FRONT cinch plug jack (amplifier
connection [red / front right]) go.
GB/IE
KH2391_Content_UK.indd 12
05.09.2006 14:49:12 Uhr
Installation
•Then insert the second red plug of the second
cinch connection cable as far as it will go into
the FRONT cinch plug jack (amplifier connection
[red / front right]) of the amplifier.
•Insert the white plug of the second cinch
connection cable as far as it will go into the
OUT / FRONT cinch plug jack (amplifier connection [white / front left]) gn.
•Then insert the second white plug of the second
cinch connection cable as far as it will go into
the FRONT cinch plug jack (amplifier connection
[white / front left]) of the amplifier.
L
Connecting a portable audio device
For establishing a cinch connection to any audio
source the headphone output (3.5 mm stereo jack)
of any audio device (e.g. MP3 player) can be connected to the car radio.
Use a 3.5 mm jack plug connection cable to 2 x
cinch plugs.
•Guide the cinch connection cable to the portable
audio device and carefully out of the front of the
DIN assembly bracket.
•Insert the red plug of the cinch connection cable
as far as it will go into the LINE IN R cinch plug
jack [red / rear right] ft.
•Insert the white plug of the cinch connection
cable as far as it will go into the LINE IN L cinch
plug jack [white / rear left] fu.
•Then insert the 3.5 mm stereo jack into the
headphone output of the audio device.
•In order to play back the sound, press the
• MODE button cn
, until the letters AUX appear
in the display window.
For operation of the external device, please see
its operating instructions.
LConnecting to the aerial
of the motor vehicle
•Guide the connection cable of the vehicle aerial
carefully out of the front of the DIN assembly
bracket iqup to the car radio.
•Insert the plug of the connection cable of the
vehicle aerial as far as it will go into the aerial
socket gmof the car radio. If necessary, use an
aerial adapter in accordance with the technical
data of the aerial.
•If present: Connect the 12 V DC connection cable
of an electric aerial to the electric aerial fo
plug-in.
LAttaching to the
DIN assembly bracket
•Insert the rear of the car radio together with the
connected cables carefully into the DIN assembly
bracket iq.
•Ensure that no objects are able to cover the
vents of the metal housing du.
•Ensure that there is no connection cable between
the metal housing duand the DIN assembly
bracket iq.
Prevent the cables from becoming caught, as
any damage may result in a short circuit and
malfunctioning of the device or the vehicle‘s
electronic system.
•Push the car radio into the DIN assembly
bracket iquntil it distinctly locks in place.
•You should also secure your device against theft.
Fix the attachment screw frwith the anchoring
plate and the attachment material to the engine
fire wall of the vehicle.
•Fix the attachment screw frwith the M5 nut and
washer to the holder of the assembly cut-out of
the vehicle.
•Ensure that all cables are properly connected
and that the power supply is working correctly.
The LED (red) / power supply dqflashes.
•Use the tip of a ballpoint pen to press the reset
button dron the front of the device (see Fig. C).
The default settings are activated.
L
Attaching the control panel
•Remove the control panel 1from the plastic
box.
•Avoid hard contact with the display window 9.
GB/IE
KH2391_Content_UK.indd 13
13
05.09.2006 14:49:12 Uhr
Installation / Operation
•Place the rear left-hand edge of the control
panel 1on the control panel attachment point
dson the front of the device.
•Ensure that the plug-in connection strip cris
positioned in front of the connection socket dl.
•Carefully press the rear right-hand edge of the
control panel 1against the control panel
attachment point dpuntil it distinctly locks into
place.
•Fold the control panel 1upwards and allow it
to lock into place.
L
Switching off
•Press the
button cp. The background
illumination of the control panel 1goes off
and the time appears in the display window 9.
When the radio is switched off it stores all
settings from the last time it was operated. The
device automatically adjusts the time with the
help of the radio signals received. When the
radio is switched on again it plays back the last
audio storage medium used or the tuner.
L
Selecting and adjusting the sound
VOL: Volume of the loudspeakers
•Adjust the loudspeakers to the desired volume
by turning the “SEL / VOL” control knob co.
L Operation
L
Switching on
•Press the
BAS: Bass (lower range of the loudspeaker sound)
•Press THE “SEL / VOL” control knob countil
[BAS] appears in the display window 9.
•Turn the “SEL / VOL” control knob coto set the
desired bass level.
Values between [-7] and [7] can be selected.
button cp.
The factory settings of the device are as follows:
•The word [WELCOME] appears in the display
window 9.
•The buttons are illuminated in blue (these can
be adjusted on two levels).
•Press the MU/DIM button bofor 2 seconds. If it
is pressed again for 2 seconds the brightness
of the display window is increased once more.
-The tuner is activated and [FM1] (1st FM
band), [87.50] (station frequency) appears
in the display window 9. [AF] flashes.
-The loudspeakers play back the reception
from the tuner.
•Turn the “SEL / VOL” control knob coto adjust
the volume as desired.
TRE: Treble (higher range of the loudspeaker sound)
•Press the “SEL / VOL” control knob corepeatedly
until [TRE] appears in the display window 9.
•Turn the “SEL / VOL” control knob coto set the
desired treble level.
Values between [-7] and [7] can be selected.
BAL: Balance (difference in volume between the
left [L] and right [R] loudspeakers)
•Press the “SEL / VOL” control knob countil
[BAL] appears in the display window 9.
•Turn the “SEL / VOL” control knob coto set the
desired balance.
Values between [10L] and [10R] can be
selected. The mean value is [0].
FAD: Fading (difference in volume between the
front [F] and rear [R] loudspeakers)
•Press the “SEL / VOL” control knob countil
[FAD] appears in the display window 9.
•Turn the “SEL / VOL” control knob coto set the
14
GB/IE
KH2391_Content_UK.indd 14
05.09.2006 14:49:13 Uhr
Operation
desired fading level. Values between [10F] and
[10R] can be selected. The mean value is [0].
Your settings are automatically stored.
LSelecting and adjusting
playback functions
•Press the “SEL / VOL” control knob coand keep
it pressed for two seconds.
In order to select the next function, press the
“SEL / VOL” control knob countil you have
reached the desired function.
TA SEEK / ALARM:
[TA SEEK]: If the radio is not receiving any Traffic
Program Signal (TP Signal) from the current station,
the next station with a Traffic Program Signal
(TP Signal) is automatically searched for.
Or
[TA ALARM]: If the radio is not receiving any Traffic
Program Signal (TP Signal) from the current station,
the radio informs you of this with a beep.
The radio does not change stations.
•Turn the “SEL / VOL” control knob coto set the
desired function.
MASK DPI / ALL:
[DPI]: Radio stations with optimum reception
frequencies are received.
[ALL]: Radio stations without an RDS signal with a
high field strength are received.
•Turn the “SEL / VOL” control knob coto set the
desired function.
RETUNE_S / L:
[L]: The length of time during which radio stations
with traffic information are searched for is 90 seconds.
[S]: The length of time during which radio stations
with traffic information are searched for is 30 seconds.
•Turn the “SEL / VOL” control knob coto set the
desired function.
DSP: (OFF / POP M / ROCK M / CLASS M / FLAT M):
Selection of an acoustic pattern for various playback styles of music and language with preset
bass and treble levels.
•Turn the “SEL / VOL” control knob co; the
acoustic pattern of your setting for BAS and
TRE is selected.
•Turn the “SEL / VOL” control knob countil
[POP M] appears in the display window 9;
the acoustic pattern for pop music is selected.
•Turn the “SEL / VOL” control knob countil
[ROCK M] appears in the display window 9;
the acoustic pattern for rock music is selected.
•Turn the “SEL / VOL” control knob countil
[CLASS M] appears in the display window 9;
the acoustic pattern for classical music is
selected.
•Turn the “SEL / VOL” control knob countil
[FLAT M] appears in the display window 9;
the acoustic pattern for speech is selected.
LOUD ON / OFF:
The loudness function increases the playback level
of the bass sounds when the volume is low.
•Press the “SEL / VOL” control knob co.
[LOUD ON] appears in the display window 9.
•Turn the “SEL / VOL” control knob coagain.
[LOUD OFF] appears in the display window 9.
ESP 10 / 40 (Electronic Shock Protection):
For the playback of CDs, CD-Rs or CD-RWs the
data are stored for either 10 or 40 seconds in advance. This enables the sound to be played back
free from interference (e.g. when driving over
bumpy surfaces).
•Turn the “SEL / VOL” control knob countil
[ESP 10] appears in the display window 9.
The data are stored for 10 seconds.
•Turn the “SEL / VOL” control knob countil
[ESP 40] appears in the display window 9.
The data are stored for 40 seconds.
MULT ON / OFF (Function not possible on the
KH 2391):
[MULT ON]: CD playback from the (optional) CD
changer.
GB/IE
KH2391_Content_UK.indd 15
15
05.09.2006 14:49:14 Uhr
Operation
[MULT OFF]: CD playback from the CD
compartment cu.
•Turn the “SEL / VOL” control knob coto set the
desired function.
BEEP ON / OFF:
[BEEP ON]: A beep is heard through the loudspeakers when the radio is operated.
[BEEP OFF]: No beep is heard when the radio is
operated.
•Turn the “SEL / VOL” control knob coto set the
desired function.
SEEK 1 / 2 :
[SEEK 1]: The automatic station search stops at
the first radio station that can be received.
[SEEK 2]: The automatic station search only stops
after the 9 button 6or the : button 7
is released.
•Turn the “SEL / VOL” control knob coto set the
desired function.
STEREO / MONO:
Stereo or mono sound playback during radio
reception.
•Press the “SEL / VOL” control knob co.
[STEREO] appears in the display window 9.
•Turn the “SEL / VOL” control knob coagain.
[MONO] appears in the display window 9.
LOCAL / -DX-:
[LOCAL]: Radio stations in the local vicinity with a
strong transmission signal are played back.
[-DX-]: Distant radio stations with a weak transmission signal are also played back.
•Turn the “SEL / VOL” control knob coto set the
desired function.
•Press the “SEL / VOL” control knob co.
Your settings are automatically stored.
After 10 seconds the device automatically changes
to playback mode.
L
Setting the volume
•Increase the volume by turning the “SEL / VOL”
control knob coin a clockwise direction.
•Reduce the volume by turning the “SEL / VOL”
control knob coin an anticlockwise direction.
Mute Function
The mute function enables you to turn off the
loudspeakers.
•Press the MU/DIM button bo. Playback is
muted and [MUTE ON] appears in the display
window 9.
•Press the MU/DIM button boagain. Playback
continues as before the MUTE function was
activated and [MUTE ON] disappears from the
display window 9.
L
Setting the 3-Band PLL Tuner
•Press the • MODE button cnuntil TUNER appears in the display window.
You can select 3 x FM frequency bands (FM1, FM2
and FM3), 1 x medium wave frequency band (MW)
and 1 x long wave frequency band (LW). Each frequency band has six presets on which you can
store radio stations.
•Press the • BAND button bland select the frequency band you wish to receive. In the
display window 9you will now see the designation of the frequency band (e.g. [FM2]), the
frequency (e.g. [99.20]) of a radio station that
is being received or the programme ID during
stereo reception and [TP] for traffic information.
Automatic Station Search
In the case of preset playback function SEEK1:
•Press the 9 button 6or : button 7
for two seconds. The tuner automatically stops
at the first radio station that it receives and
shows the information in the display window 9.
In the case of preset playback function SEEK2:
•Press and hold down the 9 button 6or
: button 7in order to approach the
desired frequency. After the button has been
16
GB/IE
KH2391_Content_UK.indd 16
05.09.2006 14:49:14 Uhr
Operation
released the station search automatically stops
at the next radio station with ideal reception and
shows the information in the display window 9;
or
•Press the • SCAN button cm.
The radio station search stops every 5 seconds
at one of the radio stations that can be received.
Manual Radio Station Search
•Touch the 9 button 6lightly in order to approach the desired lower frequency step by step.
•Touch the : button 7lightly in order to approach the desired higher frequency step by step.
You can determine the storage location of the radio
station being received.
•Press the button of the desired storage location
for approximately 2 seconds:
1 PAU -button bu
2 INT -button bt
3 RPT -button bs
4 RDM -button br
5 -button bq
6 -button bp
The number of the storage location appears im
display window 9.
Automatic Radio Station Search and Storage
This function searches automatically for six radio
stations within the selected frequency band whose
field strength is sufficient.
•Press the A/PS button clfor approximately 2
seconds in order to start the function. The automatic radio station search stops for 5 seconds
as soon as a radio station is received. The
number of the storage location, e.g. [4] flashes
in the display window. The car radio stores the
radio station at storage location 4. You can
determine the storage location of the radio
station being received.
•In order to do so, press the button of the desired
storage location within the five seconds in which
the information flashes:
1 PAU -button bu
2 INT -button bt
3 RPT
4 RDM
5
6
-button bs
-button br
-button bq
-button bp
The number of the storage location appears in
the display window 9.
Playing Back the Stored Stations
Press the button of the desired radio station that
has been stored:
1 PAU -button bu
2 INT -button bt
3 RPT -button bs
4 RDM -button br
5 -button bq
6 -button bp
Including Traffic Information in Playback
•Press the TA button 5once in order to
include traffic information in playback.
[TA] and [TP] alternate in the display window 9if
the radio station to which you are listening transmits
traffic information. [NO TP, TA] flashes in the display
window 9if the radio station to which you are listening does not transmit any traffic information. For
the duration of the traffic information being transmitted the tuner switches automatically within the
same radio company to the radio station transmitting
the traffic information. [TRAFFIC INF] appears in
the display window 9.
Note: When traffic information is transmitted CD
playback is interrupted and then started again
automatically.
•Press the TA button 5again in order to
switch this function off.
AF Function (Alternative Frequencies)
This function makes it possible for the tuner to
permanently optimise reception of a radio station.
•Press the AF button 8; [AF] appears in
the display window 9. The tuner searches for
and receives the optimum frequency that can
be received on which the radio station being
GB/IE
KH2391_Content_UK.indd 17
17
05.09.2006 14:49:15 Uhr
Operation played back is transmitted.
•Press and hold down the AF button 8so
that [REG ON] appears in the display window 9.
The tuner searches within the surrounding region
for identical radio stations of the radio company.
•Press the AF button 8. [REG OFF] appears
in the display window 9. The tuner searches
for all radio stations.
PTY Function
Select this function in order to receive stations
with special programme categories.
Press the PTY button bmand then one of the
storage buttons 1-6 bpbqbrbsbtbu.
[PTY] appears in the display window 9and one of
the categories: The following programme categories
are currently stored.
Music
1. POP M, ROCK M
2. EASY M, LIGHT M
3. CLASSICS, OTHER M
4. JAZZ M, COUNTRY
5. NATION M, OLDIES M
6. FOLK M
Speech
1. NEWS, AFFAIRS, INFO
2. SPORT, EDUCATE, DRAMA
3. CULTURE, SCIENCE, VARIED
4. WEATHER, FINANCE, CHILDREN
5. SOCIAL, RELIGION, PHONE IN
6. TRAVEL, LEISURE, DOCUMENT
Note: A few seconds after you have made your selection the search begins for a station transmitting
the desired programme category. If no suitable station is found at the time, [NO PTY] appears in the
display window and the station you were listening
to previously is received again.
DISP Function
•Press the DISP button bn; the display window
9now shows the current frequency. Press it
again to call up the time, PTY and station.
18
L
Playing Back Audio Storage Media
L
CDs, CD-Rs and CD-RWs
Tip!
•Prevent poor playback from audio storage media!
Clean CDs, CD-Rs and CD-RWs before use with
a dry antistatic cloth, starting from the centre
and moving towards the outside edge!
•Ensure that playback from the sensitive audio
storage media is not disrupted by condensation!
Remove the CD, CD-R and CD-RW from the
device if the humidity is high and ambient temperatures are low.
Only audio storage media with completely dry
surfaces should be used.
•Store the audio storage media outside the device
in an appropriate protective sleeve.
Inserting a CD
•Press the “Open” button 4. The control panel 1
folds forwards.
The LED (red) / CD compartment csand the CD
eject button dtlight up in red.
•Ensure that there is no CD, CD-R or CD-RW in
the CD compartment cu.
•In order to do so, press the CD eject button dt.
•If you would like to listen to a CD, CD-R or CD-RW,
insert it carefully into the CD compartment cu.
The device draws the CD, CD-R or CD-RW in.
•Please ensure that the side on which the audio
data are to be found is facing downwards.
•Fold the control panel 1upwards and allow it
to lock into place.
Playback begins automatically with the first track
and [CD] appears in the display window 9,
followed by [TOC READ] (the data are read in).
Information on the track and running time then
appears.
This information varies according to the storage
medium used.
Selecting Tracks
You can define the sequence of playback.
•Press the 9 button 6to jump to the
previous track.
•Press the : button 7to jump to the next
track.
GB/IE
KH2391_Content_UK.indd 18
05.09.2006 14:49:16 Uhr
Operation
Accessing Track Passages
Within a track you can access previous or subsequent passages.
•Press and hold down the 9 button 6in order to access a preceding passage within a track.
•Press and hold down the : button 7in
order to access a subsequent passage within a
track.
As soon as the button used is released, playback
continues from the accessed passage.
Selecting Tracks on the Basis of the
Storage Location
(Only possible with MP3 data)
•Press the A/PS button clonce. [TRK SCH]
appears in the display window 9.
•Press the “SEL / VOL” control knob coand the
third figure of the storage location appears in
the display window 9.
•Turn the “SEL / VOL” control knob co, select the
third figure of the storage location for the desired
track and press the “SEL / VOL” control knob co.
In the display window 9the second figure of
the storage location flashes.
•Turn the “SEL / VOL” control knob co, select the
second figure of the storage location for the
desired track and press the “SEL / VOL” control
knob co. In the display window 9the first figure
of the storage location flashes.
•Turn the “SEL / VOL” control knob co, select the
first figure of the storage location for the desired
track and press the “SEL / VOL” control knob co.
The desired track plays back.
Searching for Tracks from Folders
You can only use this function with CDs, CD-Rs,
CD-RWs, a USB stick or SD / MMC if these contain
MP3 data and are arranged in folder structures.
•Press the A/PS button cltwice. [FILE SCH]
appears in the display window 9.
•Press the “SEL / VOL” control knob co. The
available folder names appear in the display
window 9.
•Press and turn the “SEL / VOL” control knob co
to move between the folders in order to select
the desired folder name.
•Press the “SEL / VOL” control knob coto confirm.
The tracks of the selected folder appear in the
display window 9. Press and turn the
“SEL / VOL” control knob coto move within the
folder. Press the “SEL / VOL” control knob co
again to playback the desired track.
Searching for Tracks by the File Name
You can only use this function with CDs, CD-Rs,
CD-RWs, a USB stick or SD / MMC if these contain
MP3 data and are arranged in folder structures.
You can select the track by entering the file name
of up to 8 places.
•Press the A/PS button clthree times.
[CHAR SCH] appears in the display window 9.
•Press the “SEL / VOL” control knob co. [A] flashes
in the display window 9.
•By pressing the A/PS button clthe last entry
(figure / letter) is deleted.
•Turn the “SEL / VOL” control knob co, select the
first letter of the file name (figure / letter) and
confirm this by pressing the A/PS button cl
again.
•Select and confirm one of the tracks by pressing
and turning the “SEL / VOL” control knob co.
•Press the “SEL / VOL” control knob coto confirm
the last letter / the last figure. Playback of the
desired track begins.
• Tip: Instead of entering the 8-place filename
you can press the “SEL / VOL” control knob co
for 2 seconds to confirm the first letter. Select
and confirm one of the tracks by pressing and
turning the “SEL / VOL” control knob co.
Changing the Folder Sequence
You can only use this function with CDs, CD-Rs,
CD-RWs, a USB stick or SD / MMC if these contain
MP3 data and are arranged in folder structures.
•Press the 5 button bqand the folder before
the folder currently running is played back.
•Press the 6 button bpand the folder after
the folder currently running is played back.
Pause
•Press the 1 PAU button buand playback is
interrupted.
•Press the 1 PAU button buagain and playback
continues.
GB/IE
KH2391_Content_UK.indd 19
19
05.09.2006 14:49:17 Uhr
Operation
Repeat
•Press the 3 RPT button bsand the current track
is repeated permanently. [RPT ON] appears in
the display window 9. The current track is
played back repeatedly.
•Press the 3 RPT button bsagain. [RPT OFF]
appears in the display window 9.
Scanning
•Press the 2 INT button btand the first few
seconds of all tracks are played back. [INT ON]
appears in the display window 9.
•Press the 2 INT button btagain and playback
continues without scanning the first few seconds.
[INT OFF] appears in the display window 9.
Random Playback
•Press the 4 RDM button brund the tracks are
played back randomly. [RDM ON] appears in
the display window.
•Press the 4 RDM button bragain and playback
is no longer random. [RDM OFF] appears in
the display window.
Removal
•Press the “Open” button 4. The control panel
folds towards the front.
Press die CD eject button dtand the CD, CD-R or
CD-RW is pushed out of the CD compartment cu.
Remove the CD, CD-R or CD-RW within 5 seconds. Otherwise this is drawn back into the
device.
L
USB Memory Stick, MP3 Player or SD / MMC
mCaution! Optimum data transfer at the USB
port docan only be guaranteed with a USB
memory stick. Due to the large number of USB
memory sticks available it is not possible to
guarantee compatibility with current and future
USB products.
Tip!
Use the USB memory stick / MP3 player or
SD / MMC in accordance with the operating
instructions!
20
Insertion
•Remove the protective cap from the USB plug do.
•Insert the USB plug of the USB audio storage
medium (MP3 player or USB memory stick)
(with data in MP3 format) completely into the
USB port do.
Or
•Insert the SD / MMC (with data in MP3 format)
completely into the SD and MMC port dn(see
illustration of the device).
•Please ensure that the flattened corner is facing
downwards and the contact surface to the left.
Playback
Playback begins automatically and the following
information appears in the display window 9:
track, running time, artist or folder. This information
varies depending on the storage medium used.
•If the USB stick is already in the USB port do,
press the • MODE button cnuntil USB appears
in the display window 9.
Or
•If there is an SD / MMC (with data in MP3 format)
in the SD and MMC port dn, press the -button cn
until 9MEM-CARD appears in the display
window.
For the following operations please see the following
chapter:
Playing back from Audio Storage Media / CDs, CD-Rs and CD-RWs:
- Selecting tracks
- Accessing track passages
-Selecting tracks on the basis of the storage
location
- Searching for tracks from folders
- Searching for tracks by the file name
- Changing the folder sequence
- Pause
- Repeat
- Scanning
- Random Playback
GB/IE
KH2391_Content_UK.indd 20
05.09.2006 14:49:17 Uhr
Operation / Remote Control / Troubleshooting
Disconnection
•Remove the USB plug of the USB audio storage
medium completely from the USB port do.
Or
•Press the SD / MMC in the SD and MMC port dn
in order to unlock it.
•Remove the SD / MMC from the SD and MMC
port dn.
L Remote Control
Tip!
Familiarise yourself with use of the similar buttons
on the remote control (see Fig. F). Please see the
layout of the control panel 1for the functions.
Ensure that the front edge of the remote control is
pointing in the direction of the sensor 3of the remote control 1.
•Please note that the AF function only works with
ther AF button 8on the control panel 1.
•Please also note the modified procedure for:
Adjusting the Volume
•Increase the volume by pressing the
VOL+ button gt
.
•Reduce the volume by pressing the
VOLbutton hm.
Inserting the Battery
•Press the unlock button ipand remove the
battery holder iofrom the battery compartment in(see Fig. G).
•Insert a lithium battery of type CR2025, 3 V DC
into the battery holder ioin such a way that
the side marked with a “+” is facing upwards.
Then push the battery holder iointo the battery
compartment inuntil it distinctly locks into place.
L Troubleshooting
E Fault e Cause E Correction
EThe device cannot be switched on and / or
[ERROR] appears in the display window 9.
The connections of the 12 V DC power supply
are faulty.
ECheck that the wiring of the device is correct
(see the section on „Connecting to the Vehicle‘s
12 V DC Power Supply“). Then press the RESET
button drwith the tip of the ballpoint pen.
Or
The 10 A f lflat blade fuse in the flat blade
fuse socket euis broken.
EReplace the broken flat blade fuse with a new
10 A flat blade fuse. Then press the RESET
button drwith the tip of the ballpoint pen.
Or
A 15 A fuse of the fuse holder of the 12 V DC
power supply is broken.
EReplace the broken fuse with a new 15 A fuse.
Then press the RESET button drwith the tip of
the ballpoint pen. If the fuse is broken again,
check that the wiring is correct.
Or
The device is broken.
EPlease contact the service centre for your
country (see guarantee card).
E The device cannot be operated.
The control panel 1is wrongly connected.
EEnsure that the control panel 1is correctly
connected (see the section on attaching the
control panel).
Or
The battery of the remote control is flat.
EReplace the used battery with a new lithium
battery of type CR2025, 3 V DC.
Or
The sensors 3of the control panel 1and / or
remote control may be dirty.
EClean the sensor 3of the control panel 1or
the remote control if necessary.
Or
The device is broken.
EPlease contact the service centre for your
country (see guarantee card).
E The stored stations do not remain stored if
the control panel is removed or the engine
turned off.
The connections for 12 V constant current fnand
12 volt ignition current fphave been mixed up
GB/IE
KH2391_Content_UK.indd 21
21
05.09.2006 14:49:18 Uhr
Troubleshooting / Care and Maintenance / Disposal
on the ISO plug in the vehicle (various layouts
of the respective manufacturers). As soon as
the ignition is switched off the internal memory
of the radio no longer has any power supply.
EThe colour coding of the stated cables must be
red and yellow. In this case swap over the connections for 12 V constant current fnand 12 volt
ignition current fp.
Some manufacturers provide the opportunity of
swapping the two cables by means of preassembled plug-in connectors.
A further possibility is to purchase an additional
ISO adapter (plug on socket) with plug-in connectors from a specialist shop and also to swap
over the two contacts (red and yellow).
This work should only be carried out by a professional electrician.
L Disposal
L Care and Maintenance
Battery Disposal
As the end consumer you are legally obliged according to the battery regulations to return all used batteries. Batteries containing pollutants are marked
with the adjacent symbols which indicate that it is
forbidden to dispose of them in the normal domestic
waste. The designations for the significant heavy
metals are:
Cd = Cadmium, Hg = mercury, Pb = lead.
Please take used batteries to a disposal centre of
your local authority or return them to the dealer
where you bought them.
With this you are fulfilling your legal obligations and
making an important contribution to environmental
protection.
The device is maintenance-free.
•Turn the device off.
•Clean the plastic surfaces of the device and
remote control with a dry cloth. Under no
circumstances should you use solvent or other
aggressive detergents.
Changing the Battery of the Remote Control
•Press the unlock button ipand remove the
battery holder iofrom the battery compartment in(see Fig. G).
•Insert a lithium battery of type CR2025, 3 V DC
into the battery holder ioin such a way that
the side marked with a + is facing upwards.
Then push the battery holder iointo the battery
compartment vuntil it distinctly locks into place.
22
The packaging consists of 100 % environmentally friendly materials which can be
disposed of at the local recycling points.
Do not throw electrical equipment into
the domestic waste!
According to European Directive 2002 / 96 / EC on old
electrical and electronic equipment and its implementation in national law, used electrical equipment
must be collected separately and recycled in an
environmentally friendly manner.
Please contact your local authority for information
on the possibilities of disposing of used electrical
equipment.
GB/IE
KH2391_Content_UK.indd 22
05.09.2006 14:49:18 Uhr
Information
L Information
L
Important Guarantee Information
Thank you for deciding to purchase a SilverCrest
product with 36 months‘ guarantee (from the date
of purchase).
Please read the operating instructions carefully before using your product for the first time.
If in spite of the high level of quality of this device
you should have cause for complaint or a hardware
fault should occur, you have the opportunity of contacting the service hotline (see guarantee card). If it
is not possible to solve the problem by telephone,
the hotline will give you a processing number
(RMA) as well as an address to which you can send
your product to have it repaired under the guarantee.
If you send your product in for repair, please enclose
a copy of the sales receipt. The device must be
packaged in such a way that it is not damaged
during transport and the RMA number must be
readily visible. Any products sent in without an
RMA number cannot be processed.
Subject to technical changes in the interests of further development.
Note: Your warranty claims are not affected by the
guarantee.
L
Importer
Kompernass GmbH
Burgstr. 21
D-44867 Bochum
Germany
GB/IE
KH2391_Content_UK.indd 23
23
05.09.2006 14:49:19 Uhr
24
GB/IE
KH2391_Content_UK.indd 24
05.09.2006 14:49:20 Uhr
Please fill out this section completely and enclose with the device!
Garantiekarte
Guarantee
MP3 Car Radio
KH 2391
In order to ensure that your device is repaired free
of charge please contact our service hotline. Please
have your sales receipt at hand when doing so.
Kompernass Service
United Kingdom
08707/876177
Kompernass Service Ireland
087-99 62 077
Please provide clear details of the sender:
www.mysilvercrest.de
Surname:
First name:
Street:
Postcode / Town:
Country:
Telephone:
Date / Signature:
✃
Description of the fault:
KH2391_Content_UK.indd 25
05.09.2006 14:49:22 Uhr
KH2391_Content_UK.indd 26
05.09.2006 14:49:22 Uhr
GB/IE
KH2391_Content_UK.indd 27
27
05.09.2006 14:49:22 Uhr
28
GB/IE
KH2391_Content_UK.indd 28
05.09.2006 14:49:22 Uhr