1
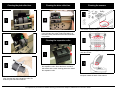
Cleaning imaging guides and camera
glass covers
Ngenuity Operator Utility
When cleaning is finished, reset the maintenance
reminder by clicking the link on the Maintenance
monitor.
Ngenuity 9000 Series Scanners
Release the fastening clips on the imaging guide
and remove it from the scanner. Clean both sides
with a Staticide wipe. Then wipe the guide with a
lint-free cloth.
Supplies and Accessories
Camera
cover
glass
CAT No.
Description
182 9779 Small Roller Kit with Feeder Preseparation Pad
121 1515 Medium Roller Kit with Feeder Preseparation Pad
119 5460 Large Roller Kit with Feeder Preseparation Pad
Locate the camera glass cover between and below
the LED lamps. Clean it with a dry swab. Do not
use solvents when cleaning the camera glass.
Reinsert the imaging guide into the scanner.
When finished, clean the bottom imaging guide and
bottom camera cover glass.
Reference Guide
175 0462 Ultralight Feeder Kit - for use with
feeder and pre-separation pad only
853 5981 Kodak Digital Science Roller Cleaning
Pads
896 5519 Staticide Wipes for Kodak Scanners
179 7158 Blower Brush
162 0640 Imaging Guide Assembly
199 8103 Calibration Kit (contains Calibration
Sheet 5K0449)
802 9654 Straight Pass-Through Adapter
896 1955 Front/Rear Printer Kit - Accessory
155 8667 Printer Kit Cartridge
EASTMAN KODAK COMPANY
343 State Street
Rochester, New York 14650 U.S.A.
A-61703 / Part #5K0570 October, 2011
© Eastman Kodak Company, 2011
TM: Kodak
Kodak Service & Support
www.kodak.com/go/disupport
1.800.822.1414
(US&C only; all other regions, contact your local
Kodak Support Center)
www.kodak.com/go/dicontacts
When contacting support, have the following available:
•
A description of your problem
•
Scanner model and serial number
•
Computer configuration
•
Software application you are using
Cleaning the pick roller tires
Cleaning the drive roller tires
Cleaning the sensors
Use the blower brush to clean all 7 sensors. The
feed sensor is shown above.
Remove the drive roller by pushing the roller to the
right. Hold the drive roller in place and slide it off
the shaft. Gently release the drive roller shaft back
into position.
Rotate the roller release lever up.
Cleaning the separation roller
Clean the gap sensors, page entry sensors and
pass thru sensor.
Push the pick roller to the right and remove it.
Pull the separation roller door forward and remove
the separation roller. Scrub the tires in a side-toside motion with a roller cleaning pad and re-install
the separation roller.
Scrub the roller tires in a side-to-side motion with a
roller cleaning pad and re-install the roller. Reinstall the pick roller when finished.
Clean the exit sensor which is located on the
transport toward the back of the scanner.
For replacement procedures and detailed cleaning procedures see Chapter 6, Maintenance in the User’s Guide.