1
Use & Care Guide
Manual de Uso y Cuidado
English / Espa_ol
Models/Modelos:
253.70051, 253.79081, 253.70101, 253.70121, 253.70151
l<enmore
P/N
2020211A1450
Sears Brands Management
Hofl:man Estates, IL 60179
www.kenmore.com
www.sears.com
Corporation
U.S.A.
TABLE
OF
Warranty
................................................................
Master
CONTENTS
Protection
Important
Additional
Care and Cleaning
3
Energy Saving
................................ 4
Troubleshooting
Guide
5-7
Normal
Sounds
........................................................
8
Call for Service
.......................................................
Agreements
Safety
Air conditioner
2
Instructions
Feature
............................
.........................................
Things ...................................................
Kenmore
Limited Warranty
When instaJJed, operated
and maintained
defect
in material
arrange
and workmanship
for free
If the sealed
refrigerant
1.
applies
family
9
...........................................
instructions, if this product
faiJs due to a
1-800-4-MY-HOME®
to
for free
is defective
within five years from the purchase
date,
call
repair.
for only 90 days from
the date
of purchase
if this product
is ever used for
purposes.
covers only
Expendable
..............................................
Ideas
within one year from the date of purchase,call
system of this product
to arrange
coverage
other than private
This warranty
to aJJ supplied
9
repair.
1-800-4-MY-HOME®
All warranty
according
.................................................
defects in material
items that can wear
and workmanship.
out from normal
Sears wlll
NOT pay for:
use, including but not limited
to filters,
belts, light bulbs,
and bags.
2.
A service technician
to instruct the user in correct
3.
A service technician
to clean or maintain
4.
Damage
to or failure
instructions supplied
5.
6.
of this product
to or failure
intended
purpose.
Damage
to or failure
Damage
to or failure
resulting
of this product
caused
Customer's
sole and exclusive
one year
from
warranties;
limltatlon
remedy
or maintenance.
or maintained
according
to the all
damages.
Some states and provinces
damages,
or limitation
on the duration
cleaners,
chemicals
or utensils
with the product.
from unauthorized
modifications
made to this product.
of remedies
of merchantability
allowed
abuse, misuse or use for other than its
by the use of detergents,
under this limited warranty
including warranties
or the shortest period
accident,
in all instructions supplied
of parts or systems resulting
of impiled
warranties,
if it is not installed, operated
of this product
Disclaimer
Implied
installation, operation
with the product.
Damage
other than those recommended
7.
product
this product.
shall be product
by law. Sears shall not be liable
do not allow
of implied
the exclusion
warranties
repair
or fitness for a particular
for incidental
or limitation
of merchantability
as provided
purpose,
herein.
are limited
of incidental
or consequential
or fitness, so these exclusions
or Jimitations may not appJy to you.
This warranty
you specific
applies
legal
only while this appliance
is used in the United States or Canada.
This warranty
rights, and you may also have other rights which vary from state to state.
Sears Brands Management Corporation, Hoffman Estates, IL 60179
Sears Canada inc., Toronto, Ontario, Canada MSB 2C3
2
to
or consequential
gives
10-1 1
11
Back Cover
Master Protection Agreements
Congratulations
on making
dependable
operation.
when
a Master
having
The Master
includes:
[]
Protection
a smart
purchase.
But like all products,
Protection
Agreement
Agreement
Your new Kenmore ® product
it may require
preventive
is designed
maintenance
and manufactured
or repair
for years
of
from time to time. That's
can save you money and aggravation.
also helps extend
the life of your new product.
Here's what
the Agreement
_
Ports and Iobor needed to help keep products operating properly under normal use, not just defects. Our
coverage goes well beyond the product warranty. No deductibles, no functional failure excluded from coverage
-- real protection.
Expert service by a force of more than 10,000 authorized Sears service technicians, which means someone
you can trust will be working on your product.
Unlimited service calls and nationwide service, as often as you want us, whenever you want us.
"No-lemon"
guarantee -- replacement of your covered product if four or more product failures occur within twelve
months.
[]
[]
[]
[]
[]
[]
Product replacement if your covered product can't be fixed.
Annual Preventive Maintenance Check at your request -- no extra charge.
Fast help by phone -- we call it Rapid Resolution -- phone support from a Sears representative on all products.
Think of us as a "talking owner's manual."
Power surge protection against electrical damage due to power fluctuations.
$250 Food Loss Protection annually for any food spoilage that is the result of mechanical failure of any covered
refrigerator or freezer.
Rental reimbursement if repair of your covered product takes longer than promised.
10% discount off the regular price of any non-covered repair service and related installed parts.
[]
[]
[]
[]
Once
you purchase
anytime
day
The Master
Protection
warranty
period,
expires.
Purchase
Some limitations
1-800-827-6655.
Coverage
the Agreement,
a simple
or night, or schedule
Agreement
we will provide
your Master
call is all that it takes for you to schedule
purchase.
Or, a prorated
refund.
Agreement
apply.
service.
You can call
online.
is a risk free
Protection
varies
phone
appointment
a full
and exclusions
in Canada
Sears Installatlon
a service
If you cancel
for any reason
refund
anytime
after
during
the product
the product
warranty
period
todayJ
For prices and additional
on some items. For full
details
information
in the U.S.A.call
call Sears Canada
at 1-800-36|-6665.
Service
For Sears professional
installation
of home appliances,
home items, in the U.S.A. or Canada
This Use & Care
air conditioner
cover
caution
every
call
Guide
provides
only as instructed
possible
condition
must be practiced
Record Your
Model
in the space
located
on the outside
instructed
provided
Serial Number :
Purchase Date :
openers,
operating
in this guide.
and situation
below
of the cabinet,
" Care and
Model Number :
specific
when installing,
may be easier
under
door
water
heaters,
and
other
major
®.
instructions
These instructions
that
for your
may occur. Common
operating,
model.
Use the
are not meant
and maintaining
to
sense and
any appliance.
and Serial Numbers
Record
the numbers
garage
|-800-4-MY-HOME
the model
or behind
by using a flashlight
Cleaning.
"
and serial
filter
numbers.
at the bottom
or by removing
The serial
plate
of unit. Reading
the cabinet
front
as
is
important
Safety
Read allinstructions
instructions
before using this air conditioner.
For Your Safety
Do not store or use gasoline or other flammable
or any other appliance.
The power supply cord with
this air conditioner contains a current
detection device designed to reduce the risk of
fire.
Please refer to the section'Operation of
Current Device' for details.
In the event that the power supply cord is
damaged, it cannot be repaired, and it must
be replaced with a cord from the Product
manufacturer.
Avoid fire hazard or electric
shock. Do not use an extension cord or an
adaptor
plug. Do not remove any prong from
the power cord.
vapors and liquids in the vicinity of this
Read product labels for flammability
and other warnings.
Prevent Accidents
To reduce the risk of fire, electrical shock, or injury to persons when using your air
conditioner, follow basic precautions, including the following:
Be sure the electrical service is adequate
for the model you have chosen. This
information
can be found on the nameplate, which is located on the side of the
cabinet.
If the air conditioner is to be installed in a window, you will probably
want to
dean both sides of the glass first. If the window is a triple-track
type with a
screen panel included,remove
the screen completely
before installation.
Be sure the air conditioner has been securely and correctly installed according
to the separate installation instructions provided with this manual. Save this
manual and the installation
instructions for possible future use in removing or
reinstalling this unit.
When handling the air conditioner, be careful to avoid cuts from sharp metal
fins on front and rear coils.
Electrical Information
I!
The complete electrical rating of your new room air conditioner is stated on the serial
plate. Refer to the rating when checking the electrical requirements.
Be sure the air conditioner is properly grounded. To minimize shock and fire
hazards, proper grounding is important. The power cord is equipped with a
three-prong grounding plug for protection against shock hazards.
Your air conditioner must be used in a properly grounded wall receptacle. If the
wall receptacle you intend to use is not adequately
grounded or protected by a
time delay fuse or circuit breaker, have a qualified electrician install the proper
receptacle.
Do not run air conditioner without outside protective cover in place. This could
result in mechanical damage within the air conditioner.
Do not use an extension cord or an adapter plug.
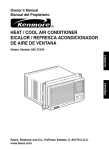
Power supply cord
with 3-prong grounding
plug and current
detection device
READ THIS SECTION
Unit must be upright
Operation
Device
Plug in &
press RESET
BEFORE ATTEMPTING
for one hour prior
of Current
TO OPERATE AIR CONDITIONER.
to operating.
The power supply cord contains a current device that senses damage to the
power cord.
To test your power supply cord do the following:
1. Plug in the Air Conditioner.
2. The power supply cord will have TWO buttons on the plug head. Press the
TEST button. You will notice a click as the RESET button pops out.
3. Press the RESET button. Again you will notice a click as the button engages.
4. The power supply cord is now supplying electricity to the unit. (On some
products this is also indicated by a light on the plug head).
NOTES:
• Do not use this device to turn the unit on or off.
. Always make sure the RESET button is pushed in for correct operation.
• The power supply cord must be replaced
if it fails to reset when either the
TEST button is pushed, or it cannot be reset. A new one can be obtained by
contacting Sears at 1 -800-4-MY-HOME
®.
• If power supply cord is damaged,
it CANNOT be repaired.
It MUST be
replaced
by one obtained
by contacting Sears at 1-800-4-MY-HOME
®.
4
Air Conditioner
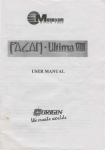
ELECTRONIC
Features
CONTROL
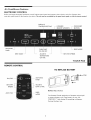
Before you begin, thoroughly familiarize
yourself with the control panel and remote as shown below and all its functions, then
touch the symbol pads for the functions you desire. The unit can be controlled by the panel touch pads or with the remote control.
DISPLAYS
TEMPERATURE/TIME
ACTIVATES .................
TIMER
................
INFRARED
REMOTE WINDOW
TURNS UNIT
................
FILTER RESET
BUTTON
/................
SLEEP MODE
ON OR OFF
SETS MODE ...................
ADJUSTS
.................
...................
SETS FAN SPEEDS
TEMPERATURE
OR TIME
T OUCH
PAD
REMOTE CONTROL
TO REPLACE BATTERY
_4.._TAB
ACTIVATES
TIMER
SETS FAN
SPEEDS
ADJUSTS
TEMP & TIME
Battery Size: CR2025
AUTO FAN
SLEEP
MODE
Turn Remote Control upside down. Squeeze tab and pull
to remove battery
POSITIVE("+")
Re-insert battery
5
tray. Place battery
side facing
tray.
in tray with
UP, according
to diagram.
Air Conditioner
Note: The following
Remote Control.
Features
Ccontlnued)
instructions describe
the Control
To turn unit on or off press the ON/OFF
temperature
Panel Touch Pads. The same instructions apply
_) button:
setting of 72 °F.
Note: The unit is programmed
To use Cool, press the MODE
To change the Temperature
to the
to start in the cool mode, with high fan speed
and a
button to select:
Setting use the UP and Down
arrows
as required:
To adjust Fan Speeds press the Fan Speed button and select:
MED
To use the Auto Fan Feature
HIGH
press the Fan Speed button and select AUTO:
Note: Fan speed
dictates.
starts at high and adiusts to a slower speed as the room temperature
For example,
if the room doesn't
If the room temperature
automatically
rises quickly,
go to the highest speed. The fan speed
speed as the room returns to the original
To operate
get too warm it will stay at the slowest speed.
such as when a door is opened,
on Fan Only, press the MODE
will re-adiust
it will
back to the slowest
set temperature.
button to select:
Use Fan Only function to circulate
any fan speed you prefer
DISPLAY.
room air without
air conditioner
and the actual room temperature
6
cooling.
You can use
will be displayed
in the
Air Conditioner Features
(continued)
To use Energy Saver press the MODE button to select:
You will save energy
usage in this mode. The compressor
the room is at the desired temperature.
and motor will turn off once
The air will be sampled for 20 seconds every
10 minutes until the room is above the set temperature,
at which point the compressor
turns back on and the fan runs. The entire process is now repeated.
To use the Sleep feature
press the SLEEP button and the LED will illuminate:
The set temperature
will increase 2 °F 30 minutes after this mode is selected. It will
increase again after 30 minutes by another 2 °F. It will stay at this set point for 7 hours,
and then return to the original
setting.
To use the Timer function press the TIMER button and the LED will illuminate:
Press the UP and DOWN
arrows to select the desired time up to 24 hrs. The control will
count down the time remaining in 1 and 0.5 hr increments. If you need to change the set
temperature,
press MODE then the UP/DOWN
will revert to the hours remaining.
button. The mode will operate
arrows. Then after 5 seconds the display
This mode can be cancelled
one time, then the above
NOTE: Timer button is functional
when On/Off
by pressing the TIMER
steps have to be repeated.
button is set to either On or Off. When
set to On, the amount selected is the time remaining
until the unit shuts Off. When set
to Off, the amount is the time until the unit turns On.
Check Filter Feature:
After 250 hours of operation,
the Filter Reset LED will light. This is a reminder to clean
the filter housed behind the front panel to keep the unit operating efficiently. Pressing the
FILTER RESETbutton for 3 seconds will reset this reminder and turn off the LED.
7
ADDiTiONAL
THINGS YOU SHOULD KNOW
Now that you understand
familiar.
the basic operation
functions, here are more control features
with which you should became
The "cool" circuit has an automatic 3 minute time delayed start if the unit is turned off and on quickly. This prevents
overheating
of the compressor and possible circuit breaker tripping. The fan will continue to run during this time.
There is a 2-Second delay for the compressor shutting down when selecting
of having to roll through to select another mode.
The control will maintain the set temperature
within 2 degrees
Fahrenheit,
FAN ONLY. This is to cover the possibility
between
60F and 90F degrees.
The control is capable of displaying temperature in degrees Fahrenheit or degrees CeLsius. To convert from one to the
other and back, press and hold both the "TEMP/TIMER" Up(A)
and Down (v)
buttons for 3 seconds.
FAULT CODES :
If the display
reads "ES" or "AS", a sensor has failed.
Evaporator
Contact
1-800-4-MY-HOME®
coil sensor
for repair.
Air temperature
sensor
AUTO RE-START :
After a power outage, the unit will remember
the last setting and return the unit to the same setting once power is restored.
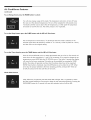
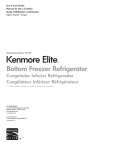
FRESH AIR VENT CONTROL (On 253.70101,253.70121,253.70151
models)
1. Pushed In (Fig. 1) - Recirculates inside air
2. Partially Pulled Out (Fig. 2) - Draws fresh air into room
3. Fully Pulled Out (Fig. 3) - Exhausts air from room and draws
air into room
fresh
Figure 1 ( VENT CLOSED )
Figure 2 ( VENT OPEN )
Figure 3 ( VENT & EXHAUST OPEN )
8
LOUVERS
Air Directional
Air directional
8-way
Louvers
louvers control air flow direction.
directional
system described
Your air conditioner
has the
below.
The louvers will allow you to direct the air flow Up or Down and Left or Right
throughout the room as needed. Rotate the Auger Wheels until the desired
Left or Right direction is obtained.
Pivot horizontal louvers with your fingertips
until the desired Up!Down direction is obtained. There are a total of 8 possible
AUGER WHEELS
Care and Cleaning
air directional
orientations
available
with this system.
Clean your air conditioner
occasionally to keep it looking new. Be sure to
unplug the unit before cleaning to prevent shock or fire hazards.
Air Filter Cleaning
The air filter should be checked
at least once a month to see if cleaning
necessary.
Trapped
particles in the filter can build
cooling coils and cause an accumulation
•
•
.
°
•
up and block air from flowing
of frost on the cooling coils.
is
to
On models with Fresh Air Vent Control, push in control to vent closed position.
Open the front panel.
Grasp the filter by the center and pull up and out.
Wash the filter using liquid dishwashing detergent
and warm water. Rinse
filter thoroughly. Gently shake excess water from the filter. Be sure filter is
thoroughly dry before replacing.
Or instead of washing, you may vacuum the filter clean.
NOTE: When replacing the air filter after cleaning, make sure the tabs on
the air filter are on the upper part of filter, and placed outward as shown in
the drawing on the left side.
Air Filter
Cabinet Cleaning
" Be sure to unplug the air conditioner to prevent shock or fire hazard. The
cabinet and front may be dusted with an oil-free cloth or washed with a
cloth dampened
in a solution of warm water and mild liquid dishwashing
detergent. Rinse thoroughly
and wipe dry.
• Never use harsh cleaners, wax or polish on the cabinet front.
" Be sure to wring excess water from the cloth before wiping around the
controls. Excess water in or around the controls may cause damage to the
air conditioner.
Plug in air conditioner.
Winter Storage
If you plan to store the air conditioner during the winter, remove it carefully
from the window according to the installation
instructions. Cover it with cloth
or return it to the original carton.
NOTE: Store air conditioner
tal with base down).
Energy
Saving
Ideas
in a dry place in upright
The capacity of the room air conditioner
and satisfactory
operation.
position
(horizon-
must fit the room size for efficient
Install the room air conditioner on the shady side of your home. A window
that faces north is best because it is shaded most of the day.
_- Do not block inside airflow around air conditioner with blinds, curtains or
furniture;
or outside
with shrubs, enclosures,
or other buildings.
Close the fireplace
damper, floor and wall registers so cool air does not
escape up the chimney and into the duct work.
Keep blinds and drapes in other windows closed during the sunniest part of
the day.
Clean the air filter
as recommended
Proper insulation and weather
out and cool air in.
in the section "Care and Cleaning."
stripping
in your home will help keep warm air
External house shading with trees, plants or awnings
air conditioner's
work load.
will help reduce the
Operate
heat producing appliances such as ranges, washers, dryers
dishwashers during the coolest part of the day.
9
and
g
Room Air Conditioner
THE AiR CONDITIONER
Troubleshooting
Guide
WiLL NOT OPERATE
Check if...
Then ...
Power supply cord is disconnected
Firmly push the cord into a live wall outlet having proper voltage.
House fuse has blown or circuit breaker
tripped
(Page 4)
Replace the fuse with a time delay type or reset the circuit breaker.
(Page 4)
Power is OFF.
Push ON/OFF
Temperature setting is warmer than room temperature.
Set temperature
Unit was turned OFF and ON too quickly.
Built-in delay
Timer shut unit OFF.
Push ON/OFF
Touch Pad and Remote not responding.
Unit is in a locked mode. Unplug unit for 10 seconds, and then plug in again and
the controls will reset. (Page 4)
Power Cord has tripped
Press the RESETbutton on the plug head. (Page 4)
THE AiR CONDITIONER
Button to turn ON. (Page 6)
to a lower setting. (Page 6)
will prevent compressor from turning on for 3 minutes.
Button to turn unit ON. (Page 6)
BLOWS FUSES OR TRIPS CIRCUIT BREAKER
Check if...
Then ...
House fuse has blown or circuit breaker
Too many electrical
tripped.
Replace the fuse with a time delay type or reset the circuit breaker.
devices are being used on the same circuit.
Unplug or relocate
electrical devices being shared on same circuit.
Unit is rated over 7.5 amps.
Unit should be plugged
Unit is plugged
Do not use an extension cord to run the unit. (Page 4)
into an extension cord.
into a single circuit outlet.
Turn unit OFF and wait 3 minutes before
THE AIR CONDITIONER
Ch_
__
if...
Th_
...
I Set fan speed at the fastest setting for maximum cooling. (Page 6)
g
is on.
JENERGY
SAVER
feature (Page
does not
I constant air
circulation.
5) circulate air continually.
JTimer turned unit ON or shut unit OFF.
THE AiR CONDITIONER
restarting. (Page 6)
TURNS ON AND OFF BY iTSELF
nit was turned OFF and ON too quickly.
Outside temperature is extremely hot.
JENERGY SAVER feature
(Page 4)
I Push ON/OFF
Set mode to COOL for
Button to turn unit ON or OFF. (Page 6)
DOES NOT COOL THE ROOM miCE BEHIND FRONT PANEL
Check if...
Then ...
Outside temperature
is below 60°F.
Set mode to FAN ONLY and fan speed to fastest setting to defrost coil. (Page 6)
Filter is dirty.
Open front panel. Remove filter. Rinse or vacuum filter. Replace filter. Close
Panel (Page 9)
BTU size is too large.
A lower capacity
unit may be required
depending
on the size of the room being
cooled. (Page 9)
THE AiR CONDiTiONER
DOES NOT COOL THE ROOM mNO iCE BEHIND FRONT PANEL
Check if...
Then ...
Filter is dirty.
Open front panel. Remove filter. Rinse or vacuum filter. Replace filter. Close
Panel (Page 9)
Temperature
setting is warmer than room temperature.
Room temperature
is below 60°F.
Front of unit is blocked by furniture, drapes,
Set temperature
to a lower setting. (Page 6)
Unit is not designed to cool below 60°F. (Page 8)
blinds, etc.
Clear away area in front of unit.
Back of unit is blocked by leaves, dirt, branches, etc.
Clear away
Doors, windows, registers, etc. are open.
Close doors, windows, registers, etc.
Unit recently turned on.
Allow time to cool a larger
Temperature
Open front panel. Remove filter. Turn end of temperature
Replace filter. Close panel.
sensor is touching the coil.
Excessive heat in the room being cooled.
back of unit.
room.
sensor away from coil.
Use exhaust vents while cooking or bathing. Limit use of heat producing
during the hottest part of the day. (Page 9)
Vent control (on some models) is pulled open.
Push in vent control for maximum cooling. (Page 8) (CLOSED POSiTiON)
10
appliances
Room Air Conditioner
Troubleshooting
Guide
(Continued)
THE AiR CONDiTiONER
RUNS TOO MUCH
Check if...
Then ...
Energy Saver is chosen.
inside blower continues operating for one minute to use as muchcooITng that is
available
Current Unit replaced
an older unit.
in the evaporator.
Newer, higher efficiency Air Conditioner
may run longer to cool the room. Total
energy consumption is less due to higher efficiency.
BTU size is too small.
A higher capacity unit may be required
cooled. (Page 9)
WATER DRiPPiNG
_sn_t properly
FROM AiR CONDiTiONER
on the size of the room being
= iNSiDE ROOM
Ja
carpenter's
to provTde
proper
drainage.slope
ReposTtTonor
shim(1/2
cabTnet
as on
I Unit
should be level)
mounted
on a 1/4"
downward
to the outside
bubble
Inecessary. DO NOT drill drain pan.
installed.
WATER DRIPPING
depending
FROM AiR CONDITIONER
= OUTSNDE ROOM
Check if...
Then ...
Room is hot and humid.
Normal operation
during hot and humid days.
THE REMOTE WILL NOT OPERATE AiR CONDiTiONER
Check if...
Then ...
Batteries are not installed properly.
Verify
The remote is pointed at the unit.
The remote may not work properly
the unit.
TYPICAL AiR CONDiTiONER
batteries
are installed properly.
(Page 5)
when used at extreme angles to the front of
SOUNDS YOU MAY HEAR
Check if...
Then ...
High pitched whine or pulsating noise that cycles on and off.
Compressor - Normal noise due to modern high efficiency compressors. (Page 1 1)
Rushing air sound.
Fan/Motor
- Normal noise of higher efficiency fans pushing air further into the
room. (Page 1 1)
Pinging or swishing sounds.
Condenser - Normal noise of water hitting the condenser to increase energy
efficiency. (Page 11 )
Gurgling
Evaporator
or hissing sounds.
- Normal noise of refrigerant
passing through evaporation.
(Page 1 1 )
Beeping.
Electronic Control - Normal noise when electronic control settings are changed.
Vibration.
Unit Vibration
- Due to poor wall or window construction or incorrect installation.
(Page 1 1 )
Normal
High Pitched Whine
Sounds
Today's
high efficiency
compressors
high pitched
the cooling
Vibration
may have a
Unit may vibrate
whine during
noise because of poor wall
or window construction or
cycle.
incorrect
and make
installation.
Sound of Rushing Air
At the front of the unit,
you may hear the sound
of rushing air being moved
by the fan.
Pinging
or Swishing
Droplets
of water
hitting
during
normal
condenser
operation
Gurgle/Hiss
"Gurgling
or hissing" noise may
be heard
due to refrigerant
through
evaporator
during
"pinging
sounds.
passing
normal
operation.
11
may cause
or swishing"
Your Home
For troubleshooting,
product manuals and expert advice:
managemylife
www.managemylife.com
For repair - in your home - of all major brand appliances,
lawn and garden equipment, or heating and cooling systems,
no matter who made it, no matter who sold it!
For the replacement parts, accessories and
owner's manuals that you need to do-it-yourself.
For Sears professional installation of home appliances
and items like garage door openers and water heaters.
1-800-4-MY-HOME
Call anytime,
®
(1-800-469-4663)
day or night (U.S.A. and Canada)
www.sears.com
www.sears.ca
Our Home
For repair of carry-in items like vacuums, lawn equipment,
and electronics, call anytime for the location of your nearest
Sears Parts & Repair Service
1-800-488-1222
(U.S.A.)
www.sears.com
To purchase a protection
1-800-827-6655
agreement
Para pedir servicio de reparaci6n
a domicilio, y para ordenar piezas:
(1-888-784-6427)
www.sears.com
® Registered Trademark
/ TMTrademark
®
1-800-469-4663
(Canada)
www.sears.ca
(u.S.A.)
1-888-SU-HOGAR
Center
on a product serviced by Sears:
1-800-361-6665
(Canada)
Au Canada pour service
en fran(_ais:
1-800-LE-FOYER
Mc
(1-800-533-6937)
www.sears.ca
of KCD IP, LLC in the United States, or Sears Brands, LLC in other countries
® Marca Registrada / TMMarca de Fabrica de KCD IP, LLC en Estados Unidos, o Sears Brands, LLC in otros paises
MCMarque de commerce / MDMarque d6pos6e de Sears Brands, LLC