1
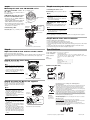
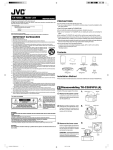
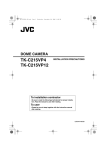
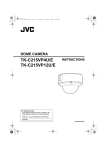
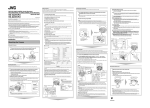
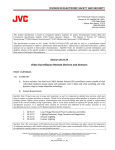
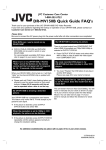
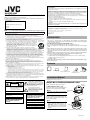
INFORMATION FOR USA
■ INFORMATION
This equipment has been tested and found to comply with the limits for a Class B digital device, pursuant
to Part 15 of the FCC Rules.
These limits are designed to provide reasonable protection against harmful interference in a residential
installation. This equipment generates, uses, and can radiate radio frequency energy and, if not installed
and used in accordance with the instructions, may cause harmful interference to radio communications.
However, there is no guarantee that interference will not occur in a particular installation.
HEATER UNIT
KA-ZH215U
If this equipment does cause harmful interference to radio or television reception, which can be
determined by turning the equipment off and on, the user is encouraged to try to correct the interference
by one or more of the following measures:
• Reorient or relocate the receiving antenna.
• Increase the separation between the equipment and receiver.
• Connect the equipment into an outlet on a circuit different from that to which the receiver is connected.
• Consult the dealer or an experienced radio/TV technician for help.
INSTRUCTIONS
Thank you for purchasing the JVC option hater unit.
To obtain the best results from your new camera, read these instructions carefully before use;
retain the manual for future reference.
For Customer Use:
Enter below the Serial No. which is located on the
body.
■ CAUTION
CHANGES OR MODIFICATIONS NOT APPROVED BY JVC COULD VOID USER’S AUTHORITY TO
OPERATE THE EQUIPMENT.
Retain this information for future reference.
Model No.
Dear Customer,
Serial No.
This apparatus is in conformance with the valid European directives and standards regarding
electromagnetic compatibility and electrical safety.
These instructions are for KA-ZH215U
These are general IMPORTANT SAFEGUARDS and certain items may not apply to all appliances.
European representative of Victor Company of Japan Limited.is:
JVC Technology Centre Europe GmbH
P.O.Box 10 05 52
61145 Friedberg
Germany
IMPORTANT SAFEGUARDS
1.
2.
3.
4.
Read all of these instructions.
Save these instructions for later use.
All warnings on the product and in the operating instructions should be adhered to.
Unplug this appliance system from the wall outlet before cleaning. Do not use liquid cleaners or
aerosol cleaners. Use a damp cloth for cleaning.
5. Do not use attachments not recommended by the appliance manufacturer as they may cause hazards.
6. Do not use this appliance near water - for example, near a bathtub, washbowl, kitchen sink, or
laundry tub, in a wet basement, or near a swimming pool, etc.
7. Do not place this appliance on an unstable cart, stand, or table. The appliance may PORTABLE CART WARNING
fall, causing serious injury to a child or adult, and serious damage to the appliance. (symbol provided by RETAC)
Use only with a cart or stand recommended by the manufacturer, or sold with the
appliance. Wall or shelf mounting should follow the manufacturer's instructions,
and should use a mounting kit approved by the manufacturer. An appliance and
cart combination should be moved with care.
Quick stops, excessive force, and uneven surfaces may cause the appliance and
cart combination to overturn.
8. Slots and openings in the cabinet and the back or bottom are pro-vided for
S3125A
ventilation, and to insure reliable operation of the appliance and to protect it from
overheating, these openings must not be blocked or covered. The openings
should never be blocked by placing the appliance on a bed, sofa, rug, or other similar surface.
This appliance should never be placed near or over a radiator or heat register. This appliance should
not be placed in a built-in installation such as a bookcase unless proper ventilation is provided.
9. This appliance should be operated only from the type of power source indicated on the marking label.
If you are not sure of the type of power supplied to your home, consult your dealer or local power
company. For appliance designed to operate from battery power, refer to the operating instructions.
10.For added protection for this product during a lightning storm, or when it is left unattended and
unused for long periods of time, unplug it form the wall outlet and disconnect the antenna or cable
system. This will prevent damage to the product due to lightning and power-line surges.
11.Do not allow anything to rest on the power cord. Do not locate this appliance where the cord will be
abused by persons walking on it.
12.Follow all warnings and instructions marked on the appliance.
13.Do not overload wall outlets and extension cords as this can result in fire or electric shock.
14.Never push objects of any kind into this appliance through cabinet slots as they may touch
dangerous voltage points or short out parts that could result in a fire or electric shock. Never spill
liquid of any kind on the appliance.
15.Do not attempt to service this appliance yourself as opening or removing covers may expose you to
dangerous voltage or other hazards. Refer all servicing to qualified service personnel.
16.Unplug this appliance from the wall outlet and refer servicing to qualified service personnel under
the following conditions:
When the power cord or plug is damaged or frayed.
If liquid has been spilled into the appliance.
If the appliance has been exposed to rain or water.
If the appliance does not operate normally by following the operating instructions. Adjust only those controls
that are covered by the operating instructions as improper adjustment of other controls may result in damage
and will often require extensive work by a qualified technician to restore the appliance to normal operation.
e. If the appliance has been dropped or the cabinet has been damaged.
f. When the appliance exhibits a distinct change in performance - this indicates a need for service.
PRECAUTION
To save energy, turn the power off when not in use.
This unit is a special heater for TK-C215VP4U, TK-C215VP4E, TK-C215VP12U,TKC215VP12E (henceforth referred to TK-C215VP series) Dome camera. It cannot be installed
to other color video cameras.
●
Use AC 24 V power supply for TK-C215VP series.
● Do not modify this machine without prior permission. Accidents may occur.
● Refer to the instructions for TK-C215VP series on installing the camera and connecting the
cables.
● After installing to TK-C215VP series , switch off the machine power supply and then connect.
●
Always use the desiccant that comes with this unit. Other desiccants or the desiccant that
comes with TK-C215VP series are unable to remove moisture completely under extreme low
temperature.
● When the heater board is installed, the switch on the camera unit is hidden and image adjustment cannot be made. Always adjust the image quality before installing the heater.
● Do not use the heater unit in the following locations:
• Locations where the surrounding temperature exceeds -22J to 122J (-30f to 50f).
• Locations where corrosive gas occurs.
• Vibrating locations
●
●
●
Do not touch this unit during operation or after operation as its temperature is high.
It may cause a burn.
Contents
a.
b.
c.
d.
17.When replacement parts are required, be sure the service technician has used replacement parts
specified by the manufacturer that have the same characteristics as the original part. Unauthorized
substitutions may result in fire, electric shock, or other hazards.
18.Upon completion of any service or repairs to this appliance, ask the service technician to perform
routine safety checks to determine that the appliance is in safe operating condition.
Instructions
1
Warranty Card
1
Service Information Card
1
Desiccant
(Service Parts
No.LW40790-001A)
1
HEATER UNIT
1
Installation Method
Mount this unit onto TK-C215VP series.
FOR USA AND CANADA
CAUTION
RISK OF ELECTRIC SHOCK
DO NOT OPEN
CAUTION
: TO REDUCE THE RISK OF ELECTRIC
SHOCK. DO NOT REMOVE COVER (OR
BACK). NO USER-SERVICEABLE PARTS
INSIDE.REFER SERVICING TO
QUALIFIED SERVICE PERSONNEL.
Due to design modifications, data given in this
instruction book are subject to possible change
without prior notice.
WARNING:
TO REDUCE THE RISK OF FIRE OR
ELECTRIC SHOCK, DO NOT EXPOSE
THIS APPLIANCE TO RAIN OR
MOISTURE.
The lightning flash wish arrowhead
symbol, within an equilateral triangle
isintended to alert the user to the presence
of uninsulated "dangerous voltage" within
the product's enclosure thatmay be of
sufficient magnitude to constitute a risk of
electric shock to persons.
The exclamation point within an
equilateral triangle is intended to alert
theuser to the presence of important
operating and maintenance (servicing)
instructions in the literature
accompanying the appliance.
AVERTISSEMENT:
POUR EVITER LES RISQUES
D'INCENDIE OU D'ELECTROCUTION,
NE PAS EXPOSER L'APPAREIL A
L'HUMIDITE OU A LA PLUIE.
INFORMATION (FOR CANADA)
RENSEIGNEMENT (POUR CANADA)
This Class B digital apparatus complies with
Canadian ICES-003.
Cet appareil numerique de la Classe B est
conforme a la norme NMB-003 du Canada.
Step1: Disassembling TK-C215VP series
Switch off the power supply of the camera.
Wrench
(Supplied)
1. Removing the dome cover
Remove the dome cover by unfastening the 3
fastening screws using the wrench supplied.
Memo
●
The dome cover and base are connected
with fall prevention wire.
Fall Prevention
Wire
2. Removing the inner dome
The inner dome is fastened using lugs at 3 different positions. Grasp the inner dome and
remove it from the lugs.
Inner
Dome
Note
●
Before touching the camera unit, make
sure to touch the metal surface of the
[MONITOR] terminal to discharge any
static electricity from your body. Static
electricity may cause the camera to malfunction.
Lug(x 3)
*
TK-C215VP4 is used in the illustration.
LST0472-001A
Step6: Installing the dome cover
Step2:
Mounting this unit onto TK-C215VP series
1. Install TK-C215VP series on
1. Cleaning the dome cover
[to HEATER] terminal
Before mounting, remove any dust or dirt from
the dome cover.
the ceiling
Refer to TK-C215VP series “INSTRUCTIONS” for
the installation method.
Memo
for Heater of TK-C215VP series
HEATER fastening
hole
• Mount this unit onto DOME CAMERA as
shown in the right figure.
• Insert the claw of this unit into Space for
2
3
2. Mounting the dome cover to
Space for Heater
• After inserting this unit into Space for Heater,
make sure to tighten the fastening screw of
this unit with a + screwdriver.
3. Connecting cable
Dirt that is not removed from the cover
before mounting may appear on the camera’s image.
● Do not apply excessive force to the dome
cover such as stretching it.
●
2. Mounting this unit onto Space
Heater. Make sure to mount properly.
Position Alignment Mark (x 3)
the base
HEATER fastening hole
[to HEATER]
terminal
3.
Cable
Connect the cable to the [to HEATER] terminal of
TK-C215VP series.
Wrench (Supplied)
Mount the dome cover by aligning the 3 position marks on the base with the dome cover.
Note
●
When mounting the dome cover, take note
that the desiccant is not caught between
base and dome cover.
*
TK-C215VP4 is used in the illustration.
Space for Heater
3. Fastening the dome cover
Fasten by tightening the 3 fastening screws of the dome cover using the wrench supplied.
Step7: Check items after installation
Claw
Cable
2.
Fastening Screws
*
TK-C215VP4 is used in the illustration.
Check the following items after installation.
□ Is the power supply for TK-C215VP series AC 24 V?
□ Have you inserted the desiccant that comes with this unit?
□ Does an image appear normally on the monitor after switching on the power for TK-C215VP
series?
□ Is the cable of this unit connected to the [to HEATER] terminal of TK-C215VP series?
□ Has the fastening screw of this unit been tightened properly?
Specifications
Step3:
Adjust the field of view and lens of the camera
Switch on the power supply of the camera.
Refer to TK-C215VP series “INSTRUCTIONS” on how to adjust the field of view and lens of the
camera.
After adjusting the field of view and lens of the camera, switch off the power supply of the
camera.
Step4: Install the inner dome
Power supply / Voltage :AC 24 V ± 10%, 60 Hz/50 Hz
Power consumption
:18 W (during AC 24 V)
Heater operation
:Surrounding temperature -22 °F to 32°F ( -30f to 0f)(auto on/off)
* By using this unit, the operation guarantee temperature of the camera
becomes -22 °F to 122°F (-30f to 50f)
Mass
:56 g
Accessories
:Instructions .......................................... 1
Warranty Card ..................................... 1
Service Information Card .................... 1
Desiccant ............................................ 1
(Service Parts No.LW40790-001A)
Mount the inner dome to the 3 lugs.
Note
Lug(x 3)
Mount the inner dome such that it does
not cover the lens.
● When mounting the inner dome, make
sure not to move the position of the lens.
Doing so may cause the preset angle of
view to go out of alignment.
●
o Dimensions(Unit: mm)
*
52
Inner
Dome
TK-C215VP4 is used in the illustration.
81
45.5
* Design and specifications are subject to change without notice.
Step5: Inserting the Desiccant supplied
Take out the desiccant from the aluminum
package, insert it into the desiccant insertion
space of the camera unit and fasten using the
lug plate.
Information for Users on Disposal of Old Equipment
[European Union]
Memo
During reconnection or re-installation
after repair or maintenance, make sure to
replace the desiccant with a new one.
● Consult your nearby JVC’s dealer on the
replacement procedures.
Serial number of part to be replaced: Use
a LW40790-001A desiccant.
●
Desiccant
Insertion Space
Attention:
This symbol is
only valid in the
European Union.
Note
When mounting is performed on a rainy
day, make sure that rain water does not
enter this unit.
● Make sure to use the desiccant supplied.
Failure to do so may cause the camera
lens and dome cover to fog.
● If the angle of view is not adjusted immediately after mounting the camera, insert
the desiccant after adjustment is completed. The desiccant loses its effect if it is
exposed to the air for a prolonged period
of time.
Desiccant
●
This symbol indicates that the electrical and electronic equipment should not be
disposed as general household waste at its end-of-life. Instead, the product
should be handed over to the applicable collection point for the recycling of
electrical and electronic equipment for proper treatment, recovery and recycling
in accordance with your national legislation.
By disposing of this product correctly, you will help to conserve natural resources
and will help prevent potential negative effects on the environment and human
health which could otherwise be caused by inappropriate waste handling of this
product. For more information about collection point and recycling of this product,
please contact your local municipal office, your household waste disposal service
or the shop where you purchased the product.
Penalties may be applicable for incorrect disposal of this waste, in accordance
with national legislation.
(Business users)
If you wish to dispose of this product, please visit our web page
www.jvc-europe.com to obtain information about the take-back of the product.
[Other Countries outside the European Union]
Lug Plate
*
If you wish to dispose of this product, please do so in accordance with
applicable national legislation or other rules in your country for the treatment of
old electrical and electronic equipment.
TK-C215VP4 is used in the illustration.
© 2006 Victor Company of Japan, Limited
LST0472-001A