1
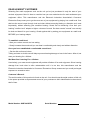
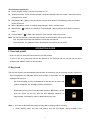
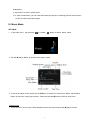
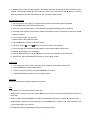
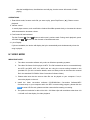
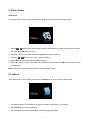
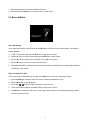
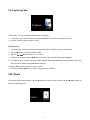
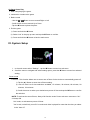
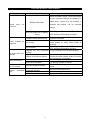
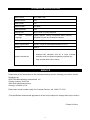
DIGITAL MEDIA PLAYER
USER MANUAL
SMPV-4GBTA
PLEASE READ THIS OPERATING MANUAL COMPLETELY BEFORE
OPERATING THIS UNIT AND RETAIN THIS BOOKLET FOR FUTURE
REFERENCE.
DEAR JENSEN® CUSTOMER
Selecting fine audio equipment such as the unit you've just purchased is only the start of your
musical enjoyment. Now it's time to consider how you can maximize the fun and excitement your
equipment offers. This manufacturer and the Electronic Industries Association's Consumer
Electronics Group want you to get the most out of your equipment by playing it at a safe level. One
that lets the sound come through loud and clear without annoying blaring or distortion and, most
importantly, without affecting your sensitive hearing. Sound can be deceiving. Over time your
hearing "comfort level" adapts to higher volumes of sound. So what sounds "normal" can actually
be loud and harmful to your hearing. Guard against this by setting your equipment at a safe level
BEFORE your hearing adapts.
To establish a safe level:
- Start your volume control at a low setting.
- Slowly increase the sound until you can hear it comfortably and clearly and without distortion.
Once you have established a comfortable sound level:
- Set the dial and leave it there.
Taking a minute to do this now will help to prevent hearing damage or loss in the future. After all, we
want you listening for a lifetime.
We Want You Listening For a Lifetime
Used wisely, your new sound equipment will provide a lifetime of fun and enjoyment. Since hearing
damage from loud noise is often undetectable until it is too late, this manufacturer and the
Electronic Industries Association's Consumer Electronics Group recommend you avoid prolonged
exposure to excessive noise.
Customer's Record:
The serial number of this product is found on the unit. You should note the serial number of this unit
in the space provided as a permanent record of your purchase to aid in identification in the event of
theft of loss.
Model Number: SMPV-4GBTA
Serial Number:
1
WARNING
Do not throw the product into fire to avoid danger of explosion.
Do not immerse into water or get soaked since the battery charging function will be lost.
Place the product far away from heat sources, and protect the product from direct sunlight.
Do not charge the internal rechargeable battery longer than specified to prevent danger of fire.
Overcharging rechargeable batteries may shorten their life span.
Do not unplug the unit during file transfer. It may cause malfunction to your PC and the unit.
Do not plug in the earbuds or audio cable during file transfer.
Do not use the product where electric appliances are prohibited.
Protect the product from violent impact and vibration.
No compensation responsibility for malfunctions caused by improper use.
It is prohibited to conduct illegal audio recording.
Downloading can be delayed if there are too many folders or files.
Do not attempt to disassemble or alter any part of the unit that is not expressly described in this
guide. Internal inspections, alternations and repairs should be conducted by qualified service
personnel.
Save the data in the memory of the product to other storage device before repair. No
compensation responsibility if the data are lost during repair.
Please make sure that the version of the Direct X in the computer must be Direct X 9.0 or
above when converting the format of the video file. For the update of DirectX, please visit
www.microsoft.com and read the relative information carefully.
2
COMPLIANCE WITH FCC REGULATIONS
This device complies with Part 15 of the FCC Rules. Operation is subject to the following two
conditions:
(1) this device may not cause harmful interference, and
(2) this device must accept any interference received, including interference that may cause
undesired operation.
NOTE : This equipment has been tested and found to comply with the limits for a Class B digital
device, pursuant to Part 15 of the FCC Rules. These limits are designed to provide reasonable
protection against harmful interference in a residential installation. This equipment generates, uses
and can radiate radio frequency energy and, if not installed and used in accordance with the
instructions, may cause harmful interference to radio communications. However, there is no
guarantee that interference will not occur in a particular installation. If this equipment does cause
harmful interference to radio or television reception, which can be determined by turning the
equipment off and on, the user is encouraged to try to correct the interference by one or more of the
following measures:
- Reorient or relocate the receiving antenna.
- Increase the separation between the equipment and receiver.
- Connect the equipment into an outlet on a circuit different from that to which the receiver is
connected.
- Consult the dealer or an experienced radio/TV technician for help.
CAUTION: Changes or modifications not expressly approved by the party responsible for
compliance could void the user’s authority to operate the equipment.
BATTERY INFORMATION
For the first time use of the product, you are recommended to fully charge your unit. Connect the
unit with the provided USB cable to the personal computer correctly. Once the unit connects with
the PC, it starts charging. Charge the battery until the sign is fully displayed. The charging time is 3
hours approximately.
NOTE:
-
To prolong the life of a rechargeable battery, completely discharge it before fully charging it
again.
-
Recharge the unit when below status shows:
-
Low battery;
-
System auto off (without Auto power off function);
-
Operation button not working (except key pad locked)
3
FEATURES
Support MP3、WMA、WAV music format
Support MTV video format(MTV video conversion software included in the CD-Rom)
Support JPEG, BMP photo format
6 pre-set plus 1 user custom EQ
Built-in microphone for voice recording
Multi-language support
USB2.0 interface
E- book
Game
USB mass storage device
Built in lithium battery that charged by USB connection of your computer.
LOCATION OF CONTROLS
1
USB Port
6
Back Button (
2
Stereo Phone Jack
7
Forward Button (
3
Power ON/OFF Switch
8
Vertical Scroll Bar
9
Play/Pause ( ►|| ) Button
10
LCD Display
4
5
Strap Eyelet / Built-in Microphone
Menu ( M ) Button
4
)
)
Touch Buttons and Switch
Power ON/OFF Switch: Turn the unit power on / off.
Vertical Scroll Bar: Touch and flick upward / downward along the bar to increase / decrease volume,
scroll menu up / down
Play/Pause ( ►|| ) Button: Play and Pause control; Open folder for file deleting; Press and hold to
power off the unit.
Menu ( M ) Button: menu or working mode selection; enter / confirm button
Back Button (
): Main menu selection; Fast backward / skip to previous tack; Back to previous
menu.
Forward Button (
): Main menu selection; Fast forward / skip to next track.
Note: You can Tap a button, Press and Hold a button to enter different menu mode, where:
Tap: You press the button and release it in less than one second.
Press and Hold: You press the button and release in more than two seconds.
OPERATION GUIDE
I. Turn unit on/off
- To turn on the unit, slide the Power Switch to the ON position,
- To turn off the unit, press and hold the ►|| Button for few seconds will turn off the unit and then
switching the ON/OFF switch to OFF position.
II. Key Lock
The key lock function will automatically activate after 30 seconds if you do not press any key. A lock icon
will be displayed in the playback mode at top margin of the screen and the
backlight will switch off.
-
Key lock activating: if a key is pressed when the key lock is active, this
symbol will appear. The backlight remains switched off.
-
Deactivating the key lock: Press and hold the Menu (M) Button until the
lock icon opens up and key pad red LED backlight switches on
(approximate 3 seconds) in order to deactivate the key lock.
Note: 1. You have to deactivate key lock first if key pad no response when touching.
2. When playing video, key lock and unlock icon will not appear during activating and
5
deactivating.
3. Key lock no function in game mode.
4. In case of malfunction, you can reset and restart the player by switching the main power switch
to OFF and then ON position again.
III. Music Mode
SETTINGS
1. In the main menu,tap the Back (
) / Forward (
) Button to select “Music” mode.
2. Tap the M (Menu) Button to access music player screen.
3. In the music player screen mode, tap the M Button to access the sub-menu of Music, tap the Back
Button to return the music player screen. Press and hold the M Button to back to main menu.
Repeat mode
1. In the sub-menu of the music, select Repeat from the sub-menu and tap the M Button to enter.
6
2. In Repeat menu, touch and flick upward / downward along the Vertical Scroll Bar to scroll the menu
upward / downward to select the play mode you want to set, and then tap the M Button to confirm.
After play mode set, tap the Back Button to return to music player screen.
Equalizer(EQ) mode
1. In the sub-menu of the music, scroll the menu upward / downward to select Equalizer.
2. Tap the M Button to enter EQ selection menu.
3. There are 6 pre-set EQ modes - Normal/Pop/Rock/Classic/Jazz/Bass can be selected.
4. Scroll the menu upward / downward to select the equalizer mode you desired, and then tap the M
Button to confirm.
5. You can also custom you own EQ.
1). Select Custom EQ under EQ menu.
2). Tap the M Button to enter Custom EQ setup.
3). Tap the Forward
/ Back
Button to select the bars to be adjusted.
4). Touch and flick the vertical scroll bar upward / downward to adjust the bar level.
5). Repeat above steps 3-4 if necessary.
6). After all adjustment done, tap the M Button to confirm your setting and exit EQ mode.
6. After EQ set, tap the Back Button to return to music player screen.
A3D mode
1. In the sub-menu of the music, scroll the menu upward / downward to select A3D.
2. Tap the M Button to enter setting mode.
3. Scroll to select A3D On/Off and tap the M Button to confirm.
4. Tap the Back Button to return to music player screen.
Play rate
You can set the music playback speed in this mode.
File
In this mode, you can browse all the music files,
1. Select File in sub-menu of music, tap the M Button to enter then browsing music files which stored in
the player.
2. Select a track and tap the M Button to play the selected track directly or tap the ►|| Button on the
selected track, “Add to List” menu will pop-up, tap the M Button to confirm if you want to add the track
you just selected to your play list.
3. Tap the Back Button repeatedly to back to music player screen.
7
Classified
It will sort the music files into different classes like Genre, Artist, Album or Title.
1. In the sub-menu of the music, select Classified from sub-menu and tap the M Button to enter,
“Refresh” menu will pop-up.
2. Select “Yes” and then tap the M Button to confirm. It will classify audio files automatically.
3. You can select the file according to the Genre, Artist, Album or Title now by enter Classified mode
again.
Play List
Browse the files according to the list set by the user.
Slide Show
- This allows you to view the pictures (in SLS format) as a Slide Show on your unit’s screen. Before
using this feature you will need to convert your photos on your PC using the included software.
1. Install the slideshow maker software in your PC.
2. Use the Slide Show Maker (SLS maker.exe) software included on the CD to covert the photos in
BMP, JPG format into *.SLS format. Please see user manual “Slide_Show_Maker_AP” in Slide
Show Maker folder.
3. After conversion, switch off the unit and connect it to the PC.
4. Browse the internal storage, you will see a SLS.DIR folder, if not, create a new folder and rename it
as SLS.DIR in the internal storage of the player.
5. Use your PC to copy the *.SLS file into the SLS.DIR folder.
6. Disconnect the unit from PC using Windows “Safe remove USB Mass Storage” process.
7. Turn on the unit and enter the sub-menu of music, then select Slide Show function.
8. There are 5 playback settings for the slideshow, 5 seconds, 10 seconds, 15seconds, 30 seconds,
and 60 seconds.
9. Touch and flick the Vertical Scroll Bar upward / downward to select the slide show starting time you
desired
10. Tap the M Button to confirm.
11. The slide show will start once the music begins for the time you have selected. To turn off slide
show function, enter Slide Show setting menu and then select “Off”, tap the M Button to confirm.
IMPORTANT NOTE
1. The slide show conversion software only works on Windows operating systems.
2. You will need to convert your photos into SLS format by using the SLS convert tool included
on the CD enclosed.
3. If the slideshow is turned ON before the backlight timer, the slideshow and will play, but the
backlight timer will not activate and the screen will not turn off. If the slideshow is turned ON
8
after the backlight timer, the slideshow and will play, but the screen will remain off while
playing.
OPERATIONS:
1. Enter Music mode, locate a music file you want to play, press Play/Pause ( ►|| ) Button to start
playback.
2. Volume control
In music player screen, touch and flick the Vertical Scroll Bar upward slowly to increase the volume
while downward to decrease volume.
3. Fast forward & fast backward
/ Back
Tap the Forward
and hold the
/
Button to select next / previous track. During music playback, press
Buttons to fast forward or fast backward scan.
4. Lyrics Display
If lyric are available, the device will display the lyrics automatically and simultaneously when the
song is played.
IV. VIDEO MODE
IMPORTANT NOTE
1. The video conversion software only works on Windows operating systems.
2. The video file format for this player is MTV. The file formats that can be converted directly
into MTV are MPG, ASF, AVI, WMV and etc using the convert tooling located on the
provided CD. (For the conversion details, users can always refer to the instruction manual
file in the attached CD-ROM’s Video Conversion Software folder.)
3. Please make sure that the source video file can be played on your computer. If not, it
cannot be played on the unit.
4. Install the video conversion software (CD-ROM\Video Conversion Software\MTV
Converter.exe) on your computer and in the MTV convert tooling program, please click the
to enter HELP mode, please read the content before starting converting.
5. The optimum resolution for this unit is 160 x 128 Video clips with resolutions other than 160
x 128 will not fit the display for video playback.
9
SETTINGS
1. In the main menu, press the
/
Buttons to select “Video” and then press the M Button to access.
2. Locate a movie list, scroll the menu upward / downward to select a movie you want to play and then
tap the M Button to start playback.
3. In video playback screen, tap the M Button to enter the sub-menu for play mode and Subtitle color
setting.
4. Tap the M Button to exit and tap the M Button again to resume video playback.
5. To return to main menu, press and hold the M Button in VIDEO mode, main menu will appear.
Repeat mode
In the repeat mode, scroll the selection upward and downward to select the play mode you wan to set,
and then tap the M Button to confirm.
Subtitle Color set
In this mode, you can select different color for the progress bar and the time displaying during
playback.
OPERATIONS:
1. Select a movie from the list, tap the M Button to start playback.
2. Tap the ►|| Button to play / pause the movie.
3. Fast Forward / Fast Backward
During normal video playback, press and hold the
/
Button to fast forward or backward.
4. Volume control
In video playing mode, touch and flick the Vertical Scroll Bar upward / downward to adjust the
volume level.
10
V. Photo Viewer
View Photo
In the main menu, select “Photo” and press the M Button to enter into Photo viewer mode,
1. Tap the
/
Button and scroll the menu upward / downward to navigate to select a photo folder
and then tap the M Button to enter.
2. Selecting a photo in the folder and tap the M Button to view the picture.
3. Press the
/
Button to view next / previous picture.
4. Tap the M Button to back to the photo files exploring.
5. Tap the ►|| Button to back to the folder you selected or press and hold the M Button to back to main
menu directly.
Note: This unit only support photo browse in JPG and BMP format.
VI. e-Book
In the main menu, select “eBook” and then tap the M Button to enter into the E-book mode.
1. Scroll menu upward / downward to navigate and select E-book files in TXT format
2. Tap the M Button to open selected file
3. Touch and flick the Vertical Scroll Bar to scroll the pages for reading.
11
4. Tap the Back Button to back to EBOOK sub-menu.
5. Press and hold the M Button to exit and return to main menu
VI. Record Mode
Voice Recording
In the main menu select “Record” and tap the M Button to enter the voice record mode, voice player
screen appears.
1. In the voice pause mode, tap the M Button to open the sub-menu.
2. Scroll sub-menu to select Record and tap the M Button to start record.
3. Tap the ►|| Button to pause the recording, tap it again to continue.
4. Tap the M Button to save the current recording file.
5. Recorded files will be saved and named as “MICXXXXX” where XXXXX is in sequential number of
recording in wave format.
Play recorded voice files
In the main menu, select “Record” and press the M Button to enter the voice player mode.
1. Press the M Button and then enter File menu to select recorded file to play.
2. Tap the M Button to start playback.
3.
Press the
/
Button to skip to the next or previous file.
4. Touch and flick the Vertical Scroll Bar slowly to adjust the volume.
5. Tap M Button to enter the sub-menu of voice play mode setting. For the detailed settings, please
refer to the music mode.
12
VII. Exploring Files
In this mode, you can find all the files stored in the player.
1. In the main menu, select “Explorer” and tap the M Button to enter the file exploring mode.
2. Scroll the menu to select a folder or a file.
Delete the file
1. To delete a file, use the scroll bar to navigate and select a folder or a file to be deleted.
2. Tap the M Button to enter the delete mode,
3. Tap the
/
Button to select “Yes” or “No”.
4. Select “Yes” and then tap the M Button to confirm. A file or entire folder will be deleted.
5. To delete a file in a folder, select the folder and then tap the ►|| Button to open the folder. Select the
file you want to delete and repeat above steps 2-4.
6. Tap the Back Button to back to previous menu.
7. Press and hold the M Button to return to the main menu directly.
VIII. Game
In the main menu select “Game”, tap the M Button to enter the game mode. Tap the M Button again to
select the Gobang game.
13
Go Bang Game Play
1. Start: Start playing the game.
2. Introduction: Introduce the game.
3. Basic control
- Use the
/
Button to move toward Right or Left
- Scroll the bar to move toward Up or Down.
- Tap the M Button to place the piece.
4. Exit the game
1). Press and hold the M Button
2). Select “exit” in the pop up menu and tap the M Button to confirm.
3). Press and hold the M Button to back to main menu.
IX. System Setup
1. In the main menu select “Settings”,tap the M Button to enter into sub-menu.
2. Scroll the menu to navigate and select setting option, press the M Button to enter into selected
setting。
Power mode
1. Auto off - This function allows user to set an auto off timer for the device to automatically power-off.
1). Tap the ►|| Button to enter Auto off timer setting.
2). Auto off timer has 5 time selections available, 15 minutes, 30 minutes, 60 minutes, 90
minutes, 120 minutes.
3). Scroll the menu to select your desired auto power off time and tap the M Button to confirm
the selection
NOTE: To activate the auto off timer, Always ON function under Power sub-menu must set to “No”.
2. Always ON
“No” mode, to activate auto power off timer.
“Yes” mode, unit will only turn off if no music and video is played for more than the time you select
in the “Auto off”.
14
Language
- To select language of the menu.
Display
1. Brightness
- To set display backlight dimmer.
- 4 different settings: Low, Medium, High and Maximum
2. Backlight
- To set backlight turn off timer for battery saving.
- 4 different settings: 15seconds, 30 seconds, 1 Minute and Close. The screen will be turned off when
selected time expires.
- Select Close to disable the backlight timer.
Record
To set voice record mode, 3 settings Quality, VAD and AGC are available.
1. Quality
- 3 selections available: Long Time, Normal Quality and High Quality
2. VAD
VAD: Record according to the voice. If no voice is heard then recording will stop automatically.
In this setting, you can turn on VAD function or turn off this function by selecting On or Off in its
sub-menu.
3. AGC
AGC: This function determines the volume of the MIC and can prevent voice distortion if you are
recording something loud, it can also prevent recording low unwanted sounds.
In this setting, you can turn on AGC function or turn off this function by selecting On or Off in its
sub-menu.
System Tools
1. Delete – To delete the file.
2. Format – To format the player. Two selections Quick and Complete are available.
3. Reset – To reset the unit to ex-factory setting
1). Tap the M Button to enter.
2). Tap the
/
Button to select “Yes” or “No”.
3). Tap the M Button to confirm selection to reset device to factory default settings.
4. System information - Display the system information of the player.
5. Refresh - Refresh the player
15
TROUBLESHOOTING GUIDE
Symptom
Possible Problem
Solution
Check the battery power, connect the player
to your computer USB port for recharging. It
takes about 3 hours for a full recharge. If
Battery exhausted.
Device does
power on
problem still persists, call for customer
not
service.
Unit auto power off for battery
saving
Key pad locked automatically
Touch buttons no
Unit is busy
response
Unit is frozen
Switching the Power ON/OFF switch to
OFF and then ON position to restart.
Press and hold the M (Menu) button to
unlock the key pad.
Wait a minute and try again or tap the
other button to verify touch panel is
working
Switching the Power ON/OFF switch to
OFF and then ON position to reset.
Earbuds are not connected Check if earbuds are connected properly
properly.
No sound from your
Check volume level. Touch and flick the
earbuds
Vertical Scroll Bar upward slowly to increase
Volume is turned to minimum.
the volume level if necessary.
Earbud
plug
is
dirty
Clean
the plug.
Noisy interruptions
Music file is corrupted
Try playing another music file
Select correct language from Settings
Abnormal characters
Incorrect language setting
on LCD screen
menu.
Unit and computer are not
Check the USB connection.
Cannot
download connected properly
files
Memory is full
Delete unwanted file to free some space.
USB cable defective
Try another USB cable
·
·
16
TECHNICAL SPECIFICATION
Music format
MP3. WMA. WAV
Record format
WAV
Video format
MTV
Picture format
JPG, BMP
Internal Memory
4GB
Playing Time
About 7 hour for music playback
8
User
Interface
English, Spanish, French, Portuguese, Italian, German,
Language
Simplified Chinese and Traditional Chinese
Display
1.46” color TFT, 176 X 132 pixels
Battery specification
Built-in Li Polymer rechargeable battery DC 4.2V
PC slot
USB2.0
1. Windows ME, Win2000, Win XP or Vista, included
System requirement
software works on Windows operating systems only.
2. Plug and play Mac OS9 or above.
SERVICE
Please refer to the instructions on the enclosed warranty card for returning your unit for service.
Distributed by:
SPECTRA Merchandising International, Inc.
Chicago Industry Tech Park
4230 North Normandy Avenue
Chicago, IL 60634, U.S.A.
Please have model number ready, for Customer Service, call 1-800-777-5331.
*The specification and external appearance of the set are subject to change without prior notice.*
Printed in China
17