1
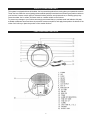
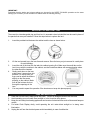
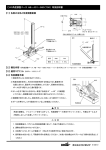
JCR-263
AM/FM DUAL ALARM CLOCK RADIO
INSTRUCTION MANUAL
PLEASE READ THIS OPERATING MANUAL COMPLETELY BEFORE OPERATING
THIS UNIT AND RETAIN THIS BOOKLET FOR FUTURE REFERENCE.
SAFETY INSTRUCTIONS
WARNING: TO PREVENT FIRE OR SHOCK HAZARD, DO NOT EXPOSE THIS
APPLIANCE TO RAIN OR MOISTURE.
1.
2.
3.
4.
5.
6.
7.
8.
9.
10.
11.
12.
13.
14.
Read these instructions
Keep these instructions
Heed all warnings.
Follow all instructions.
Do not use this apparatus near water.
Clean only with dry cloth.
Do not block any ventilation openings. Install in accordance with these instructions.
Do not install near any heat sources such as radiators, heat registers, stoves, or other
apparatus (including amplifiers) that produce heat.
Protect the power cord from being walked on or pinched particularly at plugs, convenience
receptacles, and the point where they exit from the apparatus.
Only use attachments / accessories specified in these instructions.
Unplug this apparatus during lightning storms or when unused for long periods of time.
Refer all servicing to qualified service personnel. Servicing is required when the apparatus
has been damaged in any way, such as power-supply cord or plug is damaged, liquid has
been spilled or objects have fallen into the apparatus, the apparatus has been exposed to
rain or moisture, does not operate normally, or has been dropped.
This appliance shall not be exposed to dripping or splashing water and that no object filled
with liquids such as vases shall be placed on the apparatus.
Do not attempt to dismantle, open or repair this product yourself. If a fault occurs, seek
advice from your local qualified service technician or contact the distributor via the telephone
number at the back of this instruction manual.
1
PROTECT YOUR FURNITURE!!
This system is equipped with non-skid rubber ‘feet’ to prevent the product from moving when you operate the controls.
These ‘feet’ are made from non-migrating rubber material specially formulated to avoid leaving any marks or stains on
your furniture. However certain types of oil based furniture polishes, wood preservatives, or cleaning sprays may
cause the rubber ‘feet’ to soften, and leave marks or a rubber residue on the furniture.
To prevent any damage to your furniture we strongly recommend that you purchase small self-adhesive felt pads,
available at hardware stores and home improvement centers everywhere, and apply these pads to the bottom of the
rubber ‘feet’ before you place the product on fine wooden furniture.
FUNCTIONS AND CONTROLS
2
POWER SOURCE
This AM/FM Dual Alarm Clock Radio operates on AC 240V~ 50Hz line power supply. 2 ‘AA’ (UM-3) alkaline
batteries (Not included) are also required to retain the normal and alarm time settings in the event of a power
outage.
AC OPERATION
Plug the AC Power Cord into the AC 240V~ 50Hz power source.
BACKUP BATTERY INSTALLATION
1. Open the Battery Compartment Door. Following the polarity diagram shown in the Battery
Compartment, insert 2 new ‘AA’ size (UM-3) alkaline batteries.
2. Replace the Battery Compartment Door.
IMPORTANT: Be sure that the batteries are installed correctly. Wrong polarity may damage the unit.
BATTERY CARE
i. An Alkaline-type battery is recommended. For optimum performance, the batteries should be replaced
every 6 months.
ii. If the unit is not to be used for an extended period of time, remove the batteries. An old or leaking
battery can cause damage to the unit and will void the warranty.
iii. a) Do not mix old and new batteries.
b) Do not mix alkaline, standard (carbon-zinc) or rechargeable (Nickel-Cadmium) batteries.
iv. Do not try to recharge a battery that is not intended to be charged. The battery can overheat, rupture
and leak. (Follow battery manufacturer’s directions).
v. Do not dispose of batteries in fire, batteries may leak or explode and cause personal injury.
POWER FAILURE INDICATOR
If no battery is installed or if the battery installed is weak or dead, the time and alarm settings will be lost if
the power is interrupted. When the AC power is restored the Display will show “AM 12:00”. This indicates
that the time displayed is incorrect and needs to be reset.
IMPORTANT:
After you have reset the time, be sure to reset your alarm settings as well.
3
TIME SETTING
NOTE:
The clock has to be set when you first plug it in. The following procedure illustrates the setting of the Clock using 7:30
PM as an example time.
1.
2.
3.
4.
5.
Connect the AC cord to an AC 240V~ 50 Hz power outlet. The LCD will show “AM 12 : 00”
Note: Make sure to use an outlet that is always “live”. Do not use an outlet that is controlled by a wall
switch.
For best viewing, press the BRIGHTNESS Button (# 14) once to turn on the LCD back-light. Press
the BRIGHTNESS Button (# 14) again the LCD- back light will become brighter. To obtain the
maximum brightness, press the BRIGHTNESS Button (# 14) the third time. Pressing the
BRIGHTNESS Button (# 14) again will turn the back light off.
Set the Clock Set Selector (# 18) to the “TIME” position. “AM 12:00” will blink. While “AM 12:00” is
blinking, press and hold the TIME SET ! or " Buttons (# 15 or # 16) to adjust the time. The Hour
and Minute digits will advance forward or backward rapidly.
Keep pressing and release the Buttons when the displayed clock time is close to the actual time.
Repeatedly press the ! or " Buttons to adjust the clock time precisely.
Note: Make sure the hour is set so that AM or PM is correctly displayed.
Set the Clock Set Selector (# 18) to the “LOCK” position to complete the time setting. The current
time will be displayed steadily in the LCD.
RADIO OPERATION
1. Set the Band Switch (# 12) to the AM or FM band as desired. For example FM band is
selected.
2. Press the RADIO ON/OFF Button (# 4) once to turn the radio
“ON”. The Display will show the frequency of the FM
station briefly and then return to show the
current time.
3. Turn to your favorite station using the TUNING
Control (# 13).
4. A d j u s t
the
Control(# 6).
sound
level
5. Press the RADIO
“OFF”
ON/OFF Button (# 4)
using
the
VOLUME
again to turn the radio
Note:
I. When listening to an FM program, fully extend the Wire Antenna to insure maximum tuner
sensitivity.
4
II. This receiver has a built-in bar antenna. If the AM reception is week, slightly rotate or re-positioning
the unit will usually improve the reception.
AUX OPERATION
THIS UNIT FEATURES AN AUX LINE-IN JACK FOR CONNECTING YOUR iPod, MP3 PLAYER OR OTHER
DIGITAL MUSIC PLAYER.
1. Connect the headphone jack of your external device to the AUX IN Jack (# 8) located on the back of the
JCR-263 (cable not included).
2.
3.
4.
5.
6.
Turn on the JCR-263 and set the FUNCTION Selector (# 9) to the “AUX” position.
Start playing your iPod, MP3 player or other external audio device.
Slowly adjust both volume controls on the JCR-263 and the external device.
Turn off your iPod, MP3 player etc. when finish listening.
Turn the JCR-263 off and unplug the AUX Line-IN jack.
SETTING ALARM TIME
AND WAKE UP MODE
The JCR-263 allows you to set two different wake up times that you can choose to use independently, as ALARM
1, ALARM 2 or simultaneously together.
The JCR-263 provides wake to RADIO or ALARM BUZZER options.
Setting ALARM Time(s)And Wake Up Mode
Note:
The Alarm time(s)can be set
either in POWER ON or OFF mode.
1. Set the Clock Set Selector (# 18) to AL1
or
AL2. The
respective
ALARM 1 (AL1)
or
ALARM 2 (AL2) Indicator will appear with ‘AM 12:00’ blinking in the Display.
2. While the ‘AM 12:00’ is blinking, press and hold the TIME SET ! or " Buttons. The Digits will skip forward or
backward rapidly.
3. Keep pressing and release the TIME SET ! or " Buttons (# 15 or # 16) to adjust the time. The Hour and
Minute digits will advance forward or backward rapidly.
4. Keep pressing and release the Buttons when the displayed clock time is close to the desired alarm
time. Repeatedly press the ! or " Buttons to adjust the alarm time precisely.
Note: Make sure the hour is set so that AM or PM is correctly displayed.
5. Set the Clock Set Selector (# 18) to the “LOCK” position to complete the setting.
Indicator disappears in the LCD Display.
or
6. If you want to be woke up by ALARM 1 or
Button (# 17) once.The
the ‘Wake
Press
to
the
ALARM2, press ALARM1 (# 1) or ALARM2
respective ALARM Indicator
Buzzer’icon
respective Alarm
will
Buuton
Wakeup mode from buzzer(
5
appear
again
, Alarm
time
in
Display.
the
will
)to radio(
).
switch
and
the
6. When the preset wake up time is reached the selected wakeup mode turns “On”. The respective
ALARM Indicator(AL1 or AL2)and Wakeup mode icon(
or
)will flash.
The alarm will continue to sound and last for 3 0 minutes before turning off automatically.
The alarm remains set and will turn the JCR-263 on again at the same time on the following day.
7. To stop the alarm before the alarm time elapses, press the ALARM OFF Button (# 14). The
alarm will stop but the alarm remains set and will turn JCR-263 on again at the same time on the
following day.
8. If you do not want the alarm to turn JCR-263 on the following day, press the ALARM1 or
A L A R M 2 B u t t o n s r e p e a t e d l y u n t i l t h e A L A R M 1 or
ALARM2 Indicator(s), Alarm time(s)and Wakeup mode Icon (
or
) disappear in
the LCD.
Note:
If you have chosen “Wake to RADIO” alarm mode, make sure that you have tuned to a station and adjusted the
volume to a comfortable level.
1.
2.
SNOOZE OPERATION
When the alarm sounds (buzzer or radio), you can press the SNOOZE Button to extend the alarm time by 9
minutes. The re sp ec ti ve ALARM I n d i c a t o r ( A L 1 o r A L 2 ) a n d
Wakeup mode Icon(
or
) will blink and the SNOOZE Indicator ‘SNZ’ appears in
the Display. The buzzer or radio will then turn on again when the snooze duration has elapsed.
The SNOOZE operation can be repeated several times within the 30 minutes alarm duration.
NAP OPERATION
The JCR-263 is equipped with the NAP function.
The NAP time is adjustable from 10 to 119 minutes.
The defaulted NAP time is 30 minutes.
1. To activate the NAP function, in POWER Off mode press
the NAP Button once. The Display will show 30 minutes
of NAP time and JCR-263 will turn on when the 30
minutes has elapsed.
2. To
increase or
decrease the
NAP time, keep
pressing and release theTIME SET ! or " Buttons until
time (10~119 minutes) is shown in the LCD.
6
3.
The JCR-263 will turn on when the preset NAP time has elapsed.
4. To cancel the NAP time before it turns the JCR-263 on, press the NAP Button once. When the NAP time
appears press the NAP Button again. The NAP time will resume to current time display. Press the NAP Button
the third time and hold until “NAP” disappears in the LCD.
SLEEP OPERATION
You can use the SLEEP Timer to fall asleep to Radio for a maximum duration of 120 minutes.
SETTING THE SLEEP TIMER
Note: The default SLEEP duration is 59 minutes.
1. In Power On mode, operate the Radio as usual. Adjust the volume to the desired level.
2. Press the SNOOZE button once. The Sleep Indicator “SLP” and “59” will appear and flash in the Display.
The display will return to show the current time in a few seconds with the Sleep Indicator “SLP” shown steadily in
the Display. The Radio will automatically turn off after 59 minutes has elapsed. The Sleep Indicator “SLP” will
then disappear in the Display.
ADJUSTING THE SLEEP PERIOD
1. With the unit In POWER ON mode, press the SLEEP Button once. The display will show 59 minutes of playing
time.
2. To adjust your desired sleep time set between 01 and 120 minutes, press the ! or " Buttons repeatedly and
release until your desired SLEEP duration appears in the Display.
3. The unit will automatically turn off after the preset sleep time has elapsed.
4. If you want to turn JCR-263 off before the preset sleep time has elapsed, simply press the RADIO ON/OFF Button
once.
SLEEP AND WAKE TO BUZZER/RADIO
1. Refer to the section “SETTING THE ALARMS AND WAKE UP MODE” on page 5 to set the desired wake up time
(s), wakeup mode, i.e. RADIO or Buzzer and volume level.
2. Follow step 1-3 (shown above) under the “ADJUSTING THE SLEEP PERIOD” section to set the desired SLEEP
time.
The JCR-263 is now programmed to turn off automatically at the Sleep Time you selected and then to turn on again at the
preset “Alarm Time”.
7
IMPORTANT:
Remember that the station and volume settings you choose for the SLEEP TO MUSIC operation are the same
settings you will hear if you set the alarm for wake to radio the following morning.
REPLACING TOP AND FRONT LENS
There are four interchangeable top and front lens’ in assorted colors included that can be used in place of
the panels that come pre-installed. Follow the steps below to replace the lens’.
1.
Insert the provided tool between the cabinet and the lens as shown below.
2.
Lift the tool upward to pry the lens free and remove. Store the lens you just removed in a safe place
to avoid damage.
Insert the end of the lens with the tabs into cabinet opening first. Make sure the small tabs on the
lens line-up with the notches in the cabinet; see the illustrations below with arrows showing where
the tabs should be inserted.
Gently push down on the lens
making sure it snaps down into
position. For the top lens you
may need to adjust the buttons
slightly so the lens seats
properly on the cabinet. Make
sure all the buttons stick out
through the openings in the
lens.
You may need to repeat the operation if the lens does not snap into place properly.
3.
4.
5.
1.
2.
3.
4.
5.
CARE AND MAINTENANCE
Clean the unit with a soft, damp (never wet) cloth. Solvent or detergent should never be used.
Avoid operating your unit under direct sunlight or in hot, humid or dusty places.
Keep your unit away from heating appliances and sources of electrical noise such as fluorescent lamps or
motors.
For better Clock Display clarity, avoid operating the unit under direct sunlight or in strong room
illumination.
Unplug the unit from the electrical power outlet immediately in case of malfunction.
8
SERVICE
All necessary care is taken at the point of manufacture to ensure this unit will perform to the Jensen’s
high quality standards. However if this unit becomes faulty within the warranty period please return it to the
point of purchase with your proof of purchase for a replacement. When returning the unit, please remove any
batteries to prevent damage to the unit in transit and/or from possible battery leakage. Please note that we are
not responsible for batteries returned with the unit or for the cost of replacement of batteries.
Distributed in Australia by:
ROVEREY INTERNATIONAL
PO Box 30
Mulgrave
Vic 3170
Telephone: 1 800 686 079
Email Address: [email protected]
Printed in China
9