1
JENN
-AIR®
COMPACTORS
Tableof Contents ..............................2
9871852
TABLE
OFCONTENTS
COMPACTOR SAFETY..............................................................3
INSTALLINGYOUR COMPACTOR...............................................
4
UnpackingYourCompactor........................................................
4
LocationRequirements................................................................
4
ElectricalRequirements...............................................................
5
UndercounterJnstallat}on
.............................................................
5
Air Freshener................................................................................
7
Installinga Custompanel.............................................................
7
COMPACTOR USE.........................................................................
7
How YourCompactor Works.......................................................
7
Loadingthe Compactor...............................................................
8
Starting Your Compactor.............................................................
8
Stopping Your Compactor...........................................................
8
Removinga FilledBag .................................................................
8
Installinga New Bag ....................................................................
9
COMPACTORCARE......................................................................
9
CleaningYour Compactor ...........................................................
9
TROUBLESHOOTING..................................................................
10
RECYCLINGWITH YOUR COMPACTOR ..................................
10
ASSISTANCEOR SERVICE.........................................................
11
In the U.S,A................................................................................
11
Accessories................................................................................
11
WARRANTY..............................................................................
12
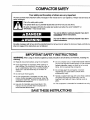
COMPACTORSAFETY
Your safety and the safety of others are very important.
We have provided many importantsafety messages inthis manual and on your appliance. Always read and obey all
safety messages.
This is the safety alert symbol.
This symbol alerts you to potential hazardsthat can kill or hurtyou and others.
All safety messages will follow the safety alert symbol and either the word "DANGER"or
"WARNING."These words mean:
ADANGER
AWARNING
You can be killed or seriously injured if you don't
immediately follow instructions.
You can be killed or seriously injured if you don't
follow instructions.
All safety messageswill tell you what the potential hazard is,tell you how to reduce the chance of injury, and tell you
what can happen if the instructionsare not followed.
IMPORTANT
SAFETYINSTRUCTIONS
WARNING: When using an electrical appliance, basic precautions should always be followed, including the
following:
• Readall instructions before using the compactor.
• Do not compact toxic or volatile flammable material
such as oily rags and insect sprays. Do not compact
• Close supervision is necessary when used by or
lighted cigarettes, cigars, or other hot or burning
near children. Do not allow to be used as a toy, or
to run unattended at any time. Lock Key Switch
items. Do not overload the compactor.
when not in use and store key out of reach of
• Do not take apart the compactor, incorrect
children,
reassemblycan cause electric shock when
• Do not touch moving parts,
subsequently used.
•
Handlea loaded trash bag with care. Sharp objects
• Do not operate with a damaged cord set, plug,
motor, or after damage in any manner. Havethe
can pierce the bag and cause injury. Do not
overload trash bag with heavy material such as
compactor examined, repaired or adjusted by an
authorized serviceperson,
glass.
• Use only for intended use as described in this
manual. Do not use other than manufacturer's
recommended attachments.
• This compactor is intended for household use only.
SAVETHESEINSTRUCTIONS
WARNING
INSTALLING
YOUR
IM PORTANT:
Installer:Leave Useand Care Guidewith the homeowner.
COMPACTOR
Homeowner: Keep Useand Care Guide for future referenceand
for local electrical inspector's use, if required.
_._,.._,_,_-_..:._%_"_-.- ,.:__'_'._._._-,_-_,
o.-_
_..-_.o_.
-_"
_ ....
IMPORTANT.
• Do not grasp consoleto movecompactor.
• Beginin the room where the compactor will be located.
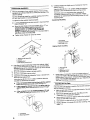
1. Removecompactorfromshippingcarton.Removeall
protectivepackagingmaterialssuchas tape andshipping
pads. Usea mild solutionof liquidhouseholdcleanerand
warm waterto remove waxy residuecaused by protective
shipping material. Dry thoroughly with a soft cloth. For more
information, see the "Cleaning Your Compactor" section.
2. Check to be sure the power cord is attached to the cord clip
on the rear of the compactor.
1............
......_
I
Use two or more people to move and install
compactor.
Failure to do so can result in back or other injury.
Excessive Weigh, Hazard
4. Place the other two corner posts on the floor to the side of
the compactor.Grasp the sides of the compactor cabinet ant
put compactor on its side on top of the corner posts. Remow
the shipping base from the bottom of the compactor.
_
_"_i_
__
._
\,Jl
1,Levelinglegs
2, Shippingbase
__',_'._'_'_e'__'__:_'_._::_"_'_,_"_'_:
Check the location where your compactor will be installed.Th
cabinet openingshould be square. Youshould be able to fully
open the compactor drawer. Allow 6 in. (15,2cm) of clearancec
the right side of the compacter drawer to remove compactor ha!
Allow 23 in. (58.4 cm) in front of the compactor to remove the
drawer.
Product dimensions
1,Cordclip
3. Placethe two corner posts from the carton on the floor near
the compactor. Open the compactor drawer and remove any
shippingmaterialsor other items from the drawer.Do not
remove the compactor bag. Graspthe handle and raisethe
front of drawer until it clears the drawerstops. Graspsides of
drawer and lift drawer out of compactor. Placethe draweron
the two corner posts.
- _-
_/-_
[_--
34_"
(86.7cm)
15"
(38.1cm)
24"
(61 cm)
Cutout dimensions
/
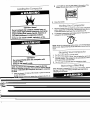
WARNING
34t/,° rain.
l
18"min.
(4s.7cm)
24" min.
161_
I_
Electrical ShockHazard
Plugintoa grounded3 prongoutlet.
Do not removegroundprong.
187cm)
I
Failureto followtheseinstructionscan resultin
death,fire,orelectrical
DOnotusean adapter.shock.
15'_"min. _
(38.7cm) _
1.Groundedelectricaloutletmustbe a minimumof
3 in.(7.6cm)awayfromsurrounding
cabinetsor
nearbywallsasshown./tcanbeplacedeitherto
the/eft or therightsideof theproduct,
Clearance dimensions
',
_
2 ..........
i
---_
................
Recommended Grounding Method
This compactorisfor use on a singlephase,115-volt, 60 Hz,A
onJy15 or 20 amperefusedand properlygroundedcircuitand i
equippedwitha groundingplugas shownbelow.Timedelay fu_
or circuit breakeris recommended.It is recommendedthat a
separatecircuitservingonlythisappliance be provided.In the
eventof an electricalshortcircuit,groundingreducesthe risk o
electric shock by providingan escape wire for the electTic
current. Donot modify the plug attached to the compactor; use
only with a grounded receptacle.
This compactor must be groundedwhile inuse to reduce the ri_
of electric shock. The compactor is equipped with a threeconductor cord and three-prong grounding-type plug to fit the
proper grounding-type receptacle.The green (or green and
yellow)conductor in the cord Is the grounding wire. Never
connect the green (or green and yellow) wire to a live terminal.
The outlet should be properly installed and grounded in
accordancewith the National ElectricalCode and Local codes
and ordinances. No adapter should be used with this applianc_
1
1.Leave6 in. (15.2cm)of clearancespaceto the
rightsideof thecompactorin ordertoremovethe
compactorbags.
_'=_;_'_'_"_
_'"_'_ _ _.;,C_i_
NOTE:Properinstallationis your responsibility.Makesureyou
haveeverythingnecessaryfor correctinstallation.It is the
2. Leave23in. (58.4cm)of clearancein frontof the
compactorin orderto fullyopenor removethe
compactordrawer,
personalresponsibility
and obligationof the customerto cont_
a qualified installerto assure that electricalinstallationmeets
national and local codes and ordinances.
Toolsand materialsneeded for installation:
Level
Scissors
_ in. Hex-Hea
TapeMeasure
PhillipsNo. 2 Screwdriver Socket Wrench
Pliers
Flat-HeadScrewdriver
Utility Knife
IMPORTANT:
•
Do not grasp control panel to move compactor.
•
Slide compactor onto cardboard or hardboard before
movingcompactor across floor to preventdamaging fk
covering.
•
Do not allow the rear frame of the compactor to touch1
floor coveringwhen lifting or moving compactor.
_ _.....
The solid air freshener.......
system_"_'_'_
is designed
to help control odors
that might develop in the trash. An air freshener disc can be
purchased in department stores (not sold with compactor). Place
the disk-shaped solid air freshener into the air freshener
compartment. The air freehener should last 4 to 6 weeks. It is
(5.6 mm) _'_b
"
"mm)
""
used more rapidly when the temperature is high or the air is very
dry.
1 .......................
23_5_6"
r
(60.5 cm)
3/16"
(8 mm)t,_._:_
_
_
_,_,
_,__,_
To order a color-matched trim kit for the installation of a custommade panel, contact your local authorized dealer.
l_im Kits for Custom Front Panels:
Order Part #TCDW (Trim kit for custom made panel)
Order Part #TCBS (Stainless steel door panel)
'r
23_/_"
(60,5 cm)
14%"
(37.2 ¢m)
Flat panel: A 7132"(5,6 ram) thick panel isrequired,
Thisis the same thicknessas a standard 1/4"
(6.4 ram,)plywood or paneling.
_
Sll_"
both aides
(8 mm)
1, Raisedpanel or decorative trim.
2. Outer section of panel,
Raisedpanel: Theouter section of the panel must be
7/32" (5.6ram) thick to fit into trim. Raisedpanel
dimensionsas shown above.
COMPACTOR
USE
The compacting ram Is the part of the compactor which
compresses the trash, The compacting ram does not go to
the bottom of the drawer, You will not see compacting of
NOTE: The compactor drawer should be more than Z_ full
before the compactor can begin to compress the load,
You may hear a noise when glass breaks. Strong glass bottles
may
The trash
in a full
kashnot
thebreak
first at
fewall.times
you load
the compactor
compactor.bag will be
about V_the size of its original bulk.
....
i
r.....
I
"_
I
tL i
_ -_
_-=_
i,
:
F]_,.__,
'
l
Load bulk'y trash, bottles, and cans in the center of the drawer
Bottles or cans not placed in the center may become caught
between the ram and the drawer. The Drawer Monitor Switch
then senses a "misload" and causes the ram to return to the %
posit(on without compacting.
'_
,.._
'_
'_
............
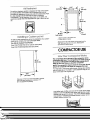
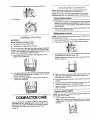
Undercounter Installal]on
1. Measurethe height of your cabinet opening. The top of the
compactor should be at least 1_in. (3 mm) from the top of the
cabinet opening,
The rear wheels are presetfor a cabinet openingof 34 1/4 in.
(87 cm). See PositionA in picturefollowing,
Toadjust for other cabinet opening heights:
• Loosenself-tapping screw just enoughto clear stud from
hole In Position =A,"
needed for your cabinet opening measurement:
Position B: 341/4in. to 347Asin. (87 to 87.5 cm)
PositionC: 347A6in. to 34% in. (87.5 to 88 cm)
NOTE: To levelthe unit in position"C," you may needto
add shims underthe levelinglegs.
•
6. CarefullyIjft the front slightJyand rol} compactor into the
cabinet opening.
Using the two #8-18 x I/2in. screws, fasten the retaining
brackets to the countertop with the mounting screws.
if bracketscannot be attached to the underside of
countertop, attach mounting clips to brackets. Fasten
compactor to cabinet front with mounting screws through
mountingclips.
Countertop Mounting
1.........
..........
Tighten screw. Repeat for other rear wheel....
_,
3/i
0
.................
2
B,,
.............
._,.,3
2,
Retainingbracket
1,Countertop
3, Mountingscrew
Cabinet-front mounting
""
• 3
2,Cabinet
3.Locatingstud
4.Salf-tappingscrew(pivot)
2 .........
2. Use pliersto lower levelinglegs away from cabinet. Adjust
legsso there will be a _/_in. (3 ram)to _,4in. (6.4ram)space
betweenthe top of the compactor and the top of the cabinet
opening. Stand the compactor upright.
3. Movethe compactor close to its final position.
4. Plug into a grounded 3 prong outlet.
5. Determineif you want the compactor frame or drawerfront
flush with the cabinet front,
Usingthe two #8-18 x _s in. screws, installthe retaining
brackets to cabinet top as needed:
•
•
•
If the compactor frame is to be flush with the cabinet
front, place retainingbracket screwsthrough "A."
if the compactor drawer front is to be flush with the
cabinetfront, place retainingbracket screwsthrough
"C,"
If the compactor is to be midway between "A" and
"C", placethe retainingbracketscrewsthrough"B."
..................
t
,,............. . _. ,. :::.....=
i
__
1,Mount# i clip
2. Cabinet
3. Retainingbracket
4.Mountingscrew
7. Graspsides of compactor drawer and place bottom of
drawer into tracks. Lift at the handle so drawer will go ova
drawer stops. Close drawer. Check to see if drawer open_
freely. If the toe plate rubs against floor, see "Adjusting th
Toe Plate" for further instructions.
_
..........
Adjusting the Toe Plate
_
.........,
If the toe plate rubs the floor covering,the toe plate clearanc,
may be changed as follows:
1. Mark on each side of the toe plate the amount of toe pla
thatrubs the floor covering.
2. Removethe drawerfrom the unit.(See Step3 in the
"Unpacking Your Compactor" section.)
3, Use
a ruler
andside
a pencil
or plate.
cha)k to draw a line between
marks
on each
of toe
eA
1.Countartop
2.Retainingbracket
"
5. Replace drawer.If toe plate still rubs floor covering,rep_
steps 1-4.
4. Use scissorsor utility knifeto cut toe plate along line.
•
L_%_,_'_
_;_
C:I{_[_.'_/_C_O[
Load bottles or cans on their sides in the center of the
drawer. Do not load bottles in an upright position.
WARN NG
3. Close the drawer.
Do not compact any container, aerosol cans, or
cloths which might contain insecticide, hair spray,
engine starting fluid, paints, liquids, thinners, or
any other poisonous or explosive products.
1. Turn the Control Knob to START.As soon as the compactor
starts, releasethe Control Knob, The knob will then advanc_
to the RUN position and begin the compacting cycle.
2. A
completewillautomaticallystop.
compacting cycle takes about 27 seconds.The
compactor
Doing so can result in death, explosion, or fire.
WARNING
NOTE:When the compacting cycle is done,turn the Key-Knob t
OFF& LOCK. Removethe Key-Knob and store it out of children
reach.
Cut Hazard
Do not push items down into compactor with
hands or feet.
1, Turnthe Control Knob to OFF& LOCK.
2. Turnthe Control Knob to RUN. Thiswill raisethe ram to its
topmost position. The compactor will automaticallyadvan(
to theend of the cycle and stop.
Doing so can result in cuts.
3. Youcan openthedrawerafterthe compactorstops.
NOTE:
Youwill
not compactor.
see compacting
of trash thedrawer
first few
times you
load the
The compactor
should
be about 1/_full before the compactor can begin to compress
the load.
1. Openthe drawer. Lift and pull the handle or pressthe toe bar
to open the drawer.
NOTE: Pressingthe toe bar opensthe containeronly 3 in.to
6 in. (7.6 cm to 15.2 cm), dependingon the load.
_'_"_;,-_._
_/_,...;.'
_ :_'_%,_..,'_-_
I_:_:_
__,_,_......
_ _(_.,_
When the trash is compacted to the top of the drawer,remove
the bag. If the bag is too heavy, compact less trash before
emptyingit inthe future.
&WARNING
Cut Hazard
2. Place trashin compactor.
• Wrapor coverwet or messytrash,
• Do not compactitemsthat may developoffensiveodors
suchas rawmeat,fish, grapefruitrinds,disposable
diapers,or personalhygieneitems.
8
Do not push items down into compactor with
hands or feet.
Doing so can result in cuts.
1. Pullthe drawercompletelyopen.
2, Removetop of bag from bag retainerbuttons. Pullup all
bag cuffs. Close bag with twist tie provided.
3. Push Side-Lock Latch down and tilt drawerside open.
Beforecleaning the compactor, turn the Key-Knob (or KeySwitch)to the OFF & LOCK position and remove it.
NOTE:Any services other than those outlined in this section
_.x
_S
should be performed by a designatedservice representative.
4. Liftout bag.
Cleaning Exterior Surfaces
1. Wash exteriorsurfaces(including stainlesssteel) with a clear
sponge or soft cloth and a mild detergent in warm water. Do
not use abrasive or harsh cleaners. Rinse and dry thoroughly
with a soft cloth.
2. Wipe up spills right away.Some foods can damage the finish
if left on the compactor surface.
Cleaning Inside the Drawer
_
IMPORTANT:
Beforeinstallinga new bag, be sure:
• The drawer sideis securelylocked.
_•_'_
bitsNOTE:of
glassY°u
mayin
theWantdrawer.t°
wear protective glovesas there may be
1. Removethe bag. (See the "Removinga Filled Bag" section.)
2. Pressdown on the lever-actionlock (orSide-Lock latch).
_.
• The container is clean and free of debris.
Donot use any kind of bag other than those designed especially
for use in your compactor. Order replacement compactor bags
through your local dealer or by calling the toll-free number on the
cover or in the "Assistanceor Service"section.
t.
Placefolded bag into the drawer.Open bag and pulltop
edges over the drawertop.
I I_
3. Hold the lever-actionlock down and tilt the side of the draw_
out until the lock clears the drawer front.
up, then lifting it out.
2, Lock bag in place by pulling thefour prepunchedholesover
the bag retainerbuttons.Holeswill expandoverthe buttons
withoutdamagingthe bag.
3. Pressinsideof bag against the drawer bottom, sides and
corners for a smooth fit.
NOTE: If desired, the drawer side can be removed by tilting
L
4, Washthe interiorof the drawerwith a cleanspongeor soft
clothand a mild detergentinwarm water.Rinseand dry
thoroughly with a soft cloth.
5. If the drawer side was removed, slide it back into the tilted
pushing the drawer side to the upright position.
7. Latch the drawer side by pushingup the lever-action lock ((
Side-Lock Latch).
6. Pressthe lever-actionlock (or Side-Lock Latch) down while
-!__=
Cleaning Inside the Cabinet
position.
.........
COMPACTORCARE
Your new compactor is designed to give you many years of
dependableservice. However,there are a few things you are
expected to do in order to maintain your compactor properly.
This section will tell you how to clean and care for your
compactor.
NOTE:Youmaywant to wearprotectiveglovesas theremay lb,teofg,ass
in the cabinet.
1. Pull the drawer
out until it stops.
NOTE: Look to see how the drawer rollersmove in the trac_
It will be easier to replacethe drawer when you are finishe(
cleaning.
\'_,
I_'1
2. Lift the front of the drawer to clearthe stops.
3. Grasp the draweron the sides and pull it out the rest of the
way.Set the drawerdown gently.
,.... _
Yourcompactor won't operate
__
.........................
• Is the power supply cord unplugged?
.................
•
Hasa householdfuse or circuit breaker tripped?
Replacethefuse or resetthe circuitbreaker,
-
Is the drawer completely closed?
Closethe drawer firmly and start the compactor again.
•
Is the Key-Knobturned all the way to START?
Turnthe Key-Knob(Key-Switch)fully to STARTand release
(onsome models), See the "Starting YourCompactor"
section.
4. Vacuumthe insideof the cabinet, Liquid spillsor wet trash
should be cleaned up by hand, or by using a vacuum
designedto pick up liquids,
PressON before pressing START(on some models).See the
"Starting Your Compactor" section.
The drawer won't open
•
•
•
Is the ram all the way up?
Drawerwill
open
only
whenpressingSTART?
ram is fully raised.
Did you press
ON
before
To raise the ram on models with e Key-Knob (or KeySwitch):
Turnthe Key-Knob (Key-Switch)to STARTand release. See
the "Starting YourCompactor" section.
•
To raise the ram on models with push button controls:
PressOFF,andthen pressON. See the "StartingYour
Compactor"section.
5. Washthe insideof the cabinet with clean sponge orsoft
cloth and a mild detergent in warm water. Rinseand dry
thoroughly w(th a soft cloth,
6. To replacethe drawer, graspit by the sides and insertthe
rollersontothe tracks.
7. Lift the frontof the drawerand push it in fully past the stops.
Cleaningthe Ram
Thereisnotenoughcompactionorforce
NOTE:Youmay wantto wearprotectiveglovesas there may be
bits of glass onthe ram cover.
1. Wipe glassparticlesoffof the ram coverwitha clothor paper
towels.
2, Removefoodswith a cleanspongeor soft cloth and a mild
detergentinwarmwater.Rinseand dry thoroughly
with a soft
cloth.
L._
•
Do you use the compactingcycle frequently enough?
Compactingworksbest when only a few items are loaded.
............................
Bottles don't break
•
How often do you notice this?
Bottleswill not breakeverytime.Thethicknessof the bottle
glassand
the content
of the trash load below it may preyer
the bottlefrom
breaking,
RECYCLING
WITHYOUR
COMPACTOR
......
""-'_"
If youwill be away for morethan a coupleof days,removethe
itc°mpact°rbag.
stOreout
of children's
Removethe
reach.
Key-Knob (or Key-Switch)and
TROUBLESHOOTING
Try the solutions suggested here first In order to avoidthe
cost of an unnecessary service call,
•
10
Is the drawer less than half full?
Drawermust be more than half full before trash is
compacted.
P_ I=
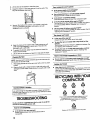
_1_
LDPE
HDPE
_
PP
V
_
PS
These
codesindicatewhichtypeofplasticwasused
in manufacturing
thecontainer.
Yourrecycling
programwillconfirmwhichcodesareacceptedfor
recycling.
OTHER
Plasticswiththissymbolcannotbe recycled,
compacting cycle is complete, remove the plastic bag as shown
Itemswiththissymbolcanberecycledor weremade
fromrecycledmaterials,
A compactor makes recyclingand landfill reduction efforts
enough to recycle.
in "Removingcompactingboth
a filled bag" and return
it to storage
until it is full
Remember,
recyclablss
and nonrecyclablesmeans lesssolid waste and waste transportation
costs--and a better environmentfor all,
more effective and efficient.
Reduce - Reuse - Recycle
Recycling Guidelines
Contact your community recycling program or local recycling
organizationsto find out which items are accepted for recycling
and how they should be preparedand organized.These
programs will provide essentialrecycling guidelines:
• Method and frequency of collection--curbside collections
and drop-off centers.
•
Categories of recyclable items,and how to distinguish
betweenthem. Plastic containers are identified by codes on
the bottom. Sort by the numbersinside the triangular arrows.
For example, most plastic soda bottles and some cleaning
bottles have code 1; most milk and water jugs, laundry and
personalhygiene product containers have cede 2. Paper and
cardboard containers (paperboard)also have recycle
symbols to indicate a container is recyclable.
•
Preparations of recyclable items. Most recycling programs
provide specific guidelineson preparation. For example,
aluminumcans and plastic containersneed to be rinsed out,
lids removed, but often labels can be left on.
IMPORTANT:
•
Some items, such as glass, should not be compacted.
•
•
ASSISTANCE
ORSERVICE
Before calling for assistanceor service, please check
"Troubleshooting."It may save you the cost of a service call. If
you still need help, follow the instructions below.
Whencalling, please know the purchase date and the complete
model and serialnumber of your appliance.This informationwill
help us to better respond to your request.
_'_ ::_.
_...---_,.,,,
_.
...........
_.._ _,_
If the problem is not due to one of the items listed in the
"TroubleshootJrlg" section.,.
Callthe dealerfrom whom your appliance was purchased, or ca
Maytag ApplianceSales Company,Jenn-Air Customer
Assistanceat 1-800-688-1100 or 1-423-472-3333 to locate an
authorized servicecompany. When calling, pleaseknow the
purchasedate and the complete model and serialnumber ofyo_
appliance.Be sureto retain proof of purchaseto verify warrant_
status.
Most recycfingprogramswill not accept crushed glass,
write to:
Check with your recycling programfor specific guidelineson
preparingrecyclabtes,
..........................................................................................................
Organizing the Recycling Workspace
Jenn-Air Customer Service
Attn."CAIR"_Center
P.O. Box 2370
Cleveland, TN 37320-2370
Convenientrecycle binsare made to fit in the compactor drawer.
Thesebins,as wellas plasticcompactorbags,can be purchased
Web address:www.jennair,com
Or call: 1-800-688-1100.
in a variety of colors at hardwarestoresand supermarkets.Set
up a system of color-coded bags in an area chosenfor
processingrecyclables.Each color can represent a category of
recyclable items, based on types specified by your recycling
program. Separaterecyclable items from non-recyctableitems:
• Recyclableitems can be sorted using the color-coded bags.
Prepareitems according to guidelines provided by your
recycling program.
U.S.customers usingTTY for deaf, hearingimpaired or speecl
impaired,call: 1-800-688-2080 (Monday-Friday,8:00 a.m.-8:01
•
Non-recyclable items should be compacted because
compaction reduces trash volume to its originalsize: four
bags of trash can be compacted into one bag. This
contributesto reducinglandfill volumeand relatedwaste
transportationburdens,
REMEMBER:Do notexpect itemswhich containminimalair,
such as folded newspapers,to compact significantly.
Compacl_tlg Recyclable IleiTis
..................................................................................................
Most recycling programswant the consumerto crush or flatten
recyclable items such as plastics, cans, and paperboard.
Compactingrecyclabie itemsconsolidatesvolumeand thereby
reducestransportation costs--and also helps manage recycling
workspace more effectively.The compactor (s ideal for such a
task.When a plastic bag is full enough to require compacting,
place the bag in the drawer as shown in "Installinga new bag."
Thenfollow instructions in "Using YourCompactor." Whenthe
p.m. EasternTime).
NOTE:Whenwriting or calling about a service problem, pleas
includethe following information:
1. Yourname,addressand daytime telephone number.
2. Appliancemodel number and serial number.
3. Name and address of your dealer or servicer.
4. A clear description of the problem you are having.
5. Proof of purchase (salesreceipt).
A_Ispecificationsare subjectto change by manufacturerwith
notice.
._......._.- __•_,_. _
Toorder a color-matchedtrim kit for the installation of a oust
made panel, contact your local authorized dealer.
Replacement Bags - Call for Part Number
Trim Kits for Custom Front Panels:
Order Part #TCDW (Trimkit for custommade panel)
Order Part #TCBS (Stainlesssteel door panel)
JENN-AIRCOMPACTOR
WARRANTY
FULL ONE-YEAR WARRANTY
For one (1)year from the date of original retail purchase,any part whichfailsinnormalhomeusewillbe repairedor replacedfree of
charge.
LIMITED "I'WO-YEAR WARRANTY
Fromthe secondyearthroughtheend ofthethirdyearfollowingthe dateof originalretailpurchase,parts whichfail in normalhomeus
willbe repairedor replacedfreeof chargefor the part itself,with theownerpayingallothercosts,includinglabor,mileageand
transportation.
PLEASENOTE: The fullwarrantyappliesonlywhenthecompactoris locatedin the UnitedStatesor Canada. Compactorslocated
elsewhereare coveredbythe limitedwarrantyonly,includinglimitedwarrantiesfor parts whichfail duringthe firstyear.
CANADIAN RESIDENTS:ThesewarrantiescoveronlythosecompactorsinstalledinCanadathat havebeenlistedwith Canadian
StandardsAssociationunlessthe compactorsarebroughtintoCanadadueto transferof residencefrom the UnitedStatesto Canad_
The specific warranties expressed above are the ONLY warranties provided by the manufacturer. These warrantie:
give you specific legal rights, and you may also have other rights that vary from state to state.
What is Not Covered by These Warranties:
1. Conditions and damages resultingfrom anyof the following:
a. Improper installation, delivery or maintenance.
b. Any repair,modification,alteration or adjustment not authorized by the manufactureror an authorized servicer.
c. Misuse,abuse, accidents or unreasonableuse.
d. Incorrect electric current,voltage or supply.
e. Improper setting of any control.
2. Warrantiesare void if the originalserial numbers have been removed, alteredor cannot be readily determined.
3. Products purchasedfor commercial or industrial use.
4. The cost of serviceor service call to:
a. Correct installation errors.
b, Instruct the user on proper use of the product.
c. Transportthe appliance to the servicer.
5. Consequentialor incidental damages sustained by any person as a result of any breach of these warranties.
Some states do not allow the exclusion or limitation of consequential or incidental damages, so the above
exclusion may not apply,
User's guides, service manuals and parts catalogs are available from Maytag Appliances Sales Company, Mayta(,
Customer Assistance.
6/_
Keep this book and your sales sliptogether for future
reference. You must provide proof of purchase or installation
date for in-warranty service.
Writedownthe followinginformationaboutyourcompactorto
better helpyou obtainassistanceor serviceif youeverneed it.
Youwillneed to knowyourcompletemodelnumberand serial
number.Youcan findthis informationon the modeland serial
numberlabellocatedon the insidewall ofthe compactordrawer.
Dealer name
Address
Phonenumber
Model number
Serial number
Purchasedate
9871852
© 2001 MaytagAppliance
Sales Company.
All warrantiesare madeby MaytagApplianceSaias Company
® MaytagApplianceSalesCompany
2/
Printedin U.S