1
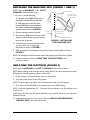
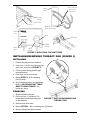
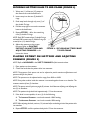
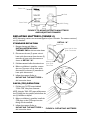
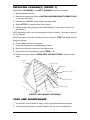
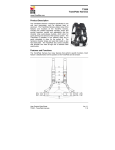
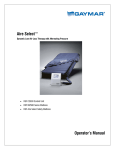
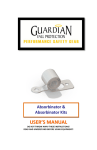
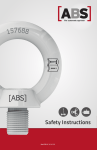
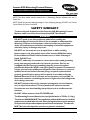
Invacare 8000 Alternating Pressure Mattress Assembly, Installation and Operating Instructions Model No. CG8000 NOTE: The above model number contains one (1) Alternating Pressure Mattress and one (1) Power Unit. NOTE: Check ALL parts for shipping damage. In case of shipping damage, DO NOT use. Contact Carrier/Dealer for further instruction. SAFETY SUMMARY To ensure the safe installation of the Invacare 8000 Alternating Pressure Mattress and Power Unit, these instructions MUST be followed: WARNING DO NOT install or use this equipment without first reading and understanding this instruction sheet. If you are unable to understand the Warnings, Cautions or Instructions, contact a healthcare professional, dealer or technical personnel before attempting to install this equipment otherwise, injury or damage may occur. DO NOT use the mattress near an open flame or while smoking. Inspect power cord, plug and air hoses of the Invacare 8000 Alternating Pressure Mattress/Power Unit for breaks, tears, or kinks. If damage is found, DO NOT use. DO NOT, under any circumstances, cut or remove the round grounding prong from any plug used with or for Invacare products. Devices are equipped with three-prong (grounding) plugs for protection against possible shock hazards. Where a two-prong wall receptacle is encountered, it is the personal responsibility and obligation of the customer to contact a qualified electrician and have the two-prong receptacle replaced with a properly grounded three-prong wall receptacle in accordance with the National Electrical Code. If you must use an extension cord, use ONLY a three-wire extension cord having the same or higher electrical rating as the device being connected. DO NOT place hot objects (for example: heating pads, electric blankets, etc.) on top of the mattress. This may weaken the mattress material. Use extreme care when handling sharp objects such as needles near the mattress. Do NOT inflate mattress of an OCCUPIED bed. The Alternating Pressure Mattress has a weight limitation of 250 lbs. (114 kg.). The Invacare 8000 APM MUST be installed on medical bed frames or medicalgrade home care beds with side rails. After placing the patient on the mattress, verify the side rails provide adequate protection for the patient. The side rails MUST be in the raised position, whenever a patient is on the bed. INVACARE 8000 PRESSURE MATTRESS 1 Part No. 1078996 Rev. B INSTALLING THE INVACARE 8000 (FIGURES 1 AND 2) NOTE: Refer to WARNINGS in the SAFETY SUMMARY of this instruction sheet. Power Unit Power Unit Air Hose Quick Disconnect 1. Do one (1) of the following: A. Place the Invacare 8000 Power Unit on a flat surface near the foot end of the bed. Hooks (2 Each) B. Open the hooks on the back of the Invacare 8000 Power Unit and install on the outside of the bed frame at the foot end of the bed as shown in FIGURE 1. Mattress Air Hose Quick Disconnect Foot End 2. Remove existing mattress from bed. 3. Place Invacare 8000 mattress on top of bed with the cushions facing up and air hoses at the foot end of the bed. 4. Insert mattress air hose quick disconnects into the power unit air hose quick disconnects as shown in FIGURE 1. Outside Bed Frame FIGURE 1- INSTALLING THE INVACARE 8000 5. Slide the transport mat inbetween the cushions and the mattress base as shown in FIGURE 2. NOTE: The transport mat will ensure the patient has support should the cushions deflate. 6. Inflate the mattress. Refer to INFLATING THE MATTRESS in this instruction sheet. INFLATING THE MATTRESS (FIGURE 2) NOTE: Refer to WARNINGS in the SAFETY SUMMARY of this instruction sheet. NOTE: Before inflating, ensure that ALL cushion fittings, both air hose quick disconnects and both CPR plugs are secured, otherwise, inflation will not occur. 1. Plug the power cord on the power unit into wall outlet. 2. Turn the power switch to the ON position. NOTE: The green light on the power unit will be illuminated when in the ON position. 3. Turn the knob CLOCKWISE on the power unit to the +MAX setting. NOTE: It will take approximately 30 - 45 minutes for the mattress to be fully inflated at the maximum p.s.i. NOTE: Keep the hose quick disconnects attached to the mattress and power unit, otherwise, deflation will occur. 4. Install the therapy pad to the mattress. Refer to INSTALLING/REMOVING THERAPY PAD in this instruction sheet. INVACARE 8000 PRESSURE MATTRESS 2 Part No. 1078996 Rev. B Power Unit Air Hose Quick Disconnect Power Unit Cushion Fittings Transport Mat Cushion Mattress Air Hose Quick Disconnect Power Unit Knob Power Switch -MIN Setting CPR Plugs +MAX Setting FIGURE 2- INFLATING THE MATTRESS INSTALLING/REMOVING THERAPY PAD (FIGURE 3) INSTALLING 1. Position therapy pad over mattress. 2. Insert one (1) of the ten (10) straps into open latch as shown in FIGURE 3. 3. Pull strap until therapy pad fits tight around mattress. 4. Push down on latch to secure. 5. Repeat STEPS 2 - 4 for remaining nine (9) straps. 6. Secure mattress base to the bed frame. Refer to SECURING MATTRESS BASE TO BED FRAME in this instruction sheet. Strap Latch REMOVING 1. Remove patient from bed. 2. Pull up on one (1) of the ten (10) latches that secure the therapy pad to the mattress. FIGURE 3 - INSTALLING/REMOVING THERAPY PAD 3. Remove strap from latch. 4. Repeat STEPS 2 - 3 for remaining nine (9) latches. 5. Remove therapy pad from mattress. Part No. 1078996 Rev. B 3 INVACARE 8000 PRESSURE MATTRESS SECURING MATTRESS BASE TO BED FRAME (FIGURE 4) 1. Wrap one (1) of the ten (10) straps on the mattress around the bed frame. Double D-rings 2. Insert strap into the two (2) double Drings. 3. Feed strap back through only one (1) of the double D-rings. 4. Pull the strap tight to secure the mattress base to the bed frame. Strap 5. Repeat STEPS 1 - 4 for the remaining nine (9) double D-rings. NOTE: Each SIDE contains three (3) double D-rings and each END contains two (2) double D-rings for a total of ten (10) double D-rings. 6. Adjust the mattress to the proper firmness. Refer to PLACING PATIENT ON MATTRESS AND ADJUSTING FIRMNESS in this instruction sheet. FIGURE 4 - SECURING MATTRESS BASE TO BED FRAME PLACING PATIENT ON MATTRESS AND ADJUSTING FIRMNESS (FIGURE 5) NOTE: Refer to WARNINGS in the SAFETY SUMMARY of this instruction sheet. 1. Place patient on the mattress. 2. Check the level that the patient sinks into mattress. NOTE: The pressure of the power unit can be adjusted to provide maximum effectiveness and pressure relief for the patient. NOTE: The pressure can be adjusted with a range from -MIN to +MAX. NOTE: Every other cushion inside the mattress is connected together known as a chamber. The mattress consists of two (2) chambers. NOTE: The power unit will cycle every eight (8) minutes. It will alternate inflating and deflating the two (2) air chambers. NOTE: The patients body should sink approximately 1/3 into the mattress. 3. If the level is unacceptable, do one (1) of the following: A. To increase firmness - turn knob towards +MAX setting. B. To decrease firmness - turn knob towards -MIN setting. NOTE: After adjusting the knob, wait ten (10) minutes before rechecking the level the patient sinks into mattress. 4. Repeat STEP 3 until the patients body sinks 1/3 into the mattress. INVACARE 8000 PRESSURE MATTRESS 4 Part No. 1078996 Rev. B Power Unit Knob Power Switch +MAX Setting -MIN Setting FIGURE 5 - PLACING PATIENT ON MATTRESS AND ADJUSTING FIRMNESS DEFLATING MATTRESS (FIGURE 6) NOTE: Alternating cushions are connected together to form a chamber. The mattress consists of two (2) chambers. DETAIL A STANDARD DEFLATION Power Unit 1. Remove therapy pad. Refer to INSTALLING/REMOVING THERAPY PAD in this instruction sheet. 2. Disconnect the two (2) power unit air hose quick disconnects from the two (2) mattress air hose quick disconnects as shown in DETAIL A. 3. Fold the mattress in half to force the air out. 4. Before re-inflation is possible, connect the two (2) power unit air hose quick disconnects to the two (2) mattress air hose quick disconnects. Power Unit Air Hose Quick Disconnect Mattress Air Hose Quick Disconnect Manifold CPR Straps 5. Inflate the mattress. Refer to INFLATING THE MATTRESS in this instruction sheet. RAPID (CPR) DEFLATION CPR Plugs 1. Pull the two (2) CPR straps labeled PULL CPR away from mattress. NOTE: Using the PULL CPR straps will disconnect the CPR plugs from the manifold, which allows the two (2) chambers to deflate. 2. Before re-inflation is possible, install the CPR plugs on the CPR straps into the fittings on the manifold. 3. Inflate the mattress. Refer to INFLATING THE MATTRESS in this instruction sheet. Part No. 1078996 Rev. B FIGURE 6 - DEFLATING MATTRESS 5 INVACARE 8000 PRESSURE MATTRESS REPLACING CUSHION(S) (FIGURE 7) NOTE: Refer to WARNINGS in the SAFETY SUMMARY of this instruction sheet. 1. Remove patient from bed. 2. Remove the therapy pad. Refer to INSTALLING/REMOVING THERAPY PAD in this instruction sheet. 3. Unbutton the EXISTING cushion from the mattress base. 4. Repeat STEP 3 for opposite side of the cushion. 5. Pull the cushion fitting away from the manifold fitting to remove the cushion from the mattress. NOTE: Alternating cushions are connected together to form a chamber. The mattress consists of two (2) chambers. NOTE: The cushions in the same chamber as the one removed in STEP 5 will deflate when the fittings are removed. 6. Position NEW cushion into mattress. 7. Insert cushion fitting into manifold fitting to secure. 8. Button the cushion(s) to secure to the mattress base. 9. If more cushions need replacing, repeat STEPS 3 - 8. 10. Inflate the mattress. Refer to INFLATING THE MATTRESS in this instruction sheet. Therapy Pad Button Holes Manifold Manifold Fitting Mattress Base Button Cushion Fitting Cushion FIGURE 7- REPLACING CUSHION(S) CARE AND MAINTENANCE 1. The mattress can be cleaned by wiping it with a germicidal disinfectant solution. 2. The mattress therapy pad is machine washable. Air dry at a cool temperature. INVACARE 8000 PRESSURE MATTRESS 6 Part No. 1078996 Rev. B LIMITED WARRANTY PLEASE NOTE: THE WARRANTY BELOW HAS BEEN DRAFTED TO COMPLY WITH FEDERAL LAW APPLICABLE TO PRODUCTS MANUFACTURED AFTER JULY 4, 1975. This warranty is extended only to the original purchaser/user of our products. This warranty gives you specific legal rights and you may also have other legal rights which vary from state to state. Invacare warrants its product to be free from defects in materials and workmanship for one(1) year on the pump and six (6) months on the mattress for the original purchaser. If within such warranty period any such product shall be proven to be defective, such product shall be repaired or replaced, at Invacare's option. This warranty does not include any labor or shipping charges incurred in replacement part installation or repair of any such product. Invacare's sole obligation and your exclusive remedy under this warranty shall be limited to such repair and/or replacement. For warranty service, please contact the dealer from whom you purchased your Invacare product. In the event you do not receive satisfactory warranty service, please write directly to Invacare at the address on the next page. Provide dealer's name, address, model number, date of purchase, indicate nature of the defect and, if the product is serialized, indicate the serial number. Invacare Corporation will issue a return authorization. The defective unit or parts must be returned for warranty inspection using the serial number, when applicable, as identification within thirty (30) days of return authorization date. DO NOT return products to our factory without our prior consent. C.O.D. shipments will be refused; please prepay shipping charges. LIMITATIONS AND EXCLUSIONS: THIS WARRANTY SHALL NOT APPLY TO PROBLEMS ARISING FROM NORMAL WEAR OR FAILURE TO ADHERE TO THE ENCLOSED INSTRUCTIONS. IN ADDITION, THE FOREGOING WARRANTY SHALL NOT APPLY TO SERIAL NUMBERED PRODUCTS IF THE SERIAL NUMBER HAS BEEN REMOVED OR DEFACED; PRODUCTS SUBJECTED TO NEGLIGENCE, ACCIDENT, IMPROPER OPERATION, MAINTENANCE OR STORAGE; PRODUCTS MODIFIED WITHOUT INVACARE'S EXPRESS WRITTEN CONSENT (INCLUDING, BUT NOT LIMITED TO: MODIFICATION THROUGH THE USE OF UNAUTHORIZED PARTS OR ATTACHMENTS): PRODUCTS DAMAGED BY REASON OF REPAIRS MADE TO ANY COMPONENT WITHOUT THE SPECIFIC CONSENT OF INVACARE; PRODUCTS DAMAGED BY CIRCUMSTANCES BEYOND INVACARE'S CONTROL; PRODUCTS REPAIRED BY ANYONE OTHER THAN AN AUTHORIZED INVACARE DEALER. SUCH EVALUATION SHALL BE SOLELY DETERMINED BY INVACARE. THE FOREGOING WARRANTY IS EXCLUSIVE AND IN LIEU OF ANY OTHER WARRANTIES WHATSOEVER, WHETHER EXPRESSED OR IMPLIED, INCLUDING THE IMPLIED WARRANTIES OF MERCHANTIBILITY AND FITNESS FOR A PARTICULAR PURPOSE, AND THE SOLE REMEDY FOR VIOLATIONS OF ANY WARRANTY WHATSOEVER, SHALL BE LIMITED TO REPAIR OR REPLACEMENT OF THE DEFECTIVE PRODUCT PERSUANT TO THE TERMS CONTAINED HEREIN. THE APPLICATION OF ANY IMPLIED WARRANTY WHATSOEVER SHALL NOT EXTEND BEYOND THE DURATION OF THE EXPRESS WARRANTY PROVIDED HEREIN. INVACARE SHALL NOT BE LIABLE FOR ANY CONSEQUENTIAL OR INCIDENTAL DAMAGES WHATSOEVER. THIS WARRANTY SHALL BE EXTENDED TO COMPLY WITH STATE/ PROVINCIAL LAWS AND REQUIREMENTS. Part No. 1078996 Rev. B 7 INVACARE 8000 PRESSURE MATTRESS Invacare Corporation www.invacare.com USA Canada 570 Matheson Blvd E Unit 8 Mississauga Ontario L4Z 4G4 Canada 800-668-5324 One Invacare Way Elyria, Ohio USA 44036-2125 800-333-6900 Invacare is a registered trademark of Invacare Corporation. Yes, you can. is a trademark of Invacare Corporation. © 2003 Invacare Corporation Part No. 1078996 Rev B - 05/03