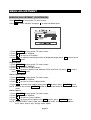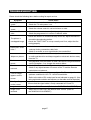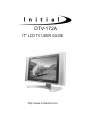
1
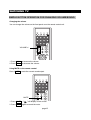
DTV-172A
17" LCD TV USER GUIDE
http://www.initialdvd.com
TABLE OF CONTENTS (FOR TV TUNER)
IMPORTANT INFORMATION
IMPORTANT SAFETY PRECAUTIONS
SUPPLIED ACCESSORIES
PREPARATION
● INSERTING BATTERIES INTO THE REMOTE CONTROL
● USING THE REMOTE CONTROL UNIT
● CAUTIONS REGARDING REMOTE CONTROL UNIT
FUNCTIONAL OVERVIEW
● FRONT VIEW
● REAR VIEW
● REMOTE CONTROL
CONNECTIONS
BASIC OPERATIONS
● TURNING ON THE POWER
● TURNING OFF THE POWER
● TV/AV MODE SELECTION
WATCHING TV
● TURNING ON THE POWER
● TURNING OFF THE POWER
● SIMPLE BUTTON OPERATIONS FOR CHANGING CHANNELS
● USING LAST ON THE REMOTE UNIT
● SIMPLE BUTTON OPERATION FOR CHANGING VOLUME/SOUND
MENU ADJUSTMENT
● TV TUNER ADJUSTMENT
● CONTENT BLOCKING
●
PICTURE ADJUSTMENT
● AUDIO ADJUSTMENT
● WINDOW ADJUSTMENT
● OPTIONS ADJUSTMENT
TROUBLESHOOTING
SPECIFICATIONS
LCD VIEWING ANGLE ADJUSTMENT
1
2-3
4
5
5
5
5
6-9
6
7
8-9
10-11
12
12
12
12
13-15
13
13
13
14
15
16-24
16-17
18
19-20
20-21
22-24
25-26
27
28
29
IMPORTANT INFORMATION
WARNING: TO REDUCE THE RISK OF FIRE OR ELECTRIC SHOCK, DO NOT EXPOSE
THIS PRODUCT TO RAIN OR MOISTURE.
CAUTION
RISK OF ELECTRIC SHOCK
DO NOT OPEN
The lightning flash with arrowhead symbol, within an equilateral triangle,
is intended to alert the user to the presence of uninsulated ''dangerous
voltage'' within the product's enclosure that may be of sufficient
magnitude to constitute a risk of electric shock to persons.
The exclamation point within a triangle is intended to alert the user to the
presence of important operation and maintenance (servicing) instructions
in the literature accompanying the product.
FCC RF INTERFERENCE STATEMENT
NOTE: This equipment has been tested and found to comply with the limit for a Class B digital
device, pursuant to Part 15 of the FCC Rules. These limits are designed to provide
reasonable protection against harmful interference in a residential installation.
This equipment generates, uses and can radiate radio frequency energy and, if not
installed and used in accordance with the instructions, may cause harmful interference to
radio communications. However, there is no guarantee that interference will not occur in a
particular installation.
If this equipment does not cause harmful interference to radio or television reception which
can be determined by turning the equipment off and on, the user is encourage to try to
correct the interference by one or more of the following measure.
● Reorient or relocate the receiving antenna.
● Increase the separation between the equipment and receiver.
● Correct the equipment into an outlet on a circuit different from that to which the receiver
is connected.
● Consult the dealer or an experienced radio, TV technical for help.
● Only shielded interface cable should be used.
page1
IMPORTANT SAFETY PRECAUTIONS
The present set has been designed and manufactured to assure personal safety. Improper use
can result in electric shock or fire hazard. The safeguards incorporated in the present unit will
protect you if you observe the following procedures in installing, using and servicing. The present
unit is fully transistorized and does not contain any element that can be repaired by the user.
1. Read these instructions - All operating instructions must be read and understood before the
product is operated.
2. Keep these instructions - These safely and operating instructions must be kept in a safe place
for future reference.
3. Heed all warnings - All warnings on the product and in the instructions must be observed closely.
4. Follow instructions - All operating instructions must be followed.
5. Attachment - Do not use attachments not recommended by the manufacturer. Use of inadequate
attachments can result in accidents.
6. Power source - This product must operate on a power source specified on the model label. If
you are not sure of the type of power supply used in your home, consult your dealer or local
power company.
7. AC cord protection - The AC cords must be routed properly to prevent people from stepping on
them or objects from resting on them. Check the cords at the plugs and product.
8. Overloading - Do not overload AC outlets or extension cords. Overloading can cause fire or
electric shock.
9. Entering of objects and liquids - Never insert an object into the product through vents or
openings. High voltage flows in the product, and inserting an object can cause electric shock
and/or short internal parts. For the same reason, do not spill water or liquid on the product.
10. Servicing - Do not attempt to service the product yourself. Removing covers can expose you
to high voltage and other dangerous conditions. Request a qualified service person to
perform servicing.
11. Repair - If any of the following conditions occurs, unplug the AC cord from the AC outlet, and
request a qualified service person to perform repairs.
a) When the AC cord or plug is damaged.
b) When a liquid was spilled on the product or when objects have fallen into the product.
c) When the product has been exposed to rain or water.
d) When the product does not operate properly as described in the operating instructions. Do
not touch the controls other than those described in the operating instructions. Improper
adjustment of controls not described in the instructions can cause damage, which often
requires extensive adjustment work by a qualified technician.
e) When the product has been dropped or damaged.
page2
IMPORTANT SAFETY PRECAUTIONS
f) When the product displays an abnormal condition. Any noticeable abnormality in the product
indicates that the product needs servicing.
12. Replacement parts - In case the product needs replacement parts, make sure that the service
person uses replacement parts specified by the manufacturer, or those with the same
characteristics and performance as the original parts. Use of unauthorized parts can result in
fire, electric shock and/or other danger.
13. Safety checks - Upon completion of service or repair work, request the service technician to
perform safety checks to ensure that the product is in proper operating condition.
14. Wall or ceiling mounting - When mounting the product on a wall or ceiling, be sure to install
the product according to the method recommended by the manufacturer.
15. Unplug the AC cord from the AC outlet before installing the speakers.
16. Cleaning - Unplug the AC cord from the AC outlet before cleaning the product. Use only with
a dry cloth to clean this apparatus. Do not use liquid or aerosol cleaners.
17. Water and moisture - Do not use this product near water such as bathtub, washbasin, kitchen
sink and laundry tub, swimming pool and in a wet basement. TV set shall not be exposed to
dripping or slashing and no objects filled with liquid, such as vases, shall be placed on the TV
set.
18. Stand - Do not place the product on an unstable cart, stand, tripod or table. Unstable installation
is likely to make the product fall resulting in serious injuries as well as material damage. Use
only the cart, stand, tripod, bracket, or table specified by the manufacturer, or sold with the
apparatus.
19. When a cart is used, use caution when moving the cart/apparatus combination to void injury
from tip-over.
20. Ventilation - The vents and other openings in the cabinet are designed for ventilation. Do not
cover or block them since insufficient ventilation can overheat and/or shorten the product’s
life span. Do not place the product on the bed, sofa, rug or other similar surfaces since they
can block ventilation openings. This product is not designed for built-in installation; do not
place the product in an enclosed place such as a bookcase or rack unless proper ventilation
is provided or the manufacturer's instructions are followed.
21. The LCD panel used in this product is made of glass. Therefore, it can be broken when the
product is dropped or gets shock. Be careful not to be injured by glass pieces in case the
panel is broken.
22. Heat sources - Do not install near any heat sources such as radiators, heat registers, stoves,
or other apparatus (including amplifiers) that produce heat.
23. The LCD panel is a product of very high technology with 2,949,120 thin film transistors, giving
you fine picture details. Occasionally, a few non-active pixels may appear on the screen as a
fixed blue, green or red point. Please note that this does not affect your product's performance.
page3
SUPPLIED ACCESSORIES
Make sure the following accessories are provided with the product.
Power adapter
POWER
MPX
OSD
OPEN
1
2
3
4
5
6
7
9
10/0
+10
USB Extension Cable
AV cables
8
AUTO
DTV-172A
CAPTION
17" LCD TV USER GUIDE
MUTE
VOL
CH
LAST
TV/DVD
/AUX/PC
TV MENU
OK
DVD TITLE
DVD MENU
PLAY
PAUSE
STOP
SEARCH
SKIP
ZOOM
SLOW
SETUP
P. MODE
REMAIN
REPEAT
RETURN
WIDE
A. MODE
AUDIO
SUBTITLE
ANGLE
http://www.initialdvd.com
RC-172DT
Remote control
Component Video Cable or
Y/Pb/Pr cable
It also includes:
AAA batteries (2)
Warranty card
Audio cable for
component input
page4
User guide
PREPARATION
INSERTING BATTERIES INTO THE REMOTE CONTROL
Insert supplied batteries via the battery compartment on the back of the remote control.
Make sure polarity matches the (+) and (-) marks inside the compartment.
-
+
+
-
USING THE REMOTE CONTROL UNIT
●
●
●
POWER
MPX
OSD
1
2
3
5
6
7
Use the remote control by pointing it towards the remote
sensor on the TV. Objects between the remote control and
the sensor may disrupt operation.
Effective range is 20 feet but is dependant on what your
viewing angle is.
Range can also be affected by direct sunlight on the TV's
sensor.
OPEN
4
8
AUTO
10/0
9
+10
CAPTION
MUTE
VOL
CH
LAST
TV/DVD
/AUX/PC
TV MENU
OK
DVD TITLE
DVD MENU
PLAY
PAUSE
SKIP
STOP
SEARCH
ZOOM
SLOW
P. MODE
REMAIN
REPEAT
WIDE
A. MODE
AUDIO
SUBTITLE
ANGLE
SETUP
RETURN
RC-172DT
CAUTIONS REGARDING REMOTE CONTROL UNIT
●
●
Do not expose remote to liquids, direct sunlight or shock.
The remote control unit may not work properly if the remote sensor window of the Display is
under direct sunlight or strong lighting. In such case, change the angle of the lighting or Display,
or operate the remote control unit closer to the remote sensor window.
page5
FUNCTIONAL OVERVIEW
FRONT VIEW
4
5
6
CH
7
CH
VOL
8
VOL
TV/AUX/PC
3 2 1
1) REMOTE SENSOR
2) POWER ON INDICATOR
3) STANDBY INDICATOR
4) TV/AUX/PC: Use to select the AV signal source between: TV, DVD/USB/CARD, AUX-Video,
AUX-S-Video, AUX-Component,PC.
5) MUTE: Mute the sound.
6) PREV/NEXT (CH+/-): To skip to the previous/next chapter (previous/next channel).
7) VOLUME+/-: Use to adjust the volume.
8) POWER BUTTON: Use to turn the unit on and off.
page6
FUNCTIONAL OVERVIEW
REAR VIEW
AV1 IN
VIDEO
L
AUDIO
S-VIDEO
1
R
AV OUT
VIDEO
L
AUDIO
CR / PR
R
CB / PB
L
AUDIO
2
3
R
Y
AV2 IN
AUDIO
VGA
PHONES
DC IN
1) AV1 IN (Composite Video, S-Video and Audio In)
2) AV OUT (Composite Video and Audio Out)
3) AV2 IN (Component Video and Audio In)
4) VGA, Audio (PC Input)
5) PHONES
6) DC IN
page7
4
5
6
FUNCTIONAL OVERVIEW
REMOTE CONTROL
POWER
OSD
MPX
OPEN
32
1
2
34
33
1
2
3
5
6
7
4
8
AUTO
9
10/0
3
4
31
+10
30
CAPTION
MUTE
VOL
CH
29
LAST
5
6
7
8
9
28
TV/DVD
/AUX/PC
TV MENU
OK
DVD TITLE
DVD MENU
27
PLAY
10
11
12
13
14
15
16
17
18
PAUSE
STOP
26
SKIP
SEARCH
25
ZOOM
SLOW
SETUP
RETURN
P. MODE
REMAIN
REPEAT
WIDE
A. MODE
AUDIO
SUBTITLE
ANGLE
24
23
22
21
20
19
RC-172DT
1) POWER: Use to turn the unit on and off.
2) Number Buttons: Use to set the channel and to enter DVD chapter numbers.
3) CAPTION: Use to select close caption mode.
4) VOLUME+/-: Use to adjust the volume.
5) LAST: Press to return to the previous channel in normal viewing mode.
6) TV/DVD/AUX/PC: Use to bring up the AV signal source selection screen and use the /
buttons to select between: TV, AUX-Video, AUX-S-Video, AUX-Component,PC, and press the
OK button to confirm.
7) Cursor Buttons: Use to navigate in menus.
page8
FUNCTIONAL OVERVIEW
REMOTE CONTROL (CONTINUED)
8) OK: Use to confirm your selections.
9) DVD TITLE: Use to bring up the DVD title menu.
10) PLAY:Use to begin the DVD playback.
11)PAUSE:Use to pause the DVD playback.
12) PREV/NEXT: Use to skip to the previous/next chapter.
13) ZOOM: Use to zoom the DVD playback picture.
14) SLOW: Use to slow the DVD playback speed.
15) P. MODE: Use to shift DVD play mode.
16) REMAIN: Use to display the time of the DVD playback.
17) A. MODE: Use to shift the DVD playback audio mode.
18) AUDIO: Use to shift DVD audio language.
19) SUBTITLE: Use to shift DVD subtitle language.
20) ANGLE: Use to shift DVD viewing angle.
21) REPEAT: Use to repeat the DVD playback.
22) WIDE: In DVD mode, use to set TV display mode.
23) SETUP: Use to bring up DVD setup menu.
24) RETURN: Return to the previous menu screen.
25) FF/FR: Use to play DVD fast forward/backward.
26) STOP: Use to stop the DVD playback.
27) DVD MENU: Use to bring up the DVD root menu.
28) TV MENU: Use to bring up TV menu; and exits TV menu by pressing again.
29) CH+/-:Use to skip to the previous/next channel.
30) MUTE: Mute the sound.
31) AUTO: Auto adjustment for PC signals.
32) OPEN( ):Use to eject the disc being played in the disc slot.
33) OSD: Use to bring up the DVD On-Screen-Display.
34) MPX: Use to select MPX mode.
page9
AV1 IN
L
R
L
R
page10
DC IN
PHONES
VGA
AUDIO
AV2 IN
R
AUDIO
CB / PB
CR / PR
Y
L
AUDIO
VIDEO
AV OUT
S-VIDEO
AUDIO
VIDEO
1a
2d
2a
1b
2f
or HDTV Receiver
2c
2e
VGA Audio Cable
Computer
2b
CONNECTIONS
CONNECTIONS
1. CONNECT TO POWER
a. Connect the mini plug of the AC power adapter to DC IN jack on the back of the DTV-172A.
b. Connect the power plug of the AC power adapter to the power socket.
2. SYSTEM CONNECTIONS
a. Using the antenna input: Connect the antenna terminal from an antenna or cable/satellite
receiver to the antenna input terminal on the DTV-172A; use the TV/DVD/AUX/PC button and
the / buttons to set the DTV-172A's signal source to "TV".
b. Using the AV1 RCA Video/Audio input: Connect compatible AV equipment to the DTV-172A
through the AV1 IN jacks on DTV-172A (Composite Video and Audio input jacks); use the
TV/DVD/AUX/PC button and the / buttons to set the DTV-172A's signal source to "AUXVideo".
c. Using the AV1 S-Video and RCA Audio input: Connect AV equipment to the DTV-172A
through the AV1 IN jacks on DTV-172A (S-Video and Audio input jacks); use the
TV/DVD/AUX/PC button and the / buttons to set the DTV-172A’s signal source to “AUX-SVideo”.
d. Using the AV2 Component input: The AV2 input may be used for Progressive scan (this
connection is also known as “Y/Pb/Pr”) or HDTV inputs; use the TV/DVD/AUX/PC button and
the / buttons to set the DTV-172A's signal source to "AUX-Component".
e. Using the VGA connector: Connect a PC computer to the DTV-172A through the VGA socket
on DTV-172A. The Mini-plugged next to the VGA input is for audio associated with this type of
signal. Audio cables for this purpose are supplied with the DTV-172A. Use the TV/DVD/AUX/PC
button and the / buttons to set the DTV-172A’s signal source to “PC”. DTV-172A monitor’s
native resolution for computer use is 1024x768.
f. Using the AV out, RCA Video/Audio output: Connect the DTV-172A to another TV Monitor
through the AV OUT jacks on DTV-172A (Composite Video and Audio output jacks); now you
can use the TV Monitor as an external monitor. Signals from the Antenna, AV1 will be available
at this point.
page11
BASIC OPERATIONS
POWER
TV/AUX/PC
POWER
MPX
OSD
OPEN
1
2
3
4
5
6
7
POWER
CH
CH
VOL
VOL
TV/AUX/PC
8
AUTO
10/0
9
+10
CAPTION
MUTE
VOL
CH
LAST
TV/DVD/
AUX/PC
TV/DVD
/AUX/PC
TV MENU
OK
DVD TITLE
DVD MENU
PLAY
PAUSE
STOP
SEARCH
SKIP
ZOOM
SLOW
SETUP
RETURN
P. MODE
REMAIN
REPEAT
WIDE
A. MODE
AUDIO
SUBTITLE
ANGLE
TURNING ON THE POWER
1. Press POWER button on the front panel to turn on the TV set. The POWER indicator
lights up green.
2. If the STANDBY indicator still lights up red, press POWER on the remote control to turn
the TV set on.
TURNING OFF THE POWER
1. Press POWER on the remote control, the image on the screen disappears and the
STANDBY indicator lights up red.
NOTE: Small amounts of electric power is still consumed even when the power is turned off.
TV/AV MODE SELECTION
By pressing the TV/AUX/PC on the TV set and confirming by the OK button on the remote
control, you can change the mode as follows:
TV
AUX-Video
AUX-S-Video
page12
AUX-Component
PC
WATCHING TV
TURNING ON THE POWER
1. Press POWER button on the front panel to turn on the TV set. The POWER indicator
lights up green.
2. If the STANDBY indicator still lights up red, press POWER on the remote control to turn
the TV set on.
TURNING OFF THE POWER
1. Press POWER on the remote control, the image on the screen disappears and the
STANDBY indicator lights up red.
NOTE: Even though the TV is turned off a small amount of power is used to maintain various
functions.
SIMPLE BUTTON OPERATIONS FOR CHANGING CHANNELS
You can change channels in several ways.
∧/∨
∨ on the remote unit
Using CH∧
CH+/CH
CH
VOL
VOL
TV/AUX/PC
POWER
MPX
OSD
OPEN
1
2
3
4
5
6
7
8
AUTO
9
10/0
+10
CAPTION
MUTE
VOL
CH
CH∧/∨
LAST
TV/DVD
/AUX/PC
TV MENU
OK
DVD TITLE
PLAY
DVD MENU
PAUSE
STOP
∧ to increase channel number.
1. Press CH∧
∨ to decrease channel number.
2. Press CH∨
NOTE: CH+/- on the TV set operates the same as CH∧/∨ on the remote unit.
page13
WATCHING TV
Using number buttons on the remote unit
NUMBER BUTTONS
POWER
MPX
OSD
OPEN
1
2
3
4
5
6
7
8
AUTO
10/0
9
+10
CAPTION
MUTE
VOL
CH
LAST
Select the channels directly by pressing the number buttons.
EXAMPLE:
To select a 1-digit channel (e.g. channel 2):
● Press 2 .
To select a 2-digit channel (e.g. channel 12):
● Press 1 ,followed by 2 .
USING LAST ON THE REMOTE UNIT
POWER
MPX
OSD
OPEN
1
2
3
4
5
6
7
8
AUTO
9
10/0
+10
CAPTION
MUTE
VOL
CH
LAST
LAST
TV/DVD
/AUX/PC
TV MENU
OK
DVD TITLE
DVD MENU
Press LAST to switch the currently tuned channel to the previous tuned channel.
Press LAST again to switch back to the currently tuned channel.
page14
WATCHING TV
SIMPLE BUTTON OPERATION FOR CHANGING VOLUME/SOUND
Changing the volume
You can change the volume on the front panel or on the remote control unit.
POWER
MPX
OSD
OPEN
1
2
3
4
5
6
7
8
AUTO
9
10/0
+10
CAPTION
MUTE
VOLUME+/-
VOL
CH
LAST
TV/DVD
/AUX/PC
TV MENU
OK
1. Press VOL+ to increase the volume.
2. Press VOL- to decrease the volume.
Using MUTE on the remote control
Press MUTE to mute the current sound output.
POWER
MPX
OSD
OPEN
1
2
3
4
5
6
7
8
AUTO
9
10/0
+10
CAPTION
MUTE
VOL
MUTE
CH
LAST
1. Press MUTE . ''
'' will display on the screen.
2. Press MUTE again to cancel the mute.
page15
MENU ADJUSTMENT
TV TUNER ADJUSTMENT
Press TV MENU to bring up the TV menu screen.
Press
/
to select "Settings" and press
to enter into the items below ''Settings''.
NOTE: Only when in TV status, there is "Settings"option.
Make sure press TV MENU to exit TV menu screen before other operatings.
TV Source
This will help you to select the TV's signal source.
1. Press TV MENU to bring up the TV menu screen.
2. Press
/
to select "Settings" and press
3. Press
to enter "TV Tuner" menu.
to select "TV Tuner".
off
2
page16
MENU ADJUSTMENT
TV TUNER ADJUSTMENT (CONTINUED)
4. Press / to select "TV Source".
5. Press / to select your desired TV source between Antenna and Cable; press OK to
return; press TV MENU to exit.
Automatic channel search
Channel auto search finds and memorizes all channels viewable in your area. Select one
between ANTENNA and CABLE before this operation.
1. Press TV MENU to bring up the TV menu screen.
2. Press
/
to select "Settings" and press
to select "TV Tuner".
3. Press
to enter "TV Tuner" menu.
4. Press
/
5. Press
to begin the searching. Wait until the searching ends.
to select "Auto Search".
NOTE: The illustrations and on-screen displays in this manual are for explanation purposes and
may vary from the actual operations.
Fine tune
1. Press TV MENU to bring up the TV menu screen.
2. Press
/
3. Press
to enter "TV Tuner" menu.
4. Press
/
5. Press
to enter "Fine Tune" screen.
6. Press
/
to select "Settings" and press
to select "TV Tuner".
to select "Fine Tune".
to tune for a better picture and sound; press OK to return; press TV MENU to exit.
Channel skip
1. Press TV MENU to bring up the TV menu screen.
2. Press
/
to select "Settings" and press
to select "TV Tuner".
3. Press
to enter "TV Tuner" menu.
4. Press
/
to select "Channel Skip".
5. Press
/
to select between "On" and "Off"; press OK to return; press TV MENU to exit.
Current channel number selection
1. Press TV MENU to bring up the TV menu screen.
2. Press
/
to select "Settings" and press
to select "TV Tuner".
3. Press
to enter "TV Tuner" menu.
4. Press
/
to select "Current Channel".
5. Press
/
to select a current channel number you want; press OK to return; press
TV MENU to exit.
page17
MENU ADJUSTMENT
CONTENT BLOCKING
Password
1. Press TV MENU to bring up the TV menu screen.
2. Press / to select "Settings" and press to select "Content Blocking".
3. Press to enter "Content Blocking (Password)" menu.
4. Press to select "Enter" and press to enter the password.
5. Press / to select digit and press / to change the selected digit.
6. Press to select "OK" and press OK to check the password. Then there will be "Change"
and "Clear" under "Enter".
7. Press to select "Change" and press to change the password.
8. Press / to select digit and press / to change the selected digit.
9. Press to select "OK" and press OK to confirm your change.
10. Press to select "Clear" and press
to clear the password; press OK to return; press
TV MENU to exit.
NOTE:The preset password is 000000.
page18
MENU ADJUSTMENT
PICTURE ADJUSTMENT
Press TV MENU to bring up the TV menu screen.
Press
/
to select ''Picture'' and press
to enter into below items.
16
16
16
16
tint
16
Contrast
1. Press TV MENU to bring up the TV menu screen.
2. Press / to select ''Picture''.
3. Press
/ to move to ''Contrast''.
4. Press / to adjust the picture contrast; press OK to return; press TV MENU to exit.
Brightness
1. Press TV MENU to bring up the TV menu screen.
2. Press / to select ''Picture''.
3. Press / to move to ''Brightness''.
4. Press / to adjust the picture brightness; press OK to return; press TV MENU to exit.
Color
1. Press TV MENU to bring up the TV menu screen.
2. Press / to select ''Picture''.
3. Press / to move to ''Color''.
4. Press / to adjust the picture color; press OK to return; press TV MENU to exit.
Sharpness
1. Press TV MENU to bring up the TV menu screen.
2. Press / to select ''Picture''.
3. Press / to move to ''Sharpness''.
4. Press / to adjust the picture sharpness; press OK to return; press TV MENU to exit.
page19
MENU ADJUSTMENT
PICTURE ADJUSTMENT
Tint
1. Press TV MENU to bring up the TV menu screen.
2. Press / to select ''Picture''.
3. Press / to move to 'Tint''.
4. Press / to adjust the tint; press OK to return; press TV MENU to exit.
NOTE: Only when in TV,Video and S-Video status, there is “Tint” option.
AUDIO ADJUSTMENT
Press TV MENU to bring up the TV menu screen.
Press
/
to select ''Audio'' and press
to enter into below items.
6
16
16
16
MPX
Mono
equalizer
down for audio settings
Volume
1. Press TV MENU to bring up the TV menu screen.
2. Press / to select ''Audio''.
3. Press / to move to ''Volume''.
4. Press / to adjust the volume; press OK to return; press TV MENU to exit.
Bass
1. Press TV MENU to bring up the TV menu screen.
2. Press / to select ''Audio''.
3. Press / to move to ''Bass''.
4. Press / to adjust the bass weaker or stronger; press OK to return; press TV MENU to
exit.
page20
MENU ADJUSTMENT
AUDIO ADJUSTMENT (CONTINUED)
Treble
To stress high frequency sound
1. Press TV MENU to bring up the TV menu screen.
2. Press / to select ''Audio''.
3. Press / to move to ''Treble''.
4. Press / to adjust the treble weaker or stronger; press OK to return; press TV MENU to
exit.
Balance
1. Press TV MENU to bring up the TV menu screen.
2. Press / to select ''Audio''.
3. Press / to move to ''Balance''.
4. Press / to adjust audio output between left and right speakers; press OK to return; press
TV MENU to exit.
MPX
This function is to select a MPX mode.
1. Press TV MENU to bring up the TV menu screen.
2. Press / to select ''Audio''.
3. Press / to move to ''MPX''.
4. Press / to select a MPX mode; press OK to return; press TV MENU to exit.
NOTE: 1. You can also use the MPX button on the remote control to select a MPX mode.
2. Only when in TV status, there is “MPX” option.
Equalizer
1. Press TV MENU to bring up the TV menu screen.
2. Press / to select “Audio”.
3. Press /
to move to “Equalizer”.
4. Press to enter “Equalizer” menu.
5. Press /
to select every options and press / to adjust.
6. Press OK to return; press TV MENU to exit.
page21
MENU ADJUSTMENT
WINDOW ADJUSTMENT
PC mode input format
VGA
SVGA
XGA
Resolution
V freq. (Hz)
H freq. (KHz)
640×480
640×480
640×480
640×480
720×400
800×600
800×600
800×600
800×600
1024×768
1024×768
1024×768
60
72
75
85
70
60
75
85
72
60
70
75
31.5
37.9
37.5
43.3
31.5
37.9
46.9
53.7
48.1
48.4
56.5
60.2
In case of inputting the PC signal other than above signals, ''OUT OF RANGE'' will display.
…
Setup your PC software…
Even if your actual display-setting screen looks different from the windows below, basic setup
methods will be applied in most of the case.
1. First, click on ''Setting'' on the Windows Start menu. While ''Setting'' is selected, move the cursor
to submenu ''Control Panel''.
page22
MENU ADJUSTMENT
WINDOW ADJUSTMENT (CONTINUED)
2. When the control panel screen appears, click on ''Display'' and a display dialog box displays.
3. Navigate to the ''Setting'' tab on the display dialog box. The correct setting of size (resolution) is
''1024 x 768 pixels''.
Check the vertical frequency of your PC.
page23
MENU ADJUSTMENT
WINDOW ADJUSTMENT (CONTINUED)
Press TV MENU to bring up the TV menu screen.
Press
/
to select ''Window'' and press
to enter into below items.
display mode
50
H-Position
1. Press TV MENU to bring up the TV menu screen.
2. Press / to select ''Window''.
3. Press / to move to ''H-Position''.
4. Press / to adjust the horizontal position of displayed image; press OK to return; press
TV MENU to exit.
Display Mode
1. Press TV MENU to bring up the TV menu screen.
2. Press / to select ''Window''.
3. Press / to move to ''Display Mode''.
4. Press / to select a display mode between:Fill All and Force 4:3; press OK to return;
press TV MENU to exit.
Close Caption Mode
1. Press TV MENU to bring up the TV menu screen.
2. Press / to select ''Window''.
3. Press / to move to ''Close Caption Mode''.
4. Press / to select close caption mode; press OK to return; press TV MENU to exit.
NOTE: You can also use the CAPTION button on the remote control to select close caption
mode.
Close Caption
1. Press TV MENU to bring up the TV menu screen.
2. Press / to select ''Window''.
3. Press / to move to ''Close Caption''.
4. Press / to control close caption; press OK to return; press TV MENU to exit.
NOTE: In COMPONENT status, there are only “Display mode” and “H position” options.
In PC status, there is only “Display mode” option.
page24
MENU ADJUSTMENT
OPTIONS ADJUSTMENT
Press TV MENU to bring up the TV menu screen.
Press
/
to select ''Options'' and press
to enter into below items.
osd timeout
sleep time
never
0 minutes
down for option settings
Menu Background
1. Press TV MENU to bring up the TV menu screen.
2. Press / to select ''Options''.
3. Press / to move to ''Menu Background''.
4. Press / to select the menu background between:Translucent and Opaque; press OK to
return; press TV MENU to exit.
page25
MENU ADJUSTMENT
OPTIONS ADJUSTMENT (CONTINUED)
OSD Timeout
It is used to adjust the OSD timeout .
1. Press / to select "OSD Timeout " in "Option" menu.
2. Press / to adjust the "OSD Timeout " :
5sec
10sec
15sec
20sec
60sec
never
25sec
50sec
30sec
40sec
From 5 to 60 second : the menu will disappear automatically according to the time you
selected .
Never : when you select the "Never" , the menu will not disappear automatically , you must
press TV MENU to exit the LCD menu .
4. Press TV MENU to exit.
Sleep Time
It is used to set the sleep time and the time remaining will be displayed .
1. Press / to select "Sleep Time "in "Options" menu.
2. Press / to adjust the "Sleep Time " :
10minutes
0 minutes
20minutes
240minutes
30minutes
180minutes
120minutes
60minutes
90minutes
3. When you have set the "Sleep Time " , the count down will be applied automatically , and the
time remaining displays the remain time .
If you set the "Remaining time " at "10 minutes …… or 240 minutes " , "Time Remaining "
displays :
Sleep Time
120minutes
Time remaining
120min
4. If you want to cancel the " Sleep Time " , you can set the " Sleep Time " on " OFF" .
5. Press TV MENU to exit.
Reset
1. Press TV MENU to bring up the TV menu screen.
2. Press / to select ''Options''.
3. Press / to move to ''Reset''.
4. Press to reset all settings to factory setting.
NOTE: In PC status,there is "Back Light Adjust" option under "Menu Background".The operation
is all the same as "Menu Background".
page26
TROUBLESHOOTING
Please check the following items before asking for repair service.
Symptom
Neither picture nor
sound.
Picture is OK, but no
sound.
Sound is OK, but no
color.
Check Items
- Check the contact of sockets is all right.
- Check the TV main power is on.
- Check the volume control is set to minimum or mute.
- Check the color control and adjust it properly.
- Check the programme is in color or in black & white.
The picture is
overlapped image.
-Check the antenna is installed correctly and if not, adjust the antenna
toward the broadcasting station.
-Check the ''FINE TUNE ''is set up correctly and if not, adjust the fine
tuning properly.
Picture has ''snow
noise ''.
- Check the antenna or its connection is correct and if not, correct the
antenna fault or connection cable fault.
- Check if car traffic or neon sign disturbs the sound effect.
Stripes on picture.
- Check the susceptible interference by other electronic devices such
as radio and television and keep magnetic or electronic devices away
from the TV.
Bad stereo or SAP
sound.
Remote control does
not work.
''Out Of Range''
appears on the
screen.
''No Signal'' appears
on the screen.
Image is not clear.
Image is not
centered.
- Long distance from the station or other radio waves can generate bad
sound. Reception. If so, change the mode to Mono.
- Check if the batteries in the Remote control die.
- Check if any object between IR sensor of the TV and the Remote
control does not obstruct.
- Check the resolution and frequency of your PC. Then, adjust them to
optimum condition for LCD TV: 1024X768 and 60Hz.
- Refer to the table of PC mode input format indicated on page 22. (Not
being registered resolution and frequency on the table won't be displayed.)
-Ensure that the signal cable is firmly connected to PC and TV.
-Adjust the PHASE control. (Refer to the PICTURE ADJUSTMENT.)
- Adjust the H-POSITION, and IMAGE SIZE Control. (Refer to
the WINDOW ADJUSTMENT.)
page27
SPECIFICATIONS
PANEL
17'' WIDE TFT LCD
RESOLUTION
1280 X RGB X 768 (WXGA)
ACTIVE AREA (mm)
LCD
VIEWING ANGLE (°,U/D/L/R)
CONTRAST RATIO
BRIGHTNESS (cd/m2)
WITH STAND (mm)
DIMENSION
WITHOUT STAND (mm)
WEIGHT (WITHOUT ACCESSORIES)
TV STANDARD
45/45/60/60
400:1
450
500 X 352 X 220
500 X 292 X 83
13.7lbs (6.6kg)
NTSC
TUNING SYSTEM
TV-FUNCTION
370 X 222
ELECTRIC TUNING SYSTEM
FREQUENCY RANGE
STEREO
VHF/UHF
NICAM
CATV
INPUT POWER
DC12V, AC100-240V~, 50/60Hz
SOUND OUTPUT
4W + 4W
POWER CONSUMPTION
45W
AV IN
VIDEO, S-VIDEO, AUDIO L&R
TERMINALS
125 CHANNELS
COMPONENT
Y, Pb (Cb), Pr (Cr)
MONITOR OUT
VIDEO OUT
HEADPHONE
3.5mm STEREO MINI-JACK
PC IN
D-SUB 15PIN RGB IN
ANTENNA IN
F-TYPE
page28
LCD VIEWING ANGLE ADJUSTMENT
Horizontal Adjustment
5
5
Vertical Adjustment
10
page29