1
AS WX 1 Satellite Weather Receiver
Installation & Operations Manual
531675-1_B
Thank You!
Thank you for choosing Humminbird®, America's #1 name in Fishfinders.
Humminbird® has built its reputation by designing and manufacturing
top-quality, thoroughly reliable marine equipment. Your Humminbird®
accessory is designed for trouble-free use in even the harshest marine
environment. In the unlikely event that your Humminbird® accessory does
require repairs, we offer an exclusive Service Policy - free of charge during
the first year after purchase, and available at a reasonable rate after the
one-year period. For complete details, see the separate warranty card
included with your accessory. We encourage you to read this operations
manual carefully in order to get full benefit from all the features and
applications of your Humminbird® product.
Contact our Customer Resource Center at 1-800-633-1468 or visit our web
site at www.humminbird.com.
WARNING! This device indicates impending weather patterns; however weather
conditions may move too quickly to allow adequate reaction time. It is the operator’s
responsibility to make prudent decisions regarding personal safety. This device
should not be used as a replacement for official weather forecasts.
NOTE: The AS WX 1 Satellite Weather Receiver is compatible with many
Humminbird® models, and every effort has been made to note the differences
between the models and functions throughout this manual. The illustrations
in this manual may look different than your display, but your model will
operate in a similar way.
WARNING! It is prohibited to copy, decompile, disassemble, reverse engineer, or
manipulate any technology incorporated in receivers compatible with the XM
Satellite Radio system. The user of this or any other software contained in an XM
Radio is explicitly prohibited from attempting to copy, decompile, reverse engineer,
or disassemble the object code, or in any other way convert the object code into
human-readable form. The software is licensed solely for use within this product.
WARNING! This product contains chemicals known to the State of California to
cause cancer and/or reproductive harm.
WARNING! Disassembly and repair of this electronic unit should only be performed
by authorized service personnel. Any modification of the serial number or attempt to
repair the original equipment or accessories by unauthorized individuals will void the
warranty.
i
XM WX™ is a trademark of XM Satellite Radio and Weather to the Power of X® is a
registered trademark of XM Satellite Radio Inc. All rights reserved.
700 Series™, 900 Series™, 1100 Series™, CannonLink™, DualBeam PLUS™,
Humminbird®, HumminbirdPC™, InterLink™, WeatherSense®, and X-Press™ Menu,
are trademarked by or registered trademarks of Humminbird®.
© 2009 Humminbird®, Eufaula AL, USA. All rights reserved.
ii
Table of Contents
AS WX 1 Accessory Kit
1
About XM WX Satellite Weather® . . . . . . . . . . . . . . . . . . . . . . . . . . . . . . . . . . . . 1
XM WX Satellite Weather® Service Disclaimer. . . . . . . . . . . . . . . . . . . . . . . . . . 1
How to Subscribe and Activate XM WX
2
Installing the AS WX 1 Satellite Weather Receiver
4
Stem Mount with 1” - 14 Thread. . . . . . . . . . . . . . . . . . . . . . . . . . . . . . . . . . . . . 5
Access Under Mounting Location . . . . . . . . . . . . . . . . . . . . . . . . . . . . . . . . . . . . 7
No Access Under Mounting Location . . . . . . . . . . . . . . . . . . . . . . . . . . . . . . . . . 8
Finish Routing the Cable and Check Operation . . . . . . . . . . . . . . . . . . . . . . . . 10
Views
11
Weather View . . . . . . . . . . . . . . . . . . . . . . . . . . . . . . . . . . . . . . . . . . . . . . . . . . . 12
Current Weather. . . . . . . . . . . . . . . . . . . . . . . . . . . . . . . . . . . . . . . . . . . . . . . . . 13
Forecast Conditions . . . . . . . . . . . . . . . . . . . . . . . . . . . . . . . . . . . . . . . . . . . . . . . 14
Weather Alerts . . . . . . . . . . . . . . . . . . . . . . . . . . . . . . . . . . . . . . . . . . . . . . . . . . 16
City and Spot Forecasts . . . . . . . . . . . . . . . . . . . . . . . . . . . . . . . . . . . . . . . . . . . 18
Weather Info Submenu . . . . . . . . . . . . . . . . . . . . . . . . . . . . . . . . . . . . . . . . . . . 20
Loop Playback (788c-ci, 786ci, 798c-ci, 900 Series™, and 1100 Series™ only) . . . . . . . 21
Chart/Weather Combo View (900 Series™ and 1100 Series™ only) . . . . . . . . . . . . 23
Weather Legend, Icons and Select Readouts
24
Weather Legend . . . . . . . . . . . . . . . . . . . . . . . . . . . . . . . . . . . . . . . . . . . . . . . . . 24
Icons . . . . . . . . . . . . . . . . . . . . . . . . . . . . . . . . . . . . . . . . . . . . . . . . . . . . . . . . . . 25
Select Readouts . . . . . . . . . . . . . . . . . . . . . . . . . . . . . . . . . . . . . . . . . . . . . . . . . 26
Current Conditions in the Select Readouts Window . . . . . . . . . . . . . . . . . . . . 27
Forcast Conditions in the Select Readouts Window. . . . . . . . . . . . . . . . . . . . . 28
The Menu System
29
Start-Up Options Menu . . . . . . . . . . . . . . . . . . . . . . . . . . . . . . . . . . . . . . . . . . . 29
X-Press™ Menu . . . . . . . . . . . . . . . . . . . . . . . . . . . . . . . . . . . . . . . . . . . . . . . . . 29
iii
Table of Contents
Main Menu . . . . . . . . . . . . . . . . . . . . . . . . . . . . . . . . . . . . . . . . . . . . . . . . . . . . .
Simulator (Start-Up Options Menu) . . . . . . . . . . . . . . . . . . . . . . . . . . . . . . . . . . . . .
System Status (Start-Up Options Menu) . . . . . . . . . . . . . . . . . . . . . . . . . . . . . . . . .
Self Test . . . . . . . . . . . . . . . . . . . . . . . . . . . . . . . . . . . . . . . . . . . . . . . . . . . . . . .
Accessory Test . . . . . . . . . . . . . . . . . . . . . . . . . . . . . . . . . . . . . . . . . . . . . . . . . .
GPS Diagnostic View . . . . . . . . . . . . . . . . . . . . . . . . . . . . . . . . . . . . . . . . . . . . .
Weather X-Press™ Menu (Weather Views only)
Weather Display . . . . . . . . . . . . . . . . . . . . . . . . . . . . . . . . . . . . . . . . . . . . . . . . .
Weather Detail Level . . . . . . . . . . . . . . . . . . . . . . . . . . . . . . . . . . . . . . . . . . . . .
Loop Playback (788c-ci, 786ci, 798c-ci, 900 Series™, and 1100 Series™ only) . . . . . . .
Active Side (900 Series™ and 1100 Series™ only) . . . . . . . . . . . . . . . . . . . . . . . . . .
Split Position (900 Series™ and 1100 Series™ only) . . . . . . . . . . . . . . . . . . . . . . . . .
29
30
31
31
31
31
32
33
33
34
34
35
Select Readouts (Setup Main Menu: Advanced)
36
Views Menu Tab
37
XM Weather Submenu (Accessories Main Menu)
38
Legend . . . . . . . . . . . . . . . . . . . . . . . . . . . . . . . . . . . . . . . . . . . . . . . . . . . . . . . .
Alert Radius . . . . . . . . . . . . . . . . . . . . . . . . . . . . . . . . . . . . . . . . . . . . . . . . . . . .
XM Info . . . . . . . . . . . . . . . . . . . . . . . . . . . . . . . . . . . . . . . . . . . . . . . . . . . . . . .
XM Diagnostic (Advanced) . . . . . . . . . . . . . . . . . . . . . . . . . . . . . . . . . . . . . . . . . .
Troubleshooting
39
39
40
40
41
AS WX 1 Satellite Weather Receiver Alert Messages . . . . . . . . . . . . . . . . . . . 41
Fishing System Doesn’t Power Up. . . . . . . . . . . . . . . . . . . . . . . . . . . . . . . . . . . 42
Fishing System Defaults to Simulator with a Transducer Attached. . . . . . . . . 42
Humminbird® Accessories
43
Contact Humminbird®
46
iv
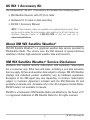
AS WX 1 Accessory Kit
The Humminbird® AS WX 1 Connection Kit includes the following items:
• XM Weather Receiver with 20' (6 m) cable
• Hardware kit for stem or deck mounting
• AS WX 1 Accessory Manual
NOTE: 10 foot extension cables are available as an optional purchase item. These
can be used to extend the total receiver cable length up to 50 feet. Contact our
Customer Resource Center at 1-800-633-1468 or visit our web site at
www.humminbird.com.
About XM WX Satellite Weather®
XM WX Satellite Weather® is a graphical weather data service provided by
XM Satellite Radio. The service uses the XM network of geosynchronous
satellites to deliver high-resolution weather data and forecasts.
XM WX Satellite Weather® Service Disclaimer
Hardware and required monthly subscription sold separately. Subscription
fee is consumer only. Other fees and taxes, including a one-time activation
fee may apply. All fees and weather data subject to change. XM WX Weather
displays and individual product availability vary by hardware equipment.
Reception of the XM signal may vary depending on location. Subscription
subject to Customer Agreement included with the XM Welcome Kit and
available at xmradio.com. Available only in the 48 contiguous United States.
XM WX data is not available in Canada.
XM WX is a trademark of XM Satellite Radio and Weather to the Power of X®
is a registered trademark of XM Satellite Radio Inc. All rights reserved.
1
AS WX 1 Accessory Kit
How to Subscribe and
Activate XM WX
The AS WX 1 Satellite Weather Receiver
requires a monthly subscription from XM WX Satellite Weather®. Before the
AS WX 1 Satellite Weather Receiver can be used on the water, the
subscription must be activated on your Humminbird® control head.
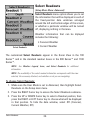
To activate XM WX Satellite Weather®:
1. The XM Radio ID is required to set up the XM WX subscription.
1a. Use a Y-Cable to connect a GPS and the AS WX 1 Satellite Weather
Receiver to your Humminbird® control head. The slots are keyed to
prevent reversed installation, so be careful not to force the connectors
into the slots (see Finish Routing the Cable for details).
1b. Power on the control head and start Normal (with transducer
attached) or Simulator mode (without transducer attached).
1c. Press the MENU key twice to open the Main Menu. Select the
Accessories tab. Highlight XM Weather, and press the RIGHT Cursor
key. Select XM Info, and press the RIGHT Cursor key. The Radio ID is
the set of uppercase, alphanumeric characters shown here.
NOTE: The Radio ID can also be found on AS WX 1 Satellite Weather Receiver
packaging or on the bottom of the receiver; however the Humminbird® control
head must be powered ON with the receiver connected to complete the
subscription activation process.
2. After you’ve noted the Radio ID, press the EXIT key to exit out of the
Main Menu. Press the VIEW key until the Weather View is displayed.
The Weather View is identified by the Signal Icon
on the screen.
3. Check the Signal Icon
to confirm that the unit is receiving a strong
signal (4 bars). Move the receiver if the signal is weak. The most
effective reception is outdoors, facing south, without any obstructions
(i.e. people, trees, buildings), and at least 3 ft from the control head.
4. Contact XM on the web at www.xmradio.com and click Activate Radio,
or call (800) 967-2346 or (800) 985-9200 to set up your account.
Refer to your Radio ID, and select “NavWeather Basic Package.”
Subscription & Activation
2
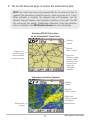
5. The control head will begin to receive the authorization data.
NOTE: The control head must stay powered ON the full amount of time to
complete the subscription activation process, which may take up to 1 hour.
When activation is complete, the diagonal lines will disappear, and the
Weather View will display current weather conditions on the chart. The XM
Info setting will also display “NavWeather Authorized” when the activation
status is confirmed. See XM Weather Submenu for more information.
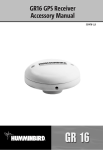
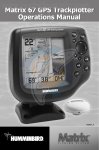
Activating XM WX Subscription
on the Humminbird® Control Head
Weather
Legend
Weather
Status: Current
Diagonal Lines
indicate weather
data unavailable
or not yet received
Signal Icon
indicates strength
of signal, which
should be 4 bars
to successfully
receive the
subscription
activation.
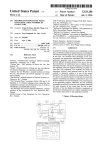
Subscription Activation Complete
Weather
Legend
Weather
Status: Current
Signal Icon
indicates strength
of reception
Weather Data
(colors)
Weather Icons
3
Subscription & Activation
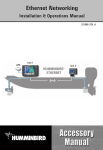
Installing the AS WX 1 Satellite Weather Receiver
Use the chart below to determine the appropriate mounting method for your
AS WX 1 Satellite Weather Receiver. The instructions for each mount are
described on the following pages.
NOTE: You must have an XM WX Satellite Weather® account and a GPS must also
be installed on your boat and connected to your Humminbird® Fishing System.
If you have…
See Installation Section...
An antenna stem with standard 1" – 14 thread
Stem Mount with 1" - 14 Thread
Access under mounting location
Access Under Mounting Location
No access under mounting location
No Access Under Mounting Location
For Best Performance: Mount the AS WX 1 Satellite Weather Receiver in an
area that provides full exposure to the sky. The effective area of reception is 10°
above the horizon, with a clear access to the south at all times.
It is also important to separate the receiver at least 3 feet from the control head.
Installation
4
Stem Mount with 1" - 14 Thread
Stem Mount describes when you have purchased or have a pre-existing
antenna pole to mount the AS WX 1 Satellite Weather Receiver.
For Best Performance: Mount the receiver in an area that provides full exposure
to the sky. The effective area of reception is 10° above the horizon, facing south.
It is also important to separate the receiver at least 3 feet from the control head.
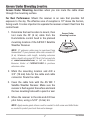
If you have a pre-existing stem mount, proceed
to step 3.
1. Determine the best location to mount the
antenna pole (stem). Preplan and test the
cable routing to your Humminbird® unit
before you start drilling or cutting any
of your boat surfaces, and then route the
20’ (6 m) cable to the planned mounting
location.
2. Mark the location and drill a 3/4” (19 mm)
hole for the cable and cable connector. If
you have purchased hardware to stem
mount your AS WX 1 Satellite Weather
Receiver, follow the instructions included
with that hardware to attach the stem to
the boat.
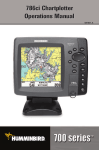
Stem Mount, Attaching
Receiver Base to Stem
Receiver Head
Receiver
Base
Antenna
Stem
NOTE: 10’ extension cables may be purchased from
Humminbird® if your planned cable route exceeds 20’
(6 m). Maximum cable length, including extension
cables, should not exceed 50’ (16 m). Visit our web site
at www.humminbird.com, or call our Customer
Resource Center at 1-800-633-1468 to purchase
extension cables.
5
Installation
3. Screw on the receiver base to the stem
first, making sure that the stem pipe does
not protrude from the receiver base. This
adds protection to the cable when pulling
it through the pipe stem. Deburr the pipe
edges to reduce cable abrasion.
Attaching the Receiver
to the Base
(make sure cable
is not pinched)
#6 - 1/4” Mounting
Screws
4. Route the AS WX 1 Satellite Weather
Receiver cable through the stem and
continue with the planned cable route.
5. Attach the AS WX 1 Satellite Weather
Receiver to its base using the included
#6 - 1/4” screws. Hand tighten only.
6. Proceed to “Finish Routing the Cable and
Check Operation.”
Installation
6
Cable
Route
Stem
Stop
Access Under Mounting Location
Access Under Mounting describes when you can route the cable down
through the mounting surface.
For Best Performance: Mount the receiver in an area that provides full
exposure to the sky. The effective area of reception is 10° above the horizon,
facing south. It is also important to separate the receiver at least 3 feet from the
control head.
1. Determine the best location to mount, then
test route the 20’ (6 m) cable from the
Humminbird® control head to the planned
mounting location of the AS WX 1 Satellite
Weather Receiver.
Access Under
Mounting Location
NOTE: 10’ extension cables may be purchased from
Humminbird® if your planned cable route exceeds 20’
(6 m). Maximum cable length, including extension
cables, should not exceed 50’ (16 m). Visit our web site
at www.humminbird.com, or call our Customer
Resource Center at 1-800-633-1468 to purchase
extension cables.
2. Mark the mounting location and drill a
3/4” (19 mm) hole for the cable and cable
connector. Route the cable.
3. Cover the cable hole with the AS WX 1
Satellite Weather Receiver. Make sure the
receiver is flush against the surface and mark
the two mounting holes with a pencil or awl.
4. Move the receiver to the side and drill two
pilot holes, using a 5/32” (4 mm) bit.
NOTE: Apply marine-grade silicone caulk or sealant to both screw and drilled holes
as needed to protect your boat from water damage.
7
Installation
5. Align the AS WX 1 Satellite Weather Receiver’s screw holes over the
pilot screw holes and attach with the #6 - 3/4” Phillips head screws.
Hand tighten only.
NOTE: If the mounting surface is thin or made of a light-weight material, you may
need to add reinforcing material below the mounting surface in order to support
the AS WX 1 Satellite Weather Receiver.
6. Proceed to “Finish Routing the Cable and Check Operation.”
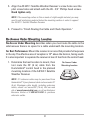
No Access Under Mounting Location
No Access Under Mounting describes when you must route the cable to the
side because there is no space for a cable underneath the mounting location.
For Best Performance: Mount the receiver in an area that provides full exposure
to the sky. The effective area of reception is 10° above the horizon, facing south.
It is also important to separate the receiver at least 3 feet from the control head.
1. Determine the best location to mount, then
test route the 20’ (6 m) cable from the
Humminbird® control head to the planned
mounting location of the AS WX 1 Satellite
Weather Receiver.
NOTE: 10’ extension cables may be purchased from
Humminbird® if your planned cable route exceeds 20’
(6 m). Maximum cable length, including extension
cables, should not exceed 50’ (16 m). Visit our web
site at www.humminbird.com, or call our Customer
Resource Center at 1-800-633-1468 to purchase
extension cables.
Installation
8
No Access Under
Mounting Location
2. Confirm that the cable length is adequate and route the cable from
the receiver to the Humminbird® control head. If holes are required to
route the cable, they must be 3/4” (19 mm) to allow for the cable
connector.
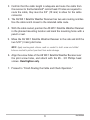
3. The AS WX 1 Satellite Weather Receiver has two wire routing notches.
Use the cable notch closest to the intended cable route.
4. With the cable routed, position the AS WX 1 Satellite Weather Receiver
in the planned mounting location and mark the mounting holes with a
pencil or awl.
5. Move the AS WX 1 Satellite Weather Receiver to the side and drill the
two 5/32” (4 mm) pilot holes.
NOTE: Apply marine-grade silicone caulk or sealant to both screw and drilled
holes as needed to protect your boat from water damage.
6. Align the screw holes of the AS WX 1 Satellite Weather Receiver over
the pilot screw holes, and attach with the #6 - 3/4 Phillips head
screws. Hand tighten only.
7. Proceed to “Finish Routing the Cable and Check Operation.”
9
Installation
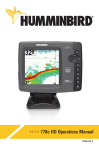
Finish Routing the Cable and Check Operation
Follow these steps to finish routing the AS WX 1 Satellite Weather Receiver
cable between the control head and the receiver:
1. Secure the cable along its path to the control head as needed, using
cable ties.
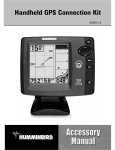
2. Insert a Y-cable’s COM connector into the appropriate terminal slot
on the back of the Humminbird® control head. Connnect the GPS
cable to the NMEA-COM connector, and attach the AS WX 1 cable to
the ACCY-COM connector.
NOTE: The slots are keyed to prevent reversed installation, so be careful not to
force the connector into the slot.
COM
Fishing System
ACCY-COM
NMEA-COM
AS-YC ("Y") Cable
COM
ACCY-COM
AS WX 1
ACCY-COM
GPS Receiver
Installation
10
Views
Sonar
Views
Weather
Combo
View
Navigation
Views
Weather
View
When the AS WX 1 Satellite Weather Receiver is
connected to your Humminbird® unit, the following
views will be added to the View Rotation:
• Weather View
• Chart/Weather Combo View (900/1100 only)
NOTE: When you press the VIEW key, the display cycles through the available views
on your screen. When you press the EXIT key, the display cycles through the
available views in reverse order.
Your Fishing System will display the chart from the installed Unimap
included in your model, from an optional-purchase NVB chart, or from an
optional-purchase MMC/SD card chart. Weather data is displayed on the
chart in the Weather View and the Chart/Weather Combo View, and the data
refreshes every 2 minutes.
11
Views
Weather View
Weather View displays current weather conditions within 400 statute miles
from your boat. Forecasts and additional weather details can also be seen from
this view. See the illustrations and descriptions on the following pages.
• Current Weather includes the visibility, winds, weather/precipitation,
temperature, and road conditions. The current conditions are
represented by weather icons and the colors on your screen.
• Forecast Conditions include hail or storm potential, the 30 minute
forecast for your current location, and the forecast for over 150
selected cities across the nation.
• Weather Alerts: When there is a new alert, your Fishing System will
display an alert banner on the screen, and the affected area will be
highlighted by red blocks on the Weather View. Your Fishing System
will display National Weather Service Advisories, Watches and
Warnings, Baron Alerts and Warnings, and road closures. Press the
EXIT key to read all subsequent weather alert banners.
• City Forecasts and Spot Forecasts: Use the 4-WAY Cursor Control
key to move the cursor to a city icon
or other latitude/longitude
position on the screen. Press the INFO key to view an information box
which displays information about that area.
• X-Press™ Menu: Press the MENU key once to access the X-Press™
Menu in the Weather View. In the Weather Display menu option, you
can select Current Weather or Forecast Weather. In Weather Detail
Level, you can choose how much weather detail you would like to see
on the screen. You can also start Loop Playback from the X-Press™
Menu. See Weather X-Press™ Menu for more information.
NOTE: Your Fishing System can display the chart from the installed Unimap included
in your model or from an optional-purchase NVB chart or MMC/SD card chart. The
weather information available will also depend on your Humminbird® model.
Weather View
12
Current Weather
Current Weather is the default display mode in the Weather View and
displays the current weather within 400 statute miles from your boat. The
Current Weather refreshes every 2 minutes and includes visibility, winds,
weather/precipitation, temperature, and road conditions.
• Weather Conditions are represented by icons and colors on your
screen (see Weather Legend, Icons, and Select Readouts).
• Signal Icon
shows the strength of the signal the AS WX 1 Satellite
Weather Receiver is currently receiving.
• Current Weather is displayed next to the Signal Icon to indicate that
current weather is displayed in the view.
• Unavailable Conditions are represented by diagonal lines over the
chart in Weather View. To access information for a certain location,
use the 4-WAY Cursor Control key to move the cursor to the location,
and press the INFO key (also, see Views: City and Spot Forecasts).
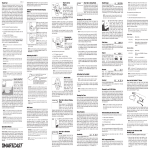
Weather View
with Current Weather Displayed
Depth
Weather
Legend
Weather
Status: Current
Track Scale
Signal Icon
indicates strength
of reception
Bearing of Boat
with Respect
to True North
Boat
Weather Icons
Speed of
Boat
Latitude and
Longitude
Position of Boat
Water Surface
Temperature
13
Current Conditions
Forecast Conditions
Forecast Conditions can be selected to display the forecasted weather
within 400 statute miles from your boat. Forecast Conditions refresh every 2
minutes and include hail or storm potential, the 30 minute forecast for your
current location, and the forecast for over 150 selected cities across the
nation.
• View Forecast Information: Press the MENU key once to access the
Weather X-Press™ Menu, and select Forecast Weather from the
Weather Display menu option.
• Forecast Weather is displayed next to the Signal Icon
that the weather forecast is being displayed in the view.
to indicate
• Forecast Conditions are represented by colors on your screen. Weather
icons are not displayed on the forecast display (see Weather Legend,
Icons, and Select Readouts).
• Unavailable conditions are represented by diagonal lines over the
chart in Weather View. To access information for a certain location,
use the 4-WAY Cursor Control key to move the cursor to the location,
and press the INFO key (also, see Views: City and Spot Forecasts).
Forecast Conditions
14
Weather View with Active X-Press™ Menu
Weather
Legend
X-Press™ Menu
with Forecast
Weather selected
from the Weather
Display menu
option
Weather View
with Forecasted Weather Displayed
Weather
Legend
Depth
Weather Status:
Forecast
Signal Icon
indicates strength
of reception
Track Scale
Bearing of Boat
with Respect
to True North
Boat
Speed of
Boat
Latitude and
Longitude
Position of Boat
15
Forecast Conditions
Weather Alerts
Your Fishing System displays National Weather Service Advisories, Watches
and Warnings, Baron Alerts and Warnings, and road closures for the area you
choose on your Fishing System.
• Alert Radius: The Fishing System will display warnings for the area
you set in the Alert Radius menu option (see XM Weather Submenu:
Alert Radius).
• Weather Alert Banner: When there is a new weather alert, your
Fishing System will display a warning message on the screen.
• The affected alert area is highlighted by red blocks on the Weather
View. The icons on the Weather View can also be used to identify
dangerous weather conditions (see Weather Legend, Icons, and
Select Readouts).
• If a view other than the Weather View is active on the screen, press
the VIEW key to scroll to the Weather View for additional information.
• Press the EXIT key to remove a Weather Alert Banner from the screen.
The Fishing System will display the next alert. Continue to press the
EXIT key until you've read all of the Weather Alert Banners.
• Use the 4-WAY Cursor Control key to move the active cursor to
anywhere within the highlighted alert area, and press the INFO key.
Additional information about the weather alert will display in the City
Data or Grid Data Information box. See Views: City and Spot
Forecasts for more information.
• If you press the INFO key without using the cursor to pan to an area,
the Weather Info submenu will display. You can search information
in the following categories: Nearest Lightning, Nearest Hail/Storm
Potential, Nearest Strong Weather, and Nearest City. See Views:
Weather Info Submenu for more information.
Weather Alerts
16
Current Weather
with Weather Alert Banner
Depth
Weather
Legend
Signal Icon
indicates strength
of reception
Weather
Status: Current
Highlighted Area
of Alert identified
by red blocks
Lightning Icons
Weather Alert
Banner
Moderate Wind
Icons
Select Readouts
Active Cursor: Grid Data Information Box
View Alerts, Current
Conditions, and
Forecasts
for the selected
area.
Grid Data
Information Box
Down Arrow:
Press the DOWN
Cursor key to
view more
information.
17
Weather Alerts
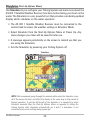
City and Spot Forecasts
The AS WX 1 displays current and forecasted weather information for over
150 cities. You can also choose an area that is not designated by a city icon
to view current and forecasted weather information about that area.
• City Weather Data includes Alerts, Current Conditions, and detailed
Forecasted Conditions for the next 3 days and nights.
• Grid Weather Data reports weather conditions for the areas not
designated as cities. Grid Weather Data includes Alerts, Current
Conditions, Lightning, Winds, Visibility, Hail/Shear Potential, Road
Conditions, and Forecasted Conditions.
• Active Cursor: Use the 4-WAY Cursor Control key to move the cursor
to a city icon
or other latitude/longitude position on the screen.
Press the INFO key to view the City Data information box or Grid Data
information box for weather information about the selected area.
• Inactive Cursor: If you press the INFO key without using the cursor to
pan to an area, the Weather Info submenu will display.
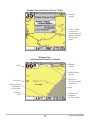
Weather View with Active Cursor
Depth
Weather
Legend
Weather
Status: Current
Track Scale
Signal Icon
indicates strength
of reception
Bearing of Boat
with Respect
to True North
Cursor
centered on
City Icon
Speed of
Boat
Latitude and
Longitude of
Active Cursor
Distance to
Cursor and
Bearing to
Cursor
City and Spot Forecasts
18
City Weather Data Information Box
View Alerts, Current
Conditions, and
Forecasts
for the selected city.
City Weather Data
Information Box
Down Arrow:
Press the DOWN
Cursor key to
view more
information.
Grid Data Information Box
View Alerts, Current
Conditions, and
Forecasts
for the selected
location.
Grid Data
Information Box
Down Arrow:
Press the DOWN
Cursor key to
view more
information.
NOTE: While you are moving the cursor, you might notice that weather data is
not available. The weather data stays with your boat as you pan, however, once
you press the INFO key, you can view the weather data for any area you choose.
19
City and Spot Forecasts
Weather Info Submenu
The Weather Info submenu will display on the screen if the cursor is not
active and you press the INFO key. The Weather Info submenu provides
information for the area set in the Alert Radius or at least 60 miles, whichever
distance is greater. Information can be viewed in each of the categories below.
• Nearest Lightning indicates the lightning within the alert radius.
• Nearest Hail/Storm Potential indicates the hail or storm potential
within the alert radius.
• Nearest Strong Weather finds the closest heavy rain, heavy freezing
rain or ice, heavy snow, or dangerous winds.
• Nearest City activates the cursor to the nearest city in relation to
your current position. Press the INFO key to view the City Data
information box.
• “No results found within search area” If there are no weather
conditions to report for the category you select, your Fishing System
will display this message.
To view Weather Info submenu:
1. From the Weather View, press the
INFO key to access the Weather
Info submenu.
2. Press the UP or DOWN Cursor key
to choose a category, and press the
RIGHT Cursor key to access the
information for each category.
Weather Info Submenu
20
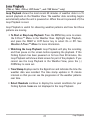
Loop Playback
(788c-ci, 786ci, 798c-ci, 900 Series™, and 1100 Series™ only)
Loop Playback shows the most recent 60 minutes of weather data in a 15
second playback on the Weather View. The weather data recording begins
automatically when the unit is powered on. When the unit is powered off, the
Loop Playback is reset.
Loop Playback is useful for observing weather patterns and how fast those
patterns are moving.
• To Start or Stop Loop Playback: Press the MENU key once to access
the X-Press™ Menu in the Weather View. Highlight Loop Playback,
and press the RIGHT or LEFT Cursor key to select On or Off. See
Weather X-Press™ Menu for more information.
• Watching the Loop Playback: Loop Playback will play the recording
and then pause on the screen before repeating the playback. If the
Fishing System has been powered on for less than 60 minutes, the
Loop Playback will show a blank screen for part of the playback. If you
cannot see the Loop Playback in the Weather View, press the (-)
ZOOM key to zoom out.
• Time Stamp displays next to the Signal Icon and indicates the time the
weather data was recorded. The time stamp updates in 15 minute
intervals so that you can see the progression of the weather patterns
over time.
• Select Readouts continue to display the current conditions for your
Fishing System. Icons are not displayed in the Loop Playback.
21
Loop Playback
Loop Playback
Weather
Legend
Loop Playback
Time Stamp
Weather
Status: Current
Signal Icon
indicates strength
of reception
Select
Readouts
continue to
display current
conditions
Loop Playback
22
Chart/Weather Combo View
(900 Series™ and 1100 Series™ only)
Chart/Weather Combo View is displayed as a split screen, with Track or
Chart View in one window and Weather View in the second window.
• Active Side: You can perform any of the functions for either side of
the Combo View, but the view you want to control must be selected
as the active side. Press the MENU key once to open the X-Press™
Menu and choose from Active Side (see Weather X-Press™ Menu).
• Split Position: After you choose an active side of the Combo View, you
can adjust the screen size for the side of the Combo View. Press the
MENU key once to open the X-Press™ Menu and adjust the setting in
the Split Position menu option (see Weather X-Press™ Menu).
Chart/Weather Combo View
Chart View
Weather View
Signal Icon
indicates
strength of
reception
Weather
Status: Current
Weather
Legend
Forecast
Conditions
Current
Conditions
Boat Speed
Course
Voltage
NOTE: The Chart/Weather Combo view is not available in the 700 Series™.
23
Chart/Weather Combo View
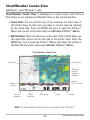
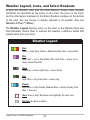
Weather Legend, Icons, and Select Readouts
In both the Weather View and the Chart/Weather Combo View, weather
conditions are identified by the colors on the chart, the icons on the chart,
and the information displayed in the Select Readout windows at the bottom
of the view. You can choose to display selected or all weather data (see
Weather X-Press™ Menu).
The Weather Legend displays colors on the chart in the Weather View and
Chart/Weather Combo View to indicate the weather conditions within 400
statute miles from your boat.
Weather Legend
Rain
Green = Light Rain, Yellow = Moderate Rain, Red = Heavy Rain
Mix
Light Pink = Ice or Snow/Rain Mix, Dark Pink = Heavy Ice or
Heavy Snow/Rain Mix
Snow
Dark Gray = Snow, Light Gray = Heavy Snow
Fog
Light Olive = Fog, Dark Olive = Heavy Fog
Clouds
Light Blue = Partly Cloudy, Medium Blue = Mostly Cloudy, Dark
Blue = Overcast
Alert: Area of alert. Red boxes will highlight the alert area.
No Data: No data available.
Legend, Icons, and Select Readouts
24
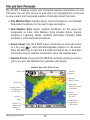
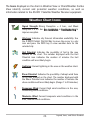
The Icons displayed on the chart in Weather View or Chart/Weather Combo
View identify current and potential weather conditions, as well as
information related to the AS WX 1 Satellite Weather Receiver equipment.
Weather Chart Icons
Signal Strength: Strong Reception = 4 bars, and Weak
Reception = 0 to 1 bar. See Installation or Troubleshooting to
improve reception.
City Icon: Indicates city forecast information availability. Use
the 4-WAY Cursor Control key to move the cursor to a city
icon and press the INFO key to view weather data for the
selected city.
Hail Potential: Indicates the possibility of hail in the area
marked on the chart. The number displayed with the Hail
Potential icon indicates the number of minutes the hail
condition will most likely begin.
Lightning: Current lightning in the area on the weather chart.
Shear Potential: Indicates the possibility of abrupt wind force
in the area marked on the chart. The number displayed with
the Shear Potential icon indicates the number of minutes the
shear condition will most likely begin. (Range: 1 to 20 minutes).
Dangerous Wind: Current high wind conditions in the area,
threatening wind conditions.
Moderate Wind: Current temperate wind conditions in the
area, medium wind conditions.
25
Legend, Icons, and Select Readouts
Select Readouts display current and forecasted weather conditions in the
digital readout boxes of your Fishing System. The Select Readouts appear on
the Sonar View in the 700 Series™ and in the standard readout boxes in the
900 Series™ and 1100 Series™. See The Menu System: Select Readouts for
more information.
Sonar View with Weather Select Readouts
Current Weather
Conditions
Forecast Weather
Conditions
NOTE: For specific Select Readout information for your Humminbird® model, see
your fishing system operations manual.
Legend, Icons, and Select Readouts
26
Current Conditions in the Select Readouts window display the current
weather conditions using the icons shown here.
Select Readouts: Current Conditions
Clear Sky
Lightning
Mostly Clear Sky
with Few Clouds
Light Rain
Partly Cloudy
Moderate Rain
Mostly Cloudy
Heavy Rain
Overcast
Snow
Fog
Heavy Snow
Heavy Fog
Ice or Snow/Rain Mix
Heavy Ice or
Heavy Snow/Rain Mix
27
Legend, Icons, and Select Readouts
Select Readouts: Current Conditions (contd.)
Clear Visibility
Low Wind
Marginal Visibility
Moderate Wind
Patchy Visibility
Heavy Wind
Poor Visibility
Data Unavailable
Forecast Conditions in the Select Readouts window display the forecasted
weather conditions using the icons shown below.
Select Readouts: Forecast Conditions
Dry Weather
Hail and Shear
Potential within
0 to 5 minutes
Rain
Hail and Shear
Potential within
5 to 15 minutes
Snow
Hail and Shear
Potential within
15 to 25 minutes
Rain/Snow Mix
Legend, Icons, and Select Readouts
28
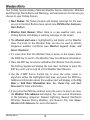
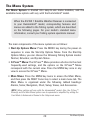
The Menu System
The Menu System is divided into easy-to-use menu modules, and the
available menu options will vary with the Humminbird® model.
When the AS WX 1 Satellite Weather Receiver is connected
to your Humminbird® model, corresponding features and
menus are added to the fishing system, which are described
on the following pages. For your model’s standard menu
information, consult your fishing system operations manual.
The main components of the menu system are as follows:
• Start-Up Options Menu: Press the MENU key during the power on
sequence to view the Start-Up Options Menu. From the Start-Up
Options Menu, you can choose the following Fishing System modes:
Normal, Simulator, and System Status.
• X-Press™ Menu: The X-Press™ Menu provides a shortcut to the most
frequently-used settings, and the options on the X-Press™ Menu
correspond with the current view. Press the MENU key once in any
view to access the X-Press™ Menu.
• Main Menu: Press the MENU key twice to access the Main Menu,
and then press the RIGHT Cursor key to select a main menu tab. The
Main Menu is organized under the following tabbed headings:
Alarms, Sonar, Navigation, Chart, Setup, Views, and Accessories.
NOTE: Menu options will vary with the Humminbird® model. Also, the X-Press™
Menu(s) and the Main Menu options can be expanded or simplified by setting the
User Mode to Advanced or Normal in the Setup main menu.
29
The Menu System
Simulator (Start-Up Options Menu)
Use Simulator to pre-configure your Fishing System and learn more about the
AS WX 1 Satellite Weather Receiver functions before taking your boat on the
water. The Simulator is a very powerful tool that provides a randomly-updated
display which simulates on the water operation.
• The AS WX 1 Satellite Weather Receiver must be connected to the
control head to access the weather settings in Simulator Mode.
• Select Simulator from the Start-Up Options Menu at Power Up. Any
menu changes you make will be saved for later use.
• A message appears periodically on the screen to remind you that you
are using the Simulator.
• Exit the Simulator by powering your Fishing System off.
Simulator
NOTE: We recommend going through this manual while using the Simulator, since
all of the menus function and affect the display in the same way as they would in
Normal operation. To get the full benefit of the Simulator, it is important to select
Simulator manually from the Start-Up Options Menu as opposed to letting the
Fishing System enter Simulator automatically (as it will if a transducer is not
connected and you do nothing during power up).
The Menu System
30
System Status (Start-Up Options Menu)
Use System Status to view system connections and to conduct a unit self-test.
After you select System Status from the Start-Up Options Menu, press the
VIEW key to display the following information views:
• Self Test: displays results from the internal diagnostic self test, including
unit serial number, Printed Circuit Board (PCB) serial number, software
revision, total hours of operation, and the input voltage.
• Accessory Test: lists the accessories connected to the system.
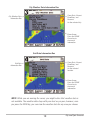
• GPS Diagnostic View: shows a sky chart and numerical data from the
GPS receiver. The sky chart shows the location of each visible GPS
satellite with its satellite number and a signal strength bar.
NOTE: A GPS Fix is required to identify your location and load weather data.
Use this view to confirm GPS Fix Type. For an XM Diagnostic View, see XM
Weather Submenu: XM Info.
GPS Diagnostic View
GPS Fix Type
Sky Chart
Satellite Being
Monitored
Satellite
Being Used
Current Latitude
and Longitude
The current GPS Fix Type is reported as No Fix, 2D Fix, 3D Fix, or Enhanced. An
Enhanced fix has been augmented using information from WAAS, EGNOS, or MSAS.
A 3D or Enhanced Fix is required for navigation.
31
The Menu System
Weather X-Press™ Menu
(Weather Views only)
The Weather X-Press™ Menu will be added
to the menu system when the AS WX 1
Satellite Weather Receiver is connected to the
Fishing System.
Press the MENU key once while in the
Weather View or Chart/Weather Combo View
to access the Weather X-Press™ Menu.
NOTE: Active Side and Split Position are available in
the 900 Series™ and 1100 Series™ only.
Weather X-PressTM Menu
Weather X-Press™ Menu
32
Weather Display
Weather Display allows you to choose if you
want to view current or forecasted weather on the Weather View. Current
Weather displays the present weather conditions. Forecast weather displays the
30 minute forecast for the selected area. The screen refreshes at 2 minute
intervals in both view modes.
To select the Weather Display mode:
1. Highlight Weather Display on the Weather X-Press™ Menu.
2. Press the RIGHT or LEFT Cursor key to choose Current Weather or
Forecast Weather. (Current Weather, Forecast Weather; Default =
Current Weather)
Weather Detail Level
Weather Detail Level allows you to choose how
much weather data to display on the Weather View.
To set the Weather Detail Level:
1. Highlight Weather Detail Level on the Weather X-Press™ Menu.
2. Press the RIGHT or LEFT Cursor key to choose which weather data to
display. (All Weather, Color Grid Only, Alert Icons Only; Default = All
Weather)
33
Weather X-Press™ Menu
Loop Playback (788c-ci, 786ci, 798c-ci,
900 Series™, and 1100 Series™ only)
Loop Playback shows the most recent 60 minutes of weather data in a 15
second playback on the Weather View. This function is useful for observing
weather patterns (see Views: Loop Playback for details).
The weather data recording begins automatically when the unit is powered
on. When the unit is powered off, the Loop Playback is reset.
To start or stop Loop Playback:
1. Highlight Loop Playback on the Weather X-Press™ Menu.
2. Press the RIGHT or LEFT Cursor key to begin or end playback. To start
Loop Playback, select ON. To stop Loop Playback, select OFF. (On, Off;
Default = Off)
Active Side
(900 Series™ and 1100 Series™ only)
Active Side allows you to select which side of a Combo View will be active;
key presses will only affect the active side of the screen. When a menu is
displayed, the non-active side of the screen will be grayed out; at any other
time, a green arrow will point to the active side. The Active Side menu option
is only available when a Combo View is active.
To select the Active Side:
1. From the Chart/Weather Combo View, highlight Active Side on the
Weather X-Press™ Menu.
2. Press the RIGHT or LEFT Cursor key to change which side is active.
(Left, Right; Default = Left)
Weather X-Press™ Menu
34
Split Position
(900 Series™ and 1100 Series™ only)
Split Position allows you to adjust the size of the left side of the Combo View.
You can also adjust each side independently by first selecting the view in the
Active Side menu option.
The number setting indicates the percentage taken up by the left side of the
Combo View. Selecting Left sets the left side of the screen to its smallest
setting. The Split Position menu option is only available when a Combo View
is active.
To adjust Split Screen Position:
1. From the Chart/Weather Combo View, highlight Split Position on the
Weather X-Press™ Menu.
2. Press the RIGHT or LEFT Cursor key to change the size of the left side
of the split screen. (Left, 30, 40, 50, 60, 70, Right; Default varies)
35
Weather X-Press™ Menu
Select Readouts
(Setup Main Menu: Advanced)
Select Readouts menu option allows you to set
the information that will be displayed in each of
the fixed-position data windows arranged
around the left and bottom edges of the screen,
or whether a particular window will be turned
off, displaying nothing in that area.
Weather information that can be diplayed
includes the following:
• Forecast Weather
Select Readouts
• Current Weather
The customized Select Readouts appear in the Sonar View in the 700
Series™ and in the standard readout boxes in the 900 Series™ and 1100
Series™.
NOTE: See Weather Legend, Icons, and Select Readouts for additional
information.
NOTE: The availability of the select readout information corresponds with the view
selected, the accessory attached, and whether or not you are navigating.
To change Select Readouts:
1. Make sure the User Mode is set to Advanced, then highlight Select
Readouts on the Setup main menu.
2. Press the RIGHT Cursor key to access the Select Readouts submenu.
3. Press the UP or DOWN Cursor key to select a Readout position, then
press the RIGHT or LEFT Cursor key to choose what will be displayed
in that position. To hide the data window, select Off. (Forecast,
Current Weather, Off)
Select Readouts
36
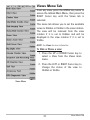
Views Menu Tab
From any view, press the MENU key twice to
access the tabbed Main Menu, then press the
RIGHT Cursor key until the Views tab is
selected.
This menu tab allows you to set the available
views to Hidden or Visible in the view rotation.
The view will be removed from the view
rotation if it is set to Hidden and will be
displayed in the view rotation if it is set to
Visible.
NOTE: See Views for more information.
To Hide or Show a view:
1. Press the UP or DOWN Cursor key to
select a View from the Views main
menu.
2. Press the LEFT or RIGHT Cursor key to
change the status of the view to
Hidden or Visible.
Views Menu
37
Views Menu Tab
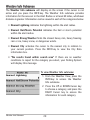
XM Weather Submenu
(Accessories Main Menu)
Highlight XM Weather in the Accessories main
menu, and press the RIGHT Cursor key to
access the XM Weather submenu, which
includes the following options:
• Legend
• Alert Radius
XM Weather Submenu
• XM Info
• XM Diagnostic
XM Weather Submenu
38
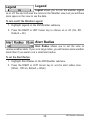
Legend
Legend allows you to turn the weather legend
on or off. You can still view the colors on the Weather view, but you will have
more space on the view to see the data.
To turn on/off the Weather Legend:
1. Highlight Legend on the XM Weather submenu.
2. Press the RIGHT or LEFT Cursor key to choose on or off. (On, Off,
Default = On)
Alert Radius
Alert Radius allows you to set the zone to
receive weather alerts. If you set a large radius, you will receive more weather
alerts than if you were to set a small alert radius.
To set the Alert Radius:
1. Highlight Alert Radius on the XM Weather submenu.
2. Press the RIGHT or LEFT Cursor key to set the alert radius zone.
(60sm - 180 sm, Default = 60sm)
39
XM Weather Submenu
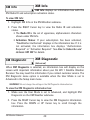
XM Info
XM Info displays an information box with the
XM Radio ID and subscription activation status.
To view XM Info:
1. Highlight XM Info on the XM Weather submenu.
2. Press the RIGHT Cursor key to view the Radio ID and activation
status.
• The Radio ID is the set of uppercase, alphanumeric characters
shown under XM Info.
• Activation Status: If your subscription has been activated,
“NavWeather Authorized” displays in the information box. If it is
not activated, the information box displays “Authorization
Required” or “Activation Required.” See How to Subscribe and
Activate XM WX for details.
XM Diagnostic
(Advanced)
When XM Diagnostic is selected, an information box will display on the
screen with important information about your AS WX 1 Satellite Weather
Receiver. You may need this information if you contact customer service. The
XM Diagnostic menu option is available when the User Mode is set to
Advanced in the Setup main menu.
WARNING! Do not change the settings in the XM Diagnostic information box.
To view the XM Diagnostic information box:
1. Make sure the User Mode is set to Advanced, and highlight XM
Diagnostic on the XM Weather submenu.
2. Press the RIGHT Cursor key to view the XM Diagnostic information
box. Press the DOWN or UP Cursor key to scroll through the
information.
XM Weather Submenu
40
Troubleshooting
Before contacting the Humminbird® Customer Resource Center, please read
the following section. Taking the time to review these troubleshooting
guidelines may allow you to solve a performance problem yourself, and
therefore avoid sending your unit back for repair.
AS WX 1 Satellite Weather Receiver Alert Messages
The following alert banners will appear on your Fishing System.
• Authorization Required or Activation Required: The subscription for
XM WX Satellite Weather® has not been activated. See How to
Subscribe and Activate XM WX for details.
• Check Antenna: Confirm that the receiver is fully connected to the
Fishing System. Also, consult the installation section of this manual to
confirm correct installation of the receiver.
• Ch Unauthorized: The subscription for XM WX Satellite Weather® has
not been activated. See How to Subscribe and Activate XM WX for
details.
• No Signal: The signal quality is too low. The receiver reception might
be blocked. The most effective reception is outdoors, facing south,
without any obstructions (i.e. people, trees, structure). Also, confirm
that the receiver is fully connected to the Fishing System.
• Weather Data is More Than __ Minutes Old: The weather data
displayed on the Weather View is not current. Make sure the signal
icon is displaying 4 bars. If reception is weak or has been blocked,
make sure the receiver is clear of obstructions (i.e. people, trees,
structure). The error message should disappear within 5 seconds, and
the Weather View will refresh with the current data.
41
Troubleshooting
Fishing System Doesn’t Power Up
If your Fishing System doesn’t power up, use the installation guide that is
included with your Fishing System to confirm specific details, making sure that:
• the power cable is properly connected to the Fishing System control
head,
• the power cable is wired correctly, with red to positive battery
terminal and black to negative terminal or ground,
• the fuse is operational, and
• the battery voltage of the power connector is at least 10 Volts.
Correct any known problems, including removing corrosion from the battery
terminals or wiring, or actually replacing the battery if necessary.
Fishing System Defaults to Simulator
with a Transducer Attached
A connected and functioning transducer will cause the newly-started Fishing
System to go into Normal operating mode automatically. If, when you power
up the Fishing System, it goes into Simulator mode automatically, even
though a transducer is already connected, this means that the control head
is not detecting the transducer. Perform the following troubleshooting tasks:
• Using the Installation Guide that also comes with your Fishing
System, check to make sure that the transducer cable is securely
connected to the Fishing System. Reconnect if necessary, and power
up the Fishing System again to see if this fixes the problem.
• Replace the non-functioning transducer with a known good
transducer if available and power up the control head again.
• Check the transducer cable. Replace the transducer if the cable is
damaged or corroded.
Troubleshooting
42
Humminbird® Accessories
Accessories customize your Fishing System to your needs and enable you to
stay on the edge of new technology. When an accessory is connected to the
Fishing System, additional menus and readouts are added automatically to
the Main Menu System. Accessories available today that are supported by
your Fishing System include:
GPS Connection Cable: purchase the GPS Connection Cable in order to
connect a handheld or other NMEA* GPS-compatible device that you may
already own to your Fishing System.
*NMEA 0183 is a National Marine Electronics Association standard for data
communication.
PC Connect Cable: Purchase the PC Connect Cable to connect the Fishing
System to a PC in order to upload product software updates and new features
obtained from www.humminbird.com. This accessory requires the
MSWindows-compatible HumminbirdPC™ software downloaded from our
web site to your PC in order to communicate with the Fishing System.
WeatherSense® Fishing Condition Monitor: purchase and plug in the
WeatherSense® accessory to your Fishing System to obtain barometric
pressure readouts and trend data in real time.
Wireless Sonar Link (WSL): purchase the Wireless Sonar Link (WSL)
accessory to receive remote sonar signals from a SmartCast® Remote Sonar
Sensor (RSS). Radio signals from the RSS are received by the WSL and are
transmitted over the Accessory Bus to the Fishing System.
Universal Sonar 2: Your Fishing System supports Universal Sonar 2, a stateof-the-art, integrated and protected transducer that is built into the lower unit
of Minnkota trolling motors. With Universal Sonar 2, all wiring is concealed
inside the indestructible composite shaft—out of sight and out of harm’s way,
with no clamps, ties, or exposed wires. Universal Sonar 2 features new
temperature sensing and the performance of DualBeam PLUS™ technology
(available with all Humminbird® DualBeam PLUS™ models). An expanded
view and greater bottom detail gives you a totally new perspective of the
water below, along with optimal sonar performance to help you find fish.
43
Humminbird® Accessories
Downriggers are the key to catching fish you otherwise couldn’t even touch.
And now Humminbird’s CannonLink™ Downrigger Controller makes operation
of up to six Cannon® Mag 20 DT or Mag 20 DT/HS downriggers incredibly easy.
Using the controls on your Fishing System, deploy or retrieve downriggers, hold
a specific distance off the bottom, cycle downriggers between two depths, and
adjust the Positive Ion Control. Even see temperature and water clarity at depth
and speed at the ball right on-screen when using the Cannon® Speed-n-Temp.
You’ll never be shorthanded again, just make adjustments from the helm, while
your mate rigs the lines and brings in the fish!
With the new InterLink™ Network Connection, you can now share GPS
position, waypoints, routes and your current track between two Humminbird®
Fishing Systems in real time. Mark a waypoint at the console, and it’s instantly
available on the second unit. No matter where you’re at on the boat, you’ll have
access to your critical fishing and navigation information. Plus, daisy chain
InterLink™ with other System Modules and you’ll have a network that lets you
share digital data around the boat. It’s a simply, clearly, better networking
solution!
Be sure to check out our web site at www.humminbird.com for additional
new and exciting accessories to grow your Fishing System!
NOTE: Each accessory requires a separate purchase. You can visit our web
site at www.humminbird.com or contact our Customer Resource Center at
1-800-633-1468 for additional details.
Humminbird® Accessories
44
Notes
45
Contact Humminbird®
Contact the Humminbird® Customer Resource Center
in any of the following ways:
By Telephone:
(Monday - Friday 8:00 a.m. to 4:30 p.m. Central Standard Time):
1-800-633-1468
By e-mail:
(typically we respond to your e-mail within three business days):
[email protected]
For direct shipping, our address is:
Humminbird
Service Department
678 Humminbird Lane
Eufaula, AL 36027 USA
46