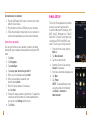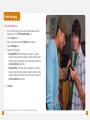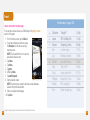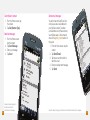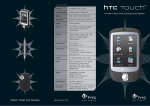
1
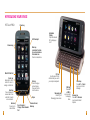
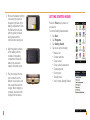
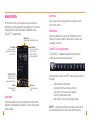
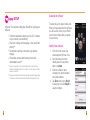
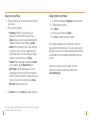
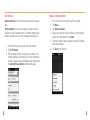
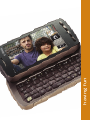
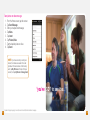
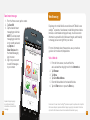
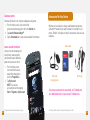
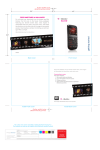
Gutter width to be
determined by printer
5.0"
4.5"
FREE RINGTONES & WALLPAPER
For a limited time, downloads from the hottest new 20th
Century Fox films are on the house. Enjoy wallpaper
featuring your favorite screen stars, voice ringers of
memorable and funny lines, and much more. Just follow
the directions on the other side of this page to be granted
access. Downloading is simple. Controlling your phone’s
ego? Not so simple.
(See inside back cover for instructions.)
getting star ted
5.0"
TM1630
Back Cover
Front Cover
Enjoy free wallpaper of your favorite screen stars, voice ringers
of memorable and funny lines, and much more.
Downloading is simple.
From your computer:
1. Go to www.t-mobile.com/foxinbox.
2. Log in and register for first time access.
3. Choose your phone.
4. Select content and follow directions
ns to download
directly to your phone.
Movie images ©2009 Twentieth Century Fox Film Corporation.
Inside Front Cover
Inside Back Cover
Gutter width to be
determined by printer
This is the cover art for 2 booklets: Getting Started & Having Fun.
The booklets are side by side saddle-stich binding (or perfect-bound).
MATCH COLORS:
PRINTING STATIONS: 4
TM1630 Touch Pro2 Guide_Cover.ai
05.13.09
CREATIVE APPROVAL
T-Mobile
PRINTER CONTACT
production
PROCESS
BUILD
Varies, see dieline
CYAN
MAGENTA
YELLOW
BLACK
CONFIDENTIAL
72K
THIS PROOF
IS NOT FOR
COLOR MATCH
CLIENT SIGNATURE INDICATES THAT THE CLIENT HAS PROOFREAD COPY AND CLOSELY EXAMINED ART FOR FINAL APPROVAL OF THIS MECHANICAL FILE TO PROCEED TO THE PRINTER. PHILIPPEBECKER IS NOT RESPONCIBLE FOR PROOFREADING
COPY OF OTHER MATERIALS SUPPLIED. SPELLING, PUNCTUATION, GRAMMAR, AND CONTECT ARE THE SOLE RESPONSIBILITY OF THE CLIENT. THIS MECHANICAL FILE CONTAINS PROPRIETARY INFORMATION AND IS CONFIDENTIAL.
OVERVIEW
This guide provides you with everything you need to get
started. If you need additional information on features and
services, please select one of these helpful options:
Refer to your User Manual on the CD
that comes with your device,
Visit www.t-mobile.com,
On your device, tap Start > Help,
On your device, tap Start >
Programs > My Account.
n
n
n
n
Table of Contents
Having Fun
Introducing Your Device . ................................................. 4
Service Activation . ........................................................... 6
SIM Card and Battery ...................................................... 7
Getting Started Wizard . ................................................... 9
Home Screen ................................................................. 10
Communication Manager............................................... 12
Call Functions ................................................................ 13
Contacts . ....................................................................... 14
Synchronize ................................................................... 15
E-mail Setup . ................................................................. 17
myFaves® Setup............................................................. 18
Bluetooth® Setup ........................................................... 25
Emergency Dialing . ....................................................... 26
Caring for Your Device ................................................... 27
Tips for Safety................................................................. 28
Turn to the Having Fun section of this booklet
to learn what else your new phone can do.
3
Introducing your device
HTC Touch PRO2
Power key
Soft Reset port
Volume keys
Mute key
Located on the back
of your device below
the camera lens.
Press to mute/unmute.
MicroSD Card Slot
Zoom bar
Swipe right or left to
zoom in or out or to
enlarge or shrink text.
End key
Press to hang up
and exit menus.
Press and hold to
lock the device.
Send key
Press to make and
answer calls. Press
and hold to launch
voice command.
Home key
Press to go to
Home Screen.
4
Adjustable
Display
Open the slide and
tilt the display up
to 50o.
Stylus
Sync Connector /
Charger / Wired Headset
Port
Previous Screen /
Back key
Ctrl key
Use the same Ctrl key
shortcuts that you use on
your computer keyboard.
Messaging key
Press to go to
Messaging main screen.
SMS key
Press ALT
+ SMS to
open your text
messaging
inbox.
Comm key
Press ALT + Comm
key to open Comm
Manager.
Browser key
Press ALT + Browser
key to launch Internet
Explorer.
5
Service ACTIVATION
sim CARD and battery
If you are a new T-Mobile® customer and your service
has not been activated, simply call Customer Care at
1-800-937-8997 from your landline phone and a T-Mobile
Activations representative will assist you.
You will need the following information when activating service:
Your Subscriber Identity Module (SIM) card identifies you to
the wireless network. Your device will not work without the SIM
card.
To insert the SIM and battery:
1. Detach your SIM card.
Service Agreement and agent code on your
Agreement
Your name, home address, home phone, and billing
address
n
n
NOTE: For business and government account, please provide the name
of your company or government agency, address, and tax ID.
Your Social Security number, current driver’s license
number, and date of birth for credit check purposes
Your choice of T-Mobile rate plan and services
(see www.t-mobile.com for latest plan information)
SIM serial number and IMEI number (located on the
box bar code label)
n
n
n
2. Press and slide to
disengage the back
battery cover. Lift the
cover up and away.
By activating service, you acknowledge that you have read, understand,
and agree to be bound by each of the terms and conditions of the Service
Agreement.
6
7
3. Remove the battery by lifting
it out using the groove in
the upper right side of the
battery compartment. Slide
the SIM card into the slot
with the golden contacts
facing down and the
notched corner facing out.
4. Align the golden contacts
on the battery with the
contacts in the battery
compartment. Snap the
battery into place and
replace the battery cover.
Getting Started Wizard
Press the Power key to power on
your device.
To run the Getting Started wizard:
1. Tap Start.
2. Tap Programs.
3. Tap Getting Started.
4. Tap to set up the following:
Make a call
Set date and time
Set up e-mail
Set up a device password
Set background
Set ring tone
Transfer music
Add / remove Getting Started
n
n
n
n
n
5. Plug the charger into the
sync connector on the
bottom of your device and
into an electrical outlet to
charge. When charging is
complete, disconnect the
charger from the device.
8
n
n
n
9
Home Screen
Start Menu
On the Home screen, you can quickly access a variety of
information, such as applications and settings on your device
through the Quick Menu, Start Menu, Notifications, and
TouchFLOTM navigation tabs.
Status Icons
Tap to access Notifications screen.
Start Menu
Tap to access all
programs and settings
on your device.
Quick Menu
Tap to view memory
used or to view,
close, or switch to
running programs.
TouchFLOTM Tabs
Touch and slide to
access your most
widely-used functions.
Camera
Tap to launch the
camera.
Tap to access all of your programs and settings or return
to the Home screen.
Notifications
Tap the top status bar to access the Notifications screen.
View your connection status, missed calls, voicemail, new
messages, and more.
TouchFLOTM 3D navigation tabs
The TouchFLO™ navigation tabs allow quick access to
commonly used functions and programs.
Scroll through and select TouchFLOTM tabs using your finger or
the stylus:
All People
Tap to open phone
book.
Tap to select the desired tab.
Touch and hold the active tab, and then
slide right or left over the tabs. Release
when the desired tab is active.
Swipe right or left to scroll through the tabs.
n
n
Quick Menu
Tap the Quick Menu icon to view and stop currently running
programs, switch between programs, or view current system
memory usage.
10
n
NOTE: To customize the Home screen tabs, please refer to
the User Manual on the CD that comes with your device.
11
Communication manager
Call Functions
The Communication Manager allows you to enable or
disable device features and data connections. To access the
Communication Manager, from the Home screen, swipe right
or left to the Settings tab and tap Communications.
To make a call:
1. From the Home screen, press the Send key.
NOTE: If you have myFaves, tap Phone.
2. Tap the phone number.
3. Tap Talk or press the Send key.
To answer a call: Touch and drag the slider
to Answer or press the Send key.
To end a call: Tap End Call or press
the End key.
Set up and call voicemail
Airplane Mode
Tap to toggle between turning airplane
mode on or off
Phone
Tap to toggle between enabling or
disabling the phone function
12
Bluetooth®
Tap to toggle between turning the
Bluetooth feature on or off. Tap Settings
> Bluetooth to configure the Bluetooth
feature on your device.
Wi-Fi
Tap to toggle between turning Wi-Fi on
or off. Tap Settings > Wireless LAN to
configure Wi-Fi on your device.
Microsoft Direct Push
Tap to toggle between automatically
receiving (as items arrive) or manually
retrieving Outlook e-mail
Data Connection
Tap to connect or disconnect active
data services (e.g. GPRS)
To set up voicemail, from the Home
screen, press the Send key (if you have
Touch and slide
myFaves, tap Phone) and then touch and
to answer or
hold the 1 button or open the slide and then
ignore
press and hold the 1 key on the keypad.
To set up your voicemail, follow the tutorial.
To reset the password to the last four digits of your phone
number, enter #793# and press the Send key.
To call voicemail, from the Home screen, press the Send key
(if you have myFaves, tap Phone) and then touch and hold
the 1 button.
13
Contacts
Synchronize
Add new contact
Synchronize using USB cable
1.
2.
3.
4.
5.
From the Home screen, press the Send key.
NOTE: If you have myFaves, tap Phone.
Tap the numbers for the desired phone number.
Tap Save to contacts.
Tap Yes, Create new contact.
Tap the First field to enter the contact’s first name using
the on-screen keyboard.
NOTE: You can also open the slider and use the
keypad.
6. Tap Done.
7. Tap the Last field to enter the contact’s last name.
8. Tap Done.
9. Tap the Number Type drop-down menu and tap the
desired number type.
10.Tap Save.
Call contact from the phone book
14
1. From the Home screen, press the Send key.
NOTE: If you have myFaves, tap Phone.
2. Enter the contact’s name by tapping the number buttons
with the associated letter. A list of possible contact’s
displays.
3. Tap the desired contact to initiate the call.
You can synchronize your corporate e-mail, calendar,
contacts, and tasks directly with your computer by connecting
your device to your computer using the USB cable. Before
you can synchronize using the USB cable, you must first
install Microsoft ActiveSync 4.5 or higher on your computer.
ActiveSync is a synchronization program that allows you to:
Synchronize your corporate e-mail, calendar,
tasks, contacts, and Internet Explorer favorites
Copy files between your device and your computer
Install applications on your device
Back up and restore device information
n
n
n
n
Install ActiveSync on computer
1. Insert the CD that came with your device into the
CD-ROM drive in your computer.
2. Follow the instructions on the CD to install ActiveSync
and Microsoft Outlook if you do not already have it
installed on your computer.
15
Connect device to computer
1. Plug the USB cable into the sync connector port on the
bottom of your device.
2. Plug the other end into a USB port on your computer.
3. Follow the ActiveSync instructions on your computer to
synchronize data between your device and computer.
Synchronize wirelessly
You can synchronize e-mail, calendar, contacts, and tasks
directly with your computer wirelessly without using the USB
cable.
1. Tap Start.
2. Tap Programs.
3. Tap ActiveSync.
4. Tap set up your device to sync with it.
5. Enter your e-mail address and tap Next.
6. Enter your username, password, and
domain and tap Next.
7. Enter the Server address, if necessary
and tap Next.
8. Choose the data you want to synchronize. To adjust the
e-mail size and the number of e-mails downloaded to
your device, tap Settings at this screen.
9. Tap Finish.
16
E-mail Setup
The Set Up E-mail application provides
access to your work and personal
e-mail from Microsoft® Exchange, AOL®,
AIM®, Yahoo!®, Windows Live™, Gmail™,
EarthLink®, Comcast®, and many more,
including any POP3 or IMAP4 E-mail
server. To set up your e-mail account:
1. From the Home screen, tap the
Mail tab.
2. Tap New Account.
3. Tap the e-mail provider.
4. Read the Terms of Use and tap
Accept, if necessary.
5. Enter your username and password.
6. Tap Next.
7. Tap Finish.
NOTE: To add additional e-mail
accounts, while on the Mail tab,
tap Menu > Accounts >
New Account.
17
SETUP
myFaves® is an optional calling plan. Benefits of signing up to
myFaves:
Unlimited nationwide calling to any five U.S. numbers,
on any network (even landlines)*
One-touch calling, text messaging, e-mail, and photo
sharing**
No domestic roaming or domestic long-distance
charges
Personalize contacts with favorite pictures and
downloadable icons**
n
Subscribe to myFaves®
To subscribe, go to www.t-mobile.com.
When you have subscribed to myFaves,
you will see five circles on your Home
screen a few minutes after you power
on your device.
n
n
n
* myFaves only applies to calls directly between two people and allows
unlimited nationwide calling to 5 U.S. numbers. You can change myFaves
numbers once/month.
** Separate purchase/download charges may apply. Separate charges apply
to send/receive domestic/international text/picture messages and e-mail.
18
Add myFaves contacts
1. From the Home screen, tap
an unassigned myFaves circle.
2. Scroll to and tap a contact
already saved in your phone
book or tap New.
3. Enter the contact’s name,
company, title, phone number,
and e-mail address.
4. Tap Done now or go to Step 5
to assign an icon and Step 8 to
assign a ringtone.
19
Assign icon to myFaves
5. Tap the myFaves icon circle at the top right corner of
your screen.
6. Tap one of the following:
Facebook: Enter the e-mail address and
password for your Facebook account. Tap
Done. Swipe up or down to scroll to and tap the
Facebook contact. At Link Profiles, tap Done.
Album: Tap the desired picture. Touch and drag
to move the crop circle to the desired location.
Zoom the picture in or out by sliding your finger
right or left on the Zoom bar. Tap Done.
Camera: Frame the subject and tap the Shutter
icon to capture. Tap the Back Arrow icon.
My Pictures: Tap the desired picture. Touch
and drag to move the crop circle to the desired
location. Zoom the picture in or out by sliding your
finger right or left on the Zoom bar. Tap Done.
My Icons: Tap the desired icon.
n
n
Assign ringtone to myFaves
8. Scroll down and tap the Ring tone drop-down menu.
9. Tap the desired ringtone.
10.Tap Done.
11.When you are finished, tap Done.
12.Tap Yes to confirm saving the contact.
An hourglass displays in the circle while the contact is
being added to the phone book. You can use your device
during this time. Once the contact is added, you will receive
a confirmation and the hourglass is replaced by your new
contact.
n
n
Now you are ready to call your contact. From the
Home screen, tap the contact circle and then tap
Call [number type].
n
7. Tap Done now or go to Step 8 to assign a ringtone.
20
NOTE: Each original icon/ringtone selection and each change to an icon/ringtone
may incur a separate download charge.
21
Edit myFaves
Names and icons: You can change names and icons at any
time.
Phone numbers: You can only change a contact’s phone
number once per calendar month. If a number change is not
allowed, you will receive an error message explaining why.
1. From the Home screen, tap the myFaves contact.
2. Tap Edit Contact.
3. Edit the contact’s name, company, title, number, icon,
ringtone, birthday, or anniversary. For more information
on how to assign icons and ringtones, see instructions in
the Add myFaves contacts section of this guide.
22
Replace myFaves contacts
1.
2.
3.
4.
From the Home screen, tap the myFaves contact.
Tap Menu.
Tap Replace Contact.
Swipe up or down to scroll to and tap a contact already
saved in your phone book or tap New.
5. Enter the contact’s name, company, title, phone number,
and e-mail address.
6. Tap Done when finished.
23
Add e-mail address
1.
2.
3.
From the Home screen, tap the myFaves contact.
Tap the Envelope tab at the bottom of your screen.
Tap Add Account.
NOTE: To add additional e-mail accounts, tap Menu >
Add Email Address.
4. Enter the e-mail address.
5. Tap Ok.
Link with Facebook
1. From the Home screen, tap the
myFaves contact.
2. Tap the Updates and Events tab
at the bottom of the screen.
3. Tap Link Profiles.
4. Enter the e-mail address and password for your Facebook account.
5. Tap Done.
6. Tap Link Profiles again.
7. Scroll to and tap the Facebook
contact profile.
8. At Link Profiles, tap to select or
clear the check boxes next to the content you want to link.
9. Tap Done.
24
Bluetooth® Setup
Your device comes with Bluetooth technology, which is a wireless
technology that enables a data connection between your device
and a Bluetooth wireless headset and other Bluetooth devices.
Prepare Bluetooth wireless headset
To pair your device with a Bluetooth headset, make sure that your
headset is fully charged and that you put the headset into pairing
mode. See your Bluetooth headset’s manual for more information.
Turn on Bluetooth feature and pair with headset
1. From the Home screen, touch and hold
the active tab and then drag right or left
to the Settings tab.
2. Tap Communications.
3. Tap Settings.
4. Tap Bluetooth.
5. Tap Yes to turn Bluetooth on.
6. Tap Add. Your device searches for
your Bluetooth headset.
7. Tap the headset.
8. Enter the PIN, if required, and tap OK.
9. Tap Done.
25
Emergency Dialing
Caring for Your Device
While all phones are equipped with 911 emergency
calling, this device may or may not permit its location to be
approximated during a 911 call.*
MAKING IT LAST
* Availability of this feature depends on upgrades to the (a) wireless network and
(b) 911 calling system that are required to be installed by the local 911 response
agency or public safety answering point (PSAP); these upgrades may not be
available everywhere within our wireless coverage area or your roaming area. This
approximation of the device’s location and the transmittal of location information are
subject to emergency situations, transmission limits, network problems/limitations,
interconnecting carrier problems, your device, buildings/tunnels, signal strength and
atmospheric/topographical conditions, and may be curtailed, interrupted, dropped or
refused. The device’s approximate location is transmitted to the local 911 response
agency or PSAP while the call is in progress; this approximation is intended solely
to aid the PSAP in dispatching emergency assistance or to limit the search area for
emergency services personnel. You should not rely solely on a phone for essential
communications (such as a medical or other emergency). Please see T-Mobile’s
Terms and Conditions and Privacy Policy for additional service restrictions and
details.
26
Your device is a complex electronic device; think of it as a
mini-computer. Here are some hints that should help you
extend the life of your new device.
Phones aren’t cheap, so keep yours in a safe place —
away from children who may find it fun to see if the device sinks
or floats, and away from dogs that find plastic-coated products
to be irresistible chew toys.
Water will damage your device and accessories — even
a small amount such as water droplets from a soda in your
car cup-holder, melting snowflakes, tears of joy, squirt-gun
crossfire or steam from hot water in the kitchen or bathroom.
Use only batteries and accessories from the original
manufacturer of your device. Non-approved accessories can
cause damage to you or your device and shorten the device’s
life. Hint: If it’s being sold out of someone’s car trunk, walk
away.
If your charger or any other accessory is damaged,
replace it or take it to a qualified service dealer. Do not attempt to operate your device charger if it has received a sharp
blow, been dropped, thrown from a speeding motorcycle or is
otherwise damaged; doing so may damage your device.
27
Tips for Safety
Check with your doctor if you have a pacemaker or hearing
aid in order to ensure that cell phone usage is safe with your
device. If you have questions about the interaction of cellular
radio frequency and any other electronic equipment, ask the
manufacturer of the equipment if cell phone radio frequencies
will disrupt the equipment’s performance.
When you are driving, T-Mobile encourages you to use
your device in a safe and sensible manner. Here are
a few tips:
Assess road conditions before answering.
Your safety is more important than any call.
Prepare your hands-free headset, if you have one,
or turn on your speakerdevice option before you
start moving.
Keep your device close. If it rings and you discover
it’s in the back seat, do NOT crawl over the seat
to answer it while driving.
Program frequently used numbers into your
speed dial for easy one-touch dialing.
n
n
n
n
28
having fun
Table of Contents
Memory Card.................................................................... 2
Text Messaging................................................................. 4
Picture Messaging............................................................ 8
Video Messaging............................................................ 10
Instant Messaging . ........................................................ 12
E-mail............................................................................. 14
myFaves® ...................................................................... 16
Call myFaves ......................................................... 16
Send Text Message................................................ 16
Send E-mail Message............................................ 17
Send Picture or Video Message . .......................... 18
Send Instant Message . ......................................... 20
Browsing ....................................................................... 21
Accessories For Your Device......................................... 23
Additional Information.................................................... 24
II
1
Memory Card
Your device is capable of using a removable microSD memory card
where you can store multimedia files, such as video clips, music
tracks, sound files, images, and messaging data. See your User
Manual for more information. Memory card sold separately.
To install the memory card, remove the back battery cover. Open the
memory card slot cover and insert the card with the golden contacts
facing down. Push it into the slot until it clicks into place and then
replace the battery cover. To remove the card, press the card into the
slot until it releases and pops out slightly, then pull it out.
Locate files on memory card
Pictures, videos, and music files are saved to the memory card by
default, when installed.
1. Tap Start.
2. Tap Programs.
3. Tap File Explorer.
4. Tap Up until you see My Device in the top left corner below
File Explorer.
5. Tap Storage Card.
NOTE: You can also see photos and videos stored on your
memory card by going to Start > Programs > Albums >
Albums > Storage Card.
Move files between memory card and device
1.
2.
3.
4.
Tap Start.
Tap Programs.
Tap File Explorer.
Tap Up until you see My Device in the top left corner below
File Explorer.
5. Tap Storage Card.
6. Tap and hold the desired file.
7. Tap Copy or Cut.
8. Navigate to the destination location and tap Menu.
9. Tap Edit.
10.Tap Paste.
2
3
Text Messaging
Your device supports three text modes:
n
Predictive (XT9®) mode analyzes the keys you tap or press
n
n
and attempts to finish the word you are entering. Words are
also predicted based on words you have entered before.
Manual mode does not attempt to predict the word you are
entering.
Number (123) and Symbol mode allows you to enter
numbers and symbols.
Use on-screen keyboard
n
n
To change text mode, while in the text
entry screen, tap
on the on-screen
keyboard to toggle between XT9 and
manual mode.
Tap
to place in Number and Symbol
mode.
Use the keypad
Caps / Shift key
Press once to
capitalize the next
letter. Press twice to
capitalize all letters.
Press a third time to
toggle back to initial
cap mode.
Delete
key
Alt key
Press to enter the
upper level character
on a key.
Control key
Functions the same
as the Control key
on your computer
keyboard.
SYM key
Press ALT and then SYM
to access symbols menu.
Enter
key
Space
key
SMS key
Press ALT and then
SMS to open your
text messaging
inbox.
Browser key
Press ALT and
then Browser to
launch Internet
Explorer.
Comm
Manager Key
Press ALT and
then Comm
Manager to
open the Conm
Manager.
To highlight text, position the cursor then press and hold the
Caps / Shift key and use the directional arrows to highlight.
To copy text, highlight the text and press Ctrl + C.
To place copied text, position the cursor and press Ctrl + P.
To type symbols, while in a text entry screen press the
ALT key, then the SYM key, and then tap the desired symbol.
n
See your User Manual for more information.
n
n
n
4
5
Send message
1. From the Home screen, tap
the Messages tab.
2. Tap the New Message icon.
3. At To, enter the contact’s
phone number or name.
If the contact is in your phone
book, tap to select from the list
displayed as you enter.
4. Tap in the message body and
enter your message.
5. Tap Send.
Read and delete message
Your device displays a New Message indicator
in your task bar
when you receive a new text message. A circled number will also appear on the Messages tab on the Home screen.
To read a new message, from the Home screen, tap the New Message
indicator in the task bar to open the Notifications screen. Tap the message you want to view.
To access messages in your Inbox:
1. From the Home screen, tap the Messages tab.
2. Tap All Messages.
OR
1. Tap Start.
2. Tap Messaging.
3. Tap Text/Multimedia.
4. Tap the message you want to view.
6
Separate charges may apply to send/
receive domestic/international text
messages.
To delete while in the inbox, touch and hold the message you
want to delete and then tap Delete.
To delete while viewing a message, tap Menu > Delete.
7
Picture Messaging
Take and send pictures
1. From the Home screen, touch and hold the active tab and then
drag right or left to the Photos and Videos tab.
2. Tap the Camera icon.
3. Frame your subject and tap the Shutter icon to capture.
4. Tap the Envelope icon
5. Tap one of the following:
Send via MMS: At To, enter the phone number. To select a
contact in your phone book, begin to enter the contact’s name
or phone number, then tap the contact. Enter your subject and
tap Insert text here to add text.
Send via E-Mail: At To, enter the e-mail address. To select a
contact in your phone book, begin to enter the contact’s name
or phone number, then tap the contact. Enter your subject and
tap Insert text here to add text.
n
n
6. Tap Send.
8
Separate charges may apply to send/receive domestic/international picture messages.
9
Video Messaging
Record and send videos
1. From the Home screen, touch and hold
the active tab and then drag right or left
to the Photos and Videos tab.
2. Tap the Video icon.
3. Frame your subject and tap the Shutter icon
to begin recording.
4. Tap the Shutter icon again when finished.
5. Tap the Envelope icon.
6. Tap the desired account.
7. At To, enter the e-mail address. To select a
contact in your phone book, begin to enter
the contact’s name or phone number, then
tap the contact.
8. Enter your subject.
9. Tap Insert text here.
10.Enter your message.
11.Tap Send.
“Wishing you a Happy Birthday...!”
10
Separate charges may apply to send/receive domestic/international video messages.
11
Instant Messaging
Access and send instant messages
1. Tap Start.
2. Tap Instant Messaging.
3. Tap the instant messaging provider.
If you tapped Windows Live™
Messenger, tap Sign in.
If you tapped any other instant
messaging provider, tap each provider
that you would like to log in to and then
tap OK.
To add a provider at a later time, tap
Options > Select Services from the
Instant Messaging sign in screen.
4. Tap the AIM®, Google TalkTM, MySpace®,
or Yahoo! Messenger® tab.
5. Sign in to your account to send IM
messages to your contacts.
n
n
n
12
Separate charges may apply to send/receive domestic/international instant messages.
James05
movie @ 7.15. don’t b late.
0207_lana
no worries. on my way.
James05
see you then!
13
E-mail
Access and send e-mail messages
To set up new e-mail accounts, see E-Mail Setup in the getting started
section of this guide.
1. From the Home screen, tap the Mail tab.
2. If you have multiple accounts set up, tap
the Envelope icon for the account you
want to access.
NOTE: Touch and hold the icon to see the
associated e-mail account.
3. Tap Inbox.
4. Tap Menu.
5. Tap New.
6. At To, tap Menu.
7. Tap Add Recipient.
8. Tap the desired contact.
NOTE: You will only see contact’s who have e-mail addresses
saved in their phone book profile.
9. Enter your subject and message.
10.Tap Send.
14
Separate charges may apply to send/receive/read domestic/international e-mails.
Wednesday, August 26
Christine
Jason
Donna
Erin
Jay
William
Amy
Scott
Philippe
Kelsey
Tom
Tonight?
RE: Sat May 5th
Shipping Confir...
cookie recipe
Birthday Surpris...
pics from this w...
Trip to PA?
book club on Fri...
beach trip - Sat...
RE: copyright
State football ga...
3:22p
1:06p
12:28p
11:17a
11:09a
10:50a
10:36a
10:17a
9:44a
8:38a
8:02a
15
Call myFaves® contact
1. From the Home screen, tap
the contact.
2. Tap Call [Number Type].
Send text message
1. From the Home screen,
tap the contact.
2. Tap Send Message.
3. Enter your message.
4. Tap Send.
16
Separate charges may apply to
send/receive domestic/
international text messages.
Send e-mail message
You will not see the Send E-mail link
until you save an e-mail address for
your myFaves contact. To add an
e-mail address to a myFaves contact,
see myFaves setup - Add e-mail address in the getting started section of
this guide.
1. From the Home screen, tap the
contact.
2. Tap Send E-mail.
3. Tap the account from which to
send the e-mail.
4. Enter your subject and message.
5. Tap Send.
Separate charges may apply to send/receive domestic/international picture messages.
17
Send picture or video message
1.
2.
3.
4.
5.
6.
7.
8.
From the Home screen, tap the contact.
Tap Send Message.
Enter your subject and message
Tap Menu.
Tap Insert.
Tap Picture/Video.
Tap the desired picture or video.
Tap Send.
NOTE: If you have a memory card in your
device, then videos are saved to the card
by default. To locate videos on the memory
card, tap My Pictures at the top left of your
screen, then tap My Device > Storage Card.
“you’ve GOT to see this...”
18
Separate charges may apply to send/receive domestic/international video messages.
19
Send instant message
1. From the Home screen, tap the contact.
2. Tap Send IM.
3. Tap the desired instant
messaging provider tab.
NOTE: To add an instant
messaging provider that
is not currently activated,
tap Options >
Select Services from
the Instant Messaging
sign in screen.
4. Sign in to your account
to send IM messages
to your contact.
Separate charges may apply
to send/receive domestic/
international e-mail and instant
messages.
20
Web Browsing
Experience the mobile Web like never before with T-Mobile’s new
web2goSM experience. New features include Web optimized device
browser, a customizable start page for easy, one-click access to
information, a powerful built-in Web search engine, and the ability
to manage your account right from your device.
For more information about these services, see your services
guide or visit t-mobile.com/shop/addons.
Visit a Web site
1. From the Home screen, touch and hold the
active tab and then drag right or left to the Internet tab.
2. Tap Browser.
3. Tap Menu.
4. Tap Go to Web Address.
5. Enter the Web address for the desired Web site.
6. Tap the Enter button or press the Enter key.
Full access to the new t-zones® web2goSM experience requires the purchase of a compatible
Web access data plan; separate additional charges may apply for downloads. Not all sites
optimized for Web browsers. Actual content available for download may vary.
21
Download content
Download myFaves® icons, ringtones, wallpapers, and games:
1. From the Home screen, touch and hold the
active tab and then drag right or left to the Internet tab.
2. Tap Launch Browser/web2goSM.
3. Tap the Downloads tab to view content available for download.
Accessories For Your Device
Whether you’re looking for a charger, a fashionable carrying case,
a Bluetooth® headset or just want to browse for fun extras for your
phone, T-Mobile® is the place to shop for accessories. Here are a few
examples…
Memory Card
Access account information
View your minutes remaining and
bill summary, make payments,
get information about additional
plans and services, and more!
1. From the Home screen,
touch and hold the active
tab and then drag right or
left to the Programs tab.
2. Tap My Account.
NOTE: You can also
access My Account by tapping
Start > Programs > My Account.
22
Separate purchase/download charges may apply.
USB & Wall
Charging System
Car Charger
To purchase accessories for your phone, visit T-Mobile.com,
call 1.800.204.2449 or visit your nearest T-Mobile store.
*Accessory selection subject to change and may vary by location.
23
Additional Information
myFaves: Not available with all rate plans. myFaves only applies to
calls directly between two people and allows unlimited nationwide calling to 5 U.S. numbers. You can change myFaves numbers once/month.
Messaging Plans/Features: You will be charged for all data sent by or
to you through the network, regardless of whether received. Character
length/file size of messages/ attachments may be limited. T-Mobile
is not liable for content of messages/attachments or for any failures,
delays or errors in any T-Mobile generated alerts or notifications.
Downloads: Additional charges apply; not all downloads available on
all devices. You obtain no rights in downloads; duration of use may
be limited; may be stored solely for use with your device. T-Mobile is
not responsible for any download lost due to your error. See Pricing,
Services and Device brochures, and T-Mobile’s Terms and Conditions
(including arbitration provision) at T-Mobile.com, for rate plan information, charges for features and services, and restrictions and details.
Yahoo!® and the Yahoo!® Messenger logos are registered trademarks
of Yahoo! Inc. The Bluetooth® word mark and logo are owned by the
Bluetooth SIG, Inc. and are used by T-Mobile under license. T-Mobile,
t-zones, and the magenta color are federally registered trademarks of
Deutsche Telekom AG. myFaves and the myFaves design are federally
registered trademarks and web2go is a service mark of T-Mobile USA,
Inc. All other brands, product names, company names, trademarks
and service marks are the property of their respective owners. © 2009
T-Mobile USA, Inc.
24