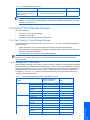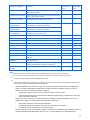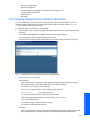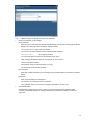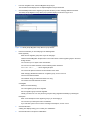
1
HP StorageWorks XP
Tiered Storage Manager User Guide
Part number: T1785-96002
First edition: 11/2005
Revision history (start here) 1
Legal notices
© Copyright 2005 Hewlett-Packard Development Company, L.P.
Hewlett-Packard Company makes no warranty of any kind with regard to this material, including, but not limited to, the implied warranties
of merchantability and fitness for a particular purpose. Hewlett-Packard shall not be liable for errors contained herein or for incidental or
consequential damages in connection with the furnishing, performance, or use of this material.
This document contains proprietary information, which is protected by copyright. No part of this document may be photocopied,
reproduced, or translated into another language without the prior written consent of Hewlett-Packard. The information is provided “as is”
without warranty of any kind and is subject to change without notice. The only warranties for HP products and services are set forth in the
express warranty statements accompanying such products and services. Nothing herein should be construed as constituting an
additional warranty. HP shall not be liable for technical or editorial errors or omissions contained herein.
BSAFE is a registered trademark or trademark of RSA Security Inc. in the United States and/or other countries.
Java and all Java-based trademarks and logos are trademarks or registered trademarks of Sun Microsystems, Inc. in the United States
and other countries.
Microsoft is a registered trademark of Microsoft Corp. in the U.S. and other countries.
Microsoft Internet Explorer is a product name of Microsoft Corp.
Mozilla is a trademark of the Mozilla Foundation in the U.S and other countries.
Netscape is a registered trademark of Netscape Communications Corporation in the United States and other countries.
RC2 is a registered trademark or trademark of RSA Security Inc. in the United States and/or other countries.
RC4 is a registered trademark or trademark of RSA Security Inc. in the United States and/or other countries.
RSA is a registered trademark or trademark of RSA Security Inc. in the United States and/or other countries.
HP StorageWorks XP Tiered Storage Manager includes RSA BSAFE Cryptographic software from RSA Security Inc.
Solaris is a trademark or registered trademark of Sun Microsystems, Inc. in the United States and other countries.
All SPARC trademarks are used under license and are trademarks or registered trademarks of SPARC International, Inc., in the United
States and other countries. Products bearing SPARC trademarks are based upon an architecture developed by Sun Microsystems, Inc.
Sun is a trademark or registered trademark of Sun Microsystems, Inc. in the United States and other countries.
VERITAS Cluster Server is a product name of VERITAS Software Corporation in the United States and other countries.
Windows is a registered trademark of Microsoft Corp. in the U.S. and other countries.
Windows Server is a registered trademark of Microsoft Corp. in the U.S. and other countries.
This product includes software developed by the Apache Software Foundation (http://www.apache.org/).
This product includes software developed by Ben Laurie for use in the Apache-SSL HTTP server project.
This product includes software developed by Ralf S. Engelschall <[email protected]> for use in the mod_ssl project
(http://www.modssl.org/).
HP StorageWorks XP Tiered Storage Manager User Guide
2
Contents
Revision history (start here)
Revision tables ..................................................................................................................................................... 10
1 Using Tiered Storage Manager
1-1
Functions of Tiered Storage Manager....................................................................................................... 11
1-1-1
Migrating Data without Interrupting Your Current Application ........................................................ 12
1-1-2
Grouping and Migrating Volumes ................................................................................................... 13
1-1-3
Defining Migration Target Volumes ................................................................................................ 13
1-1-4
Using the External Storage Connection Function .......................................................................... 13
1-1-5
Using HTSM With Clients ............................................................................................................... 13
1-2
Deciding When to Migrate Data ................................................................................................................ 13
1-2-1
When the Importance of Data Changes ......................................................................................... 13
1-2-2
When Improving Storage Performance .......................................................................................... 14
1-2-3
When the Storage Environment Changes ...................................................................................... 16
1-3
How Migration Works ................................................................................................................................ 17
1-4
Methods of Migration................................................................................................................................. 18
1-4-1
Migration within a Domain Control Storage Subsystem ................................................................. 18
1-4-2
Migration Between Domain Control Storage and External Storage Subsystems........................... 19
1-4-3
Migration Between Two External Storage Subsystems.................................................................. 19
1-5
Required Components of Migration........................................................................................................... 20
1-6
Users of Tiered Storage Manager ............................................................................................................. 21
1-6-1
User Types for Tiered Storage Manager ........................................................................................ 21
1-6-2
Changing User Information............................................................................................................. 21
1-6-3
Using Tiered Storage Manager with PSAs ..................................................................................... 22
1-7
Performing a Refresh ................................................................................................................................ 22
1-7-1
How Refresh Works........................................................................................................................ 22
1-7-2
When to Perform a Refresh............................................................................................................ 23
1-7-3
Refresh Types and Scopes ............................................................................................................ 23
1-7-4
Refresh Status Information............................................................................................................. 24
1-7-5
Using Refresh to Detect Inconsistencies........................................................................................ 24
1-8
Volumes Used for Migration ...................................................................................................................... 25
2 Getting Started with the GUI
2-1
2-2
2-3
Preparing for GUI Operations.................................................................................................................... 28
Guidelines for Using Tiered Storage Manager GUI................................................................................... 29
Logging Into Tiered Storage Manager....................................................................................................... 29
2-3-1
Logging In from the Login Dialog Box ............................................................................................ 29
2-3-2
Logging In from another Command View XP AE Suite Software ................................................... 30
2-4
Logging Out of Tiered Storage Manager................................................................................................... 30
2-5
Starting Tiered Storage Manager .............................................................................................................. 30
2-6
Using Tiered Storage Manager Windows.................................................................................................. 31
2-6-1
About the Menu-bar Frame ............................................................................................................ 32
2-6-2
About the Navigation Frame........................................................................................................... 32
2-6-3
About the Method Frame................................................................................................................ 33
2-6-4
About the Information Frame.......................................................................................................... 33
2-6-5
About Pop-up Dialog Boxes ........................................................................................................... 34
3 Creating a Storage Domain
3-1
3-2
3-3
About Storage Domains ............................................................................................................................ 35
Storage Domains and Migration Groups ................................................................................................... 35
Creating a Storage Domain....................................................................................................................... 36
4 Creating a Storage Tier
4-1
4-2
4-3
4-4
About Storage Tiers .................................................................................................................................. 38
Storage Tier Operations ............................................................................................................................ 39
Creating a Storage Tier by Selecting Storage Tiers Object from a Storage Domain ................................ 39
Creating a Storage Tier Based on Results of a Storage Domain Volume Search .................................... 42
5 Applying Filter Conditions
6 Creating a Migration Group
6-1
6-2
6-3
About Migration Groups ............................................................................................................................ 49
Creating a Migration Group by Selecting Object in a Storage Domain ..................................................... 49
Creating a Migration Group based on Storage Domain Volume Searches............................................... 51
Contents 3
6-4
Creating a Migration Group based on a Storage Tier Volume Search...................................................... 53
7 Performing a Migration
7-1
About Migration Tasks............................................................................................................................... 57
7-1-1
Attributes of Migration Tasks .......................................................................................................... 57
7-1-2
Status of Migration Tasks ............................................................................................................... 57
7-2
Migration Task Operations ........................................................................................................................ 58
7-3
Steps for Performing a Migration............................................................................................................... 59
8 Managing Storage Domains
8-1
8-2
8-3
8-4
8-5
8-6
Viewing a List of Storage Domains ........................................................................................................... 64
Viewing Storage Domain Properties ......................................................................................................... 64
Searching Volumes in a Storage Domain ................................................................................................. 65
Refreshing Storage Domain Information ................................................................................................... 67
Changing Storage Domain Attribute Information....................................................................................... 68
Deleting a Storage Domain ....................................................................................................................... 69
9 Managing Storage Tiers
9-1
9-2
9-3
9-4
9-5
Viewing a List of Storage Tiers.................................................................................................................. 70
Viewing Storage Tier Properties................................................................................................................ 70
Searching for Volumes in a Storage Tier .................................................................................................. 72
Changing Storage Tier Attribute Information............................................................................................. 73
Deleting a Storage Tier ............................................................................................................................. 76
10 Managing Migration Groups
10-1
10-2
10-3
10-4
10-5
10-6
Viewing a List of Migration Groups................................................................................................. 77
Viewing Detailed Information about a Migration Group .................................................................. 77
Changing Migration Group Attribute Information ............................................................................ 78
Adding a Volume to a Migration Group .......................................................................................... 80
Removing a Volume from a Migration Group ................................................................................. 82
Deleting a Migration Group............................................................................................................. 83
11 Managing Migration Tasks
11-1
11-2
11-3
11-4
11-5
Searching for a Migration Task....................................................................................................... 85
Viewing Detailed Information about a Migration Task .................................................................... 86
Executing a Migration Task ............................................................................................................ 87
Deleting a Migration Task............................................................................................................... 88
Canceling a Migration Task before Executing It ............................................................................. 88
12 Troubleshooting
12-1
12-2
12-3
12-3-1
12-3-2
Appendix A
Troubleshooting by Function .......................................................................................................... 90
Troubleshooting Procedures .......................................................................................................... 94
Message and Trace Logs ............................................................................................................... 94
Message Logs ................................................................................................................................ 94
Trace Logs...................................................................................................................................... 95
Recommended and Maximum Values
Acronyms and Abbreviations
Index
Contents 4
Figures
Figure 1-1 Scope of Data Eligible for Migration ......................................................................................................... 12
Figure 1-2 Data Migration according to Life Cycle Management............................................................................... 12
Figure 1-3 Migration Suited to the Life Cycle of Data ................................................................................................ 14
Figure 1-4 Migration in the Domain Controller ........................................................................................................... 14
Figure 1-5 Migrating Data to Redistribute Access Load (before migration) ............................................................... 15
Figure 1-6 Migrating Data to Redistribute Access Load (after migration) .................................................................. 15
Figure 1-7 Migration by Rearranging Storage Subsystems ....................................................................................... 16
Figure 1-8 Migration from an External Storage Subsystem to the Domain Controller ............................................... 16
Figure 1-9 Migration Between Two External Storage Subystems ............................................................................. 17
Figure 1-10 Relationship between Volumes and LDEV Numbers ............................................................................ 18
Figure 1-11 Migration within a Domain Control Storage Subsystem ......................................................................... 19
Figure 1-12 Migration Between Domain Control Storage Subsystem and External Storage Subsystem.................. 19
Figure 1-13 Migration Between Two External Storage Subsystems.......................................................................... 20
Figure 1-14 Migration of LUSE Configuration ............................................................................................................ 27
Figure 2-1 Tiered Storage Manager Main Window .................................................................................................... 30
Figure 2-2 Main Window with List Objects Subwindow ............................................................................................. 31
Figure 2-3 Tiered Storage Manager Window Frames................................................................................................ 31
Figure 2-4 Information Frame with Subwindow ......................................................................................................... 33
Figure 2-5 Pop-up Dialog Box.................................................................................................................................... 34
Figure 3-1 Creating a Storage Domain Pop-up Window............................................................................................ 36
Figure 4-1 Storage Tiers and Volumes Relationship ................................................................................................. 39
Figure 4-2 Creating a Storage Tier Pop-up Window.................................................................................................. 40
Figure 4-3 Filter Condition Pop-up Window ............................................................................................................... 41
Figure 4-4 Filter Condition Pop-up Window Displaying List of Volumes .................................................................... 41
Figure 4-5 Search Volumes-Storage Domain Name Subwindow .............................................................................. 42
Figure 4-6 Create Storage Tier-Storage Domain Name Pop-up Window .................................................................. 43
Figure 6-1 Create Migration Group Pop-up Window.................................................................................................. 50
Figure 6-2 Search Volumes-Storage Domain Name Subwindow .............................................................................. 51
Figure 6-3 Create Migration Group-Storage Domain Name Pop-up Window............................................................ 52
Figure 6-4 Create Migration Group-Confirmation Pop-up Window ............................................................................ 53
Figure 6-5 Search Volumes-Storage Tier Name Subwindow .................................................................................... 54
Figure 6-6 Create Migration Group-Storage Tier Name Pop-up Window .................................................................. 55
Figure 6-7 Create Migration Group-Confirmation Pop-up Window ............................................................................ 56
Figure 7-1 Executing a Migration Task on Tiered Storage Manager clients .............................................................. 58
Figure 7-2 Migration and Operations at a Web client ................................................................................................ 59
Figure 7-3 List Objects-Migration Groups Subwindow............................................................................................... 60
Figure 7-4 Migrate-Step 1 of 4 Pop-up Window......................................................................................................... 60
Figure 7-5 Migrate-Step 2 of 4 Pop-up Window......................................................................................................... 61
Figure 7-6 Modify Volume Pair Pop-up Window ........................................................................................................ 61
Figure 7-7 Modify Volume Pair Pop-up Window (drop down list for Source Volume)................................................ 62
Figure 7-8 Migrate-Step 3 of 4 Pop-up Window......................................................................................................... 62
Figure 7-9 Migrate-Step 4 of 4 Pop-up Window......................................................................................................... 63
Figure 8-1 List Objects-Storage Domains Subwindow .............................................................................................. 64
Figure 8-2 Show Properties-Storage Domain Name Subwindow .............................................................................. 65
Figure 8-3 Search Volumes-Storage Domain Name Subwindow .............................................................................. 66
Figure 8-4 Search Volumes-Storage Domain Name Subwindow Displaying a List of Volumes ................................ 66
Figure 8-5 Refresh-Storage Domain Name Pop-up Window ..................................................................................... 67
Figure 8-6 Modify Storage Domain-Storage Domain Name Pop-up Window............................................................ 68
Figure 8-7 Delete Storage Domain-Storage Domain Name Pop-up Window ............................................................ 69
Figure 9-1 List Objects-Storage Tiers Subwindow..................................................................................................... 70
Figure 9-2 Show Properties-Storage Tier Name Subwindow .................................................................................... 71
Figure 9-3 Volume Detailed Information- Device Number Pop-up Window ............................................................... 71
Figure 9-4 Migration Group Detailed Information-Storage Tier Name Pop-up Window............................................. 72
Figure 9-5 Search Volumes-Storage Tier Name Subwindow .................................................................................... 72
Figure 9-6 Search Volumes-Storage Tier Name Subwindow Displaying a List of Volumes ...................................... 73
Figure 9-7 Modify Storage Tier-Storage Tier Name Pop-up Window ........................................................................ 74
Figure 9-8 Edit Filter Condition Pop-up Window........................................................................................................ 75
Figure 9-9 Search Volumes Pop-up Window Displaying a List of Volumes............................................................... 75
Figure 9-10 Delete Storage Tier-Storage Tier Name Pop-up Window ...................................................................... 76
Figure 10-1 List Objects-Migration Groups Subwindow............................................................................................. 77
Figure 10-2 Migration Group Detailed Information-Migration Group Name Pop-up Window..................................... 78
Figure 10-3 Modify Group-Migration Group Name Pop-up Window .......................................................................... 79
Figures 5
Figure 10-4 Migration Group Detailed Information-Migration Group Name Pop-up Window..................................... 80
Figure 10-5 Add Volume-Migration Group Name Pop-up Window ............................................................................ 81
Figure 10-6 Add Volume-Migration Group Name Pop-up Window Displaying Volume Search Result List ............... 81
Figure 10-7 Add Volume-Confirmation Window......................................................................................................... 82
Figure 10-8 Remove Volume-Migration Group Name Pop-up Window ..................................................................... 83
Figure 10-9 Remove Volume-Confirmation Pop-up Window ..................................................................................... 83
Figure 10-10 Delete Migration Group-Migration Group Name Pop-up Window ........................................................ 84
Figure 11-1 List Objects-Tasks Subwindow............................................................................................................... 85
Figure 11-2 List Objects-Tasks Subwindow Displaying a Task List........................................................................... 86
Figure 11-3 Task Detailed Information-Task ID Pop-up Window............................................................................... 87
Figure 11-4 Volume Detailed Information- Device Number Pop-up Window (tasks) ................................................ 87
Figure 12-1 Troubleshooting Procedures .................................................................................................................. 94
Figures 6
Tables
Table 1 Document Conventions.................................................................................................................................. 8
Table 2 Revisions ..................................................................................................................................................... 10
Table 1-1 Required Migration Components ............................................................................................................... 20
Table 1-2 Tiered Storage Manager Operations and Related User Types ................................................................ 21
Table 1-3 Character Strings Representing Reasons a Volume Cannot Be a Migration Source or Target ................ 25
Table 5-1 Filtering Condition Elements and Values (1 of 3) ...................................................................................... 45
Table 7-1 Migration Task Status Messages............................................................................................................... 57
Table 12-1 Troubleshooting (logon)........................................................................................................................... 90
Table 12-2 Troubleshooting (window display) ........................................................................................................... 90
Table 12-3 Troubleshooting Tiered Storage Manager Functions (continues on the following pages)....................... 91
Table 12-4 Message Log .......................................................................................................................................... 94
Table 12-5 Trace Log................................................................................................................................................ 95
Tables 7
About this guide
This guide provides information about:
•
An overview of migration (the process of relocating data on a volume to another storage subsysytem).
•
Instructions on performing a migration from a Web client using HP StorageWorks XP Tiered Storage
Manager.
Intended audience
This guide is intended for customers and HP authorized service providers who are experienced with the
following:
•
Basic knowledge about Storage Area Network (SAN)
•
Knowledge about system operation and management tasks using HP StorageWorks XP Device Manager
(HP StorageWorks XP Device Manager installation, user settings, user group settings, volume (LDEV)
creation, and Logical group creation)
•
Basic knowledge about Windows or Solaris, which is the prerequisite operating system for HP
StorageWorks XP Tiered Storage Manager client
Prerequisites
Prerequisites for installing this product include:
•
Reading through the user’s guide.
•
Meeting all the minimum installation requirements.
•
Reviewing the readme.txt file on the CD for any last-minute announcements.
Document conventions and symbols
Table 1 Document Conventions
Convention Element
Convention Element
Medium blue text: Figure 1
Cross-reference links and e-mail addresses
Medium blue, underlined text
(http://www.hp.com)
Web site addresses
Bold font
•
•
•
italics font
Text emphasis
Monospace font
Monospace, italic font
Monospace, bold font
Key names
Text typed into a GUI element, such as into a box
GUI elements that are clicked or selected, such as
menu and list
•
•
•
•
File and directory names
System output
Code
Text typed at the command-line
•
•
Code variables
Command-line variables
Emphasis of file and directory names, system output, code,
and text typed at the command-line
CAUTION: Indicates that failure to follow directions could result in damage to equipment or data.
IMPORTANT: Provides clarifying information or specific instructions.
NOTE: Provides additional information.
About this guide 8
Revision history (start here)
TIP: Provides helpful hints and shortcuts.
HP technical support
Telephone numbers for worldwide technical support are listed on the HP web site:
http://www.hp.com/support/
Collect the following information before calling:
•
Technical support registration number (if applicable)
•
Product serial numbers
•
Product model names and numbers
•
Applicable error messages
•
Operating system type and revision level
•
Detailed, specific questions
For continuous quality improvement, calls may be recorded or monitored.
HP strongly recommends that customers sign up online using the Subscriber’s choice web site at
http://www.hp.com/go/e-updates
•
Subscribing to this service provides you with email updates on the latest product enhancements, newest
versions of drivers, and firmware documentation updates as well as instant access to numerous other
product resources.
•
After signing-up, you can quickly locate your products by selecting Business support and then Storage
under Product Category.
HP-authorized reseller
For the name of your nearest HP-authorized reseller:
•
In the United States, call 1-800-345-1518.
•
Elsewhere, visit http://www.hp.com and click Contact HP to find locations and telephone numbers.
Helpful web sites
For additional product information, see the following web sites:
•
http://www.hp.com
•
http://www.hp.com/go/storage
•
http://www.hp.com/support/
About this guide 9
Revision history (start here)
Revision tables
Table 2 Revisions
Date
Edition
Revision
November 1, 2005 First
About this guide 10
1 Using Tiered Storage Manager
This chapter explains the features of Tiered Storage Manager, describes the objects and timing associated with
migration (which is a main function of Tiered Storage manager), lists volume filter conditions, and documents
the procedure for refresh operations.
•
Functions of Tiered Storage Manager (section 1-1 )
•
Deciding When to Migrate Data (section 1-2 )
•
How Migration Works (section 1-2-3 )
•
Methods of Migration (section 1-4 )
•
Required Components of Migration (section 1-5 )
•
Users of Tiered Storage Manager (section 1-6 )
•
Performing a Refresh Operation (section 1-7 )
•
Volumes Used for Migration (section 1-8 )
1-1 Functions of Tiered Storage Manager
Tiered Storage Manager is designed to relocate (migrate) data from one volume on a storage subsystem to
another volume. You can migrate data simply by specifying the relocation destination. (Tiered Storage
Manager does not migrate data to a tape device.) See Figure 1-1 for an illustration of the scope of data you can
migrate using Tiered Storage Manager.
Using Tiered Storage Manager offers the following advantages:
•
You can migrate data without interrupting the current application.
•
You can migrate data without being aware of the storage configuration.
•
You can migrate multiple volumes at once.
•
You can reduce the preparation time for a migration.
•
You can use multiple storage subsystems as though they were a single storage subsystem and centrally
manage different types of storage environments, since Tiered Storage Manager uses the StorageWorks
XP12000/10000.
•
You can migrate data in line with the concept of Data Lifecycle Management (DLCM) so that data used
frequently is stored in high-performance storage and data used less frequently is stored in lowperformance storage. See Figure 1-2 for an illustration of migrating data according to DLCM.
Using Tiered Storage Manager 11
Figure 1-1 Scope of Data Eligible for Migration
Figure 1-2 Data Migration according to Life Cycle Management
1-1-1 Migrating Data without Interrupting Your Current Application
When you use Tiered Storage Manager to migrate data, you do not have to be aware of changes to the storage
configuration or to the volume containing the data being migrated. You can access the migrated data in the
same way as before migration. Even during migration, you do not have to interrupt an application.
12
1-1-2 Grouping and Migrating Volumes
You can define a group of storage volumes in advance, so that they are migrated at the same time. By giving
the group an appropriate name , and by setting an explanation of the group as an attribute, you can easily
identify the group of volumes to be migrated.
You can also prevent a group of volumes from migrating accidentally by disabling migration for that group.
1-1-3 Defining Migration Target Volumes
You can define a group of target volumes in advance for a particular purpose, such as access speed, reliability
or bit cost. In response to a request from a user, you can also migrate data whose usage value has dropped
from a high-performance storage subsystem to a low-performance storage subsystem. You can select the
group you need when you are migrating data to suit your specific requirements without having to specify any
detailed conditions. Such volume groups can be created, for example, on a storage subsystem, CLPR, or array
group basis.
1-1-4 Using the External Storage Connection Function
Using the external storage connection function of StorageWorks XP12000/10000, you connect to various types
of storage subsystems using fiber channels, thereby integrating the subsystems into a single virtual storage
subsystem. You select volumes within this storage subsystem as the migration source or target. This means
you can migrate data without worrying about the different types of storage subsystems.
1-1-5 Using HTSM With Clients
•
Web client: This client enables you to operate Tiered Storage Manager on a browser. For details about
the window, click the Help button on the window and refer to the displayed Tiered Storage Manager GUI
Help.
•
Command Line Interface (CLI) client: This client directly operates the command line, so you can batch
operations such as migration. Refer to the HP StorageWorks XP Tiered Storage Manager CLI Reference
Guide for details.
1-2 Deciding When to Migrate Data
Migrating data helps increase the efficiency of an entire storage system. You can decide to migrate data:
•
When the importance of data changes
•
When storage performance needs to be improved
•
When the storage environment changes
Tiered Storage Manager migrates data between storage subsystems.
NOTE: In this manual, the term domain controller refers to the following products
•
•
StorageWorks XP12000/10000
StorageWorks XP10000
1-2-1 When the Importance of Data Changes
You can migrate data in line with the concept of Data Lifecycle Management (DLCM), so that data used
frequently is stored in high-performance, high-price storage and data used less frequently is stored in lowperformance, low-price storage. You can migrate data between high- and low-performance storage
subsystems, depending on how often it is used.
Figure 1-3 illustrates migration according to the life cycle of data.
13
Using Tiered Storage
Manager
You can use Tiered Storage Manager with two types of clients:
Figure 1-3 Migration Suited to the Life Cycle of Data
1-2-2 When Improving Storage Performance
You can migrate data to improve storage performance if multiple volumes with high-access frequency in the
same array group become overloaded, if a storage subsystem reaches a bottleneck, or if data outlives the life
of the storage system.
Migration in a domain controller is illustrated by Figure 1-4
Figure 1-4 Migration in the Domain Controller
Figure 1-5 and Figure 1-6 illustrate migrating data to redistribute access load and improve storage
performance.
14
Using Tiered Storage
Manager
Figure 1-5 Migrating Data to Redistribute Access Load (before migration)
Figure 1-6 Migrating Data to Redistribute Access Load (after migration)
Figure 1-7 illustrates migrating data by rearranging the storage subsystems.
15
Figure 1-7 Migration by Rearranging Storage Subsystems
After you have installed a higher performance storage subsystem, you can migrate data with a high usage
frequency to high-performance storage.
Figure 1-8 illustrates migration from an external storage subsystem to the domain controller.
Figure 1-8 Migration from an External Storage Subsystem to the Domain Controller
1-2-3 When the Storage Environment Changes
When data is to be held for a long period, the storage subsystem may reach the end of its life cycle before the
data does.
In this case, you can migrate the data to a different storage subsystem before the first storage subsystem
reaches the end of its life cycle.
16
Figure 1-9 Migration Between Two External Storage Subystems
Tiered Storage Manager allows you to migrate data located on a volume within the scope eligible for migration
without being aware of the change in LDEV number. After performing a migration, Tiered Storage Manager
changes the LDEV number automatically so that you do not have to change the access path to the host, which
prevents any interruption of an application service. Tiered Storage Manager migrates data in units of volumes.
You can migrate data between any storage subsystems as long as they are within the migration scope.
Migration consists of five processing steps:
1.
After you create a migration task, you reserve a migration target volume. The reserved volume is not
accessible from a host.
2.
When the execution of a migration task starts, Tiered Storage Manager copies data from the migration
source volume to the migration target volume
3.
Tiered Storage Manager switches the LDEV number of the migration source volume with the LDEV
number of the migration target volume. A volume reservation is performed for an LDEV number. Thus,
the volume reservation moves from the migration source volume to the migration target volume just as
the LDEV numbers are switched
4.
The volume reservation is removed. A volume reservation is also removed when a migration task is
canceled, or a migration task fails to execute. If removal of the volume reservation fails, refresh the
storage domain to remove it.
5.
Tiered Storage Manager erases the data from the migration source volume when you select that option.
Figure 1-10 shows the relationship between volumes and LDEV numbers in volume reservation, LDEV number
switching, and data erasure
17
Using Tiered Storage
Manager
1-3 How Migration Works
Figure 1-10 Relationship between Volumes and LDEV Numbers
1-4 Methods of Migration
This section describes three methods of migration:
•
Migration within a domain control storage subsystem.
•
Migration between a domain control storage subsystem and an external storage subsystem.
•
Migration between two external storage subsystems.
1-4-1 Migration within a Domain Control Storage Subsystem
You can migrate data within a control storage subsystem to distribute access load, as shown in Figure 1-11
below.
18
Figure 1-11 Migration within a Domain Control Storage Subsystem
1-4-2 Migration Between Domain Control Storage and External Storage
Subsystems
Using Tiered Storage
Manager
You can migrate data from a domain control storage subsystem to an external storage subsystem, or from an
external storage subsystem to a domain control storage subsystem. You do this when a high-performance
storage subsystem has been added. Figure 1-12 illustrates this method of migration.
Figure 1-12 Migration Between Domain Control Storage Subsystem and External Storage Subsystem
1-4-3 Migration Between Two External Storage Subsystems
You can migrate data between two external storage subsystems connected to separate domain control storage
subsystems. You do this when an external storage subsystem is full. Figure 1-13 illustrates this method of
migration.
19
Figure 1-13 Migration Between Two External Storage Subsystems
1-5 Required Components of Migration
The following four components are required for migration in Tiered Storage Manager. Table 1-1 describes
these components and their related operations and refers you to chapters or sections in this manual where you
can find more detailed information.
Table 1-1 Required Migration Components
Required Component
Storage domain
Refers to either a domain control
storage subsystem, or a domain
control storage subsystem connected
to an external storage subsystem.
You can create only one storage
domain for each domain control
storage subsystem. You can migrate
data only between volumes in the
same storage domain.
Storage tier
A group of volumes that serve as
migration targets. When you migrate
data, you select a migration target
volume from a specified storage tier.
Migration group
A group of volumes you migrate at
the same time.
Migration task
Moving data from the source volume
to the target volume for each volume
in a migration group. Created by
linking a migration source volume in
Operation
Chapter or Section
•
•
•
•
•
•
•
Creating a storage domain
Viewing a list of storage domains
Viewing storage domain properties
Searching volumes in a storage domain
Refreshing storage domain information
Changing storage domain attribute information
Deleting a storage domain
3
8-1
8-2
8-3
8-4
8-5
8-6
•
•
•
•
•
•
•
•
•
•
Creating a storage tier
Configuring a storage tier with filters
Viewing a list of storage tiers
Viewing storage tier properties
Searching for volumes in a storage tier
Changing storage tier attribute information
Deleting a storage tier
Creating a migration group
Viewing a list of migration groups
Viewing detailed information about a migration
group
Changing migration group attributes information
Adding a volume to a migration group
Removing a volume from a migration group
Deleting a migration group
Creating a migration task
Searching for a migration task
Viewing detailed information about a migration
task
Executing a migration task
4
5
9-1
9-2
9-3
9-4
9-5
6
10-1
10-2
10-3
10-4
10-5
10-6
•
•
•
•
•
•
•
•
7
11-1
11-2
11-3
11-4
20
Table 1-1 Required Migration Components
Required Component
the migration group with a migration
target volume in the storage tier and
specifying options.
Operation
Chapter or Section
•
•
11-5
Deleting a migration task
Canceling a migration task before executing it
IMPORTANT: Whenever you change storage configurations or migrate data using Tiered Storage
Manager, you must perform a refresh. Refresh is an operation that updates your information. (For more
information, see Section 1-7 ).
1-6 Users of Tiered Storage Manager
This section describes:
•
User Types for Tiered Storage Manager.
•
Changing User Information.
•
Using Tiered Storage Manager with PSA Administrators.
1-6-1 User Types for Tiered Storage Manager
Tiered Storage Manager includes three levels of users (see Table 1-2 for a list of Tiered Storage Operations
and related users):
•
System Administrator: Can access all functions and resources on Tiered Storage Manager.
•
Storage Administrator: Configures and manages the storage subsystems. Can access all functions and
resources on Tiered Storage Manager.
•
Guest: Can reference the resources of Tiered Storage Manager.
NOTE: Tiered Storage Manager includes the same types of users as Device Manager. For more
information, refer to the HP StorageWorks Command View XP Advanced Edition Device Manager Web
Client User Guide.
1-6-2 Changing User Information
When using Device Manager, and you want to change the user ID or password for accessing Device Manager
that was specified when installing Tiered Storage Manager, execute the Tiered Storage Manager command for
changing user information (htsmmodhdvmuser). This command can be executed by a System Administrator or
Storage Administrator when Device Manager is active. For details about the command for changing user
information (htsmmodhdvmuser), see the manual HP StorageWorks XP Tiered Storage Manager Server
Installation and Configuration Guide.
Operation
Storage domain
Storage tier
Migration group
Create
Reference List
Reference Properties
Change Attribute
Information
Refresh
Delete
Create
Reference List
Reference Properties
Change Attribute
Information
Delete
Create
Reference List
Reference Detailed
Information
Add Volume
System Administrator or
Storage Administrator
Guest
Y
Y
Y
Y
N
Y
Y
N
Y
Y
Y
Y
Y
Y
N
N
N
Y
Y
N
Y
Y
Y
Y
N
N
Y
Y
Y
N
21
Tiered Storage
ger
Table 1-2 Tiered Storage Manager Operations and Related User Types
Table 1-2 Tiered Storage Manager Operations and Related User Types
Operation
Migration task
Delete Volume
Change Attribute
Information
Delete
Create
Reference Detailed
Information
Reference Search List
Execute
Delete
Cancel
System Administrator or
Storage Administrator
Guest
Y
Y
N
N
Y
Y
Y
N
#
N
Y
Y
Y
Y
Y
Y
N
N
N
Legend:
Y ― Can operate N ― Cannot operate
# ― On a CLI client, you can create a migration task even when the user type is Guest.
1-6-3 Using Tiered Storage Manager with PSAs
Logical Partition (LPAR) is the generic name for the Cache Logical Partition (CLPR) and Storage Logical
Partition (SLPR) functions.
Tiered Storage Manager uses an SLPR administrator in addition to the administrator for the entire storage
subsystem. The SLPR administrator is called the Partition Storage Administrator (PSA).
In some cases, when a Device Manager user registered in Storage Navigator as a partition storage
administrator (PSA) adds a domain controller to Device Manager, the domain controller added to Device
Manager is called a domain controller for which the PSA is managing SLPR operations.
A domain controller for which the PSA is managing SLPR operations cannot be used as a storage domain for
Tiered Storage Manager.
Do not change a domain controller that Storage Administrator has registered in Tiered Storage Manager to a
domain controller for which the PSA is managing SLPR operations on Device Manager. In addition, in the
storage subsystem that performs LPAR operations, a candidate for the migration target volume is selected
from within the LPAR to which the migration source volume belongs. In a domain controller managed by the
Storage Administrator, a migration can be performed for volumes that have overlapping LPARs.
For details on the CLPR and SLPR, see the manual HP StorageWorks Command View XP Advanced Edition
Device Manager Web Client User's Guide or the Virtual Partition Manager User's Guide.
1-7 Performing a Refresh
When you change storage configurations or finish performing a migration, you must update —meaning refresh
— information to reflect the latest status. You can view the latest refresh date and time in the List Objects –
Storage Domain Name subwindow of the Web client. You cannot perform most Tiered Storage Manager
operations during a refresh. This section describes the refresh operation, including:
•
How Refresh Works
•
When to Perform a Refresh
•
Refresh Types and Scopes
•
Refresh Status Information
•
Using Refresh to Detect Inconsistencies
1-7-1 How Refresh Works
Performing a refresh takes time because it updates repositories and cache information.
The repositories are databases that manage setup information for Tiered Storage Manager, Device Manager,
and Command View XP AE Suite Common Component. The repositories are managed by Command View XP
AE Suite Common Component.
The repository types are:
•
Repository for Tiered Storage Manager: Manages information defined for migration and the status of the
Tiered Storage Manager server.
22
•
Repository for Device Manager: Manages system and hardware information about storage subsystems
managed by Device Manager.
•
Repository for Command View XP AE Suite Common Component: Common to all Command View XP AE
Suite software. It manages data displayed in display areas common to Web client series products. If a
Web client or CLI client gives an instruction to perform a refresh, this repository does not change.
The cache is information that is imported from the Device Manager repositories to a database (repository) for
Tiered Storage Manager.
1-7-2 When to Perform a Refresh
You must perform a refresh:
•
After changing logical device or hardware configurations (see section 1-7-2-1 ).
•
After registering or performing a migration task (see section 1-7-2-2 ).
NOTE: Tiered Stored Manager automatically performs a refresh when you add or delete a storage domain.
You cannot perform a refresh:
•
If a storage domain is managed with PSA permissions (an error message displays).
•
During another operation, including another refresh (an error message displays).
NOTE: It takes some time to refresh the Tiered Storage Manager storage domain because the refresh
operation updates the database (repositories).
1-7-2-1 After Changing Logical Device or Hardware Configurations
If you do not perform a refresh after changing configurations, data will be migrated to the wrong location.
Example:
a. LDEV 2:01 is externally connected to StorageWorks XP1024.
b. A refresh is performed by using Tiered Storage Manager.
c. The external connection target of 2:01 is changed to StorageWorks XP512 by using Remote Web
Console.
d. 2:01 is migrated by using Tiered Storage Manager.
In the Web client display, 2:01 still matches StorageWorks XP1024. The migration target of 2:01 still
appears to be StorageWorks XP1024. However, migration to StorageWorks XP512 has actually been
performed.
1-7-2-2 After Registering or Performing a Migration Task
If you do not perform a refresh after registering or performing a migration task, an error might occur in the
subsystem.
NOTE: After you perform a refresh, the latest refresh data and time display in the List Objects – Storage
Domain Name subwindow. The information in the navigation frame is also updated.
1-7-3 Refresh Types and Scopes
There are four refresh operation types:
•
Refresh to synchronize information in the storage subsystems with the repository for Device Manager
•
Refresh to synchronize the repository for Device Manager with the repository for Tiered Storage Manager
•
Refresh to synchronize the repository for Tiered Storage Manager with the HiCommand common
repository
•
Refresh to synchronize the HiCommand common repository with the browser
Performing a refresh to synchronize information in the storage subsystems with the repository for Device
Manager
This refresh synchronizes information in the storage subsystems with the storage subsystem configurations
held by Device Manager.
If an attempt is made to refresh Tiered Storage Manager when an inconsistency exists between the
information in the storage subsystems, the storage configuration information held by Device Manager,
and the storage configuration information held by Tiered Storage Manager, a message asking whether
you want to refresh Device Manager is displayed. Click the OK button if you want to refresh Tiered
Storage Manager and Device Manager.
23
The refresh scope of Device Manager is the domain controllers that contain the storage domain that is the
refresh target of Tiered Storage Manager.
For details on performing a refresh to synchronize information in the storage systems with the repository
for Device Manager, see 1.6.4 Refreshing Device Manager Repositories.
Performing a refresh to synchronize the repository for Device Manager with the repository for Tiered Storage
Manager
This refresh synchronizes the storage subsystem configurations held by Device Manager with the storage
subsystem configurations held by Tiered Storage Manager.
This refresh is executed when a storage subsystem configuration (such as an LDEV configuration) is
changed in Device Manager or Remote Web Console. The refresh scope is the migration target storage
domain.
The refresh is the Refresh displayed in the method frame (Web client) or a refresh executed by the
Refresh command (CLI client).
Performing a refresh to synchronize the repository for Tiered Storage Manager with the Command View XP AE
Suite Common Component repository
This refresh synchronizes the storage domain and storage tier objects held by Tiered Storage Manager
with the Tiered Storage Manager objects (for tree display) held in the Command View XP AE Suite
Common Component repository.
A refresh is automatically executed when the Tiered Storage Manager server starts. When the Tiered
Storage Manager server is abnormally terminated during update processing of the repository for
Command View XP AE Suite Common Component, all storage domains in Tiered Storage Manager are
refreshed.
Performing a refresh to synchronize the HiCommand common repository and the browser
This refresh synchronizes the Tiered Storage Manager objects (for tree display) held in the Command
View XP AE Suite Common Component repository with the tree displayed by the browser.
Execute this refresh by choosing Refresh in the menu bar frame. The refresh scope is the added storage
domain.
1-7-4 Refresh Status Information
When you have created or deleted a storage domain, Tiered Storage Manager automatically refreshes
information. At this time, there are four possible refresh statuses:
•
Status in which a refresh has not been performed: Indicates the status immediately after creating a
storage domain (before performing a refresh). After creating a storage domain, Tiered Storage Manager
automatically performs a refresh. If the automatic refresh fails, perform another refresh.
•
Normal status (refresh-successful status): Indicates that the refresh was successful and that the
repository and cache are normal.
•
Refresh in progress status: Indicates that a refresh is being performed.
•
Cache abnormal status (refresh-failed status): Indicates that the refresh failed due to an error and that the
status of the repository or cache is abnormal.
1-7-5 Using Refresh to Detect Inconsistencies
If an error occurs in the network or storage device when a migration task is created, performed, or cancelled,
the following three types of information may become inconsistent:
•
Information within the storage subsystems
•
The repository for Device Manager
•
The repository for Tiered Storage Manager
You can detect these inconsistencies, by refreshing the information after migration finishes (the status of the
migration task is Success, Failure, or Cancel.). If you try to refresh Tiered Storage Manager while the
repository is inconsistent, a message asking whether you want to refresh Device Manager is displayed. Click
OK if you want to refresh Tiered Storage Manager and Device Manager.
24
The refresh scope on Device Manager is the domain controllers that make up the storage domain that is the
refresh target on Tiered Storage Manager.
1-8 Volumes Used for Migration
Migration source and target volumes must satisfy the following conditions in a migration using Tiered Storage
Manager:
•
The emulation types of the migration source volumes and migration target volumes match.
•
The sizes of the migration source and migration target volumes match.
The emulation types of the migration source volumes and the migration target volumes are not OPEN-V,
but the volumes are both CVS or both normal.
You can check the emulation type and size of a volume in the Volume Detailed Information – Device Number
popup window. For details on this window, see the GUI Help.
•
Volumes that cannot be migrated
For volumes that cannot be migrated, you can check the status from the Volume Detailed Information Device Number pop-up window - Can Migrate or Volume Status.
Can Migrate
When Yes is specified for Can Migrate, you can perform migration using the volume as a source
volume.
When No is specified, you cannot perform migration using the volume as a source volume. An error
occurs when you click the Migration button.
Volume Status
When Unused is specified for Volume Status, it is available as a source target.
When Used is specified, the volume will not be displayed as a candidate for the migration target
volume.
When No is specified for Can Migrate, or Used is specified for Volume Status, the reasons are displayed in
Reasons that a volume cannot become source/target volume in the Volume Detailed Information - Device
Number pop-up window. For details on the character strings to be displayed and their descriptions, see Table
1.5 Character Strings Representing Reasons a Volume Cannot Be a Migration Source or Target, and a
Description of those Character Strings.
•
Volumes that cannot be checked for migration suitability
The following volumes cannot be checked for suitability by using Can Migrate or Volume Status. An error
occurs when executing a migration task with these volumes selected as a source volume. Also, an error
occurs when creating a migration task that has these volumes selected as migration target volumes.
•
A volume that makes up a Cross-system Copy pair
•
A volume that is the target of XRC (Extended Remote Copy, which is the IBM remote copy function)
•
A volume that is the target of Concurrent copy
•
A volume that cannot be accessed because it has a blocked status or is being formatted
An error occurs when executing a migration task using the following volumes together:
•
•
For a migration source volume: volume made up of a TrueCopy pair
•
For a migration target volume: externally connected volumes
Information displayed as reasons that a volume cannot be a migration source or target
When migration suitability checks can be performed from Tiered Storage Manager, if volumes are
determined to be unsuitable as a migration source or target, the reasons are displayed in Reasons that a
volume cannot become source/target volume in the Volume Detailed Information - Device Number pop-up
window.
The following table shows the character strings representing the reasons that a volume cannot be a
migration source or target.
Volumes that can be checked by Tiered Storage Manager, and for which a migration task or data deletion task
is being executed, are not displayed in Reasons that a volume cannot become source/target volume. Such
volumes cannot be used as either migration source volumes or migration target volumes.
Table 1-3 Character Strings Representing Reasons a Volume Cannot Be a Migration Source or Target
25
Character string displayed
Description
Migration source
volume
Migration target
volume
Continuous Access XP (target)
Volume that makes up a Continuous Access XP pair and whose
status is PSUS or PSUE
--
Y
Continuous Access XP Status
Volume that makes up a Continuous Access XP pair and whose
status is neither PSUS nor PSUE
Y
Y
Business Copy XP (target)
Volume that makes up a Business Copy XP pair
--
Y
Business Copy XP
Configuration [Root]
Volume that makes up a Business Copy XP pair (This is a PVOL that makes up a pair with three S-VOLs.)
Y
Y
Business Copy XP
Configuration [Node]
Volume that makes up a Business Copy XP pair (This is an SPVOL that makes up a pair with two S-VOLs.)
Business Copy XP
Configuration [Leaf]
Volume that makes up Business Copy XP pair (This is an S-VOL
that makes up a pair with an SP-VOL.)
Migration Group (target)
Volume that is included in an migration group
--
Y
Volume reserved as a migration target
Y
Y
Continuous Access XP Journal
Volume that makes up a Continuous Access XP Journal pair
Y
Y
Snapshot XP
Volume that makes up a Snapshot XP pair
Y
Y
Cache LUN XP
Volume for which Cache LUN XP is set
Y
Y
Command Device
Volume used as a Command Device
Y
Y
LUSE (target)
Volume that makes up LUSE
--
Y
Path (target)
Volume for which a path is set
--
Y
Locked (target)
Volume that is locked (not Read/Write) by LUN Security XP
#2
Extention
--
Y
NAS (target)
NAS system volume
--
Y
Externally Locked
Volume that is using the external subsystem function and is
#2
locked (not Read/Write) by LUN Security XP Extention
Y
Y
Not Acquired Volume
Information
Volume whose volume information cannot be obtained
Y
Y
Already Reserved
#1
Legend:
Y: Corresponds to the reason that the volume cannot be migrated (cannot be used as a volume for migration)
--: Does not correspond to the reason that the volume cannot be migrated (can be used as a volume for migration)
#1
Includes the volumes migrated by HP StorageWorks Auto LUN XP.
#2
LUN Security XP Extention is a product name. For details on this product, see the manual HP StorageWorks LUN Security XP
Extention User Guide for the XP12000/XP10000/XP1024/XP128.
When the migration source volume is a LUSE, you can specify only those volumes that are not applicable to
Table 1-4 Character Strings Representing Reasons a Volume Cannot Be a Migration Source or Target. In
addition, the volume must satisfy the following conditions:
•
All migration target volumes are made up of either internal or external volumes.
•
If they are external volumes, the external volume attributes (emulation type, IO suppression mode, cache
mode, and CLPR) are identical.
Although they are not required, it is recommended that the following conditions be satisfied. If they are not
satisfied, errors might occur during operation after migration is performed.
•
All migration target volumes have the same RAID level.
•
All migration target volumes have the same drive type, either SATA or non-SATA.
•
For external volumes, all volumes are in the same chassis.
When the migration source volume LUSE is migrated, each LDEV in the migration target volume will make up a
LUSE and be replaced with the migration source. Figure 1-14 shows migration of a LUSE configuration.
26
Figure 1-14 Migration of LUSE Configuration
27
2 Getting Started with the GUI
This chapter describes getting started using Tiered Storage Manger with the Web client GUI. It includes the
following sections:
•
Preparing for GUI Operations (section 2-1 )
•
Guidelines for Using the GUI (section 2-2 )
•
Logging In (section 2-3 )
•
Logging Out (section 2-4 )
•
Starting Tiered Storage Manager (section 2-5 )
•
Using Tiered Storage Manager Windows (section 2-6 )
2-1 Preparing for GUI Operations
Before starting Tiered Storage Manager operation, you must check the following:
Storage Subsystem
All the storage subsystems being managed by Tiered Storage Manager must be connected by a LAN,
and must be accessible from the Tiered Storage Manager's management server and management
clients.
A storage subsystem being used as a domain controller must be connected to the external subsystem,
and a logical device within that external subsystem must be mapped to the domain controller.
The term “domain controller” in this user’s guide refers to the StorageWorks XP12000 and the
StorageWorks XP10000.
The Device Manager server must be installed and set up in advance so that it is fully ready for use. For
more information, refer to the HP StorageWorks Command View XP Advanced Edition Device Manager
Server Installation and Configuration Guide.
Tiered Storage Manager server
The Tiered Storage Manager server must be installed and set up in advance so that it is fully ready for
use. For more information, refer to the HP StorageWorks XP Tiered Storage Manager Server Installation
and Configuration Guide.
Browser
Check the name and version of the browser you are using:
•
®
®
®
If your OS is Solaris , verify that your browser is Netscape Navigator 7.0 or Mozilla 1.4 or later.
•
If your OS is Windows®, verify that your browser is Internet Explorer 6.0 or later.
Internet Explorer with Windows® XP Service Pack
If you are using Internet Explorer with Windows® XP Service Pack 2, a problem can occur such as a popup window not opening. In such cases, do the following for the connection-target server:
1.
From the Internet Explorer Tools menu, select Pop-up Blocker, and then Pop-up Blocker Settings.
2.
Type the address (URL) of the connection-target server in the Address of Web site to allow box, and then
click Add.
If the registration processing ends successfully, the server will be added and displayed in the Allowed
sites box.
Internet Explorer and Displayed Fonts
If you specify a font size in Internet Explorer to one other than medium, it might display differently during
processing from what you have specified. When display processing finishes, the fonts will display in the
size you specified. This does not affect operations.
Language Used for the Tiered Storage Manager GUI
The language you use for the Tiered Storage Manager GUI depends on the language setting for the
browser you are using. The date format also depends on the language setting for your browser.
The time is always displayed in 24-hour format, regardless of the browser's language setting.
Getting Started with the GUI 28
Using Tiered Storage
Manager
Device Manager server
However, the language being used by the OS and browser determines the language used for the Browse
button, which is displayed in the Tiered Storage Manager version information dialog box, as well as the
language used for the license file selection dialog box, which you open by clicking the Browse button.
An error message might contain text that remains unchanged after being received from the Device
Manager server. The language type for these parts of a message is determined according to the location
of the machine where the Device Manager server is running. We recommend that you match the
language type for a Web client to the location on the server side.
2-2 Guidelines for Using Tiered Storage Manager GUI
To make sure that the Tiered Storage Manager GUI works correctly, you should avoid doing the following:
•
Do not click the Next or Back buttons of the browser.
•
Do not select an item in the menu opened by a right-click in a window.
•
Do not use a shortcut key, such as Back Space or Tab.
•
Do not select a menu-bar item in the browser window.
Note, however, that even if you inadvertently perform such an operation, the database (repository) that is used
internally by Tiered Storage Manager will not be corrupted. If you inadvertently perform one of the above
operations, do the following:
•
If your browser is Internet Explorer, click Refresh on the View menu in the browser window. This redisplays the window that was displayed immediately after login.
•
If your browser is Netscape Navigator® or Mozilla®, click Reload on the View menu from the browser
window. This re-displays the window that was displayed immediately after login.
2-3 Logging Into Tiered Storage Manager
You can log into Tiered Storage Manager in either of two ways:
•
From the login dialog box.
•
From another Command View XP AE Suite software.
2-3-1 Logging In from the Login Dialog Box
To log in to Tiered Storage Manager:
1.
Make sure you have registered the license information.
2.
Start the browser and enter the URL of the Tiered Storage Manager server in the following format:
http://Tiered-Storage-Manager-server-address:port-number/TieredStorageManager/
For Tiered-Storage-Manager-server-address, enter the IP address or host name of the Tiered Storage
Manager server. For port-number, enter the port number for Command View XP AE Suite Common Web
Service. For more information on the port number, refer to the HP StorageWorks Command View XP
Advanced Edition Device Manager Server Installation and Configuration Guide.
When the IP address is 172.16.45.1 and the port number is 23015 (default), the URL is as follows:
http://172.16.45.1:23015/TieredStorageManager/
Entering the URL displays the Tiered Storage Manager title window and login window.
3.
In the login window, enter your user ID and password.
For the User ID, enter the user name you specified in Device Manager.
When entering the password in Password, note that the password is case-sensitive. If you enter an
invalid password, an error message displays in the login dialog box. Enter the correct password.
4.
Click the Login button.
The Tiered Storage Manager Main window displays (see Figure 2-1).
29
Figure 2-1 Tiered Storage Manager Main Window
2-3-2 Logging In from another Command View XP AE Suite Software
You can log into Tiered Storage Manager by performing the Link-and-Launch operation from a Web client of
another Command View XP AE Suite software (such as Device Manager or Tuning Manager). In this case, you
do not have to specify the user ID and password.
To log into Tiered Storage Manager from another product, do the following:
1.
In the Menu-bar frame in the main window of the other Command View XP AE Suite software, click Tool.
The tool window displays.
2.
In the tool window, select Tiered Storage Manager.
2-4 Logging Out of Tiered Storage Manager
1.
In the Menu-bar of the main window, select one of the following:
•
Logout: Terminates the Web client. You cannot use other Command View XP AE Suite software that
have been started by the Link-and-Launch operation from the terminated Web client. You can, however,
continue to use other Command View XP AE Suite software that have been logged into from the start
menu.
•
Close: Closes the browser but does not log you out if you have logged into Tiered Storage Manager from
another Command View XP AE Suite software. You can continue to use other Command View XP AE
Suite software. If you close all other Command View XP AE Suite software, you will be automatically
logged out after a factory-set period of inactivity.
2.
Click the OK button on the confirmation window.
2-5 Starting Tiered Storage Manager
Once you connect to the Tiered Storage Manager server, you can start Tiered Storage Manager operations.
After logging into Tiered Storage Manager, you can start using its functions from the Main window.
To start Tiered Storage Manager:
1.
Log in to Tiered Storage Manager:
The Main window displays with the List Objects Subwindow (see Figure 2-2).
30
Getting Started with the GUI
To log out of Tiered Storage Manager:
Figure 2-2 Main Window with List Objects Subwindow
2.
Select the function you want to use from the list in the List Objects subwindow (in the Information frame
on the right) or from the list in the Object Tree (in the Navigation frame on the left).
2-6 Using Tiered Storage Manager Windows
This section describes the components of the Tiered Storage Manager windows and their associated tasks
(see Figure 2-3).
Figure 2-3 Tiered Storage Manager Window Frames
The Tiered Storage Manager windows include the following components, including frames, pop-up boxes and
subwindows. (In this manual, a panel displayed in a frame is called a subwindow.)
Menu-bar Frame (section 2-6-1 )
Use the Menu-bar frame to perform operations that affect Tiered Storage Manager as a whole, such as
logging out or displaying version information. When you select an item in this frame, the dialog box
associated with the selected item pops up.
Navigation Frame (section 2-6-2 )
31
Use the Navigation frame to select an operation in Tiered Storage Manager. When you select an
operation in this frame, the method and information frames display a subwindow that allows you to start
the operation.
Method Frame (section 2-6-3 )
Use the Method frame to select an operation. When you select an operation in this frame, the information
frame displays the associated subwindow. The Method frame may also display a pop-up dialog box.
Information Frame (section 2-6-4 )
This frame displays information required to configure various settings. Information in this frame is
displayed in table format.
Pop-up Dialog Boxes (section 2-6-5 )
Pop-up dialog boxes display additional information you need to add or know to complete an operation.
2-6-1 About the Menu-bar Frame
Use the menu-bar frame to perform operations that affect Tiered Storage Manager as a whole, such as logging
out or displaying version information. When you select a menu item in this frame, the dialog box associated
with the selected item is displayed.
You can use the following menu items from the menu-bar frame:
Tools
Click Tools to display a dialog box that allows you to see another product's window.
Logout
Click Logout to display a logout confirmation dialog box.
Close
Click Close to display a confirmation dialog box from which you can close the browser.
Profile
Click Profile to display a dialog box that provides you with user information.
About
Click About to display information on the product version and license and to register license information.
Help
2-6-2 About the Navigation Frame
Use the navigation frame to select an operation object in Tiered Storage Manager. (These are listed under
Object Tier.) When you select an operation in this frame, the method and information frames display a
subwindow that allows you to start the operation.
Refresh
Click Refresh at the top of the navigation frame to refresh information and re-open the navigation frame.
Tiered Storage Manager
Select Tiered Storage Manager to display a subwindow in the method and information frames that allows
you to start Tiered Storage Manager.
Storage Domains
Select Storage Domains to display a subwindow in the method and information frames that allows you to
start creating and managing storage domains.
Storage Tiers
Select Storage Tiers to display a subwindow in the method and information frames that allows you to start
creating and managing storage tiers.
Migration Groups
Select Migration Groups to display a subwindow in the method and information frames that allows you to
start creating and managing migration groups.
32
Getting Started with the GUI
Click Help to display the Tiered Storage Manager online help.
Tasks
Select Tasks to display a subwindow in the method and information frames that allows you to start
managing tasks.
2-6-3 About the Method Frame
Use the Method frame to select an operation. When you select an operation in this frame, the information
frame displays the associated subwindow. The Method frame may also display a pop-up dialog box.
The Method frame includes the following components:
Subwindow Name
The name of the subwindow displays in the top left corner.
Method Name
The method name displays under the subwindow name. In this manual, a panel item used to start an
operation is called a method. When you select a method, the information frame displays a new
subwindow or pop-up dialog box associated with the method you selected.
Object Address
The address of the operation object you selected in the Navigation frame displays above the name of the
subwindow in the Information frame. The address reflects the hierarchical sequence in the Navigation
frame, with Tiered Storage Manager as the root object, as shown in the following example:
Tiered Storage Manager > Storage Domains
Information Table
The Information table displays Tiered Storage Manager management information in table format. The
table includes text (including links), graphics, buttons and related items.
2-6-4 About the Information Frame
Use this frame to display information required to configure various settings. Information in this frame is
displayed in table format.
Figure 2-4 Information Frame with Subwindow
The Information frame includes the following components:
Object Address
The address of the operation object you selected in the Navigation frame displays above the name of the
subwindow in the Information frame. The address reflects the hierarchical sequence in the Navigation
frame, with Tiered Storage Manager as the root object, as shown in the following example:
Tiered Storage Manager > Storage Domains
33
Subwindow Name
The name of the subwindow displays in the top left corner.
Help
Click Help to display more detailed information about the relevant frame.
2-6-5 About Pop-up Dialog Boxes
Pop-up dialog boxes display detailed information or commands for performing operations with Tiered Storage
Manager, as shown in Figure 2-5.
Figure 2-5 Pop-up Dialog Box
Pop-up Dialog Boxes include the following components:
Object Address
The address of the operation object you selected in the Navigation frame displays above the name of the
pop-up dialog box. The address reflects the hierarchical sequence in the Navigation frame, with Tiered
Storage Manager as the root object, as shown in the following example:
Dialog Box Name
The name of the pop-up dialog box displays at the top left. (The name of the pop-up dialog box in Figure
2-5 is Storage Domain.)
Help
Click Help to display more detailed information about the relevant dialog box.
34
Getting Started with the GUI
Tiered Storage Manager > Storage Domains
3 Creating a Storage Domain
This chapter describes how to create a storage domain.
•
About Storage Domains (section 3-1 )
•
Storage Domains and Migration Groups (section 3-2 )
•
Creating a Storage Domain (section 3-3 )
For information on displaying a list of storage domains, changing attribute information and deleting storage
domains, see 8 .
3-1 About Storage Domains
A storage domain is a grouping of one or more of the following subsystems:
•
StorageWorks XP12000
•
StorageWorks XP10000
•
Storage subsystem externally connected to StorageWorks XP12000
•
Storage subsystem externally connected to StorageWorks XP10000
Tiered Storage Manager operates and manages each storage domain, so migration is performed between
volumes in the same storage domain.
Only one storage domain can be created for each domain controller. In other words, a single domain controller
is used in one Tiered Storage Manager server.
You can use multiple domain controller on a single Tiered Storage Manager server. Each storage domain
name must therefore be unique within its Tiered Storage Manager server.
You cannot delete or change the attribute information of a storage domain while the status of a migration task
is Active or Standby.
If you create or delete a storage domain, Tiered Storage Manager automatically refreshes information. For
information on the Refresh operation, see 1-7 Performing a Refresh.
A Partition Storage Administrator (PSA) cannot create a storage domain for a domain controller that manages
Storage Logical Partition (SLPR) operations.
Only the System Administrator and Storage Administrator can create, change, or delete a storage domain. The
System Administrator, Storage Administrator, and Guests who have access privileges can reference storage
domains.
You can create a storage domain by specifying the following attributes:
•
Storage domain name.
•
Description.
•
Model and serial number of the domain controller , or domain controller name.
When you create a new storage domain, information is refreshed.
3-2 Storage Domains and Migration Groups
A migration group is a group of volumes that are collectively migrated in one operation. This means that
volumes in a migration group have the same characteristics (volumes which store databases for a certain
business system, etc. ).To create a migration group, use search conditions to search the volumes in a storage
domain or in a storage tier, and then select and register the desired volumes from those found.
Multiple migration groups can be created in a storage domain. An unlimited number of storage domains can be
created in a migration group.
Permission to perform migration can be set for any migration group. If you want to protect a group of volumes
from being accidentally migrated, create a migration group that contains these volumes, and then specify No
for Can Migrate.
Note that when a storage domain is deleted, the migration groups within that domain are also deleted. Volumes
and migration tasks within the deleted migration group, however, are not deleted.
Creating a Storage Domain 35
3-3 Creating a Storage Domain
You can create a storage domain as a migration range. When creating a storage domain, you must specify a
domain controller. When there are no addable domain controllers, an error is displayed.
If an attempt to create a storage domain fails, re-create the storage domain. After a storage domain is created,
Tiered Storage Manager automatically starts to perform a refresh. Sometimes the refresh fails, but if this
happens, perform the refresh again.
To create a storage domain:
1.
In the navigation frame, select the Storage Domains object.
The method frame displays the Create Storage Domain method.
2.
Select the Create Storage Domain method in the method frame.
The Create Storage Domain pop-up window displays, as shown in Figure 3-1.
Figure 3-1 Creating a Storage Domain Pop-up Window
3.
Enter the following information in the Create Storage Domain pop-up window:
Name (required)
Enter a storage domain name of up to 75 bytes of UTF-8 characters.
You can use non-ASCII characters, and the following ASCII characters:
A to Z a to z
0 to 9
-
_
.
@ and a single-byte space
Do not use spaces for the first or last character of the name.
An error occurs if:
You do not enter a Name.
The character string for Name is too long.
You enter an invalid character for Name.
Select a domain controller (domain control storage subsystem). Domain controllers (domain control
storage subsystems) that perform SLPR operations with PSA permissions are not displayed.
Description
Enter a description of the storage domain you are creating of up to 500 bytes of UTF-8 characters.
If you enter 501 bytes or more in UTF-8 encoding for Description, an error occurs.
4.
Click the OK button.
The Create Storage Domain-Processing pop-up window displays (clicking the x (Close) button at the top
right corner of the screen does not stop processing). When processing ends, a new storage domain is
created and the Create Storage Domain-Result pop-up window displays the execution result.
36
Creating a Storage Domain
Domain Controller
5.
Click the Close button.
Information about the storage domain is refreshed, and the navigation frame refreshes. If a storage
domain list was displayed in the information frame, it is updated.
About UTF-8 Characters
The maximum number of characters you can enter in the Name and Description columns is limited to the
specified number of permitted bytes in UTF-8 encoding. One ASCII character equals 1 byte in UTF-8.
Other characters are from 1 to 3 bytes in UTF-8.
37
4 Creating a Storage Tier
This chapter describes creating a storage tier and includes the following sections:
•
About Storage Tiers (section 4-1 )
•
Storage Tier Operations (section 4-2 )
•
Creating a Storage Tier by Selecting the Storage Tiers Object from a Storage Domain (section 4-3 )
•
Creating a Storage Tier Based on a Storage Domain Volume Search (section 4-4 )
For information about viewing a list of storage tiers, searching volumes and changing attribute information, see
9.
4-1 About Storage Tiers
Set filter conditions for target volumes (such as the array group or RAID level) as the definition of certain
storage tiers. This allows you to select volumes that match those filter conditions for the migration destination
when you perform a migration. For more information on volume filter conditions, see 5 . Applying Filter
Conditions.
You can create multiple storage tiers within a storage domain. The maximum number of storage tiers you can
create within a single storage domain is 100. If you create 101 or more storage tiers, operation of Tiered
Storage Manager cannot be guaranteed.
When you create a storage tier, or when you update an existing storage tier, the storage tier is defined with the
specified volume filter conditions.
•
Define by using conditions that can be used for the definition of storage tiers. This means that LDEV
numbers or volume statuses cannot be used to define storage tiers.
•
Define by using and or or for all conditions.
Examples of creating a storage tier are as follows:
Example 1: When creating a storage tier for each storage subsystem
Select Storage Subsystem from the volume filter conditions. If you select StorageWorks
XP12000/XP10000 as a filter condition, StorageWorks XP12000/XP10000 is created as the storage
tier.
Example 2: When creating a storage tier for a CLPR
Select CLPR from the volume filter conditions. If you set CLPR1 as filter condition 1 and CLPR0 as
filter condition 2, and then search volumes on the combination of conditions 1 and 2 by OR, all
volumes in CLPR1 and 2 are displayed. Every volume can be created in a separate storage tier. If
you set CLPR1 as a filter condition, a storage tier for CLPR1 is created.
Example 3: When creating a storage tier for an array group
Select Array group from the volume filter conditions. If you set Array group 1-1-1 for filter condition 1,
Array group 1-2-1 for filter condition 2 and Array group 1-2-2 for filter condition 3, and then search
volumes on the combination of condition 1-3 by OR, all volumes in array group 1-1-1, 1-2-1 and 1-2-2
are displayed. All the volumes can be created as a storage tier. If you set Array group 1-2-2 as a filter
condition, a storage tier for Array group 1-2-2 is created.
A storage tier name must be unique within its storage domain. When creating a storage tier that includes a
LUSE volume, make sure that the LUSE volume is in no more than one storage tier. If the LUSE volume is in
more than one storage tier, see Table 12-3.
Volumes from one storage tier can also be included in another storage tier. Even if a volume filtered by volume
filter conditions is different, there is no problem.
Figure 4-1 illustrates the relationship between storage tiers and volumes.
Creating a Storage Tier 38
Figure 4-1 Storage Tiers and Volumes Relationship
When you delete a storage domain, the storage tiers within the deleted storage domain are also deleted at the
same time. Volumes within the storage tiers and migration tasks that are related to the storage tiers are not
deleted, however.
When an operational targeted storage tier belongs to a storage domain that is being refreshed, you cannot
operate the storage tier. In addition, if the status of a migration task of an operation target storage tier, which is
specified as the migration target, is Active or Standby, you cannot delete the storage tier or change its
attribute information.
4-2 Storage Tier Operations
Storage tier operations include creating a storage tier, deleting a storage tier, referencing the list of storage
tiers, referencing properties of a storage tier, changing attribute information for a storage tier, and searching
volumes within a storage tier.
Only the System Administrator and Storage Administrator can create, change attribute information for a storage
tier, or delete a storage tier. The System Administrator, Storage Administrator, and Guests who have access
privileges can reference storage tiers.
If the storage domain containing the storage tier to be operated is currently refreshing, you cannot operate the
storage tier. In addition, you cannot create or delete a storage tier or change attribute information for a storage
tier while the status of a migration task is Active or standby.
There are two methods for creating a storage tier:
•
Creating a storage tier by defining its name and filter conditions in advance.
See 4-3 Selecting a Storage Tier Object within a Storage Domain and Creating a Storage Tier.
•
Searching volumes and then creating a storage tier from the search result
See 4-4 Creating a Storage Tier from the Search Result for Volumes within a Storage Domain.
For each storage tier, you can specify a storage tier name, filter conditions, and description of the storage
tier. The storage tier name must be unique within its storage domain. You can change the filter conditions
for a storage tier by changing the attribute information.
4-3 Creating a Storage Tier by Selecting Storage Tiers Object
from a Storage Domain
You can create a storage tier by selecting the Storage Tiers object from a storage domain. When using this
method, first determine the name of the storage tier, and then create the storage tier by specifying conditions
for filtering volumes.
To create a storage tier by selecting the Storage Tiers object from a storage domain:
1.
In the navigation frame, select the Storage Tiers object.
The method frame displays the Create Storage Tier method.
2.
Select the Create Storage Tier method.
The Create Storage Tier pop-up window displays as shown in Figure 4-2.
39
Creating a Storage Tier
Figure 4-2 Creating a Storage Tier Pop-up Window
3.
Enter the information required to create a storage tier in the Create Storage Tier pop-up window.
Name (required)
Enter a storage tier name. The storage tier name must be unique within that storage domain and up
to 75 bytes of UTF-8 characters.
You can use non-ASCII characters, and the following ASCII characters:
A to Z a to z 0 to 9
-
_
.
@ and a single-byte space
You cannot use spaces for the first or last character of the name.
An error occurs if:
You do not enter a Name.
The character string for Name is too long.
You enter an invalid character for Name.
Description
Enter a description of the storage tier you are creating up to 500 bytes of UTF-8 characters.
If you enter 501 bytes or more in UTF-8 encoding for Description, an error occurs.
4.
Click the Edit button.
The Edit Filter Condition pop-up window displays, allowing you to specify filter conditions.
40
Figure 4-3 Filter Condition Pop-up Window
5.
Specify filter conditions by entering the following information:
Search Type
Select And or Or as the search type.
Condition n#
Specify the volume filter conditions. You can select an array group name, disk type, and other
conditions from a pull-down menu.
To add a filter condition, click the Add Condition button.
To remove a filter condition, click the Remove button.
To re-order the filter conditions, click the
or the
button.
#
n indicates the filter condition number. For example, if Condition 1 is displayed, clicking the Add
Condition button displays Condition 2 as the added filter condition.
6.
Click the Show Volume List button.
The Filter Condition pop-up window redisplays, with a list of volumes that meet the conditions you just
specified, as shown in Figure 4-4.
Figure 4-4 Filter Condition Pop-up Window Displaying List of Volumes
If Volume Status for a volume shows Used in the list of volumes, you cannot migrate that volume.
7.
Click the OK button.
41
8.
Click the OK button.
A dialog box displays asking whether you want to complete creating the storage tier.
9.
Click OK to create a new storage tier.
The results are displayed in the Create Storage Tier-Result pop-up window.
10.
Click the Close button.
About UTF-8 Characters
The maximum number of characters you can enter in the Name and Description columns is limited to the
specified number of permitted bytes in UTF-8 encoding. One ASCII character equals 1 byte in UTF-8.
Other characters are from 1 to 3 bytes in UTF-8.
4-4 Creating a Storage Tier Based on Results of a Storage
Domain Volume Search
To create a storage tier based on the results of a storage domain volume search:
1.
In the navigation frame, select the Storage Domains object.
The information frame displays the List Objects-Storage Domains subwindow.
2.
In the List Objects-Storage Domains subwindow, select the Storage Domain Name that identifies the
storage domain to be searched for the volume.
The method frame displays the Storage Domain Name subwindow.
3.
In the Storage Domain Name subwindow, select the Search Volumes method.
The information frame displays the Search Volumes-Storage Domain Name subwindow as shown in
Figure 4-5.
Figure 4-5 Search Volumes-Storage Domain Name Subwindow
4.
Specify the volume search filter conditions by entering the following information.
Search Type
Select And or Or as the search type.
Condition n#
Specify the volume filter conditions. You can select an array group name, disk type, and other
conditions from a pull-down menu.
To add a filter condition, click the Add Condition button.
To remove a filter condition, click the Remove button.
42
Creating a Storage Tier
The Filter Condition pop-up window closes. The Create Storage Tier pop-up window displays with the
filter conditions you just specified.
To re-order the filter conditions, click the
or the
button.
#
n indicates the filter condition number. For example, if Condition 1 is displayed, clicking the Add
Condition button displays Condition 2 as the added filter condition.
5.
In the Search Volumes-Storage Domain Name subwindow, click the Show Volume List button.
The Search Volumes-Storage Domain Name subwindow redisplays, and includes a list of volumes that
meet the filter conditions you just specified.
If Volume Status for a volume shows Used in the list of volumes, you cannot select the volume as a
migration target volume.
6.
Click the Create Storage Tier button.
The Create Storage Tier-Storage Domain Name pop-up window displays as shown in Figure 4-6.
Figure 4-6 Create Storage Tier-Storage Domain Name Pop-up Window
7.
Enter the information required to create a storage tier in the Create Storage Tier-Storage Domain Name
pop-up window. The Filter Condition area displays the volume filter conditions you just specified.
Name (required)
Enter a storage tier name. The storage tier name must be unique within that storage domain.
You can use non-ASCII characters, and the following ASCII characters:
A to Z a to z 0 to 9 - _ . @ and a single-byte space
You cannot use spaces for the first or last character of the name.
When creating a storage tier, an error occurs if:
You do not enter a Name.
You enter a character string for Name that is too long.
You enter an invalid character for Name.
Description
Enter a description for the storage tier you are creating up to 500 bytes of UTF-8 characters.
If you enter 501 bytes or more in UTF-8 encoding for Description, an error occurs.
8.
Click the OK button.
A dialog box displays asking if you want to complete creating the storage tier.
9.
Click the OK button in the message dialog box to create a new storage tier. The results are displayed in
the Create Storage Tier-Result pop-up window.
10.
Click the Close button.
About UTF-8 Characters
43
The maximum number of characters you can enter in the Name and Description columns is limited to the
specified number of permitted bytes in UTF-8 encoding. One ASCII character equals 1 byte in UTF-8.
Other characters are from 1 to 3 bytes in UTF-8.
44
Tiered Storage Manager allows you to specify and apply filter conditions to help you identify and classify data
you are migrating more easily. You can specify up to 30 volume filter conditions, using various types of
attributes of volumes in a storage subsystem as condition elements.
For volume filter conditions, the condition elements that can be used in a Web client are as follows:
•
Creating a storage tier in a storage domain.
Specify volume filter conditions when creating a storage tier. These become part of the definition of the
storage tier. You can change the definitions later, by changing the filter conditions.
•
Selecting a migration target volume from the storage tier.
Specify volume filter conditions during a migration operation. Tiered Storage Manager selects a migration
target candidate volume that matches the filter conditions, from the storage tier.
•
Viewing a list of volumes in a storage domain or storage tier.
You can view a list of volumes that match the specified filter conditions. You can check volume locations
or attributes from the list.
You can use the following condition elements from the Web client:
•
Conditions where only one condition element is specified.
•
Conditions where multiple condition elements are combined by AND.
•
Conditions where multiple condition elements are combined by OR.
5-1-1-1-1Notes on volume filter conditions
The following are notes on volume filter conditions.
•
When creating a storage tier, you cannot use the LDEV, the volume status, the host, or the volume lock
status as filter conditions.
•
If you specify server.checkOutVolumeRange = false in the properties file (server.properties),
single-byte spaces and upper - and lower-case characters are used as volume filter conditions exactly as
they are entered. For details about the server.properties file, refer to the HP StorageWorks XP Tiered
Storage Manager Server Installation and Configuration Guide.
Table 5-1 Elements of Filter Conditions Specified When Filtering Volumes
Table 5-1 Filtering Condition Elements and Values (1 of 3)
Condition
Elements
Operators
Values
Filter by LDEV
LDEV
is
Filter by volume status
Volume Status
is
Filter by host name of the
Host
is
Specify two hexadecimal numbers less than 0x100, delimited by
a colon (:). You cannot specify a blank character before or after
a colon.
To specify multiple LDEVs, delimit them by using commas (,)
or specify an LDEV range with a hyphen (-).
You cannot specify an LDEV by using a mixture of commas (,)
and hyphens (-).
If you use commas (,), you can specify a maximum of 100
LDEVs. If you use hyphens (-), you cannot specify a multiple of
LDEV ranges.
Example 1:
The following example specifies LDEV 0:0A and 0:0B.
0:0A,0:0B
Example 2:
The following example specifies LDEV 0:0A to 0:0C.
0:0A–0:0C
Select a volume status from the drop-down list. You cannot
specify a volume in a Used status as the migration target
volume. The displayed items are:
• Used: The volume cannot be used as the migration
destination.
• Unused: The volume can be used as the migration
destination.
Specify a character string up to 256 bytes in length (UTF8
Purpose
Applying Filter Conditions 45
Creating a Storage Tier
5 Applying Filter Conditions
Table 5-1 Filtering Condition Elements and Values (1 of 3)
Purpose
Condition
Elements
application server (search for
volumes used by a host)
Operators
Values
is not
starts with
contains
conversion) You cannot specify blank characters.
Multiple items cannot be specified.
You cannot use a host name that is not registered in Device
Manager.
If is or is not is specified:
You cannot specify space characters at the start or end of this
item.
Filter by storage subsystem
name (search for volumes
within a storage subsystem)
Subsystem
is
is not
Filter by the vendor name of
the storage subsystem
Vendor
is
is not
If starts with or contains is specified:
If starts with is specified, space characters at the end are
included in the filter string.
If contains is specified, space characters at the start or end are
included in the filter string.
Select a storage subsystem from the drop-down list. The dropdown list displays storage subsystems in the following format:
storage-subsystem-name
If the subsystem name has not been or cannot be registered in
Device Manager, it is displayed in the drop-down list in productname#serial-number format.
Select the vendor name of a storage subsystem from the dropdown list. The list displays storage subsystems in the following
format:
storage-subsystem-vendor-name
Filter by the model name for
display of the storage
subsystem
Subsystem
Display Type
is
is not
Filter by storage subsystem
serial number (volume
search in storage
subsystem)
Subsystem
Serial Number
is
is not
starts with
contains
Filter by controller array
group name
Filter by array group name
Controller Array
Group
Array Group
is
is not
starts with
contains
is
Since storage subsystem names are not case - sensitive, the
same vendor names may be displayed more than once in the
drop-down list , but when you select such a vendor name, the
same results are displayed, regardless of the case of the
vendor name selected
Select the subsystem display model names of a storage
subsystem from the drop-down list. The model name displayed
in this list corresponds to displayArrayType in Device Manager.
The subsystem display model names that are displayed depend
on the settings in Device Manager.
Specify a character string up to 75 bytes in length (UTF8
conversion). You cannot specify blank characters.
Multiple items cannot be specified.
If is or is not is specified:
You cannot specify space characters at the start or end of this
item.
If starts with or contains is specified:
If starts with is specified, space characters at the end are
included in the filter string.
If contains is specified, space characters at the start or end are
included in the filter string.
Up to 75 bytes, after conversion to UTF-8.
If is or is not is specified:
To specify multiple elements, delimit them by using commas
(,). The maximum number of elements separated by commas
(,) is 100. Space characters at the start or end of the controller
array group name are disregarded.
If starts with or contains is specified:
Multiple elements cannot be specified.
If starts with is specified, space characters at the end are
included in the filter string.
If contains is specified, space characters at the start or end are
included in the filter string.
Specify a character string up to 75 bytes in length (UTF8
46
Table 5-1 Filtering Condition Elements and Values (1 of 3)
Condition
Elements
Operators
Values
is not
starts with
contains
conversion).
Filter by RAID level and
RAID drive setting
RAID Level
is
is not
Filter by disk type
Disk Type
is
is not
Filter by volume capacity
Capacity
>
>=
<
<=
=
<>
Filter by volume lock status
Volume Lock
Status
is
Filter by emulation type
Emulation Type
is
is not
If starts with or contains is specified:
To specify multiple elements, delimit them by using commas
(,). You can specify a maximum of 100 elements. Space
characters at the start or end of the array group name are
disregarded.
If starts with or contains is specified:
Multiple elements cannot be specified.
If starts with is specified, space characters at the end are
included in the filter string.
If contains is specified, space characters at the start or end are
included in the filter string.
Level
Select a RAID level from the drop-down list. The displayed
items are:
• RAID0
• RAID0+1
• RAID1
• RAID1+0
• RAID5
• RAID6
Drive Conf.
Select a RAID drive setting from the drop-down list. You cannot
specify this value if the RAID level is not being used as a filter
condition.
The displayed items change according to the specified RAID
level. For example, for RAID0+1, the following items are
displayed:
• 2D+2P
• 3D+3P
• 4D+4P
• 5D+5P
• 6D+6P
• 7D+7P
• 8D+8P
Select a disk type from the drop-down list. The displayed items
are:
• FC
• AT
• BD
63
Enter an integer from 0 to 9223372036854775807 (2 -1) to
indicate the capacity of the volume.
When specifying volume capacity, you must also specify the
unit of capacity.
Select the unit of the volume capacity from the drop-down list.
The displayed items are:
• KB
• MB
• GB
• TB
Select a volume lock status from the drop-down list. When
Locked is displayed, it means that there is some kind of
restriction on the volume.
• Locked
• Unlocked
Select a displayed emulation type from the drop-down list. The
displayed items are:
47
Applying Filter Conditions
Purpose
Table 5-1 Filtering Condition Elements and Values (1 of 3)
Condition
Elements
Purpose
Operators
Values
•
•
•
•
•
•
•
•
Filter by SLPR number
SLPR Number
Filter by CLPR number
CLPR Number
is
is not
is
is not
OPEN-V
OPEN-L
OPEN-M
OPEN-E
OPEN-K
OPEN-9
OPEN-8
OPEN-3
Enter a number from 0 to 31 to indicate an SLPR number.
Enter a number from 0 to 31 to indicate a CLPR number.
NOTE:
•
•
The range of values displayed in the drop-down list is the range of values in the storage domain. If a value that does
not exist in the storage domain is set as a filter condition on the CLI, or if a value no longer exists after the storage
configurations are changed, that value is displayed in the drop-down list.
If the storage subsystem name has not been or cannot be registered in Device Manager, the same subsystem names
might be displayed in the drop-down list of the subsystem. In this case, even if you click a subsystem among those
subsystems, the same search results will be displayed.
48
6 Creating a Migration Group
This chapter describes creating a migration group and includes the following sections:
•
About Migration Groups (section 6-1 )
•
Creating a Migration Group by Selecting the Object in a Storage Domain (section 6-2 )
•
Creating a Migration Group from Storage Domain Volume Searches (section 6-3 )
•
Creating a Migration from Storage Tier Volume Searches (section 6-4 )
For information on how to display a list of migration groups, change attribute information, and add volumes, see
10 .
A migration group is a group of migration source volumes that have the same characteristics (such as disk
type, RAID level, and array group) and are related to the same job.
A migration group is created by specifying filter conditions, and then registering the volumes that match those
conditions. For details on volume filter conditions, see 5 .
Volumes from one migration group cannot be included in another migration group. Volumes from a migration
group can be included in a storage tier, however.
You can specify whether a migration group is eligible for migration. If you have created a migration group that
contains a group of volumes that must not be migrated, you can prevent accidental migration by setting Can
Migrate to No.
When you delete a storage domain, the migration groups within the deleted storage domain are also deleted.
Volumes and migration tasks within the deleted migration group are not deleted, however.
If a storage domain containing a migration group is currently refreshing data, you cannot operate that migration
group. You cannot delete a migration group, add or delete a volume of a migration group, or change attribute
information for a migration group while the status of a migration task is Active or Standby.
Only the System Administrator and Storage Administrator can create, change, or delete a migration group, or
add or delete a volume. The System Administrator, Storage Administrator, and Guests who have access
privileges can reference migration groups.
You can create a migration group within a storage domain. There is no restriction on the number of migration
groups you can create within a single storage domain.
For each migration group, you can specify a migration group name, description of the migration group, and a
status indicating whether migration is enabled.
There are three methods for creating a migration group:
•
Creating an empty migration group without any volumes before adding volumes to it.
You can even create an empty migration group that does not contain any volumes. In this case, you must
add volumes after you create the migration group. See Section 6-2 .
•
Creating a migration group by searching volumes within a storage domain.
See Section 6-3 .
•
Creating a migration group by searching volumes within a storage tier.
See Section 6-4 .
6-2 Creating a Migration Group by Selecting Object in a Storage
Domain
You can create a migration group by selecting the Migration Groups object in a storage domain. First create an
empty migration group, and then click the Add Volume button to add a volume. For more information on the
Add Volume button and how to add a volume, see 10-4 .
To create a migration group by selecting the Migration Groups object in a storage domain:
1.
In the navigation frame, select the Migration Groups object in the storage domain in which you want to
create a migration group.
2.
In the method frame, select the Create Migration Group method.
Creating a Migration Group 49
Applying Filter Conditions
6-1 About Migration Groups
The Create Migration Group pop-up window displays, as shown in Figure 6-1.
Figure 6-1 Create Migration Group Pop-up Window
3.
Enter the following information for the migration group you are creating in the Create Migration Group
pop-up window:
Name (required)
Enter the migration group name.
The migration group name must be unique within the storage domain. You can check other migration
group names that exist within the same storage domain, by clicking the Show All Migration Groups
button.
You can enter up to 75 bytes of UTF-8 characters.
You can use non-ASCII characters, and the following ASCII characters:
A to Z a to z 0 to 9 - _ . @ and a single-byte space
You cannot use spaces for the first or last character of the name.
When creating a migration group, an error occurs if:
You have not entered a Name.
The character string you entered for Name is too long.
You entered an invalid character for Name.
Can Migrate
Specify whether or not the migration group can be migrated.
Yes: The migration group can be migrated.
No: The migration group cannot be migrated.
Usually, select YES. You can prevent a group from being migrated accidentally by specifying No for a
group you do not want to migrate.
Description
Enter a description for the migration group you are creating up to 500 bytes of UTF-8 characters.
If you enter 501 bytes or more in UTF-8 encoding for Description, an error occurs.
4.
Click the OK button.
A new migration group is created. The results are displayed in the Create Migration Group-Result pop-up
window.
5.
Click the Close button.
UTF-8 Encoding
50
For Name and Description, the number of entered characters is limited by the specified number of bytes
in UTF-8 encoding. In UTF-8, ASCII characters are 1 byte and non-ASCII characters are from 1 to 3
bytes.
6-3 Creating a Migration Group based on Storage Domain
Volume Searches
To create a migration group based on the result of a storage domain volume search, enter the following
information:
1.
2.
In the navigation frame, select the Storage Domain Name object for the storage domain in which you
want to create a migration group.
In the method frame, select the Search Volumes method.
Creating a Migration Group
The information frame displays the Search Volumes-Storage Domain Name subwindow as shown in
Figure 6-2.
Figure 6-2 Search Volumes-Storage Domain Name Subwindow
3.
Specify the filter conditions you want to apply to the storage domain volume search:
Search Type
Select And or Or as the search type.
#
Condition n
Specify the volume filter conditions. You can select an LDEV, a host name, and other conditions from
a pull-down menu.
To add a filter condition, click the Add Condition button.
To remove a filter condition, click the Remove button.
To re-order the filter conditions, click the
or the
button.
#
n indicates the filter condition number. For example, if Condition 1 is displayed, clicking the Add
Condition button displays Condition 2 as the added filter condition.
4.
Click the Show Volume List button in the Search Volumes-Search Volumes-Storage Domain Name
subwindow.
The Search Volumes-Search Volumes-Storage Domain Name subwindow redisplays, including a list of
volumes that meet the filter conditions you just specified.
If Volume Status for a volume shows Used in the list of volumes, you cannot migrate that volume.
5.
Click the Create Migration Group button.
The Create Migration Group-Search Volumes-Storage Domain Name pop-up window displays as shown
in Figure 6-3.
51
Figure 6-3 Create Migration Group-Storage Domain Name Pop-up Window
6.
Enter the following information for the migration group you are creating:
Name (required)
Enter the migration group name.
The migration group name must be unique within the storage domain. You can check other migration
group names that exist within the same storage domain, by clicking the Show All Migration Groups
button.
You can enter up to 75 bytes of UTF-8 characters.
You can use non-ASCII characters, and the following ASCII characters:
A to Z a to z 0 to 9 - _ . @ and a single-byte space
You cannot use spaces for the first or last character of the name.
When creating a migration group, an error occurs if:
You have not entered a Name.
You entered a character string for Name that is too long.
You entered an invalid character for Name.
Can Migrate
Specify whether or not the migration group you created can be migrated.
Yes: The migration group can be migrated.
No: The migration group cannot be migrated.
Usually, select YES. You can prevent a group from being migrated accidentally by specifying No for a
group you do not want to migrate.
Description
Enter a description for the migration group you are creating up to 500 bytes of UTF-8 characters.
If you enter 501 bytes or more in UTF-8 encoding for Description, an error occurs.
7.
Select the volumes you want to add to a migration group.
From Volume List, select the volumes you want to add to a migration group. To select all the displayed
volumes, select Select All. To cancel all the selected volumes, select Unselect All.
8.
Click the Next button.
The Create Migration Group-Confirmation pop-up window displays, allowing you to confirm the settings
you specified for the migration group you created. See Figure 6-4.
52
Figure 6-4 Create Migration Group-Confirmation Pop-up Window
9.
Click the OK button.
A new migration group is created and the results are displayed in the Create Migration Group-Result popup window.
Click the Close button.
UTF-8 Encoding
For Name and Description, the number of entered characters is limited by the specified number of bytes
in UTF-8 encoding. In UTF-8, ASCII characters are 1 byte and non-ASCII characters are from 1 to 3
bytes.
6-4 Creating a Migration Group based on a Storage Tier Volume
Search
To create a migration group based on the result of a storage tier volume search, do the following:
1.
2.
In the navigation frame, select the Storage Tier Name object for the storage tier in which you want to
create a migration group.
In the method frame, select the Search Volumes method.
The information frame displays the Search Volumes-Storage Tier Name subwindow as shown in Figure
6-5.
53
Creating a Migration Group
10.
Figure 6-5 Search Volumes-Storage Tier Name Subwindow
3.
Specify the filter conditions for the volume search:
Search Type
Select And or Or as the search type.
Condition n#
Specify the volume filter conditions. You can select an LDEV, a host name, and other conditions from
a pull-down menu.
To add a filter condition, click the Add Condition button.
To remove a filter condition, click the Remove button.
To re-order the filter conditions, click the
or the
button.
#
n indicates the filter condition number. For example, if Condition 1 is displayed, clicking the Add
Condition button displays Condition 2 as the added filter condition.
4.
Click the Show Volume List button in the Search Volumes-Storage Domain Name subwindow.
The Search Volumes-Storage Domain Name subwindow redisplays, including a list of volumes that meet
the filter conditions you just specified.
If Volume Status for a volume shows Used in the list of volumes, you cannot select the volume as a
migration target volume.
5.
Click the Create Migration Group button.
The Create Migration Group-Storage Tier Name pop-up window displays as shown in Figure 6-6.
54
Figure 6-6 Create Migration Group-Storage Tier Name Pop-up Window
6.
Enter information for the migration group you are creating in the Create Migration Group-Storage Domain
Name pop-up window, enter the necessary information.
Name (required)
The migration group name must be unique within the storage domain. You can check other migration
group names that exist within the same storage domain, by clicking the Show All Migration Groups
button.
You can enter up to 75 bytes of UTF-8 characters.
You can use non-ASCII characters following ASCII characters:
A to Z a to z 0 to 9 - _ . @ and a single-byte space
You cannot use spaces for the first or last character of the name.
When creating a migration group, an error occurs if:
You have not entered a Name.
The character string you entered for Name is too long.
You entered an invalid character for Name.
Can Migrate
Specify whether or not the migration group you created can be migrated:
Yes: The migration group can be migrated.
No: The migration group cannot be migrated.
Usually, select YES. You can prevent a group from being migrated accidentally by specifying No for a
group you do not want to migrate.
Description
Enter a description for the migration group you are creating.
You can enter up to 500 bytes of UTF-8 characters.
If you enter 501 bytes or more in UTF-8 encoding for Description, an error occurs.
7.
Select the volumes you want to add to a migration group.
From Volume List, select the volumes you want to add to a migration group. To select all the displayed
volumes, select Select All. To cancel all the selected volumes, select Unselect All.
8.
Click the Next button.
The Create Migration Group-Confirmation pop-up window displays, allowing you to confirm the settings
specified for the migration group to be created. See Figure 6-7.
55
Creating a Migration Group
Enter the migration group name.
Figure 6-7 Create Migration Group-Confirmation Pop-up Window
9.
Click the OK button.
A new migration group is created and the results are displayed in the Create Migration Group-Result popup window.
10.
Click the Close button.
UTF-8 Encoding
For Name and Description, the number of entered characters is limited by the specified number of bytes
in UTF-8 encoding. In UTF-8, ASCII characters are 1 byte and non-ASCII characters are from 1 to 3
bytes.
56
7 Performing a Migration
This chapter describes performing a migration, which includes creating a migration task and then executing it.
•
About Migration Tasks (section 7-1 )
•
Migration Task Operations (section 7-2 )
•
Steps for Performing a Migration (section 7-3 )
For more information on searching for a migration task, viewing detailed information about a migration task,
and executing or deleting a migration task, see 10 .
7-1 About Migration Tasks
A migration task is the migration (movement of data from the migration source volume to the migration target
volume) of each volume within a migration group.
A migration task is created by specifying the correspondence between the migration source volumes within the
migration group and the migration target volumes that match the volume search result for that storage tier, as
well as their options.
There is no restriction to the number of migration tasks you can create within the same storage domain.
When a storage domain that contains the operation-target storage tiers is being refreshed, you cannot operate
those storage tiers.
Migration tasks have the following attributes. You can check the attributes in the detailed information for a
migration task.
•
Task ID and a description statement about the corresponding migration task.
•
A user who registers the migration task, and a user group of the user.
•
Status of the migration task.
•
Creation time, execution request time, and end time.
•
Storage domain, migration group, and migration target storage tier.
•
Total capacity of the data to be migrated.
•
Progress of migration (including the progress of each volume).
When you create a migration task, it is given a task ID (TK########). The character string ######## consists
of the time that the migration task was created and the serial number. The value ######## is obtained by
adding the time and serial number, and then converting the result to base 36.
7-1-2 Status of Migration Tasks
A migration task can be in any of a number of statuses. By specifying the task ID, date, or status, you can find
out whether the corresponding migration task has finished (the status of the migration task is Success,
Failure, or Cancel) and its current status.
On a Web client, the status of a migration task is displayed only by an icon, or by an icon and the status
enclosed in parenthesis. If the status is Failure, it might be displayed by an icon, and
Failure.MigrationFailure or Failure.DataErasureFailure. For more information about icon
meanings and sub-statuses, see GUI Help.
On a CLI client, you can use the GetTasks command to check the status of a migration task. For more
information, refer to the HP StorageWorks XP Tiered Storage Manager CLI Reference Guide.
Table 7-1 lists the migration task status messages displayed by a CLI client and by a Web client icon.
Table 7-1 Migration Task Status Messages
Status Displayed by a CLI client
Standby
Active.WaitingMigration
Active.Migrating
Active.WaitingDataErasure
Active.DataErasing
Status Displayed by a Web client
(contents displayed in parenthesis)
Standby
Active
Performing a Migration 57
Creating a Migration Group
7-1-1 Attributes of Migration Tasks
Table 7-1 Migration Task Status Messages
Status Displayed by a CLI client
Success
Failure
Failure.MigrationFailure
Failure.DataErasureFailure
Cancel
Status Displayed by a Web client
(contents displayed in parenthesis)
Success
Failure
Cancel
•
A migration task whose status is not Standby cannot be performed.
•
When the migration task status is either Active or Standby, none of the storage domain, the storage
tier or the migration group can be deleted, nor can the attribute information be changed. Wait until the
migration task status changes to Success, Failure, or Cancel, and then retry the operation.
7-2 Migration Task Operations
Migration task operations include creating and executing a migration task (described in this chapter) and
deleting a migration task, searching for a migration task, canceling a migration task and referencing detailed
information about a migration task (described in 11 ).
You can create and execute a migration task in two ways:
•
Create a migration task and then immediately issue an execution request to Tiered Storage Manager.
•
Create a migration task, place it in a Standby status, and then later issue an execution request to Tiered
Storage Manager.
Figure 7-1 illustrates the process of creating and executing a migration task on the Tiered Storage Manager
web and CLI clients:
Figure 7-1 Executing a Migration Task on Tiered Storage Manager clients
Figure 7-2 illustrates the migration and the flow of operations at a Web client.
58
Performing a Migration
Figure 7-2 Migration and Operations at a Web client
7-3 Steps for Performing a Migration
You can perform migration that is either concurrent to migration task registration or subsequent to migration
task registration. You can also change the migration target volume before the migration task is registered.
IMPORTANT: After you create a migration task, do not change the configuration of volumes in the storage
subsystem until the migration task finishes. If you do, a migration might fail or have unintended results. For
example, if Remote Web Console or Device Manager changes the migration source volumes to LUSEs after
a migration task is created, only some of the LDEVs in the LUSE volume are migrated, and then those
LDEVs become incomplete LUSE volumes.
To perform a migration:
1.
In the Navigation frame, select the Migration Groups object.
The information frame displays the List Objects-Migration Groups subwindow, as shown in Figure 7-3
below.
59
Figure 7-3 List Objects-Migration Groups Subwindow
2.
Click the Migration button to the left of the name of the migration group you are migrating.
The Migrate-Step 1 of 4 pop-up window displays, as shown in Figure 7-4 below, allowing you to select a
migration target storage tier.
Figure 7-4 Migrate-Step 1 of 4 Pop-up Window
3.
Select the target storage tier.
In the Migrate-Step 1 of 4 pop-up window, select the radio button that corresponds to the target storage
tier name.
4.
In the Migrate-Step 1 of 4 pop-up window, click the Next button.
The Migrate-Step 2 of 4 pop-up window displays, as shown in Figure 7-5 below, allowing you to select
volume pairs of migration source and migration target volumes.
60
Figure 7-5 Migrate-Step 2 of 4 Pop-up Window
After Tiered Storage Manager selects, from the selected migration target storage tier, a candidate
migration target volume corresponding to each volume in the migration group, the Migrate Step 2 of 4
pop-up window displays a list of volume pairs. This list allows you to modify the migration target volumes.
If you do not have to modify the migration target volumes, go to step 10.
5.
Click the Modify button displayed to the left next of the desired migration target volume, and then modify
the migration target volume.
Performing a Migration
The Modify Volume Pair pop-up window displays for the volume pair containing the migration target
volume you are changing. In the Modify Volume Pair pop-up window, information on the migration source
volume (such as an LDEV) and a list of migration-target candidate volumes display, as shown in Figure 76 below.
Figure 7-6 Modify Volume Pair Pop-up Window
You can use the following buttons on the Modify Volume Pair window:
Save and Continue: Saves the modification and allows you to modify another migration target
volume.
Save and Close: Saves the modification and returns to the Migrate-Step 2 of 4 pop-up window.
Close: Returns to the Migrate-Step 2 of 4 pop-up window without saving the modification.
6.
Select a volume from the list of candidate migration target volumes.
Select the radio button to select the desired volume:
61
•
When you finish modifying all intended volumes, go to step 9.
•
If you want to modify more migration target volumes, go to step 7.
7.
Click the Save and Continue button.
8.
From the drop-down list for Source Volume of the volume pair, select the LDEV of the migration source
volume for which you want to modify the candidate target volume.
In the list of candidate migration target volumes, candidate target volumes are displayed for the selected
migration source volume, as shown in Figure 7-7 below. To select the migration target volume, go to step
6.
Figure 7-7 Modify Volume Pair Pop-up Window (drop down list for Source Volume)
9.
Click the Save and Close button.
The Modify Volume Pair pop-up window closes, and then returns to the Migrate-Step 2 of 4 pop-up
window.
10.
In the Migrate-Step 2 of 4 pop-up window, click the Next button.
The Migrate-Step 3 of 4 pop-up window displays, as shown in Figure 7-8 below, prompting you to select
the desired migration options.
Figure 7-8 Migrate-Step 3 of 4 Pop-up Window
11.
In the Migrate-Step 3 of 4 pop-up window, set the migration options and Description.
You can select either migration concurrent to task registration or migration subsequent to task
registration. To perform migration concurrent to task registration, select Execute Immediately.
To delete data on the migration source volume after migration, select Erase Data.
In the Migrate-Step 3 of 4 pop-up window, set the Description.
62
Description
Enter a description for the migration group you are creating.
You can enter up to 500 bytes of UTF-8 characters.
If you enter 501 bytes or more in UTF-8 encoding for Description, an error occurs.
12.
In the Migrate-Step 3 of 4 pop-up window, click the Next button.
The Migrate-Step 4 of 4 pop-up window displays as shown in Figure 7-9, prompting you to verify the
selected migration settings. Check the settings.
Figure 7-9 Migrate-Step 4 of 4 Pop-up Window
13.
In the Migrate-Step 4 of 4 pop-up window, click the Confirm button.
When Execute Immediately has been selected:
The Migrate-Processing pop-up window and then the Migrate-Result pop-up window display in
succession.
The Migrate-Result pop-up window displays a message indicating that the migration task has started
successfully.
When Execute Immediately has not been selected:
The Migrate-Result pop-up window displays a message indicating that the migration task has been
created successfully.
14.
In the Migrate-Result pop-up window, click the Close button.
#
Displaying the Settings of Migrate-Step n of 4 Pop-up Window
In the Migrate-Step n of 4 pop-up window, when n is 2 or more, you can go back to the window of the
previous step by clicking the Back button or selecting the link on the upper left corner of the Migrate-Step
n of 4 pop-up window.
If you do the following, the specified settings are cleared:
1.
In the Migrate-Step 3 of 4 pop-up window, click the Back button . The Migrate-Step 2 of 4 pop-up window
displays.
2.
In the Migrate-Step 2 of 4 pop-up window, click the Next button. The Migrate-Step 3 of 4 pop-up window
displays with its settings cleared.
#
n indicates a number from 1 to 4.
63
Performing a Migration
The Migrate-Processing pop-up window and then the Migrate-Result pop-up window display in
succession.
8 Managing Storage Domains
This chapter describes managing storage domains and includes the following sections:
•
Viewing a List of Storage Domains (section 8-1 )
•
Viewing Storage Domain Properties (section 8-2 )
•
Searching Volumes in a Storage Domain (section 8-3 )
•
Refreshing Storage Domain Information (section 8-4 )
•
Changing Storage Domain Attribute Information (section 8-5 )
•
Deleting a Storage Domain (section 8-6 )
For information on creating storage domains, see 3 .
8-1 Viewing a List of Storage Domains
You can view a list of storage domains on Tiered Storage Manager to check the following:
•
The name and total capacity of each storage domain.
•
The used and free capacities of each storage domain.
•
The number of storage tiers included in each storage domain.
•
The number of migration groups included in each storage domain.
•
The refresh status.
Even when a refresh is being performed, some information is still displayed. Information that cannot be
displayed is shown as Unknown.
You can view a list of storage domains in two ways:
•
From the navigation frame, select the Storage Domain object.
•
From the method frame, select the Object List method.
Performing a Migration
When you select either the Storage Domain object or the Object List methods, the List Objects-Storage
Domains subwindow displays as shown in Figure 8-1.
Figure 8-1 List Objects-Storage Domains Subwindow
8-2 Viewing Storage Domain Properties
You can view storage domain properties on Tiered Storage Manager, including:
•
The name of the storage domain.
•
The domain controller.
•
The capacity of the volumes in the storage domain.
•
User capacity of the volumes and the ratio of the used capacity to the total capacity, and free capacity of
the volumes and the ration of the free capacity to the total capacity.
Managing Storage Domains 64
•
Information about the storage subsystems in the storage domain. This includes the number of storage
subsystems in the storage domain.
•
Information about the storage tiers in the storage domain. This includes the number of storage tiers in the
storage domain.
•
The number of migration groups you can access (the number of migration groups within the storage
domain you can access).
•
The refresh status. The refresh status of the storage domain is displayed by an icon. For information
about these icons, see the GUI help.
You can view storage domain properties in two ways:
•
From the navigation frame, select the Storage Domain Name object.
•
From the methods frame, select the Show Properties method.
Whether you select the Storage Domain Name object, or the Show Properties method, the Show PropertiesStorage Domain Name subwindow displays as shown in Figure 8-2.
Figure 8-2 Show Properties-Storage Domain Name Subwindow
8-3 Searching Volumes in a Storage Domain
You can use filter conditions to search volumes in a storage domain, and reference volume information for the
volumes that match those conditions.
You cannot search or reference volumes during a refresh.
You can create a storage tier and migration group in a storage domain by searching a volume in that storage
domain.
To search volumes in a storage domain:
1.
In the navigation frame, select the Storage Domain Object name for the volume to be searched.
The information frame displays the Show Properties-Storage Domain Name subwindow.
2.
In the method frame, select the Search Volumes method.
The Search Volumes-Storage Domain Name subwindow displays, as shown in Figure 8-3.
65
Figure 8-3 Search Volumes-Storage Domain Name Subwindow
3.
Specify the filter conditions for searching the volumes in the storage domain:
Search Type
Select And or Or for the search type.
Condition n#
Specify the volume filter conditions. You can select items such as LDEVs or host names from the
pull-down menu.
To add a filter condition, click the Add Condition button.
To delete a filter condition, click the Delete button.
To re-order the filter conditions, click the
button or the
button.
#
n indicates the filter condition number. For example, if Condition 1 is displayed, clicking the Add
Condition button displays Condition 2 as the added filter condition.
4.
Click the Show Volume List button in the Search Volumes-Storage Domain Name subwindow.
Managing Storage Domains
The Search Volumes-Storage Domain Name subwindow redisplays, as shown in Figure 8-4, including a
list of volumes that meet the filter conditions you just specified.
Figure 8-4 Search Volumes-Storage Domain Name Subwindow Displaying a List of Volumes
If Volume Status for a volume shows Used in the list of volumes, you cannot select the volume as a
migration target volume.
66
The following buttons are displayed in the Search Volumes-Storage Domain Name subwindow:
Create Migration Group button
Click to create a migration group from the volume search results.
For more information, see 6-3 .
Create Storage Tier button
Click to create a storage tier from the volume search results.
For more information, see 4-4 .
8-4 Refreshing Storage Domain Information
When you perform a migration or change the storage configuration, make sure that you perform a refresh. For
information on performing a refresh, see 1-7 .
To refresh information for the storage domain:
1.
In the navigation frame, select the Storage Domain Name object you are refreshing.
The information frame displays the Show Properties-Storage Domain Name subwindow. In the Show
Properties-Storage Domain Name subwindow, you can check the date and time when the last refresh
was performed.
2.
In the method frame, select the Refresh method.
The Refresh-Storage Domain Name pop-up window displays, as shown in Figure 8-5.
Figure 8-5 Refresh-Storage Domain Name Pop-up Window
3.
Click the OK button.
The Refresh-Processing pop-up window displays and processing starts.
When processing ends, the execution results from the refresh are displayed in the Refresh-Result pop-up
window.
4.
Click the Close button.
Operations Allowed during a Refresh
During a refresh you can view a list of storage domains and their properties. You can view the following
items:
•
•
On the List Objects-Storage Domain Name subwindow:
•
Name of a storage domain.
•
Number of storage tiers within a storage domain.
•
Number of migration groups within a storage domain.
•
Status of the refresh operation.
On the Show Properties-Storage Domain Name subwindow:
67
•
Name of a storage domain.
•
Number of storage tiers.
•
Number of migration groups that can be accessed by the logged-on user.
•
The latest refresh date and time.
•
Refresh Status.
•
Description.
8-5 Changing Storage Domain Attribute Information
You can change attribute information (name and description) for a selected storage domain. You cannot
change the attribute information for the storage domain while the status of a migration task is active or
standby or while a refresh is being performed.
To change the attribute information for a storage domain:
1.
In the navigation frame, select the Storage Domain Name object for which you want to change attribute
information.
The information frame displays the List Objects-Storage Domain Name subwindow.
2.
In the method frame, select the Modify Storage Domain method.
The Modify Storage Domain-Storage Domain Name pop-up window displays, as shown in Figure 8-6.
Figure 8-6 Modify Storage Domain-Storage Domain Name Pop-up Window
Specify the items you are changing.
Name (required)
Enter the name of the storage domain. When the Modify Storage Domain-Storage Domain Name
pop-up window displays, the current storage domain name displays in Name.
You can enter up to 75 bytes of UTF-8 characters.
You can use non-ASCII characters, and the following ASCII characters:
A to Z a to z 0 to 9 - _ . @ and a single-byte space
You cannot use spaces for the first or last character of the name.
When changing attribute information for a storage domain, an error occurs if:
You have not entered a Name.
The character string you entered for Name is too long.
You entered an invalid character for Name.
Description
Enter a description for the storage domain. When the Modify Storage Domain-Storage Domain Name
pop-up window displays, the current description of the storage domain displays in Description.
68
Managing Storage Domains
3.
You can center up to 500 bytes of UTF-8 characters.
If you enter 501 bytes or more in UTF-8 encoding for Description, an error occurs.
4.
Click the OK button.
A dialog box is displayed to confirm the completion of the modifications.
Click the OK button to change the attribute information for the storage domain, and display the execution
results in the Modify Storage Domain-Result pop-up window.
5.
Click the Close button.
UTF-8 Encoding
For Name and Description, the number of entered characters is limited by the specified number of bytes
in UTF-8 encoding. In UTF-8, ASCII characters are 1 byte and non-ASCII characters are from 1 to 3
bytes.
8-6 Deleting a Storage Domain
You can delete storage domains that are no longer needed. You cannot a delete storage domain while
migration tasks are running or while a refresh is being performed.
When a storage domain is deleted, the storage tiers as well as migration groups within the deleted storage
domain are also deleted at the same time. Volumes and migration tasks that are included in those storage tiers
and migration groups, however, are not deleted.
To delete a storage domain:
1.
In the navigation frame, select the Storage Domain Name object you are deleting.
2.
In the method frame, select the Delete Storage Domain method.
The Delete Storage Domain-Storage Domain Name pop-up window displays as shown in Figure 8-7.
Figure 8-7 Delete Storage Domain-Storage Domain Name Pop-up Window
From the Delete Storage Domain-Storage Domain Name pop-up window, select Yes. I have confirmed it.
If you click the OK button without selecting Yes. I have confirmed it, an error message dialog box
displays.
4.
Click the OK button.
The deletion process starts, and the Processing Deletion window is displayed. When deletion is complete,
the Delete Storage Domain-Result window displays.
5.
Click the Close button.
69
Managing Storage Domains
3.
Managing Storage Tiers
9 Managing Storage Tiers
This chapter describes managing storage tiers, which includes the following:
•
Viewing a List of Storage Tiers (section 9-1 )
•
Viewing Storage Tier Properties (section 9-2 )
•
Searching for Volumes in a Storage Tier (section 9-3 )
•
Changing Storage Tier Attribute Information (section 9-4 )
•
Deleting a Storage Tier (section 9-5 )
•
For information on creating storage tiers, see 4 .
9-1 Viewing a List of Storage Tiers
You can view a list of the storage tiers inside a storage domain. Viewing the list allows you to check the
following:
•
•
Information on the storage domain that contains the selected storage tier:
•
- Capacity:
•
total capacity.
•
used capacity (capacity of the volumes that cannot be selected as a migration target, and the ratio of
this capacity to the total capacity).
•
free capacity (capacity of the volumes that can be selected as a migration target, and the ratio of this
capacity to the total capacity).
•
- Number of storage tiers within the storage domain.
Information on each storage tier:
•
- Name of the storage tier.
•
- Capacity of each storage tier (total capacity, used capacity, and free capacity).
•
- Capacity used by each storage tier within a storage domain.
You can display the list of storage tiers in two ways:
•
Select the Storage Tiers object in the navigation frame.
•
Select the Object List method in the method frame.
Whether you select the Storage Tiers object or the Object List method, the List Objects-Storage Tiers
subwindow displays in the information frame, as shown in Figure 9-1.
Figure 9-1 List Objects-Storage Tiers Subwindow
9-2 Viewing Storage Tier Properties
Viewing the storage tier properties allows you to check the following:
•
Details of the storage tier (such as filtering conditions, used capacity, free capacity, and description).
Managing Storage Tiers 70
•
A list of the volumes in the storage tier and details of the volumes (such as the name of the migration
group to which the volume belongs, the array group to which the volume belongs, and the RAID Level
and emulation type of the volume).
To view the storage tier properties:
1.
In the navigation frame, select the Storage Tier Name object for which you want to view properties.
You can also select the Show Properties method in the method frame.
The Show Properties-Storage Tier Name subwindow displays, as shown in Figure 9-2.
Figure 9-2 Show Properties-Storage Tier Name Subwindow
You can check the following information from the Show Properties-Storage Tier Name subwindow.
•
Detailed information on the selected volume:
When you select LDEV in the Volume List, you can check the detailed information on the volume
(such as Array Group, RAID Level, and LDEV) in the Volume Detailed Information-Storage Tier Name
pop-up window, as shown in Figure 9-3.
Figure 9-3 Volume Detailed Information- Device Number Pop-up Window
•
Detailed information on the selected migration group:
When you select Migration Group Name in the Volume List, you can check the detailed information
on the migration group that contains the selected volume, in the Migration Group Detailed
Information-Storage Tier Name pop-up window, as shown in Figure 9-4. You can also perform
operations such as adding and deleting volumes for the displayed migration group in this window.
71
Managing Storage Tiers
Figure 9-4 Migration Group Detailed Information-Storage Tier Name Pop-up Window
9-3 Searching for Volumes in a Storage Tier
To search for volumes in a storage tier:
1.
In the navigation frame, select the Storage Tiers object that you want to search for volumes.
The information frame displays the Show Properties-Storage Tier Name subwindow.
2.
In the method frame, select the Search Volumes method.
The Search Volumes-Storage Tier Name subwindow displays as shown in Figure 9-5.
Figure 9-5 Search Volumes-Storage Tier Name Subwindow
3.
Specify the filter conditions for searching for volumes in the storage tier.
Search Type
Select And or Or for the search type.
Condition n#
Specify the volume filter conditions. You can select items such as LDEVs or host names from the
pull-down menu.
To add a filter condition, click the Add Condition button.
To delete a filter condition, click the Delete button.
To re-order the filter conditions, click the
button or the
button.
72
#
n indicates the filter condition number. For example, if Condition 1 is displayed, clicking the Add
Condition button displays Condition 2 as the added filter condition.
4.
Click the Show Volume List button.
The Search Volumes-Storage Tier Name subwindow redisplays, as shown in Figure 9-6, showing a list of
volumes that meets the filter conditions you just specified.
Figure 9-6 Search Volumes-Storage Tier Name Subwindow Displaying a List of Volumes
If Volume Status for a volume shows Used in the list of volumes, that volume cannot be migrated.
The Search Volumes-Storage Tier Name Subwindow displays the following button:
Create Migration Group button
You can create a migration group from the volume search results.
For information on creating a migration group by clicking the Create Migration Group button, see 6-3
Creating a Migration Group Based on the Result of Storage Domain Volume Searches.
9-4 Changing Storage Tier Attribute Information
You can change the attribute information of a storage tier, such as the name of the storage tier or the filter
conditions. When changing the filter conditions, change the attribute information for the storage tier. However,
you cannot change attribute information for the storage tier while the status of a migration task is active or
standby.
To change the attribute information of a storage tier:
1.
In the navigation frame, select the Storage Tier Name object for which you are changing the attribute
information.
The information frame displays the List Objects-Storage Tiers Name subwindow.
2.
In the method frame, select the Modify Storage Tier method.
The Modify Storage Tier-Storage Tier Name pop-up window displays, as shown in Figure 9-7.
73
Figure 9-7 Modify Storage Tier-Storage Tier Name Pop-up Window
3.
Enter the information you are changing.
Name (required)
Enter the name of the storage tier. When the Modify Storage Tier-Storage Tier Name pop-up window
displays, the current name of the storage tier displays in Name.
You can enter up to 75 bytes of UTF-8 characters.
You can use non-ASCII characters, and the following ASCII characters:
A to Z a to z 0 to 9 - _ . @ and a single-byte space
You cannot use spaces for the first or last character of the name.
When changing attribute information for a storage tier, an error occurs if:
You have not entered a Name.
The character string you entered for Name is too long.
You entered an invalid character for Name.
Filter Condition
Enter filter condition information you are changing and click the Edit button. The new filter conditions
display.
Description
Enter a new description of the storage tier.
You can enter up to 500 bytes of UTF-8 characters.
If you enter 501 bytes or more in UTF-8 encoding for Description, an error occurs.
4.
Click the Edit button.
The Edit Filter Condition pop-up window, in which you can edit the information specified as Filter
Condition in the Modify Storage Tier - Storage Tier Name pop-up window, is displayed, as shown in
Figure 9-8.
74
Managing Storage Tiers
Figure 9-8 Edit Filter Condition Pop-up Window
5.
Specify the filter conditions.
Search Type
Select And or Or for the search type.
Condition n#
Specify the volume filter conditions. You can select items such as LDEVs or host names from the
pull-down menu.
To increase the number of filter conditions, click the Add Condition button.
To delete a filter condition, click the Delete button.
To re-order the filter conditions, click the
button or the
button.
#
n indicates the filter condition number. For example, if Condition 1 is displayed, clicking the Add
Condition button displays Condition 2 as the added filter condition.
6.
Click the Show Volume List button.
The Search Volumes pop-up window redisplays, as shown in Figure 9-9 displaying the volumes that meet
the filter conditions you just specified.
Figure 9-9 Search Volumes Pop-up Window Displaying a List of Volumes
7.
Click the OK button.
The Search Volumes pop-up window closes, and the Modify Storage Tier-Storage Tier Name pop-up
window displays with your updated information.
75
8.
Click the OK button.
9.
Click the OK button to accept the changes.
10.
Click the Close button.
UTF-8 Encoding
For Name and Description, the number of entered characters is limited by the specified number of bytes
in UTF-8 encoding. In UTF-8, ASCII characters are 1 byte and non-ASCII characters are from 1 to 3
bytes.
9-5 Deleting a Storage Tier
You can delete a storage tier if it is no longer required.
However, you cannot delete a storage tier in the following situations:
•
A task is being executed.
•
A storage tier contains a migration task whose status is active or standby.
•
A storage tier is in a storage domain for which information is being refreshed.
To delete a storage tier:
1.
2.
Select the Storage Tier Name object to be deleted in the navigation frame.
Select the Delete Storage Tier method in the method frame.
The Delete Storage Tier-Storage Tier Name pop-up window displays, as shown in Figure 9-10.
Figure 9-10 Delete Storage Tier-Storage Tier Name Pop-up Window
3.
Select Yes. I have confirmed it in the Delete Storage Tier-Storage Tier Name pop-up window.
If you click the OK button without choosing Yes. I have confirmed it, an error message dialog box
displays.
4.
Click the OK button.
The deletion processing begins, and the Deletion In Progress window displays. When the deletion has
been completed, the Delete Storage Tier-Result pop-up window displays.
5.
Click the Close button.
76
Managing Storage Tiers
A message dialog displays asking you whether you have finished making changes.
10 Managing Migration Groups
This chapter describes managing migration groups, which includes the following operations:
•
Viewing a List of Migration Groups (10-1 )
•
Viewing Detailed Information about a Migration Group (10-2 )
•
Changing Migration Group Attribute Information (10-3 )
•
Adding a Volume to a Migration Group (10-4 )
•
Removing a Volume from a Migration Group (10-5 )
•
Deleting a Migration Group (10-6 )
For more information on creating migration groups, see 6 .
10-1 Viewing a List of Migration Groups
You can view a list of migration groups to check the following:
•
Storage domain name to which a migration group belongs.
•
Destination storage tier for a migration (The destination storage tier displays. If a migration has never
been performed, nothing displays.)
•
Status of migration.
•
The time at which the last migration was completed.
•
Migration availability (whether or not a migration is possible).
•
Number of volumes within a migration group.
- You can check the number of volumes within a migration group.
- The total capacity of the volumes within a migration group.
You can view the list of migration groups in two ways:
•
From the navigation frame, select the Migration Groups object.
•
From the methods frame, select the Object List method.
Whether you select Migration Groups or Object List, the List Objects-Migration Groups subwindow displays in
the information frame, as shown in Figure 10-1.
Figure 10-1 List Objects-Migration Groups Subwindow
10-2 Viewing Detailed Information about a Migration Group
You can view the following information about migration groups and migration.
•
About migration groups:
•
- Migration group name.
•
- Storage domain name to which the migration group belongs.
Managing Migration Groups 77
•
•
- Migration group creation time.
•
- Name of the user group of the user who last updated the migration group.
•
- Time at which the migration group was last updated.
•
- Number of volumes in the migration group.
About migration:
•
- Time at which the last migration was complete.
•
- Migration status.
•
- Attribute indicating whether migration is possible.
To view detailed information about a migration group:
1.
From the navigation frame, select the Migration Group object.
2.
From Name in the List Objects-Migration Groups subwindow, select Migration Group Name for which for
which you want to view detailed information.
The Migration Group Detailed Information-Migration Group Name pop-up window displays, as shown in
Figure 10-2.
Figure 10-2 Migration Group Detailed Information-Migration Group Name Pop-up Window
The following buttons display in the Migration Group Detailed Information-Migration Group Name pop-up
window:
Add Volume button
Click to add a volume from the volume search results to the migration group. When making an
external connection, you can add a volume with the same attribute to the migration group. For more
information about adding a volume to a migration group by clicking the Add Volume button, see 10-4
Adding a Volume to a Migration Group.
Remove Volume button
Click to remove a volume from a migration group. When releasing an external connection or changing
the status of a migration group, you can remove a volume from a migration group. For more
information about removing a volume from a migration group by clicking the Remove Volume button,
see 10-5 Removing a Volume From a Migration Group.
3.
Click the Close button.
The List Objects-Migration Groups subwindow redisplays.
10-3 Changing Migration Group Attribute Information
You can change a migration group name, the description of a migration group, and the status controlling
whether a migration group can be migrated. You cannot change attribute information for the migration group
while the status of a migration task is active or standby.
To change attribute information for a migration group:
78
Managing Migration Groups
The information frame displays the List Objects-Migration Groups subwindow.
1.
From the navigation frame, select the Migration Group object.
The information frame displays the List Objects-Migration Groups subwindow.
2.
Click the Modify button for the migration group name for which you are modifying attribute information.
The Modify Group-Migration Group Name pop-up window displays, as shown in Figure 10-3.
Figure 10-3 Modify Group-Migration Group Name Pop-up Window
3.
Enter the information you are modifying in the following fields:
Name (required)
Enter the new migration group name if you are changing it.
Click the Show All Migration Groups button to check the names of other migration groups in the same
storage domain.
You can enter up to 75 bytes of UTF-8 characters.
You can use non-ASCII characters, and the following ASCII characters:
A to Z a to z 0 to 9 - _ . @ and a single-byte space
You cannot use spaces for the first or last character of the name.
When changing attribute information for a migration group, an error occurs if:
You have not entered a Name.
The character string you entered for Name is too long.
You entered an invalid character for Name.
Can Migrate
Select one of the following:
Yes: The migration group can be migrated.
No: The migration group cannot be migrated.
Usually you select Yes. You can prevent a group from being migrated accidentally by selecting No.
Description
Enter a new description for the migration group, if you are changing it.
You can enter up to 500 bytes of UTF-8 characters.
If you enter 501 bytes or more in UTF-8 encoding for Description, an error occurs.
4.
Click the OK button.
A dialog box displays asking you to confirm your modifications.
5.
Click the OK button to accept the modifications.
79
6.
Click the Close button.
The List Objects-Migration Groups subwindow redisplays with your modifications.
UTF-8 Encoding
For Name and Description, the number of entered characters is limited by the specified number of bytes
in UTF-8 encoding. In UTF-8, ASCII characters are 1 byte and non-ASCII characters are from 1 to 3
bytes.
10-4 Adding a Volume to a Migration Group
You cannot add a volume to a migration group if:
•
It is registered in an unfinished (the status is not Success, Failure, or Cancel) migration task. Wait
until the migration task finishes, and then add the volume.
•
You have registered the volume in another migration group.
•
You have registered a migration task whose target is the migration group to which you are adding the
volume.
To add a volume to a migration group:
1.
From the navigation frame, select the Migration Group object.
The information frame displays the List Objects-Migration Groups subwindow.
2.
From Name in the List Objects-Migration Groups subwindow, select the Migration Group Name to which
you are adding the volume.
The Migration Group Detailed Information-Migration Group Name pop-up window displays, as shown in
Figure 10-4.
Figure 10-4 Migration Group Detailed Information-Migration Group Name Pop-up Window
3.
Click the Add Volume button.
The Add Volume-Migration Group Name pop-up window displays, as shown in Figure 10-5. (It does not
display if the status of a migration task is active or standby.)
80
Managing Migration Groups
You can add a volume to a migration group. There is no restriction on the number of volumes you can add.
However, you cannot add a volume to a migration group that
Managing Migration Groups
Figure 10-5 Add Volume-Migration Group Name Pop-up Window
Note that an error window is displayed when the Add Volume button is clicked while the status of a migration
task is active or standby.
4.
Specify the following to search for a volume:
Search Type
Select And or Or for the search type.
#
Condition n
Specify the volume filter conditions. You can select items such as LDEVs or host names from the
pull-down menu.
To add a filter condition, click the Add Condition button.
To delete a filter condition, click the Delete button.
To re-order the filter conditions, click the
or the
buttons.
#
n indicates the filter condition number. For example, if Condition 1 is displayed, clicking the Add
Condition button displays Condition 2 as the added filter condition.
5.
Click the List Volumes button to display volumes, as shown in Figure 10-6.
Figure 10-6 Add Volume-Migration Group Name Pop-up Window Displaying Volume Search Result List
If Volume Status for a volume shows Used in the volume search results list, you cannot select the volume
as a migration target volume.
6.
Select volumes you want to add.
81
To add all the volumes, click Select All. To clear all the selected volumes, click Unselect All.
7.
Click the Next button.
The Add Volume-Confirmation window displays, as shown in Figure 10-7.
Figure 10-7 Add Volume-Confirmation Window
8.
•
To return to the Add Volume-Migration Group Name pop-up window, click the Back button instead of
the OK button.
•
To cancel volume addition, click the Cancel button instead of the OK button.
Click the OK button.
The Add Volume-Result pop-up window displays.
9.
Click the Close button.
The migration group to which you added the volume displays with Number of Volumes changed, in the
Migration Group Detailed Information-Migration Group Name pop-up window.
10-5 Removing a Volume from a Migration Group
You can delete a volume from a migration group. Deleting a volume from a migration group does not delete it
from the storage domain. You cannot delete a volume from a migration group that is registered in an unfinished
(the status is not Success, Failure, or Cancel) migration task. Wait until the migration task finishes, and
then delete the volume. If you have registered a migration group whose target is the migration group for which
a volume is to be removed, you cannot remove the volume from the migration group.
To remove a volume from a migration group:
1.
From the navigation frame, select the Migration Group object.
The information frame displays the List Objects-Migration Groups subwindow.
2.
From Name in the List Objects-Migration Groups subwindow, select the Migration Group Name from
which you are removing the volume.
The Migration Group Detailed Information-Migration Group Name pop-up window displays.
3.
Click the Remove Volume button.
The Remove Volume-Migration Group Name pop-up window displays, as shown in Figure 10-8. (The
Remove Volume button does not display if a volume has not been registered in the migration group.)
82
Managing Migration Groups
Figure 10-8 Remove Volume-Migration Group Name Pop-up Window
4.
Select the volume you are removing.
Select Select All to remove all volumes or Unselect All to unselect all volumes.
5.
Click the Next button.
The Remove Volume-Confirmation pop-up window displays, as shown in Figure 10-9.
Figure 10-9 Remove Volume-Confirmation Pop-up Window
6.
Click the OK button.
The Remove Volume-Result pop-up window displays.
To go back to the Remove Volume - Migration Group Name pop-up window, click Back instead of OK.
To cancel the volume deletion, click Cancel instead of OK.
An error window displays if a migration task is registered for the selected volume.
7.
Click the Close button.
The migration group from which the volume was removed displays with Number of Volumes changed and
the Migration Group Detailed Information-Migration Group Name pop-up window displays.
10-6 Deleting a Migration Group
You can delete obsolete migration groups. Deleting a migration group does not delete the volumes that are in
the migration group from the storage domain. You cannot delete a migration group that is registered in an
unfinished (the status is not Success, Failure, or Cancel) migration task. Wait until the migration task
83
finishes, and then delete the migration group. You cannot delete a migration group within a storage domain for
which information is being refreshed.
To remove a migration group:
1.
From the navigation frame, select the Migration Group object.
The information frame displays the List Objects-Migration Groups subwindow.
2.
From the List Objects-Migration Groups subwindow, click the Remove button for the Migration Group
Name you are deleting.
The Delete Migration Group-Migration Group Name pop-up displays, as shown in Figure 10-10.
Figure 10-10 Delete Migration Group-Migration Group Name Pop-up Window
3.
4.
From the Delete Migration Group-Migration Group Name pop-up window, select Yes. I have confirmed it.
Click the OK button.
The Delete Migration Group-Result pop-up window displays.
(If you click OK without having selected Yes. I have confirmed it in Step 3, an error message displays.
5.
Click the Close button.
The Delete Migration Group-Result pop-up window closes and the List Objects-Migration Groups
subwindow redisplays.
84
11 Managing Migration Tasks
This chapter describes managing migration tasks, which includes the following operations:
•
Searching for a Migration Task (section 11-1 )
•
Viewing Detailed Information about a Migration Task (section 11-2 )
•
Executing a Migration Task (section 11-3 )
•
Deleting a Migration Task (section 11-4 )
•
Canceling a Migration Task before Executing It (section 11-5 )
11-1 Searching for a Migration Task
You can begin managing migration tasks by searching for a migration task.
To search for a migration task:
1.
Select the Task object in the navigation frame.
The List Objects-Tasks subwindow displays in the information frame, as shown in Figure 11-1.
Figure 11-1 List Objects-Tasks Subwindow
2.
3.
Set the migration task filter conditions, such as a storage domain name and migration group name, from
the drop-down list. For more information, see the GUI help.
Click the Show Tasks button.
The migration task search is executed, and migration tasks that match the set task filter conditions display
in the Task List, as shown in Figure 11-2.
Managing Migration Tasks 85
Managing Migration Groups
For more information on migration tasks, see 7 .
Figure 11-2 List Objects-Tasks Subwindow Displaying a Task List
4.
About Storage Domains, Migration Groups, and Target Storage Tier in the List Objects - Tasks
subwindow
Even if a name displayed in the drop-down list of Storage Domains, Migration Groups, and Target
Storage Tier is deleted and then recreated, Tiered Storage Manager does not recognize the recreated
name as the same name that was deleted.
5.
Choosing a Task ID displayed in the task list
To execute, delete, or cancel a migration task, select a task ID corresponding to each migration task
displayed in the task list of the search result. To select a task ID, select the check box next to that task
ID.
11-2 Viewing Detailed Information about a Migration Task
You can check the following by viewing detailed information on a migration task:
•
Migration status of the migration task.
•
Migration task information, such as the user who owns a task, the date and time when a task was
created, and the date and time when a task has started.
•
Array groups and RAID levels of the source volume and target volume included in the migration task.
To view detailed information on a migration task:
1.
Select the Tasks object from the navigation frame.
The List Objects-Tasks subwindow displays in the information frame.
2.
Set task filter conditions for viewing detailed information on the migration task.
For information on how to search for a migration task, see 11-1 Searching for a Migration Task.
3.
Click the Show Tasks button.
The migration task search is executed, and migration tasks that match the set task filter conditions display
in the Task List.
4.
From the task IDs displayed in Task List, select the Task ID corresponding to the task detailed
information that you want to view.
The Task Detailed Information-Task ID pop-up window displays, as shown in Figure 11-3.
86
Figure 11-3 Task Detailed Information-Task ID Pop-up Window
Choosing LDEV from the Task Detailed Information-Task ID pop-up window displays the Volume Detailed
Information- Device Number pop-up window (tasks). You can check the details for the chosen source
volume or target volume from the Volume Detailed Information- Device Number pop-up window (tasks),
shown in Figure 11-4.
Figure 11-4 Volume Detailed Information- Device Number Pop-up Window (tasks)
11-3 Executing a Migration Task
Registered migration tasks subject to migration have a Standby status. You can search for migration tasks
that have a Standby status, and collectively execute (migrate) them. If you try to execute a migration task that
does not have a Standby status, an error occurs, even if it is one of several tasks with Standby status you
are executing at the same time.
To execute a migration task:
1.
Select the Tasks object in the navigation frame.
The List Objects-Tasks subwindow displays in the information frame.
2.
Set a migration task filter condition.
Be sure to select migration tasks that have a Standby status for the migration task filter condition.
3.
Click the Show Tasks button.
87
Managing Migration Tasks
The property information for registered Task IDs displays in the Task Detailed Information-Task ID pop-up
window.
The migration task search is executed, and migration tasks that match the set task filter condition display
in the Task List.
4.
Select the task ID of the task that you want to execute by selecting the check box next to it.
5.
Click the Execute button.
The Tasks-Processing pop-up window displays. After a migration task completes, the Task-result pop-up
window displays and the list of tasks in the information frame is updated.
11-4 Deleting a Migration Task
You can delete migration tasks that are in the Success, Migration Failure, or Cancel status. You can
also collectively delete those migration tasks.
To delete a migration task:
1.
Select the Tasks object in the navigation frame.
The List Objects-Tasks subwindow displays in the information frame.
,
,
Set a migration task filter condition.
,
2.
From Status select Success Migration Failure or Cancel for the migration task filter condition.
3.
Click the Show Tasks button.
The migration task search is executed, and migration tasks that match the set task filter condition display
in the Task List.
5.
Select the task ID of the task that you want to delete by selecting the check box next to it. You can check
the check box next to the desired task ID. You can select multiple task IDs to delete.
Click the Delete button.
The Deletion Confirmation dialog box displays.
6.
Click the OK button.
The migration task is deleted, and the List Objects-Tasks subwindow redisplays.
Deleting a Migration Task with Standby Status
You cannot delete a migration task with Standby status. To delete a migration task with a Standby status,
you must first cancel the migration task by changing Status to Cancel and then delete the migration task.
For information on how to change Status to Cancel, see 11-5 Canceling a Migration Task before
Executing It.
11-5 Canceling a Migration Task before Executing It
.
You can search for and cancel a registered migration task that has a Standby status. The status of the
canceled migration task changes to Cancel If you try to cancel a task that does not have a Standby status,
an error occurs.
To cancel a migration task:
1.
Select the Tasks object in the navigation frame.
The List Objects-Tasks subwindow displays in the information frame.
2.
Set a migration task filter condition.
Be sure to select Standby from Status as the migration task filter condition.
3.
Click the Show Tasks button.
The migration task search is executed, and migration tasks that match the set task filter condition display
in the Task List.
4.
Select the task ID of the task you want to cancel by selecting the check box next to it. You can select
multiple task IDs to be canceled.
5.
Click the Cancel button.
The cancellation confirmation dialog box displays.
6.
Click the OK button.
.
The migration task is canceled and Status for the canceled migration task in the List Objects-Tasks
subwindow changes from Standby to Cancel
The Tasks-Processing pop-up window displays. After a migration task is cancelled, the Task-result popup window displays with an updated list of tasks.
88
Managing Migration Tasks
4.
89
12 Troubleshooting
This chapter includes troubleshooting procedures you can follow if you have problems with Web client for
Tiered Storage Manager. It also describes the message and trace logs that are created by the Web client.
•
Troubleshooting by Function (section 12-1 )
•
Troubleshooting Procedures (section 12-2 )
•
Troubleshooting Message and Trace Logs (section 12-3 )
12-1 Troubleshooting by Function
This section includes a few examples of troubleshooting for each function of Tiered Storage Manager.
Table 12-1 Troubleshooting (logon)
Problem (displayed message ID)
Cause
Actions
Unable to log on. (KATS20505-E)
Not registered as an
authorized user with Device
Manager.
Register as an authorized user with
Device Manager.
You do not have permission to Change the Device Manager user
log on to Tiered Storage
role to System Administrator,
Manager.
Storage Administrator, or Guest.
The user ID or password you
entered is incorrect.
Enter a correct user ID or
password.
Table 12-2 Troubleshooting (window display)
Problem
Cause
Actions
In an English environment,
messages are displayed in a
foreign language.
If an overwrite installation of
Tiered Storage Manager is
performed, a window is not
displayed correctly.
A foreign locale is set on the
management server.
Set the English locale on the management
#1
server.
The style sheet used by
Tiered Storage Manager has
been updated, or the old
style sheet was read from
the cache.
In a daylight savings time
environment, the operation
start and end time displayed
as a transaction log in the
List Objects-Tasks
subwindow does not show
that the time setting has
changed to daylight savings
time.
After the repository is
restored, the navigation
frame display does not
match the display in the
information frame.
The start and end time
maintained by the task
management is the time on
the management server. The
time setting on the client
does not match the one on
the management server.
Take the following action.
In Internet Explorer:
Select View and then Refresh. Alternatively,
select Tools and Internet Options. Then,
click Delete Files from Temporary Internet
files.
®
®
In Mozilla and Netscape :
Select View and then Reload.
Set the time on the client PC to daylight
savings time.
The repository of the
Command View XP AE Suite
Common Component has
not been synchronized with
the repository of Tiered
Storage Manager.
Set server.base.initialsynchro in
#2
the server.properties file of Tiered
Storage Manager to true, and then restart
the server.
#1: An error message might contain text that remains unchanged after being received from the Device
Manager server. The language type for these parts of a message is determined according to the locale of the
machine where the Device Manager server is running and the locale of the machine where the Tiered Storage
Manager server is running. You should match the language type for the Web client to the locale on the server
side.
Troubleshooting 90
#2: For information on the server properties file, refer to the HP StorageWorks XP Tiered Storage Manager
Server Installation and Configuration Guide.
Problem (displayed message ID)
The target storage tier cannot be
selected in the Migrate-Step 1 of
4 pop-up window.
Progress of migration or data
erasure does not proceed.
Clicking the Confirm button in the
Migrate-Step 4 of 4 popup
#
window has caused an error.
(KATS62010-E or KATS62011E)
Cause
Actions
For some volumes in the
migration group, a volume that
can be selected as the migration
target volume does not exist in
the target storage tier.
For a storage tier, Tiered Storage
Manager automatically selects
volumes when all volumes in the
storage tier satisfy all of the
following conditions:
• The capacity of the target
volume is equal to the source
volume.
• The emulation type of the
target volume is the same as
that of the source volume.
• When a migration is
performed between a CVS
volume and a normal
volume, the emulation type is
OPEN-V.
• The array group of the target
volume is different from that
of the source volume.
• The CVS attribute (CVS or
Normal) of the target volume
is the same as that of the
source volume.
• The target volume is an
unused volume (except that
Tiered Storage Manager
always selects the primary
volume automatically).
For all volumes in the migration
group, prepare a storage tier that
includes volumes satisfying the
above conditions.
• See the message log to
check whether an error has
occurred in the subsystem. If
it has, refer to the message
to remove the cause of the
error.
• If there is a task that is
progressing among the
multiple migration tasks,
Tiered Storage Manager is
running properly.
• If migration fails, temporarily
decrease the load on the
subsystem, and then retry
the migration.
Possible causes are as follows:
An error might have occurred
in the subsystem and an
attempt to acquire the
progress status has failed.
• Processing to update the
display has not started
because multiple migration
tasks are being performed
and processing to startup or
finish these tasks might be
taking a long time.
• If a high load is placed on the
subsystem, migration might
not progress or might fail
before completion. In
particular, if a volume that is
being migrated is accessed,
progress of the migration
task might deteriorate.
Possible causes are as follows:
• There is a problem with a
volume that was selected as
a migration target.
• Since Remote Web Console
•
Troubleshooting
Table 12-3 Troubleshooting Tiered Storage Manager Functions (continues on the following
pages)
Remove the cause of the error,
and then re-create the migration
task. Depending on the timing of
the error, some volumes may
have been reserved. In this case,
91
Table 12-3 Troubleshooting Tiered Storage Manager Functions (continues on the following
pages)
Problem (displayed message ID)
The status of the migration task is
Eraser Failure.
(KATS62010-E or KATS62011E)
Cause
Actions
is used in Modify mode, the
selected volume cannot be
reserved for migration. The
details of this error are
displayed in the Error
window.
An error occurred during data
erasure. The details of this error
are displayed in the Task
Detailed Information-Task ID popup window (for details on this
window, see 11-2 Viewing
Detailed Information about a
Migration Task).
use Tiered Storage Manager to
refresh the storage domain
containing the volumes that may
have been reserved.
Migration has finished. The
LDEVs of the migration source
volume and the migration target
volume have been switched.
Check the status of the source
volume whose LDEV has been
switched to the LDEV number of
the target volume. If data erasure
fails, the original data remains in
the source volume. (For details,
see Figure 12-1 Relationship
between Volumes and LDEV
Numbers 1-3 How Migration
Works) Therefore, perform the
following action:
If the Volume to which the LDEV
number of the source volume has
been switched is blocked
Format the relevant volume by
using Remote Web Console.
If the Volume to which the LDEV
number of the source volume has
been switched is not blocked
There may be data remaining on
the relevant volume. If the
remaining data needs to be
erased, format the volume or
erase the data using the
procedures below. In the
explanation below logical device
number 10:01 has been
migrated to 20:01 (the source
volume before migration has
been switched to 20:01 after
migration).
1 Use Device Manager to set
the path to 20:01 and
allocate it to a host.
2 From the path-allocated host,
write as much 0 data as the
volume size to erase data on
20:01.
3 Use Device Manager to
release the path to 20:01.
92
Table 12-3 Troubleshooting Tiered Storage Manager Functions (continues on the following
pages)
Problem (displayed message ID)
Cause
Actions
The status of the migration task is
Failure.
(KATS62010-E or KATS62011E)
An error occurred during
migration. The details of the error
are displayed in the Task
Detailed Information-Task ID popup window (11-2 Viewing
Detailed Information about a
Migration Task).
Some of the
LDEVs that
make up the
LUSE volume
are not
included in the
same storage
tier.
Both of the following conditions
exist:·
• The representative LDEV is
included in the migration
destination storage tier.
• LDEVs other than the
representative LDEV are not
included in the migration
destination storage tier.
Depending on the cause of the
error, migration may be treated as
a migration failure in Tiered
Storage Manager or Device
Manager, even though migration
has finished in the storage
subsystem.
Therefore, you need to refresh
the relevant storage domain by
using Tiered Storage Manager to
update the management
information of Tiered Storage
Manager and Device Manager to
the current information. If a
volume is left as reserved, it is
released during the refresh. After
that, view the volume information
of migration tasks that have a
failure status, and then, from the
elements listed below, determine
whether the migration task has
been executed. In this case,
check the following elements for
all logical devices (LDEV) in the
migration group:
• Array group name
• Subsystem name
If there is a logical device for
which migration has not been
executed, remove the cause of
the error, and then create and
execute the migration task again.
Review the migration volume pair.
If you migrate LDEVs other than
the representative LDEV, first respecify the migration destination
volume, and then perform
migration.
Situation (1)
The migration
volume pair
was created so
that LDEVs
other than the
representative
LDEV that do
not meet the
conditions of
the migration
destination
storage tier
would not be
migrated.
Situation (2)
The migration
volume pair
was created so
that LDEVs
that meet the
conditions of
the migration
destination
storage tier
would be
migrated
unnecessarily.
Both of the following conditions
exist:·
• The representative LDEV is
not included in the migration
destination storage tier.
• LDEVs other than the
representative LDEV are
included in the migration
destination storage tier.
Review the migration volume pair.
Create a storage tier that includes
the representative LDEV, and the
status will change to situation (1).
See the recommended action
column for situation (1) and take
appropriate action.
93
#
For details on the Migrate - Step 4 of 4 popup window, see 7-3 Steps for Performing a Migration
12-2 Troubleshooting Procedures
If an error occurs while you are using Tiered Storage Manager, follow the troubleshooting procedures shown in
Figure 12-1.
Figure 12-1 Troubleshooting Procedures
When an error occurs, do the following:
1.
Check the status of the error.
Check the status of the error at the time the error occurred. If a message is displayed, check the message
and take the appropriate action.
2.
Locate the error and examine the log. Then take corrective action.
If you cannot resolve the problem by checking the message, see the message log for the Tiered Storage
Manager server. Using the message logs, identify where the error occurred, and then remove the cause
of the error. In order to locate the error, see the message ID. For information on the message ID, refer to
the HP StorageWorks XP Tiered Storage Manager Server Installation and Configuration Guide.
3.
Contact customer support.
If you cannot resolve the problem by checking the message log for the Tiered Storage Manager server,
collect maintenance information by using the Trouble Information Acquisition tool and contact customer
support. For information on the Trouble Information Acquisition tool, refer to the HP StorageWokrs XP
Tiered Storage Manager Server Installation and Configuration Guide.
12-3 Message and Trace Logs
The Tiered Storage Manager Web client creates message and trace logs to help you identify and solve any
problems.
Troubleshooting
12-3-1 Message Logs
Message logs contain information about the history of executed processing and processing results. They
include a name and an output destination folder, as shown in Table 12-4.
Table 12-4 Message Log
Type of Log
Information
GUI message
log
Log File Name
HTSMGuiMessagen.log
Output Destination Folder
#
Windows:
Tiered-Storage-Manager-installation-folder\logs
Solaris:
<server installation folder>\logs
#: n represents a number from 1 to the number-of-files-specified-in-the-environment-settings. To specify the
number of files, change the value of the logger.guiMessageFileCount in the environment settings file
logger.properties. For information on the environment settings file logger.properties, refer to the HP
StorageWorks XP Tiered Storage Manager Server Installation and Configuration Guide.
94
12-3-2 Trace Logs
Trace logs contain information that is collected when an error occurs in order to determine how the error
occurred. They include a name and an output destination folder, as shown in Table 12-5.
Table 12-5 Trace Log
Type of Log
Information
GUI trace log
Log File Name
HTSMGuiTracen.log
Output Destination Folder
#
Windows:
Tiered-Storage-Manager-installation-folder\logs
Solaris:
<server installation folder>\logs
# — n represents a number from 1 to the number-of-files-specified-in-the-environment-settings. To specify the
number of files, change the value of logger.guiTraceFileCount in the environment settings file
logger.properties. For information on the environment settings file logger.properties, refer to the HP
StorageWorks XP Tiered Storage Manager Server Installation and Configuration Guide.
95
Appendix A
Recommended and Maximum Values
This appendix describes the recommended and maximum values for Tiered Storage Manager operations, as
shown in Table A.1.
Classification
Item
Recommended
Value
Maximum
Value
Storage domain
The number of storage domains
1
5
Storage tier
The number of storage tiers within the storage
domain
30 or less
100
Migration group
The number of migration groups within the
storage domain
1,000
5,000
Volume
The number of volumes within the storage
domain
Not applicable
16,384
The number of volumes within the migration
group
64 or less
300
The number of unfinished tasks that can be
registered in Tiered Storage Manager
Not applicable
100
Migration task
The total number of volumes (within the storage Not applicable
domain) that can be in a registered task
8192
The number of volumes where migration can
be performed concurrently
8
64
The number of tasks that can be canceled
concurrently
1
5
The number of volumes within the tasks that
can be canceled concurrently
64 or less
300
The number of task logs for finished migration
tasks that can be saved
1,000
5,000
Server execution
multiplexing
The number of users who can access the
Tiered Storage Manager server concurrently
3 or less
5
an error occurs
if exceeded
Volume filter condition
The number of condition elements that can be
combined by using AND or OR in one filter
condition expression
Not applicable
30
an error occurs
if exceeded
The number of elements that can be
Not applicable
concurrently specified when an LDEV or array
group is used for searching (the enumeration
number of elements for
ControllerDeviceNumber or ArrayGroup)
100
an error occurs
if exceeded
Appendix A
Recommended and Maximum Values 96
Troubleshooting
Table A.1 Recommended and Maximum Values
Acronyms and Abbreviations
CLI
CLPR
CVS
command line interface
cache logical partition
concurrent versions system
DLCM
Data Lifecycle Management
GB
GUI
Gigabyte
graphical user interface
HTSM
HP StorageWorks XP Tiered Storage Manager
KB
kilobyte
LAN
LDEV
LPAR
LU
local area network
logical device
logical partition
logical unit
MB
megabyte
NAS
network area storage
OS
operating system
PSA
partition storage administrator
RAID
redundant array of independent (or inexpensive) disks
SA
SAN
SLRP
system administrator
storage area network
storage logical partition
TB
terabyte
URL
USP
universal resource locator
Universal Storage Platform
97
Index
A
E
access load distribution, migration
for, 15
adding volume to migration group,
80
elements: of Tiered Storage
Manager required for migration, 20
Elements of Filter Conditions
Specified When Filtering Volumes,
45
example of pop-up dialog box, 34
example of subwindow displayed in
information frame, 33
examples: of migration, 18
Examples of creating a storage tier,
38
executing migration task, 87
external storage connection
function, 13
external storage subsystems:
migration between, 19; migration
with domain control storage
subsystem, 19
C
cache, 23
canceling migration task before
execution, 88
changing: user information, 21
changing attribute information: for
migration group, 78; for storage
domain, 68; for storage tier, 73
Character Strings Representing
Reasons a Volume Cannot Be a
Migration Source or Target, 25
choosing task ID displayed in task
list, 86
CLI client, 13
CLPR, 22
common items displayed in
information frame, 33; Help, 34;
object address, 33; subwindow
name, 34
common items displayed in method
frame, 33; information table, 33;
method name, 33; subwindow
name, 33
common items displayed in pop-up
dialog box, 34; dialog box name,
34; Help, 34; object address, 34
creating migration group: based on
result of storage domain volume
search, 51; based on result of
storage tier volume search, 53; by
selecting migration groups object
in storage domain, 49
creating storage domain, 35
creating storage tier: based on
results of storage domain volume
search, 42; by selecting storage
tiers object from storage domain,
39
D
data migration, 12
deleting: migration group, 83;
migration task, 88; storage
domain, 69; storage tier, 76
detailed information: viewing for
migration tasks, 92, 93
displaying settings of Migrate - Step
n of 4 pop-up window, 63
domain control storage subsystem:
migration in, 18; migration with
external storage subsystem, 19
domain controller: domain controller
for which the PSA is managing
SLPR operation, 22
F
frames of Tiered Storage Manager,
31
I
inconsistencies, detecting with
refresh, 24
information frame, 32; common
items, 33; example of subwindow,
33
L
language used for Tiered Storage
Manager GUI, 28
life cycle of data: migration suited to,
14
list of migration groups: viewing, 77
list of storage domains: viewing, 64
list of storage tiers: viewing, 70
logging out, 30
login: starting Tiered Storage
Manager by link-and-launch
operation, 30
logs: message log, 94; trace log, 95
LPAR, 22
M
menu-bar frame, 31; menus, 32
merits: of Tiered Storage Manager,
11
message log, 94
method frame, 32; common items,
33
Migrate - Step 1 of 4 pop-up
window, 60
Migrate - Step 2 of 4 pop-up
window, 61
Migrate - Step 3 of 4 pop-up
window, 62
Migrate - Step 4 of 4 pop-up
window, 63
migration, 11; between domain
control storage subsystem and
external storage subsystem, 19;
between two external storage
subsystems, 19; by re-arranging
storage subsystem, 16, 17;
erasing data, 62; examples, 18;
executing immediately, 62; flow of
operations at web client, 58;
operation, 59; required elements
of Tiered Storage Manager, 20;
restrictions, 25; scope of eligible
data, 12; specifying options, 62;
suited to data life cycle, 14; to
distribute access load, 14, 15;
verifying settings, 63
migration flow, 18, 92
migration group: adding volume to,
80; changing attribute information,
78; creating, based on result of
storage domain volume search,
51; creating, based on result of
storage tier volume search, 53;
creating, by selecting migration
groups objects in storage domain,
49; deleting, 83; removing volume
from, 82; viewing detailed
information about, 77; viewing list
of, 77
Migration Group, 49
migration targets: defining, 13
migration task: canceling, before
execution, 88; deleting, 88;
executing, 87; searching, 85;
viewing detailed information about,
86
Migration Task Status Messages, 57
migration tasks, 21; viewing detailed
information about, 92, 93
migration timing, 13
migration type: migration concurrent
to migration task registration, 59;
migration subsequent to migration
task registration, 59
migration within domain control
storage subsystem, 18
Modify Volume Pair pop-up window,
61
N
navigation frame, 31; objects, 32
notes: Windows XP Service Pack 2,
28
Notes on volume filter conditions, 45
O
operations for deleting storage
domain, 69
P
pop-up dialog box, 34; example, 34
PSA, 22
98
refresh, 22; status, 24
refresh, mechanics of, 22
refresh, when to, 23
refreshing: operations allowed
during refresh, 67; storage
domain, 67
removing: volume from migration
group, 82
repository: for Common Component,
23; for Device Manager, 23; for
Tiered Storage Manager, 22
restrictions: on migration, 25
searching volumes, 65; viewing list
of, 64; viewing properties of, 64
Storage Domain, 35
storage environment, changing, 16
storage performance, 14
storage tier: changing attribute
information, 73; creating, based on
results of storage domain volume
search, 42; creating, by selecting
storage tiers object from storage
domain, 39; deleting, 76;
searching volumes, 72; viewing list
of, 70; viewing properties of, 70
Storage Tier, 38
S
T
scope of data eligible for migration,
12
searching: migration task, 85;
volumes in storage domain, 65;
volumes in storage tier, 72
selecting volume pairs, 60
starting: Tiered Storage Manager
operations, 30
starting Tiered Storage Manager: by
link-and-launch operation, 30;
from login dialog box, 29
storage domain: changing attribute
information, 68; creating, 35;
deleting, 69; refreshing, 67;
Tiered Storage Manager: functions,
11; starting from login dialog box,
29; starting operations, 30; user
types, 21
Tiered Storage Manager command
for changing user information, 21;
htsmmodhdvmuser, 21
Tiered Storage Manager Operations
and Related User Types, 21
trace log, 95
troubleshooting examples: logon,
90; on web client, 90; tiered
storage manager functions, 91;
window display, 90
R
U
user information: changes to, 21
user types: in Tiered Storage
Manager, 21
V
viewing detailed information: about
migration group, 77; about
migration task, 86
viewing list of: migration groups, 77;
storage domains, 64; storage tiers,
70
viewing properties of: storage
domains, 64; storage tiers, 70
volume: adding to migration group,
80; removing from migration
group, 82; searching, in storage
domain, 65; searching, in storage
tier, 72
volume filter conditions, 21
volumes: grouping and migrating, 13
W
web client, 13; examples of
troubleshooting, 90; migration and
flow of operations, 58
Windows XP Service Pack 2: notes,
28
99