1
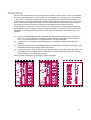
Media Usage on the Scitex FB950 Printer
Notes for Users
1
2
Table of Contents
Table of Contents ................................................................................................................................................. 3
Introduction........................................................................................................................................................... 5
Print Mode Considerations ................................................................................................................................... 5
Media Compatibility .............................................................................................................................................. 5
Flexible Media ................................................................................................................................................. 6
Rigid Media ..................................................................................................................................................... 7
Details on Specific Media Types .......................................................................................................................... 8
Acrylic Sheet (Plexiglas® and other brand names) ......................................................................................... 8
Aluminum Composite Materials (Alumacorr®, Allumalite®, Dibond®, and other brand names) ....................... 9
Card Stock .................................................................................................................................................... 10
Clear Vinyl Sheet .......................................................................................................................................... 11
Corrugated Fiberboard.................................................................................................................................. 12
Fluted Polypropylene (Coroplast® and other brand names) ......................................................................... 13
Foam Board (Fome-Cor® and other brand names) ....................................................................................... 14
Foamed PVC (Sintra® and other brand names) ............................................................................................ 15
Glass ............................................................................................................................................................. 16
PETG – Clear................................................................................................................................................ 17
Plywood and Medium Density Overlay (MDO) Plywood Materials ............................................................... 18
Polycarbonate Sheet (Lexan®, Makrolon®, Tuffak®)...................................................................................... 19
Polystyrene Sheet ......................................................................................................................................... 20
Polystyrene-Faced Foam Board (Gatorplast® and other brand names) ....................................................... 21
General Recommendations ................................................................................................................................ 22
Table Setup................................................................................................................................................... 22
Media Feed ................................................................................................................................................... 22
Other Printer Configuration Notes................................................................................................................. 23
Print Mode Selection ..................................................................................................................................... 24
Static Electricity............................................................................................................................................. 24
Using the Straight-Through Media Path ............................................................................................................. 25
Loading Media .............................................................................................................................................. 25
Media Measurement Options ........................................................................................................................ 26
Edge-to-Edge Printing ........................................................................................................................................ 26
Loading Media for Edge-to-Edge Printing ..................................................................................................... 26
Overprinting .................................................................................................................................................. 27
Two-Sided Printing ............................................................................................................................................. 28
General Notes ............................................................................................................................................... 28
Loading Media for Two-Sided Printing .......................................................................................................... 28
Preparing Image for Two-Sided Printing ....................................................................................................... 28
Multiple Sheet Printing ....................................................................................................................................... 29
Margins ......................................................................................................................................................... 29
Uneven Rows................................................................................................................................................ 29
3
4
Introduction
This handbook contains a collection of techniques and recommendations for achieving best output
using the Straight-Through Paper Path (STPP) for rigid applications and the roll-to-roll web for flexible
applications on the HP Scitex FB950 printer. These instructions provide you with a general knowledge
of media handling, its characteristics and specific normal operation procedures. Your prerequisite
operation experience is recognized and it is not considered necessary to discuss basic operational
principles.
Instructions in this handbook provide the best operating instructions under most circumstances;
however they are not a substitute for sound judgment. Multiple situations or scenarios may require
modification of the procedures. Individual print results may vary. Additionally, users may discover more
tips and tricks to improve on their success with specific media types on this product.
The selected media types were tested with the following criteria:
Print Accuracy within 0.2% in both the scan and print axes
Repeatability of the print
Consistency of Image Quality
Use by a fully trained, moderately skilled operator
Print Mode Considerations
For the sake of this handbook, the primary purpose of Billboard Print Mode is for creating drafts or proof
prints. In certain instances it may be used to produce sellable output as long as the buyer and seller
understand that the viewable distance for output generated in Billboard Print Mode is greater than 100
feet (30 m). Billboard Print Mode is unable to utilize jet mapping features as there are insufficient
swaths to incorporate jet substitution. Printing in Billboard Print Mode with a single missing jet will result
in horizontal banding anomalies throughout the image. Printing in 600x300 Production Print Mode will
provide throughput equivalent to Billboard with the additional advantage of jet replacement.
A tradeoff for printing with 600x300 Print Modes is the reduced color gamut with lower resolution when
compared with 600x600 Print Modes.
When selecting a print mode to employ for a specific application it is important to take a few factors into
consideration: the level of throughput (speed) needed to complete the job, the viewing distance for the
application, and the type of application that is to be printed. If a certain print mode selected does not
generate the desired result, it may be necessary to select a higher quality print mode.
Media Compatibility
HP Scitex FB950 printers work better with some media than with others. The tables on the following
pages indicate certain media types that have been tested with the HP Scitex FB950 printers. There are
many different types of media available in the marketplace and this list captures several of the most
typical ones but at the same time this is not a complete list of all compatible media. See the following
sections of this document for important additional details on each rigid media type.
5
Flexible Media
Printing with flexible material is possible with the optional Supply & Takeup Support System. Flexible
material should be tightly and evenly spooled onto 3-inch (7.62 cm) cores that do not exceed 98.5
inches (2.5 m) in width. The maximum diameter for the roll of media is 7.5 inches (19 cm).
For details on loading and printing on flexible media, please consult the HP Scitex FB950 User Manual,
Load and Print on Roll-Fed Media, p. 24. The User Manual may be downloaded for future reference
from http://www.hp.com/go/graphicarts.
•
Depending on a variety of factors such as intended application, ink coverage, and individual media
characteristics, a series of user configurable adjustments may help to achieve the desired end
result. Such adjustments include printing in slower print modes, vacuum settings, slightly higher
head height than nominal (0.085 inches or 0.216 cm.) may be needed to prevent the carriage from
rubbing, and adjustment of RIP ink saturation levels, as representative examples.
Tests show reliable results with the following flexible media
Table 1 Flexible Media Compatibility shown with the following media:
Media Type
Supported Print Details
Modes
Adhesive Backed
Vinyl
All
Blue Backed Solvent
Paper
All
Fabric
All
Susceptible to excessive stretching, may perform better when using a backing
material. Proper liner alignment is important to minimize bulging and headstrike
damage.
Heavy Textile
Limitations
Little air passes through the media so reduced risk of ink dust dots on the media.
Best text detail performance in 1200x600 and 600x600 print modes.
High-density
Polyethylene (HDPE)
Limitations
Very susceptible to warping when exposed to the heat generated by the UV
lamps.
Perforated Window
Cling Vinyl
Larger holes required for best performance. Use color profile that delivers lightest
ink load.
Satin Canvas
Limitations
Scrim Banner Vinyl
All
Smooth Banner Vinyl
All
Soft Plastic
All
Solvent Gloss
Canvas
All
Best text detail performance in 1200x600 and 600x600 print modes.
Non-reinforced soft plastics are susceptible to excessive stretching, may perform
better when using a backing material. Proper liner alignment is important to
minimize bulging and headstrike damage.
Solvent Matte Canvas All
UV Photobase
All
6
Rigid Media
One advantage of flatbed printers over platen printers is that the media drive system provides for a
more consistent advance rate. With the belt-fed system there is little need to perform media feed
calibrations when switching between media types or sizes. Printers that utilize a pinch roller/grit roller
drive mechanism are more sensitive to changes in size or weight, so media feed calibrations are
required when switching between media types.
Some media may be used only up to certain sizes or with certain print modes. For all media types and
sizes, sheet weight should not exceed the published specification for the printer of 125 lbs. (56.7 kg).
For materials between 50-250 lbs. (22-113 kg), choose Heavy when selecting weight in the Media
Wizard when to set the media belt drive motor and media advance interval.
Speed (print mode) limitations may be due either to weight restrictions, as the larger advance motions
do not work as well with the heavier weight materials and sizes, or because certain materials may
deform when subjected to sustained heat of the slower print modes.
Media tables should be level and coplanar to the flat surface of the media belt, appropriately and firmly
latched to the printer with the rollers oriented in such a fashion that they are in line with the print
direction. For printing on rigid media sheets greater than 12 feet (3.66 m) in length, a secondary set of
media tables should be attached to reduce the risk of headstrike damage.
For media with signs of warping or bowing that the vacuum table is unable to reduce, the hold down
rollers should be employed in conjunction with Warped Media Mode to reduce the risk of headstrike
damage.
Media size may impact results and certain sizes of media may not work as well with certain print modes.
The following table summarizes the maximum supported sizes per media type and points out which
media is likely to be inconsistent with certain print modes. Details can be found in the referred page.
Tests show reliable results with the following rigid media
Table 2 Rigid Media Compatibility shown with the following media:
Media
®
Acrylic Sheet (Plexiglas and other brand names)
®
®
Supported Print Modes
Details
All
Page 8
®
Aluminum Composite Materials (Alumacorr , Allumalite , Dibond ,
Limitations
and other brand names)
Page 9
Card Stock
All
Page 10
Clear Vinyl Sheet
All
Page 11
Corrugated fiberboard (clayfaced, kraft paper, and bleached), C
flute or smaller
All
Page 12
Fluted polypropylene / corrugated plastic (Coroplast , Interplast ,
etc.)
Limitations
Page 13
Foam board (Fome-Cor, Kappa, etc.)
All
Page 14
Foamed PVC (Sintra , Komatex , Celtec , etc.)
All
Page 15
Glass
Limitations
Page 16
PETG – Clear
All
Page 17
Limitations
Page 18
All
Page 19
All
Page 20
Limitations
Page 21
®
®
®
®
®
Plywood / Medium Density Overlay (MDO) Plywood
®
®
®
Polycarbonate Sheet (Lexan , Makrolon , Tuffak )
Polystyrene Sheet
®
®
Polystyrene-faced foam board (Gatorplast , Gatorplast , etc.)
7
Details on Specific Media Types
Acrylic Sheet (Plexiglas® and other brand names)
Considerations
•
Supported () print modes and resolutions:
1200x600
HQ
Prod
600x600
BB
HQ
Prod
600x300
BB
HQ
Prod
BB
Recommendations for best results
Preparation
• Peel the protective film off one side. If firmly affixed to media, adhesive-backed protective films can
be left on the backside while printing. This type of film creates less static when removed but
without it material can slip causing problems with registration. Print on the side without any
lettering or graphics on the protective film to avoid transfer effect from printed areas.
•
Wipe the media with an anti-static cloth or other device to remove static charge and possible
cutting remnants. Use only alcohol or approved plastic cleaner if needed.
•
These materials are heavy in larger sizes. Do not exceed the maximum weight stated in the
specifications. Flatness, size, smoothness, and weight will affect the consistency of media feed
through the printer.
•
Depending on end-use application, ink adhesion may be an issue. Clean the media as directed
and use a color profile that has low ink saturation.
•
Ink saturation and curing is best with Production or High Quality Modes in 600x600. If the
application calls for reverse printing the image will need to be flipped in the server or at the
application.
•
•
Use Low or Medium lamp settings depending on the material’s tolerance to heat.
•
Media may expand and contract during printing so a slightly higher head height than nominal
(0.085 inches or 0.216 cm.) may be needed to prevent the carriage from rubbing.
•
Use Backlit or UV White Opaque Film color profiles, or generic dot gain model depending on
application.
•
Media Feed Calibration is not necessary when switching between media types or when switching
between sizes.
Printing
These materials are usually heavy enough to lie flat, but it is important that there is a sufficient
level of vacuum to facilitate registration a setting of 5 should provide reasonable balance.
Output Handling
• Take care when lifting sheets off the table as media, especially polycarbonate, may scratch. Use
clean, cotton gloves to avoid fingerprints.
8
Aluminum Composite Materials (Alumacorr®, Allumalite®,
Dibond®, and other brand names)
Considerations
•
Supported () print modes and resolutions:
1200x600
HQ
Prod
600x600
BB
HQ
Prod
600x300
BB
HQ
Prod
BB
Recommendations for best results
Preparation
• Print on the side without any lettering or graphics on the protective film to avoid transfer effect from
printed areas. Clean well with lint-free cloth moistened with isopropyl alcohol.
•
Extra precautions should be taken when inspecting and selecting media for print applications. Nonflat materials or those with damaged corners and ends may induce printhead damage while
printing.
•
•
•
As this material is costly, it is best to run in Production or High Quality.
•
•
Use Low or Medium UV lamp settings.
•
Use a Foamed PVC color profile or another generic equivalent.
Printing
This media has low dot gain so 600x600 is the best resolution, as it places the most ink.
A head height higher than the standard 0.085 inches (2.16 cm) may be necessary to avoid
damaged or bowed edges that will interfere with the path of the carriage.
This material is usually heavy enough to lie flat without any belt vacuum; if not properly handled
and stored, however the material can bow. The material should be shipped and stored flat. The
vacuum level has very little influence but a setting of 5 or higher is recommended. If the edges are
bent, they should be flattened before imaging.
Output Handling
• No special handling required.
9
Card Stock
Considerations
•
•
C-size flutes or smaller sizes perform best
•
Supported () print modes and resolutions:
Certain coated sheets may cause ink to pool and cure unevenly, yielding a poor image quality
print. Be sure to test coated materials for compatibility before purchasing significant quantities.
1200x600
HQ
Prod
600x600
BB
HQ
Prod
600x300
BB
HQ
Prod
BB
Recommendations for best results
Preparation
• Clean with a lint-free cloth to remove any dust and handle with gloves to avoid fingerprints on the
edge of the media. Although not always visible, oils from your fingers may still mar surface and
affect image quality. Since the material creases easily watch for edges that may strike the carriage.
•
Larger flute sizes on corrugated stock can inhibit media feed. Only C flutes and smaller sizes are
recommended.
•
Depending on ink coverage and image content, all modes may print acceptably. Solid colors look
best in High Quality Mode or 600x600.
•
•
UV Lamps: Use the low UV lamp power setting.
•
Select UV Photobase or equivalent color profiles
Printing
Depending on thickness vacuum may need to be increased or decreased, a setting of 5 is a good
balance allowing for good feed and preventing puckering of the material.
Output Handling
• If tape is necessary, use low-tack tape that is easy to remove. Pull it off slowly to avoid removing
the top layer of coated paper. Again, this media creases easily, especially in printed areas, as ink
increases stiffness. Take care when lifting it off table to avoid creases.
10
Clear Vinyl Sheet
Considerations
•
Supported () print modes and resolutions:
1200x600
HQ
Prod
600x600
BB
HQ
Prod
600x300
BB
HQ
Prod
BB
Recommendations for best results
Preparation
• Dust with a lint-free cloth to remove any dust and handle with gloves to avoid fingerprints on edge
of media
•
Use isopropyl alcohol to clean handling edges. Although not always visible, oils from fingers may
still mar surface for printing.
•
Media is prone to static so it may benefit from wiping with anti-static device prior to printing.
•
High Quality 600x600 mode is recommended, but depending on ink coverage and image content,
other supported modes may print acceptably.
•
•
•
Use low UV lamp setting.
Printing
Use the Media Wizard vacuum settings, increasing if necessary.
Use Polystyrene color profile, or Foamed PVC or a generic equivalent.
Output Handling
• Adhesion may be poor on this media. Print in a higher quality mode, use a higher UV lamp power,
and/or wait 24 hours before trimming to improve adhesion.
•
Always use a sharp blade when cutting and be aware that some ink flaking will occur in high ink
load areas unless trimmed outside of the printed area.
11
Corrugated Fiberboard
Considerations
•
•
C-size flutes or smaller sizes perform best
•
Supported () print modes and resolutions:
Certain coated sheets may cause ink to pool and cure unevenly, yielding a poor image quality
print. Be sure to test coated materials for compatibility before purchasing significant quantities.
1200x600
HQ
Prod
600x600
BB
HQ
Prod
600x300
BB
HQ
Prod
BB
Recommendations for best results
Preparation
• Clean with a lint-free cloth to remove any dust and handle with gloves to avoid fingerprints on the
edge of the media. Although not always visible, oils from your fingers may still mar surface and
affect image quality. Since the material creases easily watch for edges that may strike the carriage.
•
Larger flute sizes on corrugated stock can inhibit media feed. C-size flutes and smaller are
recommended.
•
Depending on ink coverage and image content, all modes may print acceptably. Solid colors look
best in High Quality Mode or 600x600.
•
•
UV Lamps: Use the low UV lamp power setting.
•
Select UV Photobase or equivalent color profiles
Printing
Depending on thickness vacuum may need to be increased or decreased, a setting of 5 is a good
balance allowing for good feed and preventing puckering of the material.
Output Handling
• If tape is necessary, use low-tack tape that is easy to remove. Pull it off slowly to avoid removing
the top layer of coated paper. Again, this media creases easily, especially in printed areas, as ink
increases stiffness. Take care when lifting it off table to avoid creases.
12
Fluted Polypropylene (Coroplast® and other brand names)
Considerations
•
Supported () print modes and resolutions:
1200x600
HQ
Prod
600x600
BB
HQ
Prod
600x300
BB
HQ
Prod
BB
Recommendations for best results
Preparation
• Ensure that the ionizer is power on and functioning.
• Apply isopropyl alcohol greater than 90% and wipe down each sheet prior to printing for additional
static control.
•
•
Wipe with an anti-static cloth or device to remove static charge and possible cutting remnants.
•
Media is often supplied un-square, so trimming it to square may be necessary for some
applications, such as edge to edge printing. Make sure all edges are cut clean and are free of
burrs and/or excess material. Due to the substrate tending to be out-of-square, higher than normal
skew values may need to be accepted to print on material.
•
Load media first by aligning to the front media alignment bar and ensure that the media is loaded
off of the user side alignment fence such that any edge skew will not affect media feed.
•
Substrate tends to carry a higher than average static charge - extra care, such as avoiding
carpeted surfaces and sliding the media on itself, should be used to keep the media neutral.
•
Marginally flat substrates may be bent before loading such that the material will feed acceptably.
•
Media is heat-sensitive. Faster print modes, higher than standard head height, and/or printing
delays, and/or may be required in some combination to achieve best output.
•
•
Print with the flutes perpendicular to the carriage for best media feed accuracy and image quality.
•
•
Use the low lamp setting
•
Use pre-defined vacuum settings on the printer.
Ensure that media tables are attached and secured to the printer to provide a grounding path for
static loaded material.
Printing
The use of a profile created for Coroplast or a Generic Low Coverage profile will ensure the best
coverage without effecting cure.
Depending on operating environments such as high heat or low humidity, a print delay may be
necessary. Slower print speeds tend to deliver more heat into the media, so introduce print delays
or use faster print speeds to minimize/avoid bowing due to heat while printing if a slower print
mode must be used. The media is sensitive to high heat and may buckle along flutes, especially in
areas with heavy ink coverage. Use the low lamp setting or as little UV power as necessary to cure
the ink.
Output Handling
• Adhesion can vary on this media; print in a higher quality mode, and/or wait 24 hours for ink to fully
cure to improve adhesion. Sometimes it is also beneficial to wait 24 hours before cutting media
that has ink on the edges.
•
When cutting this media always use a sharp blade and be aware that some ink flaking may occur
in high ink load areas unless it is trimmed outside the printed area.
13
Foam Board (Fome-Cor® and other brand names)
Considerations
•
Supported () print modes and resolutions:
1200x600
HQ
Prod
600x600
BB
HQ
Prod
600x300
BB
HQ
Prod
BB
Recommendations for best results
Preparation
• Dust with a lint-free cloth to remove any dust and handle with gloves to avoid fingerprints on the
edge of this media. Although it is not always visible, oils from fingers may mar the surface and thus
affect image quality.
•
Make sure all edges are flat - facing material can 'lift' off of foam on edges which can lead to head
strikes. Substrate is susceptible to dents and it damages easier than most media types.
•
Do not attempt to 'twist' the media while loaded as this can lead to damage by the engaged pinch
rollers.
•
•
In general all modes should print acceptably.
•
This media holds moisture, so when heated it is prone to warping, which can reduce the
effectiveness of the belt vacuum. Use the pre-defined vacuum setting on the printer and increase if
necessary.
Printing
Images with high ink saturation and slow print speeds may require print delays. This media is
sensitive to high heat and will bow, so use the low lamp setting when possible. Slower print speeds
tend to deliver more heat into the media - introduce print delays or use faster print speeds to
minimize/avoid bowing due to heat while printing.
Output Handling
• You can usually recover from heat warp by laying this media flat and allowing it to cool.
• Always use a very sharp blade when trimming.
• Substrate is susceptible to dents and it damages more easily than most media types.
14
Foamed PVC (Sintra® and other brand names)
Considerations
•
Supported () print modes and resolutions:
1200x600
HQ
Prod
600x600
BB
HQ
Prod
600x300
BB
HQ
Prod
BB
Recommendations for best results
Preparation
• If the media has a protective film attached, peel the protective film off one side. If firmly affixed to
media, adhesive-backed protective films can be left on the backside while printing. This type of film
creates less static when removed but without it material can slip causing problems with
registration. Print on the side without any lettering or graphics on the protective film to avoid
transfer effect from printed areas.
•
Wipe the media with an anti-static cloth or other device to remove static charge and possible
cutting remnants. Use only alcohol or approved plastic cleaner if needed.
•
•
If there is a smoother side of the media print on that side.
•
•
•
•
Depending on ink coverage and image content, all modes will print acceptably.
Clean with a lint-free cloth to remove any dust and handle with gloves to avoid fingerprints on the
edge of this media. Use Isopropyl Alcohol to clean handling edges. Although it is not always being
visible, oil from your fingers may still affect the surface and reduce print quality.
Printing
UV Lamps: Use low UV lamp setting.
Use the default wizard setting for vacuum.
Use Foamed PVC color profile.
Output Handling
• No special handling required.
• If adhesion poor, as is sometimes the case, print in a higher quality mode and/or wait 24 hours
before trimming to improve adhesion.
•
Always use a sharp blade when cutting and be aware that some ink flaking may occur in high ink
load areas.
15
Glass
Considerations
•
Light reflectivity and refractivity will directly impact printhead jetting health. UV ink, even while
jetting, will begin to cure in the printhead orifice plate if exposed to stray UV light.
•
Adjusting the UV Shutter Aperture may help to reduce the amount of errant UV light that is
projected to the printheads. Individual results may vary by reflectivity, refractivity, head height
above the media, opacity, and UV treatment of the glass, so experimentation will be necessary to
find an optimal recipe for curing, adhesion, and image quality.
•
Depending on the application, High Quality Unidirectional printing with the Leading Lamp
Shuttered may reduce the amount of light projected to the printhead orifice plate and provide
sufficient curing of the inks; which will also reduce the throughput of the print.
•
To minimize the impact of stray UV light on the printheads, purging and hand cleaning of the
printheads may be necessary to avoid inducing permanent damage.
•
Supported () print modes and resolutions:
1200x600
HQ
Prod
600x600
BB
HQ
Prod
600x300
BB
HQ
Prod
BB
Recommendations for best results
Preparation
• Clean well with a glass cleaner followed by alcohol.
Printing
•
These materials are heavy in larger sizes. Do not exceed the maximum weight. Flatness, size,
smoothness, and weight will affect the consistency of media feed through the printer.
•
Cleaning the media as directed and using a color profile that has low ink saturation can reduce ink
adhesion issues found with some end use applications.
•
Ink saturation and curing are best in Production or High Quality modes. Print reversed from the
server. 1200x600 will provide better coverage than 600x600.
•
•
Use low lamp settings.
•
Use Backlit or a generic color profile, depending on application
These materials are usually heavy enough to lie flat, minimal belt vacuum should be used to
prevent additional drag and effect registration.
Output Handling
• Shows fingerprints easily, so handle with gloves at all times.
• Depending on the end use application, a post treatment may be necessary to minimize risk of
damage to the UV ink caused by scratching or other surface damage.
16
PETG – Clear
Considerations
•
Supported () print modes and resolutions:
1200x600
HQ
Prod
600x600
BB
HQ
Prod
600x300
BB
HQ
Prod
BB
Recommendations for best results
Preparation
• Peel the protective film off one side; place this side up on table. If firmly affixed to media, adhesive
based protective films can be left on the backside while printing. Print on the side without lettering
or graphics on the protective film to avoid transfer effect from printed areas. This type of film
creates less static when removed.
•
•
Ensure that the ionizer is power on and functioning.
•
•
Wipe with an anti-static cloth or device to remove static charge and possible cutting remnants.
•
These materials are heavy in larger sizes. Do not exceed the maximum weight specifications for
the printer. Flatness, size, smoothness, and weight will affect the consistency of media feed
through the printer.
•
Depending on end-use application, ink adhesion may be an issue. To minimize this issue, clean
the media as directed and use a color profile that has low ink saturation.
•
•
•
•
Ink saturation and curing are best in Production or High Quality modes
•
Use Backlit or a generic color profile, depending on application.
Apply isopropyl alcohol greater than 90% and wipe down each sheet prior to printing for additional
static control.
Ensure that media tables are attached and secured to the printer to provide a grounding path for
static loaded material.
Printing
Use Low or Medium lamp setting depending on number of hours on lamps and curing efficiency.
These materials usually are heavy enough to lie flat without belt vacuum
The media may expand and contract during printing. If possible use material with known good
thermal expansion characteristics.
Output Handling
• Handle with clean cotton gloves to avoid fingerprints
• Use care when lifting sheets off table, as the media may be scratched
17
Plywood and Medium Density Overlay (MDO) Plywood
Materials
Considerations
•
Due to the natural tendencies of Plywood and Medium Density Overlay Plywood (MDO) to warp
and the overall surface smoothness of the product, it can be difficult to attain a consistent rate of
media advance or produce repeatable results with this media. If deciding to print with this media,
precautions should be taken to minimize the risk of printhead damage from warped media and to
minimize the effects of poor media advances.
•
Supported () print modes and resolutions:
1200x600
HQ
Prod
600x600
BB
HQ
Prod
600x300
BB
HQ
Prod
BB
Recommendations for best results
Preparation
• Print on the side without any lettering or graphics on the protective film to avoid transfer effect from
printed areas. Clean well with lint-free cloth moistened with isopropyl alcohol.
Printing
•
•
•
As this material is costly, it is best to run in Production or High Quality.
•
•
Use Low or Medium UV lamp settings.
•
•
Use a Foamed PVC color profile or another generic equivalent.
This media has low dot gain so 600x600 is the best resolution, as it places the most ink.
A head height higher than the standard 0.085 inches (2.16 cm) may be necessary to avoid
damaged or bowed edges that will interfere with the path of the carriage.
This material is usually heavy enough to lie flat without any belt vacuum; if not properly handled
and stored, however the material can bow. The material should be shipped and stored flat. The
vacuum level has very little influence but a setting of 5 or higher is recommended. If the edges are
bent, they should be flattened before imaging.
Set the printer to Heavy media mode to account for the weight of the sheet(s).
Output Handling
• No special handling required.
18
Polycarbonate Sheet (Lexan®, Makrolon®, Tuffak®)
Considerations
•
Supported () print modes and resolutions:
1200x600
HQ
Prod
600x600
BB
HQ
Prod
600x300
BB
HQ
Prod
BB
Recommendations for best results
Preparation
• Peel the protective film off one side; place this side up on table. If firmly affixed to media, adhesive
based protective films can be left on the backside while printing. Print on the side without lettering
or graphics on the protective film to avoid transfer effect from printed areas. This type of film
creates less static when removed.
•
•
Ensure that the ionizer is power on and functioning.
•
•
Wipe with an anti-static cloth or device to remove static charge and possible cutting remnants.
•
These materials are heavy in larger sizes. Do not exceed the maximum weight for this printer.
Flatness, size, smoothness, and weight will affect the consistency of media feed through the
printer.
•
Depending on end-use application, ink adhesion may be an issue. To minimize this issue, clean
the media as directed and use a color profile that has low ink saturation.
•
•
•
•
Ink saturation and curing are best in Production or High Quality modes
•
Use Backlit or a generic color profile, depending on application.
Apply isopropyl alcohol greater than 90% and wipe down each sheet prior to printing for additional
static control.
Ensure that media tables are attached and secured to the printer to provide a grounding path for
static loaded material.
Printing
Use Low or Medium lamp setting depending on number of hours on lamps and curing efficiency.
These materials usually are heavy enough to lie flat without belt vacuum
The media may expand and contract during printing. If possible use material with known good
thermal expansion characteristics.
Output Handling
• Handle with clean cotton gloves to avoid fingerprints
• Use care when lifting sheets off table, as the media may be scratched
19
Polystyrene Sheet
Considerations
•
Supported () print modes and resolutions:
1200x600
HQ
Prod
600x600
BB
HQ
Prod
600x300
BB
HQ
Prod
BB
Recommendations for best results
Preparation
• Dust with s lint-free cloth to remove any dust and handle with gloves to avoid fingerprints on edge
of media
•
•
Ensure that the ionizer is power on and functioning.
•
•
Wipe with an anti-static cloth or device to remove static charge and possible cutting remnants.
•
High Quality 600x600 mode is recommended, but depending on ink coverage and image content,
other supported modes may print acceptably.
•
•
•
Use low UV lamp setting.
Apply isopropyl alcohol greater than 90% and wipe down each sheet prior to printing for additional
static control, as well as to clean handling edges. Although not always visible, oils from fingers may
still mar surface for printing.
Ensure that media tables are attached and secured to the printer to provide a grounding path for
static loaded material.
Printing
Use the Media Wizard vacuum settings, increasing if necessary.
Use Polystyrene color profile, or Foamed PVC or a generic equivalent.
Output Handling
• Adhesion may be an issue on this media. Print in a higher quality mode, use a higher UV lamp
power, and/or wait 24 hours before trimming to improve adhesion.
•
Always use a sharp blade when cutting and be aware that some ink flaking will occur in high ink
load areas unless trimmed outside of the printed area.
20
Polystyrene-Faced Foam Board (Gatorplast® and other brand
names)
Considerations
•
Supported () print modes and resolutions:
1200x600
HQ
Prod
600x600
BB
HQ
Prod
600x300
BB
HQ
Prod
BB
Recommendations for best results
Preparation
• Ensure that the ionizer is power on and functioning.
• Apply isopropyl alcohol greater than 90% and wipe down each sheet prior to printing for additional
static control.
•
•
Wipe with an anti-static cloth or device to remove static charge and possible cutting remnants.
•
Handle with gloves to avoid edge handling fingerprints
•
A print delay of 1 second or more is recommended to avoid bowing of the media, which can cause
head rubs.
•
Use low UV lamp setting. This media is sensitive to high heat, especially in high ink-load dark
areas. Use as little UV power as necessary to cure.
•
•
A strong belt vacuum is required.
Ensure that media tables are attached and secured to the printer to provide a grounding path for
static loaded material.
Printing
Use Polystyrene color profile, or a Foamed PVC or a generic equivalent.
Output Handling
• Adhesion may be an issue on this media. Print in a higher quality mode, use a higher UV lamp
power, and/or wait 24 hours before trimming to improve adhesion.
•
Always use a sharp blade when cutting and be aware that some ink flaking will occur in high ink
load areas unless trimmed outside printed area. Rotor blades may provide better results than
straight blades.
•
Do not stack freshly printed sheets on top of each other for extended periods of time.
21
General Recommendations
Table Setup
•
Ensure the printer is on an even or flat surface, preferably level. The tables should be co-planar
with the belt. Adjusting the tables to be co-planar is easier if the printer is on a level surface.
•
•
•
The input table should be set so that the table rollers are the same height as the media belt.
The output table should be set so that the table rollers are the same height as the belt.
The height of the rollers may vary from left to right; adjust the tables from the tallest set on the left
and right side of the printer.
•
A long level or a flat piece of material should be used for making adjustments. Do not use
substrates if possible since they can bow and warp or otherwise not be flat.
•
Make multiple adjustments alternating from side to side to prevent the tables from having any
significant tilt.
•
Before printing, ensure that the table latches are securely fastened to establish a proper grounding
path. This is especially important for media types with high static content as the latches secure a
grounding path; reducing the possibility for electrostatic discharge (ESD).
•
If printing on rigid sheets of media that exceed 12 feet (3.66 m) it is recommended that a
secondary set of media tables are purchased.
Media Feed
•
Depending on the weight, flatness and effect of bowing due to the UV lamps, media feed can vary
if the substrate is allowed to drag on the belt as opposed to when the substrate is making contact
with the output rollers.
•
The recommended method of media feed is the 39-inch (990 mm) calibration pattern with the plot
starting at the leading edge of the material to get the best average. For optimal accuracy, across
the full diameter of the media belt, the media feed calibration pattern should be performed three
times consecutively.
22
Media Properties
•
Store media flat, in a clean environment with the same or similar temperature and humidity as the
printer.
•
For best results, individual sheets of media should be flat. Curves in either axis of the media (left to
right, or front to back) can lead to head strikes of the carriage on the media. Accuracy of dot
placement or overall feed accuracy can also be affected by non-flat media.
•
For best results, media should have parallel opposite edges with 90° corners. Media that is not
square with itself will require extra attention when loading.
•
•
The maximum weight of the material per printer specification is less than 125lbs. (56.7 kg).
•
•
•
The front and back of the material should be clean and dry.
•
Be careful to avoid substrates with bent or damaged edges on the material, especially engineered
material such as Alumacorr or Dibond. They may create drag along surfaces such as the belt and
cause a significant change in feed or cause the material to skew.
•
Heavy substrates or sheets with a significant bow or bend will feed differently on the belt than
when contacting the output table rollers. Adjust the belt vacuum fans to Maximum to determine if
the media will suction to the belt; removing the bow. If unsuccessful and the job or size of the print
job allows for adjustment, use a leading margin of four to six inches.
For materials between 50-250 lbs. (22-113 kg), choose Heavy when selecting weight in the Media
Wizard when to set the media belt drive motor and media advance interval.
Some substrates may have different feed and handling characteristics from sheet to sheet.
Some substrates may have a coating on them; giving the effect of a glossy image. Certain coatings
may cause ink to pool and cure unevenly, yielding a poor image quality print. Be sure to test
coated materials for compatibility before purchasing significant quantities.
Other Printer Configuration Notes
•
Certain print modes and lamps settings can have an effect on handling characteristics such as
feed and skew because the material may bow. Increasing the head height and increasing the print
speed may balance this. Introducing a print pause or increasing the belt vacuum control may be
necessary.
•
Perform media feed calibrations in a representative manner relative to the way the substrate is fed
through the printer.
23
Print Mode Selection
Many cut-sheet media will work well in Production Mode. Some materials, because of their weight or
other physical properties, may give the best output in High Quality mode. Depending on the application
requirements (viewing distance, image content, level of acceptability for image quality, etc.). Plan for
some amount of experimentation the first time a media type is used.
As noted above, media that is not flat may show some output anomalies from inaccurate dot placement.
This inaccuracy stems from the bidirectional print method, which requires a flat surface in order to place
dots in the same place when printing on both directions. The typical visible defect is a grainy
appearance. For these cases, the printer has Unidirectional print modes that apply ink only in one
direction. This slows the overall throughput of the printer, but may allow you to use media that would
otherwise be unworkable.
Static Electricity
Static electricity is often a problem when working with cut sheets, particularly of synthetic materials. The
media materials are often nonconductive, so static charges cannot dissipate on their own. Besides
minor personal discomfort from static shocks, static attracts foreign particles to the media surface that
prevent ink from adhering where expected. Static can also attract ink droplets to areas of the media
surface that were supposed to remain unprinted. Low humidity levels in the printer and media storage
environment can exacerbate the issue.
A number of active and passive methods can be employed to minimize static:
•
•
Maintain a humidity level of 40-60% rH in both the printer and media storage areas.
•
Wipe down the media surface with greater than 90% isopropyl alcohol (IPA) prior to printing. This
will remove any foreign particles that were attracted to the media by static.
•
For extreme static problems, careful use of an antistatic spray may be warranted. We have found
K2r Static Stopper to provide good results. Alberto-Culver Static Guard may also be used. Lightly
spray and do not allow the antistatic spray to pool on the media. Note that the ink-adhesion
properties of some media may be negatively affected by the spray, so use the minimum amount
necessary to achieve results. Adhesion decreases were typically around 10% and typically
occurred on media that already had poorer adhesion properties without the spray.
Drape copper tinsel over the media stacks and attach the tinsel to a grounding point. This will help
discharge the static from each sheet as it is removed from the stack.
24
Using the Straight-Through Media Path
Loading Media
Always load rigid substrates from the input side, never the from output side. If loaded from the output
side, the brushes on the input side may bend back and then release as the media moves, causing
output anomalies while printing.
1. Unload any roll-fed media from the printer.
2. Move the media support tables into place at the printer.
3. On the printer’s control panel, select “Load New Media”.
4. A list of predefined media entries appears. This is the Media Wizard, which assists you in
configuring the printer to work best with individual media properties.
5. Select the Media Wizard entry that most closely matches your media. If the printer settings need to
be changed to better fit your specific media, you can make those changes later.
6. The printer will display whatever settings are associated with the media you chose in step 5. If you
want to make changes to these settings now, press the button labeled “Media Settings”. Note: if
the media you chose in step 5 is a “factory” media (the media name will be followed by an asterisk
[“*”] if it is a factory media) you will be prompted to save your changes under a new name. These
changes will be saved under a new name in the Media Wizard that you can use again in the future.
7. When settings are complete, press Proceed.
8. The printer will prompt you to enter the length of the media. You must enter a value here. The
printer will make further computations based on the length of the media, so it is recommended to
enter the length accurately.
9. The printer will then load the media and set the carriage height to the value selected.
10. The printer will measure the width of the media. If the printer’s image sensor is unable to measure
the media, as may occur with clear or highly reflective media, you will be prompted to manually
locate the edges of the media by moving the carriage. See the following section on Precise Media
Alignment for additional information on media measurements.
11. Once the media width has been determined, the printer will show the current margin settings. The
default margin settings are 0.25 inches (6 mm) right and left, 0 for leading edge, and 0 for trailing
margin.
12. Press Proceed to complete the media load process.
25
Media Measurement Options
The printer can automatically measure the media in three different ways: Standard, Maximal, and
Minimal. This option is set on the printer’s control panel under “Menu -> Printer Settings -> Media
Measurement”.
•
Maximal — measures the width of the media in two places, and finds the right and left front edges
to estimate skew and detect non-rectangular sheets. This adds a few additional seconds to the
media load process but facilitates the most accurate media placement.
•
Standard — measures the width of the media once, and finds the right and left front edges to
estimate skew. This is the factory default and is recommended for most applications. (Default)
•
One Edge — measures the user- and service-end edges on the first sheet, user-end edge only on
subsequent sheets, and the front right edge (no skew detection). For single-sheet jobs only, not
available for multi-sheet N-UP. Works best on jobs with wider margins.
•
Minimal — measures the width of the media once, and finds the front right edge only. This method
is fastest but does not provide any feedback regarding possible media skew.
Choose Minimal for fastest throughput, Maximal for greatest precision and skew detection when printing
edge-to-edge.
When the printer is unable to automatically measure the media (as may occur with transparent or highly
reflective media), the printer will prompt you to measure the media width manually. Follow the controlpanel prompts to place the left edge of the carriage first at the right edge of the media, then the left
edge of the media. The printer will calculate the location on the belt and the width of the media based
on these positions.
The manual-measurement method may also be specified in the Media Wizard entry when it is known
that the automatic method will fail.
If exact image placement is not important (such as for a quick initial test of a media), you may opt not to
measure the media by pressing Cancel. You will then be prompted to enter the width of the media at the
printer’s control panel. The printer will assume that the media is at the nominal right-most position on
the belt and will begin its printing from that location. If the media is not close to nominal, then some ink
may be sprayed on the belt. Note also that there is no skew detection with either of the manual
measurement methods.
Edge-to-Edge Printing
Edge-to-Edge printing is automatically enabled when the left and right margins are set to zero. (Menu ->
Printer Settings ->Margins). In this context, we discuss only the left-to-right edges of the media. See the
following section on Extending the Printable Length for printing front-to-back as well as edge-to-edge.
Loading Media for Edge-to-Edge Printing
The procedures for loading media for Edge-to-Edge printing are the same for any other media, but the
additional considerations should be made:
•
“Centered” print position should be used. The Print Position is set on the printer’s control panel
under “Menu -> Printer Settings -> Print Position”.
•
The “Maximal” media measurement method is recommended, or “Standard” may be used if the
media is square.
As noted above, the left and right margins are set to zero for edge-to-edge printing. With the Standard
or Maximal media measurement method, the printer will report if the media appears to be skewed and
therefore will not feed straight through the print zone.
26
Overprinting
Because most media sheets are not precisely the same width from start to finish, and to accommodate
any slight media drift that may occur the printer can be configured for a variable amount of overprinting.
In this context, “overprinting” indicates how wide of a print job beyond the initial measured width of the
media the printer will accept. Ordinarily (i.e., without overprinting) the printer will reject any job sent from
the print server that exceeds the printable area of the media. When an Overprinting area is specified,
the printer will accept a print job that is the width of the media plus the overprinting amount.
The printer does not make any changes to the job; i.e., the printer does not automatically enlarge the
job or add extra pixels to create the overprint. To take advantage of the overprint area, the job must be
prepared prior to sending it through the RIP. In most cases, this preparation will consist of one of the
following:
•
Size the job slightly larger than the media width. For example, if the media is 32 inches (81 cm)
wide, then set an overprint area 0.125 inches (3 mm) and then size the job to 32.25 inches (81.9
cm). In most cases this will have a negligible effect on the rest of the image.
•
Create the job for “full bleed” so that the background, as designed, extends beyond the page
boundary.
•
For images where there is a special detail at the edge of the page, for example a border line, make
the border line thicker than usual to extend off the page.
•
To prevent a build-up of ink on the belt, place tape under the left and right edges of the media. Use
a dark-colored tape so that the printer will still see the contrast between light media and dark belt
when it measures media width automatically.
See the following illustrations for examples of each configuration.
Entire image slightly enlarged
Source file created for full bleed
Edge detail enlaged in source file
27
Two-Sided Printing
General Notes
If two-sided printing is required, waiting up to 24 hours for the ink on the front side to completely cure
may improve substrate feed performance on the back side. Low or minimum ink usage images are
recommended for two sided applications.
The success of two-sided printing depends largely on the qualities of the media. The printer uses
suction and friction to propel the media through the print zone, so good adhesion of the ink to the media
on side one is necessary to survive the printing on side two.
Loading Media for Two-Sided Printing
The printer automatically finds the media position from left to right (except in the special cases noted
earlier), so positioning on the belt is not particularly difficult. Using the techniques for front-edge
alignment described elsewhere in this document will also make front-to-back alignment reliable.
Preparing Image for Two-Sided Printing
In most situations, such as signage, the image for the second side will be rotated 180°. Using all of the
recommended practices described previously in this document, the two sides will print with alignment
suitable to the application.
SIDE ONE
555-1138
, INC.
, INC.
ERASMUSB. DRAGON
MANAGEMENT
555-1138
ERASMUSB. DRAGON
MANAGEMENT
For some applications, such as images that will be die-cut to a custom shape, the image should be
flipped in the Y-axis (top to bottom) and the media sheet also flipped in the Y-axis. This method will
achieve the greatest accuracy of alignment on the left and right edges. See the illustration below.
SIDE TWO
Typical Double-Sided Application
Image rotated 180°
SIDE ONE
SIDE TWO
Die-Cut Application
Image Flipped in the Y-axis
28
Multiple Sheet Printing
Multiple-sheet N-UP allows you to print a multiple-copy job on multiple sheets across the belt, and
multiple rows of sheets, until the job is completed.
To print multi-sheet N-UP, load multiple sheets on the printer, then send a print job from the RIP with a
quantity greater than or equal to the number of sheets you loaded. The printer will prompt you to load
more sheets until the number of copies you specified has been printed. You can also print Stored Jobs
as multi-sheet N-UP.
Margins
This type of printing works best with an image that has wide margins on all four edges, but edge-toedge printing is also possible with the appropriate printer settings, and by carefully matching the
dimensions of the image to the dimensions of the media sheets.
When printing a multi-sheet N-UP job, the image is positioned horizontally (left-to-right) as defined
under the menu option: Printer Settings
Margin Settings Margins.
Uneven Rows
You can print any number of copies in a multi-sheet N-UP job, even if the total number does not divide
evenly into the number of sheets per rom. Only the last row may have a different number of sheets.
For example: in a twenty-sheet job, you may be able to fit three sheets in each row, so you may print six
rows of three sheets, plus one row of two sheets (6x3=18, 1x2=2, 18+2=20). If the last row is a partial
row, load the sheets from the user end toward the service end.
29
© Copyright 2010 Hewlett-Packard Development Company, L.P.
The information contained herein is subject to change without notice.
The only warranties for HP products and services are set forth in the express warranty statements accompanying such
products and services. Nothing herein should be construed as constituting an additional warranty. HP shall not be liable for
technical or editorial errors or omissions contained herein.
2010-09
H
30