1
HP 2140 Fax series
User Guide
Part number: CM721-90001
invenf
© Copyright
L.R
2009 Hewlett-Packard
Development
Company,
The information contained herein is subject to change
without notice. No part of the document may be
photocopied, reproduced, or translated to another language
without the prior written consent of Hewlett-Packard
Company.
Safety information
Z_
WARNING! To prevent fire or shock hazard, do not
expose this product to rain or any type of moisture.
Always follow basic safety precautions when using this
product to reduce risk of injury from fire or electric shock.
Notice
The only warranties for HP products and services are set
forth in the express warranty statements accompanying
such products and services. Nothing herein should be
construed as constituting and additional warranty. HP shall
not be liable for technical or editorial errors or omissions
contained herein.
The Hewlett-Packard Company shall not be liable for
incidental or consequential damages in connection with, or
arising out of the furnishing, performance, or use of this
document and program material which it describes.
-h_,_ Note: Regulatory information can be found in the
Specification section of this guide.
Z_
WARNING!
Potential shock hazard
• Read and understand
all instructions
in the setup poster.
• Telephone lines can develop hazardous voltages. To avoid
electrical shock, do not touch the contacts on the end of
the cord, or any of the sockets on the HP Fax. Replace
damaged cords immediately.
• Never install telephone wiring during a lightning storm.
• Observe all warnings and instructions
product.
marked on the
• Unplug this product from wall outlets and telephone jacks
before cleaning.
• Do not install or use this product near water or when you
are wet.
• Install the product securely on a stable surface.
• Install the product in a protected
can step on or trip over the line
cord will not be damaged.
• If the product does not operate
Troubleshooting section of this
It is not lawful in many places to make copies of the
following items. When in doubt, check with a legal
representative first.
• Governmental paper or documents
- Passports
- Immigration papers
- Selective service papers
- Identification badges, cards or insignias
• Governmental stamps:
- Postage stamps
- Food stamps
• Checks or drafts drawn on Governmental agencies
• Paper currency, traveler's checks, or money orders
• Certificates of deposit
• Copyrighted works
location where no one
cord, and where the line
normally, see the
user guide.
• No operator-serviceable
parts inside. Refer servicing to
qualified service personnel.
• Use in a well ventilated area.
Contents
2
Quick start ................................................................
4
Load paper ................................................................
Load documents to fax or copy .................................................
Send a fax .................................................................
4
5
5
Receive a fax ..............................................................
6
Make a copy ...............................................................
6
Make a telephone call ........................................................
7
HP Fax basics .............................................................
8
The HP 2140 Fax ...........................................................
9
Parts of the HP Fax .......................................................
9
Control Panel of HP Fax ..................................................
10
The menus ...............................................................
12
Overview of menu options ....................................................
BASIC FAX menu .......................................................
13
13
ADVANCED
FAX menu ..................................................
14
TOOLS menu ..........................................................
Loudspeaker
15
..............................................................
15
Navigate the menus ........................................................
15
Ready mode ...........................................................
Menu buttons ..........................................................
15
15
Enter dates, times, text, and telephone numbers ..................................
Most text fields .........................................................
16
17
Fax header telephone number .............................................
Speed dialing
18
.............................................................
18
Store a number in the phone book ..........................................
18
Print the phone book .....................................................
19
Dial from the phone book .................................................
19
One-touch dialing ....................................................
19
Phone book dialing ...................................................
19
Paper types and sizes .......................................................
20
Document types and sizes ...................................................
20
Set document resolution and contrast for a single copy .............................
21
Adjust volume .............................................................
22
Ringer volume ..........................................................
22
Speaker volume ........................................................
Automatic fax redial .........................................................
22
22
Contents
1
3
Additional features ........................................................
23
Set rings to answer ........................................................
Use Caller ID .............................................................
23
24
Turn Caller ID on .......................................................
24
See who called with Caller ID .............................................
24
Print a list of Caller ID numbers ............................................
24
Block junk fax numbers .....................................................
Add a junk fax number ..................................................
Delete a number .......................................................
Favorites
................................................................
Save a document
Delete a document
Send a document
.....................................................
25
25
Print a document .......................................................
25
Step 1--Teach
the HP Fax the ring pattern
26
..................................
26
27
Step 2--Set up distinctive ring (DRPD) answer mode ..........................
Answer/receive mode ......................................................
27
27
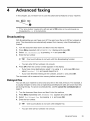
Advanced faxing ..........................................................
29
Broadcasting
.............................................................
29
Delayed fax ..............................................................
29
Polling ..................................................................
30
Setting send polling .....................................................
30
Polling another fax to receive
31
.............................................
To cancel the scheduled job .................................................
Forward faxes ............................................................
31
31
Feature reference
33
.........................................................
Set the date and time ......................................................
33
Turn on and off sounds .....................................................
33
WakeUp sounds .......................................................
Alarm sounds .........................................................
33
33
Key sounds ...........................................................
Silent mode ...........................................................
34
34
Set the fax header information
...............................................
Print reports ..............................................................
Automatic
reports
......................................................
Reports you can print ...................................................
34
34
34
35
Reprinting faxes ..........................................................
Clearing memory ..........................................................
36
36
Loudspeaker
37
.............................................................
Redial a number in memory
2
25
......................................................
Distinctive ring (DRPD) .....................................................
5
24
25
25
......................................................
Image TCR ..............................................................
4
24
Contents
.................................................
37
Care and maintenance
.....................................................
38
Print cartridge information ....................................................
View ink level .............................................................
38
38
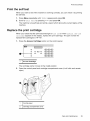
Print the self test ...........................................................
39
Replace the print cartridge ...................................................
39
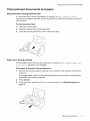
Clear jammed documents and paper ...........................................
41
Document jams during transmission .........................................
41
To clear document jam: ................................................
41
Paper jams during printing ................................................
41
If the paper is jammed in the printing area .................................
41
If the paper is jammed in the paper feed area ..............................
42
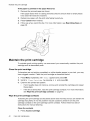
Maintain the print cartridge ...................................................
42
Clean the print cartridge ..................................................
42
Wipe the print cartridge contacts ............................................
Clean the contacts ...................................................
42
42
Clean the cartridge carrier contacts ......................................
Clean the document scanner area .............................................
43
44
Adjust the scanner
.........................................................
45
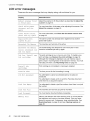
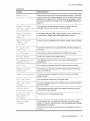
LCD error messages ........................................................
46
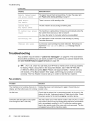
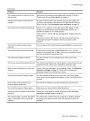
Troubleshooting
48
...........................................................
Fax problems
..........................................................
48
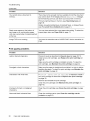
Print quality problems ....................................................
50
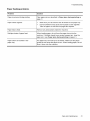
Paper feeding problems
51
Specifications
..................................................
and regulatory information .....................................
52
Paper types and sizes .......................................................
52
Document types and sizes ...................................................
52
Acceptable documents
...................................................
52
Print cartridge .............................................................
53
Product specifications
53
.......................................................
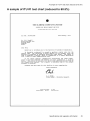
A sample of ITU #1 test chart (reduced to 60.5%) .................................
55
Environmental
56
product stewardship
program .....................................
Regulatory notices .........................................................
57
Use Hewtett-Packard
59
support services ..........................................
Declaration of conformity ....................................................
Hewlett-Packard LIMITED WARRANTY STATEMENT .............................
61
62
Index .......................................................................
63
Contents
3
1
Quick start
This chapter gives you a quick introduction to the basic functions of your new fax
machine. Please refer to the later chapters for detailed instructions.
1
The "arrow buttons" located at the left and right of OK button on the control panel are
des gnated by _
!, in the instructions.
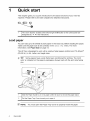
Load paper
You can load up to 50 sheets of plain paper in the input tray. Before loading the paper,
make sure the paper size is set correctly in the BASIC £AX menu. For more
information, see Paper Size on page 13.
The HP Fax is designed to work with a variety of plain papers (cotton bond 75-90 g/m 2
(20-24 lb.)) in A4, Letter, and Legal sizes.
_! TIP: Some papers have a side that's been conditioned for printing. The "print
side" is indicated on the paper's packaging. Always load with the print side facing
you.
1
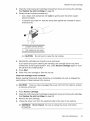
Slide the Paper Guide to Ltr or A4 paper width. Be sure not to bind the paper stack.
2
Pull the Paper Tray Cover toward you to open it.
_
4
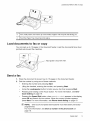
NOTE:
Quick start
You must open the Paper
Tray Cover
to properly
insert the paper.
Load
documents
tofaxorcopy
3
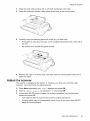
Fan,
neatly
stack,
theninsert
upto50sheets
ofpaper
withtheprint
sidefacing
you.
4
Push
thePaper
TrayCover
back
intoplace.
Load documents
to fax or copy
You can load up to 15 pages in the document feeder. Load the documents face down
(printed side toward the machine).
Adjust guides to document width.
Send a fax
1.
Place the document to be sent (up to 15 pages) in the document feeder.
2.
Dial the number by using one of these methods:
•
Entering the number and pressing Start.
•
Lifting the handset, entering the number, and pressing Start.
•
Using the Loudspeaker
•
Pressing and holding a One Touch button. For more information, see Onetouch dialing on page 19.
•
Pressing the Speed Dial button, when Sea_ch & nlal appears in the display,
press OK and search for the number. When the correct number appears,
press Start. For more information, see Phone book dialing on page 19.
button to listen as you dial, then pressing Start.
_" NOTE: One touch and speed dial locations must have been previously
programmed.
For more information, see Store a number in the phone book on
page 18.
Quick start
5
Receive
afax
Receive a fax
How faxes are received depends on how the Answer Mode/Receive Mode is set.
For more information, see Set rings to answer on page 23.
FAX answer mode
The fax machine will answer the telephone, automatically detect fax tones, and receive
a fax.
_
TIP: However, if you accidentally answer the telephone and hear fax tones,
press the Start button to receive the fax.
AUTO answer mode
In AUTO mode the telephone rings for a certain number of rings (see Set rings to
answer on page 23), then switches to FAX receiving.
TEL answer mode
If the answer Mode is set to TEL, you must manually receive faxes.
1. Answer the telephone.
2.
If you hear fax tones, press the Start button.
3.
Once you hear fax tones from both machines (this may take several seconds),
you should hang up the telephone.
Make a copy
You can make multiple copies of a 15 page document.
Single copymdefault settings
1. Turn the page face down and insert it into the document feeder.
2.
Press Copy twice.
Multiple copies or copies with options/settings
1. Turn the page face down and insert it into the document feeder.
2.
Press Copy.
Number of
Copies
then 01 [01-50]
wilt display.
3.
If you want more than one copy, use the phone pad to enter the number of copies.
4.
Press Copy to start copying or press OK to go to the next option.
Zoom
then 97% will display.
Rate
5.
Press _
6.
Press Copy to start copying or press OK to go to the next option.
Print
7.
I' to select the reduction or enlargement percentage you want (50-150).
Order
Press _
then
Normal
will display.
I' to select Reverse
if yOU want the last page printed first.
Printing the copies in reverse order will cause the first page to be on top when the
copy is complete.
8.
6
Quick start
Pressing either Copy or OK will start copying.
Make
atelephone
call
Make a telephone call
Use one of the following methods:
•
Pick up the handset and dial the number.
•
Press and hold a One Touch number. This turns on the speaker. When you are
connected, pick up the handset. For more information, see One-touch dialing on
page 19.
•
Press the Speed Dial button, when Sea_ch _ nlaZ appears in the display, press
OK and search for the number. When the correct number appears, press Start.
This turns on the speaker. When you are connected, pick up the handset. For more
information, see Phone book dialing on page 19.
_
NOTE: One touch and speed dial locations must have already been entered
before you can use them. For more information, see Store a number in the
phone book on page 18.
Quick start
7
2
HP Fax basics
This chapter lists the basic features of your new HP Fax and introduces you to the
machine.
The HP Fax features
The HP Fax offers the following features:
8
•
200 page fax memory
•
50 page paper tray
•
15 page document feeder
•
Favorites capability: Scan the entire document into memory before sending
(see page 25).
•
100 speed dialing locations (including10 One-Touch speed dials) (see page 18).
•
Distinctive Ring (DRPD) capability: Multiple numbers on the same phone line that
are differentiated by ring pattern (see page 26).
•
Broadcasting:
•
Fax forwarding:
•
Delayed fax: Send the document at a later time (see page 29).
•
Send/Receive Polling: Retrieve a waiting fax or hold a fax to be picked up
(see page 30).
•
Caller ID (see page 24).
•
Last 10 number redial (see page 37).
•
Junk fax blocking (with Caller ID) (see page 24).
•
Reports to help you manage your work (see page 34).
HP Fax basics
Send the same document to multiple destinations
(see page 29).
Forward documents to another fax machine (see page 31).
The HP 2140 Fax
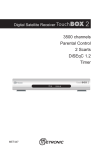
The HP 2140 Fax
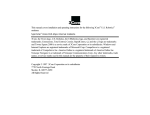
Parts of the HP Fax
Figure
2-1
Front view
0
1
Document support
5
Document feeder
2
Paper tray
6
Handset
3
Paper tray cover
7
Paper guide
4
Document guide
8
Paper support
Figure 2-2 Rear view
1
Power cord socket
2
Connect handset to the HANDSET port.
3
Connect telephone
line to the LINE port.
HP Fax basics
9
TheHP2140
Fax
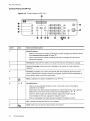
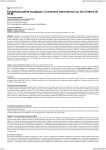
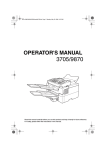
Control Panel of HP Fax
Figure 2-3 Control panel of HP Fax
@
0
o
o
Label
Icon
1
Name and Description
Mode/Contrast:
When no document is loaded, pressing this button changes the Receive Mode.
See Answer/receive
mode on page 27.
When a document is loaded, pressing this button changes the contrast for
faxing and copying.
2
Resolution:
Improves the clarity of a document that you are faxing or copying.
3
Access Cartridge:
replaced.
4
Favorites: Enables you to store documents that are frequently faxed and send
them to selected fax numbers without the originals. Press Favorites repeatedly to
Moves the print cartridge to the center so it can easily be
save, delete, send or print the documents.
5
__
Menu: Displays the options available for your HP Fax.
ScrollNolume:
When you are entering numbers or text, moves the cursor to the digit or
character to be edited.
When Menu has been pressed, displays the next and previous menu options.
Referred to as the arrow keys in text and are designated by: < ) .
When no other button has been pressed, adjusts the ringer volume.
If the handset is off hook, adjusts the handset volume.
When Loudspeaker
7
has been pressed, adjusts the speaker volume.
OK: Accepts the selection shown in the display.
8
_
10
HP Fax basics
Back: Allows you to return to the previous menu level.
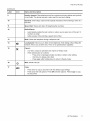
The HP 2140 Fax
(continued)
Label
Icon
Name and Description
9
Number keypad: Dials telephone and fax numbers and enters letters and symbols
in text fields. The phone key pad is also used for one-touch dialing.
10
Symbols:
text field.
11
Speed Dial: Stores and dials 100 telephone/fax
12
Redial/Pause:
[The 0 key]. Used to enter special characters when entering a name in a
numbers.
Automatically redials the last number or allows you to select one of the last 10
numbers to redial.
Adds a pause while entering a speed dial number.
13
Mute: Mutes the telephone
14
Loudspeaker:
Allows you to listen to the telephone while dialing without lifting the
handset. Allows you to listen only. There is no speakerphone capability.
15
Cancel:
during a telephone call.
In a Menu, stops an operation and returns to Ready mode.
When entering text or numbers:
Press once to backspace delete numbers or letters when editing.
Hold down to delete entire field.
Press again after holding down to return to Ready mode.
16
Start: Starts a fax job.
17
Copy:
Press twice to copy a document
with the default copy settings.
Press once then set options. Press OK between options. Press Copy to copy
the document.
HP Fax basics
11
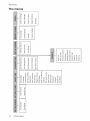
Themenus
The menus
"cJ
©
"cJ
_
"_D
(U
iiil,iiii
I
>
CD
<
co
tm
co
c
co
_
_
_
E
co
0
c
EE
_iii_iiiiii
2D
cO
C_
n
_
c
u_
co
co
co
O
co
o_ _
_ _,8_£
E
E
U_
od
(U
¢h
(U
¢h
(D
.Z3
(D
E
Z
x
12
--
HP Fax basics
E
Z
x
_
S
_=
_ _=-,,°,_o
6
z
<
o_
Overview
ofmenu
options
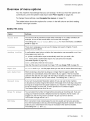
Overview
of menu options
Your fax machine
currently
has settings
set, print the System
To change
these settings,
The tables
below shows
choices
that you can change.
Data report
see Navigate
the options
(see Print
the
menus
for a menu
To find out how the options
reports
are
on page 34).
on page 15.
in the left column
and their setting
in the right column.
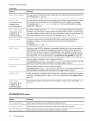
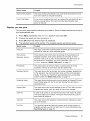
BASIC FAX menu
Option
Settings
Silent
Hode
You can turn off the machine sounds either manually or on a daily schedule (for
example, to turn off the sounds after work hours and overnight).
The settings are: off,
mode on page 34.
Language
Sending
0n-Always,
and On-Daily.
For more information,
see Silent
There are 4 languages you can use for display and reports: English, French,
Spanish and Portuguese.
Confirm
A confirmation report shows whether the transmission
many pages were sent, etc.
ON: prints a confirmation
report automatically
was successful
or not, how
each time you send a fax.
OFF: never prints a confirmation report (You can print one manually
(see Print reports on page 34)).
ERROR: prints only when an error occurs.
Note that this report can include the Image TCR (see Image TCR on page 26).
Paper
Size
A4, Letter
Auto
Reduction
When receiving a document as long as or longer than the paper loaded, the
machine can automatically reduce the data to fit your paper. If the fax machine
cannot fit the data into one page with the feature enabled, the data is divided and
3rinted in actual size on two or more sheets. The settings are Onand off.
Discard
Rings
To
ECM Mode
Size
Answer
and Legal
are the paper sizes you can use to receive faxes and copy.
If you turn the Automatic Reduction option off, you can set the fax machine
to discard any excess image at the bottom of the page when receiving a document
as long as or longer than the paper loaded in your machine. If the incoming fax is
out of the margin you have set, it will be printed on two sheets of paper.
The Discard Size can be 00 to 30 mm.
You can select the number of rings before answering an incoming call. If you are
using your machine as both a telephone and a fax machine (AUTO mode), we
suggest you set the ring count to at least 4 to give you time to answer.
The number of rings can be 2 to 7.
Error correction mode compensates for poor line quality and ensures accurate,
error-free transmission with any other ECM-equipped facsimile machine. If the line
quality is poor, transmission time may be increased when ECM is enabled.
The settings are On and Off.
HP Fax basics
13
Overview
ofmenu
options
(continued)
Option
Send
From
Caller
Settings
Memory
ID
You can see the number of the person calling you. Before using this feature, Caller
ID service must be installed on your telephone line by the telephone company.
The settings are On, On w/ Junk Fax, and Off. For more information, see Use
Caller ID on page 24.
(This option is not
available in all
countries/regions.)
Set
Junk
Fax
You can set your machine to scan a document into memory and then send the fax.
The settings are On and off.
No.
(This option is not
available in all
countries/regions.)
If you have Caller ID set to On w/ Junk Fax, yOU can block faxes from particular
numbers. You must have received a fax from that number to block it. Even though
/ou have added junk fax numbers, if you turned off the Caller ID option above, the
Junk Fax protection will be removed. The settings are Add and Delete.
Auto
Journal
The Auto Journal shows the specific information concerning transmission or
reception activities, the time and date of most recent 40 transmissions or
receptions.
The settings are On and Off.
DRPD
Mode
Distinctive ring (DRPD--distinctive
ring pattern detection) is a service provided by
some telephone companies that assigns two phone numbers to one phone line,
each of which makes your phone ring differently. If you subscribe to this service,
you can program your machine to learn one phone number and distinctive ring for
incoming faxes. For more information, see Distinctive
ring (DRPD} on page 26.
Resolution
Sets the default resolution when copying and faxing.
The settings are: Standard,
Fine, and Superfine.
For more information,
document resolution
and contrast for a single copy on page 21.
see Set
Contrast
Sets the default contrast when copying and faxing.
The settings are: Normal, Lighten,
Photo, and Darken. For more information, see
Set document resolution and contrast for a single copy on page 21.
Tmage
Image TCR prints a sending confirm page with a miniature image of the first page
of the fax. The settings are On and off. For more information, see Image TCR on
page 26.
Dial
TCR
Mode
(This option is not
available in all
Set the dialing mode to the type of the exchange to which you are connected: Tone
or Pulse.
countries/regions.)
ADVANCED FAX menu
Option
Settings
Set
Allows you to send a fax to several fax numbers at once.
Broadcasting
Set Delayed Fax
Allows you to set up a fax to be sent at any time in the next 24 hours.
Set Polling Send
Allows you to set up a fax to be polled by another machine.
14
HP Fax basics
Loudspeaker
(continued)
Option
Settings
Cancel Schedule
Cancels all scheduled faxes.
Set Fax Forward
Allows you to forward incoming faxes to another fax number.
TOOLS
menu
Option
Settings
Clean
Cartridge
Cleans the print cartridge to improve print quality.
Align
Cartridge
Aligns the print cartridge to improve print quality.
View Ink Level
Adjust
Self
Scanner
Allows you to see the estimated level of ink remaining in the cartridge.
Use only if you have dropped the fax machine.
Prints a self test to allow you to troubleshoot problems.
Test
Loudspeaker
You do not need to pick up the handset to make a phone call. When dialing, just press
the Loudspeaker button and enter the numbers. When your party answers, pick up
the handset to talk to them. This feature is especially useful for checking voicemail
messages.
_F NOTE: Your HP Fax does not have speakerphone capabilities. The loudspeaker
enables you to hear calls but you must speak using the handset.
Q'.'-TIP:
If you want to share the conversation with somebody beside you, pick up
the handset and press Loudspeaker.
The line is still connected and everybody
can listen to the conversation.
While you are using Loudspeaker, do not place the handset beside the speaker, as
this may result in noise interference.
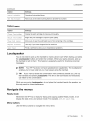
Navigate the menus
Ready
mode
Whenever the HP Fax is ready for faxing and copying (called Ready mode), it will
display the date, time, and answer mode. For example, OCT-05 14:23 FAX.
Menu
buttons
Use the Menu buttons to navigate the menu items.
HP Fax basics
15
Enter
dates,
times,
text,andtelephone
numbers
1 Press
theMenu
button
toaccess
themenu
system.
2 Usethe< ) buttons to scroll through the options on a particular
3
Press OK to select a particular menu option.
4
Press Cancel
level.
to return to Ready mode.
Example To change the default Resolution setting to Fine, you would take the
following steps.
1.
2.
Press the Menu button repeatedly until BASIC £AX displays.
Press OK.
Silent
3.
4.
will display.
Mode
Use the <
Press OK.
Standard
I' to scroll until Resolution
will
displays.
display.
5.
6.
Use the <
Press OK.
I' to scroll until £1ne displays.
7.
Press Cancel to return to Ready mode.
Enter dates, times, text, and telephone
numbers
Use these buttons when menu items ask you to enter dates, time or text.
16
•
If the date format seems unfamiliar, check that you selected the correct one for
your country when setting up your HP Fax (see Set the date and time on
page 33).
•
Some items on the display will show up with the blinking cursor under the item to
change. Simply press the key for the new character or number or use the < I, to
move to the one you want to change.
•
To enter a pause in a telephone number, press Redial/Pause. A P will appear in
the display. Press the button multiple times for a longer pause.
•
When entering text, press the phone pad button repeatedly to scroll through the
characters. Use the following table for reference.
HP Fax basics
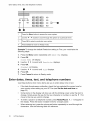
Enter dates, times, text, and telephone numbers
Most text fields
The letters and numbers scroll as shown next to each button for text fields such as the
phone book. Press the 2 to display an A and press I, for the cursor to advance
before pressing 3 to select D. If yOU want a B, press 2 twice in rapid succession.
Table 2-1
Keys to enter text and numbers
Key
Produces
Key
Produces
1
"space" 1
6
MNO6
2
ABC2
7
PQRS7
3
DEF3
8
UV8
4
GHI4
9
WXYZ9
5
JKL5
0
+-,
.'/*#&0
For example, to enter 'Jacque & Baja,lnc.' follow these steps.
Press
_,
Result
_,
)
, _,
_,
_)_),
_
'JACQUE'
will
display.
O
Enters a space.
000000000
'&' will display.
O
Enters a space.
_,
)
, _,
_,
000
OO0,
0000
_
'BAJA' will display.
' ' will display.
(_(_, _
'ZNC' will display
' ' will display.
HP Fax basics
17
Speed dialing
Fax header
telephone
number
For most telephone numbers you can only enter the numbers (for example,
1234567890). For the fax header that prints on all your faxes (see Set the fax header
information on page 34), you can enter some punctuation in the number.
To punctuate the telephone number in the fax header, use these keys.
Table 2-2
Keys to punctuate the fax header telephone number
Key
Produces
#
"space"
*
+
For example, to enter '+123 456 7890' follow these steps.
Press
Result
*
'+'
O,
O,
O
'123'
#
will display.
Enters a space.
O, _,
(_
'456'
#
_,
will display.
will display.
Enters a space.
Q, O,
O
'7890'
will display.
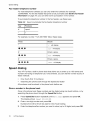
Speed dialing
Your HP Fax has a built-in phone book that allows you to enter up to 100 names and
numbers for faxing or telephone use. Once entered, you can dial the number by any of
these methods.
•
One-Touch (first 10 numbers)
•
Searching the phone book through the Speed Dial button
All numbers must be stored in the phone book before use.
Store a number
in the phone book
Once in the phone book these numbers can be dialed using one touch buttons, or by
searching the phone book through the Speed Dial button.
1.
Press Speed Dial button repeatedly until New & Edit
2.
The display shows Speed [ 00-99] >##.
Enter a two-digit number and press OK.
appears and press OK.
Numbers from 00 to 09 wilt be used for One-Touch dialing.
3.
18
Enter the telephone/fax
HP Fax basics
number you want to store (up to 40 digits) and press OK.
Speed
dialing
4.
•
If you want a pause between numbers (for example, when entering an access
code where you need to wait for a second dial tone), press Redial/Pause. A P
appears in the display. For a longer pause, simply press Redial/Pause again.
•
If you make a mistake while entering a number, use <
under the digit, then enter the correct digit.
•
Cancel wJtl backspace delete in the field.
•
Holding down Cancel wilt clear the whole field.
I, to move the cursor
Enter the name (up to 20 characters) and press OK.
If you do not want a name, just skip this step by pressing OK.
i'9,'-TIP:
If you have subscribed to a Caller ID service, we recommend that you enter
a name.
5.
Press Cancel to exit.
Print the phone
1.
2.
book
Press Menu repeatedly until REPORTSappears and press OK.
Press < I, until PhonebooZ displays and press OK.
Dial from the phone
book
Dialing works the same for both faxes and telephone calls. If a document is loaded in
the document feeder, the HP Fax sends the fax.
One-touch
•
dialing
Press and hold the number (0 through 9) on the phone pad.
You can refer to the number assigned to each code by printing the phone book.
See Print the phone book on page 19.
Phone book dialing
You can search the entire phone book to find the number you want to dial.
Search sequentially through the phone book
1. Press Speed Dial button once and when Search & Dial appears, press OK.
2.
Press < I, to move upward or downward through the directory until you find the
number you want.
3.
When the number you want appears in the display, press Start to dial.
Search for a particular first letter
1. Press Speed Dial button once and when Search & Dial appears, press OK.
2.
3.
Press the phone pad button labelled with the letter you want to find.
•
For example, if you want to find the name 'NEW YORK', press the 6 button,
which is labelled with 'MNO'.
•
The machine finds the closest entry.
•
If the machine cannot find a name that begins with the given letter, the machine
shows the message Not Found.
When the name and number you want appears in the display, press Start.
HP Fax basics
19
Paper
types
andsizes
Paper types and sizes
The HP Fax is designed to work optimally with plain paper (cotton bond: 20 lb.,
75 g/m 2) in the following sizes: A4, Letter, and Legal.
_,'- TIP: Some papers have a side that's been conditioned for printing. The print side
is usually indicated on the paper's packaging. Always load with the print side
facing you.
You can load up to 50 sheets of paper in the paper tray. Satisfactory print and receive
quality can be obtained with many types of plain paper. Since the quality of plain paper
varies widely, test the print quality before buying large quantities of paper.
Your machine uses a variety of papers including:
•
Copier paper
•
Bond paper
•
Dual-purpose paper
Because all paper varies in physical characteristics, you can receive mixed results
from different packages of paper even though the packages contain the same type of
paper. If you encounter undesirable results, try the other side of the paper, a different
type, or another package of the same kind of paper.
Do not use the following types of paper with your machine:
•
Continuous form feed paper
•
Synthetic paper (Tyvek ®, etc.)
•
Thermal paper
•
Multi-sheet forms and documents
•
Chemically treated paper (pressure-sensitive
•
Coated (glossy, photo, etc.)
•
Papers with raised, embossed lettering
paper, carbon-coated
paper, etc.)
Document types and sizes
The following document size is acceptable when you send a fax.
•
The minimum document size is 148 mm (5.8 in.) wide by 128 mm (5 in.) long.
•
The maximum size is 216 mm (8.5 in.) wide by 356 mm (14 in.) long.
Follow these tips to ensure worry-flee faxing.
20
•
Be sure that your document is dry and free of staples, paper clips, and other
foreign objects.
•
If you are sending more than one sheet, make sure the bottom sheet enters first.
Insert the sheets with a slight push to ensure smooth feeding.
•
For multiple sheets, all pages of the document must be the same size and paper
type.
HP Fax basics
Setdocument
resolution
andcontrast
forasingle
copy
•
If you are loading pages that are unusually thick or thin, feed one sheet at a time.
If the document does not feed correctly, open the control panel, remove the
document, and try loading it again.
•
For more information on what kind of paper you can use for documents,
see Acceptable documents on page 52.
DO NOT try to send documents that are:
•
wet
•
covered with wet ink or paste
•
wrinkled, curled, or folded
•
too thin (tess than 0.07 mm (0.18 in.) thick--onionskin,
•
too thick (more than 0.15 mm (0.38 in.) thick--index
•
chemically processed (pressure-sensitive
•
coated (glossy, etc.)
•
too small or short (such as a label, voucher, etc.)
•
made of cloth or metal
To send these documents,
send the copy.
Set document
resolution
airmail paper, etc.)
cards, file folders)
paper, carbon-coated
paper, etc.)
use an office copier to make a photocopy first, and then
and contrast
for a single copy
Document resolution and contrast are set in the same manner for both faxes and
copies. For most faxes and copies, default settings will work well.
If you need to send/copy a document with unusual contrast characteristics, including
images/embedded pictures, you can adjust the resolution and contrast for that
document using the control panel buttons.
_,'- TIP: You can also change the default settings for all documents using the menu.
See BASIC FAX menu on page 13.
We recommend you use documents with a high contrast, such as, documents printed
using a high quality printer, felt tip pen, black ink, or typewriter. The paper should be
white or very light, and of normal weight, not cardboard or onionskin.
Blue lines on a ruled pad don't fax welt. For more information on the types of paper you
can use for documents, see Document types and sizes on page 20.
_
NOTE:
1.
Turn the page face down and insert it into the document feeder. For more
information, see Load documents to fax or copy on page 5.
2.
You must set the resolution and contrast before dialing the number.
Press Resolution
repeatedly to select the option you want:
•
STANDARDworks well for printed or typewritten originals with normal-sized
characters.
•
£INE is good for documents containing a lot of detail.
HP Fax basics
21
Adjust
volume
SUPER £1NE works well for documents containing extremely fine detail;
for example, a map or engineering drawing. SUPER £INE only works if the
remote machine also has the suP_.R £TN_. feature.
•
_P NOTE: SUPER FINE mode is not used when sending documents scanned into
memory (i.e., Broadcasting and Delayed Fax). If you are sending document using
one of these methods, SUPER FINE will be changed back to FINE even though
you selected SUPER FINE.
3.
4.
Press Mode/Contrast
repeatedly to select the option you want:
•
NOmVA< is used for normal handwritten, typed, or printed documents.
•
T,TG_TENis used with very dark print.
•
hARKEN is used with light print or faint pencil markings.
•
P_OTO is used when faxing images/embedded pictures or other documents
containing color or gray shades. When Photo is chosen, the resolution is
automatically set to £INE.
Dial the number and press Start or press Copy.
When sending/copying
is finished, resolution/contrast
automatically
returns to default.
Adjust volume
You can adjust the volume level for both the ringer and the speaker.
Ringer
volume
Speaker
•
Press _ I, when the fax is in Ready mode to adjust the volume of the ringer.
Whenever you press the button, it will increase or decrease the volume.
_
NOTE: The volume 0 indicates that the machine will not ring when a call is
received.
volume
1.
Press Loudspeaker.
2.
Then press <
Automatic
I, to adjust the volume of the speaker.
fax redial
When you send a fax, if the number you have dialed is busy or there is no answer,
the machine wilt automatically redial the number every three minutes up to two times.
If you wish to manually redial the number immediately, press Start after the display
shows To redial now, press Start.
Or,press Cancel to stop redialing and the machine returns to Ready mode.
22
HP Fax basics
3
Additional
features
This chapter contains information on additional features you may want to set or change
for your HP Fax.
•
Rings to answer: Sets the number of rings before the HP Fax answers the phone.
•
Caller ID: If you subscribe to Caller ID through your local phone company, you can
use it with your HP Fax.
•
Block Junk Faxes: In conjunction with Caller ID, you can block certain numbers
from sending you a fax.
•
Favorites
•
Image TCR
•
Distinctive Ring
•
Answer/Receive
1
mode: Determines how the HP Fax responds to incoming calls.
The "arrow buttons" located at the left and right of OK button on the control panel are
designated by _ _ in the instructions.
Set rings to answer
You can select the number of rings that will occur before the fax answers an incoming
call.
NOTE:
If you are using your machine as both a telephone and a fax machine,
we suggest you set the ring count to at least 4 to give you time to answer.
1.
Press Menu repeatedly until BASIC FAX displays and press OK.
2.
Press < _, until Rings
3.
Enter the number
The HP Fax rings
different sounding
•
The additional
•
to
Answer
displays and press OK.
of rings you want (2-7) and press OK.
the set number of times and then answers. It then produces a
ring to alert you to which type of call is incoming.
ring may occur once for a fax call
The additional ring occurs 5 times for a voice call.
Additional features
23
UseCaller
ID
Use Caller ID
Many countries have the Caller ID system that enables the receiver to view the
numbers or names of callers. Once you have subscribed to Caller ID services through
your local phone company, your machine can display caller information.
_
Turn Caller
NOTE:
This option is not available in all countries/regions.
ID on
1.
Press Menu repeatedly until BASIC FAX displays and press OK.
2.
Use the _
3.
Use the _ I, to scroll to the desired option and press OK.
•
On: Activates the Caller ID feature.
I' to scroll to Caller
zn and press OK.
•
On w/ Junk £ax: Activates Caller ID and ignores any fax registered as a junk
fax (Block junk fax numbers on page 24).
•
off:
See who called
Deactivates the Caller ID feature.
with Caller
ID
This function allows you to see who has called. You cannot dial these numbers.
Print
1.
Hold RediallPause
2.
Press _
3.
Scroll through the numbers by pressing
a list of Caller
for about two seconds.
I, until Call÷=
Tn displays and press OK.
_
I, .
ID numbers
1.
Press Menu repeatedly until REPORTSdisplays and press OK.
2.
Press _
I' until Call÷=
Tn displays and press OK.
Block junk fax numbers
If you subscribe to Caller ID through your local phone company, you can block future
faxes from numbers on the Caller ID List. Before using this feature, you must set the
Caller ID option to on w/ Junk £ax (see Use Caller ID on page 24).
_
Add a junk
NOTE:
This option is not available in all countries/regions.
fax number
1.
2.
Press Menu repeatedly until BASIC FAX appears and press OK.
Press _ I, until Set Junk £ax No, displays and press OK.
3. Press _ I' until Add displays and press OK.
The machine shows the first Caller ID number.
4.
Press _ I, to find the Caller ID number you want to register as a junk fax and
press OK.
You can enter up to 20 numbers. Numbers which have already been entered as a junk
number are marked by * at the end of the display.
24
Additional features
Favorites
Delete a number
1.
Press Menu repeatedly until BASIC FAX appears and press OK.
2.
Press _
I, until Set Junk Fax No, displays and press OK.
3.
Press
I' until Delete
_
displays and press OK.
The machine shows the first junk number.
4.
Press _
I, to scroll to the junk fax number you want to delete and press OK.
Favorites
Favorites enables you to store documents that are frequently faxed and send them to
selected fax numbers without the originals.
NOTE: When you use this feature, PHOTOcontrast and SUPER FINE resolution
are not supported.
Save a document
1.
Load the documents face down in the document feeder.
2.
Press Favorites
3.
4.
Enter the document ID name (up to 15 characters) by using the number keypad.
Press OK.
repeatedly until save appears and press OK.
The document will be scanned into memory.
Exceeded Job Memory message appears when you try to save more than
five Favorites.
Delete
a document
1.
Press Favorites repeatedly until Delete
2.
Press _ I, and then OK to select one or all documents. If you select one
document, press _ I, and when the correct document ID is displayed, press OK.
appears and press OK.
3.
Select Y and press OK when the machine asks if you are sure.
Send a document
1.
Press Favorites repeatedly until Send appears and press OK.
2.
Press _ I, to scroll to the document you want to send and press OK.
Enter the fax number.
3.
4.
Press OK when the correct number is displayed.
If you have more destinations, select Y and press OK when asked Another?
and repeat from step 3.
Y/N
Print a document
1.
Press Favorites repeatedly until Print
appears and press OK.
2.
Press _ I, and then OK to select one or all documents. If you select one
document, press _ I, and when the correct document ID is displayed, press OK.
Additional features
25
Image
TCR
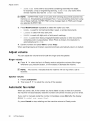
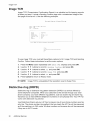
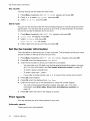
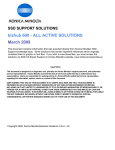
Image TCR
Image TCR (Transmission Confirmation Report) is a valuable tool for keeping records
of faxes you send. It prints a Sending Confirm page with a miniaturized image of the
first page of the fax on it. See the following example.
Sending
Confirm
Date : SE£-15-2002 SUN 11:25
Name : PAT
Tel. : 1234567890
Phone
Pages
Start Time
Elapsed Time
Mod
Result
:
:
:
:
:
987654321
i/i
09-15 11:24
00'3g"
ECM
Ok
First page of recent document transmitted,,,
To use image TCR, you must set these Menu options to On: Image TCR and Sending
Confirm. Follow these instructions to set the menu options:
1.
Press the Menu button repeatedly until BASIC FAX displays and press OK.
2.
Use the _
I' buttons to scroll to Sending
3.
Use the _
I' buttons to select On and press OK.
4.
Use the _
I' buttons to scroll to Image TCR and press OK.
5.
Use the _
I' buttons to select On and press OK.
6.
Press Cancel to return to Ready mode.
_2/ NOTE:
Distinctive
Confirm
and press OK.
Image TCR is unavailable if the resolution is set to Super Fine.
ring (DRPD)
Distinctive ring or distinctive ring pattern detection (DRPD) is a service offered by
some telephone companies. When you subscribe to this service through your local
phone company, you have different ring patterns; such as double ring and triple ring,
that allow you to have different telephone numbers on one physical line. Your HP Fax
works with distinctive ring service.
Use Distinctive Ring to set your HP Fax to answer one of your phone numbers as a fax
only line. The phone number (ring pattern) that you teach the HP Fax wilt be answered
as if the machine is in FAX mode. All other numbers on the same line will be answered
if they are in AUTO mode.
26
Additional features
Answer/receive
mode
If you have this service follow both of these instructions in this order to set it up and
use it.
Step lmTeach
the HP Fax the ring pattern
The HP Fax will learn the ring pattern when you call it from another telephone or fax
machine.
1.
Be ready to call the fax machine.
2.
Press Menu repeatedly until BASIC FAX displays and press OK.
3.
Use _
4.
Call this fax from another fax machine... Waiting Ring...
wilt display.
Call the HP Fax.
I' to scroll through the options until DRPD Mode displays and press OK.
DRPD OK wilt display when the pattern has been learned and the HP Fax will return
to Ready mode.
Step 2reSet
up distinctive
ring (DRPD)
answer
mode
Once you have activated distinctive ring, it becomes one of the answering modes you
can select by pressing the Mode/Contrast
button.
•
Press Mode/Contrast
repeatedly until DRPD Mode appears in the display.
•
In Ready mode, DRPD appears in the right hand corner of the display.
•
Now, the H P Fax wilt manage calls and faxes as if it were set to AUTO mode
(AUTO mode on page 28)
"@_TIP:
Distinctive ring must be set up again if you reassign your fax number
or connect the machine to another telephone line. Once set up again (that
is, the fax machine has learned the ring pattern and the answering mode is
correctly set), you should test the fax machine by calling the fax number
and another number on the same line. The machine should respond
appropriately to a call placed to the fax number with fax tones, and to a
normal telephone call with the expected ring pattern.
Answer/receive
mode
How the product receives faxes depends on the answer/receive mode you chose when
you set up the product. You can send faxes in any answer/receive mode. The answer/
receive mode setting determines how the device answers the incoming call.
How are you going to use your HP Fax?
Read about...
•
Fax machine with few or no voice calls.
FAX mode
•
Telephone and fax machine.
AUTO mode
•
Using Distinctive Ring (DRPD) service to
set up a separate telephone number for
your fax on the same physical line as your
other numbers.
See Distinctive
page 26.
ring (DRPD) on
Additional features
27
Answer/receive
mode
(continued)
HowareyougoingtouseyourHPFax?
• Telephone
withfewornofaxcalls.
•
Read
about...
TELmode
When no document is loaded, press the Mode/Contrast
option displays.
FAX
mode
AUTO
button until the desired
•
In Ready mode, FAX appears in the right hand corner of the
display.
•
When you get a call, the machine answers and receives the fax
automatically. When reception is complete, the machine returns to
Ready mode.
•
If you want to change the number of rings before it answers,
see Set rings to answer on page 23.
•
In Ready mode, AUTO appears in the right hand corner of the
display.
•
When a call comes in, the machine answers it. If a fax is being sent,
the device receives the fax. If the machine does not sense a fax
mode
signal, it will ring 5 times in a different tone to tell you it may be a
regular telephone call. If you do not pick up the handset it will try
again to receive a fax after several more rings.
•
TEL
mode
28
Additional features
If you want to change the number of rings before it answers,
see Set rings to answer on page 23.
•
In Ready mode, TEL appears in the right hand corner of the display.
•
Automatic fax reception is turned off. You can receive a fax only by
lifting the handset and pressing Start.
4
Advanced
faxing
In this chapter, you will learn how to use the advanced fax features of your machine.
1
The "arrow buttons" located at the left and right of OK button on the control panel are
designated by _ _ in the instructions.
Broadcasting
With Broadcasting you can have your HP Fax send your fax up to 20 fax numbers at
once. The documents are automatically erased from memory when Broadcasting is
finished.
1. Turn the document face down and feed it into the machine.
2.
Press Menu repeated until ADVANCED£AX displays and press OK.
3.
4.
Select Set Broadcastincj
Enter the fax number.
5.
by pressing 4 _, and press OK.
_
TIP:
One touch buttons do not work with this Broadcasting function.
•
You can enter 20 fax numbers into one job.
Press OK when the correct number appears in the display.
•
If you have more destinations, select ¥ by using 4 I, and press OK when
asked Another? Y/N and repeat steps from 4.
•
If you have finished entering all the numbers, answer N and press OK.
The document will be scanned into memory before transmission.
Delayed fax
You can set your machine to send a fax any time in the next 24 hours. For example, it
is usually cheaper to send a fax at night because telephone rates are lower than they
are during the day. To cancel a scheduled fax, see To cancel the scheduled job on
page 31.
1. Turn the document face down and feed it into the machine.
2.
Press Menu repeatedly until ADVANCED£AX appears and press OK.
3.
4.
Select set DeZayed Fax by pressing
Enter the fax number.
"_ TIP:
•
4 _, and press OK.
One touch buttons do not work with Delayed Fax.
You can enter 20 fax numbers into one job.
Advanced faxing
29
Polling
5.
6.
Press OK when the number appears in the display.
•
If you have more destinations, select Y by using 4 _, and press OK when
asked Another? Y/N and repeat steps from 4.
•
If you have finished entering all the numbers, answer N and press OK.
7.
Enter the name if you want to name the transmission.
If not, skip this step.
Press OK.
8.
Enter the time (in the next 24 hours) for the transmission
9.
Press OK when the time appears correctly in the display.
to start.
The document will be scanned into memory before transmission
programmed time.
and be sent at the
Polling
Polling enables you to set up a document so it can be retrieved at a later time.
For example, you can place the document in your machine, and the other party can
retrieve it when they are in the office or when their calling rates are lower.
Setting
send
polling
You can program your fax machine to send a document when it is requested by a
remote fax machine.
_P NOTE: Your HP Fax allows you to set one poll job at a time and it can be
retrieved once.
1.
Turn the document face down and feed it into the machine.
2.
Press Menu repeatedly until ADVANCEDFAX appears and press OK.
3.
Select get
Poll
4.
30
PoZZing
Code [0000]
Send by pressing 4 ) and press OK.
wittdisplay.
Enter the poll code you want to use for this document and press OK.
•
The poll code is preset to 0000, which means that the receiver does not need
to enter a poll code to receive the document.
•
The poll code is not static. You enter a new one for each document.
•
The poll code is used to prevent your document from being retrieved by an
unauthorized caller.
•
Your machine starts scanning the document(s) into memory and shows
POLLING SEND in the display. If the answer mode was TEL, the machine
changes it to FAX mode automatically.
•
When it is polled, the page in memory wilt be deleted automatically. To cancel
Send Polling, see To cancel the scheduled job on page 31.
Advanced faxing
To cancel the scheduled job
Polling
another
fax to receive
You can dial another fax machine that has a document waiting and request it to be sent
to your fax machine.
1.
Dial the telephone number of the remote machine that is ready to be polled.
_
TIP:
One touch buttons do not work in this area.
2. Press Menu when you hear a fax tone from the remote machine.
The display shows To poll documentspress Start.
3. Press Start.
4. Enter the other fax's Poll Code to retrieve the document, and press OK.
_
NOTE:
If the other fax machine does not have a poll code, enter 0000.
The HP Fax receives and prints the polled document.
_F NOTE:
Not all fax machines have polling capability, and polling
incompatibility sometimes occurs between fax machines made by different
manufacturers.
To cancel
the scheduled
job
All scheduled jobs remain in memory after they have been set. To make more memory
available, cancel unnecessary scheduled jobs.
1.
Press Menu repeatedly
ADVANCEDFAX appears and press OK.
2.
Select Cancel
3.
4.
Select the scheduled job you want to cancel by pressing 4 _.
Press OK to cancel the selected schedule.
Schedule
by pressing 4 _, and press OK.
Forward faxes
While you are away from your home or office, you do not have to miss important faxes.
Your machine can forward any faxes it receives to a fax machine at your current
location, and if you choose, it can print a copy for you to review when you get back
as well.
A Sending Confirm report will print for every fax that is forwarded.
1.
Press Menu repeatedly until ADVANCEDFAX appears and press OK.
2.
Select
3.
Use 4 _, to select the option you want and press OK.
4.
Set
Fax
Forward
by pressing 4 l, and press OK.
•
off:
•
Forward: forwards a fax to your new location
disables fax forwarding
•
Forward
& Print:
If you selected
a.
prints a fax and also forwards it to your new location
Forward or Forward
&
Print, Tel: will display.
Enter the fax number and press OK.
Advanced faxing
31
Forward
faxes
Start
b.
Date&Time
will
display.
Press OK.
The current date and time will display.
¢.
Enter the start time and press OK.
Date&Time
will display.
Press OK.
End
d.
e.
Enter the end time and press OK.
•
The machine returns to Ready mode and £WD wilt appear in the display at
the start time and every fax will be forwarded to your new location till the
end time.
•
32
Advanced faxing
During forwarding time, the answer mode temporarily changes to FAX.
5
Feature reference
This chapter contains instructions for other features of the HP Fax that you may want
to use from time to time.
1
The "arrow buttons" located at the left and right of OK button on the control panel are
designated by 4 I, in the instructions.
Set the date and time
The current date and time are shown in the display when the machine is on and ready
for use (Ready mode). The date and time will be printed on all faxes you send.
1.
Press Menu.
2.
Press 4 I, to choose
3.
Press OK when the display shows Date
4.
Press 4 I, to select either Europe
press OK.
5.
Press OK when the display shows Date
6.
Use the keypad to enter the date and time. You can move the cursor by
pressing 4 I,. Enter the hour in 24-hour format.
Press OK.
7.
SET DATE & TIME and press OK.
Format.
(day month year) or USA (month day year) and
& Time.
Turn on and off sounds
You can turn on and off the sounds the HP Fax makes.
WakeUp sounds
WakeUp sound will ring at a specific time set even when Silent Mode is enabled.
1.
Press Menu repeatedly until SET UP SOlD appears and press OK.
2.
3.
WakeUp Sound wilt display. Press OK.
Select On and enter the time you want the HP Fax to ring. Press OK.
Select off
to turn off WakeUp Sound. Press OK.
Alarm sounds
Alarm sounds include the fax tones and beeps.
1.
Press Menu repeatedly until SET UP SOUND appears and press OK.
2.
Press 4 I, to select
3.
Select On or off
AZarm Sound and press OK.
and press OK.
Feature reference
33
Setthefaxheader
information
Key sounds
The Key sounds are the beeps the keys make.
1.
2.
Press Menu repeatedly until SET UP SOUND appears and press OK.
Press < ) to select Key Sounds and press OK.
3.
Select
On or off
and press OK.
Silent mode
You can turn the sounds of the HP Fax (including ringing) on and off using the control
panel button. You can also set all sounds to turn off on a daily schedule; for example,
turn all the sounds off between 8 pm and 8 am.
1.
Press Menu repeatedly until BASIC £AX appears and press OK.
2.
Silent
3.
Select
On-DaiZy
£rom:
00h To : 23h will display.
4.
Mode will display. Press OK.
and press OK.
Enter a start time and an end time and press OK.
Set the fax header information
This information is required by taw in many countries. The fax header prints your name
and fax number on the top of every fax you send.
1.
Press Menu repeatedly until < _, SET £AX HEADERdisplays and press OK.
2.
Press OK when the display shows Fax Number.
3.
Enter the fax number to which your machine is connected.
•
You can enter up to 20 digits, and include special characters (space, plus sign,
etc). For more information, see Fax header telephone number on page 18.
•
To enter a space, press # once.
•
To enter a plus sign +, press *
•
If you enter a wrong number, use < _, to move to the number and correct it.
4.
Press OK when finished.
5.
Press OK when the display shows Fax Name.
6.
Enter the fax name (up to 40 characters) by using the number keypad.
•
7.
You can include special characters (space, plus sign, etc.). For more
information, see Enter dates, times, text, and telephone numbers on
page 16.
Press OK when the name in the display is correct.
Print reports
Your fax machine can print many reports for your use.
Automatic
reports
These reports print automatically.
34
Feature reference
Print
reports
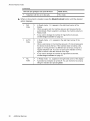
Reports
Report name
Content
Multi-Communication
This report prints automatically if you have faxed documents
than one location by using Broadcasting.
Power Fail Report
If you have a scheduled job (such as, delayed fax and send poll) and
there is a power failure, this report is printed automatically when
power is restored.
to more
you can print
You can print these reports whenever you need to. Some of these reports can be set to
print automatically also.
1.
Press Menu repeatedly until REPORTS appears and press OK.
2.
Choose the report you want by using 4 l,.
3.
Press OK when the desired report is displayed.
4.
The selected report will be printed. The available reports are shown below:
Report name
Content
Help List
This report covers the machine's basic functions and commands.
can also be used as a quick reference guide.
Sent Journal
These reports show information concerning the transmission and
reception activities. They can be printed on command. Or if the
machine is set to do so, they will automatically print after every 40
transmissions or receptions. For more information, see Auto
rournal under the "BASIC FAX menu" on page 13.
Received Journal
It
Phonebook
This report shows all of the numbers currently stored in the fax
machine's memory as One-Touch Dial and Speed Dial.
Sending Confirm
This report shows the fax number, the number of pages, elapsed time
of the operation, the communication mode, and the communication
results. To set up your machine to automatically print, see Sending
Confirm under the "BASIC FAX menu" on page 13.
Schedule Inform
This report shows the document currently stored for Delayed FAX and
Send Polling along with the fax number, starting time and type of
scheduled event.
System Data
This report shows the current settings of your HP Fax. After you have
changed any setting, print this report to check your changes.
Caller ID
If Caller ID is turned on, this report shows the most recent 30 callers
who have called your machine. The report will be empty if you don't
have Caller ID turned on.
Junk Fax
This report shows the telephone
fax to be blocked.
Print Fax
Your machine stores fax data into memory as far as the memory is
available and lets you print it at later time. For more information, see
Reprinting faxes on page 36.
numbers that are marked as a junk
Feature reference
35
Reprinting
faxes
Reprinting faxes
You may sometimes need to reprint a received fax. Your machine stores the most
recently received faxes in memory (approximately 200 pages). As this memory is filled,
old faxes that have been printed will be erased to make room for new faxes.
_* NOTE:
Unplugging the fax machine power cord and plugging it back in again
clears the memory including all unprinted or unsent faxes. A power outage also
clears the fax machine memory.
1.
2.
3.
Press Menu repeatedly until REPORTS appears and press OK.
Press 4 _, to choose
Print
£ax and press OK.
•
If there are only old faxes, the machine wilt automatically print all of them and
return to Ready mode without moving to the next step.
•
If there are no faxes in memory, the machine will inform you by displaying
Memory Empty.
•
If there are both old faxes and unprinted faxes in memory, the machine will go
to step 3.
Select between
Print New Fax or Reprint Old Fax and press OK.
•
Print New £ax: The machine prints all new faxes which have never been
printed.
•
Reprint
Old Fax: The machine prints all faxes regardless of new or old.
Clearing memory
You can selectively clear information stored in your machine's memory.
1.
Press Menu repeatedly until MEMORY CLEAR appears, and press OK.
The display shows the type of information you can clear from memory.
2.
Select what you want to delete by pressing 4 _, and press OK.
3.
Select Y and press OK when the machine asks if you are sure.
The types of information you can clear are:
Item
It will
Fax Header
Delete the name and phone number from your fax header
information.
Dial/Schedule
Clear the stored numbers in the phone book. In addition, all
the scheduled jobs are also cancelled.
Clear all records of transmissions
Journal
Factory
36
Feature reference
Default
and receptions.
Return all settings to factory defaults.
Loudspeaker
Loudspeaker
You do not need to pick up the handset to make a phone call. When dialing, just press
the Loudspeaker button and enter the numbers. When your party answers, pick up
the handset to talk to them. This feature is especially useful for checking voicemail
messages.
_
NOTE: Your HP Fax does not have speakerphone capabilities. The loudspeaker
enables you to hear calls but you must speak using the handset.
_
TIP: If you want to share the conversation with somebody beside you, pick up
the handset and press Loudspeaker. The line is still connected and everybody
can listen to the conversation.
While you are using Loudspeaker, do not place the handset beside the speaker, as
this may result in noise interference.
Redial a number in memory
These steps allow you to dial one of the last 10 numbers called that is in memory.
1.
Hold Redial/Pause for about two seconds.
2.
Press 4 _, until Recent
3.
Press 4 _, to find the number you want to dial.
4.
Press Start when the correct number appears.
Numbers displays and press OK.
If a document is loaded, the machine automatically
begins to send.
Feature reference
37
6
Care and maintenance
This chapter contains information about changing print cartridges, maintaining your HP
Fax, the menu settings, error messages, and troubleshooting.
Print cartridge
information
The print cartridge life is very sensitive to the content of received faxes or copies you
make. To increase its life, we recommend you follow the instructions below:
•
Always use the HP 701 (CC635A) black inkjet print cartridge.
_
NOTE: Your HP Fax was shipped with a starter ink cartridge. Replace the
starter cartridge when it runs out of ink with the HP 701 cartridge.
•
DO NOT unpack the cartridge until you are ready to use it.
•
Store it in the same environment as the fax machine.
•
If you have unpacked the cartridge but are not using it, store it in an airtight plastic
bag.
•
DO NOT leave it exposed for an extended period.
•
DO NOT refill the cartridge. The warranty will not cover damage caused by using
refilled cartridges.
View ink level
When using the 17ml print cartridge, your machine allows you to check the amount of
ink remaining. To view the current ink level:
1,
Press Menu repeatedly until TOOLS appears and press OK.
2.
Scroll to View Ink
LeveZ by pressing
4 _, and press OK.
The machine displays a fractional number. For examples, 1/8 means that ink is
low and you need to replace the cartridge. 8/8 means that a new cartridge is
installed.
_F NOTE:
If the print cartridges were used before being installed in the HP Fax,
the estimated ink levels may be inaccurate or unavailable.
_F NOTE:
If the HP Fax is tow on ink (ink level is 1/8), new faxes that come in
will not be printed. They wilt be stored in memory. You must manually print the
faxes from memory (see Reprinting faxes on page 36) until you replace the
ink cartridge (see Replace the print cartridge on page 39).
i_i TIP: If memory become full before the print cartridge is replaced, the HP Fax
will stop answering the phone. Be sure to print the faxes out of memory
regularly if you do not immediately replace the ink cartridge.
38
Care and maintenance
Print
theselftest
Print the self test
When you want to test if the machine is working correctly, you can check it by printing
the self test.
1,
Press Menu repeatedly until TOOLS appears and press OK.
2.
Scroll to Self
Test
by pressing
< _, and press OK.
The machine runs self test and prints a report which shows the current status of the
machine.
Replace the print cartridge
When you notice that the print becomes light or ink low or when install
new ink
cartridge
appears in the display, replace the print cartridge. The part number for
replacement cartridges is HP 701.
1.
Press the Access Cartridge button on the control panel.
|
@
¢
1
Access Cartridge
The cartridge carrier moves to the install position.
2,
Open the control panel and cartridge compartment cover (it will click and remain
open).
/
/
/
/
1
Control panel
2
Cartridge compartment
cover
Care and maintenance
39
Replace the print cartridge
3.
Push the cartridge down and remove it.
4.
Take out a new cartridge from its packaging and carefully remove the tape covering
the printhead.
Hold the cartridge by the colored top or black areas only. Do not touch the copper
area.
5.
To toad the cartridge insert the cartridge as shown below. When the cartridge is
pushed to the back of the cartridge carrier, push the top of the cartridge until it
clicks into place.
If the cartridge moves loosely in the carrier, it has not clicked into place. Repeat
this step.
6.
7.
8.
Close the cartridge compartment
Press Start.
cover and control panel.
Press 1 for new cartridge, or 2 for the old one.
•
When you put in a new cartridge, you must choose
l:New
•
When you put in a used cartridge, choose 2 :Used. This helps you to check the
correct amount of ink you have left.
_'[- TIP:
If you mix up several used cartridges, it is not possible to check the
correct amount of remaining ink. Once you have put in a new cartridge, use it
until it is completely exhausted.
40
Care and maintenance
Clear
jammed
documents
andpaper
Clear jammed documents and paper
Document
jams during
transmission
If a document jams during transmission or copying, Remove
jammed document
appears in the display. DO NOT pull the document out of the slot. Doing so could harm
your machine.
To clear document jam:
1. Open the control panel.
2.
Carefully remove the jammed document.
3.
Close the control panel firmly until it clicks into place.
Paper jams during
printing
If the fax paper jams while you are receiving or printing,
press Cancel appears inthe message.
If the paper is jammed
1.
Remove
jammed
paper
and
in the printing area
Remove the jammed paper by pulling it out smoothly in the direction of the arrow
as shown.
If the paper tears when it is being removed check to ensure that no small pieces
have been left inside the machine.
2.
Press Cancel.
3.
If this was a fax, reprint the fax. For more information, see Reprinting
page 36.
faxes on
Care and maintenance
41
Maintain
theprintcartridge
If the paper is jammed
1.
in the paper feed area
Remove the jammed paper as shown.
If the paper tears when it is being removed check to ensure that no small pieces
have been left inside the machine.
2.
3.
Reload new paper with the print side facing toward you.
Press Cancel when finished.
4.
If this was a fax, reprint the fax. For more information, see Reprinting faxes on
page 36.
Maintain the print cartridge
To maintain good printing quality, we recommend you occasionally
cartridge and its associated parts:
Clean
maintain the print
the print cartridge
If characters are not printing completely or white streaks appear in your text, you may
have clogged nozzles. Clean the print cartridge as described below:
1.
Press Menu repeatedly until TOOLS appears and press OK.
2.
Scroll to Clean Cartridge by pressing
3.
Examine the printed test pattern.
4 _, and press OK.
•
If print quality does not improve, remove and reinstall the cartridge and repeat
these steps.
•
If the line is still broken, wipe the print cartridge contacts. For more information,
see Wipe the print cartridge contacts on page 42.
Wipe the print cartridge
contacts
If cleaning the print cartridge as discussed above does not help and you are certain the
cartridge has plenty of ink, the problem may be caused by dried ink on the print
cartridge contacts or the print cartridge carrier contacts. Follow these two sets of
instructions for manual cleaning.
Clean the contacts
1.
42
Press Access Cartridge.
Care and maintenance
Maintain
theprint
cartridge
2.
Open the control panel and cartridge compartment
See Replace the print cartridge on page 39.
3.
Gently blot and wipe the contacts dry.
cover and remove the cartridge.
•
Use a clean cloth dampened with water to gently clean the entire coppercolored contacts.
•
To dissolve any dried ink, hold the damp cloth against the contacts for about
three seconds.
1
Copper-colored
2
nk nozz es (do not clean)
A
CAUTION:
contacts
Do not touch or clean the ink nozzles.
4.
Reinstall the cartridge and close the cover and panel.
5.
If you spend a long time cleaning the cartridge, the cartridge carrier may have
moved back to the original position. If so, press Access Cartridge again to move
the carrier to the install position.
Press Start.
6.
Press 1 for new cartridge or 2 for the old one.
Clean the cartridge carrier contacts
Before cleaning these parts, there should be no scheduled job such as delayed fax,
send polling, or faxes received into memory.
a
CAUTION:
Once you have unplugged the power cord from the machine, all data
in memory will be lost.
1.
Press Access
2.
Open the control panel and cartridge compartment
See Replace the print cartridge on page 39.
3.
Remove the print cartridge.
4.
Unplug the power cord from the electrical outlet of the rear of the machine.
A
WARNING!
proceeding.
Cartridge.
Shock Hazard.
cover and remove the cartridge.
Be sure to unplug the power cord before
Care and maintenance
43
Clean the document scanner area
5.
Clean the cartridge carrier contacts with clean cotton swab.
6.
Plug in the power cord and reinstall the cartridge.
Clean the document
scanner area
To keep your machine working properly, occasionally clean the white roller, document
feeder rubber piece, and the scanning glass. If they are dirty, documents sent to
another fax machine will not be clear.
A
CAUTION:
When you turn the power off to clean the scanner, documents stored
in memory will be lost.
1,
Open the control panel.
Remove the white roller.
2.
44
a.
At the right-hand end of the white roller there is a bushing that is secured with a
small tab.
b.
Push the tab slightly inward, then rotate towards you. Then pull up the righthand end of the roller to remove it.
1
White roller
2
White roller latch
Care and maintenance
Adjust the scanner
3,
Wipe the white roller surface with a soft cloth dampened with water.
4.
Clean the document feeder rubber piece at the back of the control panel.
5,
Carefully wipe the scanning glass with a soft, dry, tint free cloth.
6.
•
If the glass is very dirty, first wipe it with a slightly dampened cloth, then with a
dry one.
•
Be careful not to scratch the glass surface.
Replace the roller in reverse order, and then close the control panel firmly until it
clicks into place.
Adjust the scanner
The scanner is adjusted at the factory. If, however, you drop your machine while
moving it, we recommend you adjust scanner.
1,
Press Menu repeatedly until TOOLS appears and press OK.
2.
Scroll to Adjust
3.
Load a plain WHITE sheet of paper (no writing or graphics) into the document
feeder and press OK.
Scanner
by pressing 4 I, and press OK.
•
The machine starts to scan the document to adjust the scanner.
•
Printing quality may be unexpectedly worse if you do not use a plain WHITE
paper for the adjustment.
Care and maintenance
45
LCDerror
messages
LCD error messages
These are the error message that may display along with solutions for you.
Status/Solution
Display
Adjust scanner
in TOOLS menu
first
Adjust the scanner to fix this problem as described in Adjust
scanner
the
on page 45.
You must use plain, white paper when adjusting the scanner. See
Adjust the scanner on page 45.
Check white paper
document and try
again
Clean
white
glass
and
For more information,
on page 44.
roller,
try
Duplicated
again
No.xx]
Exceeded
Exceeded
Cancel
Job
Memory
Job
Memory
scheduled
and
try
Ink
Low.
ink
cartridge
scanner
area
The same number has already been registered into another
speed dial location.
with
[Speed
see Clean the document
The machine can hold only 5 Favorites.
job
The broadcasting and delayed fax can hold 5 jobs in total.
Cancel a scheduled job and try again.
again
Install
new
The print cartridge is low or has run out of ink. To install a new
3rint cartridge, see Replace the print cartridge on page 39.
Although this message is displayed, you can make a copy or
print a report. Incoming faxes will be stored in memory. You must
manually print them, see Reprinting faxes on page 36.
ink
Print cartridge is not installed or improperly
Invalid
Time
The time you set for fax forwarding
Job Not
Assigned
You attempted to cancel a scheduled
scheduled.
Install
installed.
cartridge
is wrong.
job but no jobs are
You attempted to delete, print or send the Favorites document
when there is no document stored.
Junk
Fax
Empty
You attempted to delete a junk fax number when there is no junk
fax number.
Junk
Fax
Full
The machine can hold only 20 junk fax numbers.
Load
Document
Memory
46
Full
Care and maintenance
You must load a document
before proceeding.
Memory has become full while receiving a fax. It will not answer
the telephone until memory has been cleared. Print any faxes
stored in memory and, if necessary, clear scheduled jobs. See
Reprinting faxes on page 36 and see Clearing memory on
page 36.
LCDerror
messages
(continued)
Display
Memory
Press
Status/Solution
Full
OK to continue
Memory Received
Ink Low. Install
ink cartridge
new
Memory has become full while scanning a document. Press OK
to send or copy the scanned pages only. To cancel the job press
Cancel and try again when memory becomes available, or split
the new document into smaller parts. See Clearing memory on
page 36.
The machine has data stored in memory. Replace the print
cartridge with new one in order to print the faxes.
Memory Received
Load paper
and
press OK
Load paper and press OK. There might be a jam. Clear the jam
as described in Paper jams during printing on page 41.
Memory Received
Install ink
cartridge
There is no print cartridge in the machine. Install a print cartridge.
No answer from
remote fax
The other machine has not answered after all redial attempts to
send a fax.
No CID Number
The machine could not detect the CID (Caller ID) number.
No Dial
There is no number in the redial memory.
Not
Number
_v_iZ_ble
reprinting
while
fax
The machine could not receive a new fax while printing the
stored faxes.
Not Found
The number you are searching for does not exist in memory.
Number
already
The number you are trying to enter already exists in the phone
book or junk fax list.
Not
There is no number assigned to this One-Touch or two-digit
Speed number.
registered
Number
Poll
Code
Poll job
already
Polling
Check
Error
exists
Error
remote site
Receiving
Ask
Assigned
Error.
sender
The remote user entered the wrong poll code.
You have already programmed
job and try again.
a polling send. Cancel scheduled
The machine you want to poll is not ready to answer your poll.
Check with the other person.
There is an error while receiving a fax.
to
try again.
Remove
document
jammed
The document you are sending has jammed in the document
feeder. To clear the document jam, see Document jams during
transmission
on page 41.
You tried to copy or fax a document which is longer than 390 mm
(15.4 in.).
Care and maintenance
47
Troubleshooting
(continued)
Display
Status/Solution
Remove jammed
paper
and press
Cancel
The paper has jammed during printing. To clear the paper jam,
see Paper jams during printing on page 41.
Send Error.
Try again.
There is an error while sending a fax.
System Busy
Try again later
The fax machine is busy doing something else.
To redial
Start
The machine is waiting (three minutes) to automatically
fax number that was busy or did not answer.
now, press
redial the
You have the option to manually redial by pressing Start.
Unknown
You attempted to enter Favorites while sending or printing
Favorites document.
Job
Processing
ink
level
A previously used cartridge has been detected. Remaining ink
reported in View Tnk Level and Tnk Low message may be
inaccurate.
Troubleshooting
Your problem
shows
other
may be listed in "LCD
problems
error
messages"
you can solve yourself.
see Use Hewlett-Packard
on page 46. The chart
For problems
you cannot
below
resolve
here,
support services on page 59.
"_ TIP:
(For U.S. only) You can test your HP Fax to make sure it is set up properly
for faxing. Place a document in the document feeder, dial 1-888 HP FAX ME
(1-888-473-2963) and press Start. Please wait approximately 1 minute and you
wilt receive a "Fax Back System Test" page, confirming your product is working
correctly. The Fax Header must be set up in order to test the fax machine.
Fax problems
Problem
Solution
The machine is not working, there is no
Unplug the power cord and plug it in again. Check that your
display, and the buttons are not working,
socket is live.
No dial tone.
Check that the phone line is connected properly to the port in the
bottom of the fax. Unplug and replug it. Make sure it clicks. Check
the phone socket in the wall by plugging in another phone.
Someone calls and gets a busy signal
even though the fax is not busy.
This may rarely occur if the answer mode is set to AUTO, a voice
call comes in and is hung up without being answered, and another
call is immediately received. In AUTO mode the machine goes
back to fax receive mode if the voice call is not answered. The line
will appear busy until the machine resets.
48
Care and maintenance
Troubleshooting
(continued)
Problem
Solution
Thenumbers
stored
inmemory
donot Make
surethenumbers
areprogrammed
correctly.
Toprint
a
dialcorrectly.
Phone
book
list,seePrintreports
onpage
34.
Thedocument
does
notfeedintothe
machine,
Besurethedocument
isnotwrinkled,
andyouareputting
itin
correctly.
Check
thatthedocument
istheright
sizeandnottoo
thickortoothin.SeeDocument
typesandsizesonpage
52.
You
cannot
receive
faxes
automatically.
Check
if TELappears
ontherightsideofthedisplay.
InTEL
mode,
youcannot
receive
afaxautomatically.
Besurethe
handset
isseated
onthecradle
properly.
Iftheinkislow,thefaxwillstopprinting
faxes.
Replace
theprint
cartridge.
Ifthefaxmemory
isfull,thefaxwillstopanswering
thephone.
Load
paper
andprintthefaxes
inmemory
toclear
outthe
memory.
Themachine
cannot
receive
faxes
Donothang
upthehandset
before
pressing
Starttoreceive
afax.
manually.
thatthedocument
isloaded
facedown.Send
should
Themachine
does
notsend
anything.Check
appear
inthedisplay
after
itdials.
Check
ifthemachine
towhich
youaresending
canreceive
yourfax.
You
cannot
pollanother
machine.
Thefaxmachine
youarepolling
maybeusing
apollcode
(password).
Thefaxyoureceived
hasblank
bitsonit. Themachine
sending
toyoumaybefaulty.
Anoisy
phone
linecan
cause
lineerrors.
Check
yourmachine
bymaking
acopy.
Spots
orlines
missing
fromthefaxyou Check
iftheprint
cartridge
isokbymaking
acopy.
SeeMaintain
receive,
theprintcartridge
onpage
42.Check
withthetelephone
company
toseeifyourphone
lineisnoisy.
You
arereceiving
poor
quality
copies. Thefaxmachine
sending
toyoumayhave
adirtyscan
glass.
Also,
check
withthetelephone
company
toseeifyourphone
line
isnoisy.
Some
ofthewords
onthefaxyou
Themachine
sending
toyouhadatemporary
document
jam.
received
appear
stretched.
Your
machine
does
notmake
copies. Make
sure
yourdocument
isloaded
facedown.
There
arelines
oncopies
ordocuments
Check
yourscan
glass
formarks
andclean
it(see
Clean
the
yousend.
document
scanner
areaonpage
44).
Themachine
dialsanumber,
butfailsto Theremote
faxmachine
maybeturned
offorunable
toanswer
make
aconnection
witharemote
fax incoming
calls.
Speak
withtheother
faxoperator
tosolve
the
machine,
problem.
Care
andmaintenance
49
Troubleshooting
(continued)
Problem
You
cannot
store
adocument
in
memory.
Solution
There
maynotbeenough
memory
available
tohold
thedocument
youwant
tostore.
Ifthedisplay
shows
a Menory
Full message,
dothefollowing
untilyoucanstore
yourdocument
inmemory:
Printallunprinted
faxes
inmemory
(seeReprinting
faxeson
page
36.
Delete
unneeded
polling
faxes,
broadcast
faxes,
ordelayed
faxes
(seeTocancel
thescheduled
jobonpage
31).
Blank
areas
appear
atthebottom
of
Youmayhave
selected
thewrong
paper
sizesetting.
Toselect
the
each
page
oroncontinuation
pages, proper
paper
size,
seePaper
Sizeonpage
13.
withonlyasmall
stripofmaterial
printed
atthetop.
Image
TCRisnotworking
Youhave
theresolution
settoSUPER
FINE.
Settheresolution
to
FINE.
Print quality problems
Problem
Solution
Light or blurred characters.
Check ink level as described in View ink level on page 38. To
install a new print cartridge, see Replace the print cartridge on
page 39.
Make sure the print cartridge is installed correctly. To clean the
3rint cartridge, see Maintain the print cartridge on page 42.
Smudged or dark characters.
Make sure the paper is straight and unwrinkled. Let ink dry before
handling the paper. To clean the print cartridge, see Maintain the
print cartridge on page 42.
Characters with white lines.
If
Ink
Low.
Install
new
ink
cartridge
new print cartridge as described in Replace
on page 39.
is displayed,
install
a
the print cartridge
Remove and reinstall the print cartridge.
Clean the print cartridge (see Maintain
page 42).
the print cartridge
Improperly formed or misaligned
characters.
Clean the print cartridge (see Clean the print cartridge
42).
Abnormal black horizontal lines
Clean the cartridge carrier (see Clean the cartridge
contacts on page 43).
50
Care and maintenance
on
on page
carrier
Troubleshooting
Paper feeding problems
Problem
Solution
Paper is jammed during printing.
Clear paper jam as described in Paper jams during
page 41.
Paper sticks together.
•
Make sure you have fewer than 50 sheets in the paper tray.
•
Humid conditions may cause some paper to stick together.
Take the paper out and fan the pages and replace.
printing
on
Paper fails to feed.
Remove any obstructions
inside the machine.
Multiple sheets of paper feed.
When loading paper, do not force the paper down into the
machine. If multiple sheets have caused a paper jam, clear the
paper jam. (see Paper jams during printing on page 41 .)
Paper skews or buckles in the
paper tray.
The paper tray can hold up to 50 sheets. Make sure the paper
guides do not cause the paper to bow. When loading paper, do not
force it down into the machine.
Care and maintenance
51
7
Specifications
information
and regulatory
This chapter contains product and supplies specifications,
regulatory statements.
ordering information, and
Paper types and sizes
The HP Fax is designed to work optimally with plain cotton bond paper.
The following paper sizes and weight can be used with your machine:
Paper size
Dimensions
A4
210mm x 297mm (8.3in x 11.7in)
Letter
216mm x 279mm (8.5in x 11.0in)
Legal
216mm x 356mm (8.5in x 14.0in)
Document
types
Paper weight
75 - 9Og/m 2
(20 - 241bs)
and sizes
You can insert a document
that is up to 15 pages
long in the document
feeder.
Acceptable documents
Single sheet
Document size
Max
216mm (W) x 356mm (L) a
8.5in (W) x 14in (L)
Min.
148mm (W)x 128mm (L)
5.8in (W) x 5in (L)
Effective scanning width
2 or more sheets
210mm
8.27in
Number of sheets which can be
loaded at a time
-
Up to 15
Thickness of document
0.O7mm - O.15mm
0.018in - 0.038in
0.O75mm - O.12mm
0.019in - 0.03in
Paper quality
Uncoated on both sides
a.When sending a document that is longer than A4 (297 mm/11.69 in.), you must immediately
take out each sheet as soon as it has been scanned. Otherwise, the document may jam.
52
Specifications
and regulatory information
Print cartridge
Print cartridge
The HP Fax uses the following
print cartridge.
HP 701 black inkjet print cartridge CC635A
Product specifications
The specifications
are subject
to change
without
notice.
Item
Specification
Type of unit
Inkjet Desktop Facsimile Transceiver
Communication
System
Compatibility
Compression
Public Switched Telephone Network (PSTN) and PABX
ITU Group3
scheme
MH, MR, MMR
Modem speed
14400/12000/9600/7200/4800/2400bps
Scanning method
CIS (Contact Image Sensor)
Input document size
8.5 inches (216 mm)
Effective scanning width
8.27 inches (210 mm)
Effective recording width
8 inches (203 mm)
Power consumption
Standby: 4.9Wh
Printing Mode: Maximum 15 Wh
Voltage
100 - 127~
Frequency
50 - 60 Hz
Current
500 mA
Temperature range
50°F to 89°F (10°C to 32°C)
Humidity range
20 to 80% RH (non-condensing)
Dimension (W x D x H)
355 x 232 x 118 mm (14.0 x 9.1 x 4.6 in.)
(without tray)
355 x 311 x 244 mm (14.0 x 12.2 x 9.6 in.)
(with tray)
Weight
2.5 Kg (5.5 Ib) (including handset)
Power source
See Rating Label attached on the back of the machine.
Specifications
and regulatory information
53
Product
specifications
(continued)
Item
Resolution
Specification
Copy Standard/Fine:
300 x 300 dpi
Super Fine/Photo: 600 x 300 dpi
FaxingStandard:
100 x 200 dpi
Fine: 200 x 200 dpi
Super Fine: 400 x 200 dpi
Speed
dials
ECM
mode
YES
Grey
scale
64 levels
User
memory
capacity
InkCartridge
Part
Number
54
Specifications
and regulatory information
IO0
2.5 Mbytes (capable of 200 pages at ITU#1 test chart)
4% coverage on A4)
HP 701 (17ml) (CC635A)
Asample
ofITU#1testchart(reduced
to60.5%)
A sample
of ITU #1 test
chart
(reduced
to 60.5%)
®
TIlE
SLEREXE
SAPORS
LANE
COMPANY
,_I_)RSI';
- BOOLE
LIMITED
1' _ BII 25 8 ER
I _I_EPIION_ BOOI,E(_)_5 13)5_617- "tELEX I_3_56
_x
Ref.
3501PJC/EAC
DXo
P.N.
Cundall
Mining
Surveys
Holroyd
Road,
Reading_
Rerks.
Dear
18th
Janua_u/,
1972.
Ltd_
Pete,
Permit
me
to
introduce
you
to
the
facility
of
facsimile
transmission.
In
facsimile
a photocell
is
caused
to
perform
a _aster
scan
over
the
subject
Copy.
The
variations
of
print
density
on
the
doc_ent
cause
the
photocell
to
generate
an
analogous
electrical
video
81_al,
The
signal
is
used
to
modulate
a carrier_
which
is
transmitted
to
a remote
destination
over
a radio
or
cable
ccaununications
lines
At
the
re_ote
terminal,
demodulation
reconstructs
the
which
is
use
dot
modulate
the
density
of
print
produced
device.
This
device
is scaD.ning
in
a raster
scan
synch_onised
the
transmitting
terminal_
A_
a res_It,
a facs!mile
copy
document
is produced.
Probably
you
have
uses
for
this
facility
Y_rs
in
you_
ered
organisation.
Sincerely,
P.J. CROSS
Group Leader
R_.glst
video
signal,
by
a printing
with
that
at
of
the
subject
Regislered
hi I'mgla.fl:
No.
Om¢c:
6{) Vicarg
I,a.e,
- Facsimile
Research
2038
Ilfl)rd_
|_ ssex.
Specifications
and regulatory information
55
Environmental
product
stewardship
program
Environmental product stewardship program
Protecting
the environment
Hewlett-Packard Company is committed to providing quality products in an environmentally
sound manner. This product has been designed with several attributes to minimize impacts on our
environment. For more information, visit HP Commitment to the Environment website at:
http://www.hp.com/qo/environment
Ozone
production
This product generates no appreciable
Paper
ozone gas (03).
use
This product is suited for the use of recycled paper according to DIN 19309.
Plastics
Plastic parts over 25 grams are marked according to international standards that enhance the
ability to identify plastics for recycling purposes at the end of the product's life.
Material
safety
data
sheets
Material Safety Data Sheets (MSDS) can be obtained from the HP web site at:
http :llwww.hp.comlgolmsds
Customers
Recycling
without Internet access should contact their local HP Customer Care Center.
program
HP offers an increasing number of product return and recycling programs in many countries, as
well as partnering with some of the largest electronic recycling centers throughout the world. HP
also conserves resources by refurbishing and reselling some of its most popular products.
This HP product contains the following materials that may require special handling at end-of-life:
• Mercury in the fluorescent
lamp in the scanner (<2 mg)
• A lithium battery
This product contains a small Lithium battery that must be removed and disposed of properly at
the end of the product's useful life. The battery is located on the main circuit board.
-Battery
Part Number: Panasonic
CR2032
- Battery Material: Lithium
-Battery
Type: Button/Coin
-Quantity
Per Product: 1
-Weight:
approximately
Cell Battery
3 grams
- Lithium Type: Solid
- Battery Manufacturer:
California
Hazardous
Panasonic of Japan
Waste
Requirement
Attention California users:
The battery supplied with this product may contain perchlorate material. Special handling may
apply. See www.dtsc.ca.gov/hazardouswaste/perchlorate
for information.
Atenci6n a los usuarios de California:
La pila proporcionada con este producto puede contener perclorato. Debera con cuidado.
Consulte www.dtsc.ca.gov/hazardouswaste/perchlorate
para informaci6n.
56
Specifications
and regulatory information
Regulatory
notices
Regulatory
notices
The HP Fax meets product requirements
Regulatory
model
identification
from regulatory agencies in your country/region.
number
For regulatory identification purposes, your product is assigned a Regulatory Model Number. The
Regulatory Model Number for your product is SNPRG-0802. This regulatory number should not
be confused with the marketing name (HP 2140 Fax series) or product number.
Notice
to users
of the U.S. telephone
network:
FCC requirements
This equipment complies with Part 68 of the FCC rules and the requirements adopted by the
ACTA. On the back of this equipment is a label that contains, among other information, a product
identifier in the format US:AAAEQ##TXXXX.
If requested, this number must be provided to the
telephone company.
The HP 2140 Fax series is provided with a RJ11C connector for connecting this product to the
telephone network. An additional RJ 11C connector is provided for connecting an additional
device to the telephone network from the HP 2140 Fax series.
A plug and jack used to connect this equipment to the premises wiring and telephone network
must comply with the applicable FCC Part 68 rules and requirements adopted by the ACTA. A
compliant telephone cord and modular plug is provided with this product. It is designed to be
connected to a compatible modular jack that is also compliant. See installation instructions for
details.
The REN is used to determine the number of devices that may be connected to a telephone line.
Excessive RENs on a telephone line may result in the devices not ringing in response to an
incoming call. In most but not all areas, the sum of RENs should not exceed five (5.0). To be
certain of the number of devices that may be connected to a line, as determined by the total
RENs, contact the local telephone company. For products approved after July 23, 2001, the REN
for this product is part of the product identifier that has the format US:AAAEQ##TXXXX.
The
digits represented by ## are the REN without a decimal point (e.g., 03 is a REN of 0.3).
For earlier products, the REN is separately shown on the label.
If the HP 2140 Fax series causes harm to the telephone network, the telephone
notify you in advance that temporary discontinuance of service may be required.
notice isn't practical, the telephone company will notify the customer as soon as
you will be advised of your right to file a complaint with the FCC if you believe it
company will
But if advance
possible. Also,
is necessary.
The telephone company may make changes in its facilities, equipment, operations or procedures
that could affect the operation of the equipment. If this happens, the telephone company will
provide advance notice in order for you to make necessary modifications to maintain
uninterrupted service.
There are no customer serviceable parts inside the HP 2140 Fax series. If trouble is experienced
with the HP 2140 Fax series, for repair or warranty information, please contact Hewlett-Packard
technical support by calling 866-331-9600. If you have Internet access, you can go to
www.hp.com/support
for more information on the HP 2140 Fax series.
If the equipment is causing harm to the telephone network, the telephone company may request
that you disconnect the equipment until the problem is resolved.
Connection to party line service is subject to state tariffs. Contact the state public utility
commission, public service commission or corporation commission for information.
If your home has specially wired alarm equipment connected to the telephone
installation of HP 2140 Fax series does not disable your alarm equipment.
If you have questions about what will disable alarm equipment,
or a qualified installer.
This equipment
line, ensure the
consult your telephone
company
is hearing aid compatible.
Specifications
and regulatory information
57
Regulatory
notices
HPrecommends
theuseofaSurge
Suppressor
when
connecting
theHP2140Faxseries
toAC
power.
UseofaSurge
Suppressor
willhelpprotect
theHP2140
Faxseries
andthetelephone
network
fromabnormal
surges
ontheACpowerline.
TheCustomer
Information
forfacsimile
(FAX)
equipment
must
contain
thefollowing
wording:
TheTelephone
Consumer
Protection
Actof1991
makes
itunlawful
foranyperson
tousea
computer
orother
electronic
device,
including
FAX
machines,
tosend
anymessage
unless
such
message
clearly
contains
inamargin
atthetoporbottom
ofeach
transmitted
page
oronthefirst
page
ofthetransmission,
thedateandtimeitissentandanidentification
ofthebusiness
orother
entity,
orother
individual
sending
themessage
andthetelephone
number
ofthesending
machine
orsuchbusiness,
other
entity,
orindividual.
(Thetelephone
number
provided
maynotbea900
number
oranyother
number
forwhich
charges
exceed
local
orlong-distance
transmission
charges.)
Inorder
toprogram
thisinformation
intoyourFAX
machine,
SeeSetthefaxheader
information
onpage
34.
Automatic Dialers:
WHEN PROGRAMMING
EMERGENCY
EMERGENCY NUMBERS:
NUMBERSAND(OR)
MAKING TESTCALLSTO
1) Remain on the line and briefly explain to the dispatcher the reason for the call.
2) Perform such activities in the off-peak hours, such as early morning or late evenings.
FCC statement
The United States Federal Communications Commission (in 47 CFR 15.105) has specified that
the following notice be brought to the attention of users of this product.
This equipment has been tested and found to comply with the limits for a Class B digital device,
pursuant to part 15 of the FCC Rules. Operation is subject to the following two conditions: (1) this
device may not cause harmful interference, and (2) this device must accept any interference
received, including interference that may cause undesired operation. Class B limits are designed
to provide reasonable protection against harmful interference in a residential installation. This
equipment generates, uses, and can radiate radio frequency energy, and, if not installed and used
in accordance with the instructions, may cause harmful interference to radio communications.
However, there is no guarantee that interference will not occur in a particular installation. If this
equipment does cause harmful interference to radio or television reception, which can be
determined by turning the equipment off and on, the user is encouraged to try to correct the
interference by one or more of the following measures:
• Reorient the receiving antenna.
• Increase the separation
between the equipment
• Connect the equipment
connected.
into an outlet on a circuit different from that to which the receiver is
• Consult the dealer or an experienced
and the receiver.
radio/TV technician for help.
The user may find the following booklet prepared by the Federal Communications Commission
helpful: How to Identify and Resolve Radio-TV Interference Problems. This booklet is available
from the U.S. Government Printing Office, Washington DC, 20402. Stock No. 004-000-00345-4.
/X
CAUTION:
Pursuant to Part 15.21 of the FCC Rules, any changes or modifications
to this
equipment not expressly approved by the Hewlett-Packard Company, may cause harmful
interference and void the FCC authorization to operate this equipment.
58
Specifications
and regulatory information
UseHewlett-Packard
support
services
Notice
to
users of the Canadian
r6seau t616phonique Canadien
telephone
network/Note
& rattention
des utilisateurs
This product meets the applicable Industry Canada technical specifications/Le
est conforme aux specifications techniques applicables d'lndustrie Canada.
du
present materiel
The Ringer Equivalence Number is an indication of the maximum number of devices allowed to
be connected to a telephone interface. The termination on an interface may consist of any
combination of devices subject only to the requirement that the sum of the RENs of all the devices
does not exceed five/L'indice d'equivalence de la sonnerie (IES) sert a indiquer le nombre
maximal de terminaux qui peuvent 6tre raccordes a une interface tel6phonique. La terminaison
d'une interface peut consister en une combinaison quelconque de dispositifs, a la seule condition
que la somme d'indices d'equivalence de la sonnerie de tousles dispositifs n'exc_de pas 5.
For non-European
customers
This product is approved for use only in the country in which it was purchased. Local country laws
may prohibit the use of this product outside the country of purchase. It is strictly forbidden by law
in virtually every country to connect nonapproved telecommunications equipment (fax machines)
to public telephone networks.
Use Hewlett-Packard support services
www.hp.com/support
If you are unable to find the answer you need in the printed documentation supplied with your
product or on the web, you can contact your HP dealer or call the support phone number for your
country/region for help.
For the most current list of telephone
support numbers and call costs information, go to
www.hp.com/support.
Before calling customer support
1 Make sure that
• Your unit is plugged in and turned on.
• The correct print cartridge is installed properly.
• The recommended paper is loaded in the input tray.
2 Reset your unit by unplugging it and plugging it in again.
3 If you need to speak to an HP Customer Support Representative:
• Have your serial number ready.
• Print a Self-Test Report.
• Be prepared to discuss your problem in detail.
4 Be near your unit when you call.
Prepareyour unit for shipment
If you are requested to send in your unit for service, do the following:
• Remove the print cartridge and place it in an airtight bag so it will not dry out. Do not send the print cartridge
with the unit unless asked to do so.
• If you do not have the original packing material, you can request a replacement package set from HP
Customer Support. Shipping damage caused by improper packaging is not covered under the warranty.
• Include these items in the box:
• A brief description of the symptoms (sample prints are helpful).
• A copy of your sales slip or proof of purchase (to establish the warranty period).
• Your name, address, and telephone number where you can be reached during the day.
Specifications
and regulatory information
59
UseHewlett-Packard
support
services
_
Africa (English speaking)
www,hp.com/support
Jamaica
+27 11 2345872
Argentina
(Buenos Aires)
Argentina
Australia
Australia
(out-of-warranty)
Osterreich
1-800-711-2884
R•
Afdque (francophone)
+33 1 4993 9230
021 672 280
_1_1
0570-000511
R;z_
03-3336-9800
0800 222 47
54-11-4708-1600
0-800-555-5000
_1-_
1300 721 147
Luxembourg
(Frangais)
1902 910 910
Luxemburg
+43 0820 87 4417
(Deutsch)
0,145 € p/m
17212049
_ J_._
Malaysia
+352 900 40 006
0,161 €
+352 900 40 007
0,161 €
1800 88 8588
+32 070 300 005
0,174€
Mauritius
+32 070 300 004
0,174€
M6xico
01-800-472-68368
Maroc
081 005 010
Brasil (Sao Paulo)
Brasil
55-11-4004-7751
0-800-709-7761
Nededand
+31 0900 2020 165
Canada
1-(800)-474-6836
hp invent)
Belgi6
Belgique
Central America
Caribbean
& The
800-360-999
d_[]
1068687980
d_[]
de M6xico
55-5258-9922
0,20 €
(1-800
New Zealand
0800 441 147
Nigeria
(01) 271 2320
Norge
+47 815 62 070
0,39 NOK
24791773
800-810-3888
(BogotA)
(230) 262 210 404
M6xico(Ciudad
www.hp.com/support
Chile
Colombia
Colombia
571-606-9191
01-8000-51-4746-8368
j_._t.
Panama
1-800-711-2884
Paraguay
PerQ
009 800 54 1 0006
0-800-10111
Philippines
2 867 3551
Costa Rica
0-800-011-1046
Polska
801 800 235
Ceska republika
810 222 222
Portugal
Danmark
+45 70 202 845
+351 808 201 492
0,024 €
0,25 DKK
Puerto Rico
1-877-232-0689
Ecuador (Andinatel)
1-999-119
?_
800-711-2884
RepOblica Dominicana
Reunion
1-800-711-2884
0820 890 323
Ecuador (Pacifitel)
1-800-225-528
800-711-2884
RomAnia
0801 033 390
PoccL4_ (Moc_:aa)
095 777 3284
0,03 €
Pocca_ (CaH_rReTepdypr)
812 332 4240
0,08 €
_i'
(02) 6910602
El Salvador
800-6160
Espafia
+34 902 010 059
0,078 €
France
800 897 1415
+33 0892 69 60 22
0,337 €
Deutschland
+49 01805 652 180
0,14 € aus dem deutschen
Festnetz - bei Anrufen aus
Mobilfunknetzen
k6nnen
andere Preise gelten
E_a6a
(omr6 TO E_TCplK6)
+ 30 210 6073603
E_aTe
(SVT6_ EX_dSQ(j)
801 11 75400
EX,kaTa (aT[6 KOTrpo)
Guatemala
+65 6272 5300
Slovensko
0850 111 256
South Africa (RSA)
0860 104 771
Suomi
+358 0 203 66 767
0,015€
Sverige
+46 077 120 4765
0,23 SEK
Switzerland
+41 0848 672 672
0.08 CHF
_
02-8722-8000
800 9 2654
1-800-711-2884
"1_J
+66 (2) 353 9000
(852) 2802 4098
MagyarorszAg
India
06 40 200 629
1-800-425-7737
Trinidad & Tobago
India
91-80-28526900
TQrkiye (istanbul,
izmir & Bursa)
071 891 391
+62 (21) 350 3408
+971 4 224 9189
jl_.JI
+971 4 224 9189
,::_._1
+971 4 224 9189
aL,_
+971 4 224 9189
+971 4 224 9189
Ireland
_1
+353 1890 923 902
0,05 €
1-700-503-048
Italia
0,023 €
Specifications
and regulatory information
_
1-800-711-2884
Ankara,
YKpai"Ha
600 54 47 47
444 0307
(044) 230-51-06
_<,._1_1
United Kingdom
+44 0870 010 4320
0.05 £
United States
1-(800)-474-6836
Uruguay
0004-054-177
Venezuela
'7_-_,
+39 848 800 871
M3--_
Singapore
_J,_E_
Indonesia
60
_._J_q
1588-3003
(Caracas)
58-212-278-8666
Venezuela
0-800-474-68368
Vi6t Nam
+84 88234530
_IjL_
Declaration of conformity
Declaration
of conformity
[h#]
oEc.A .,o,
oFCO.FO.M,.Y
according
to ISO/IEC
17050-1
and
EN 17050-1
invent
DoC
Supplier's
Name:
Supplier's
Address:
Hewlett-Packard
Company
Extended Printing Solutions (EPS)
61 Alexandra
Terrace
#08-01 Harbour Link
Singapore
119936
Declares, that the product:
Product Name and Model:
HP 2140 Fax series
Regulatory Model
Product Options:
SNPRG-0802
All
conforms
EMC:
#: SNPRG-0802
Number:
to the following
Product
Specifications
and
Regulations:
C/ass B
FCC Part 15 Subpart
B
Safety:
UL 60950-1
CAN/CSA-C22.2
No. 60950-1-03,
First Edition.
Telecom:
FCC Part 68 and TIA-968-A-1
IC CS-03 standard
This device
complies
(1) This device
t_lay
received,
including
Additional
This product
design.
The
and
+ A-2 + A-3 standard
(issue 9)
with
part
not cause
interference
15 of the
hartqlful
that
FCC
Rules.
interference,
may cause
Operation
is subject
and
(2) this device
undesired
operation.
to the
tq]ust
following
accept
two
any
conditions:
interference
Information:
is assigned
Regulatory
test reports,
a Regulatory
Model
Model
Number
is the
this number
should
not
be
Number
which
main
product
confused
with
stays with the regulatory
identifier
in the regulatory
the
t_]arkefing
nar_]e
aspects
of the
documentation
or the
product
numbers.
Manager
Local contact for regulatory
U.S.:
HewJett
Packard,
topics only:
3000 Hanover
St., Palo Alto
94304, U.S.A. 650 857 1501
Specifications
and regulatory information
61
Hewlett-Packard
LIMITED
WARRANTY
STATEMENT
Hewlett-Packard
LIMITED WARRANTY
STATEMENT
HP product
Duration
Fax
1 year
of limited warranty
Print or Ink cartridges
Until the HP ink is depleted or the '*end of warranty" date printed
on the cartridge has been reached, whichever occurs first. This
warranty does not cover HP ink products that have been refilled,
remanufactured,
refurbished, misused, or tampered with.
Accessories
1 year unless otherwise
stated
A. Extent of limited warranty
1. Hewlett-Packard
(HP) warrants to the end-user customer that the HP products specified above will be free from defects
in materials and workmanship
for the duration specified above, which duration begins on the date of purchase by the
customer.
2. For software products, HP's limited warranty applies only to a failure to execute programming instructions. HP does not
warrant that the operation of any product will be interrupted or error free.
3. HP's limited warranty covers only those defects that arise as a result of normal use of the product, and does not cover
any other problems, including those that arise as a result of:
a. Improper maintenance or modification;
b. Software, media, parts, or supplies not provided or supported by HP;
c. Operation outside the product's specifications;
d. Unauthorized modification or misuse.
4. For HP printer products, the use of a non-HP cartridge or a refimied cartridge does not affect either the warranty to the
customer or any HP support contract with the customer. However, if printer failure or damage is attributable to the use of
a non-HP or refilled cartridge or an expired ink cartridge, HP will charge its standard time and materials charges to
service the printer for the particular failure or damage.
5. If HP receives, during the applicable warranty period, notice of a defect in any product which is covered by HP's
warranty, HP shaft either repair or replace the product, at HP's option.
6. If HP is unable to repair or replace, as applicable, a defective product which is covered by HP's warranty, HP shaE
within a reasonable time after being notified of the defect, refund the purchase price for the product.
7. HP shall have no obligation to repair, replace, or refund until the customer returns the defective product to HP.
8. Any replacement product may be either new or like-new, provided that it has functionality
at least equal to that of the
product being replaced.
9. HP products may contain remanufactured
parts, components, or materials equivalent to new in performance.
10. HP's Limited Warranty Statement is valid in any country where the covered HP product is distributed by HR Contracts
for additional warranty services, such as on-site service, may be available from any authorized HP service facility in
countries where the product is distributed by HP or by an authorized importer.
B. Limitations of warranty
TO THE EXTENT ALLOWED BY LOCAL LAW, NEITHER HP NOR ITS THIRD PARTY SUPPLIERS MAKES ANY
OTHER WARRANTY OR CONDITION
OFANY KIND, WHETHER EXPRESS OR IMPLIED WARRANTIES
OR
CONDITIONS
OF MERCHANTABILITY,
SATISFACTORY
QUALITY, AND FITNESS FORA PARTICULAR PURPOSE.
C. Limitations of liability
1. To the extent aflowed by local law, the remedies provided in this Warranty Statement are the customer's sole and
exclusive remedies.
2. TO THE EXTENT ALLOWED BY LOCAL LAW, EXCEPT FOR THE OBLIGATIONS
SPECIFICALLY
SET FORTH IN
THIS WARRANTY STATEMENT, IN NO EVENT SHALL HP OR ITS THIRD PARTY SUPPLIERS BE LIABLE FOR
DIRECT, INDIRECT, SPECIAL, INCIDENTAL, OR CONSEQUENTIAL
DAMAGES, WHETHER BASED ON
CONTRACT, TORT, OR ANY OTHER LEGAL THEORY AND WHETHER ADVISED OF THE POSSIBILITY OF
SUCH DAMAGES.
D. Local law
1. This Warranty Statement gives the customer specific legal rights. The customer may also have other rights which vary
from state to state in the United States, from province to province in Canada, and from country to country elsewhere in
the world.
2. To the extent that this Warranty Statement is inconsistent with local law, this Warranty Statement shall be deemed
modified to be consistent with such local law. Under such local law, certain disclaimers and limitations of this Warranty
Statement may not apply to the customer. For example, some states in the United States, as well as some governments
outside the United States (including provinces in Canada), may:
a. Preclude the disclaimers and limitations in this Warranty Statement from limiting the statutory rights of a consumer
(e.g., the United Kingdom);
b. Otherwise restrict the ability of a manufacturer
to enforce such disclaimers or limitations; or
c. Grant the customer additional warranty rights, specify the duration of implied warranties which the manufacturer
cannot disclaim, or allow limitations on the duration of implied warranties.
3. THE TERMS IN THIS WARRANTY STATEMENT, EXCEPT TO THE EXTENT LAWFULLY PERMITTED, DO NOT
EXCLUDE, RESTRICT, OR MODIFY, AND ARE IN ADDITION TO, THE MANDATORY STATUTORY RIGHTS
APPLICABLE TO THE SALE OF THE HP PRODUCTS TO SUCH CUSTOMERS.
HP Limited
Warranty
Dear Customer,
You will find below the name and address
country.
of the HP entity
You may have additiona!
statutory rights against
in any way affected
by this HP Limited Warranty,
responsible
for the performance
the seller based on your
purchase
of the HP Limited Warranty
agreement.
Ireland: HewletbPackard
Ireland Limited, 63-74 Sir John Rogerson's Quay, Dubiin 2
Malta: Hewlett Packard International Trade BV, Branch, 48, Sqaq Nru 2, Triq ix-Xatt, Pieta MSD08,
South Africa: HewletbPackard
South Africa Ltd, 12 Autumn Street, Rivonia, Sandton,
United Kingdom:
HewletbPackard
Ltd, Cain Road, BracknelI, GB-Berks RG12 1HN
62
Specifications
and regulatory information
Those
rights
Malta
2128, Republic
of South Africa
in your
are not
Index
A
Caller ID menu
Cancel
Access Cartridge
button 39
alarm sounds
discard
menu
align cartridge
menu 15
15
cancelling
answer ring pattern detection
26
answer/receive
mode 27
a scheduled
replacing
38
54
39
changing language
clean cartridge
menu 15
menu 13
automatic fax redial
22
13
cleaning the fax 44
block junk faxes 24
broadcasting
29
menu 14
broadcasting
buttons
faxes
Access Cartridge
Back 10
Cancel 11
control panel
Copy 11
Favorites
10
11
10
11
Number keypad 11
OK 10
Redial/Pause
11
Resolution
10
Scroll/Volume
10
Symbols
clearing
contrast
paper jams
21
11
11
Caller ID 24
junk faxes
list 24
24
report 35
turning on 24
41
8
number of pages
DRPD 26
5
entering
16
error messages
46
F
control panel buttons
10
6
Favorites
button
25
10
making
6
fax forwarding
15
fax header 34
multiple
6
fax memory
options 6
reduce or enlarge
Copy 11
Button 11
copy
collate
number of pages
FAX mode 28
fax name 34
6
fax number
of copies
print order
zoom 6
Copy button
6
reprinting
36
faxing
color documents
11
images/embedded
22
33
33
forwarding
faxes 15,
delayed fax 14, 29
Dial Mode 14
dialing
automatic
fax redial
34
faxes
6
D
date and time
8
fax problems 48
fax receiving
6
fax tones. See sounds
6
number
date, setting
dates 16
C
number of pages
document jams 41
documents
load 5
ECM mode 54
menu 13
36
default 14
menu 14
copies
collate
10
Speed Dial
Start 11
memory
10
Loudspeaker
Menu 10
Mode/Contrast
Mute
clearing
29
distinctive ring 26
menu 14
distribution list. See
E
clearing jams
document
41
B
31
13
broadcasting
faxes
document feeder
cleaning 42
maintenance
part number
menu 14
auto reduction
job
cartridge
4
size
(see also auto reduction)
menu 13
button 11
cancel schedule
33
arrow buttons
Auto Journal
14
22
pictures
31
front panel 10
front view 9
22
G
getting help
59
Index
63
14
messages
R
help 59
help list 35
HP Fax
displayed
46
mode/contrast
button 10
ready mode
rear view 9
mute
button
parts of 9
HP support 59
I
N
image TCR 26
menu 14
number
part number 38,
replacing
39
ink level 15
53
cartridge
38
ITU #1 chart 55
keypad
J
redialing
automatic
11
regulatory
button
one-touch
10
dialling
out of ink
19
15
paper
journal
14
See reprinting
report 35
junk faxes 14
41,
paper tray
capacity
34
language
menu
loading documents
loading paper
Loudspeaker
button 11
send
36
replacing
print fax 35
13
inform
scheduled
scheduled
45
35
fax 14
faxes 35
scheduled job
cancelling
31
scheduled jobs
30
print quality
menu setting
Index
schedule
cancelling
scroll/volume
42
39
problems
15
button 10
see answer mode
38, 53
6
self test 39
menu 15
print quality
self test 39
picture 12
using 15
language
19
part number
13
adjustment
area
cleaning 44
schedule a fax 29
print cartridge
ink level 38
maintenance
6
BASIC FAX, options
button 10
scanner
scanner
faxing 22
polling 14, 30
receive 31
37
M
a copy
S
53
18, 35
searching
photo
14, 26
ring volume 22
rings to answer 23
menu 13
dialing 19
print 19
5
4
loudspeaker
15,
button 11
memory
clearing
menu
default 14
menu 14
8
pause 19
phone book
13
13
35
ring pattern detection
part number
ink cartridge
L
confirm
sent journal 35
system data 35
reprinting faxes 36
resolution
21
button 10
51
paper size 52
menu 13
K
key sounds
20
type 20
paper jams
24
20
5
35
printing faxes 35
received journal 35
schedule inform 35
sending
size
junk fax
blocking
57
35
phone book
loading 4
not recommended
number of sheets
41
22
in memory
information
junk fax
paper
41
fax redial
reports 34, 35
Caller ID 35
P
clearing paper
document 41
35
27
redial a number
37
out of paper.
faxes
jams
64
11
OK
42
journal
receiving faxes
redial/pause
button 11
O
ink cartridge
maintenance
making
received
15
50
sending confirm 35
image TCR 14
menu 13
sent journal
35
setbroadcasting
menu14
setdelayed
fax
menu14
setfaxforward
menu15
setjunkfaxno
menu14
setpolling
send
menu14
setting
dateandtime33
setting
faxnumber
34
silent
mode
daily34
dailyschedule
13
menu13
sounds
alarm33
keys34
onandoff33
WakeUp
33
speaker
volume22
speed
dial
button11
programming
18
using18
speed
dials
number
of 8
start
button11
supplies
printcartridge
38
symbols
button11
system
data35
V
view ink level
menu 15
volume
ring
22
speaker
22
W
WakeUp
WakeUp
warranty
33
sounds
62
33
T
TEL mode
28
telephone
dialing 7
telephone numbers
entering
16
text
entering
16
time, setting 33
troubleshooting
fax problems
48
messages
46
paper feeding 51
print quality 50
U
unwanted
faxes
14
Index
65
© 2009 HewJett-Packard DeveJopment Company, L.P.
www.hp.com
Printed in Korea
Illll!1IJll
Uli
I!!1
IitliIi!11
II
CM721-90001
i n v e n t