1
HP 3100 Fax series
User Guide
HP 3100 Fax series
User Guide
Copyright information
© 2008 Copyright Hewlett-Packard
Development Company, L.P.
Hewlett-Packard Company
notices
The information contained in this
document is subject to change without
notice.
All rights reserved. Reproduction,
adaptation, or translation of this
material is prohibited without prior
written permission of Hewlett-Packard,
except as allowed under copyright laws.
The only warranties for HP products
and services are set forth in the express
warranty statements accompanying
such products and services. Nothing
herein should be construed as
constituting an additional warranty. HP
shall not be liable for technical or
editorial errors or omissions contained
herein.
Safety information
Always follow basic safety precautions
when using this product to reduce risk
of injury from fire or electric shock.
1. Read and understand all instructions
in the documentation that comes with
the HP Fax.
2. Use only a grounded electrical outlet
when connecting this product to a
power source. If you do not know
whether the outlet is grounded, check
with a qualified electrician.
3. Observe all warnings and
instructions marked on the product.
4. Unplug this product from wall outlets
before cleaning.
5. Do not install or use this product near
water, or when you are wet.
6. Install the product securely on a
stable surface.
7. Install the product in a protected
location where no one can step on or
trip over the line cord, and the line cord
cannot be damaged.
8. If the product does not operate
normally, see Maintain and
troubleshoot.
9. There are no user-serviceable parts
inside. Refer servicing to qualified
service personnel.
Contents
1
Get started
Find other resources for the product .........................................................................................5
Understand the HP Fax parts.....................................................................................................5
Front view.............................................................................................................................6
Back view..............................................................................................................................6
Control panel buttons and lights...........................................................................................7
Load full-size paper....................................................................................................................8
Load originals...........................................................................................................................10
Change HP Fax settings...........................................................................................................11
Send a basic fax.......................................................................................................................11
Set the answer mode................................................................................................................12
Set up faxing for the HP Fax ...................................................................................................12
Set up faxing (parallel phone systems)..............................................................................13
Serial-type fax setup...........................................................................................................14
2
Use the HP Fax
Control panel menus................................................................................................................15
Use control panel menus..........................................................................................................16
Control-panel message types...................................................................................................16
Text and symbols......................................................................................................................17
Type numbers and text on the control-panel keypad.........................................................17
To enter text..................................................................................................................17
To enter a space, pause, or symbol.............................................................................18
To erase a letter, number, or symbol............................................................................18
Available symbols for dialing fax numbers.........................................................................18
Set up speed-dial entries..........................................................................................................18
Set up fax numbers as speed-dial entries or groups..........................................................19
Set up speed-dial entries..............................................................................................19
Set up a speed-dial group............................................................................................19
Print and view a list of speed-dial entries...........................................................................20
Select print media.....................................................................................................................20
Tips for selecting and using print media.............................................................................20
Understand specifications for supported media.................................................................21
Understand supported sizes.........................................................................................21
Understand supported media types and weights.........................................................21
Set minimum margins.........................................................................................................21
1
3
Fax
Send a fax................................................................................................................................22
Send a fax manually from a phone.....................................................................................22
Send a fax using monitor dialing........................................................................................24
Send a fax from memory....................................................................................................24
Schedule a fax to send later...............................................................................................25
Send a fax to multiple recipients.........................................................................................25
Send a color original or image/embedded picture fax........................................................26
Change the fax resolution and Lighter/Darker settings......................................................27
Change the fax resolution.............................................................................................27
Change the Lighter / Darker setting............................................................................28
Set new default settings...............................................................................................28
Send a fax in Error Correction Mode..................................................................................29
Receive a fax............................................................................................................................29
Receive a fax manually......................................................................................................29
Set up backup fax reception...............................................................................................30
Reprint received faxes from memory..................................................................................31
Poll to receive a fax............................................................................................................31
Forward faxes to another number......................................................................................32
Set the paper size for received faxes.................................................................................32
Set automatic reduction for incoming faxes........................................................................33
Block junk fax numbers......................................................................................................33
Set the junk fax mode...................................................................................................33
Add numbers to the junk fax list...................................................................................34
Remove numbers from the junk fax list........................................................................34
Change fax settings..................................................................................................................35
Configure the fax header....................................................................................................35
Set the number of rings before answering..........................................................................35
Change the answer ring pattern for distinctive ring............................................................36
Set the fax error correction mode.......................................................................................36
Set the dial type..................................................................................................................36
Set the redial options..........................................................................................................37
Set the fax speed................................................................................................................37
Fax over the Internet................................................................................................................38
Cancel a fax..............................................................................................................................38
4
Copy
Make copies from the control panel..........................................................................................39
Change the copy settings.........................................................................................................39
Set the number of copies..........................................................................................................40
Set the copy paper size............................................................................................................40
Set the copy paper type............................................................................................................40
Change copy speed or quality..................................................................................................41
Resize an original to fit onto letter or A4 paper........................................................................41
Copy a legal-size document onto letter paper..........................................................................42
Adjust the lightness and darkness of your copy.......................................................................42
Enhance blurred areas of your copy.........................................................................................42
Enhance light areas of your copy.............................................................................................43
Cancel a copy job.....................................................................................................................43
2
Contents
5
Configure and manage
Manage the HP Fax..................................................................................................................44
Use reports...............................................................................................................................44
Print fax confirmation reports..............................................................................................44
Print fax error reports..........................................................................................................45
Print and view the fax log...................................................................................................45
Test fax setup...........................................................................................................................46
The fax test failed.....................................................................................................................46
6
Maintain and troubleshoot
Work with print cartridges.........................................................................................................51
Print cartridges....................................................................................................................51
Handle the print cartridges.................................................................................................52
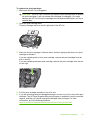
Replace the print cartridges................................................................................................52
Align the print cartridges.....................................................................................................55
Clean the print cartridges...................................................................................................55
Clean the print cartridge contacts.......................................................................................56
Clean the area around the ink nozzles...............................................................................57
Store print cartridges..........................................................................................................58
Clean the HP Fax.....................................................................................................................59
Clean the glass strip...........................................................................................................59
Clean the white strip...........................................................................................................60
Clean the exterior...............................................................................................................61
Troubleshooting tips and resources.........................................................................................61
Solve printing problems............................................................................................................61
Poor print quality and unexpected printouts.............................................................................62
Solve paper-feed problems......................................................................................................63
Solve copy problems................................................................................................................63
Solve fax problems...................................................................................................................65
Troubleshoot setup issues........................................................................................................70
Clear paper jams......................................................................................................................71
Avoid paper jams......................................................................................................................72
A HP supplies and fax specifications
Order printing supplies online...................................................................................................73
Supplies....................................................................................................................................73
HP media............................................................................................................................73
Print cartridges....................................................................................................................73
Physical specifications..............................................................................................................74
Product features and capacities...............................................................................................74
Memory specifications..............................................................................................................74
Print specifications....................................................................................................................74
Copy specifications...................................................................................................................74
Fax specifications.....................................................................................................................75
Environmental specifications....................................................................................................75
Electrical specifications............................................................................................................75
Acoustic emission specifications (noise levels per ISO 7779)..................................................75
B Support and warranty
Obtain electronic support..........................................................................................................77
3
Obtain HP telephone support...................................................................................................77
Before you call....................................................................................................................77
Support process.................................................................................................................78
HP support by phone..........................................................................................................78
Phone support period...................................................................................................78
Placing a call.................................................................................................................78
After the phone support period.....................................................................................78
Additional warranty options................................................................................................78
Prepare the HP Fax for shipment.............................................................................................78
Pack the HP Fax.......................................................................................................................79
Warranty...................................................................................................................................80
C Regulatory information
FCC statement..........................................................................................................................81
Noise emission statement for Germany...................................................................................82
Notice to users of the U.S. telephone network: FCC requirements..........................................82
Notice to users of the Canadian telephone network.................................................................83
Notice to users in the European Economic Area......................................................................83
Regulatory model number........................................................................................................84
Environmental product stewardship program...........................................................................84
Paper use...........................................................................................................................84
Plastics...............................................................................................................................84
Material safety data sheets.................................................................................................84
Energy consumption...........................................................................................................84
Recycling program..............................................................................................................84
HP inkjet supplies recycling program.................................................................................84
Disposal of waste equipment by users in private households in the European
Union..................................................................................................................................86
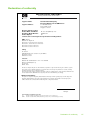
Declaration of conformity..........................................................................................................87
Index..............................................................................................................................................88
4
1
Get started
This guide provides details about how to use the HP Fax and to resolve problems.
•
•
•
•
•
•
•
•
Find other resources for the product
Understand the HP Fax parts
Load full-size paper
Load originals
Change HP Fax settings
Send a basic fax
Set the answer mode
Set up faxing for the HP Fax
Find other resources for the product
You can obtain product information and further troubleshooting resources that are not
included in this guide from the following resources:
Resource
Description
Location
Setup poster
Provides illustrated setup
information.
A printed version of the
document is provided with the
HP Fax.
Control panel
Provides status, error, and
warning information about
operations.
For more information, see
Control panel buttons and
lights.
Logs and reports
Provides information about
events that have occurred.
For more information, see
Configure and manage.
HP Web sites
If you have Internet access,
you can get help and support
from the HP Web sites. These
Web sites offer technical
support, supplies, and
ordering information.
www.hp.com/support
Lists information to contact
HP. During the warranty
period, this support is often
free of charge.
For more information, see
Obtain HP telephone support.
HP telephone support
www.hp.com
Understand the HP Fax parts
•
•
•
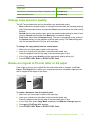
Front view
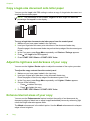
Back view
Control panel buttons and lights
Understand the HP Fax parts
5
Chapter 1
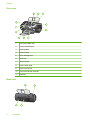
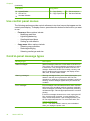
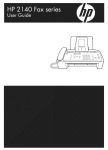
Front view
1
Document feeder tray
2
Control panel display
3
Paper guides
4
Control panel
5
Print cartridge door
6
Input tray
7
Tray extender
8
Paper-width guide
9
Document catcher
10
Document catcher extender
11
Handset
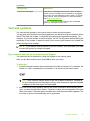
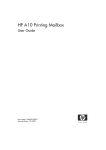
Back view
6
Get started
1
Power connection
2
Fax ports (1-LINE and 2-EXT)
3
Rear door
4
Rear door access tab
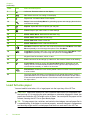
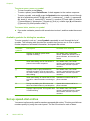
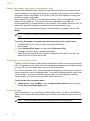
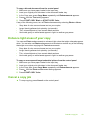
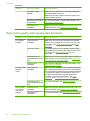
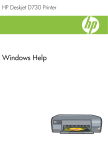
Control panel buttons and lights
The following diagram and related table provide a quick reference to the control panel
features.
Label
Icon
Name and Description
1
Speed Dial: Selects a speed dial number
2
Lighter / Darker: Lightens or darkens black-and-white faxes being sent
3
Fax Resolution: Adjusts the resolution for black-and-white faxes being sent
4
Attention light: When blinking, the attention light indicates an error has occurred that
requires your attention
5
Display: View menus and messages
6
Back: Moves you one level up in the menu
Understand the HP Fax parts
7
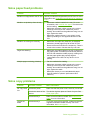
Chapter 1
(continued)
Label
Icon
Name and Description
7
Left arrow: Decrease values on the display
8
OK: Selects a menu or a setting on the display
9
Right arrow: Increases values on the display
10
Setup: Presents the Setup Menu for generating reports and changing fax and other
maintenance settings
11
Reports: Opens the menu of reports you can print
12
Cancel: Stops a job, exits a menu, or exits settings
13
START COPY Black: Starts a black-and-white copy
14
START COPY Color: Starts a color copy
15
START FAX Color: Starts a color fax
16
START FAX Black: Starts a black-and-white fax
17
Fax Menu: Places the HP Fax in fax mode and presents the Fax Menu. Press Fax
Menu repeatedly to scroll through the options in the Fax Menu.
18
Copy Menu: Places the HP Fax in copy mode and presents the Copy Menu. Press
Copy Menu repeatedly to scroll through the options in the Copy Menu.
19
Keypad: Enter fax numbers, values, or text
20
Flash: Cancels a fax and brings up a dial tone. Also used to answer a call waiting
21
Answer Mode: Switches among the Answer Mode settings. Depending on the
setting, the HP Fax automatically answers incoming phone calls, requires you to
receive the fax manually, or "listens" for fax tones.
22
Redial/Pause: Redials the most recently dialed number or inserts a 3-second pause
in a fax number
23
One-touch speed dial buttons: Accesses the first 20 speed dial numbers. Press a
speed dial button once to select the speed dial number presented in the left column.
Press the same speed dial button a second time to select the speed dial number in
the right column.
Load full-size paper
You can load full-size letter, A4, or legal paper into the input tray of the HP Fax.
CAUTION: Make sure that the HP Fax is idle and silent when you load paper into
the input tray. If it is servicing the print cartridges or otherwise engaged in a task, the
paper stop inside the HP Fax might not be in place. You could push the paper too far
forward, causing the HP Fax to eject blank pages.
TIP: To help prevent rips, wrinkles, and curled or bent edges, store all paper flat in
a resealable bag. If the paper is not stored properly, extreme changes in temperature
and humidity might result in curled paper that does not work well in the HP Fax.
8
Get started
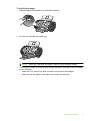
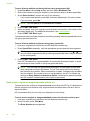
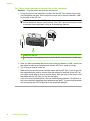
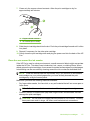
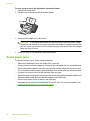
To load full-size paper
1. Slide the paper-width guide to its outermost position.
2. Flip the tray extender up toward you.
NOTE: When you use legal-size paper, leave the tray extender closed.
3. Tap a stack of paper on a flat surface to align the edges, and then check the paper
for the following:
• Make sure it is free of rips, dust, wrinkles, and curled or bent edges.
• Make sure all the paper in the stack is the same size and type.
Load full-size paper
9
Chapter 1
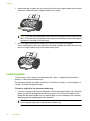
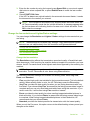
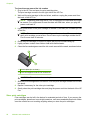
4. Insert the stack of paper into the input tray with the short edge forward and the print
side down. Slide the stack of paper forward until it stops.
TIP: If you are using letterhead, insert the top of the page first with the print side
down. For more help on loading full-size paper and letterhead, refer to the diagram
engraved in the base of the input tray.
5. Slide the paper-width guide inward until it stops at the edge of the paper.
Do not overload the input tray; make sure the stack of paper fits within the input tray
and is no higher than the top of the paper-width guide.
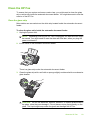
Load originals
You can copy or fax a single or multiple-page A4-, letter-, or legal-size document by
placing it in the document feeder tray.
The document feeder tray holds a maximum of 20 sheets of letter- or A4-size paper, or
it holds 15 sheets of legal-size paper.
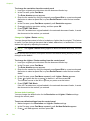
To load an original in the document feeder tray
1. Load your original, with the print side down, into the document feeder tray. Place the
pages so that the top edge of the document goes in first. Slide the media into the
automatic document feeder until you hear a beep or see a message on the display
indicating that the loaded pages were detected.
TIP: For more help on loading originals in the automatic document feeder, refer
to the diagram engraved in the document feeder tray.
10
Get started
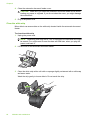
2. Slide the width guides inward until they stop at the left and right edges of the media.
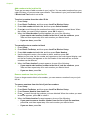
Change HP Fax settings
You can change the HP Fax settings from the control panel:
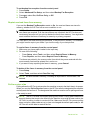
To change settings from the control panel
1. At the control panel, press the menu button for the function you are using (for example,
Copy Menu).
2. To reach the option that you want to change, use one of the following methods:
• Press a control-panel button, and then use the left or right arrow keys to adjust
the value.
• Select the option from the menu on the control-panel display.
3. Select the value that you want, and then press OK.
Send a basic fax
You can easily send a single- or multiple-page black-and-white fax by using the control
panel.
NOTE: If you need printed confirmation that your faxes were successfully sent,
enable fax confirmation before sending any faxes.
TIP: You can also send a fax manually from a phone or by using monitor dialing.
These features allow you to control the pace of your dialing. They are also useful
when you want to use a calling card to charge the call and you have to respond to
tone prompts while dialing.
Send a basic fax
11
Chapter 1
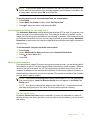
To send a basic fax from the control panel
1. Load your originals. For additional information, see Load originals.
2. Enter the fax number by using the keypad, press Speed Dial or a one-touch speed
dial button to select a speed dial, or press Redial/Pause to redial the last number
dialed.
TIP: To add a pause in the fax number you are entering, press Redial/Pause,
or press the Symbols (*) button repeatedly, until a dash (-) appears on the display.
3. Press START FAX Black.
If the HP Fax detects an original loaded in the automatic document feeder, it sends
the document to the number you entered.
TIP: If the recipient reports issues with the quality of the fax you sent, you can
try changing the resolution or contrast of your fax.
Set the answer mode
The answer mode determines how the HP Fax answers incoming calls.
•
•
•
•
Select Fax mode if you want to receive faxes automatically. The HP Fax will answer
the telephone, automatically detect fax tones, and receive a fax.
Select Tel mode if you want to receive faxes manually. You must be available to
respond in person to the incoming fax call or the HP Fax does not receive faxes. Press
START FAX Black or START FAX Color to begin receiving the fax.
Select FaxTel mode if you want the HP Fax to answer faxes automatically after a
certain number of rings that are specified by the Rings to Answer setting. If the HP
Fax does not sense a fax signal, it will ring 5 times in a different tone to tell you it may
be a regular telephone call. If you do not pick up the handset, it will try again to receive
a fax after several more rings.
Select AnswerMachine mode if you have an answering machine connected directly
to the port labeled 2-EXT on the back of your HP Fax. When a call comes in, the
answering machine answers and listens. If it detects fax tones, it receives the fax;
otherwise, the answering machine records the caller's message. If the answering
machine is switched off or not connected to your HP Fax, the HP Fax will automatically
attempt to receive a fax after several rings.
To select the answer mode via the control panel
▲ Press Answer Mode button until the desired mode displays.
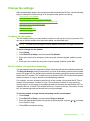
Set up faxing for the HP Fax
After completing all the steps in the setup poster, use the instructions in this section to
complete your fax setup. Keep your setup poster for later use.
In this section, you will learn how to set up the HP Fax so that faxing works successfully
with equipment and services you might already have on the same phone line.
12
Get started
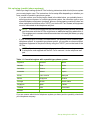
Set up faxing (parallel phone systems)
Before you begin setting up the HP Fax for faxing, determine which kind of phone system
your country/region uses. The instructions for fax setup differ depending on whether you
have a serial- or parallel-type phone system.
•
If you do not see your country/region listed in the table below, you probably have a
serial-type phone system. In a serial-type phone system, the connector type on your
shared telephone equipment (modems, phones, and answering machines) does not
allow a physical connection to the "2-EXT" port on the HP Fax. Instead, all equipment
must be connected at the telephone wall jack.
NOTE: In some countries/regions that use serial-type phone systems, the phone
cord that came with the HP Fax might have an additional wall plug attached to it.
This enables you to connect other telecom devices to the wall jack where you plug
in the HP Fax.
•
If your country/region is listed in the table below, you probably have a parallel-type
telephone system. In a parallel-type phone system, you are able to connect shared
telephone equipment to the phone line by using the "2-EXT" port on the back of the
HP Fax.
NOTE: If you have a parallel-type phone system, HP recommends you use the
2-wire phone cord supplied with the HP Fax to connect it to the telephone wall
jack.
Table 1-1 Countries/regions with a parallel-type phone system
Argentina
Australia
Brazil
Canada
Chile
China
Colombia
Greece
India
Indonesia
Ireland
Japan
Korea
Latin America
Malaysia
Mexico
Philippines
Poland
Portugal
Russia
Saudi Arabia
Singapore
Spain
Taiwan
Thailand
USA
Venezuela
Vietnam
If you are unsure which kind of telephone system you have (serial or parallel), check with
your telephone company.
Set up faxing for the HP Fax
13
Chapter 1
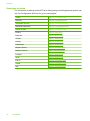
Serial-type fax setup
For information on setting up the HP Fax for faxing using a serial-type phone system, see
the Fax Configuration Web site for your country/region.
14
Austria
www.hp.com/at/faxconfig
Germany
www.hp.com/de/faxconfig
Switzerland (French)
www.hp.com/ch/fr/faxconfig
Switzerland (German)
www.hp.com/ch/de/faxconfig
United Kingdom
www.hp.com/uk/faxconfig
Finland
www.hp.fi/faxconfig
Denmark
www.hp.dk/faxconfig
Sweden
www.hp.se/faxconfig
Norway
www.hp.no/faxconfig
Netherlands
www.hp.nl/faxconfig
Belgium (Dutch)
www.hp.be/nl/faxconfig
Belgium (French)
www.hp.be/fr/faxconfig
Portugal
www.hp.pt/faxconfig
Spain
www.hp.es/faxconfig
France
www.hp.com/fr/faxconfig
Ireland
www.hp.com/ie/faxconfig
Italy
www.hp.com/it/faxconfig
Get started
2
Use the HP Fax
•
•
•
•
•
•
Control panel menus
Use control panel menus
Control-panel message types
Text and symbols
Set up speed-dial entries
Select print media
Control panel menus
Setup Menu
1. Print Report
4. Advanced Fax Setup
❑
❑
❑
❑
❑
❑
❑
❑
❑
❑
❑
❑
❑
❑
❑
❑
❑
❑
1. Fax Confirmation
2. Image on Fax Send Report
3. Fax Error Report
4. Self-Test Report
5. Last Transaction
6. Fax Log
7. Speed Dial List
8. Caller ID Report
9. Junk Fax List
0. Reprint Faxes in Memory
1. Distinctive Ring
2. Busy Redial
3. No Answer Redial
4. Automatic Reduction
5. Backup Fax Reception
6. Error Correction Mode
7. Fax Speed
8. Fax Forwarding (Black Only)
2. Speed Dial Setup
5. Tools
❑
❑
❑
❑
❑
❑
❑
❑
❑
❑
❑
1. Individual Speed Dial
2. Group Speed Dial
3. Delete Speed Dial
4. Print Speed Dial List
1. Clean Print Cartridge
2. Align Print Cartridge
3. Date and Time
4. Restore Factory Defaults
5. Reprint Faxes in Memory
6. Run Fax Test
7. Clear Fax Log
3. Basic Fax Setup
6. Preferences
❑
❑
❑
❑
❑
❑
❑
❑
❑
❑
1. Fax Header
2. Rings to Answer
3. Fax Paper Size
4. Rings and Beep Volume
5. Phone Line, Monitor Volume
6. Tone and Pulse Dialing
7. Junk Fax Blocker Setup
1. Set Language and Country/Region
2. Set Scroll Speed
3. Set Prompt Delay Time
Fax Menu
Copy Menu
❑
❑
❑
Enter Number
Resolution
❑
Number of
Copies
Reduce/Enlarge
❑
❑
Paper Type
Lighter/Darker
Control panel menus
15
Chapter 2
(continued)
Fax Menu
Copy Menu
❑
❑
❑
❑
❑
Lighter/Darker
How to Fax
Set New Defaults
Copy Quality
Copy Paper Size
❑
❑
Enhancements
Set New Defaults
Use control panel menus
The following sections provide a quick reference to top-level menus that appear on the
control-panel display. To display a menu, press the menu button for the function you want
to use.
•
•
Fax menu: Menu options include:
◦ Modifying resolution
◦ Lightening/darkening
◦ Sending delayed faxes
◦ Setting up new defaults
Copy menu: Menu options include:
◦ Selecting copy quantities
◦ Reducing/enlarging
◦ Selecting media type and size
Control-panel message types
Message type
Description
Status messages
Status messages reflect the current state of the HP Fax.
They inform you of normal operation and require no action
to clear them. They change as the state of the HP Fax
changes. Whenever the HP Fax is ready, not busy, and
has no pending warning messages, the display shows
date, time, and the answer mode.
Warning messages
Warning messages inform you of events that require your
attention, but they do not prevent the HP Fax from
operating. An example of a warning message is a low ink
warning. These messages appear until you resolve the
condition.
Error messages
Error messages communicate that some action must be
performed, such as adding media or clearing a media jam.
These messages are usually accompanied by a blinking
red Attention light. Take the appropriate action to continue
printing.
If the error message shows an error code, unplug the HP
Fax, and then plug it in again. In most situations, this
action solves the problem. If the message persists, your
HP Fax might need service. For more information, see
Support and warranty.
NOTE: The faxes stored in memory are not deleted
when you unplug the power cord.
16
Use the HP Fax
(continued)
Message type
Description
Critical error messages
Critical error messages inform you of a HP Fax failure.
Some of these messages can be cleared by unplugging
the power cord, and plugging it back in again. If a critical
error persists, service is required. For more information,
see Support and warranty.
NOTE: The faxes stored in memory are not deleted
when you unplug the power cord.
Text and symbols
You can use the keypad on the control panel to enter text and symbols.
You can also enter symbols from the keypad when you dial a fax or phone number. When
the HP Fax dials the number, it interprets the symbol and responds accordingly. For
example, if you enter a dash in the fax number, the HP Fax will pause before dialing the
remainder of the number. A pause is useful if you need to gain access to an outside line
before dialing the fax number.
NOTE: If you want to enter a symbol in your fax number, such as a dash, you need
to enter the symbol by using the keypad.
Type numbers and text on the control-panel keypad
You can enter text or symbols by using the keypad on the control panel.
After you are done entering text, press OK to store your entry.
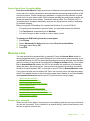
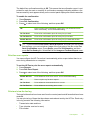
To enter text
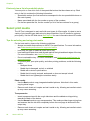
1. Press the keypad numbers that correspond to the letters of a name. For example, the
letters a, b, and c correspond to the number 2, as shown on the button below.
TIP: Press a button multiple times to see the available characters. Depending
on your language and country/region setting, other characters might be available
in addition to the ones shown on the keypad.
2. After the correct letter appears, wait for the cursor to advance automatically to the
right, or press the right arrow button. Press the number that corresponds to the next
letter in the name. Press the button multiple times until the correct letter appears. The
first letter of a word is automatically set to uppercase.
Text and symbols
17
Chapter 2
To enter a space, pause, or symbol
• To insert a space, press Space.
• To enter a pause, press Redial/Pause. A dash appears in the number sequence.
• To enter a symbol, such as @, press the Symbols button repeatedly to scroll through
the list of available symbols: at (@), period (.), underscore (_), dash (-), ampersand
(&), slash (/), colon (:), semicolon (;), comma (,), question (?), back slash (\), asterisk
(*), parentheses ( ), apostrophe ('), equals (=), plus (+), number sign (#), exclamation
(!), percent (%), and quotation mark (“).
To erase a letter, number, or symbol
▲ If you make a mistake, press the left arrow button to clear it, and then make the correct
entry.
Available symbols for dialing fax numbers
To enter a symbol, such as *, press Symbols repeatedly to scroll through the list of
symbols. The following table provides the symbols that you can use in a fax or phone
number sequence, fax header information, and speed-dial entries.
Available
symbols
Description
Available when entering
*
Displays an asterisk symbol when
required for dialing.
Fax header name, speed-dial
names, speed-dial numbers, fax or
phone numbers, and monitor dial
entries
-
When auto-dialing, the HP Fax enters a
pause in the number sequence.
Fax header name, fax header
number, speed-dial names, speeddial numbers, and fax or phone
numbers
()
Displays a left or right parenthesis to
separate numbers, such as area codes,
for easier reading. These symbols do not
affect dialing.
Fax header name, fax header
number, speed-dial names, speeddial numbers, and fax or phone
numbers
W
When auto-dialing, W causes the HP Fax
to wait for a dial tone before continuing to
dial.
Speed-dial numbers and fax or
phone numbers
R
During auto-dialing, the R functions the
same as a Flash button on your telephone.
Speed-dial numbers and fax or
phone numbers
+
Displays a plus symbol. This symbol does
not affect dialing.
Fax header name, fax header
number, speed-dial names, speeddial numbers, and fax or phone
numbers
Set up speed-dial entries
You can set up frequently used fax numbers as speed-dial entries. This lets you dial those
numbers quickly by using the control panel. The first 20 entries for each of these
18
Use the HP Fax
destinations are associated with the 10 dual-purpose speed-dial buttons on the control
panel.
•
•
Set up fax numbers as speed-dial entries or groups
Print and view a list of speed-dial entries
Set up fax numbers as speed-dial entries or groups
You can store fax numbers or groups of fax numbers as speed-dial entries. Speed-dial
entries 1 through 20 are associated with the corresponding ten speed-dial buttons on the
control panel.
For information about printing a list of the speed-dial entries that are set up, see Print and
view a list of speed-dial entries.
•
•
Set up speed-dial entries
Set up a speed-dial group
Set up speed-dial entries
Control panel: Press Setup, and then select the Speed Dial Setup option.
◦ To add or change an entry: Select Individual Speed Dial or Group Speed Dial and
press the arrow keys to move to an unused entry number, or type a number on the
keypad. Type the fax number, and then press OK. Include any pauses or other
required numbers, such as an area code, an access code for numbers outside a PBX
system (usually a 9 or 0), or a long-distance prefix. Type the name, and then press
OK.
◦ To delete one entry or all entries: Select Delete Speed Dial, press the arrow keys to
highlight the speed-dial entry that you want to delete, and then press OK.
Set up a speed-dial group
If you send information to the same group of fax numbers on a regular basis, you can set
up a speed-dial entry for a group in order to simplify the task. The speed-dial entry for a
group can be associated with a speed-dial button on the control panel.
A group member must be a member of the speed-dial list before you can add the member
to a speed-dial group. You can add up to 48 fax numbers to each group (with up to 50
characters for each fax number).
Control panel: Press the Setup button, and then select the Speed Dial Setup option.
◦ To add a group: Select Group Speed Dial, select an unassigned speed-dial entry,
and then press OK. Use the arrow keys to highlight a speed-dial entry, and then press
OK to select it. Repeat this step to add additional speed-dial entries to this group.
Use the keypad to enter a group speed-dial name, and then press OK. Follow any
prompts that might occur.
◦ To add entries to a group: Select Group Speed Dial, select the group speed-dial
entry that you want to change, and then press OK. Use the arrow keys to highlight a
speed-dial entry, and then press OK to select it. Repeat this step to add additional
speed-dial entries to this group. Follow any prompts that might occur.
◦ To delete a group: Select Delete Speed Dial, press the arrow keys to highlight the
speed-dial entry that you want to delete, and then press OK.
Set up speed-dial entries
19
Chapter 2
Print and view a list of speed-dial entries
You can print or view a list of all of the speed-dial entries that have been set up. Each
entry in the list contains the following information:
•
•
•
Speed-dial number (the first ten entries correspond to the ten speed-dial buttons on
the control panel)
Name associated with the fax number or group of fax numbers
For the fax speed-dial list, the fax number (or all of the fax numbers for a group)
Select print media
The HP Fax is designed to work well with most types of office media. It is best to test a
variety of print media types before buying large quantities. Use HP media for optimum
print quality. Visit the HP Web site at www.hp.com for more information about HP media.
Tips for selecting and using print media
For the best results, observe the following guidelines.
•
•
•
•
•
Always use media that conforms to the HP Fax specifications. For more information,
see Understand specifications for supported media.
Load only one type of media at a time into a tray.
Load media print-side down and aligned against the right and back edges of the tray.
For more information, see Load full-size paper.
Do not overload the tray. For more information, see Understand specifications for
supported media.
To prevent jams, poor print quality, and other printing problems, avoid the following
media:
◦ Multipart forms
◦ Media that is damaged, curled, or wrinkled
◦ Media with cutouts or perforations
◦ Media that is heavily textured, embossed, or does not accept ink well
◦ Media that is too lightweight or stretches easily
Photo media
• Use the Best mode to copy images/embedded pictures. Note that in this mode,
copying takes longer.
• Remove each sheet as it copies and set it aside to dry. Allowing wet media to stack
up may cause smearing.
Transparencies
• Insert transparencies with the rough side down and the adhesive strip pointing
towards the back of the device.
• Use the Normal mode to copy transparencies. This mode provides longer drying time
and ensures that the ink dries completely before the next page is delivered to the
output tray.
• Remove each sheet as it copies and set it aside to dry. Allowing wet media to stack
up may cause smearing.
20
Use the HP Fax
Understand specifications for supported media
Use the following tables to determine the correct media to use with your HP Fax, and
determine what features will work with your media.
•
•
Understand supported sizes
Understand supported media types and weights
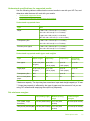
Understand supported sizes
Type
Size
Paper
Letter: 216 x 279 mm (8.5 x 11 inches)
A4: 210 x 297 mm (8.3 x 11.7 inches)
Legal: 216 x 356 mm (8.5 x 14 inches)
B5–JIS: 182 x 257 mm (7.2 x 10.1 inches)
Transparency film
Letter: 216 x 279 mm (8.5 x 11 inches)
A4: 210 x 297 mm (8.3 x 11.7 inches)
Premium photo paper
Letter: 216 x 280 mm (8.5 x 11 inches)
A4: 210 x 297 mm (8.3 x 11.7 inches)
Understand supported media types and weights
Type
Paper weight
Input tray*
Output tray**
Document
feeder tray
Plain paper
16 to 24 lb. (60 to
90 gsm)
up to 100
up to 20
up to 20
(16 lb. paper)
(16 lb. paper)
20 to 24 lb. (75 to
90 gsm)
up to 100
up to 20
(16 lb. paper)
(16 lb. paper)
Transparency film
N/A
25
up to 10
N/A
8.5 x 11 inch photo
paper
N/A
40
20
N/A
Legal paper
up to 15
* Maximum capacity. The input tray has a maximum input stack height capacity of 10 mm.
** Output tray capacity is affected by the type of paper and the amount of ink you are
using. HP recommends emptying the output tray frequently.
Set minimum margins
Top (leading edge)
Bottom (trailing
edge)
Left and Right
margins
U.S. (Letter, Legal,
Executive)
1.5 mm (0.06 inches)
12.7 mm (0.50
inches)
6.4 mm (0.25 inches)
ISO (A4, A5) and JIS (B5)
1.8 mm (0.07 inches)
12.7 mm (0.50
inches)
3.2 mm (0.13 inches)
Select print media
21
3
Fax
You can use the HP Fax to send and receive faxes, including color faxes. You can
schedule faxes to be sent at a later time and set up speed-dials to send faxes quickly and
easily to frequently used numbers. From the control panel, you can also set a number of
fax options, such as resolution and the contrast between lightness and darkness on the
faxes you send.
NOTE: Before you begin faxing, make sure you have set up the HP Fax properly for
faxing.
You can verify the fax is set up correctly by running the fax setup test from the control
panel. To run the fax test, press Setup, select Tools, select Run fax test, and then press
OK.
•
•
•
•
•
Send a fax
Receive a fax
Change fax settings
Fax over the Internet
Cancel a fax
Send a fax
You can send a fax in a variety of ways. Using the control panel, you can send a blackand-white or color fax. You can also initiate a fax manually from an external phone. This
allows you to speak with the recipient before sending the fax.
•
•
•
•
•
•
•
•
Send a fax manually from a phone
Send a fax using monitor dialing
Send a fax from memory
Schedule a fax to send later
Send a fax to multiple recipients
Send a color original or image/embedded picture fax
Change the fax resolution and Lighter/Darker settings
Send a fax in Error Correction Mode
Send a fax manually from a phone
Sending a fax manually allows you to make a phone call and talk with the recipient before
you send the fax. This is useful if you want to inform the recipient that you are going to
send them a fax before sending it. When you send a fax manually, you can hear the dial
tones, telephone prompts, or other sounds through the handset on your telephone. This
makes it easy for you to use a calling card to send your fax.
Depending on how the recipient has their fax machine set up, the recipient might answer
the phone, or the fax machine might take the call. If a person answers the phone, you
can speak with the recipient before sending the fax. If a fax machine answers the call,
22
Fax
you can send the fax directly to the fax machine when you hear the fax tones from the
receiving fax machine.
To initiate a fax manually from an external phone
1. Load your originals. For additional information, see Load originals.
2. Dial the number by using the keypad on the phone that is connected to the HP Fax.
NOTE: Do not use the keypad on the control panel of the HP Fax when manually
sending a fax. You must use the keypad on your phone to dial the recipient's
number.
3. If the recipient answers the telephone, you can engage in a conversation before
sending your fax.
NOTE: If a fax machine answers the call, you will hear fax tones from the
receiving fax machine. Proceed to the next step to transmit the fax.
4. When you are ready to send the fax, press START FAX Black or START FAX
Color.
NOTE: If prompted, select Send Fax, and then press START FAX Black or
START FAX Color again.
If you were speaking with the recipient before sending the fax, inform the recipient
that they should press Start on their fax machine after they hear fax tones.
The telephone line is silent while the fax is transmitting. At this point, you can hang
up the telephone. If you want to continue speaking with the recipient, remain on the
line until the fax transmission is complete.
To send a fax manually using the attached handset
1. Load your originals print side down and top first in the center of the document feeder
tray.
2. Pick up the handset that is attached to the HP Fax and dial the number by using the
keypad on the control panel.
3. If the recipient answers the telephone, you can engage in a conversation before
sending your fax.
NOTE: If a fax machine answers the call, you will hear fax tones from the
receiving fax machine. Proceed to the next step to transmit the fax.
4. Once you are ready to send the fax, press START FAX Black or START FAX
Color.
NOTE: If prompted, select Send Fax, and then press START FAX Black or
START FAX Color again.
If you were speaking with the recipient before sending the fax, inform the recipient
that they should press Start on their fax machine after they hear fax tones.
The telephone line is silent while the fax is transmitting. At this point, you can hang
up the telephone. If you want to continue speaking with the recipient, remain on the
line until the fax transmission is complete.
Send a fax
23
Chapter 3
Send a fax using monitor dialing
Monitor dialing allows you to dial a number from the control panel as you would dial a
regular telephone. When you send a fax using monitor dialing, you can hear the dial tones,
telephone prompts, or other sounds through the speakers on the HP Fax. This enables
you to respond to prompts while dialing, as well as control the pace of your dialing.
TIP: If you do not enter your calling card PIN fast enough, the HP Fax might start
sending fax tones too soon and cause your PIN not to be recognized by the calling
card service. If this is the case, you can create a speed dial entry to store the PIN for
your calling card.
NOTE: Make sure the volume is turned on, or you will not hear a dial tone.
To send a fax using monitor dialing from the control panel
1. Load your originals. For additional information, see Load originals.
2. Press START FAX Black or START FAX Color.
If the HP Fax detects an original loaded in the automatic document feeder, you will
hear a dial tone.
3. When you hear the dial tone, enter the number by using the keypad on the control
panel.
4. Follow any prompts that might occur.
TIP: If you are using a calling card to send a fax and you have your calling card
PIN stored as a speed dial, when prompted to enter your PIN, press Speed
Dial or a one-touch speed dial button to select the speed dial entry where you
have your PIN stored.
Your fax is sent when the receiving fax machine answers.
Send a fax from memory
You can scan a black-and-white fax into memory and then send the fax from memory.
This feature is useful if the fax number you are trying to reach is busy or temporarily
unavailable. The HP Fax scans the originals into memory and sends them once it is able
to connect to the receiving fax machine. After the HP Fax scans the pages into memory,
you can immediately remove the originals from the document feeder tray.
NOTE: You can only send a black-and-white fax from memory.
To send a fax from memory
1. Load your originals print side down into the document feeder tray.
2. In the Fax area, press Fax Menu.
The Enter Number prompt appears.
3. Enter the fax number by using the keypad, press Speed Dial or a one-touch speed
dial button to select a speed dial, or press Redial/Pause to redial the last number
dialed.
4. In the Fax area, press Fax Menu repeatedly until How to Fax appears.
24
Fax
5. Press until Scan & Fax appears, and then press OK.
6. Press START FAX Black.
The HP Fax scans the originals into memory and sends the fax when the receiving
fax machine is available.
Schedule a fax to send later
You can schedule a black-and-white fax to be sent within the next 24 hours. This enables
you to send a black-and-white fax late in the evening, when phone lines are not as busy
or phone rates are lower, for example. The HP Fax automatically sends your fax at the
specified time.
You can only schedule one fax to be sent at a time. You can continue to send faxes
normally, however, while a fax is scheduled.
NOTE: You can only send faxes in black and white due to memory limitations.
To schedule a fax from the control panel
1. Load your originals print side down into the document feeder tray.
2. In the Fax area, press Fax Menu repeatedly until How to Fax appears.
3. Press until Send Fax Later appears, and then press OK.
4. Enter the send time by using the numeric keypad, and then press OK. If prompted,
press 1 for AM, or 2 for PM.
5. Enter the fax number by using the keypad, press Speed Dial or a one-touch speed
dial button to select a speed dial, or press Redial/Pause to redial the last number
dialed.
6. Press START FAX Black.
The HP Fax scans all pages and the scheduled time appears on the display. The fax
is sent at the scheduled time.
To cancel a scheduled fax
1. In the Fax area, press Fax Menu repeatedly until How to Fax appears.
2. Press until Send Fax Later appears, and then press OK.
If there is a fax already scheduled, the Cancel prompt appears on the display.
3. Press 1 to select Yes.
NOTE: You can also cancel the scheduled fax by pressing Cancel on the control
panel when the scheduled time is visible on the display.
Send a fax to multiple recipients
You can send a fax to multiple recipients without first setting up a group speed dial.
NOTE: The list of recipients you specify for this fax is not saved and only works for
sending faxes in black. If you intend to send other faxes to the same recipient list, you
should create a group speed dial list. For more information, see Set up fax numbers
as speed-dial entries or groups
Send a fax
25
Chapter 3
To send a fax to multiple recipients without using group speed dial
1. Press Fax Menu, select How to Fax, and then select Broadcast Fax.
2. Enter a fax number by using the keypad, or use the arrow keys to access speed dials.
3. At the Enter Another? prompt, do one of the following:
• If you want to add another, press Yes, and then repeat step 2 for each number.
• If you are done, press No.
NOTE: You can add up to 20 individual fax numbers.
4. Press START FAX Black.
5. When prompted, load your originals print side down and top first in the center of the
document feeder tray. For additional information, see Load originals.
6. Press START FAX Black again.
You can send a fax to multiple recipients at once by grouping individual speed dial entries
into group speed dial entries.
To send a fax to multiple recipients using group speed dial
1. Load your originals print side down into the document feeder tray.
2. Press Speed Dial repeatedly, until the appropriate group speed dial entry appears.
TIP: You can also scroll through the speed dial entries by pressing or , or
you can select a speed dial entry by entering its speed dial code using the keypad
on the control panel.
3. Press START FAX Black.
If the HP Fax detects an original loaded in the automatic document feeder, it sends
the document to each number in the group speed dial entry.
NOTE: You can only use group speed dial entries to send faxes in black and
white, because of memory limitations. The HP Fax scans the fax into memory
then dials the first number. When a connection is made, it sends the fax and dials
the next number. If a number is busy or not answering, the HP Fax follows the
settings for Busy Redial and No Answer Redial. If a connection cannot be made,
the next number is dialed and an error report is generated.
Send a color original or image/embedded picture fax
You can fax a color original or image/embedded picture from the HP Fax. If it determines
that the recipient's fax machine only supports black-and-white faxes, the fax is sent in
black and white.
HP recommends that you use only color originals for color faxing.
To send a color original or image/embedded picture fax from the control panel
1. Load your originals print side down into the document feeder tray.
2. In the Fax area, press Fax Menu.
The Enter Number prompt appears.
26
Fax
3. Enter the fax number by using the keypad, press Speed Dial or a one-touch speed
dial button to select a speed dial, or press Redial/Pause to redial the last number
dialed.
4. Press START FAX Color.
If the HP Fax detects an original loaded in the automatic document feeder, it sends
the document to the number you entered.
NOTE: If the recipient's fax machine only supports black-and-white faxes, the
HP Fax automatically sends the fax in black and white. A message appears after
the fax has been sent indicating that the fax was sent in black and white. Press
OK to clear the message.
Change the fax resolution and Lighter/Darker settings
You can change the Resolution and Lighter / Darker settings for documents that you
are faxing.
NOTE: These settings do not affect copy settings. Copy resolution and lightness/
darkness are set independently from fax resolution and lightness/darkness.
•
•
•
Change the fax resolution
Change the Lighter / Darker setting
Set new default settings
Change the fax resolution
The Resolution setting affects the transmission speed and quality of faxed black-andwhite documents. If the receiving fax machine does not support the resolution you have
chosen, the HP Fax sends faxes at the highest resolution supported by the receiving fax
machine.
NOTE: You can only change the resolution for faxes that you are sending in black
and white. The HP Fax sends all color faxes using Fine resolution.
The following resolution settings are available for sending faxes: Fine, Very Fine,
Photo, and Standard.
•
•
•
•
Fine: provides high-quality text suitable for faxing most documents. This is the default
setting. When sending faxes in color, the HP Fax always uses the Fine setting.
Very Fine: provides the best quality fax when you are faxing documents with very
fine detail. If you choose Very Fine, be aware that the faxing process takes longer to
complete and you can only send black-and-white faxes using this resolution. If you
send a color fax, it will be sent using Fine resolution instead.
Photo: provides the best quality fax when sending images/embedded pictures in
black and white. If you choose Photo, be aware that the faxing process takes longer
to complete. When faxing images/embedded pictures in black and white, HP
recommends that you choose Photo.
Standard: provides the fastest possible fax transmission with the lowest quality.
When you exit the Fax menu, this option returns to the default setting unless you set your
changes as the default.
Send a fax
27
Chapter 3
To change the resolution from the control panel
1. Load your originals print side down into the document feeder tray.
2. In the Fax area, press Fax Menu.
The Enter Number prompt appears.
3. Enter the fax number by using the keypad, press Speed Dial or a one-touch speed
dial button to select a speed dial, or press Redial/Pause to redial the last number
dialed.
4. In the Fax area, press Fax Menu repeatedly until Resolution appears.
5. Press to select a resolution setting, and then press OK.
6. Press START FAX Black.
If the HP Fax detects an original loaded in the automatic document feeder, it sends
the document to the number you entered.
Change the Lighter / Darker setting
You can change the contrast of a fax to be darker or lighter than the original. This feature
is useful if you are faxing a document that is faded, washed out, or handwritten. You can
darken the original by adjusting the contrast.
NOTE: The Lighter / Darker setting applies to black-and-white faxes only, not color
faxes.
When you exit the Fax menu, this option returns to the default setting unless you set your
changes as the default.
To change the Lighter / Darker setting from the control panel
1. Load your originals print side down into the document feeder tray.
2. In the Fax area, press Fax Menu.
The Enter Number prompt appears.
3. Enter the fax number by using the keypad, press Speed Dial or a one-touch speed
dial button to select a speed dial, or press Redial/Pause to redial the last number
dialed.
4. In the Fax area, press Fax Menu repeatedly until Lighter / Darker appears.
5. Press to lighten the fax or press to darken it, and then press OK.
The indicator moves to the left or right as you press an arrow button.
6. Press START FAX Black.
If the HP Fax detects an original loaded in the automatic document feeder, it sends
the document to the number you entered.
Set new default settings
You can change the default value for the Resolution and Lighter / Darker settings
through the control panel.
To set new default settings from the control panel
1. Make changes to the Resolution and Lighter / Darker settings.
2. In the Fax area, press Fax Menu repeatedly until Set New Defaults appears.
3. Press until Yes appears, and then press OK.
28
Fax
Send a fax in Error Correction Mode
Error Correction Mode (ECM) prevents loss of data due to poor phone lines by detecting
errors that occur during transmission and automatically requesting retransmission of the
erroneous portion. Phone charges are unaffected, or might even be reduced, on good
phone lines. On poor phone lines, ECM increases sending time and phone charges, but
sends the data much more reliably. The default setting is On. Turn ECM off only if it
increases phone charges substantially, and you can accept poorer quality in exchange
for reduced charges.
Before turning the ECM setting off, consider the following. If you turn ECM off
•
•
•
The quality and transmission speed of faxes you send and receive are affected.
The Fax Speed is automatically set to Medium.
You will no longer be able to send or receive faxes in color.
To change the ECM setting from the control panel
1. Press Setup.
2. Select Advanced Fax Setup and then select Error Correction Mode.
3. Press to select On or Off.
4. Press OK.
Receive a fax
You can receive faxes automatically or manually. Press the Answer Mode button to
select the desired mode. If you select Tel mode, you must receive faxes manually. If you
select FaxTel mode, the HP Fax automatically answers incoming calls and receives faxes
after the number of rings that are specified by the Rings to Answer setting. If you select
Fax or AnswerMachine modes, the HP Fax will answer the telephone, automatically
detect fax tones, and receive a fax. You must have an answering machine connected
directly to the port labeled 2-EXT on the back of your HP Fax for AnswerMachine mode.
If you receive a legal-size fax and the HP Fax is not currently set to use legal-size paper,
the HP Fax reduces the fax so that it fits on the paper that is loaded. If you have disabled
the Automatic Reduction feature, the HP Fax prints the fax on two pages.
•
•
•
•
•
•
•
•
Receive a fax manually
Set up backup fax reception
Reprint received faxes from memory
Poll to receive a fax
Forward faxes to another number
Set the paper size for received faxes
Set automatic reduction for incoming faxes
Block junk fax numbers
Receive a fax manually
When you are on the phone, the person you are speaking with can send you a fax while
you are still connected. This is referred to as manual faxing. Use the instructions in this
section to receive a manual fax.
Receive a fax
29
Chapter 3
NOTE: You can pick up the handset to talk or listen for fax tones.
You can receive faxes manually from a phone that is:
•
•
Directly connected to the HP Fax (on the 2-EXT port)
On the same phone line, but not directly connected to the HP Fax
To receive a fax manually
1. Make sure the HP Fax is plugged in and you have paper loaded in the input tray.
2. Remove any originals from the document feeder tray.
3. Set the Rings to Answer setting to a high number to allow you to answer the incoming
call before the HP Fax answers. Or, select Tel mode so that the HP Fax does not
automatically answer incoming calls.
4. If you are currently on the phone with the sender, instruct the sender to press Start
on their fax machine.
5. When you hear fax tones from a sending fax machine, do the following:
a. Press START FAX Black or START FAX Color on the control panel.
b. When prompted, select Fax Receive.
c. After the HP Fax begins to receive the fax, you can hang up the phone or remain
on the line. The phone line is silent during fax transmission.
Set up backup fax reception
Depending on your preference and security requirements, you can set up the HP Fax to
store all the faxes it receives, only the faxes it receives while the HP Fax is in an error
condition, or none of the faxes it receives.
The following Backup Fax Reception modes are available:
On
The default setting. When Backup Fax Reception is On, the HP Fax stores
all received faxes in memory. This enables you to reprint the most recently
printed faxes if they are still saved in memory.
NOTE: When HP Fax memory is low, it overwrites the oldest, printed faxes
as it receives new faxes. If the memory becomes full of unprinted faxes, the
HP Fax stops answering incoming fax calls.
NOTE: If you receive a fax that is too large, such as a very detailed color
image/embedded picture, it might not be stored in memory due to memory
limitations.
30
Fax
On Error Only
Causes the HP Fax to store faxes in memory only if an error condition exists
that prevents the HP Fax from printing the faxes (for example, if the HP Fax
runs out of paper). The HP Fax continues to store incoming faxes as long
as there is memory available. (If the memory becomes full, the HP Fax stops
answering incoming fax calls.) When the error condition is resolved, the
faxes stored in memory print automatically, and then they are deleted from
memory.
Off
Faxes are never stored in memory. For example, you might want to turn off
Backup Fax Reception for security purposes. If an error condition occurs
that prevents the HP Fax from printing (for example, the HP Fax runs out
of paper), the HP Fax stops answering incoming fax calls.
To set backup fax reception from the control panel
1. Press Setup.
2. Select Advanced Fax Setup, and then select Backup Fax Reception.
3. Press to select On, On Error Only, or Off.
4. Press OK.
Reprint received faxes from memory
If you set the Backup Fax Reception mode to On, the received faxes are stored in
memory, whether the HP Fax has an error condition or not.
NOTE: After the memory becomes full, the oldest, printed faxes are overwritten as
new faxes are received. If all the stored faxes are unprinted, the HP Fax does not
receive any fax calls until you print or delete the faxes from memory. You might also
want to delete the faxes in memory for security or privacy purposes.
You can reprint the most recently printed faxes, if they are still in memory. For example,
you might need to reprint your faxes if you lost the copy of your last printout.
To reprint faxes in memory from the control panel
1. Make sure you have paper loaded in the input tray.
2. Do one of the following:
• Press Setup, select Tools, and then select Reprint Faxes in Memory.
• Press Reports, and then select Reprint Faxes in Memory.
The faxes are printed in the reverse order from which they were received with the
most recently received fax printed first, and so on.
3. If you want to stop reprinting the faxes in memory, press Cancel.
To delete all the faxes in memory from the control panel
1. Press Setup.
2. Select Tools, and then select Clear Fax Log.
NOTE: All faxes stored in memory, including all unprinted or unsent faxes, are
deleted.
Poll to receive a fax
Polling allows the HP Fax to ask another fax machine to send a fax that it has in its queue.
When you use the Poll to Receive feature, the HP Fax calls the designated fax machine
and requests the fax from it. The designated fax machine must be set for polling and have
a fax ready to send.
NOTE: The HP Fax does not support polling pass codes. Polling pass codes are a
security feature that require the receiving fax machine to provide a pass code to the
HP Fax it is polling in order to receive the fax. Make sure the HP Fax you are polling
does not have a pass code set up (or has not changed the default pass code) or the
HP Fax will not be able to receive the fax.
Receive a fax
31
Chapter 3
To set up poll to receive a fax from the control panel
1. In the Fax area, press Fax Menu repeatedly until How to Fax appears.
2. Press until Poll to Receive appears, and then press OK.
3. Enter the fax number of the other fax machine.
4. Press START FAX Black or START FAX Color.
NOTE: If you press START FAX Color but the sender sent the fax in black and
white, the HP Fax prints the fax in black and white.
Forward faxes to another number
You can set up the HP Fax to forward your faxes to another fax number. A received color
fax is forwarded in black and white.
HP recommends that you verify the number you are forwarding to is a working fax line.
Send a test fax to make sure the fax machine is able to receive your forwarded faxes.
To forward faxes from the control panel
1. Press Setup.
2. Select Advanced Fax Setup, and then select Fax Forwarding Black Only.
3. Press until On-Forward or On-Print & Forward appears, and then press OK.
• Choose On-Forward if you want to forward the fax to another number without
printing a backup copy on the HP Fax.
NOTE: If the HP Fax is not able to forward the fax to the designated fax
machine (for example, if it is not turned on), the HP Fax prints the fax. If you
set up the HP Fax to print error reports for received faxes, it will also print an
error report.
•
Choose On-Print & Forward to print a backup copy of your received fax while
forwarding the fax to another number.
4. At the prompt, enter the number of the fax machine that will receive the forwarded
faxes.
5. At the prompt, enter a start time and date and a stop time and date.
6. Press OK.
Fax Forwarding appears on the control-panel display.
If the HP Fax loses power when Fax Forwarding is set up, it saves the Fax
Forwarding setting and phone number. When power is restored to the HP Fax, the
Fax Forwarding setting is still On.
NOTE: You can cancel fax forwarding by pressing Cancel on the control panel
when the Fax Forwarding message is visible on the display, or you can select
Off from the Fax Forwarding Black Only menu.
Set the paper size for received faxes
You can select the paper size for received faxes. The paper size you select should match
what is loaded in your input tray. Faxes can be printed on letter, A4, or legal paper only.
32
Fax
NOTE: If an incorrect paper size is loaded in the input tray when you receive a fax,
the fax does not print and an error message appears on the display. Load letter, A4,
or legal paper, and then press OK to print the fax.
To set the paper size for received faxes from the control panel
1. Press Setup.
2. Select Basic Fax Setup and then select Fax Paper Size.
3. Press to select an option, and then press OK.
Set automatic reduction for incoming faxes
The Automatic Reduction setting determines what the HP Fax does if it receives a fax
that is too large for the default paper size. This setting is turned on by default, so the
image of the incoming fax is reduced to fit on one page, if possible. If this feature is turned
off, information that does not fit on the first page is printed on a second page. Automatic
Reduction is useful when you receive a legal-size fax and letter-size paper is loaded in
the input tray.
To set automatic reduction from the control panel
1. Press Setup.
2. Select Advanced Fax Setup and then select Automatic Reduction.
3. Press to select Off or On.
4. Press OK.
Block junk fax numbers
If you subscribe to a caller ID service through your phone provider, you can block specific
fax numbers so the HP Fax does not print faxes received from those numbers. When an
incoming fax call is received, the HP Fax compares the number to the list of junk fax
numbers to determine if the call should be blocked. If the number matches a number in
the blocked fax numbers list, the fax is not printed. (The maximum number of fax numbers
you can block varies by model.)
NOTE: This feature is not supported in all countries/regions. If it is not supported in
your country/region, Junk Fax Blocker Set Up does not appear in the Basic Fax
Setup menu.
NOTE: If no phone numbers are added in the Caller ID list, it is assumed that the
user has not signed up for the Caller ID service with the phone company.
Set the junk fax mode
By default, Block Junk Fax mode is turned On. If you do not subscribe to a caller ID
service through your phone provider, or do not want to use this feature, you can turn off
this setting.
Receive a fax
33
Chapter 3
Add numbers to the junk fax list
There are two ways to add a number to your junk list. You can select numbers from your
caller ID history, or you can enter new numbers. The numbers in your junk list are blocked
if Block Junk Fax mode is set to On.
To select a number from the caller ID list
1. Press Setup.
2. Press Basic Fax Setup, and then press Junk Fax Blocker Setup.
3. Press Add number to Junk List, and then press Select Number.
4. Press to scroll through the numbers from which you have received faxes. When
the number you want to block appears, press OK to select it.
5. When the Select Another? prompt appears, do one of the following:
• If you want to add another number to the list of junk fax numbers, press
Yes, and then repeat step 4 for each number you want to block.
• If you are done, press No.
To manually enter a number to block
1. Press Setup.
2. Press Basic Fax Setup, and then press Junk Fax Blocker Setup.
3. Press Add number to Junk List, and then press Enter Number.
4. Use the keypad to enter a fax number to block, and then press OK.
Make sure you enter the fax number as it appears on the control-panel display, and
not the fax number that appears on the fax header of the received fax, as these
numbers can be different.
5. When the Enter Another? prompt appears, do one of the following:
• If you want to add another number to the list of junk fax numbers, press
Yes, and then repeat step 4 for each number you want to block.
• If you are done, press No.
Remove numbers from the junk fax list
If you no longer want to block a fax number, you can remove a number from your junk
fax list.
To remove numbers from the list of junk fax numbers
1. Press Setup.
2. Press Basic Fax Setup, and then press Junk Fax Blocker Setup.
3. Press Remove Number from Junk List.
4. Press to scroll through the numbers you have blocked. When the number you want
to remove appears, press OK to select it.
5. When the Delete Another? prompt appears, do one of the following:
• If you want to remove another number from the list of junk fax numbers,
press Yes, and then repeat step 4 for each number you want to block.
• If you are done, press No.
34
Fax
Change fax settings
After completing the steps in the setup poster that came with the HP Fax, use the following
steps to change the initial settings or to configure other options for faxing.
•
•
•
•
•
•
•
Configure the fax header
Set the number of rings before answering
Change the answer ring pattern for distinctive ring
Set the fax error correction mode
Set the dial type
Set the redial options
Set the fax speed
Configure the fax header
The fax header prints your name and fax number on the top of every fax you send. You
can set up the fax header from the control panel, as described here.
NOTE: In some countries/regions, the fax header information is a legal requirement.
To set or change the fax header
1. Press Setup.
2. Press Basic Fax Setup, and then press Fax Header.
3. Enter your personal or company name using the numeric keypad, and then press
OK.
4. Enter your fax number by using the numeric keypad, and then press OK.
Set the number of rings before answering
You can specify how many rings occur before incoming calls are automatically answered.
The Rings to Answer setting is important if you have an answering machine on the same
phone line as the HP Fax, because you want the answering machine to answer the phone
before the HP Fax does. The number of rings to answer for the HP Fax should be greater
than the number of rings to answer for the answering machine.
For example, set your answering machine to a low number of rings and the HP Fax to
answer in the maximum number of rings. (The maximum number of rings varies by
country/region.) In this setup, the answering machine answers the call and the HP Fax
monitors the line. If the HP Fax detects fax tones, it receives the fax. If the call is a voice
call, the answering machine records the incoming message.
To set the number of rings before answering via the control panel
1. Press Setup.
2. Press Basic Fax Setup, and then press Rings to Answer.
3. Enter the appropriate number of rings by using the keypad, or press or
the number of rings.
4. Press OK to accept the setting.
to change
Change fax settings
35
Chapter 3
Change the answer ring pattern for distinctive ring
Many phone companies offer a distinctive ring feature that allows you to have several
phone numbers on one phone line. When you subscribe to this service, each number is
assigned a different ring pattern. You can set up the HP Fax to answer incoming calls
that have a specific ring pattern.
If you connect the HP Fax to a line with distinctive ring, have your telephone company
assign one ring pattern to voice calls and another ring pattern to fax calls. HP
recommends that you request double or triple rings for a fax number. When the HP Fax
detects the specified ring pattern, it answers the call and receives the fax.
If you do not have a distinctive ring service, use the default ring pattern, which is All
Rings.
NOTE: The HP Fax cannot receive faxes when the main phone number is off the
hook.
To change the answer ring pattern for distinctive ring via the control panel
1. Verify that the HP Fax is set to answer fax calls automatically.
2. Press Setup.
3. Press Advanced Fax Setup, and then press Distinctive Ring.
4. Press to select an option, and then press OK.
When the phone rings with the ring pattern assigned to your fax line, the HP Fax
answers the call and receives the fax.
Set the fax error correction mode
Typically, the HP Fax monitors the signals on the phone line while it is sending or receiving
a fax. If it detects an error signal during the transmission and the error-correction setting
is on, the HP Fax can request that a portion of the fax be resent.
Turn off error correction only if you are having trouble sending or receiving a fax, and you
want to accept the errors in the transmission. Turning off the setting might be useful when
you are trying to send a fax to another country/region or receive a fax from another
country/region, or if you are using a satellite phone connection.
To set the fax error-correction mode
▲ Control panel: Press Fax Menu, open the Advanced Fax Setup menu, and then
use the Error correction mode option.
Set the dial type
Use this procedure to set tone-dialing or pulse-dialing mode. The factory-set default is
Tone. Do not change the setting unless you know that your phone line cannot use tone
dialing.
NOTE: The pulse-dialing option is not available in all countries/regions.
36
Fax
To set the dial type
▲ Control panel: Press Setup, press Basic Fax Setup, and then use the Tone or
Pulse Dialing option.
Set the redial options
If the HP Fax was unable to send a fax because the receiving fax machine did not answer
or was busy, the HP Fax attempts to redial based on the settings for the busy-redial and
no-answer-redial options. Use the following procedure to turn the options on or off.
•
•
Busy redial: If this option is turned on, the HP Fax redials automatically if it receives
a busy signal. The factory-set default for this option is ON.
No answer redial: If this option is turned on, the HP Fax redials automatically if the
receiving fax machine does not answer. The factory-set default for this option is
OFF.
To set the redial options
▲ Control panel: Press Setup, press Advanced Fax Setup, and then use the Busy
Redial or No Answer Redial options.
Set the fax speed
You can set the fax speed used to communicate between your HP Fax and other fax
machines when sending and receiving faxes. The default fax speed is Fast.
If you use one of the following, setting the fax speed to a slower speed might be required:
•
•
•
•
An Internet phone service
A PBX system
Fax over Internet Protocol (FoIP)
An integrated services digital network (ISDN) service
If you experience problems sending and receiving faxes, you might want to try setting the
Fax Speed setting to Medium or Slow. The following table provides the available fax
speed settings.
Fax speed setting
Fax speed
Fast
v.34 (33600 baud)
Medium
v.17 (14400 baud)
Slow
v.29 (9600 baud)
To set the fax speed from the control panel
1. Press Setup.
2. Select Advanced Fax Setup, and then press Fax Speed.
3. Select an option using the arrow keys, and then press OK.
Change fax settings
37
Chapter 3
Fax over the Internet
You may subscribe to a low cost phone service that allows you to send and receive faxes
with your HP Fax by using the Internet. This method is called Fax over Internet Protocol
(FoIP). You probably use a FoIP service (provided by your telephone company) if you:
•
•
Dial a special access code along with the fax number, or
Have an IP converter box that connects to the Internet and provides analog phone
ports for the fax connection.
NOTE: You can only send and receive faxes by connecting a phone cord to the port
labeled "1-LINE" on the HP Fax. This means that your connection to the Internet must
be done either through a converter box (which supplies regular analog phone jacks
for fax connections) or your telephone company.
Some Internet faxing services do not work properly when the HP Fax is sending and
receiving faxes at high speed (v.34, 33600bps). If you experience problems sending and
receiving faxes while using an Internet fax service, use a slower fax speed. You can do
this by changing the Fax Speed setting from High (the default) to Medium. For
information on changing this setting, see Set the fax speed.
If you have questions about internet faxing, contact your internet faxing services support
department.
Cancel a fax
You can cancel a fax you are sending or receiving at any time.
To cancel a fax
▲ Press Cancel on the control panel to stop a fax you are sending or receiving. If the
HP Fax does not stop faxing, press Cancel again.
The HP Fax prints any pages it has already started printing and then cancels the
remainder of the fax. This can take a few moments.
To cancel a number you are dialing
▲ Press Cancel to cancel a number you are currently dialing.
38
Fax
4
Copy
You can make quality copies using the HP Fax.
•
•
•
•
•
•
•
•
•
•
•
•
Make copies from the control panel
Change the copy settings
Set the number of copies
Set the copy paper size
Set the copy paper type
Change copy speed or quality
Resize an original to fit onto letter or A4 paper
Copy a legal-size document onto letter paper
Adjust the lightness and darkness of your copy
Enhance blurred areas of your copy
Enhance light areas of your copy
Cancel a copy job
Make copies from the control panel
Use the following instructions to make copies on the HP Fax.
To make a copy from the control panel
1. Make sure you have paper loaded in the input tray.
2. Load your original using the ADF. For more information, see Load originals.
3. Do one of the following:
• Press START COPY Black to start a black-and-white copy job.
• Press START COPY Color to start a color copy job.
NOTE: If you have a color original, pressing START COPY Black produces a
black-and-white copy of the color original, while pressing START COPY Color
produces a full-color copy of the color original.
Change the copy settings
You can customize the copy settings to handle nearly any task.
When you change copy settings, the changes are for the current copy job only. You must
set the changes as defaults for the settings to apply to all future copy jobs.
To save the current settings as defaults for future jobs
1. Make any necessary changes to the settings in the Copy Menu.
2. Press Copy Menu, and then press the arrow keys until Set New Defaults appears.
3. Press the arrow keys to select Yes, and then press OK.
Change the copy settings
39
Chapter 4
Set the number of copies
You can set the number of copies that you want to print by using the Number of
Copies option.
To set the number of copies from the control panel
1. Make sure you have paper loaded in the input tray.
2. Load your original print side down in the document feeder tray.
Place the pages so that the top edge of the document goes in first.
3. In the Copy area, press Copy Menu repeatedly until Number of Copies appears.
4. Press or use the keypad to enter the number of copies, up to the maximum.
(The maximum number of copies varies by model.)
TIP: If you hold down either of the arrow buttons, the number of copies changes
by increments of 5 to make it easier to set a large number of copies.
5. Press START COPY Black or START COPY Color.
Set the copy paper size
You can set the paper size on the HP Fax. The paper size you select should match what
is loaded in your input tray.
To set the paper size from the control panel
1. In the Copy area, press Copy Menu repeatedly until Copy Paper Size appears.
2. Press until the appropriate paper size appears.
3. Press START COPY Black or START COPY Color.
Set the copy paper type
You can set the paper type on the HP Fax.
To set the paper type for copies from the control panel
1. In the Copy area, press Copy Menu repeatedly until Paper Type appears.
2. Press until the appropriate paper type appears.
3. Press START COPY Black or START COPY Color.
Refer to the following table to determine which paper type setting to choose based on the
paper loaded in the input tray.
40
Paper type
Control panel setting
Copier paper or letterhead
Plain Paper
HP Bright White Paper
Plain Paper
HP Premium Plus Photo Paper, Glossy
Premium Photo
HP Premium Plus Photo Paper, Matte
Premium Photo
Copy
(continued)
Paper type
Control panel setting
HP Premium or Premium Plus Inkjet Transparency Film
Transparency
Other transparency film
Transparency
Change copy speed or quality
The HP Fax provides three options that affect copy speed and quality:
•
•
•
Best produces the highest quality for all paper and eliminates the banding (striping)
effect that sometimes occurs in solid areas. Best copies slower than the other quality
settings.
Normal delivers high-quality output and is the recommended setting for most of your
copying. Normal copies faster than Best and is the default setting.
Fast copies faster than the Normal setting. The text is comparable to the quality of
the Normal setting, but the graphics might be lower quality. The Fast setting uses
less ink and extends the life of your print cartridges.
To change the copy quality from the control panel
1. Make sure you have paper loaded in the input tray.
2. Load your original print side down in the document feeder tray.
Place the pages so that the top edge of the document goes in first.
3. In the Copy area, press Quality until the appropriate quality setting is lit.
4. Press START COPY Black or START COPY Color.
Resize an original to fit onto letter or A4 paper
If the image or text on your original fills the entire sheet with no margins, use Fit to
Page or Full Page 91% to reduce your original and prevent unwanted cropping of the
text or images at the edges of the sheet.
To resize a document from the control panel
1. Make sure you have paper loaded in the input tray.
2. Load your original print side down in the document feeder tray.
Place the pages so that the top edge of the document goes in first.
3. In the Copy area, press Copy Menu repeatedly until Reduce / Enlarge appears.
4. Press until Full Page 91% appears.
5. Press START COPY Black or START COPY Color.
Resize an original to fit onto letter or A4 paper
41
Chapter 4
Copy a legal-size document onto letter paper
You can use the Legal > Ltr 72% setting to reduce a copy of a legal-size document to a
size that fits onto letter paper.
NOTE: The percentage in the example, Legal > Ltr 72%, might not match the
percentage that appears in the display.
To copy a legal-size document onto letter paper from the control panel
1. Make sure you have paper loaded in the input tray.
2. Load your legal-size document print side down in the document feeder tray.
Place the page in the document feeder tray so that the top edge of the document goes
in first.
3. In the Copy area, press Copy Menu repeatedly until Reduce / Enlarge appears.
4. Press until Legal > Ltr 72% appears.
5. Press START COPY Black or START COPY Color.
Adjust the lightness and darkness of your copy
You can use the Lighter / Darker option to adjust the contrast of the copies you make.
To adjust the copy contrast from the control panel
1. Make sure you have paper loaded in the input tray.
2. Load your original print side down in the document feeder tray.
Place the pages so that the top edge of the document goes in first.
3. In the Copy area, press Copy Menu repeatedly until Lighter / Darker appears.
4. Do one of the following:
• Press to darken the copy.
• Press to lighten the copy.
5. Press START COPY Black or START COPY Color.
Enhance blurred areas of your copy
You can use the Enhancements feature to adjust the quality of text documents by
sharpening edges of black text or adjust images/embedded pictures by enhancing light
colors that might otherwise appear white.
The Mixed enhancement is the default option. Use the Mixed enhancement to sharpen
edges of most originals.
42
Copy
To copy a blurred document from the control panel
1. Make sure you have paper loaded in the input tray.
2. Load your original print side down in the document feeder tray.
3. In the Copy area, press Copy Menu repeatedly until Enhancements appears.
4. Press until the Text setting appears.
5. Press START COPY Black or START COPY Color.
If any of the following occur, turn off Text enhancement by selecting Photo or None:
•
•
•
•
Stray dots of color surround some text on your copies
Large, black typefaces look splotchy (not smooth)
Thin, colored objects or lines contain black sections
Horizontal grainy or white bands appear in light- to medium-gray areas
Enhance light areas of your copy
You can use Photo enhancements to enhance light colors that might otherwise appear
white. You can also use Photo enhancements to eliminate or reduce any of the following
that might occur when copying with Text enhancements:
•
•
•
•
Stray dots of color surround some text on your copies
Large, black typefaces look splotchy (not smooth)
Thin, colored objects or lines contain black sections
Horizontal grainy or white bands appear in light- to medium-gray areas
To copy an overexposed image/embedded picture from the control panel
1. Make sure you have paper loaded in the input tray.
2. Load your original print side down in the document feeder tray.
3. In the Copy area, press Copy Menu repeatedly until Enhancements appears.
4. Press until the Photo enhancement setting appears.
5. Press START COPY Color.
Cancel a copy job
▲ To stop copying, press Cancel on the control panel.
Cancel a copy job
43
5
Configure and manage
This section is intended for the administrator or individual who is responsible for managing
the HP Fax. Use the control panel to manage and monitor the HP Fax.
•
•
•
•
Manage the HP Fax
Use reports
Test fax setup
The fax test failed
Manage the HP Fax
Use the control panel to modify the following settings:
Language and country/region
Press Setup, and then open the Preferences menu.
If you do not see your country/region, press 99, and
then find your country/region in the list.
Fax sound volume
Press Setup, and then open the Basic Fax Setup
menu.
Automatic report printing
Press Reports, and then open the appropriate menu.
Set the dial type
Press Setup, and then open the Basic Fax Setup
menu.
Set up redial options
Press Setup, and then open the Advanced Fax
Setup menu.
Set the date and time
Press Setup, press Tools, and then press Date and
Time.
Use reports
You can set up the HP Fax to print error reports and confirmation reports automatically
for each fax you send and receive. You can also manually print system reports as
required; these reports provide useful system information about the HP Fax.
By default, the HP Fax is set to print a report only if there is a problem sending or receiving
a fax. A confirmation message that indicates whether a fax was successfully sent appears
briefly on the control-panel display after each transaction.
•
•
•
Print fax confirmation reports
Print fax error reports
Print and view the fax log
Print fax confirmation reports
If you require printed confirmation that your faxes were successfully sent, follow these
instructions to enable fax confirmation before sending any faxes. Select either On Fax
Send or Send & Receive.
44
Configure and manage
The default fax confirmation setting is Off. This means that a confirmation report is not
printed for each fax sent or received. A confirmation message indicating whether a fax
was successfully sent appears briefly on the control-panel display after each transaction.
To enable fax confirmation
1. Press Reports.
2. Press Fax Confirmation.
3. Press to select one of the following, and then press OK.
Off
Does not print a fax confirmation report when you send and receive
faxes successfully. This is the default setting.
On Fax Send
Prints a fax confirmation report for every fax you send.
On Fax Receive
Prints a fax confirmation report for every fax you receive.
Send & Receive
Prints a fax confirmation report for every fax you send and receive.
TIP: If you choose On Fax Send or Send & Receive, and scan your fax to send
from memory, you can include an image of the first page of the fax on the Fax
Sent Confirmation report. Press Setup, press Fax Confirmation, and then
press On Fax Send again. Select On from the Image on Fax Send Report menu.
Print fax error reports
You can configure the HP Fax so that it automatically prints a report when there is an
error during transmission or reception.
To set the HP Fax to print fax error reports automatically
1. Press Reports.
2. Press Fax Error Report.
3. Press to select one of the following, and then press OK.
Send & Receive
Prints whenever a fax error occurs. This is the default setting.
Off
Does not print any fax error reports.
On Fax Send
Prints whenever a transmission error occurs.
On Fax Receive
Prints whenever a receiving error occurs.
Print and view the fax log
The logs list faxes that have been sent from the control panel and all faxes that have been
received.
You can print a log of faxes that have been received and sent by the HP Fax. Each entry
in the log contains the following information:
•
•
•
Transmission date and time
Type (whether received or sent)
Fax number
Use reports
45
Chapter 5
•
•
•
Duration
Number of pages
Result (status) of transmission
To print the fax log from the control panel
1. On the control panel, press Reports.
2. Press the arrow key to move down to Fax Log, and then press OK.
Test fax setup
You can test your fax setup to check the status of the HP Fax and to make sure it is set
up properly for faxing. Perform this test after you have completed setting up the HP Fax
for faxing. The test does the following:
•
•
•
•
•
•
Tests the fax hardware
Verifies the correct type of phone cord is connected to the HP Fax
Checks that the phone cord is plugged into the correct port
Checks for a dial tone
Checks for an active phone line
Tests the status of your phone line connection
The HP Fax prints a report with the results of the test. If the test fails, review the report
for information on how to fix the problem and rerun the test.
To test fax setup
1. Set up the HP Fax for faxing according to your particular home or office setup
instructions.
2. Make sure the print cartridges are installed, and that full-size paper is loaded in the
input tray before starting the test.
3. From the control panel, press Setup.
4. Select Tools, and then select Run Fax Test.
The HP Fax displays the status of the test on the display and prints a report.
5. Review the report.
• If the test passes and you are still having problems faxing, check the fax settings
listed in the report to verify the settings are correct. A blank or incorrect fax setting
can cause problems faxing.
• If the test fails, review the report for more information on how to fix any problems
found.
The fax test failed
If you ran a fax test and the test failed, review the report for basic information about the
error and to see which part of the test failed. To resolve the error, locate the topic that
best matches the test failure and try the solutions.
After you resolve any problems found, run the fax test again to make sure it passes and
the HP Fax is ready for faxing. If the Fax Hardware Test continues to fail and you
experience problems faxing, contact HP Support. Go to www.hp.com/support. If
46
Configure and manage
prompted, choose your country/region, and then click Contact HP for information on
calling for technical support.
•
•
•
•
•
•
The "Fax Hardware Test" failed
The "Fax Connected to Active Telephone Wall Jack" test failed
The "Phone Cord Connected to Correct Port on Fax" test failed
The "Using Correct Type of Phone Cord with Fax" test failed
The "Dial Tone Detection" test failed
The "Fax Line Condition" test failed
The "Fax Hardware Test" failed
Solution:
• Unplug the power cord from the back of the HP Fax. After a few seconds, plug
the power cord in again. Run the test again. If the test fails again, continue
reviewing the troubleshooting information in this section.
• Try to send or receive a test fax. If you can send or receive a fax successfully,
there might not be a problem.
• Make sure you use the phone cord that came with the HP Fax. If you do not use
the supplied phone cord to connect from the telephone wall jack to the HP Fax,
you might not be able to send or receive faxes. After you plug in the phone cord
that came with the HP Fax, run the fax test again.
• If you are using a phone splitter, this can cause faxing problems. (A splitter is a
two-cord connector that plugs into a telephone wall jack.) Try removing the splitter
and connecting the HP Fax directly to the telephone wall jack.
The "Fax Connected to Active Telephone Wall Jack" test failed
Solution:
• Check the connection between the telephone wall jack and the HP Fax to make
sure the phone cord is secure.
• Make sure you have correctly connected the HP Fax to the telephone wall jack.
Using the phone cord supplied in the box with the HP Fax, connect one end to
your telephone wall jack, then connect the other end to the port labeled 1-LINE
on the back of the HP Fax. If you do not use the supplied phone cord to connect
from the telephone wall jack to the HP fax, you might not be able to send or receive
faxes. For more information on setting up the HP Fax for faxing, see the Setup
Poster.
• If you are using a phone splitter, this can cause faxing problems. (A splitter is a
two-cord connector that plugs into a telephone wall jack.) Try removing the splitter
and connecting the HP Fax directly to the telephone wall jack.
• Try connecting a working phone and phone cord to the telephone wall jack that
you are using for the HP Fax and check for a dial tone. If you do not hear a dial
tone, contact your telephone company and have them check the line.
• Try to send or receive a test fax. If you can send or receive a fax successfully,
there might not be a problem.
The fax test failed
47
Chapter 5
The "Phone Cord Connected to Correct Port on Fax" test failed
Solution: Plug the phone cord into the correct port.
1. Using the phone cord supplied in the box with the HP Fax, connect one end to
your telephone wall jack, then connect the other end to the port labeled 1-LINE
on the back of the HP Fax.
NOTE: If you use the 2-EXT port to connect to the telephone wall jack, you
will not be able to send or receive faxes. The 2-EXT port should only be used
to connect other equipment, such as an answering machine.
1
Telephone wall jack
2
Use the phone cord supplied in the box with the device to connect to the "1-LINE" port
2. After you have connected the phone cord to the port labeled 1-LINE, run the fax
test again to make sure it passes and that the HP Fax is ready for faxing.
3. Try to send or receive a test fax.
• Make sure you use the phone cord that came with the HP Fax. If you do not use
the supplied phone cord to connect from the telephone wall jack to the HP Fax,
you might not be able to send or receive faxes. After you plug in the phone cord
that came with the HP Fax, run the fax test again.
• If you are using a phone splitter, this can cause faxing problems. (A splitter is a
two-cord connector that plugs into a telephone wall jack.) Try removing the splitter
and connecting the HP Fax directly to the telephone wall jack.
48
Configure and manage
The "Using Correct Type of Phone Cord with Fax" test failed
Solution:
• Make sure you used the phone cord supplied in the box with the HP Fax to connect
to the telephone wall jack. One end of the phone cord should be connected to the
port labeled 1-LINE on the back of the HP Fax, and the other end to your telephone
wall jack. If you do not use the supplied phone cord to connect from the telephone
wall jack to the HP Fax, you might not be able to send or receive faxes.
If the phone cord that came with the HP Fax is not long enough, you can use a
coupler to extend the length. You can purchase a coupler at an electronics store
that carries phone accessories. You will also need another phone cord, which can
be a standard phone cord that you might already have in your home or office.
• Check the connection between the telephone wall jack and the HP Fax to make
sure the phone cord is secure.
• If you are using a phone splitter, this can cause faxing problems. (A splitter is a
two-cord connector that plugs into a telephone wall jack.) Try removing the splitter
and connecting the HP Fax directly to the telephone wall jack.
The "Dial Tone Detection" test failed
Solution:
• Other equipment, which uses the same phone line as the HP Fax, might be
causing the test to fail. To find out if other equipment is causing a problem,
disconnect the other equipment from the phone line, and then run the test again.
If the Dial Tone Detection Test passes without the other equipment, then one
or more pieces of the equipment is causing problems; try adding them back one
at a time and rerunning the test each time, until you identify which piece of
equipment is causing the problem.
• Try connecting a working phone and phone cord to the telephone wall jack that
you are using for the HP Fax and check for a dial tone. If you do not hear a dial
tone, contact your telephone company and have them check the line.
• Make sure you have correctly connected the HP Fax to the telephone wall jack.
Using the phone cord supplied in the box with the HP Fax, connect one end to
your telephone wall jack, then connect the other end to the port labeled 1-LINE
on the back of the HP Fax. If you do not use the supplied phone cord to connect
from the telephone wall jack to the HP Fax, you might not be able to send or
receive faxes.
• If you are using a phone splitter, this can cause faxing problems. (A splitter is a
two-cord connector that plugs into a telephone wall jack.) Try removing the splitter
and connecting the HP Fax directly to the telephone wall jack.
• If your telephone system is not using a standard dial tone, such as some PBX
systems, this might cause the test to fail. This will not cause a problem sending
or receiving faxes. Try sending or receiving a test fax.
The fax test failed
49
Chapter 5
•
•
Check to make sure the country/region setting is set appropriately for your
country/region. If the country/region setting is not set or is set incorrectly, the test
might fail and you might have problems sending and receiving faxes.
Make sure you connect the HP Fax to an analog phone line or you will not be able
to send or receive faxes. To check if your phone line is digital, connect a regular
analog phone to the line and listen for a dial tone. If you do not hear a normal
sounding dial tone, it might be a phone line set up for digital phones. Connect the
HP Fax to an analog phone line and try sending or receiving a fax.
The "Fax Line Condition" test failed
Solution:
• Make sure you connect the HP Fax to an analog phone line or you will not be able
to send or receive faxes. To check if your phone line is digital, connect a regular
analog phone to the line and listen for a dial tone. If you do not hear a normal
sounding dial tone, it might be a phone line set up for digital phones. Connect the
HP Fax to an analog phone line and try sending or receiving a fax.
• Check the connection between the telephone wall jack and the HP Fax to make
sure the phone cord is secure.
• Make sure you have correctly connected the HP Fax to the telephone wall jack.
Using the phone cord supplied in the box with the HP Fax, connect one end to
your telephone wall jack, then connect the other end to the port labeled 1-LINE
on the back of the HP Fax. If you do not use the supplied phone cord to connect
from the telephone wall jack to the HP Fax, you might not be able to send or
receive faxes.
• Other equipment, which uses the same phone line as the HP Fax, might be
causing the test to fail. To find out if other equipment is causing a problem,
disconnect the other equipment from the phone line, and then run the test again.
◦ If the Fax Line Condition Test passes without the other equipment, then one
or more pieces of the equipment is causing problems; try adding them back
one at a time and rerunning the test each time, until you identify which piece
of equipment is causing the problem.
◦ If the Fax Line Condition Test fails without the other equipment, connect the
HP Fax to a working phone line and continue reviewing the troubleshooting
information in this section.
• If you are using a phone splitter, this can cause faxing problems. (A splitter is a
two-cord connector that plugs into a telephone wall jack.) Try removing the splitter
and connecting the HP Fax directly to the telephone wall jack.
50
Configure and manage
6
Maintain and troubleshoot
•
•
•
•
•
•
•
•
•
•
•
Work with print cartridges
Clean the HP Fax
Troubleshooting tips and resources
Solve printing problems
Poor print quality and unexpected printouts
Solve paper-feed problems
Solve copy problems
Solve fax problems
Troubleshoot setup issues
Clear paper jams
Avoid paper jams
Work with print cartridges
•
•
•
•
•
•
•
•
Print cartridges
Handle the print cartridges
Replace the print cartridges
Align the print cartridges
Clean the print cartridges
Clean the print cartridge contacts
Clean the area around the ink nozzles
Store print cartridges
Print cartridges
You can find the cartridge number on the label of the print cartridge you are replacing.
The HP Fax uses the following print cartridges:
•
•
•
HP 21 black inkjet print cartridge
HP 22 tri-color inkjet print cartridge
HP 54 black inkjet print cartridge
NOTE: Ink from the cartridges is used in the printing process in a number of different
ways, including in the initialization process, which prepares the HP Fax and cartridges
for printing. In addition, some residual ink is left in the cartridge after it is used. For
more information see www.hp.com/go/inkusage.
NOTE: Ordering print cartridges online is not supported in all countries/regions. If it
is not supported in your country/region, contact a local HP reseller for information
about purchasing print cartridges.
Work with print cartridges
51
Chapter 6
Handle the print cartridges
Before you replace or clean a print cartridge, you should know the part names and how
to handle the print cartridges.
1
Copper-colored contacts
2
Plastic tape with pink pull tab (must be removed before installing)
3
Ink nozzles under tape
Hold the print cartridges by their black plastic sides, with the label on top. Do not touch
the copper-colored contacts or the ink nozzles.
NOTE: Handle the print cartridges carefully. Dropping or jarring cartridges can cause
temporary printing problems, or even permanent damage.
Replace the print cartridges
Follow these instructions when the ink level is low.
NOTE: When the ink level for a print cartridge is low, a message appears on the
display.
When you receive a low-ink warning message on the display, make sure you have a
replacement print cartridge available. You should also replace the print cartridges when
you see faded text or if you experience print quality issues related to the print cartridges.
To order print cartridges for the HP Fax, go to www.hpshopping.com. If prompted, choose
your country/region, follow the prompts to select your product, and then click one of the
shopping links on the page.
52
Maintain and troubleshoot
To replace the print cartridges
1. Make sure the HP Fax is plugged in.
CAUTION: If the HP Fax is off when you open the print cartridge door to access
the print cartridges, it will not release the cartridges for changing. You might
damage the HP Fax if the print cartridges are not docked safely when you try to
remove them.
2. Open the print cartridge door.
The print carriage moves to the far right side of the HP Fax.
3. Wait until the print carriage is idle and silent, and then lightly press down on a print
cartridge to release it.
If you are replacing the tri-color print cartridge, remove the print cartridge from the
slot on the left.
If you are replacing the black print cartridge, remove the print cartridge from the slot
on the right.
4. Pull the print cartridge toward you out of its slot.
5. If you are removing the print cartridge because it is low or out of ink, recycle the print
cartridge. The HP Inkjet Supplies Recycling Program is available in many countries/
regions, and lets you recycle used print cartridges free of charge. For more
information, go to the following Web site:
www.hp.com/hpinfo/globalcitizenship/environment/recycle/inkjet.html
Work with print cartridges
53
Chapter 6
6. Remove the new print cartridge from its packaging and, being careful to touch only
the black plastic, gently remove the plastic tape by using the pink pull tab.
1
Copper-colored contacts
2
Plastic tape with pink pull tab (must be removed before installing)
3
Ink nozzles under tape
CAUTION: Do not touch the copper-colored contacts or ink nozzles. Touching
these parts can result in clogs, ink failure, and bad electrical connections.
7. Slide the new print cartridge forward into the empty slot. Then gently push on the
upper part of the print cartridge forward until it clicks into the socket.
If you are installing the tri-color print cartridge, slide it into the left slot.
If you are installing a black print cartridge, slide it into the right slot.
8. Close the print cartridge door.
54
Maintain and troubleshoot
Align the print cartridges
The HP Fax prompts you to align cartridges every time you install or replace a print
cartridge. You can also align the print cartridges at any time from the control panel.
Aligning the print cartridges ensures high-quality output.
NOTE: If you remove and reinstall the same print cartridge, the HP Fax will not
prompt you to align the print cartridges. It remembers the alignment values for that
print cartridge, so you do not need to realign the print cartridges.
To align the print cartridges from the control panel when prompted
1. Make sure you have letter or A4 unused plain white paper loaded in the input tray,
and then press OK. The HP Fax prints a test page.
2. Load the test page print side down in the ADF, and press OK. Recycle or discard the
page after the alignment is completed.
NOTE: If you have colored paper loaded in the input tray when you align the print
cartridges, the alignment will fail. Load unused plain white paper into the input
tray, and then try the alignment again.
If the alignment fails again, you might have a defective sensor or print cartridge.
Contact HP Support. Go to www.hp.com/support. If prompted, choose your
country/region, and then click Contact HP for information on calling for technical
support.
To align the cartridges from the control panel at any time
1. Load letter, A4, or legal unused plain white paper into the input tray.
2. Press Setup.
3. Select Tools and then select Align Print Cartridge. The HP Fax prints a test page.
4. Load the test page print side down in the ADF, and press OK. Recycle or discard the
page after the alignment is completed.
Clean the print cartridges
Use this feature when there is streaking, white lines through any of the lines of color or
when a color is muddy after installing a print cartridge for the first time.
NOTE: Ink from the cartridges is used in the printing process in a number of different
ways, including in the initialization process, which prepares the HP Fax and cartridges
for printing. In addition, some residual ink is left in the cartridge after it is used. For
more information see www.hp.com/go/inkusage.
To clean the print cartridges from the control panel
1. Load letter, A4, or legal unused plain white paper into the input tray.
2. Press Setup.
3. Select Tools and then select Clean Print Cartridge.
The HP Fax prints a page that you can recycle or discard.
If copy or print quality still seems poor after you clean the print cartridges, try cleaning
the print cartridge contacts before replacing the affected print cartridge.
Work with print cartridges
55
Chapter 6
Clean the print cartridge contacts
Clean the print cartridge contacts only if you get repeated messages on the display
prompting you to check a print cartridge after you already have cleaned or aligned the
print cartridges.
Before cleaning the print cartridge contacts, remove the print cartridge and verify that
nothing is covering the print cartridge contacts, then reinstall the print cartridge. If you
continue to get messages to check the print cartridges, clean the print cartridge contacts.
Make sure you have the following materials available:
•
Dry foam rubber swabs, lint-free cloth, or any soft material that will not come apart or
leave fibers.
TIP: Coffee filters are lint-free and work well for cleaning print cartridges.
•
Distilled, filtered, or bottled water (tap water might contain contaminants that can
damage the print cartridges).
CAUTION: Do not use platen cleaners or alcohol to clean the print cartridge
contacts. These can damage the print cartridge or the HP Fax.
To clean the print cartridge contacts
1. Plug in the HP Fax and open the print cartridge door.
The print carriage moves to the far right side of the HP Fax.
2. Wait until the print carriage is idle and silent, and then unplug the power cord from
the back of the HP Fax.
NOTE: Depending how long the HP Fax is unplugged, the date and time might
be erased. You might need to reset the date and time later, when you plug the
power cord back in.
3. Lightly press down on the print cartridge to release it, and then pull it toward you out
of the slot.
NOTE: Do not remove both print cartridges at the same time. Remove and clean
each print cartridge one at a time. Do not leave a print cartridge outside the HP
Fax for more than 30 minutes.
4. Inspect the print cartridge contacts for ink and debris buildup.
5. Dip a clean foam rubber swab or lint-free cloth into distilled water, and squeeze any
excess water from it.
6. Hold the print cartridge by its sides.
56
Maintain and troubleshoot
7. Clean only the copper-colored contacts. Allow the print cartridges to dry for
approximately ten minutes.
1
Copper-colored contacts
2
Ink nozzles (do not clean)
8. Slide the print cartridge back into the slot. Push the print cartridge forward until it clicks
into place.
9. Repeat if necessary for the other print cartridge.
10. Gently close the print cartridge door and plug the power cord into the back of the HP
Fax.
Clean the area around the ink nozzles
If the HP Fax is used in a dusty environment, a small amount of debris might accumulate
inside the HP Fax. This debris can include dust, hair, carpet, or clothing fibers. When
debris gets on the print cartridges, it can cause ink streaks and smudges on printed pages.
Ink streaking can be corrected by cleaning around the ink nozzles as described here.
NOTE: Clean the area around the ink nozzles only if you continue to see streaks
and smudges on your printed pages after you have already cleaned the print
cartridges by using the control panel.
Make sure you have the following materials available:
•
Dry foam rubber swabs, lint-free cloth, or any soft material that will not come apart or
leave fibers.
TIP: Coffee filters are lint-free and work well for cleaning print cartridges.
•
Distilled, filtered, or bottled water (tap water might contain contaminants that can
damage the print cartridges).
CAUTION: Do not touch the copper-colored contacts or ink nozzles. Touching
these parts can result in clogs, ink failure, and bad electrical connections.
Work with print cartridges
57
Chapter 6
To clean the area around the ink nozzles
1. Plug in the HP Fax and open the print cartridge door.
The print carriage moves to the far right side of the HP Fax.
2. Wait until the print carriage is idle and silent, and then unplug the power cord from
the back of the HP Fax.
NOTE: Depending how long the HP Fax is unplugged, the date and time might
be erased. You might need to reset the date and time later, when you plug the
power cord back in.
3. Lightly press down on the print cartridge to release it, and then pull it toward you out
of the slot.
NOTE: Do not remove both print cartridges at the same time. Remove and clean
each print cartridge one at a time. Do not leave a print cartridge outside the HP
Fax for more than 30 minutes.
4. Place the print cartridge on a piece of paper with the ink nozzles facing up.
5. Lightly moisten a clean foam rubber swab with distilled water.
6. Clean the face and edges around the ink nozzle area with the swab, as shown below.
1
Nozzle plate (do not clean)
2
Face and edges around the ink nozzle area
CAUTION: Do not clean the nozzle plate.
7. Slide the print cartridge back into the slot. Push the print cartridge forward until it clicks
into place.
8. Repeat if necessary for the other print cartridge.
9. Gently close the print cartridge door and plug the power cord into the back of the HP
Fax.
Store print cartridges
Print cartridges can be left in the device for extended periods of time. If you remove the
print cartridges, place them in an airtight container, such as a resealable plastic tub. Make
sure the nozzles are not touching anything when you store the print cartridges.
58
Maintain and troubleshoot
Clean the HP Fax
To ensure that your copies and scans remain clear, you might need to clean the glass
strip or white strip inside the automatic document feeder. You might also want to dust the
exterior of the HP Fax.
Clean the glass strip
Minor debris can accumulate on the white strip located inside the automatic document
feeder.
To clean the glass strip inside the automatic document feeder
1. Unplug the power cord.
NOTE: Depending how long the HP Fax is unplugged, the date and time might
be erased. You might need to reset the date and time later, when you plug the
power cord back in.
2. Lift the cover of the automatic document feeder.
There is a glass strip under the automatic document feeder.
3. Clean the glass strip with a soft cloth or sponge slightly moistened with a nonabrasive
glass cleaner.
CAUTION: Do not use abrasives, acetone, benzene, or carbon tetrachloride on
the glass, since they can damage it. Do not place or spray liquid directly on the
glass. The liquid might seep under the glass and damage the HP Fax.
Clean the HP Fax
59
Chapter 6
4. Close the automatic document feeder cover.
CAUTION: Make sure you close the automatic document feeder cover before
loading any paper or originals. If you do not close the cover, you might damage
the mechanism.
5. Plug in the power cord.
Clean the white strip
Minor debris can accumulate on the white strip located inside the automatic document
feeder.
To clean the white strip
1. Unplug the power cord.
NOTE: Depending how long the HP Fax is unplugged, the date and time might
be erased. You might need to reset the date and time later, when you plug the
power cord back in.
2. Lift the cover of the automatic document feeder.
3. Clean the white strip with a soft cloth or sponge slightly moistened with a mild soap
and warm water.
Wash the strip gently to loosen debris. Do not scrub the strip.
60
Maintain and troubleshoot
4. If further cleaning is needed, repeat the previous steps using isopropyl (rubbing)
alcohol, and wipe the strip thoroughly with a damp cloth to remove any residual
alcohol.
CAUTION: Be careful not to spill alcohol on the glass or exterior of the HP Fax,
as this might damage the HP Fax.
5. Close the automatic document feeder cover.
6. Plug in the power cord.
Clean the exterior
NOTE: Before cleaning the HP Fax, unplug the power cord from the electrical
socket.
Use a soft, damp, lint-free cloth to wipe dust, smudges, and stains off of the case. The
exterior of the HP Fax does not require cleaning. Keep fluids away from the interior of the
HP Fax, as well as from the control panel.
Troubleshooting tips and resources
Use the following tips and resources to resolve printing problems.
•
•
•
•
•
•
For a paper jam, see Clear paper jams.
For paper-feed problems, such as the paper skew and paper pick, see Solve paperfeed problems.
When the HP Fax is plugged in for the first time, it takes approximately 1 - 2 minutes
to initialize it after the print cartridges are installed.
Make sure the power cord and other cables are working, and are firmly connected to
the HP Fax. Make sure the HP Fax is connected firmly to a functioning alternating
current (AC) power outlet. For voltage requirements, see Electrical specifications.
Make sure media is loaded correctly in the input tray and is not jammed in the HP
Fax.
Make sure all packing tapes and materials are removed.
Solve printing problems
Problem
Possible solution
More information
The HP Fax
shuts down
unexpectedly
Check the power and
power connections
Make sure the HP Fax is connected firmly to a
functioning alternating current (AC) power outlet. For
voltage requirements, see Electrical specifications.
Error message
appears on
control-panel
display
A non-recoverable
error has occurred
Unplug the power cord, wait about 20 seconds, and
plug the power cord back in. If the problem persists,
visit the HP Web site (www.hp.com/support) for the
latest troubleshooting information, or product fixes
and updates.
Blank or partial
page printed
Clean the print
cartridge
Complete the print cartridge cleaning procedure. For
more information, see Work with print cartridges.
Solve printing problems
61
Chapter 6
(continued)
Problem
Possible solution
More information
Check the media
settings
Make sure you select the correct quality settings for
the media loaded in the tray.
Make sure the page settings match the page size of
media loaded in the tray.
More than one page is
being picked
For more information on paper-feed problems, see
Solve paper-feed problems.
Check the print
cartridges
Make sure the print cartridges are not low on ink. For
more information, see Work with print cartridges.
Poor print quality and unexpected printouts
Problem
Possible solution
More information
Poor quality
printouts
Check the print
cartridges
Make sure the correct print cartridges are installed
and the print cartridges are not low on ink. For more
information, see Configure and manage and Print
cartridges.
Check the media
The media might not meet Hewlett-Packard media
specifications (for example, the media is too moist or
too rough). See Select print media for more
information.
Check the type of
media loaded in the HP
Fax
Make sure the HP Fax supports the type of media you
have loaded. For more information, see Understand
specifications for supported media.
Align the print
cartridges
Align the print cartridges. For more information, see
Align the print cartridges.
Check the print
cartridges
Make sure print cartridges have not been tampered
with. Refilling processes and the use of incompatible
inks can disrupt the intricate printing system and result
in reduced print quality and damage to the HP Fax.
HP does not guarantee or support refilled print
cartridges. For ordering information, see Print
cartridges and HP supplies and fax specifications.
Check the type of
media loaded in the HP
Fax.
For more information, see Select print media.
Check the print
cartridges
Make sure the print cartridges are not low on ink. For
more information, see Work with print cartridges.
Clean the print
cartridges
For more information, see Work with print cartridges.
Printout shows
bleeding
colors
Lines or dots
are missing
from text or
graphics
62
Maintain and troubleshoot
Solve paper-feed problems
Problem
Possible solution
Media is not supported for the HP Fax
Use only media that is supported for the HP Fax. For more
information, see Understand specifications for supported
media.
Media is not picked up from the tray
•
•
•
Media is not coming out correctly
•
•
Pages are skewing
•
•
Multiple pages are being picked up
•
•
•
•
Make sure media is loaded in the tray. For more
information, see Load full-size paper. Fan the media
before loading.
Make sure the paper guides are set to the correct
markings in the tray for the media size you are
loading. Also make sure the guides are snug, but not
tight, against the stack.
Make sure media in the tray is not curled. Uncurl
paper by bending it in the opposite direction of the
curl.
Make sure the output tray extension is extended;
otherwise, printed pages may fall off the HP Fax.
Remove excess media from the output tray. There is
a limit to the number of sheets the tray can hold.
Make sure the media loaded in the tray is aligned to
the paper guides. If needed, pull out the tray from the
HP Fax and reload the media properly, making sure
that the paper guides are properly aligned.
Load media into the HP Fax only when it is not
printing.
Fan the media before loading.
Make sure the paper guides are set to the correct
markings in the tray for the media size you are
loading. Also make sure the guides are snug, but not
tight, against the stack.
Make sure the tray is not overloaded with paper.
Use HP media for optimum performance and
efficiency.
Solve copy problems
Problem
Possible solution
More information
No copy came
out
Check the power
Make sure that the power cord is securely connected.
Check the status of the
device
The device might be jammed. Check for jams. See
Clear paper jams.
Check the trays
Make sure that media is loaded. See Load full-size
paper for more information.
Check the trays
If you are copying from the ADF, make sure that the
originals have been loaded correctly. For more
information, see Load originals.
Copies are
blank
Solve copy problems
63
Chapter 6
(continued)
Problem
Documents
are missing or
faded
Possible solution
More information
Check the media
The media might not meet Hewlett-Packard media
specifications (for example, the media is too moist or
too rough). See Select print media for more
information.
Check the settings
The contrast setting might be set too light. Use the
Copy button on the control panel to create darker
copies.
Clean the print
cartridges
For more information, see Work with print cartridges.
Check the media
The media might not meet Hewlett-Packard media
specifications (for example, the media is too moist or
too rough). See Select print media for more
information.
Check the settings
The quality setting of Fast (which produces draftquality copies) might be responsible for the missing or
faded documents. Change to the Normal or Best
setting.
Check the original
•
•
Clean the print
cartridges
For more information, see Work with print cartridges.
Size is
reduced
The Reduce/Enlarge or other copy feature might have been set from the control
panel to reduce the scanned image. Check the settings for the copy job to make
sure that they are for normal size.
Copy quality is
poor
Take steps to improve
the copy quality
•
•
•
Error
messages
appear
64
The accuracy of the copy depends on the quality
and size of the original. Use the Copy menu to
adjust the brightness of the copy. If the original is
too light, the copy might not be able to
compensate, even if you adjust the contrast.
Colored backgrounds might cause images in the
foreground to blend into the background, or the
background might appear in a different shade.
Use quality originals.
Load the media correctly. If the media is loaded
incorrectly, it might skew, causing unclear
images. See Load originals for more information.
Use or make a carrier sheet to protect your
originals.
Check the HP Fax
The ADF might need cleaning. See Clean the HP
Fax for more information.
Reload document and
then restart job
Press the OK button, and then reload the remaining
documents (up to 20 pages) in the ADF. For more
information see Load originals.
Maintain and troubleshoot
Problem
Defects
More information
Copy defects
are apparent
Vertical white or
faded stripes
The media might not meet Hewlett-Packard media
specifications (for example, the media is too moist or
too rough). See Select print media for more
information.
Too light or dark
Try adjusting the contrast and copy-quality settings.
Unwanted lines
The ADF might need cleaning. See Clean the HP
Fax for more information.
Black dots or streaks
Ink, glue, correction fluid, or an unwanted substance
might be on the ADF. Try cleaning the HP Fax. See
Clean the HP Fax for more information.
Unclear text
•
•
Try adjusting the contrast and copy-quality
settings.
The default enhancement setting might not be
suitable for the job. Check the setting and change
it to enhance text or images, if needed. For more
information, see Adjust the lightness and
darkness of your copy.
Incompletely filled
text or graphics
Try adjusting the contrast and copy-quality settings.
Copy is slanted or
skewed
•
•
Large, black
typefaces look
splotchy (not smooth)
The default enhancement setting might not be
suitable for the job. Check the setting and change it to
enhance text or images, if needed. For more
information, see Change the copy settings.
Horizontal grainy or
white bands in lightgray to medium-gray
areas
The default enhancement setting might not be
suitable for the job. Check the setting and change it to
enhance text or images, if needed. For more
information, see Change the copy settings.
Make sure that the input tray is not too full.
Make sure that the paper-width adjusters are
snug against the sides of the media.
Solve fax problems
Problem
Possible solution
The display always shows Phone Off
Hook
You are using the wrong type of phone cord. Make sure
you are using the phone cord that came with the HP Fax
to connect the HP Fax to your phone line. If the phone
cord that came with the HP Fax is not long enough, you
can use a coupler to extend the length. You can purchase
a coupler at an electronics store that carries phone
accessories. You will also need another phone cord,
which can be a standard phone cord that you might
already have in your home or office.
Other equipment that uses the same phone line as the HP
Fax might be in use. Make sure extension phones
(phones on the same phone line, but not connected to the
HP Fax) or other equipment are not in use or off the hook.
For example, you cannot use the HP Fax for faxing if an
Solve fax problems
65
Chapter 6
(continued)
Problem
Possible solution
extension phone is off the hook, or if you are using a
computer dial-up modem to send e-mail or access the
Internet.
The HP Fax is having problems
sending and receiving faxes
Make sure the HP Fax is plugged in. Look at the display
on the HP Fax. If the display is blank the HP Fax is
unplugged. Make sure the power cord is firmly connected
to the HP Fax and plugged into a power outlet.
After plugging in the power cord, HP recommends you
wait five minutes before sending or receiving a fax. The
HP Fax cannot send or receive faxes while it is initializing
after being plugged in.
•
•
•
•
•
Check to see if another process has caused an error.
Check the display for an error message providing
information about the problem and how to solve it. If
there is an error, the HP Fax will not send or receive
a fax until the error condition is resolved.
The phone line connection might be noisy. Phone
lines with poor sound quality (noise) can cause faxing
problems. Check the sound quality of the phone line
by plugging a phone into the telephone wall jack and
listening for static or other noise. If you hear noise,
turn Error Correction Mode (ECM) off and try faxing
again. For information about changing ECM, see
Send a fax in Error Correction Mode. If the problem
persists, contact your telephone company.
If you are using a digital subscriber line (DSL) service,
make sure that you have a DSL filter connected or
you will not be able to fax successfully.
If you are using either a private branch exchange
(PBX) or an integrated services digital network
(ISDN) converter/terminal adapter, make sure the HP
Fax is connected to the correct port and the terminal
adapter is set to the correct switch type for your
country/region, if possible.
If the HP Fax shares the same phone line with a DSL
service, the DSL modem might not be properly
grounded. If the DSL modem is not properly
grounded, it can create noise on the phone line.
Phone lines with poor sound quality (noise) can
cause faxing problems. You can check the sound
quality of the phone line by plugging a phone into the
telephone wall jack and listening for static or other
noise. If you hear noise, turn off your DSL modem and
completely remove power for at least 15 minutes.
Turn the DSL modem back on and listen to the dial
tone again.
NOTE: You might notice static on the phone line
again in the future. If the HP Fax stops sending and
receiving faxes, repeat this process.
If the phone line is still noisy, contact your telephone
company. For information on turning your DSL
modem off, contact your DSL provider for support.
66
Maintain and troubleshoot
(continued)
Problem
Possible solution
The HP Fax is having problems
sending a manual fax
NOTE: This possible solution applies only in the
countries/regions that receive a 2-wire phone cord in the
box with the HP Fax, including: Argentina, Australia,
Brazil, Canada, Chile, China, Colombia, Greece, India,
Indonesia, Ireland, Japan, Korea, Latin America,
Malaysia, Mexico, Philippines, Poland, Portugal, Russia,
Saudi Arabia, Singapore, Spain, Taiwan, Thailand, USA,
Venezuela, and Vietnam.
• Make sure the telephone you use to initiate the fax
call is connected directly to the HP Fax. To send a fax
manually, the telephone must be connected directly
to the port labeled 2-EXT on the HP Fax.
• If you are sending a fax manually from your phone
that is connected directly to the HP Fax, you must use
the keypad on the telephone to send the fax. You
cannot use the keypad on the control panel of the HP
Fax.
NOTE: If using a serial-type phone system, please
connect your phone directly on top of the HP Fax
cable which has a wall plug attached to it.
The HP Fax cannot receive faxes, but
can send faxes
If you are not using a distinctive ring service, check to
make sure that the Distinctive Ring feature on the HP
Fax is set to All Rings. For more information, see Change
the answer ring pattern for distinctive ring.
If you select Tel mode, you will need to receive faxes
manually; otherwise, the HP Fax will not receive the fax.
For information on receiving faxes manually, see Receive
a fax manually.
If you have a voice mail service at the same phone
number you use for fax calls, you must receive faxes
manually, not automatically. This means that you must be
available to respond in person to incoming fax calls. If you
want to receive faxes automatically instead, contact your
telephone company to subscribe to a distinctive ring
service, or to obtain a separate phone line for faxing.
If you have a computer dial-up modem on the same phone
line with the HP Fax, check to make sure that the software
that came with your modem is not set to receive faxes
automatically. Modems that are set up to receive faxes
automatically take over the phone line to receive all
incoming faxes, which prevents the HP Fax from receiving
fax calls.
Solve fax problems
67
Chapter 6
(continued)
Problem
Possible solution
If you have an answering machine on the same phone line
with the HP Fax, you might have one of the following
problems:
•
•
•
Your answering machine might not be set up properly
with the HP Fax.
Your outgoing message might be too long or too loud
to allow the HP Fax to detect fax tones, and the
sending fax machine might disconnect.
Your answering machine might not have enough
quiet time after your outgoing message to allow the
HP Fax to detect fax tones. This problem is most
common with digital answering machines.
The following actions might help solve these problems:
•
•
•
•
•
When you have an answering machine on the same
phone line you use for fax calls, try connecting the
answering machine directly to the port labeled 2-EXT
on the back of the HP Fax.
Make sure the HP Fax is set to receive faxes
automatically. For information on setting up the HP
Fax to receive faxes automatically, see Receive a
fax.
Make sure the Rings to Answer setting is set to a
greater number of rings than the answering machine.
For more information, see Set the number of rings
before answering.
Disconnect the answering machine and then try
receiving a fax. If faxing is successful without the
answering machine, the answering machine might be
causing the problem.
Reconnect the answering machine and record your
outgoing message again. Record a message that is
approximately 10 seconds in duration. Speak slowly
and at a low volume when recording your message.
Leave at least 5 seconds of silence at the end of the
voice message. There should be no background
noise when recording this silent time. Try to receive
a fax again.
NOTE: Some digital answering machines might not
retain the recorded silence at the end of your outgoing
message. Play back your outgoing message to
check.
If the HP Fax shares the same phone line with other types
of phone equipment, such as an answering machine, a
computer dial-up modem, or a multi-port switch box, the
fax signal level might be reduced. The signal level can
also be reduced if you use a splitter or connect extra
cables to extend the length of your phone. A reduced fax
signal can cause problems during fax reception.
If you have a special ring pattern for your fax phone
number (using a distinctive ring service through your
telephone company), make sure that the Distinctive
Ring feature on the HP Fax is set to match. For more
information, see Change the answer ring pattern for
distinctive ring.
68
Maintain and troubleshoot
(continued)
Problem
Possible solution
The HP Fax cannot send faxes, but
can receive faxes
The HP Fax might be dialing too fast or too soon. You
might need to insert some pauses in the number
sequence. For example, if you need to access an outside
line before dialing the phone number, insert a pause
following the access number. If your number is 95555555,
and 9 accesses an outside line, you might insert pauses
as follows: 9-555-5555. To enter a pause in the fax
number you are typing, press Redial/Pause, or press the
Symbols button repeatedly, until a dash (-) appears on
the display.
You can also send the fax using monitor dialing. This
enables you to listen to the phone line as you dial. You
can set the pace of your dialing and respond to prompts
as you dial. For more information, see Send a fax using
monitor dialing.
The number you entered when sending the fax is not in
the proper format or the receiving fax machine is having
problems. To check this, try calling the fax number from
a telephone and listen for fax tones. If you cannot hear fax
tones, the receiving fax machine might not be turned on
or connected, or a voice mail service could be interfering
with the recipient's phone line. You can also ask the
recipient to check the receiving fax machine for any
problems.
Fax tones are recorded on my
answering machine
When you have an answering machine on the same
phone line you use for fax calls, try connecting the
answering machine directly to the port labeled 2-EXT on
the back of the HP Fax. If you do not connect the
answering machine as recommended, fax tones might be
recorded on your answering machine.
Make sure the HP Fax is set to receive faxes automatically
and that the Rings to Answer setting is correct. The
number of rings to answer for the HP Fax should be
greater than the number of rings to answer for the
answering machine. If the answering machine and the HP
Fax are set to the same number of rings to answer, both
devices answer the call and fax tones are recorded on the
answering machine.
Set your answering machine to a low number of rings and
the HP Fax to answer in the maximum number of rings
supported. (The maximum number of rings varies by
country/region.) In this setup, the answering machine
answers the call and the HP Fax monitors the line. If the
HP Fax detects fax tones, the HP Fax receives the fax. If
the call is a voice call, the answering machine records the
incoming message. For more information, see Set the
number of rings before answering.
The phone cord that came with my HP
Fax is not long enough
If the phone cord that came with the HP Fax is not long
enough, you can use a coupler to extend the length. You
can purchase a coupler at an electronics store that carries
phone accessories. You will also need another phone
cord, which can be a standard phone cord that you might
already have in your home or office.
Solve fax problems
69
Chapter 6
(continued)
Problem
Possible solution
TIP: If the HP Fax came with a 2-wire phone cord
adaptor, you can use it with a 4-wire phone cord to extend
the length. For information on using the 2-wire phone cord
adaptor, see the documentation that came with it.
To extend your phone cord
1.
2.
Using the phone cord supplied in the box with the HP
Fax, connect one end to the coupler, then connect the
other end to the port labeled 1-LINE on the back of
the HP Fax.
Connect another phone cord to the open port on the
coupler and to the telephone wall jack.
Troubleshoot setup issues
Problem
Possible solution
More information
Hardware
setup
suggestions
Check the HP Fax
•
•
•
Check the hardware
connections
•
•
•
Check the print
cartridges
•
•
Check the HP Fax to
ensure the following:
•
•
•
•
•
•
70
Maintain and troubleshoot
Make sure that all packing tape and material have
been removed from outside and inside the HP
Fax.
Make sure that the HP Fax is loaded with paper.
If the Attention light is blinking, check for
messages on the control panel.
Make sure that any cords and cables that you are
using are in good working order.
Make sure that the power cord is connected
securely to both the HP Fax and to a working
power outlet.
Make sure that the phone cord is connected to the
1-LINE port.
Make sure the tape is removed from the print
cartridges.
Make sure that the print cartridges are firmly
installed in their correct slot. Press down firmly on
each one to ensure proper contact.
When the HP Fax is first plugged in, it takes
approximately 45 seconds to warm up.
The HP Fax is in the Ready state, and no other
lights on the control panel are lit or blinking. If the
Attention light is lit or blinking, see the message
on the control panel.
Ensure power cord and other cables are working,
and are firmly connected to the HP Fax.
All packing tapes and materials are removed from
the HP Fax.
Rear access panel is locked into place.
Paper is loaded correctly in the tray, and is not
jammed in the HP Fax.
Clear paper jams
If the paper was loaded in the input tray, you might need to clear the paper jam from the
rear door.
Paper can also jam in the automatic document feeder. Several common actions can
cause paper to jam the automatic document feeder:
•
•
•
Placing too much paper in the document feeder tray.
Using paper that is too thick or too thin for the HP Fax.
Trying to add paper to the document feeder tray while the HP Fax is feeding pages.
To clear a paper jam from the rear door
1. Unplug the power cord.
2. Press in the tab on the left side of the rear door to release the door. Remove the door
by pulling it away from the HP Fax.
CAUTION: Trying to clear a paper jam from the front of the HP Fax can damage
the print mechanism. Always access and clear paper jams through the rear door.
3. Gently pull the paper out of the rollers.
CAUTION: If the paper tears when you are removing it from the rollers, check
the rollers and wheels for torn pieces of paper that might be remaining inside the
HP Fax. If you do not remove all the pieces of paper from the HP Fax, more paper
jams are likely to occur.
4. Replace the rear door. Gently push the door forward until it snaps into place.
5. Press OK to continue the current job.
Clear paper jams
71
Chapter 6
To clear a paper jam in the automatic document feeder
1. Unplug the power cord.
2. Lift the cover of the automatic document feeder.
3. Gently pull the paper out of the rollers.
CAUTION: If the paper tears when you are removing it from the rollers, check
the rollers and wheels for torn pieces of paper that might be remaining inside the
HP Fax. If you do not remove all the pieces of paper from the HP Fax, more paper
jams are likely to occur.
4. Close the cover of the automatic document feeder.
Avoid paper jams
To help avoid paper jams, follow these guidelines.
•
•
•
•
•
•
•
72
Remove printed papers from the output tray frequently.
Prevent curled or wrinkled paper by storing all unused paper flat in a resealable bag.
Ensure that paper loaded in the input tray lays flat and the edges are not bent or torn.
Do not combine different paper types and paper sizes in the input tray; the entire stack
of paper in the input tray must be the same size and type.
Adjust the paper-width guide in the input tray to fit snugly against all paper. Make sure
the paper-width guide does not bend the paper in the input tray.
Do not force paper too far forward in the input tray.
Use paper types that are recommended for the HP Fax. For more information, see
Understand specifications for supported media.
Maintain and troubleshoot
A
HP supplies and fax
specifications
This section provides information on HP supplies and specifications for the HP Fax. The information
is subject to change; visit the HP Web site (www.hpshopping.com) for the latest updates. You may
also make purchases through the Web site.
•
Order printing supplies online
•
•
Supplies
Physical specifications
•
Product features and capacities
•
•
Memory specifications
Print specifications
•
Copy specifications
•
•
Fax specifications
Environmental specifications
•
Electrical specifications
•
Acoustic emission specifications (noise levels per ISO 7779)
Order printing supplies online
To order genuine HP supplies for the HP Fax, go to www.hpshopping.com. If prompted, choose your
country/region, follow the prompts to select your product, and then click one of the shopping links
on the page.
Supplies
•
HP media
•
Print cartridges
HP media
To order media such as HP Premium Plus Photo Paper or HP Premium Paper, go to
www.hpshopping.com.
For media and media-handling specifications, see Understand specifications for supported media.
Print cartridges
You can find the cartridge number on the label of the print cartridge you are replacing.
The HP Fax uses the following print cartridges:
•
•
HP 21 black inkjet print cartridge
HP 22 tri-color inkjet print cartridge
•
HP 54 black inkjet print cartridge
NOTE: Ink from the cartridges is used in the printing process in a number of different ways,
including in the initialization process, which prepares the HP Fax and cartridges for printing. In
addition, some residual ink is left in the cartridge after it is used. For more information see
www.hp.com/go/inkusage.
NOTE: Ordering print cartridges online is not supported in all countries/regions. If it is not
supported in your country/region, contact a local HP reseller for information about purchasing
print cartridges.
Supplies
73
Appendix A
Physical specifications
•
Height: 330.2 mm (13 inches)
•
Width: 425.5 mm (16.75 inches)
•
Depth: 203.2 mm (8 inches)
•
Weight: 5.5 kg (12 pounds)
Product features and capacities
Feature
Capacity
Print cartridges
Black and tri-color print cartridges
Supply yields
Visit www.hp.com/pageyield/ for more
information on estimated print cartridge yields.
HP Fax languages
HP PCL 3 enhanced
Font support
US fonts: CG Times, CG Times Italic, Universe,
Universe Italic, Courier, Courier Italic, Letter
Gothic, Letter Gothic Italic.
Duty cycle
Up to 1000 pages per month
Memory specifications
HP Fax memory
2 MB ROM, 16 MB RAM
Print specifications
•
Resolution: 1200 x 1200 dpi black, 4800 optimized dpi color
•
Method: drop-on-demand thermal inkjet
•
Language: Lightweight Imaging Device Interface Language (LIDIL)
Copy specifications
•
Digital image processing
•
•
Up to 99 copies from original (varies by model)
Digital zoom: from 25 to 400% (varies by model)
•
Fit to page, pre-scan
Mode
Type
Scan resolution (dpi)
Best
Black
up to 600 x 1200
Color
up to 600 x 1200
Black
up to 300 x 300
Color
up to 300 x 300
Black
up to 300 x 300
Color
up to 300 x 300
Normal
Fast
74
HP supplies and fax specifications
Fax specifications
•
Walk-up black-and-white and color fax capability
•
Up to 200 speed dials
•
Up to 300-page memory (varies by model, based on ITU-T Test Image #1 at standard resolution
more complicated pages or higher resolution pages take longer and use more memory)
•
Manual fax send and receive
•
Automatic busy redial up to five times
•
Automatic no-answer redial one time (varies by model)
•
Confirmation and activity reports
•
CCITT/ITU Group 3 fax with Error Correction Mode
•
33.6 Kbps transmission
•
Ring detect with automatic fax/answering machine switching
Photo (dpi)
Very Fine (dpi)
Fine (dpi)
Standard (dpi)
Black
196 x 203 (8-bit
grayscale)
300 x 300
196 x 203
196 x 98
Color
200 x 200
200 x 200
200 x 200
200 x 200
Environmental specifications
Operating environment
Operating temperature: 5° to 40° C (41° to 104° F)
Recommended operating conditions: 15° to 32° C (59° to 90° F)
Recommended relative humidity: 15 to 80% noncondensing
Storage environment
Storage temperature: -40° to 60° C (-40° to 140° F)
Storage relative humidity: Up to 90% noncondensing at a temperature of 65° C (150° F)
Electrical specifications
Power requirements
External AC adaptor input (max): 100 to 240 VAC (± 10%), 50/60 Hz (± 3Hz)
System DC input (max): 15 Vdc or 16 Vdc at 400 mA; 32 Vdc at 500 mA
NOTE: The AC adaptor shipped might be specified to provide more power than system DC
input (max) requirement above.
Acoustic emission specifications (noise levels per ISO 7779)
•
•
Sound pressure (bystander position)
◦
Color printing: LpAd 42 (dBA)
◦
Black-and-white printing and copying: LpAd 47 (dBA)
◦
Black-and-white printing (Fast mode): LpAd 52 (dBA)
◦
Sending black-and-white fax: LpAd 40 (dBA)
◦
Idle: LpAd 21 (dBA)
Sound power
◦
Color printing: LwAd 5.5 (BA)
◦
Black-and-white printing and copying: LwAd 5.9 (BA)
Acoustic emission specifications (noise levels per ISO 7779)
75
Appendix A
76
◦
Black-and-white printing (Fast mode): LwAd 6.4 (BA)
◦
Sending black-and-white fax: LwAd 5.3 (BA)
◦
Idle: LwAd 3.3 (BA)
HP supplies and fax specifications
B
Support and warranty
The information in Maintain and troubleshoot suggests solutions to common problems. If your HP
Fax is not operating correctly and those suggestions did not solve your problem, try using one of the
following support services to obtain assistance.
•
Obtain electronic support
•
Obtain HP telephone support
•
Prepare the HP Fax for shipment
•
Pack the HP Fax
•
Warranty
Obtain electronic support
To find support and warranty information, go to the HP Web site at www.hp.com/support. If prompted,
choose your country/region, and then click Contact HP for information on calling for technical
support.
This Web site also offers technical support, supplies, ordering information and other options such
as:
•
•
Access online support pages.
Send HP an e-mail message for answers to your questions.
•
Connect with an HP technician by using online chat.
Support options and availability vary by product, country/region, and language.
Obtain HP telephone support
During the warranty period, you may obtain assistance from the HP Customer Care Center.
This section contains the following topics:
•
Before you call
•
Support process
•
HP support by phone
•
Additional warranty options
Before you call
Visit the HP Web site (www.hp.com/support) for the latest troubleshooting information, or product
fixes and updates.
To assist our Customer Care Center representatives to serve you better, prepare the following
information if you need to call HP.
▲ If the HP Fax does not print, get the following information ready:
•
HP Fax model
•
Model number and serial number (check the back of the HP Fax)
Obtain HP telephone support
77
Appendix B
Support process
If you have a problem, follow these steps:
1. Check the documentation that came with the HP Fax.
2.
3.
Visit the HP online support Web site at www.hp.com/support. HP online support is available to
all HP customers. It is the fastest source for up-to-date HP Fax information and expert assistance
and includes the following features:
•
•
Fast access to qualified online support specialists
Valuable troubleshooting information for common problems
•
Proactive HP Fax updates, support alerts, and HP newsgrams that are available when you
register the HP Fax
Call HP support. Support options and availability vary by product, country/region, and language.
HP support by phone
This section contains the following topics:
•
•
Phone support period
Placing a call
•
After the phone support period
Phone support period
One year of phone support is available in North America, Asia Pacific, and Latin America (including
Mexico). For the most current list of telephone support numbers, go to www.hp.com/support.
Placing a call
Call HP support while you are in front of the HP Fax. Be prepared to provide the following information:
•
Model number (located on the label on the front of the HP Fax)
•
Serial number (located on the back or bottom of the HP Fax)
•
•
Messages that appear when the situation occurs
Answers to these questions:
◦
Has this situation happened before?
◦
◦
Can you re-create it?
Did anything else occur prior to this situation (such as a thunderstorm, HP Fax was moved,
etc.)?
After the phone support period
After the phone support period, help is available from HP at an additional cost. Help may also be
available at the HP online support Web site: www.hp.com/support. Contact your HP dealer or call
the support phone number for your country/region to learn more about support options.
Additional warranty options
Extended service plans are available for the HP Fax at additional costs. Go to www.hp.com/
support, select your country/region and language, then explore the services and warranty area for
information about the extended service plans.
Prepare the HP Fax for shipment
If after contacting HP Customer Support or returning to the point of purchase, you are requested to
send the HP Fax in for service, make sure you remove and keep the following items before returning
your HP Fax:
78
•
The print cartridges
•
The power cord and any other cable connected to the HP Fax
Support and warranty
•
Any paper loaded in the input tray
•
Remove any originals you might have loaded in the HP Fax
Pack the HP Fax
Complete the following steps after you have prepared the HP Fax for shipment.
To pack the HP Fax
1. If available, pack the HP Fax for shipment by using the original packaging materials, or use the
packaging materials that came with your replacement HP Fax.
If you do not have the original packaging materials, please use other adequate packaging
materials. Shipping damage caused by improper packaging and/or improper transportation is
not covered under the warranty.
2.
Place the return shipping label on the outside of the box.
3.
Include the following items in the box:
•
A complete description of symptoms for service personnel (samples of print quality problems
are helpful).
•
A copy of the sales slip or other proof of purchase to establish the warranty coverage period.
•
Your name, address, and a phone number where you can be reached during the day.
Pack the HP Fax
79
Appendix B
Warranty
HP product
Duration of limited warranty
Fax
1 year
Print or Ink cartridges
Until the HP ink is depleted or the “end of warranty” date printed
on the cartridge has been reached, whichever occurs first. This
warranty does not cover HP ink products that have been refilled,
remanufactured, refurbished, misused, or tampered with.
Accessories
1 year unless otherwise stated
A. Extent of limited warranty
1. Hewlett-Packard (HP) warrants to the end-user customer that the HP products specified above will be free from defects
in materials and workmanship for the duration specified above, which duration begins on the date of purchase by the
customer.
2. For software products, HP’s limited warranty applies only to a failure to execute programming instructions. HP does not
warrant that the operation of any product will be interrupted or error free.
3. HP's limited warranty covers only those defects that arise as a result of normal use of the product, and does not cover
any other problems, including those that arise as a result of:
a. Improper maintenance or modification;
b. Software, media, parts, or supplies not provided or supported by HP;
c. Operation outside the product's specifications;
d. Unauthorized modification or misuse.
4. For HP printer products, the use of a non-HP cartridge or a refilled cartridge does not affect either the warranty to the
customer or any HP support contract with the customer. However, if printer failure or damage is attributable to the use of
a non-HP or refilled cartridge or an expired ink cartridge, HP will charge its standard time and materials charges to
service the printer for the particular failure or damage.
5. If HP receives, during the applicable warranty period, notice of a defect in any product which is covered by HP's
warranty, HP shall either repair or replace the product, at HP's option.
6. If HP is unable to repair or replace, as applicable, a defective product which is covered by HP's warranty, HP shall,
within a reasonable time after being notified of the defect, refund the purchase price for the product.
7. HP shall have no obligation to repair, replace, or refund until the customer returns the defective product to HP.
8. Any replacement product may be either new or like-new, provided that it has functionality at least equal to that of the
product being replaced.
9. HP products may contain remanufactured parts, components, or materials equivalent to new in performance.
10. HP's Limited Warranty Statement is valid in any country where the covered HP product is distributed by HP. Contracts
for additional warranty services, such as on-site service, may be available from any authorized HP service facility in
countries where the product is distributed by HP or by an authorized importer.
B. Limitations of warranty
TO THE EXTENT ALLOWED BY LOCAL LAW, NEITHER HP NOR ITS THIRD PARTY SUPPLIERS MAKES ANY
OTHER WARRANTY OR CONDITION OF ANY KIND, WHETHER EXPRESS OR IMPLIED WARRANTIES OR
CONDITIONS OF MERCHANTABILITY, SATISFACTORY QUALITY, AND FITNESS FOR A PARTICULAR
PURPOSE.
C. Limitations of liability
1. To the extent allowed by local law, the remedies provided in this Warranty Statement are the customer's sole and
exclusive remedies.
2. TO THE EXTENT ALLOWED BY LOCAL LAW, EXCEPT FOR THE OBLIGATIONS SPECIFICALLY SET FORTH IN
THIS WARRANTY STATEMENT, IN NO EVENT SHALL HP OR ITS THIRD PARTY SUPPLIERS BE LIABLE FOR
DIRECT, INDIRECT, SPECIAL, INCIDENTAL, OR CONSEQUENTIAL DAMAGES, WHETHER BASED ON
CONTRACT, TORT, OR ANY OTHER LEGAL THEORY AND WHETHER ADVISED OF THE POSSIBILITY OF
SUCH DAMAGES.
D. Local law
1. This Warranty Statement gives the customer specific legal rights. The customer may also have other rights which vary
from state to state in the United States, from province to province in Canada, and from country to country elsewhere in
the world.
2. To the extent that this Warranty Statement is inconsistent with local law, this Warranty Statement shall be deemed
modified to be consistent with such local law. Under such local law, certain disclaimers and limitations of this Warranty
Statement may not apply to the customer. For example, some states in the United States, as well as some governments
outside the United States (including provinces in Canada), may:
a. Preclude the disclaimers and limitations in this Warranty Statement from limiting the statutory rights of a consumer
(e.g., the United Kingdom);
b. Otherwise restrict the ability of a manufacturer to enforce such disclaimers or limitations; or
c. Grant the customer additional warranty rights, specify the duration of implied warranties which the manufacturer
cannot disclaim, or allow limitations on the duration of implied warranties.
3. THE TERMS IN THIS WARRANTY STATEMENT, EXCEPT TO THE EXTENT LAWFULLY PERMITTED, DO NOT
EXCLUDE, RESTRICT, OR MODIFY, AND ARE IN ADDITION TO, THE MANDATORY STATUTORY RIGHTS
APPLICABLE TO THE SALE OF THE HP PRODUCTS TO SUCH CUSTOMERS.
HP Limited Warranty
Dear Customer,
You will find below the name and address of the HP entity responsible for the performance of the HP Limited Warranty in your
country.
You may have additional statutory rights against the seller based on your purchase agreement. Those rights are not
in any way affected by this HP Limited Warranty.
Ireland: Hewlett-Packard Ireland Ltd. 30 Herbert Street IRL-Dublin 2
United Kingdom: Hewlett-Packard Ltd, Cain Road, Bracknell, GB-Berks RG12 1HN
80
Support and warranty
C
Regulatory information
The HP Fax meets product requirements from regulatory agencies in your country/region.
This section contains the following topics:
FCC statement
•
•
Noise emission statement for Germany
•
•
Notice to users of the U.S. telephone network: FCC requirements
Notice to users of the Canadian telephone network
•
Notice to users in the European Economic Area
•
•
Regulatory model number
Environmental product stewardship program
•
Declaration of conformity
FCC statement
FCC statement
The United States Federal Communications Commission (in 47 CFR 15.105) has
specified that the following notice be brought to the attention of users of this product.
This equipment has been tested and found to comply with the limits for a Class B digital
device, pursuant to part 15 of the FCC Rules. Operation is subject to the following two
conditions: (1) this device may not cause harmful interference, and (2) this device must
accept any interference received, including interference that may cause undesired
operation. Class B limits are designed to provide reasonable protection against harmful
interference in a residential installation. This equipment generates, uses, and can radiate
radio frequency energy, and, if not installed and used in accordance with the instructions,
may cause harmful interference to radio communications. However, there is no
guarantee that interference will not occur in a particular installation. If this equipment
does cause harmful interference to radio or television reception, which can be
determined by turning the equipment off and on, the user is encouraged to try to correct
the interference by one or more of the following measures:
• Reorient the receiving antenna.
• Increase the separation between the equipment and the receiver.
• Connect the equipment into an outlet on a circuit different from that to which the
receiver is connected.
• Consult the dealer or an experienced radio/TV technician for help.
The user may find the following booklet prepared by the Federal Communications
Commission helpful: How to Identify and Resolve Radio-TV Interference Problems. This
booklet is available from the U.S. Government Printing Office, Washington DC, 20402.
Stock No. 004-000-00345-4.
CAUTION: Pursuant to Part 15.21 of the FCC Rules, any changes or modifications to
this equipment not expressly approved by the Hewlett-Packard Company, may cause
harmful interference and void the FCC authorization to operate this equipment.
FCC statement
81
Appendix C
Noise emission statement for Germany
Geräuschemission
LpA < 70 dB am Arbeitsplatz im Normalbetrieb nach DIN 45635 T. 19
Notice to users of the U.S. telephone network: FCC requirements
This equipment complies with Part 68 of the FCC rules and the requirements adopted by the ACTA.
On the back of this equipment is a label that contains, among other information, a product identifier
in the format US:AAAEQ##TXXXX. If requested, this number must be provided to the telephone
company.
The HP 3100 Fax series is provided with a RJ11C connector for connecting this product to the
telephone network. An additional RJ11C connector is provided for connecting an additional device
to the telephone network from the HP 3100 Fax series.
A plug and jack used to connect this equipment to the premises wiring and telephone network must
comply with the applicable FCC Part 68 rules and requirements adopted by the ACTA. A compliant
telephone cord and modular plug is provided with this product. It is designed to be connected to a
compatible modular jack that is also compliant. See installation instructions for details.
The REN is used to determine the number of devices that may be connected to a telephone line.
Excessive RENs on a telephone line may result in the devices not ringing in response to an incoming
call. In most but not all areas, the sum of RENs should not exceed five (5.0). To be certain of the
number of devices that may be connected to a line, as determined by the total RENs, contact the
local telephone company. For products approved after July 23, 2001, the REN for this product is part
of the product identifier that has the format US:AAAEQ##TXXXX. The digits represented by ## are
the REN without a decimal point (e.g., 03 is a REN of 0.3). For earlier products, the REN is separately
shown on the label.
If the HP 3100 Fax series causes harm to the telephone network, the telephone company will notify
you in advance that temporary discontinuance of service may be required. But if advance notice isn't
practical, the telephone company will notify the customer as soon as possible. Also, you will be
advised of your right to file a complaint with the FCC if you believe it is necessary.
The telephone company may make changes in its facilities, equipment, operations or procedures
that could affect the operation of the equipment. If this happens, the telephone company will provide
advance notice in order for you to make necessary modifications to maintain uninterrupted service.
There are no customer serviceable parts inside the HP 3100 Fax series. If trouble is experienced
with the HP 3100 Fax series, for repair or warranty information, please contact Hewlett-Packard
technical support by calling 866-331-9600. If you have Internet access, you can go to www.hp.com/
support for more information on the HP 3100 Fax series.
If the equipment is causing harm to the telephone network, the telephone company may request that
you disconnect the equipment until the problem is resolved.
Connection to party line service is subject to state tariffs. Contact the state public utility commission,
public service commission or corporation commission for information.
If your home has specially wired alarm equipment connected to the telephone line, ensure the
installation of HP 3100 Fax series does not disable your alarm equipment. If you have questions
about what will disable alarm equipment, consult your telephone company or a qualified installer.
This equipment is hearing aid compatible.
HP recommends the use of a Surge Suppressor when connecting the HP 3100 Fax series to AC
power. Use of a Surge Suppressor will help protect the HP 3100 Fax series and the telephone
network from abnormal surges on the AC powerline.
The Customer Information for facsimile (FAX) equipment must contain the following wording:
The Telephone Consumer Protection Act of 1991 makes it unlawful for any person to use a computer
or other electronic device, including FAX machines, to send any message unless such message
82
Regulatory information
clearly contains in a margin at the top or bottom of each transmitted page or on the first page of the
transmission, the date and time it is sent and an identification of the business or other entity, or other
individual sending the message and the telephone number of the sending machine or such business,
other entity, or individual. (The telephone number provided may not be a 900 number or any other
number for which charges exceed local or long-distance transmission charges.)
In order to program this information into your FAX machine, see Configure the fax header.
Automatic Dialers
WHEN PROGRAMMING EMERGENCY NUMBERS AND (OR) MAKING TEST CALLS TO
EMERGENCY NUMBERS:
1. Remain on the line and briefly explain to the dispatcher the reason for the call.
2. Perform such activities in the off-peak hours, such as early morning or late evenings.
Notice to users of the Canadian telephone network
Notice to users of the Canadian telephone network/Note à l’attention des
utilisateurs du réseau téléphonique Canadien
This product meets the applicable Industry Canada technical specifications/Le présent
materiel est conforme aux specifications techniques applicables d'Industrie Canada.
The Ringer Equivalence Number is an indication of the maximum number of devices
allowed to be connected to a telephone interface. The termination on an interface may
consist of any combination of devices subject only to the requirement that the sum of the
RENs of all the devices does not exceed five/L'indice d'équivalence de la sonnerie (IES)
sert à indiquer le nombre maximal de terminaux qui peuvent être raccordés à une
interface téléphonique. La terminaison d'une interface peut consister en une
combinaison quelconque de dispositifs, à la seule condition que la somme d'indices
d'équivalence de la sonnerie de tous les dispositifs n'excède pas 5.
Notice to users in the European Economic Area
Notice to users in the European Economic Area
This product is designed to be connected to the analog Switched Telecommunication
Networks (PSTN) of the European Economic Area (EEA) countries/regions.
Network compatibility depends on customer selected settings, which must be reset to use
the equipment on a telephone network in a country/region other than where the product
was purchased. Contact the vendor or Hewlett-Packard Company if additional product
support is necessary.
This equipment has been certified by the manufacturer in accordance with Directive
1999/5/EC (annex II) for Pan-European single-terminal connection to the public switched
telephone network (PSTN). However, due to differences between the individual PSTNs
provided in different countries, the approval does not, of itself, give an unconditional
assurance of successful operation on every PSTN network termination point.
In the event of problems, you should contact your equipment supplier in the first instance.
This equipment is designed for DTMF tone dialing and loop disconnect dialing. In the
unlikely event of problems with loop disconnect dialing, it is recommended to use this
equipment only with the DTMF tone dial setting.
Notice to users in the European Economic Area
83
Appendix C
Regulatory model number
For regulatory identification purposes, your product is assigned a Regulatory Model Number. The
Regulatory Model Number for your product is SNPRG-0702. This regulatory number should not be
confused with the marketing name (HP 3100 Fax series) or product number.
Environmental product stewardship program
Hewlett-Packard is committed to providing quality products in an environmentally sound manner.
Design for recycling has been incorporated into this product. The number of materials has been kept
to a minimum while ensuring proper functionality and reliability. Dissimilar materials have been
designed to separate easily. Fasteners and other connections are easy to locate, access, and
remove using common tools. High priority parts have been designed to access quickly for efficient
disassembly and repair.
For more information, visit HP’s Commitment to the Environment Web site at:
www.hp.com/hpinfo/globalcitizenship/environment/index.html
This section contains the following topics:
•
Paper use
•
•
Plastics
Material safety data sheets
•
Energy consumption
•
•
Recycling program
HP inkjet supplies recycling program
•
Disposal of waste equipment by users in private households in the European Union
Paper use
This product is suited for the use of recycled paper according to DIN 19309 and EN 12281:2002.
Plastics
Plastic parts over 25 grams are marked according to international standards that enhance the ability
to identify plastics for recycling purposes at the end of product life.
Material safety data sheets
Material safety data sheets (MSDS) can be obtained from the HP Web site at:
www.hp.com/go/msds
Energy consumption
This product is designed to reduce power consumption and save natural resources without
compromising product performance. It has been designed to reduce total energy consumption both
during operation and when the HP Fax is not active. Specific information on power consumption may
be found in the printed documentation that came with the HP Fax.
Recycling program
HP offers an increasing number of product return and recycling programs in many countries/regions,
and partners with some of the largest electronic recycling centers throughout the world. HP
conserves resources by reselling some of its most popular products. For more information regarding
recycling of HP products, please visit:
www.hp.com/hpinfo/globalcitizenship/environment/recycle/
HP inkjet supplies recycling program
HP is committed to protecting the environment. The HP Inkjet Supplies Recycling Program is
available in many countries/regions, and lets you recycle used print cartridges and ink cartridges
free of charge. For more information, go to the following Web site:
84
Regulatory information
www.hp.com/hpinfo/globalcitizenship/environment/recycle/
Environmental product stewardship program
85
Appendix C
86
English
Français
Deutsch
Italiano
Español
Eliminación de residuos de aparatos eléctricos y electrónicos por parte de usuarios domésticos en la Unión Europea
Este símbolo en el producto o en el embalaje indica que no se puede desechar el producto junto con los residuos domésticos. Por el contrario, si debe eliminar este tipo de residuo, es
responsabilidad del usuario entregarlo en un punto de recogida designado de reciclado de aparatos electrónicos y eléctricos. El reciclaje y la recogida por separado de estos residuos
en el momento de la eliminación ayudará a preservar recursos naturales y a garantizar que el reciclaje proteja la salud y el medio ambiente. Si desea información adicional sobre los
lugares donde puede dejar estos residuos para su reciclado, póngase en contacto con las autoridades locales de su ciudad, con el servicio de gestión de residuos domésticos o con la
tienda donde adquirió el producto.
Česky
Likvidace vysloužilého zařízení uživateli v domácnosti v zemích EU
Tato značka na produktu nebo na jeho obalu označuje, že tento produkt nesmí být likvidován prostým vyhozením do běžného domovního odpadu. Odpovídáte za to, že vysloužilé
zařízení bude předáno k likvidaci do stanovených sběrných míst určených k recyklaci vysloužilých elektrických a elektronických zařízení. Likvidace vysloužilého zařízení samostatným
sběrem a recyklací napomáhá zachování přírodních zdrojů a zajišťuje, že recyklace proběhne způsobem chránícím lidské zdraví a životní prostředí. Další informace o tom, kam můžete
vysloužilé zařízení předat k recyklaci, můžete získat od úřadů místní samosprávy, od společnosti provádějící svoz a likvidaci domovního odpadu nebo v obchodě, kde jste produkt
zakoupili.
Dansk
Bortskaffelse af affaldsudstyr for brugere i private husholdninger i EU
Dette symbol på produktet eller på dets emballage indikerer, at produktet ikke må bortskaffes sammen med andet husholdningsaffald. I stedet er det dit ansvar at bortskaffe affaldsudstyr
ved at aflevere det på dertil beregnede indsamlingssteder med henblik på genbrug af elektrisk og elektronisk affaldsudstyr. Den separate indsamling og genbrug af dit affaldsudstyr på
tidspunktet for bortskaffelse er med til at bevare naturlige ressourcer og sikre, at genbrug finder sted på en måde, der beskytter menneskers helbred samt miljøet. Hvis du vil vide mere
om, hvor du kan aflevere dit affaldsudstyr til genbrug, kan du kontakte kommunen, det lokale renovationsvæsen eller den forretning, hvor du købte produktet.
Nederlands
Afvoer van afgedankte apparatuur door gebruikers in particuliere huishoudens in de Europese Unie
Dit symbool op het product of de verpakking geeft aan dat dit product niet mag worden afgevoerd met het huishoudelijk afval. Het is uw verantwoordelijkheid uw afgedankte apparatuur
af te leveren op een aangewezen inzamelpunt voor de verwerking van afgedankte elektrische en elektronische apparatuur. De gescheiden inzameling en verwerking van uw afgedankte
apparatuur draagt bij tot het sparen van natuurlijke bronnen en tot het hergebruik van materiaal op een wijze die de volksgezondheid en het milieu beschermt. Voor meer informatie over
waar u uw afgedankte apparatuur kunt inleveren voor recycling kunt u contact opnemen met het gemeentehuis in uw woonplaats, de reinigingsdienst of de winkel waar u het product
hebt aangeschaft.
Eesti
Eramajapidamistes kasutuselt kõrvaldatavate seadmete käitlemine Euroopa Liidus
Kui tootel või toote pakendil on see sümbol, ei tohi seda toodet visata olmejäätmete hulka. Teie kohus on viia tarbetuks muutunud seade selleks ettenähtud elektri- ja elektroonikaseadmete
utiliseerimiskohta. Utiliseeritavate seadmete eraldi kogumine ja käitlemine aitab säästa loodusvarasid ning tagada, et käitlemine toimub inimeste tervisele ja keskkonnale ohutult.
Lisateavet selle kohta, kuhu saate utiliseeritava seadme käitlemiseks viia, saate küsida kohalikust omavalitsusest, olmejäätmete utiliseerimispunktist või kauplusest, kust te seadme
ostsite.
Suomi
Hävitettävien laitteiden käsittely kotitalouksissa Euroopan unionin alueella
Tämä tuotteessa tai sen pakkauksessa oleva merkintä osoittaa, että tuotetta ei saa hävittää talousjätteiden mukana. Käyttäjän velvollisuus on huolehtia siitä, että hävitettävä laite
toimitetaan sähkö- ja elektroniikkalaiteromun keräyspisteeseen. Hävitettävien laitteiden erillinen keräys ja kierrätys säästää luonnonvaroja. Näin toimimalla varmistetaan myös,
että kierrätys tapahtuu tavalla, joka suojelee ihmisten terveyttä ja ympäristöä. Saat tarvittaessa lisätietoja jätteiden kierrätyspaikoista paikallisilta viranomaisilta, jäteyhtiöiltä tai tuotteen
jälleenmyyjältä.
Ελληνικά
Απόρριψη άχρηστων συσκευών στην Ευρωπαϊκή Ένωση
Το παρόν σύμβολο στον εξοπλισμό ή στη συσκευασία του υποδεικνύει ότι το προϊόν αυτό δεν πρέπει να πεταχτεί μαζί με άλλα οικιακά απορρίμματα. Αντίθετα, ευθύνη σας είναι να
απορρίψετε τις άχρηστες συσκευές σε μια καθορισμένη μονάδα συλλογής απορριμμάτων για την ανακύκλωση άχρηστου ηλεκτρικού και ηλεκτρονικού εξοπλισμού. Η χωριστή συλλογή και
ανακύκλωση των άχρηστων συσκευών θα συμβάλει στη διατήρηση των φυσικών πόρων και στη διασφάλιση ότι θα ανακυκλωθούν με τέτοιον τρόπο, ώστε να προστατεύεται η υγεία των
ανθρώπων και το περιβάλλον. Για περισσότερες πληροφορίες σχετικά με το πού μπορείτε να απορρίψετε τις άχρηστες συσκευές για ανακύκλωση, επικοινωνήστε με τις κατά τόπους αρμόδιες
αρχές ή με το κατάστημα από το οποίο αγοράσατε το προϊόν.
Magyar
A hulladékanyagok kezelése a magánháztartásokban az Európai Unióban
Ez a szimbólum, amely a terméken vagy annak csomagolásán van feltüntetve, azt jelzi, hogy a termék nem kezelhető együtt az egyéb háztartási hulladékkal. Az Ön feladata,
hogy a készülék hulladékanyagait eljuttassa olyan kijelölt gyűjtőhelyre, amely az elektromos hulladékanyagok és az elektronikus berendezések újrahasznosításával foglalkozik.
A hulladékanyagok elkülönített gyűjtése és újrahasznosítása hozzájárul a természeti erőforrások megőrzéséhez, egyúttal azt is biztosítja, hogy a hulladék újrahasznosítása az
egészségre és a környezetre nem ártalmas módon történik. Ha tájékoztatást szeretne kapni azokról a helyekről, ahol leadhatja újrahasznosításra a hulladékanyagokat, forduljon
a helyi önkormányzathoz, a háztartási hulladék begyűjtésével foglalkozó vállalathoz vagy a termék forgalmazójához.
Latviski
Lietotāju atbrīvošanās no nederīgām ierīcēm Eiropas Savienības privātajās mājsaimniecībās
Šis simbols uz ierīces vai tās iepakojuma norāda, ka šo ierīci nedrīkst izmest kopā ar pārējiem mājsaimniecības atkritumiem. Jūs esat atbildīgs par atbrīvošanos no nederīgās ierīces,
to nododot norādītajā savākšanas vietā, lai tiktu veikta nederīgā elektriskā un elektroniskā aprīkojuma otrreizējā pārstrāde. Speciāla nederīgās ierīces savākšana un otrreizējā pārstrāde
palīdz taupīt dabas resursus un nodrošina tādu otrreizējo pārstrādi, kas sargā cilvēku veselību un apkārtējo vidi. Lai iegūtu papildu informāciju par to, kur otrreizējai pārstrādei var
nogādāt nederīgo ierīci, lūdzu, sazinieties ar vietējo pašvaldību, mājsaimniecības atkritumu savākšanas dienestu vai veikalu, kurā iegādājāties šo ierīci.
Lietuviškai
Europos Sąjungos vartotojų ir privačių namų ūkių atliekamos įrangos išmetimas
Šis simbolis ant produkto arba jo pakuotės nurodo, kad produktas negali būti išmestas kartu su kitomis namų ūkio atliekomis. Jūs privalote išmesti savo atliekamą įrangą atiduodami ją
į atliekamos elektronikos ir elektros įrangos perdirbimo punktus. Jei atliekama įranga bus atskirai surenkama ir perdirbama, bus išsaugomi natūralūs ištekliai ir užtikrinama, kad įranga
yra perdirbta žmogaus sveikatą ir gamtą tausojančiu būdu. Dėl informacijos apie tai, kur galite išmesti atliekamą perdirbti skirtą įrangą kreipkitės į atitinkamą vietos tarnybą, namų ūkio
atliekų išvežimo tarnybą arba į parduotuvę, kurioje pirkote produktą.
Utylizacja zużytego sprzętu przez użytkowników domowych w Unii Europejskiej
Symbol ten umieszczony na produkcie lub opakowaniu oznacza, że tego produktu nie należy wyrzucać razem z innymi odpadami domowymi. Użytkownik jest odpowiedzialny za
dostarczenie zużytego sprzętu do wyznaczonego punktu gromadzenia zużytych urządzeń elektrycznych i elektronicznych. Gromadzenie osobno i recykling tego typu odpadów
przyczynia się do ochrony zasobów naturalnych i jest bezpieczny dla zdrowia i środowiska naturalnego. Dalsze informacje na temat sposobu utylizacji zużytych urządzeń można
uzyskać u odpowiednich władz lokalnych, w przedsiębiorstwie zajmującym się usuwaniem odpadów lub w miejscu zakupu produktu.
Português
Smaltimento di apparecchiature da rottamare da parte di privati nell'Unione Europea
Questo simbolo che appare sul prodotto o sulla confezione indica che il prodotto non deve essere smaltito assieme agli altri rifiuti domestici. Gli utenti devono provvedere allo
smaltimento delle apparecchiature da rottamare portandole al luogo di raccolta indicato per il riciclaggio delle apparecchiature elettriche ed elettroniche. La raccolta e il riciclaggio
separati delle apparecchiature da rottamare in fase di smaltimento favoriscono la conservazione delle risorse naturali e garantiscono che tali apparecchiature vengano rottamate
nel rispetto dell'ambiente e della tutela della salute. Per ulteriori informazioni sui punti di raccolta delle apparecchiature da rottamare, contattare il proprio comune di residenza,
il servizio di smaltimento dei rifiuti locale o il negozio presso il quale è stato acquistato il prodotto.
Descarte de equipamentos por usuários em residências da União Européia
Este símbolo no produto ou na embalagem indica que o produto não pode ser descartado junto com o lixo doméstico. No entanto, é sua responsabilidade levar os equipamentos
a serem descartados a um ponto de coleta designado para a reciclagem de equipamentos eletro-eletrônicos. A coleta separada e a reciclagem dos equipamentos no momento do
descarte ajudam na conservação dos recursos naturais e garantem que os equipamentos serão reciclados de forma a proteger a saúde das pessoas e o meio ambiente. Para obter mais
informações sobre onde descartar equipamentos para reciclagem, entre em contato com o escritório local de sua cidade, o serviço de limpeza pública de seu bairro ou a loja em que
adquiriu o produto.
Slovenčina
Entsorgung von Elektrogeräten durch Benutzer in privaten Haushalten in der EU
Dieses Symbol auf dem Produkt oder dessen Verpackung gibt an, dass das Produkt nicht zusammen mit dem Restmüll entsorgt werden darf. Es obliegt daher Ihrer Verantwortung, das
Gerät an einer entsprechenden Stelle für die Entsorgung oder Wiederverwertung von Elektrogeräten aller Art abzugeben (z.B. ein Wertstoffhof). Die separate Sammlung und das
Recyceln Ihrer alten Elektrogeräte zum Zeitpunkt ihrer Entsorgung trägt zum Schutz der Umwelt bei und gewährleistet, dass sie auf eine Art und Weise recycelt werden, die keine
Gefährdung für die Gesundheit des Menschen und der Umwelt darstellt. Weitere Informationen darüber, wo Sie alte Elektrogeräte zum Recyceln abgeben können, erhalten Sie bei
den örtlichen Behörden, Wertstoffhöfen oder dort, wo Sie das Gerät erworben haben.
Postup používateľov v krajinách Európskej únie pri vyhadzovaní zariadenia v domácom používaní do odpadu
Tento symbol na produkte alebo na jeho obale znamená, že nesmie by vyhodený s iným komunálnym odpadom. Namiesto toho máte povinnos odovzda toto zariadenie na zbernom
mieste, kde sa zabezpečuje recyklácia elektrických a elektronických zariadení. Separovaný zber a recyklácia zariadenia určeného na odpad pomôže chráni prírodné zdroje a
zabezpečí taký spôsob recyklácie, ktorý bude chráni ľudské zdravie a životné prostredie. Ďalšie informácie o separovanom zbere a recyklácii získate na miestnom obecnom úrade,
vo firme zabezpečujúcej zber vášho komunálneho odpadu alebo v predajni, kde ste produkt kúpili.
Slovenščina
Évacuation des équipements usagés par les utilisateurs dans les foyers privés au sein de l'Union européenne
La présence de ce symbole sur le produit ou sur son emballage indique que vous ne pouvez pas vous débarrasser de ce produit de la même façon que vos déchets courants.
Au contraire, vous êtes responsable de l'évacuation de vos équipements usagés et, à cet effet, vous êtes tenu de les remettre à un point de collecte agréé pour le recyclage des
équipements électriques et électroniques usagés. Le tri, l'évacuation et le recyclage séparés de vos équipements usagés permettent de préserver les ressources naturelles et de s'assurer
que ces équipements sont recyclés dans le respect de la santé humaine et de l'environnement. Pour plus d'informations sur les lieux de collecte des équipements usagés, veuillez contacter
votre mairie, votre service de traitement des déchets ménagers ou le magasin où vous avez acheté le produit.
Ravnanje z odpadno opremo v gospodinjstvih znotraj Evropske unije
Ta znak na izdelku ali embalaži izdelka pomeni, da izdelka ne smete odlagati skupaj z drugimi gospodinjskimi odpadki. Odpadno opremo ste dolžni oddati na določenem zbirnem
mestu za recikliranje odpadne električne in elektronske opreme. Z ločenim zbiranjem in recikliranjem odpadne opreme ob odlaganju boste pomagali ohraniti naravne vire in zagotovili,
da bo odpadna oprema reciklirana tako, da se varuje zdravje ljudi in okolje. Več informacij o mestih, kjer lahko oddate odpadno opremo za recikliranje, lahko dobite na občini,
v komunalnem podjetju ali trgovini, kjer ste izdelek kupili.
Svenska
Disposal of Waste Equipment by Users in Private Households in the European Union
This symbol on the product or on its packaging indicates that this product must not be disposed of with your other household waste. Instead, it is your responsibility to dispose of your waste
equipment by handing it over to a designated collection point for the recycling of waste electrical and electronic equipment. The separate collection and recycling of your waste equipment
at the time of disposal will help to conserve natural resources and ensure that it is recycled in a manner that protects human health and the environment. For more information about where
you can drop off your waste equipment for recycling, please contact your local city office, your household waste disposal service or the shop where you purchased the product.
Polski
Disposal of waste equipment by users in private households in the European Union
Kassering av förbrukningsmaterial, för hem- och privatanvändare i EU
Produkter eller produktförpackningar med den här symbolen får inte kasseras med vanligt hushållsavfall. I stället har du ansvar för att produkten lämnas till en behörig återvinningsstation
för hantering av el- och elektronikprodukter. Genom att lämna kasserade produkter till återvinning hjälper du till att bevara våra gemensamma naturresurser. Dessutom skyddas både
människor och miljön när produkter återvinns på rätt sätt. Kommunala myndigheter, sophanteringsföretag eller butiken där varan köptes kan ge mer information om var du lämnar
kasserade produkter för återvinning.
Regulatory information
Declaration of conformity
DECLARATION OF CONFORMITY
according to ISO/IEC 17050-1 and EN 17050-1
DoC #: SNPRG-0702
Supplier's Name:
Supplier's Address:
Hewlett-Packard Company
Emerging Markets, Fax & OEM Division
61 Alexandra Terrace
#08-01 Harbour Link
Singapore 119936
Declares, that the product:
Product Name and Model:
HP 3100 Fax (CB820A) series
Regulatory Model Number:
SNPRG-0702
Product Options:
All
conforms to the following Product Specifications and Regulations:
EMC: Class B
FCC Part 15 Subpart B
EN 55022 : 1998 +A1:2000 +A2:2003
EN 55024 : 1998 +A1:2001 +A2:2003
EN 61000-3-2:2000 +A2:2005
EN 61000-3-3:1995 +A1:2001
Safety:
UL 60950-1
CAN/CSA-C22.2 No. 60950-1-03, First Edition.
EN 60950-1:2001
IEC 60950-1:2001
Telecom:
FCC Part 68 and TIA-968-A-1 + A-2 + A-3 standard
IC CS-03 standard (Issue 9)
ES 203 021
TBR21:1998
This device complies with part 15 of the FCC Rules. Operation is subject to the following two conditions: (1) This
device may not cause harmful interference, and (2) this device must accept any interference received, including
interference that may cause undesired operation.
The product herewith complies with the requirements of the Low Voltage Directive 2006/95/EC, the EMC Directive
2004/108/EC and the R&TTE Directive 99/5/EC, and carries the CE-marking accordingly.
Additional Information:
This product is assigned a Regulatory Model Number which stays with the regulatory aspects of the design. The
Regulatory Model Number is the main product identifier in the regulatory documentation and test reports, this
number should not be confused with the marketing name or the product numbers.
Manager
Local contact for regulatory topics only:
U.S.:
Hewlett –Packard, 3000 Hanover St., Palo Alto 94304, U.S.A. 650-857-1501
EMEA:
Hewlett –Packard GmbH, HQ-TRE, Herrenberger Strasse 140, 71034 Boeblingen, Germany
Declaration of conformity
87
Index
A
A4 paper, load 8
acoustic emissions 75
ADF (automatic document
feeder)
capacity 10
media sizes supported 21
administrator
settings 44
after the support period 78
align print cartridges 55
answer ring pattern
change 36
answering machine
fax tones recorded 69
attention light 7
automatic document feeder
(ADF)
capacity 10
media sizes supported 21
automatic fax reduction 33
B
Back button 7
backup fax reception 30
baud rate 37
best copy quality 41
black and white pages
copy 39
fax 22
black dots or streaks,
troubleshoot
copies 65
blank pages, troubleshoot
copy 63
print 61
blocked fax numbers
set up 33
broadcast faxing
send 25
buttons, control panel 7
C
cancel
button 8
88
copy 43
scheduled fax 25
capacity
ADF 10
trays 21
cartridges. See print cartridges
clean
exterior 61
fax 59
glass strip 59
print cartridge contacts 56
print cartridge ink nozzle
area 57
print cartridges 55
white strip 60
color
copies 43
fax 26
color copy 39
colors
bleeding 62
confirmation reports, fax 44
connectors, locating 6
contrast, fax 28
control panel
buttons 7
copy from 39
enter text and symbols 17
lights 7
locating 6
menus 16
messages 16
reports 7
send faxes 12
settings, change 11
copy
button 8
cancel 43
enhance light areas 43
from the control panel 39
images/embedded pictures,
enhance 42
legal to letter 42
number of copies 40
paper size 40
paper types,
recommended 40
quality 41, 64
reduce 42
settings 39
specifications 74
speed 41
text, enhance 42
troubleshoot 63
Copy menu 16
correct port test, fax 48
critical error messages 17
customer support
electronic 77
phone support 77
warranty 78
D
dark images, troubleshoot
copies 65
darken
copies 42
faxes 28
Declaration of Conformity
(DOC) 87
default settings
control panel 11
copy 39
fax 28
deleting faxes from memory 31
dial tone test, failure 49
dial type, setting 36
distinctive ringing
change 36
documentation 5
dots or streaks, troubleshoot
copies 65
duty cycle 74
E
ECM. See error correction mode
electrical specifications 75
enhance
copy, images/embeded
pictures 42
environmental specifications 75
Index
environmental sustainability
program 84
error correction mode 29
error messages
control panel 16
error reports, fax 45
error-correction mode, fax 36
F
faded copies 64
faded stripes on copies,
troubleshoot 65
fast copy quality 41
fax
answer mode 8, 12
answering machine
troubleshoot 69
backup fax reception 30
blocking numbers 33
button 8
clean 59
confirmation reports 44
contrast 28
darken or lighten 28
default settings 28
deleting from memory 31
dial tone test, failed 49
dial type, setting 36
distinctive ringing, change
pattern 36
enter text and symbols 17
error correction mode 29
error reports 45
error-correction mode 36
forwarding 32
header 35
images/embedded
pictures 26
Internet, over 38
lighten or darken 28
line condition test, failed 50
log, print 45
manual receive 29
monitor dialing 24, 25
paper size 32
parallel phone systems 13
pause 17
phone cord connection test,
failed 48
phone cord too short 69
phone cord type test,
failed 49
poll to receive 31
receive 29
receive, troubleshoot 66, 67
redial options 37
reduction 33
reports 44
reprint 31
resolution 27
rings to answer 35
schedule 25
send 22
send, troubleshoot 66, 67,
69
set up 12
settings 27
settings, change 35
specifications 75
speed 37
speed-dial entries, set
up 19
speed-dial groups, set
up 19
test failed 46
test setup 46
troubleshoot 65
wall jack test, failed 47
Fax menu 16
fax port, locating 6
Fax Resolution 7
fit to page 41
FoIP 38
fonts supported 74
forwarding faxes 32
G
glass strip
clean 59
grainy or white bands on copies,
troubleshoot 65
graphics
incompletely filled on
copies 65
missing lines or dots 62
groups, speed-dial
set up 19
H
hardware, fax setup test 47
header, fax 35
help 77
see also customer support
Hewlett-Packard Company
notices 3
humidity specifications 75
I
image/embedded picture
fax 26
image/embedded pictures
enhance copies 43
Internet
fax, using 38
J
jams
media to avoid 20
jams, paper 72
jobs
settings 11
junk fax mode 33
K
keypad 8
keypad, control panel
enter text and symbols 17
L
language, HP Fax 74
left arrow 8
legal paper
copy 40
load 8
letter paper
copy 40
load 8
light images, troubleshoot
copies 65
lighten
copies 42
faxes 28
Lighter/Darker 7
lights, control panel 7
line condition test, fax 50
lines
copies, troubleshoot 65
load
A4 paper 8
full-size paper 8
legal paper 8
letter paper 8
originals in ADF (automatic
document feeder) 10
89
log, fax
print 45
M
maintenance
align print cartridges 55
clean glass strip 59
clean print cartridges 55
clean white strip 60
replace print cartridges 52
manual faxing
receive 29
send 22, 24
margins
setting, specifications 21
media
ADF capacity 10
HP, order 73
selecting 20
skewed pages 63
specifications 21
supported sizes 21
troubleshoot feeding 63
types and weights
supported 21
memory
deleting faxes 31
reprint faxes 31
save faxes 30
specifications 74
menus, control panel 16
missing lines or dots,
troubleshoot 62
monitor dialing 24, 25
multi-feeds, troubleshoot 63
N
noise information 75
normal copy quality 41
number of copies 40
O
OK button 8
one-touch speed dial buttons 8
operating environment
specifications 75
originals
load ADF (automatic
document feeder) 10
output tray
locating 6
90
P
packing the HP Fax 79
pages per month (duty
cycle) 74
paper
jams 71, 72
legal to letter copy 42
recommended copy
types 40
size, set for fax 32
paper size
copy setting 40
paper-feed problems,
troubleshoot 63
parallel phone systems
countries/regions with 13
PCL 3 support 74
phone cord
connected to correct port
test failed 48
correct type test failed 49
extend 69
phone customer support 77
phone line, answer ring
pattern 36
phone support 78
phone support period
period for support 78
phone, fax from
receive 29
send, 22
photo media
guidelines 20
photo paper
copy 40
poll to receive fax 31
power
specifications 75
troubleshoot 61
power input, locating 6
print
fax logs 45
fax reports 44
faxes 31
speed-dial entries 20
troubleshoot 61
print cartridges
align 55
clean 55
clean contacts 56
clean ink nozzle area 57
handle 52
order online 73
part names 52
part numbers 51, 73
replace 52
supported 74
yields 74
print quality
troubleshoot 62
processor specifications 74
pulse dialing 36
Q
quality, copy 41
quality, troubleshoot
copy 64
print 62
R
rear access panel
illustration 6
receive faxes
answer mode 12
automatically 29
blocking numbers 33
forwarding 32
manually 29
polling 31
rings to answer 35
troubleshoot 66, 67
recycle
ink cartridges 84
redial options, setting 37
Redial/Pause 8
reduce fax 33
reduce/enlarge copies
resize to fit letter 42
resize to fit letter or A4 41
regulatory information 81
regulatory model number 84
replace print cartridges 52
reports
confirmation, fax 44
conrol panel button 7
error, fax 45
fax test failed 46
reprint
faxes from memory 31
resolution, fax 27
right arrow 8
rings to answer 35
Index
S
save
default settings 11
faxes in memory 30
scan glass
clean strip 59
schedule fax 25
send faxes
basic fax 11
color fax 26
manually 22
memory, from 24
monitor dialing 24, 25
schedule 25
troubleshoot 66, 67, 69
serial phone systems
countries/regions with 13
settings
administrator 44
control panel 11
copy 39
fax 27
speed, fax 37
setup
button 8
distinctive ringing 36
fax 12
fax, with parallel phone
systems 13
test fax 46
troubleshoot 70
setup poster 5
shipping the HP Fax 78
size
troubleshoot copy 64
skew, troubleshoot
copy 65
print 63
sound pressure 75
specifications
acoustic emissions 75
electrical 75
media 21
operating environment 75
physical 73
processor and memory 74
storage environment 75
speed
copy 41
Speed Dial
button 7
speed dial
fax numbers, set up 19
groups, set up 19
one-touch buttons 8
print and view 20
send fax 11
status
messages 16
storage environment
specifications 75
streaks, troubleshoot
copies 65
subscriber identification
code 35
supplies
order online 73
yields 74
support. See customer support
support process 78
symbols, enter 17
T
technical information
copy specifications 74
fax specifications 75
telephone customer support 77
telephone line, answer ring
pattern 36
telephone wall jack, fax 47
telephone, fax from
receive 29
send 22
temperature specifications 75
tests, fax
dial tone, failed 49
failed 46
fax line condition 50
fax phone cord type test
failed 49
hardware, failed 47
port connection, failed 48
setup 46
telephone wall jack 47
text
enhance on copies 42
enter from control panel 17
incompletely filled on
copies 65
splotchy on copies 65
troubleshoot 62
unclear on copies,
troubleshoot 65
tone dialing 36
transparencies
copy 40
trays
capacities 21
locating 6
media sizes supported 21
media types and weights
supported 21
paper guides illustration 6
troubleshoot feeding 63
troubleshoot
answering machines 69
blank pages printed 61
bleeding colors 62
control panel messages 16
copy 63
copy quality 64
fax 65
fax dial tone test failed 49
fax hardware test failed 47
fax line test failed 50
fax phone cord connection
test failed 48
fax phone cord type test
failed 49
fax tests 46
fax wall jack test, failed 47
jams, paper 72
media not picked up from
tray 63
missing lines or dots 62
multiple pages are
picked 63
paper-feed problems 63
power 61
print 61
print quality 62
receive faxes 66, 67
send faxes 66, 67, 69
setup 70
skewed copies 65
skewed pages 63
tips 61
V
vertical stripes on copies,
troubleshoot 65
view
speed-dial entries 20
voltage specifications 75
W
wall jack test, fax 47
warning messages 16
91
warranty 78
Web sites
customer support 77
environmental programs 84
order supplies 73
supply yield data sheet 74
white bands or stripes,
troubleshoot
copies 65
white strip, clean 60
92
© 2008 Hewlett-Packard Development Company, L.P.
www.hp.com
Printed in Germany
*CB820-90001*
*CB820-90001*
CB820-90001