1
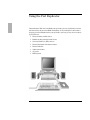
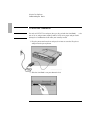
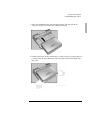
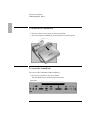
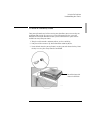
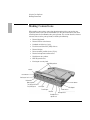
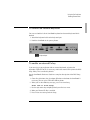
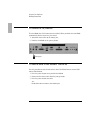
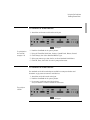
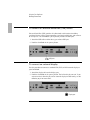
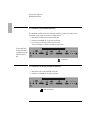
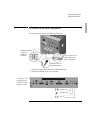
HP F1381A Port Replicator
for the HP OmniBook 3000
User’s Guide
1-1
For other Service and User Manuals, go to www.ManualDepot.com
Notice
This manual and any examples contained herein are provided “as is” and are
subject to change without notice. Hewlett-Packard Company makes no warranty of
any kind with regard to this manual, including, but not limited to, the implied
warranties of merchantability and fitness for a particular purpose. Hewlett-Packard
Co. shall not be liable for any errors or for incidental or consequential damages in
connection with the furnishing, performance, or use of this manual or the examples
herein.
Consumer transactions in Australia and the United Kingdom: The above disclaimers
and limitations shall not apply to Consumer transactions in Australia and the United
Kingdom and shall not affect the statutory rights of Consumers.
© Copyright Hewlett-Packard Company 1997. All rights reserved. Reproduction,
adaptation, or translation of this manual is prohibited without prior written
permission of Hewlett-Packard Company, except as allowed under the copyright
laws.
The programs that control this product are copyrighted and all rights are reserved.
Reproduction, adaptation, or translation of those programs without prior written
permission of Hewlett-Packard Co. is also prohibited.
Portions of the programs that control this product may also be copyrighted by
Microsoft Corporation, SystemSoft Corp., Crystal Semiconductor Corporation,
Phoenix, and Neo Magic. See the individual programs for additional copyright
notices.
Microsoft, MS, MS-DOS, and Windows are registered trademarks of Microsoft
Corporation.
Pentium and the Intel Inside logo are U.S. registered trademarks and MMX is a U.S.
trademark of Intel Corporation.
For warranty information, see the Support and Service booklet.
Hewlett-Packard Company
Mobile Computing Division
19310 Pruneridge Ave.
Cupertino, CA 95014
1-2
HP Software Product License Agreement
Your HP OmniBook PC contains factory-installed software programs. Please read
the Software License Agreement before proceeding.
Carefully read this License Agreement before proceeding to operate this
equipment. Rights in the software are offered only on the condition that the
customer agrees to all terms and conditions of the License Agreement.
Proceeding to operate the equipment indicates your acceptance of these
terms and conditions. If you do not agree with the terms of the License
Agreement, you must now either remove the software from your hard disk
drive and destroy the master disks, or return the complete computer and
software for a full refund.
Proceeding with configuration signifies your acceptance of the License Terms.
Unless otherwise stated below, this HP Software Product License Agreement
shall govern the use of all software that is provided to you, the customer, as
part of the HP computer product. It shall supersede any non -HP software
license terms that may be found online, or in any documentation or other
materials contained in the computer product packaging.
Note: Operating System Software by Microsoft is licensed to you under the
Microsoft End User License Agreement (EULA) contained in the Microsoft
documentation.
The following License Terms govern the use of the software:
Use. Customer may use the software on any one computer. Customer may not
network the software or otherwise use it on more than one computer. Customer
may not reverse assemble or decompile the software unless authorized by law.
Copies and Adaptations. Customer may make copies or adaptations of the
software (a) for archival purposes or (b) when copying or adaptation is an essential
step in the use of the software with a computer so long as the copies and
adaptations are used in no other manner.
Ownership. Customer agrees that he/she does not have any title or ownership of
the software, other than ownership of the physical media. Customer acknowledges
and agrees that the software is copyrighted and protected under the copyright laws.
Customer acknowledges and agrees that the software may have been developed by
a third party software supplier named in the copyright notices included with the
software, who shall be authorized to hold the Customer responsible for any
copyright infringement or violation of this Agreement.
Product Recovery CD -ROM. If your computer was shipped with a product
recovery CD-ROM: (i) The product recovery CD-ROM and/or support utility software
may only be used for restoring the hard disk drive of the HP computer with which
1-3
the product recovery CD-ROM was originally provided. (ii) The use of any operating
system software by Microsoft contained in any such product recovery CD-ROM shall
be governed by the Microsoft End User License Agreement (EULA).
Transfer of Rights in Software. Customer may transfer rights in the software to a
third party only as part of the transfer of all rights and only if Customer obtains the
prior agreement of the third party to be bound by the terms of this License
Agreement. Upon such a transfer, Customer agrees that his/her rights in the software
are terminated and that he/she will either destroy his/her copies and adaptations or
deliver them to the third party.
Sublicensing and Distribution. Customer may not lease, sublicense the software or
distribute copies or adaptations of the software to the public in physical media or
by telecommunication without the prior written consent of Hewlett-Packard.
Termination. Hewlett-Packard may terminate this software license for failure to
comply with any of these terms provided Hewlett-Packard has requested Customer
to cure the failure and Customer has failed to do so within thirty (30) days of such
notice.
Updates And Upgrades. Customer agrees that the software does not include
updates and upgrades which may be available from Hewlett-Packard under a
separate support agreement.
Export Clause. Customer agrees not to export or re-export the software or any copy
or adaptation in violation of the U.S. Export Administration regulations or other
applicable regulation.
U.S. Government Restricted Rights. Use, duplication, or disclosure by the U.S.
Government is subject to restrictions as set forth in subparagraph (c)(1)(ii) of the
Rights in Technical Data and Computer Software clause in DFARS 252.227-7013.
Hewlett-Packard Company, 3000 Hanover Street, Palo Alto, CA 94304 U.S.A. Rights
for non-DOD U.S. Government Departments and Agencies are as set forth in FAR
52.227-19(c)(1,2).
Edition History
Edition 1 ........................................ September 1997
This manual is printed on recycled paper.
1-4
Contents
1. Using the Port Replicator .............................. 1-7
Understanding the Basics .............................. 1-9
To dock the OmniBook ..............................1-10
To undock the OmniBook ............................1-12
To reset the OmniBook ..............................1-12
To attach a security cable ............................1-13
Making Connections ..................................1-14
To connect an external keyboard .......................1-15
To enable an external Fn key ..........................1-15
To connect a PS/2 mouse ............................1-16
To switch back to the internal TouchPad..................1-16
To connect a serial mouse ............................1-17
To connect a serial device ............................1-17
To connect a Universal Serial Bus (USB) device .............1-18
To connect an external display ........................1-18
To use the monitor stand with an external display ...........1-19
To enable the built-in and external displays ................1-19
To connect a parallel device ..........................1-20
To connect a MIDI/Joystick device ......................1-20
To connect your audio equipment ......................1-21
2. Troubleshooting.................................... 1-23
Solving Problems ....................................1-25
3. Specifications and Regulatory Information ............... 1-27
Specifications.......................................1-29
Regulatory Information ................................1-30
U.S.A. ..........................................1-30
Canada .........................................1-31
Japan ..........................................1-31
Declaration of Conformity ............................1-32
1-5
1
Using the Port Replicator
1-7
Using the Port Replicator
Congratulations! With the OmniBook port replicator, you can significantly increase
the convenience of your OmniBook for desktop use. By making one connection—
plugging your OmniBook into the port replicator—you can get easy access to these
types of devices:
♦
Printer or other parallel device.
♦
Modem or other standard serial device.
♦
Universal Serial Bus (USB) devices.
♦
External keyboard and external mouse.
♦
External monitor.
♦
Audio connections.
♦
AC power.
♦
MIDI/Joystick.
1-8
Using the Port Replicator
Understanding the Basics
Understanding the Basics
Docking the OmniBook to the port replicator is just like simultaneously adding
several devices to the OmniBook. Docking does not cause Windows 95 to create a
new hardware profile. Similarly, undocking does not create an undocked profile.
This section shows you how to get your port replicator and OmniBook up and
running quickly, including how to
♦
Dock the OmniBook.
♦
Undock the OmniBook.
♦
Reset the OmniBook while docked.
♦
Attach a security cable.
1-9
Using the Port Replicator
Understanding the Basics
To dock the OmniBook
CAUTION
Use only an HP F1377A ac adapter (the type shipped with the OmniBook)
—do
not use an ac adapter from another product. Using an improper adapter could
damage the OmniBook and will make your warranty invalid.
1. Plug the power cord into the ac adapter, then into an ac outlet. Plug the ac
adapter into the port replicator.
2. Slide the OmniBook's rear port door to the left.
1-10
Using the Port Replicator
Understanding the Basics
3. Place the OmniBook on the port replicator platform, with the back of the
computer facing the port replicator's docking connector.
4. Position your fingers on the platform grips as shown below. Use your thumbs to
push the computer firmly toward the port replicator until the OmniBook slides
into place.
1-11
Using the Port Replicator
Understanding the Basics
To undock the OmniBook
1. Raise the release lever at the top of the port replicator.
2. After removing the OmniBook, push the release lever back into place.
To reset the OmniBook
You can reset the OmniBook without undocking.
• Press the reset button on the port replicator.
The OmniBook restarts automatically after resetting.
Reset button
1-12
Using the Port Replicator
Understanding the Basics
To attach a security cable
Your port replicator has a built-in security port that allows you to secure the port
replicator with a cable. Be sure to use a second Kensington lock to secure the
OmniBook. Kensington MicroSaver lock systems work with these ports and are
available at many computer stores.
1. Wrap the cable around a stationary object, such as a table leg.
2. Loop the cable to create a slip knot around the stationary object.
3. Insert the lock into the port replicator’s security port and release the key. Store
the key in a safe place away from the OmniBook.
Second Kensington lock
secures the OmniBook.
1-13
Using the Port Replicator
Making Connections
Making Connections
When making connections, notice that the orientation of the ports on the port
replicator are the reverse of the OmniBook. Turn the connector cables over when
switching from the OmniBook to the port replicator. This section describes how to
connect devices to the port replicator, including the following:
♦
External keyboard.
♦
External PS/2 or serial mouse.
♦
Standard serial device (9-pin).
♦
Two Universal Serial Bus (USB) devices.
♦
External display.
♦
Printer or other parallel device (25-pin).
♦
External microphone audio source.
♦
Headphones or speakers.
♦
MIDI or game device.
♦
Kensington security lock.
Amplified speakers
Mouse
Reset button
Kensington lock
Keyboard
Power button
MIDI/Joystick
Two Universal Serial
Serial port
Bus (USB) ports
AC adapter
Parallel port
Monitor
Audio line-in
Microphone-in
Headphones or
speaker-out
1-14
Using the Port Replicator
Making Connections
To connect an external keyboard
You can use both the built-in OmniBook keyboard and external keyboard while
docked.
1. Attach the keyboard cable to the keyboard port.
2. Dock the OmniBook in the port replicator.
Keyboard port
To enable an external Fn key
If you are using a port replicator with an external keyboard, substitute the
keystrokes CTRL+ALT for Fn. If necessary, enable the external Fn key from the BIOS
Setup Utility. This is enabled by default.
See the OmniBook's Reference Guide for a complete description of the BIOS Setup
Utility.
1. Close all applications, then shut down Windows and reboot the OmniBook. If
necessary, you can press CTRL+ALT+DEL to reboot.
2. When you see the following message, press F2 to enter Setup.
Press <F2> to enter Setup
3. Use the right arrow key to highlight the System Devices menu.
4. Make sure External Fn Key is enabled.
5. Press F10 to save settings and exit Setup.
1-15
Using the Port Replicator
Making Connections
To connect a PS/2 mouse
The OmniBook has a PS/2 mouse driver installed. When you dock, the OmniBook
automatically detects and sets up the mouse.
1. Attach the mouse cable to the mouse port.
2. Dock the OmniBook in the port replicator.
Mouse port
To switch back to the internal TouchPad
Use this procedure to switch back to the built-in TouchPad from an external PS/2
mouse while docked.
1. Press the power button to suspend the OmniBook
2. Disconnect the mouse cable from the port replicator.
3. Press the power button to resume.
--or-Undock, disconnect mouse, then dock again.
1-16
Using the Port Replicator
Making Connections
To connect a serial mouse
1. Attach the serial mouse cable to the serial port.
Serial port
To switch back to
the TouchPad,
see page 1-16.
2. Dock the OmniBook in the port replicator.
3. Using the TouchPad, click Start, Settings, Control Panel, Mouse, General.
4. Click Change, then select Standard Mouse Types.
5. Select your mouse type from the list, or select Standard Serial Mouse.
6. Click OK, Close, then click Yes when prompted to restart.
To connect a serial device
Use standard serial cables and adapters available at computer dealers and
electronic supply stores to connect serial devices.
1. Attach the serial cable to the serial port.
2. Dock the OmniBook in the port replicator.
3. If necessary, install your serial device driver.
See your Windows or device manual for instructions.
The serial port
is COM1.
Serial port
1-17
Using the Port Replicator
Making Connections
To connect a Universal Serial Bus (USB) device
Universal Serial Bus (USB) provides a bi-directional serial interface for adding
peripheral devices such as game controllers, serial and parallel ports, and scanners
on a single bus. The OmniBook's port replicator provides two USB ports.
1. Attach the USB cable to either the upper or lower USB port.
2. Dock the OmniBook in the port replicator.
USB ports
To connect an external display
Use this procedure to connect a standard VGA, SVGA, or XGA external display to
your OmniBook.
1. Attach the display cable to the display port.
2. Dock the OmniBook in the port replicator. The built-in display turns off. If you
want to run the built-in display and an external display simultaneously, see the
following topic for instructions.
Display port
1-18
Using the Port Replicator
Making Connections
To use the monitor stand with an external display
The optional monitor stand (HP F1369A), can support a weight of 69 kg (151.8 lb.).
When setting up the monitor stand, be sure that the wide edge faces forward, as
shown below.
To enable the built-in and external displays
• Press Fn+F5 to cycle through the external and built-in display options (Internal,
External, Both).
--or-1. Close all applications, then shut down Windows and reboot the OmniBook. If
necessary, you can press CTRL+ALT+DEL to reboot.
2. When you see the following message, press F2 to enter Setup.
Press <F2> to enter Setup
3. From the Main menu, use the down arrow to highlight Video Display Device.
4. Press Enter to view choices.
5. Select Both.
6. Press F10 to save settings and exit Setup.
1-19
Using the Port Replicator
Making Connections
To connect a parallel device
Use standard parallel cables and adapters available at computer dealers and
electronic supply stores to connect parallel devices.
1. Attach the parallel cable to the parallel port.
2. Dock the OmniBook PC in the port replicator.
3. If necessary, install your parallel device driver.
See your Windows or device manual for instructions.
The port replicator’s
25-pin parallel port is
a standard enhanced
(EPP/ECP) parallel
port.
Parallel port
To connect a MIDI/Joystick device
1. Attach the cable to the MIDI/Joystick port.
2. Dock the OmniBook in the port replicator.
MIDI/Joystick port
1-20
Using the Port Replicator
Making Connections
To connect your audio equipment
The port replicator provides the following audio ports:
Amplified speaker-out
connector for
headphones
or speakers.
Line-in connector for an
external audio source
(such as a CD player).
Microphone-in for an
external microphone.
1. Attach the audio cable to the corresponding audio port.
2. Dock the OmniBook in the port replicator.
You can press Fn+F7
to mute the sound.
Pressing Fn+F7 again
enables the sound.
Speaker-out
Microphone-in
Line-in
1-21
2
Troubleshooting
1-23
Troubleshooting
There are many ways to get information and technical support for your OmniBook
and port replicator. If you have a question about your port replicator that this
manual does not answer, you can try any of the following sources:
The online OmniBook User’s Handbook
The online manual provides basic information about how to operate and
maintain your OmniBook. You can view the manual online or print it.
The printed OmniBook Reference Guide
The printed manual provides complete instructions about how to set up the
OmniBook, use accessories, install memory or hard disks, connect devices,
change the configuration (BIOS Setup Utility), recover OmniBook files, use
system resources (including memory maps, interrupt settings, I/O addresses).
The World Wide Web
The HP Web site provides information about HP mobile-computing products.
You can download new software and drivers, get detailed setup instructions, or
view a list of frequently asked questions and answers. The HP Web site address
is http://www.hp.com/go/omnibook .
Technical Support
If you’d like to talk to a trained HP representative, you can call Technical
Support. If the product is under warranty, the technical assistance is normally
free. Your only charge will be the telephone call and you will speak directly to a
support specialist. The Technical Support telephone number for your area is
listed in the Support and Service booklet that you received with your
OmniBook.
HP First (automated fax service)
You can also use the HP automated fax service. Through HP First, you can
access thousands of documents that provide help or information by fax.
The HP First telephone number is:
(800) 333-1917 (inside U.S. and Canada).
(208) 344-4809 (outside U.S. and Canada).
1-24
Troubleshooting
Solving Problems
Solving Problems
If you have a problem using the port replicator, find the symptom that matches your
situation. Try the suggestions one at a time.
If you need to replace a lost or damaged power cord
• For the replacement part number for the ac adapter power cord, contact the
number in the Support and Service booklet.
If a connection doesn't work
• Try connecting the device to the corresponding port on the OmniBook. This
can tell you if the problem is with the port replicator.
• Make sure the OmniBook is fully inserted in the port replicator. The connection
should be snug.
• Make sure the ends of the device cable are connected properly.
• Make sure the device and the port replicator are connected and both have
power connected and turned on.
• Reboot the OmniBook.
If an external PS/2 mouse or keyboard doesn’t work
• Make sure the mouse or keyboard is plugged into the correct port. The mouse
and keyboard ports look the same. See page 1-15.
• Check that the PS/2 mouse is enabled in the BIOS Setup Utility.
If you cannot hear audio devices or files
• Fn+F7 mutes the audio system. Pressing Fn+F7 again enables sound.
• Try increasing the volume. Fn + UP ARROW increases the volume.
If an external serial mouse doesn't work
• Check that the correct serial port is enabled in the BIOS Setup Utility.
1-25
3
Specifications and Regulatory
Information
1-27
Specifications and Regulatory Information
Your OmniBook port replicator is designed to provide trouble-free operation. The
following suggestions can help you while working with your OmniBook:
♦
If you have problems, see the problem-solving suggestions and references
listed in chapter 2.
♦
If you think your port replicator might need repair service, see the warranty
and service information in the Support and Service booklet.
To contact Hewlett-Packard
If you have questions that the OmniBook manuals don't answer (even after looking
in the contents and index), you can contact Hewlett-Packard at the address or
phone number listed in the Support and Service booklet or in OmniBook Support in
the online OmniBook Library. Please have your OmniBook with you.
1-28
Specifications and Regulatory Information
Specifications
Specifications
Ports
240-pin docking connector.
Parallel DB25 (EPP/ECP).
Serial DB9 (115,200-bps).
VGA port, D-sub 15-pin female connector.
6-pin external keyboard connector.
6-pin external PS/2 mouse connector.
Three audio jacks for Speaker-out, Line-in, and MIC-in.
2-pin ac jack for ac adapter.
MIDI port: D-sub, 15-pin female for MIDI in/out.
2 Universal Serial Bus (USB) ports.
Power
Includes F1377A ac adapter.
100 to 240 Vac (50 to 60 Hz) input; 19 Vdc, 2.4A output.
Security
Kensington lock slot secures port replicator.
Size
Height
Depth
Width
81.5 mm (3.21 in.).
320.0 mm (12.60 in.).
356.9 mm (14.05 in.).
Weight
1.67 kg (3.68 lb.).
Environmental
Operating temperature
Storage temperature
Relative humidity
5 to 35 °C (41 to 95 °F).
-20 to 50 °C (-4 to 122 °F).
10% to 90% (noncondensing).
1-29
Specifications and Regulatory Information
Regulatory Information
Regulatory Information
This section presents information that shows how the port replicator complies with
regulations in certain regions. Any modifications to the port replicator not expressly
approved by Hewlett-Packard could void the authority to operate the port replicator
in these regions.
This port replicator is for use only with the I.T.E. (Information Technology
Equipment) notebook computer, model HP OmniBook 3000.
U.S.A.
The port replicator generates and uses radio frequency energy and may interfere
with radio and television reception. The port replicator complies with the limits for
a Class B computing device as specified in Part 15 of FCC Rules, which provide
reasonable protection against such interference in a residential installation. The
FCC label for this product is visible on the bottom of the unit. In the unlikely event
that there is interference to radio or television reception (which can be determined
by undocking the OmniBook and unplugging the ac adapter), try the following:
• Reorienting or relocating the receiving antenna.
• Relocating the port replicator with respect to the receiver.
• Connecting the ac adapter to another power outlet.
To maintain compliance with FCC Rules and Regulations, use properly shielded
cables when connecting peripheral devices to this device. Use cables supplied with
the OmniBook when appropriate.
For more information, consult your dealer, an experienced radio/television
technician, or the following booklet, prepared by the Federal Communications
Commission: How to Identify and Resolve Radio-TV Interference Problems. This
booklet is available from the U.S. Government Printing Office, Washington, DC
20402, Stock Number 004-000-00345-4. At the first printing of this manual, the
telephone number was (202) 783-3238.
1-30
Specifications and Regulatory Information
Regulatory Information
Canada
This digital apparatus does not exceed the Class B limits for radio noise emissions
from digital apparatus as set out in the radio interference regulations of the
Canadian Department of Communications.
Le présent appareil numérique n'émet pas de bruits radioélectriques dépassant les
limites applicables aux appareils numériques de Classe B prescrites dans le
règlement sur le brouillage radioélectrique édicté par le Ministère des
Communications du Canada.
Japan
1-31
Specifications and Regulatory Information
Regulatory Information
Declaration of Conformity
Products sold by Hewlett-Packard and its authorized dealers meet the specifications
listed below, according to ISO/IEC Guide 22 and EN 45014.
Manufacturer:
Hewlett-Packard Company
Address:
Hewlett-Packard Co.
Mobile Computing Division
1000 NE Circle Blvd.
Corvallis, OR 97330
declares that the following product
Product name:
HP F1381A port replicator
Options:
All
conforms to the following product specifications
Safety:
IEC 950:1991+A1,A2 / EN 60950 (1992)+A1,A2
EMC:
CISPR 22:1993 / EN 55022 (1994): Class B [1]
EN 50082-1:1992
IEC 1000-4-2:1995 / prEN 55024-2 (1992): 4kV CD, 8kV AD
IEC 1000-4-3:1995 / prEN 55024-3 (1991): 3V/m
IEC 1000-4-4:1995 / prEN 55024-4 (1992): 0.5kV signal lines, 1.0kV power lines
ANSI C63.4:1992
Supplementary
Information:
The product herewith complies with the requirements of the EMC Directive
89/336/EEC, Part 15 of the FCC Rules (97-6430-006-I), and carries the CE mark
accordingly.
[1] The product was tested in a typical configuration with Hewlett-Packard
personal computer peripherals.
Quality Department
Hewlett-Packard Company
Mobile Computing Division
1-32
Index
A
ac power, 1-10
audio
connections, 1-21
MIDI devices, 1-20
mute key, 1-21
troubleshooting, 1-25
B
BIOS Setup, 1-15
C
cable
security, 1-13
connecting, 1-17
ac power, 1-10
external display, 1-18
keyboard, 1-15
MIDI/Joystick, 1-20
OmniBook, 1-10
parallel device, 1-20
printer, 1-20
security cable, 1-13
serial device, 1-17
serial mouse, 1-17
USB device, 1-18
contacting HP, 1-28
D
Declaration of
Conformity, 1-32
device
audio, 1-21
display, 1-18
keyboard, 1-15
MIDI/Joystick, 1-20
parallel, 1-20
serial, 1-17
USB, 1-18
dimensions, 1-29
display
external, 1-18
troubleshooting, 1-25
docking, 1-10
documentation, 1-24
J
joystick, 1-20
K
Kensington lock, 1-13
keyboard
connecting, 1-15
external Fn key, 1-15
L
license agreement, 1-3
E
enabling
display device, 1-19
external Fn key, 1-15
serial mouse, 1-17
F
fax service, 1-24
Fn key
+ F5, 1-19
+ F7, 1-25
+ up arrow, 1-25
Fn key (external), 1-15
H
help, 1-24
HP First, 1-24
M
MicroSaver lock, 1-13
MIDI, 1-20
modem, 1-17
monitor, See display
monitor stand, 1-19
O
OmniBook
docking, 1-10
documentation, 1-24
regulatory, 1-30
repair, 1-28
resetting, 1-12
specifications, 1-29
support, 1-28
operating temperature,
1-29
1-33
P
parallel device
connecting, 1-20
troubleshooting, 1-25
ports
ac, 1-10
ac adapter, 1-10
display, 1-18
keyboard, 1-15
MIDI/Joystick, 1-20
printer, 1-20
serial device, 1-17
power, 1-29
protection
security cable, 1-13
PS/2 mouse
switching back to
TouchPad, 1-16
troubleshooting, 1-25
R
regulatory, 1-30
1-34
repair, 1-28
reset button, 1-12
S
security
cable, 1-13
serial
device, 1-17, 1-25
USB device, 1-18
service (repair), 1-28
software license, 1-3
specifications, 1-29
support, 1-28
SVGA, 1-18
U
Universal Serial Bus,
1-18
USB device, 1-18
User’s Guide, 1-24
V
VGA, 1-18
W
weight, 1-29
WWW, 1-24
X
T
technical specifications,
1-29
technical support, 1-24
temperature, 1-29
TouchPad, 1-16
troubleshooting, 1-25
XGA, 1-18