1
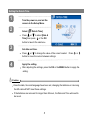
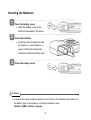
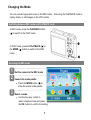
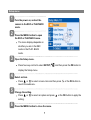
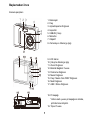
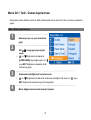
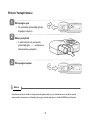
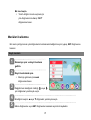
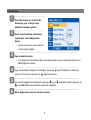
HP CA340 Digital Camera Quick Start Guide Dijital Kamera Kullanım Kılavuzu Getting Started Full User Manual located on installation CD. File name: CA340 Manual_ENG Parts of the Camera 1. Shutter Button 2. Flash 3. Power Button 4. Speaker 5. USB/AV Terminal 6. Microphone 7. Lens 8. Self-timer Lamp 9. LCD Monitor 10. Operation Lamp 11. Zoom Button 12. Strap Ring 13. Playback Button 14. Menu Button 15. Flash Button / Macro Button / DISP/ OK Button 16. Mode Button 17. ASM / Delete Button 18. Battery Cover The memory card slot is located beneath the battery cover, adjacent to the battery compartment. 19. Tripod Hole 1 Setting the Display Language / Date & Time When using the camera for the first time after purchasing, be sure to choose a language and set the date & time before using the camera. Setting the Display Language 1 Turn the power on, and set the camera to the Setup Menu. 2 Language]. Select [ or to select Press [LANGUAGE] then press or the OK button to launch the submenu. 3 Select a language. Press or to select a language and press the setting. 4 Press the MENU button to close the menu. 2 or the OK button to apply Setting the Date & Time 1 Turn the power on, and set the camera to the Setup Menu. 2 Select [ Date & Time]. Press or to select [Date & Time] then press or the OK button to launch the submenu. 3 Set date and time. Press or to change the value of the cursor located. Press or button to move the cursor between settings. 4 Apply the setting. After adjusting the settings, press the OK or the MENU button to apply the setting. Caution Once the date, time and language have been set, changing the batteries or removing the SD card will NOT reset these settings. If the batteries are removed for longer than 48 hours, the Date and Time will need to be re-set. 3 Inserting the Batteries 1 2 3 Open the battery cover. Slide the battery cover in the direction indicated by the arrow. Insert the batteries. Insert two AA-size batteries with the positive (+) and negative (-) poles matching the directions indicated inside the battery room. Close the battery cover. Caution To ensure the camera displays battery level correctly, after batteries are loaded, set the battery type in Setup Menu to match the batteries used: Alkaline / NiMH / Lithium / Qxyride 4 Changing the Mode You can record images and voices in the REC mode. replay, delete, or edit images on the LCD monitor. And using the PLAYBACK mode to Switching between REC mode and PLAYBACK mode In REC mode, press the PLAYBACK button ( ) to switch to the PLAY mode. In PLAY mode, press the PLAYBACK ( ) or the MODE ( ) button to switch to the REC mode. Selecting the REC mode 1 2 3 Set the camera to the REC mode Launch the mode palette. Press the MODE button ( ) to show the scene mode palette. Select a mode. Use the four-way control to select a desired mode and press the OK button to confirm the setting. 5 Using the Menus When a menu is displayed, the four-way control and the OK button are used to make the desired settings. REC menu 1 2 3 4 5 Turn the power on, and set the camera to the REC mode. Open the REC menu. Press the MENU button to display the menu. Select an item. or button to select a menu item. Press Change the setting. Press or to change the setting. Press the MENU or the OK button to save the settings and close the menu. 6 Setup menu 1 2 3 Turn the power on, and set the camera to the REC or PLAYBACK mode. Press the MENU button to open the REC or PLAYBACK menu. The menu displays depends on whether you are in the REC mode or the PLAY- BACK mode. Open the Setup menu. Press four-way control to select SETUP ( ) and then press the OK button to display the Setup menu. 4 5 6 Select an item. Press or to select a menu item and then press launch the submenu. Change the setting. Press or to select an option and press setting. Press the MENU button to close the menu. 7 or the OK button to or the OK button to apply the Getting Help Should you have a technical support question or your HP Digital Camera require service within the warranty period, please contact the original point of purchase or an authorized HP reseller in your country. If service is not available at those locations, please contact an HP Branded Product warranty agent from the support contact list provided below. A service agent will work with you to troubleshoot your issue and if necessary, issue a Return Material Authorization (RMA) number in order to replace your HP Branded Product. For warranty claims, you will be required to provide a copy of your original dated sales receipt as proof of purchase and the issued RMA number. You will be responsible for shipping charges when shipping the product to the service center. The service agent will provide you with an address and you will also be responsible for any shipping charges to the warranty service center. Once your product is received by this service center, a replacement unit will be shipped back to you typically within 5 business days. Email Support: Language Email Address Dutch [email protected] Chinese [email protected] [email protected] English [email protected] Français [email protected] Deutsch [email protected] Italiano [email protected] Japanese [email protected] Korean [email protected] Portuguese [email protected] Espanol [email protected] Svenska [email protected] 8 Contact/phone Support: Country Language Number België Dutch and German + 32 2700 1724 FRANCE French + 33 171230454 DEUTSCHLAND German + 49 6950073896 IRELAND English + 353 1850882016 ITALIA Italian + 39 269682189 NETHERLANDS Dutch + 31 202015093 ESPAÑA Spanish + 34 914533458 SWITZERLAND German/French/Italian + 41 18009686 UK English + 44 2073652400 United States English 1.866.694.7633 Canada English and French 1.866.694.7633 Europe Region (EMEA) North America 9 HP CA340 Dijital Kamera Kullanım Kılavuzu Başlamadan önce Kamera parçaları 1. Deklanşör 2. Flaş 3. Açma/Kapama Düğmesi 4. Hoparlör 5. USB/AV Çıkışı 6. Mikrofon 7. Objektif 8. Zamanlayıcı Gösterge Işığı 9. LCD Ekran 10. Çalışma Gösterge Işığı 11. Zoom Düğmesi 12. Bileklik Bağlantı Yuvası 13. Önizleme Düğmesi 14. Menü Düğmesi 15. Flaş / Makro /Set /DISP Düğmesi 16. Mod Düğmesi 17. ASM / Silme Düğmesi 18. Pil kapağı *Hafıza kartı yuvası pil kapağının altında, pil bölümüne bitişiktir. 19. Tripod Yuvası 1 Menü Dili / Tarih / Zaman Ayarlanması Kameranızı satın aldıktan sonra ilk defa kullanmadan önce menü dili, tarih ve zaman ayarlarını yapın. Menü Dilinin Ayarlanması 1 Kamerayı açın ve ayar menüsüne girin. 2 y Dil [ seçin.. ve Language] seçeneğini düğmelerini kullanarak [LANGUAGE] seçeneğine gelin ve veya SET düğmesine basarak dil alt menüsüne geçin. 3 Kullanmak istediğiniz dil seçimini seçin. y ve düğmelerini kullanarak kullanmak istediğiniz dili seçin ve SET düğmesine basarak seçiminizi kaydedin. 4 Menü düğmesine basarak menüyü kapatın. 2 veya Tarih ve Zaman Ayarlanmas 1 Kameray �aç�n ve ayar menüsüne girin. 2 Tarih ve zaman [ Date & Time] seçene ğini seçin .. ve düğmelerini kullanarak [Date & Time] seçeneğine gelin ve veya SET düğmesine basarak tarih ve zaman alt menüsüne geçin. 3 Tarih ve zaman ayarlarını yapın. ve düğmelerini kullanarak değerleri ayarlay�n ve veya düğmesine basarak ayarlamak istediğiniz değerleri seçin. 4 Ayarlarınızı kaydedin. Menü veya SET düğmesine basarak ayarlarınızı kaydedin. Dikkat • Tarih ve zaman ayarları yapıldıktan sonra pillerin değiştirilmesi veya SD kartın çıkartılması ayarları değiştirmez. • Cihazdaki piller çıkartılır ve 48 saatten fazla beklenirse tarih ve zaman ayarlarının tekrar yapılması gerekir. 3 Pillerin Yerleştirilmesi 1 2 3 Pil kapağını açın y Ok yönünde gösterildiği gibi pil kapağını kaydırın. Pilleri yerleştirin y 2 adet AA pilini pil yuvasında gösterildiği gibi + / - kutuplarına dikkat ederek yerleştirin. Pil kapağını kapatın Dikkat Kameranın kalan pil miktarını duzgun olarak gostermesi icin, pil dolduktan sonra, pil tipini ayarlar menusunden kameranızın kullandığı pile uygun olarak ayarlayınız: Alkalin/NiMH/Lityum/Qxyride 4 Modun değiştirilmesi Kayıt modunda fotoğraf çekip sesli görüntü kaydedebilirsiniz. Önizleme moduyla kayıtlı LCD ekranda görüntülerinizi izleyebilir, fotoğraflarınıza bakabilirsiniz. Ayrıca kaydettiğiniz dosyaları bu modda silebilirsiniz. Kayıt modu ve Önizleme modu arasında geçiş Kayıt modunda önizleme düğmesine basarak önizleme moduna geçebilirsiniz. Önizleme modunda önizleme düğmesine basarak kayıt moduna geçebilirsiniz. Kayıt modunu seçme 1 2 Kamerayı kayıt moduna getiriniz. Mod tablosunu açınız. Görüntü modu () tablosunu açmak için mod düğmesine basın. 3 5 Bir mod seçin. y Tercih ettiğiniz modu seçmek için yön düğmelerini kullanıp “SET” düğmesine basın. Menüleri kullanma Bir menü çıktığı zaman yön düğmelerini kullanarak istediğiniz seçimi yapıp, SET düğmesine basınız. Kayıt menüsü 1 2 Kamerayı açın ve kayıt moduna getirin. Kayıt menüsünü açın. y Menüyü görmek için menü düğmesine basın. 3 4 5 Değiştirmek istediğiniz özelliği yön düğmeleri yardımıyla seçin. veya İstediğiniz seçimi ▲veya ▼ düğmeleri yardımıyla seçin. Menü düğmesine veya SET düğmesine basarak seçiminizi kaydedin. 6 Ayar Menüsü 1 2 3 Turn the power on, and set the Kamerayı açın ve kayıt veya önizleme moduna getirin. Kayıt veya önizleme menüsünü açmak için menü düğmesine basın. y Açılan menü kayıt veya önizleme moduna göre değişir. Ayar menüsünü açın. y Yön düğmelerini kullanarak Ayar seçeneğine gelin ve ayar menüsüne girmek için SET düğmesine basın. 4 Ayar menüsünden değiştirmek istediğiniz seçeneği ▲veya ▼ düğmeleri yardımıyla seçin ve alt menüye ulaşmak için 5 6 düğmesine basın. Alt menüde değiştirmek istediğiniz seçeneği veya veya SET düğmesine basarak seçiminizi kaydedin. Menü düğmesine basarak menüyü kapatın. 7 düğmeleri yardımıyla seçin ve İTHALATÇI / İMALATÇI FİRMANIN UNVANI : HANKA BİLGİSAYAR SANAYİ VE TİCARET LTD.ŞTİ MERKEZ ADRESİ : SİNANPAŞA KÖPRÜ SOKAK NO:10/28 ÇELİK İŞ MRK. SİNANPAŞA/BEŞİKTAŞ/İSTANBUL TEL / TELEFAKS : 0 212 227 68 34/ 0 212 227 68 07 ÜRETİCİ FİRMA UNVANI : LITEON IT CORP. ÜRETİCİ FİRMA ADRESİ : 14F, 392, RUEY KUANG ROAD, NEIHU, TAIPEI 114, TAIWAN, R.O.C TEL/TELEFAKS : 886-2-8798-2886 / 886-2-8798-2823 KULLANIM ÖMRÜ : 7 Yıl SERVİS İSTASYONLARINI GÖSTERİR LİSTE SIRA UNVANI ADRESİ TEL/FAKS UFOTEK BİLGİSAYAR SAN. TUNUS CAD. NO: 54/3 0212 3366100 VE TİC. A.Ş. KAVAKLIDERE/ANKARA SES ELEKTRONİK İSMETPAŞA MAHALLESİ HİZMETLERİ SAN. TİC. LTD. BURSA CADDESİ NO:4/A ŞTİ. ÇANAKKALE POLEN BİLGİSAYAR REŞATBEY MAH.ORDU ELEKTRONİK TAAHHÜT CAD.BARLA İTH. İHRACAT LTD.ŞTİ./428 APT.NO:33/A 1120 SEYHAN/ NO 1 2 3 ADANA 8 0286 2126264 0322 3597776 Yardım Almak Teknik destek sorunuz varsa veya HP Dijital Resim çerçeveniz garanti süresi içerisinde servis gerektiriyorsa, lütfen orijinal satın alma noktanız ile veya ülkenizdeki yetkili bir HP bayisi ile irtibat kurun. Bu yerlerde servis yoksa, lütfen aşağıda sağlanan HP MArkalı Ütün garantisi bayi ile irtibat kurun. Sorununuzu gidermek için sizinle bir servis bayi çalışacaktır ve eğer gerekirse, HP Markalı Ürününüzü değiştirmek amacıyla bir Geri Gönderilen Malzeme Yetkilendirmesi (RMA) numarası yayınlayacaktır. Garanti talepleri için, satın alma kanıtı olarak sizden orijinal tarihli satış fişi ve yayınlanan RMA numarası istenecektir. Ürünü garanti servisi merkezine nakletmek için nakliye masraflarından sorumlu olacaksınız. Ürününüz, bu servis merkezi tarafından teslim alındığında, yeni ünite, genellikle size 5 iş günü içerisinde gönderilecektir. Email Desteği: Dil Eposta Adresi Hollandaca [email protected] Çince [email protected] [email protected] İngilizce [email protected] Fransızca [email protected] Almanca [email protected] İtalyanca [email protected] Japonca [email protected] Korece [email protected] Portekizce [email protected] İspanyolca [email protected] Svenska [email protected] 9 İrtibat/telefon Desteği: Ülke Dil Numara Belçika Hollandaca ve Almanca + 32 2700 1724 FRANSA Fransızca + 33 171230454 ALMANYA Almanca + 49 6950073896 İRLANDA İngilizce + 353 1850882016 İTALYA İtalyanca + 39 269682189 HOLLANDA Hollandaca + 31 202015093 İSPANYA İspanyolca + 34 914533458 İSVİÇRE Almanca/Fransızca/İtalyanca + 41 18009686 İNGİLTERE İngilizce + 44 2073652400 Birleşik Devletler İngilizce 1.866.694.7633 Kanada İngilizce ve Fransızca 1.866.694.7633 Avrupa Bölgesi (EMEA) Kuzey Amerika 10 P/N:7525C00050A