1
nPartition Administrator's Guide
HP Part Number: 5991-1247B_ed2
Published: February 2009
Edition: Second Edition
© Copyright 2007–2009 Hewlett-Packard Development Company, L.P
Legal Notices
© Copyright 2007–2009 Hewlett-Packard Development Company, L.P.
Confidential computer software. Valid license from HP required for possession, use or copying. Consistent with FAR 12.211 and 12.212, Commercial
Computer Software, Computer Software Documentation, and Technical Data for Commercial Items are licensed to the U.S. Government under
vendor's standard commercial license.
The information contained herein is subject to change without notice. The only warranties for HP products and services are set forth in the express
warranty statements accompanying such products and services. Nothing herein should be construed as constituting an additional warranty. HP
shall not be liable for technical or editorial errors or omissions contained herein.
Intel and Itanium are trademarks or registered trademarks of Intel Corporation or its subsidiaries in the United States and other countries.
Linux is a U.S. registered trademark of Linus Torvalds. Microsoft, Windows, and Windows NT are U.S. registered trademarks of Microsoft
Corporation.
Restricted Rights Legend
Use, duplication or disclosure by the U.S. Government is subject to restrictions as set forth in subparagraph (c) (1) (ii)
of the Rights in Technical Data and Computer Software clause at DFARS 252.227-7013 for DOD agencies, and subparagraphs (c) (1) and (c) (2)
of the Commercial Computer Software Restricted Rights clause at FAR 52.227-19 for other agencies.
HEWLETT-PACKARD COMPANY
3000 Hanover Street
Palo Alto, California 94304 U.S.A.
Table of Contents
About This Document.......................................................................................................11
New and Changed Information in This Edition...................................................................................11
Document Organization.......................................................................................................................11
Typographic Conventions.....................................................................................................................12
Related Information..............................................................................................................................13
Publishing History................................................................................................................................13
HP Encourages Your Comments..........................................................................................................13
1 Getting Started with nPartitions..................................................................................15
Introduction to nPartitions....................................................................................................................15
Operating Systems Supported on nPartitions.................................................................................15
HP Server Support for nPartitions...................................................................................................16
HP Superdome Hybrid Servers: Intel® Itanium® 2 and PA-RISC nPartition Mixing..............17
Hardware Components of nPartition-Capable Servers...................................................................18
Administration Tools for nPartitions....................................................................................................18
Commands for Configuring nPartitions.........................................................................................19
Availability of nPartition Commands........................................................................................21
Enhanced nPartitions Commands for Windows.......................................................................21
Enhanced nPartition Commands for Linux...............................................................................22
Partition Manager............................................................................................................................22
Partition Manager Version 2.0 for Windows..............................................................................23
nPartition Properties.............................................................................................................................23
Partition Numbers...........................................................................................................................24
Assigned and Unassigned Cells......................................................................................................24
Base Cells.........................................................................................................................................24
Core Cells.........................................................................................................................................24
Active and Inactive Cells.................................................................................................................25
Cell Local Memory..........................................................................................................................25
Cell Property Details.......................................................................................................................25
Active and Inactive nPartition Boot States......................................................................................27
Overview of Managing nPartitions......................................................................................................27
Basics of Listing nPartition and Complex Status.............................................................................27
Basics of nPartition Creation...........................................................................................................29
Genesis Partition.........................................................................................................................30
Basics of nPartition Modification....................................................................................................30
nPartition Modification Tasks....................................................................................................31
Basics of nPartition Booting and Resetting......................................................................................32
Boot Process for Cells and nPartitions.......................................................................................32
Common nPartition Boot Commands and Tasks.......................................................................33
Complex Profile....................................................................................................................................36
Changing the Server Complex Profile.............................................................................................37
How the Complex Profile is Updated........................................................................................37
Complex Profile Entry Locking and Unlocking..............................................................................38
Complex Profile Group Details.......................................................................................................39
Remote and Local Management of nPartitions....................................................................................41
Intelligent Platform Management Interface (IPMI).........................................................................41
IPMI Block Transfer (IPMI BT)...................................................................................................42
nPartition Configuration Privilege.......................................................................................42
IPMI over LAN...........................................................................................................................42
Web-Based Enterprise Management (WBEM)................................................................................43
Table of Contents
3
Local Management..........................................................................................................................43
Remote Management Using WBEM................................................................................................44
WBEM Remote Management Files............................................................................................44
nPartition Commands Support for Remote Management Using WBEM..................................45
Partition Manager Support for Remote Management Using WBEM........................................45
Remote Management Using IPMI over LAN..................................................................................46
nPartition Commands Support for Remote Management Using IPMI over LAN....................46
Partition Manager Support for Remote Management Using IPMI over LAN...........................47
Licensing Information: Getting Server Product Details.......................................................................47
nPartition and Virtual Partition Unique Identifiers........................................................................47
2 nPartition Server Hardware Overview.......................................................................49
sx1000 Chipset for HP Servers..............................................................................................................49
sx2000 Chipset for HP Servers..............................................................................................................49
Model Identifiers for Machine Hardware.............................................................................................49
Server Hardware Details: Cell-Based HP Servers.................................................................................51
Two-Cell nPartition Server Model...................................................................................................55
Four-Cell nPartition Server Model..................................................................................................56
Superdome Server Models..............................................................................................................57
HP Superdome 16-/32-Way Servers: SD16000, SD16A, and SD16B...........................................58
HP Superdome 32-/64-Way Servers: SD32000, SD32A, and SD32B...........................................58
HP Superdome 64-/128-Way Servers: SD64000, SD64A, and SD64B.........................................59
HP Superdome I/O Expansion Cabinet.....................................................................................59
3 Planning nPartitions......................................................................................................61
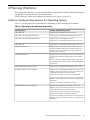
nPartition Hardware Requirements for Operating Systems................................................................61
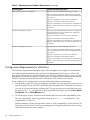
Configuration Requirements for nPartitions........................................................................................62
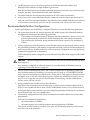
Recommended nPartition Configurations............................................................................................63
Recommended HP Superdome nPartition Configurations.............................................................64
4 Using Management Interfaces and Tools..................................................................67
SMS (Support Management Station) for HP Superdome Servers........................................................67
Overview of nPartition Service Processor (MP or GSP) Interfaces......................................................67
Service Processor (MP or GSP) Features...............................................................................................68
Service Processor Accounts and Access Levels...............................................................................69
nPartition Console Features..................................................................................................................70
nPartition Console Access versus Direct OS Login.........................................................................71
Boot Console Handler System Boot Environment................................................................................71
Extensible Firmware Interface System Boot Environment...................................................................72
Windows Special Administration Console (SAC)................................................................................72
Accessing and Using the Service Processor..........................................................................................74
Using Service Processor Menus.......................................................................................................76
Navigating through Service Processor Menus...........................................................................76
Network Configuration for a Service Processor..............................................................................77
Viewing Console Logs..........................................................................................................................77
Viewing Chassis Codes or Event Logs.................................................................................................78
Virtual Front Panel (VFP) nPartition Views..........................................................................................79
Command Reference for Service Processor Commands......................................................................80
Command Reference for EFI Shell Commands....................................................................................81
Command Reference for BCH Menu Commands................................................................................84
4
Table of Contents
5 Booting and Resetting nPartitions...............................................................................87
Overview of nPartition System Booting...............................................................................................87
Boot Process Differences for nPartitions on HP 9000 servers and HP Integrity servers.................88
Types of Booting and Resetting for nPartitions...............................................................................89
System Boot Configuration Options................................................................................................91
HP 9000 Boot Configuration Options........................................................................................91
HP Integrity Boot Configuration Options..................................................................................91
Tools for Booting nPartitions................................................................................................................95
Task Summaries for nPartition Boot and Reset....................................................................................96
Troubleshooting Boot Problems..........................................................................................................100
Accessing nPartition Console and System Boot Interfaces.................................................................101
Monitoring nPartition Boot Activity...................................................................................................104
Finding Bootable Devices....................................................................................................................106
Performing a Transfer of Control Reset..............................................................................................107
Booting and Shutting Down HP-UX...................................................................................................108
HP-UX Support for Cell Local Memory........................................................................................108
Adding HP-UX to the Boot Options List.......................................................................................109
Booting HP-UX..............................................................................................................................110
HP-UX Booting.........................................................................................................................110
Single-User Mode HP-UX Booting...........................................................................................114
LVM-Maintenance Mode HP-UX Booting...............................................................................116
Shutting Down HP-UX..................................................................................................................117
Booting and Shutting Down HP OpenVMS I64.................................................................................119
HP OpenVMS I64 Support for Cell Local Memory.......................................................................120
Adding HP OpenVMS to the Boot Options List............................................................................120
Booting HP OpenVMS...................................................................................................................122
Shutting Down HP OpenVMS.......................................................................................................123
Booting and Shutting Down Microsoft Windows..............................................................................124
Microsoft Windows Support for Cell Local Memory....................................................................124
Adding Microsoft Windows to the Boot Options List...................................................................125
Booting Microsoft Windows..........................................................................................................126
Shutting Down Microsoft Windows..............................................................................................128
Booting and Shutting Down Linux.....................................................................................................129
Linux Support for Cell Local Memory..........................................................................................129
Adding Linux to the Boot Options List.........................................................................................130
Booting Red Hat Enterprise Linux................................................................................................131
Booting SuSE Linux Enterprise Server..........................................................................................132
Shutting Down Linux....................................................................................................................134
Rebooting and Resetting nPartitions..................................................................................................135
Performing a Reboot for Reconfig.......................................................................................................139
Shutting Down to a Shutdown for Reconfig (Inactive) State..............................................................141
Booting an Inactive nPartition.............................................................................................................146
Booting over a Network......................................................................................................................147
Booting to the HP-UX Initial System Loader (ISL).............................................................................149
Booting to the HP-UX Loader (HPUX.EFI).........................................................................................150
Using HP-UX Loader Commands......................................................................................................151
HPUX.EFI Boot Loader Commands..............................................................................................151
HPUX Boot Loader Commands Issued from ISL..........................................................................151
Booting to the Linux Loader (ELILO.EFI)...........................................................................................152
Linux Boot Option Management...................................................................................................153
Linux Loader Configuration File (elilo.conf)...........................................................................153
Using Linux Loader (ELILO) Commands..........................................................................................154
Configuring Boot Paths and Options..................................................................................................155
Configuring Autoboot Options...........................................................................................................158
Table of Contents
5
Configuring Boot-Time System Tests..................................................................................................161
6 Creating and Configuring nPartitions......................................................................165
Tools for Configuring nPartitions.......................................................................................................165
Task Summaries for Creating and Configuring nPartitions...............................................................165
Creating a Genesis Partition................................................................................................................170
Creating a New nPartition..................................................................................................................172
Removing (Deleting) an nPartition.....................................................................................................176
Assigning (Adding) Cells to an nPartition..........................................................................................179
Unassigning (Removing) Cells from an nPartition.............................................................................182
Renaming an nPartition......................................................................................................................185
Renaming a Server Complex...............................................................................................................187
Setting Cell Attributes.........................................................................................................................189
Setting nPartition Core Cell Choices...................................................................................................194
Unlocking Complex Profile Entries....................................................................................................198
Canceling Pending Changes to the Complex Profile..........................................................................199
7 Managing Hardware Resources..............................................................................201
Tools for Managing Hardware............................................................................................................201
Task Summaries for Hardware Resource Management.....................................................................201
Powering Server Cabinets On and Off................................................................................................205
Powering Cells and I/O Chassis On and Off.......................................................................................206
Turning Attention Indicators (LEDs) On and Off...............................................................................209
Configuring and Deconfiguring Cells................................................................................................213
Configuring and Deconfiguring Processors.......................................................................................217
Enabling and Disabling Hyper-Threading on Dual-Core Intel® Itanium® 2 Processors..................218
Configuring and Deconfiguring Memory (DIMMs)...........................................................................220
Complex Health Analysis of a Server.................................................................................................222
8 Listing nPartition and Hardware Status....................................................................223
Tools for Listing Status........................................................................................................................223
Task Summaries for nPartition and Hardware Status........................................................................223
Listing Cell Configurations.................................................................................................................226
Listing Processor Configurations........................................................................................................227
Listing Memory Configurations.........................................................................................................229
Listing Input/Output (I/O) Configurations.........................................................................................231
Listing Cabinets in a Server Complex.................................................................................................234
Listing Product and Serial Numbers..................................................................................................235
Listing nPartition Configurations.......................................................................................................236
Listing the Local nPartition Number..................................................................................................237
Listing Power Status and Power Supplies..........................................................................................238
Listing Fan and Blower Status............................................................................................................240
A nPartition Commands................................................................................................243
Specifying Cells and I/O Chassis to Commands.................................................................................243
Cell Specification Formats.............................................................................................................243
I/O Specification Format................................................................................................................244
Specifying Remote Management Options to Commands..................................................................247
parcreate Command............................................................................................................................249
parmodify Command.........................................................................................................................252
parremove Command.........................................................................................................................256
parstatus Command............................................................................................................................258
6
Table of Contents
parunlock Command..........................................................................................................................260
fruled Command.................................................................................................................................262
frupower Command...........................................................................................................................264
cplxmodify Command........................................................................................................................266
Table of Contents
7
List of Figures
1-1
2-1
2-2
2-3
8
Partition Manager Version 2.0 Switch Complexes Dialog............................................................46
Two-Cell HP Server Cabinet..........................................................................................................55
Four-Cell HP Server Cabinet.........................................................................................................56
HP Superdome Server Cabinet......................................................................................................57
List of Figures
List of Tables
1-1
1-2
1-3
1-4
1-5
2-1
3-1
4-1
4-2
4-3
4-4
5-1
6-1
7-1
7-2
8-1
A-1
A-2
nPartition Operating System Support...........................................................................................15
HP Servers Supporting nPartitions...............................................................................................17
nPartition Commands Releases.....................................................................................................20
nPartition Commands Descriptions..............................................................................................20
Complex Profile Group Details.....................................................................................................40
Models of Cell-Based HP Servers..................................................................................................51
Operating System Hardware Requirements.................................................................................61
Windows SAC Commands............................................................................................................73
Service Processor (MP or GSP) Command Reference...................................................................80
EFI Shell Command Reference......................................................................................................81
Boot Console Handler (BCH) Command Reference.....................................................................84
nPartition Boot and Reset Task Summaries...................................................................................96
nPartition Configuration Task Summaries..................................................................................166
Hardware Management Task Summaries...................................................................................202
Attention Indicator (LED) States and Meanings.........................................................................209
Hardware and nPartition Status Task Summaries......................................................................224
Cell IDs in Global Cell Number Format......................................................................................243
Cell IDs in Hardware Location Format.......................................................................................244
9
List of Examples
1-1
1-2
4-1
5-1
7-1
7-2
7-3
A-1
10
Unique IDs for an nPartition and Complex..................................................................................48
Unique IDs for Virtual Partitions (vPars)......................................................................................48
Overview of a Service Processor Login Session............................................................................75
Single-User HP-UX Boot..............................................................................................................115
Turning Attention Indicators On and Off...................................................................................212
Checking the Hyper-Threading Status for an nPartition............................................................219
Enabling Hyper-Threading for an nPartition..............................................................................220
I/O Specification Formats for Cabinets, Bays, and Chassis.........................................................247
List of Examples
About This Document
This book describes nPartition system administration procedures, concepts, and principles for
the HP servers that support nPartitions.
New and Changed Information in This Edition
This edition includes changes and additions related to the Superdome SX1000 PA and SX2000
PA.
Document Organization
This book contains the following chapters and appendix.
Chapter 1.
“Getting Started with nPartitions” (page 15)
This chapter introduces HP nPartition system features, server models,
supported operating systems, and administration tools, and outlines the basic
information needed for managing nPartitions.
Chapter 2.
“nPartition Server Hardware Overview” (page 49)
This chapter describes HP nPartition server models and features.
Chapter 3.
“Planning nPartitions” (page 61)
This chapter describes how you can plan nPartition configurations. Details
include the nPartition configuration requirements and recommendations.
Chapter 4.
“Using Management Interfaces and Tools” (page 67)
This chapter presents the system management interfaces and tools available
on HP nPartition servers. Also described here are the nPartition boot
environments, management access procedures, and detailed command
references.
Chapter 5.
“Booting and Resetting nPartitions” (page 87)
This chapter introduces nPartition system boot and reset concepts,
configuration options, and procedures for booting and resetting nPartitions.
Chapter 6.
“Creating and Configuring nPartitions” (page 165)
This chapter presents the procedures for creating, configuring, and managing
nPartitions on HP servers that support them.
Chapter 7.
“Managing Hardware Resources” (page 201)
This chapter explains the procedures for managing the hardware resources
in nPartitions and their server complexes. It describes power and LED
(attention indicator) management, hardware configuration and
deconfiguration, and analysis of the current status of the server complex.
Chapter 8.
“Listing nPartition and Hardware Status” (page 223)
This chapter describes procedures for listing the current status of nPartitions
and server hardware components.
Appendix A.
“nPartition Commands” (page 243)
This appendix contains details and command-line syntax for the HP nPartition
configuration commands.
New and Changed Information in This Edition
11
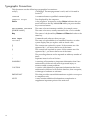
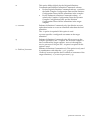
Typographic Conventions
This document uses the following typographical conventions:
12
audit(5)
A manpage. The manpage name is audit, and it is located in
Section 5.
Command
A command name or qualified command phrase.
Computer output
Text displayed by the computer.
Ctrl+x
A key sequence. A sequence such as Ctrl+x indicates that you
must hold down the key labeled Ctrl while you press another
key or mouse button.
ENVIRONMENT VARIABLE
The name of an environment variable, for example, PATH.
[ERROR NAME]
The name of an error, usually returned in the errno variable.
Key
The name of a keyboard key. Return and Enter both refer to the
same key.
User input
Commands and other text that you type.
Variable
The name of a placeholder in a command, function, or other
syntax display that you replace with an actual value.
[]
The contents are optional in syntax. If the contents are a list
separated by |, you must choose one of the items.
{}
The contents are required in syntax. If the contents are a list
separated by |, you must choose one of the items.
...
The preceding element can be repeated an arbitrary number of
times.
|
Separates items in a list of choices.
WARNING
A warning calls attention to important information that if not
understood or followed will result in personal injury or
nonrecoverable system problems.
CAUTION
A caution calls attention to important information that if not
understood or followed will result in data loss, data corruption,
or damage to hardware or software.
IMPORTANT
This alert provides essential information to explain a concept or
to complete a task
NOTE
A note contains additional information to emphasize or
supplement important points of the main text.
Related Information
You can find information on nPartition server hardware management, operating system
administration, and diagnostic support tools in the following publications and Web sites.
Web Site for HP Technical Documentation: http://docs.hp.com The HP Technical Documentation
Web site is at http://docs.hp.com and has complete information available for free.
Server Hardware Information: http://docs.hp.com/hpux/hw/ The systems hardware portion
of the docs.hp.com Web site is at http://docs.hp.com/hpux/hw/. It provides server hardware
management information, including site preparation and installation.
Diagnostics and Event Monitoring: Hardware Support Tools Complete information about HP
hardware support tools, including online and offline diagnostics and event monitoring tools, is
at the http://docs.hp.com/hpux/diag/ Web site. This site has manuals, tutorials, FAQs, and other
reference material.
Web Site for HP Technical Support: http://us-support2.external.hp.com The HP IT resource
center Web site at http://us-support2.external.hp.com/ provides comprehensive support
information for IT professionals on a wide variety of topics, including software, hardware, and
networking.
Publishing History
This is the second edition of the nPartition Administrator's Guide.
This book replaces the nPartition Administrator's Guide (5991–1247B) and HP System Partitions
Guide (5991–1247).
HP Encourages Your Comments
HP welcomes your feedback on this publication. Address your comments to
[email protected] and note that you will not receive an immediate reply. All
comments are appreciated.
Related Information
13
14
1 Getting Started with nPartitions
This chapter introduces cell-based HP server features, server models, supported operating
systems, and administration tools, and outlines the basic information needed for managing
nPartitions.
Introduction to nPartitions
Cell-based HP servers enable you to configure a single server complex as one large system or as
multiple smaller systems by configuring nPartitions.
Each nPartition defines a subset of server hardware resources to be used as an independent
system environment. An nPartition includes one or more cells assigned to it (with processors
and memory) and all I/O chassis connected to those cells.
All processors, memory, and I/O in an nPartition are used exclusively by software running in
the nPartition. Thus, each nPartition has its own system boot interface, and each nPartition boots
and reboots independently.
Each nPartition provides both hardware and software isolation, so that hardware or software
faults in one nPartition do not affect other nPartitions within the same server complex.
You can reconfigure nPartition definitions for a server without physically modifying the server
hardware configuration by using the HP software-based nPartition management tools.
For procedures for creating and reconfiguring nPartitions, see Chapter 6 (page 165).
Operating Systems Supported on nPartitions
Table 1-1 lists the operating systems that can run on nPartitions.
For an overview of the server models that support nPartitions, see “HP Server Support for
nPartitions” (page 16).
For details on operating system boot and reset procedures, see Chapter 5 (page 87).
Table 1-1 nPartition Operating System Support
Operating System
Supported Cell-Based Servers
HP-UX 11i v1 (B.11.11)
HP-UX 11i v1 (B.11.11) is supported on HP 9000 servers, including the
cell-based HP 9000 servers.
The HP-UX 11i v1 (B.11.11) December 2003 release and later supports
rp7420, rp8420, and HP 9000 Superdome (SD16A, SD32A, SD64A
models), based on the HP sx1000 chipset.
The HP-UX 11i v1 (B.11.11) December 2006 release and later supports
rp7440, rp8440, and HP 9000 Superdome (SD16B, SD32B, SD64B
models), based on the HP sx2000 chipset.
HP-UX 11i v1 does not support cell local memory.
Also see “nPartition Hardware Requirements for Operating Systems”
(page 61).
HP-UX 11i v2 (B.11.23)
HP-UX 11i v2 (B.11.23) is supported on HP Integrity servers, including
the cell-based HP Integrity servers.
The HP-UX 11i v2 (B.11.23) September 2004 release and later also
supports cell-based HP 9000 servers based on the HP sx1000 chipset.
HP-UX 11i v2 supports cell local memory.
Also see “nPartition Hardware Requirements for Operating Systems”
(page 61).
Introduction to nPartitions
15
Table 1-1 nPartition Operating System Support (continued)
Operating System
Supported Cell-Based Servers
HP-UX 11i v3 (B.11.31)
HP-UX 11i v3 (B.11.31) is supported on HP Integrity servers and HP
9000 servers.
HP-UX 11i v3 is supported on all servers based on the HP sx1000
chipset, and on HP Integrity servers based on the HP sx2000 chipset.
HP-UX 11i v3 supports cell local memory.
Also see “nPartition Hardware Requirements for Operating Systems”
(page 61).
HP OpenVMS I64 8.2-1 and 8.3
OpenVMS I64 8.2-1 is supported on cell-based HP Integrity servers
based on the HP sx1000 chipset.
OpenVMS I64 8.3 is supported on HP Integrity servers based on the
HP sx1000 and sx2000 chipsets.
OpenVMS I64 does not support cell local memory.
Also see “nPartition Hardware Requirements for Operating Systems”
(page 61).
Microsoft® Windows® Server 2003
Windows Server 2003 is supported on HP Integrity servers, including
the cell-based HP Integrity servers.
Windows Server 2003 supports cell local memory.
Also see “nPartition Hardware Requirements for Operating Systems”
(page 61).
Red Hat Enterprise Linux 3 Update 2
Red Hat Enterprise Linux 3 Update 3
Red Hat Enterprise Linux 4
Red Hat Enterprise Linux 3 and Red Hat Enterprise Linux 4 are
supported on HP Integrity servers, including the cell-based HP
Integrity servers.
Red Hat Enterprise Linux does not support cell local memory.
Also see “nPartition Hardware Requirements for Operating Systems”
(page 61).
SuSE Linux Enterprise Server 9
SuSE Linux Enterprise Server 10
SuSE Linux Enterprise Server 9 and SuSE Linux Enterprise Server 10
are supported on HP Integrity servers, including the cell-based HP
Integrity servers.
SuSE Linux Enterprise Server 9 and SuSE Linux Enterprise Server 10
support cell local memory.
Also see “nPartition Hardware Requirements for Operating Systems”
(page 61).
HP Server Support for nPartitions
HP supports nPartition capabilities on cell-based servers, listed in Table 1-2.
On HP Superdome servers based on the HP sx1000 chipset, you can mix both PA-RISC nPartitions
and Intel® Itanium® 2 nPartitions in the same server complex under specific system
configurations. For details, refer to “HP Superdome Hybrid Servers: Intel® Itanium® 2 and
PA-RISC nPartition Mixing” (page 17).
The same basic nPartition features are supported for cell-based HP 9000 servers and cell-based
HP Integrity servers, though some differences exist in the sets of supported tools and management
capabilities. Where such differences exist, this document notes them.
16
Getting Started with nPartitions
Table 1-2 HP Servers Supporting nPartitions
HP 9000 Servers HP The first-generation cell-based HP 9000 servers include the following models:
9000 servers have
• HP 9000 Superdome servers, including the SD16000, SD32000, and SD64000 models.
PA-RISC processors.
These models support up to 16 cells in a server complex.
• HP 9000 rp8400 model, which supports up to four cells in a server complex.
• HP 9000 rp7405/rp7410, which supports up to two cells in a server complex.
For details see “Server Hardware Details: Cell-Based HP Servers” (page 51).
The following second-generation cell-based HP 9000 servers use the HP sx1000 chipset. For
details see “sx1000 Chipset for HP Servers” (page 49).
• HP 9000 Superdome servers, including the SD16A, SD32A, and SD64A models. These
models support up to 16 cells in a server complex.
• HP 9000 rp8420 model, which supports up to four cells in a server complex.
• HP 9000 rp7420 model, which supports up to two cells in a server complex.
The following third-generation cell-based HP 9000 servers use the HP sx2000 chipset. For
details see “sx2000 Chipset for HP Servers” (page 49).
• HP 9000 Superdome servers, including the SD16B, SD32B, and SD64B models. These
models support up to 16 cells in a server complex.
• HP 9000 rp8440 model, which supports up to four cells in a server complex.
• HP 9000 rp7440 model, which supports up to two cells in a server complex.
For details see “Server Hardware Details: Cell-Based HP Servers” (page 51).
Cell-based HP Integrity servers use either the HP sx1000 chipset or the HP sx2000 chipset.
HP Integrity
Servers HP Integrity The following cell-based HP Integrity servers use the HP sx1000 chipset; for details see
servers have Intel®
“sx1000 Chipset for HP Servers” (page 49).
Itanium® 2 processors.
• HP Integrity Superdome servers include the SD16A, SD32A, and SD64A models. These
The Intel® Itanium®
models support up to 16 cells in a server complex.
processor family
• The HP Integrity rx8620 model supports up to four cells in a server complex.
architecture was
• The HP Integrity rx7620 model supports up to two cells in a server complex.
co-developed by
Hewlett-Packard and The following cell-based HP Integrity servers use the HP sx2000 chipset; for details see
“sx2000 Chipset for HP Servers” (page 49).
Intel.
• HP Integrity Superdome servers include the SD16B, SD32B, and SD64B models. These
models support up to 16 cells in a server complex.
• The HP Integrity rx8640 model supports up to four cells in a server complex.
• The HP Integrity rx7640 model supports up to two cells in a server complex.
For details see “Server Hardware Details: Cell-Based HP Servers” (page 51).
HP Superdome Hybrid Servers: Intel® Itanium® 2 and PA-RISC nPartition Mixing
HP Superdome servers based on the HP sx1000 chipset can support hybrid configurations with
both PA-RISC nPartitions and Intel® Itanium® 2 nPartitions in the same server complex.
NOTE: For details and restrictions on mixing PA-RISC nPartitions and Intel® Itanium® 2
nPartitions on HP Superdome servers based on the HP sx2000 chipset, see the HP Integrity
Superdome/sx2000 Service Guide.
On Superdome hybrid servers based on the HP sx1000 chipset, each nPartition must have only
PA-RISC processor or Intel® Itanium® 2 processors. However, both types of nPartitions can
reside in the same server complex. Within each PA-RISC nPartition, all cells must have the same
processor revision level. Within each Intel® Itanium® 2 nPartition, all cells must have the same
cell compatibility value.
Introduction to nPartitions
17
NOTE: Specific firmware, operating systems, and management tools are required to supported
mixing PA-RISC nPartitions and Intel® Itanium® 2 nPartitions on Superdome hybrid servers.
For details, refer to HP Superdome Hybrid Servers, which is available from the http://docs.hp.com/
en/hw.html Web site under the HP 9000 Superdome Server and HP Integrity Superdome
Server links.
Hardware Components of nPartition-Capable Servers
All hardware within a cell-based server—including all cells, I/O chassis, cables, cabinet hardware,
fans, and power and utility components—is considered to be a server complex.
Within each cell-based server cabinet are one or more cells, each of which contains processors
and memory.
Each cell-based server cabinet can have multiple I/O chassis that provide PCI slots for I/O cards.
I/O resources also include any I/O devices attached to I/O cards within the I/O chassis.
Core I/O is required for each nPartition to provide console services and other boot and
management abilities. On first-generation cell-based servers and HP sx1000 chipset-based servers,
core I/O is provided by a PCI card residing in an I/O chassis. On HP sx2000 chipset-based servers,
core I/O is provided on each cell. On all cell-based servers, each nPartition has only one core I/O
active at a time.
Each I/O chassis connects to only one cell in the server. Some cell-based servers also support
optional I/O expansion cabinets to provide additional I/O chassis. An HP Superdome complex
can consist of one cabinet or two server cabinets, and can also include one or two I/O expansion
cabinets (to provide additional I/O chassis). The two-cell HP servers consists of a single server
cabinet only. The four-cell servers consists of a single server cabinet and can optionally include
one I/O expansion cabinet to provide two additional I/O chassis.
For details on listing and managing nPartition hardware components, see Chapter 7 (page 201).
Administration Tools for nPartitions
The main administration tools for nPartitions are Partition Manager, which provides a graphical
interface, and the nPartition Commands, which provide a command-line interface.
Some nPartition configuration and management also can be accomplished using the service
processor interface to a cell-based server or by using the boot interface available through an
nPartition console.
Slightly different toolsets and capabilities are available the different server models. However,
the same basic administration tasks are supported on all cell-based servers.
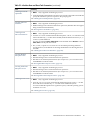
The following tools can perform nPartition administration tasks:
•
Service Processor (MP or GSP) Menus
Service processor menus provide a service interface for the entire complex. It allows access
to all hardware and nPartitions defined within the complex. The service processor is always
available, regardless of whether any nPartitions are configured or booted in the complex.
The service processor includes the Command menu, nPartition consoles, nPartition Virtual
Front Panels, nPartition console logs and the Chassis Log Viewer or Event Log Viewer (HP
9000 servers with HP PA-8700 processors have chassis logs, and servers based on the HP
sx1000 or sx2000 chipset have event logs).
See Chapter 4 (page 67).
18
Getting Started with nPartitions
For service processor commands, see “Command Reference for Service Processor Commands”
(page 80).
•
EFI Boot Manager and EFI Shell Commands
On cell-based HP Integrity servers, the Extensible Firmware Interface (EFI) supports
nPartition management. The EFI is accessible from an nPartition console when the nPartition
is in an active state but has not booted an operating system.
See “Command Reference for EFI Shell Commands” (page 81) for details.
•
BCH Menu Commands
On cell-based PA-RISC servers, the Boot Console Handler (BCH) interface supports
management from an nPartition console when the nPartition is in an active state but has not
booted an operating system. See “Command Reference for BCH Menu Commands” (page 84)
for details.
•
nPartition Commands
You can configure, manage, and monitor nPartitions and hardware using the nPartition
commands such as parstatus, parcreate, parmodify, and others.
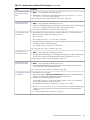
Two versions of the nPartition commands are available: the Original nPartition Commands
and Enhanced nPartition Commands. The Original nPartition Commands are used only on
HP-UX 11i v1 (B.11.11) releases prior to the December 2004 release. The Enhanced nPartition
Commands are supported for HP-UX, Windows, and Linux.
The same base set of features is available in both nPartition commands versions. However,
the Enhanced nPartition Commands include new options, such as remote administration
abilities, and include the cplxmodify command.
See “Commands for Configuring nPartitions” (page 19) for details.
•
Partition Manager (/opt/parmgr/bin/parmgr)
Partition Manager provides a graphical interface for configuring, modifying, and managing
nPartitions and hardware within a server complex.
Two versions of Partition Manager are available: Version 1.0 and Version 2.0. Partition
Manager Version 1.0 is used only on HP-UX 11i v1 (B.11.11) releases prior to the December
2004 release and relies in part on the Original nPartition Commands. Partition Manager
Version 2.0 is supported for HP-UX and Windows and relies in part on the Enhanced
nPartition Commands.
Although both Partition Manager versions support a similar set of tasks, the Partition
Manager Version 2.0 release provides a significantly improved graphical interface, a new
Web-based management interface, and remote administration abilities.
See “Partition Manager” (page 22) for details.
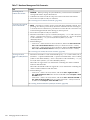
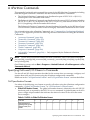
Commands for Configuring nPartitions
You can use the nPartition commands to create, modify, monitor, and remove nPartitions; get
detailed server hardware information; manipulate attention indicators (LEDs) and power; and
modify server complex attributes such as the complex name.
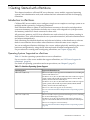
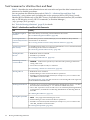
Table 1-3 describes the two nPartition commands releases, the Original nPartition Commands
and the Enhanced nPartition Commands.
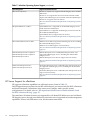
The nPartition commands include: parcreate, parmodify, parremove, parstatus,
parunlock, fruled, frupower, and cplxmodify. Table 1-4 “nPartition Commands
Descriptions” briefly describes each of the commands.
When using these commands, specify cells and I/O chassis using the notations in “Specifying
Cells and I/O Chassis to Commands” (page 243).
Administration Tools for nPartitions
19
Remote management using the commands is supported as described in “Specifying Remote
Management Options to Commands” (page 247).
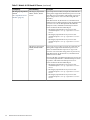
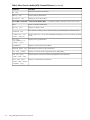
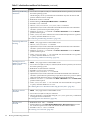
Table 1-3 nPartition Commands Releases
Original nPartition Commands
Enhanced nPartition Commands
• Support only local management of nPartitions and
complexes.
• Were distributed with HP-UX 11i v1 (B.11.11) releases
prior to the December 2004 release.
• Supported by HP-UX kernels built with nPartition
support enabled (the hd_fabric driver) and use the
libfab.1 library.
• Installed as part of the HP-UX 11i Version 1 operating
system installation prior to the December 2004 release.
• Support both local management and remote
management of nPartitions and complexes.
• Distributed with the HP-UX 11i v3 (B.11.31) release.
Installed and supported for use on all systems that run
HP-UX 11i Version 3.
• Distributed with the HP-UX 11i v2 (B.11.23) release.
Installed and supported for use on all systems that run
HP-UX 11i Version 2.
• Distributed with the HP-UX 11i v1 (B.11.11) December
2004 release and later.
• Available for Windows (32-bit) and Windows (64-bit).
Distributed with the Smart Setup CD.
• Available for Red Hat Enterprise Linux and SuSE Linux
Enterprise Server. Distributed with the HP Integrity
Essentials Foundation Pack for Linux.
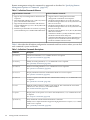
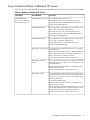
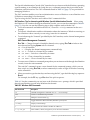
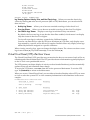
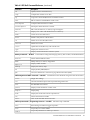
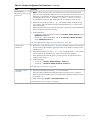
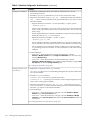
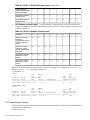
Table 1-4 describes the nPartition configuration commands and lists sections where you can find
each command's syntax and details.
Table 1-4 nPartition Commands Descriptions
Command
Description
parcreate
Create a new nPartition; root or IPMI LAN access is required.
See “parcreate Command” (page 249).
parmodify
Modify an existing nPartition; root or IPMI LAN access is required.
See “parmodify Command” (page 252).
parremove
Remove an existing nPartition; root or IPMI LAN access is required.
See “parremove Command” (page 256).
parstatus
Display nPartition information and hardware details for a server complex.
See “parstatus Command” (page 258).
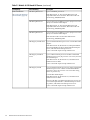
parunlock
Unlock Complex Profile data (use this command with caution); root or IPMI LAN access
is required.
See “parunlock Command” (page 260).
fruled
Blink the attention indicators (LEDs) or turn them off. This command can control these
indicators for cells, I/O chassis, and cabinet numbers.
See “fruled Command” (page 262).
frupower
Display status or turn power on or off for cells and I/O chassis; root or IPMI LAN access
is required.
See “frupower Command” (page 264).
cplxmodify
Only distributed with the Enhanced nPartition Commands.
Modify server complex attributes. Supports changing the name of a complex; root or IPMI
LAN access is required
See “cplxmodify Command” (page 266).
20
Getting Started with nPartitions
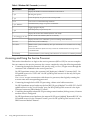
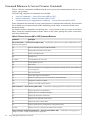
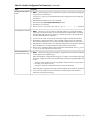
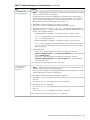
Availability of nPartition Commands
The Original nPartition Commands were distributed as part of HP-UX 11i v1 (B.11.11) releases
prior to the December 2004 release.
The Enhanced nPartition Commands are distributed with current HP-UX releases, including the
HP-UX 11i v3 (B.11.31) release, all releases of HP-UX 11i v2 (B.11.23), and releases of HP-UX 11i
v1 (B.11.11) beginning with the December 2004 release.
The Enhanced nPartition Commands also are distributed as bundles on the HP Smart Setup CD
for Windows, and as bundles on the HP Integrity Essentials Foundation Pack for Linux.
You can download the nPartition Commands for Windows and Linux from the http://
www.hp.com/ Web site. See “Downloading Enhanced nPartition Commands for Windows” and
“Downloading the HP Integrity Essentials Foundation Pack for Linux”.
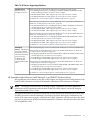
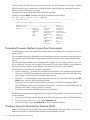
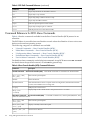
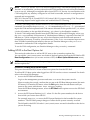
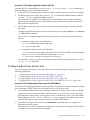
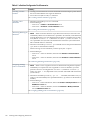
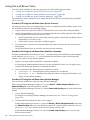
Enhanced nPartitions Commands for Windows
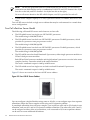
The Enhanced nPartition Commands for Windows are available in both 32-bit and 64-bit versions.
•
The Windows (32-bit) Enhanced nPartition Commands are designed for any 32-bit system
running Windows XP, Windows 2000 with Service Pack 3, or Windows Server 2003 (32-bit).
The 32-bit nPartition Commands enable you to use a 32-bit system as a remote management
station for nPartition administration.
•
The Windows (64-bit) Enhanced nPartition Commands are designed for HP Integrity servers
running Windows Server 2003, 64-bit, Enterprise Edition or Datacenter Edition.
The 64-bit nPartition Commands enable you to perform local and remote management of
nPartitions when running on a cell-based server with Windows Server 2003, and enable you
to perform remote management when running on other HP Integrity servers with Windows
Server 2003.
The Smart Setup CD has both both the 32-bit and 64-bit versions of the nPartition Commands.
You also can download the nPartition Commands bundles for Windows from the http://
www.hp.com/ Web site.
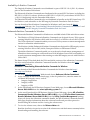
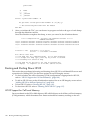
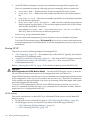
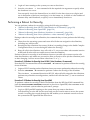
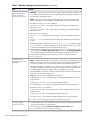
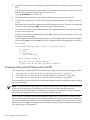
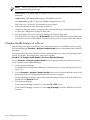
Procedure 1-1 Downloading Enhanced nPartition Commands for Windows
You can download the Enhanced nPartition Commands for Windows from the http://
www.hp.com/ Web site.
1.
2.
Go to the http://www.hp.com/ Web site and choose Software & Driver Downloads.
At the Software & Driver Downloads page, in the for product box, enter the name of a
cell-based HP Integrity server, such as:
• Integrity Superdome
• Integrity rx8620
• Integrity rx7620
3.
At the Downloads for HP Business Support Center Web page, choose Microsoft Windows
Server 2003 64-Bit from the select operating system list.
At the next Downloads for HP Business Support Center Web page, choose HP nPartition
Commands Bundle (Windows Server 2003 64-Bit) or choose HP nPartition Commands
Bundle (Windows Server 2003 32-Bit) from the Utility Partition Management heading.
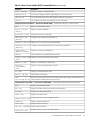
4.
After you choose the nPartition commands bundle, the HP nPartition Commands Bundle
Web page displays information about the software bundle and provides options for
downloading the software and for viewing the release notes.
5.
To view the release notes, choose the Release Notes tab.
Read the Installation instructions section of the release notes and the features summary before
downloading and installing the software.
Administration Tools for nPartitions
21
6.
To download the Enhanced nPartition Commands for Windows, choose download from
the Web page.
Enhanced nPartition Commands for Linux
The HP Integrity Essentials Foundation Pack for Linux is a CD that includes Enhanced nPartition
Commands for use with Red Hat Enterprise Linux or SuSE Linux Enterprise Server.
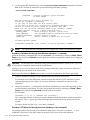
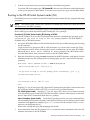
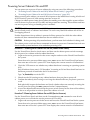
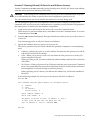
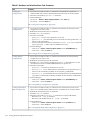
Procedure 1-2 Downloading the HP Integrity Essentials Foundation Pack for Linux
You can download the HP Integrity Essentials Foundation Pack for Linux from the http://
www.hp.com/go/softwaredepot Web site.
The downloadable CD image is an .iso file that you can use to record a usable CD.
1.
2.
3.
4.
5.
Go to the http://www.hp.com/go/softwaredepot Web site.
At the Software Depot home page, enter Foundation Pack for Linux in the Search
field to search the Software Depot.
At the product catalog page that displays the search results, choose the HP Integrity
Essentials Foundation Pack for Linux on Itanium (R) 2-based Servers entry from the
list of products.
At the HP Integrity Essentials Foundation Pack for Linux product details page, in the to
order section of the page (where it states "Click here to download"), choose the word here.
To download the HP Integrity Essentials Foundation Pack for Linux CD image file, choose
download from the Web page.
You will use the .iso file that you downloaded to create a usable CD.
6.
Go to the http://docs.hp.com/linux/ Web site to view documentation for the HP Integrity
Essentials Foundation Pack for Linux.
Under the Linux for Itanium 2-based Servers and Workstations heading of the Linux
documentation Web site, view the HP Integrity Essentials Foundation Pack for Linux
documentation.
7.
Record a CD using the HP Integrity Essentials Foundation Pack for Linux CD image file.
The CD image (.iso file) is a complete CD image in one file. Copying the file to a CD does
not create a usable CD. Instead, use a software application that supports recording a CD
from a CD image.
Partition Manager
Partition Manager provides a graphical interface for managing cell-based servers.
Partition Manager Version 1.0 was distributed with HP-UX 11i v1 (B.11.11) releases prior to the
December 2004 release. Starting with the HP-UX 11i v1 December 2004 release, Partition Manager
Version 2.0 replaces Partition Manager Version 1.0 for HP-UX 11i v1 systems.
Partition Manager Version 2.0 is distributed and installed with the HP-UX 11i v3 (B.11.31) release
and all HP-UX 11i v2 (B.11.23) releases. It also is available for Windows (32-bit) and Windows
(64-bit) as part of the the Smart Setup CD, and is available for Linux on the HP Integrity Essentials
Foundation Pack for Linux.
Partition Manager Version 2.0 for HP-UX provides the /opt/parmgr/bin/parmgr command
to run, stop, and restart Partition Manager. Refer to the parmgr -h command or the parmgr(1M)
manpage for command-line options.
Also see the Partition Manager Version 2.0 online help available at the following Web site:
http://docs.hp.com/en/PARMGR2/
To view the online help without running Partition Manager, you can open the help files using
a Web browser either on a system where Partition Manager is installed, or on a system that has
a downloaded copy of the help files.
22
Getting Started with nPartitions
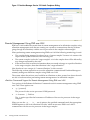
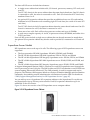
Partition Manager Version 2.0 for Windows
The Partition Manager Version 2.0 for Windows can be installed and run on either 32-bit or 64-bit
Windows systems. (A single Partition Manager bundle is provided for both 32-bit and 64-bit
systems.)
•
•
Using Partition Manager for Windows on any 32-bit system running Windows XP, Windows
2000 with Service Pack 3, or Windows 2003, 32-bit Edition enables you to use a 32-bit system
as a remote management station for nPartition administration.
Using Partition Manager for Windows on an HP Integrity servers running Windows Server
2003, 64-bit, Enterprise Edition or Datacenter Edition enables you to perform local and
remote management of nPartitions when running on a cell-based server with Windows
Server 2003, and enables you to perform remote management when running on other HP
Integrity servers with Windows Server 2003.
NOTE: Before installing the Partition Manager bundle for Windows you must download and
install the nPartition Commands bundle (either the 32-bit or 64-bit version, depending on the
platform where the installation occurs).
You also must download and install the Java 2 SE SDK v1.42 from http://java.sun.com/downloads.
For details refer to the release notes.
The Smart Setup CD includes Partition Manager Version 2.0 for Windows. You also can download
the Partition Manager bundles for Windows from the http://www.hp.com/ Web site.
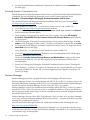
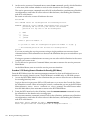
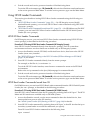
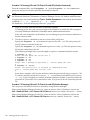
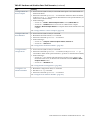
Procedure 1-3 Downloading Partition Manager Version 2.0 for Windows
You can download Partition Manager Version 2.0 for Windows from the http://www.hp.com/
Web site.
1.
2.
Go to the http://www.hp.com/ Web site and choose Software & Driver Downloads.
At the Software & Driver Downloads page, in the for product box, enter the name of a
cell-based HP Integrity server, such as:
• Integrity Superdome
• Integrity rx8620
• Integrity rx7620
3.
At the Downloads for HP Business Support Center Web page, choose Microsoft Windows
Server 2003 64-Bit from the select operating system list.
At the next Downloads for HP Business Support Center Web page, choose HP Partition
Manager Bundle from the Utility Partition Management heading.
4.
After you choose the Partition Manager bundle, the HP Partition Manager Bundle Web page
displays information about the software bundle and provides options for downloading the
software and for viewing the release notes.
5.
To view the release notes, choose the Release Notes tab.
Read the Installation instructions section of the release notes and the features summary before
downloading and installing the software.
6.
To download Partition Manager for Windows, choose download from the Web page.
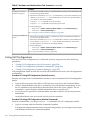
nPartition Properties
This section describes the nPartition properties you work with when performing nPartition
administration tasks.
The following nPartitions details are covered here:
•
•
“Partition Numbers”
“Assigned and Unassigned Cells”
nPartition Properties
23
•
•
•
•
•
•
“Base Cells”
“Core Cells”
“Active and Inactive Cells”
“Cell Local Memory”
“Cell Property Details”
“Active and Inactive nPartition Boot States”
Partition Numbers
Each nPartition has its own unique partition number that the nPartition administration tools use
for identifying the nPartition.
When you create an nPartition, the tool you use assigns the nPartition the lowest available
partition number. For example, the first nPartition always is partition number 0, and the second
nPartition to be created is partition number 1.
After you remove an nPartition, no cells are assigned to the nPartition. As a result, the nPartition
tools can reuse the partition number when creating a new nPartition.
For example, after you remove partition number 2, the next time you create a new nPartition the
parcreate command or Partition Manager will assign cells to partition number 2 when creating
a new nPartition, if all lower-numbered nPartitions (partition numbers 0 and 1) already are
defined.
Assigned and Unassigned Cells
Each cell in a server complex either is assigned to one of the nPartitions in the complex, or it is
unassigned and thus is not used by any of the nPartitions. If an I/O chassis is attached to an
unassigned cell, then the chassis likewise is not assigned to an nPartition.
Cells that are unassigned are considered to be available resources; they are free to be assigned
to any of the existing nPartitions, or can be used to create new nPartitions.
Base Cells
On both HP 9000 servers and HP Integrity servers, all cells within an nPartition are base cells.
The nPartitions administration tools automatically set the cell type to base cell, if you do not
specify the cell type.
Core Cells
One cell in each nPartition must serve as the active core cell. The core cell controls the nPartition
until an operating system has booted, and it provides console services and other boot and
management abilities for the nPartition. The monarch processor on the core cell runs the Boot
Console Handler (BCH) or Extensible Firmware Interface (EFI) code while all other processors
are idle until an operating system is booted.
On first-generation cell-based servers and HP sx1000 chipset-based servers, core I/O is provided
by a PCI card residing in an I/O chassis. On these servers, to be eligible as a core cell, a cell must
be assigned to the nPartition, it must be active, and it must be attached to an I/O chassis containing
functional core I/O.
On HP sx2000 chipset-based servers, core I/O is provided on each cell, so any cell assigned to an
nPartition can be a core cell.
Although an nPartition can have multiple core-capable cells, only one core I/O is actively used
in an nPartition: the core I/O belonging to the active core cell.
For details about setting and using the core cell choices (or "alternates") for an nPartition see
“Setting nPartition Core Cell Choices” (page 194). When none of the core cell choices can serve
24
Getting Started with nPartitions
as the active core cell, or if no core cell choices are specified, the nPartition attempts to select an
eligible cell using a default process.
Active and Inactive Cells
Cells that are assigned to an nPartition and have booted to form an nPartition are active cells
whose resources (processors, memory, and any attached I/O) can be actively used by software
running in the nPartition.
Cells that are inactive either are not assigned to an nPartition, or they have not participated in
partition rendezvous to form an nPartition with any other cells assigned to the nPartition.
(Partition rendezvous is the point during the nPartition boot process when all available cells in
an nPartition join together to establish which cells are active for the current boot of the nPartition.)
For example, a cell is inactive when it is powered off, has booted with a "n" use-on-next-boot
value, or is assigned to an nPartition that has been reset to the shutdown for reconfig state.
The resources belonging to inactive cells are not actively used by an nPartition. For a cell and its
resources to be actively used the cell must boot and participate in partition rendezvous.
Cell Local Memory
On cell-based servers that are based on the HP sx1000 or sx2000 chipset, a portion of the memory
in each cell can be configured as cell local memory (CLM), which is non-interleaved memory
that can be quickly accessed by processors residing on the same cell as the memory.
CAUTION: Memory configured as cell local memory only can be used by operating systems
that support it.
Any memory configured as cell local memory is unusable when an nPartition runs an operating
system that does not support it.
The nPartition management tools enable you to configure CLM for each cell either as a percentage
of the total memory in the cell, or as an absolute number of gigabytes of memory.
For details about configuring CLM see Chapter 3 (page 61).
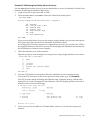
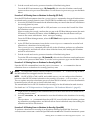
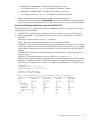
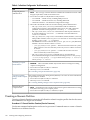
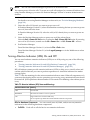
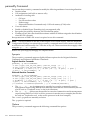
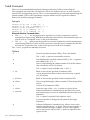
Cell Property Details
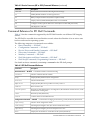
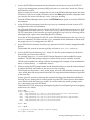
Each cell has various properties that determine how the cell can be used and managed.
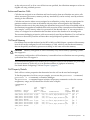
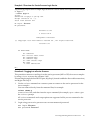
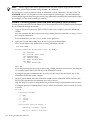
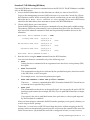
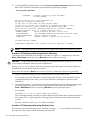
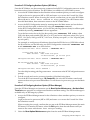
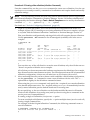
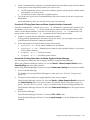
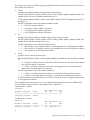
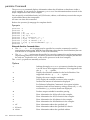
To list the properties of cells in a server complex, you can use the parstatus -C command,
parstatus -V -c# command, or Partition Manager.
The parstatus -C command output includes cell property summaries such as the current
assignments, usage, and I/O details for all cells in the complex.
# parstatus -C
[Cell]
CPU
OK/
Hardware
Actual
Deconf/
Location
Usage
Max
========== ============ =======
cab0,cell0 active core 4/0/4
cab0,cell1 active base 4/0/4
cab0,cell2 active base 4/0/4
cab0,cell3 absent
cab0,cell4 active core 2/0/4
cab0,cell5 active base 2/0/4
cab0,cell6 active base 2/0/4
cab0,cell7 absent
-
Memory
(GB)
OK/
Deconf
=========
8.0/ 0.0
8.0/ 0.0
8.0/ 0.0
4.0/ 0.0
4.0/ 0.0
4.0/ 0.0
-
Connected To
===================
cab 0,bay0,chassis1
cab 0,bay1,chassis3
cab 0,bay0,chassis3
cab 0,bay1,chassis1
-
Core
Cell
Capable
=======
yes
no
yes
yes
no
yes
-
Use
On
Next
Boot
====
yes
yes
yes
yes
yes
yes
-
Par
Num
===
0
0
0
1
1
1
-
#
nPartition Properties
25
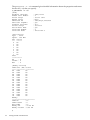
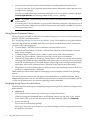
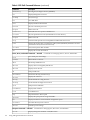
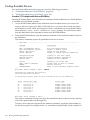
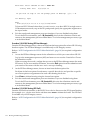
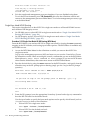
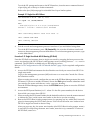
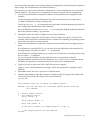
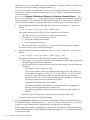
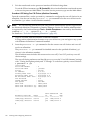
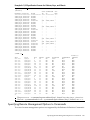
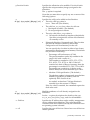
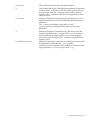
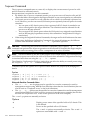
The parstatus -V -c# command gives detailed information about the properties and status
for the cell (-c#) that you specify.
# parstatus -V -c0
[Cell]
Hardware Location
Global Cell Number
Actual Usage
Normal Usage
Connected To
Core Cell Capable
Firmware Revision
Failure Usage
Use On Next Boot
Partition Number
Partition Name
:
:
:
:
:
:
:
:
:
:
:
[CPU Details]
Type : 8820
Speed : 900 MHz
CPU Status
=== ======
0
ok
1
ok
2
ok
3
ok
4
ok
5
ok
6
ok
7
ok
CPUs
===========
OK
: 8
Deconf : 0
Max
: 8
cab0,cell0
0
active core
base
cab0,bay0,chassis0
yes
20.1
activate
yes
0
Partition 0
[Memory Details]
DIMM Size (MB) Status
==== ========= =========
0A
2048
ok
4A
2048
ok
0B
2048
ok
4B
2048
ok
1A
2048
ok
5A
2048
ok
1B
2048
ok
5B
2048
ok
2A
2048
ok
6A
2048
ok
2B
2048
ok
6B
2048
ok
3A
2048
ok
7A
2048
ok
3B
2048
ok
7B
2048
ok
Memory
=========================
DIMM OK
: 16
DIMM Deconf
: 0
Max DIMMs
: 16
Memory OK
: 32.00 GB
Memory Deconf : 0.00 GB
#
26
Getting Started with nPartitions
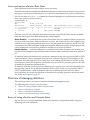
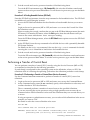
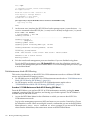
Active and Inactive nPartition Boot States
Each nPartition has a boot state of either active or inactive.
The boot state indicates whether the nPartition has booted so that it may be interactively accessed
through its console (active nPartitions) or if it cannot be used interactively (inactive nPartitions)
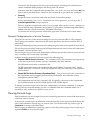
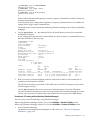
You can use the parstatus -P command or Partition Manager to list all nPartitions and their
boot states (active or inactive status).
# parstatus -P
[Partition]
Par
# of # of I/O
Num Status
Cells Chassis
=== ============ ===== ========
0 inactive
2
1
1 active
2
1
#
Core cell
==========
?
cab1,cell2
Partition Name (first 30 chars)
===============================
feshd5a
feshd5b
Likewise, you can view nPartition boot states using the Virtual Front Panel, which is available
from the service processor Main menu for the server complex.
Active nPartition An nPartition that is active has at least one core-capable cell that is active (not
in a boot-is-blocked state). When an nPartition is active, one or more of the cells assigned to the
nPartition have completed partition rendezvous and the system boot interface (the BCH or EFI
environment) has loaded and been displayed through the nPartition console. An operating system
can be loaded and run from the system boot interface on an active nPartition.
Inactive nPartition An inactive nPartition is considered to be in the shutdown for reconfig state,
because all cells assigned to the nPartition either remain at a boot-is-blocked state or are powered
off.
To make an inactive nPartition active, use the BO command at the service processor (MP or GSP)
Command menu. The BO command clears the boot-is-blocked flag for all cells assigned to the
nPartition, thus allowing the cells to rendezvous and enabling the nPartition to run the system
boot interface. (If all cells assigned to an nPartition are powered off, you must power on its cells
to enable the nPartition to become active.)
To make an nPartition inactive perform a shutdown for reconfig. You can issue commands from
the operating system, the system boot interface (BCH or EFI), or the service processor (MP or
GSP) Command menu. All three methods reboot an nPartition and hold all of its cells at
boot-is-blocked; as a result the nPartition is shutdown for reconfig (placed in an inactive state).
For details see Chapter 5 (page 87).
Overview of Managing nPartitions
This section provides overviews of common nPartition management tasks.
The following task overviews are given here:
•
•
•
•
“Basics of Listing nPartition and Complex Status”
“Basics of nPartition Creation”
“Basics of nPartition Modification”
“Basics of nPartition Booting and Resetting”
Basics of Listing nPartition and Complex Status
You can list server complex hardware details and nPartition configuration details using the
following tools and commands.
Overview of Managing nPartitions
27
For details see Chapter 8 (page 223).
•
Service processor (MP or GSP) methods for listing hardware and nPartition status include
the following commands, which are available from the service processor Command menu.
— CP — List nPartition configurations, including all assigned cells.
— PS — List cabinet, power, cell, processor, memory, I/O, and other details.
— IO — List connections from cells to I/O chassis on HP Superdome servers.
— ID — List product and serial numbers.
•
EFI Shell methods (available only on HP Integrity servers) for listing hardware and nPartition
status include the following commands. Hardware and nPartition information displayed
by the EFI Shell is limited to the local nPartition.
— info sys — List the local nPartition number and active cell details.
— info io — List the I/O configuration.
— info mem — List memory details.
— info cpu — List processor details.
•
BCH menu methods (available only on HP 9000 servers) for listing hardware and nPartition
status include the following commands. Hardware and nPartition information displayed
by the BCH menu is limited to the local nPartition in most cases.
— Information menu, PR command — List processor configuration details.
— Information menu, ME command — List memory configuration details.
— Information menu, IO command — List I/O configuration details.
— Information menu, CID command — List complex product and serial numbers.
— Configuration menu, PD command — List the local nPartition number and name.
•
nPartition administration tools for listing hardware and nPartition status include the
following features.
— Partition Manager Version 1.0 — The Complex→Show Complex Details action provides
complex status information; use the Cells tab, CPUs/Memory tab, I/O Chassis tab, and
Cabinet Info tab to display selected details.
— Partition Manager Version 2.0 — The following user interface features provide nPartition
and complex status:
General tab, Hardware tab, nPartitions tab, Cells tab, I/O tab, CPUs/Memory tab,
Power and Cooling tab. Also, the Complex→Show Complex Details action.
—
—
—
—
—
—
—
—
—
—
parstatus -C command — List cell configurations.
parstatus -V -c# command — List detailed cell information.
parstatus -I command, rad -q command on HP-UX 11i v1 (B.11.11) systems, and
olrad -q command on HP-UX 11i v2 (B.11.23) and HP-UX 11i v3 (B.11.31) systems
— List I/O chassis and card slot details.
parstatus -B command — List server cabinet summaries for the complex.
parstatus -V -b# command — List detailed server cabinet status.
parstatus -X command — List product and serial numbers.
parstatus -P command — List a configuration summary for all nPartitions.
parstatus -V -p# command — List detailed nPartition configuration information.
parstatus -w command — List the local nPartition number.
frupower -d -C command or frupower -d -I command — List power status for
all cells (-C) or all I/O chassis (-I).
For further details and summaries see Table 8-1 (page 224).
28
Getting Started with nPartitions
Basics of nPartition Creation
Creating an nPartition involves using an nPartition administration tool to assign one or more
cells in a complex to the new nPartition. At the time an nPartition is created you also can optionally
specify various configuration options for the nPartition, such as its name, cell use-on-next-boot
values, and other details. After an nPartition is created you can modify the nPartition, as described
in “Basics of nPartition Modification” (page 30). For detailed procedures see Chapter 6 (page 165).
NOTE: When creating an nPartition, follow the HP nPartition requirements and guidelines.
HP recommends only specific sets of nPartition configurations. For nPartition configuration
requirements and recommendations, see Chapter 3 (page 61).
The method you choose for creating an nPartition can depend on whether you are creating the
first nPartition in a complex, creating a "Genesis Partition" for a complex, or creating an additional
nPartition in a complex that already has one or more nPartitions defined.
•
Creating the First nPartition in a Server Complex To create the first nPartition in a complex
you can do so either by creating a Genesis Partition or by using an nPartition administration
tool to remotely manage the complex using IPMI over LAN.
— All cell-based servers support creating a Genesis Partition. See “Creating a Genesis
Partition for a Server Complex” (page 29).
— Only cell-based servers based on the HP sx1000 or sx2000 chipset support remote
administration using IPMI over LAN.
From a system with the Enhanced nPartition Commands, use the parcreate command
-g... -h... set of options. Or from Partition Manager Version 2.0 use the Switch
Complexes dialog to connect to the complex and use the nPartition→Create nPartition
action.
For remote administration details see “Remote and Local Management of nPartitions”
(page 41).
•
Creating a Genesis Partition for a Server Complex Creating a Genesis Partition involves
the service processor (MP or GSP) CC command to specify that an initial, one-cell nPartition
be created within the server complex. To create a Genesis Partition, the complex either must
have no nPartitions defined, or all nPartitions must be shutdown for reconfig (inactive). For
details see “Genesis Partition” (page 30).
•
Creating Additional nPartitions in a Server Complex You can use either of two methods to
create additional nPartitions in a complex where one or more nPartitions already are defined:
either use parcreate or Partition Manager from an nPartition running in the complex, or
use the remote administration feature of those tools running on a system outside the complex.
For a detailed procedure see “Creating a New nPartition” (page 172).
— Creating a New nPartition Locally — To create a new nPartition in the same complex
where parcreate or Partition Manager is running at least one nPartition must be
booted with an operating system that has the nPartition tools installed.
Login to HP-UX on the nPartition and issue the parcreate command, or access Partition
Manager running on the nPartition and use its Create nPartition action.
—
Creating a New nPartition Remotely — To remotely create a new nPartition in a complex,
do so either by using the Enhanced nPartition Commands version of parcreate, or
by using Partition Manager Version 2.0.
Only cell-based servers based on the HP sx1000 or sx2000 chipset support remote
administration.
Both parcreate and Partition Manager support two methods of remote administration:
WBEM and IPMI over LAN. For remote administration using WBEM the tool remotely
accesses a booted operating system running on an nPartition in the target complex (for
Overview of Managing nPartitions
29
example, by the -u... -h... set of options). For remote administration using IPMI
over LAN the tool remotely accesses the service processor of the target complex (for
example, by the -g... -h... set of options).
For remote administration details see “Remote and Local Management of nPartitions”
(page 41).
For detailed procedures for creating and managing nPartitions see Chapter 6 (page 165).
Genesis Partition
The Genesis Partition is the initial, one-cell nPartition created within a server complex by the
service processor (MP or GSP) CC command. The Genesis Partition is just like any other nPartition
except for how it is created and the fact that its creation wipes out any previous nPartition
configuration data.
For a detailed procedure see “Creating a Genesis Partition” (page 170).
If your server complex has its nPartitions pre-configured by HP, you do not need to create a
Genesis Partition.
NOTE: For servers based on the HP sx1000 or sx2000 chipset, you can instead use nPartition
tools running on a remote system to remotely create and configure new nPartitions (including
the first nPartition in the complex).
See “Remote and Local Management of nPartitions” (page 41) for details.
You can use nPartition management tools running on the Genesis Partition as the method for
configuring all nPartitions in the complex. The Genesis Partition always is partition number 0.
When it is first created, the Genesis Partition consists of one cell that is connected to an I/O chassis
that has core I/O installed. The Genesis Partition also should have a bootable disk (or a disk onto
which you can install an operating system).
If an operating system is not installed on any disks in the Genesis Partition, you can boot the
Genesis partition to the system boot interface (either BCH or EFI) and from that point install an
operating system. This installation requires either having access to an installation server, or to a
CD drive (or DVD drive) attached to an I/O chassis belonging to the nPartition.
After you boot an operating system on the Genesis Partition, you can modify the nPartition to
include additional cells. You also can create other, new nPartitions and can modify them from
the Genesis Partition or from any other nPartition that has an operating system with the nPartition
tools installed.
Basics of nPartition Modification
Modifying an nPartition involves using an nPartition administration tool to revise one or more
parts of the server Complex Profile data, which determines how hardware is assigned to and
used by nPartitions. The Complex Profile is discussed in “Complex Profile” (page 36).
For detailed procedures see Chapter 6 (page 165).
You can modify an nPartition either locally or remotely.
•
•
For local administration, use nPartition Commands or Partition Manager from an nPartition
in the same complex as the nPartition to be modified. Some nPartition details also can be
modified locally from an nPartition console by using EFI Shell commands or BCH menu
commands.
For remote administration, use remote administration features of the Enhanced nPartition
Commands or Partition Manager Version 2.0.
You can use either of two methods for remote administration: WBEM and IPMI over LAN.
30
Getting Started with nPartitions
—
For remote administration using WBEM the tool remotely accesses an operating system
running on an nPartition in the target complex.
Use the -u... -h... set of parmodify options or the Partition Manager Switch
Complexes action and "remote nPartition" option.
—
For remote administration using IPMI over LAN the tool remotely accesses the service
processor of the target complex.
Use the -g... -h... set of parmodify options or the Partition Manager Switch
Complexes action and "remote partitionable complex" option.
See “Remote and Local Management of nPartitions” (page 41) for details.
nPartition Modification Tasks
The following tasks are among the basic procedures for modifying nPartitions.
•
Assigning and Unassigning Cells
To assign (add) or unassign (remove) cells from an nPartition use the parmodify -p#
-a#... command to add a cell, or the parmodify -p# -d#... command to remove a
cell from the specified nPartition (-p#, where # is the partition number). From Partition
Manager select the nPartition, use the nPartition→Modify nPartition action, and select the
Add/Remove Cells tab.
Also see “Assigning (Adding) Cells to an nPartition” (page 179) and see “Unassigning
(Removing) Cells from an nPartition” (page 182).
•
Removing an nPartition
To remove (delete) an nPartition use the parremove -p# command to remove a specified
nPartition (-p#, where # is the partition number). From Partition Manager select the nPartition
and use the nPartition→Delete nPartition action.
Also see “Removing (Deleting) an nPartition” (page 176).
•
Renaming an nPartition
To rename an nPartition use the parmodify -p# -P name command to set the name for
a specified nPartition (-p#, where # is the partition number). From Partition Manager select
the nPartition, use the nPartition→Modify nPartition action, and select the General tab.
On an HP 9000 server you also can use use the BCH Configuration menu PD NewName
command.
Also see “Renaming an nPartition” (page 185).
•
Setting Cell Attributes
To set attributes for a cell use the parmodify -p# -m#... command to modify cell
attributes for a specified nPartition (-p#, where # is the partition number).
From Partition Manager Version 1.0 select the nPartition, use the nPartition→Modify
nPartition action, Change Cell Attributes tab, select the cell(s), and click Modify Cell(s).
From Partition Manager Version 2.0 select the nPartition, use the nPartition→Modify
nPartition action, and use the Set Cell Options tab (to set the use-on-next-boot value) and
Configure Memory tab (to set the cell local memory value).
On an HP 9000 server you also can use the BCH Configuration menu CELLCONFIG command
to set use-on-next-boot values. On an HP Integrity server you also can use the EFI Shell
cellconfig command to set use-on-next-boot values.
Also see “Setting Cell Attributes” (page 189).
Overview of Managing nPartitions
31
•
Setting Core Cell Choices
To set core cell choices for an nPartition use the parmodify -p# -r# -r#... command
to specify up to four core cell choices in priority order for a specified nPartition (-p#, where
# is the partition number).
From Partition Manager Version 1.0 select the nPartition, use the nPartition→Modify
nPartition action, Core Cell Choices tab.
From Partition Manager Version 2.0 select the nPartition, use the nPartition→Modify
nPartition action, Set Cell Options tab, and use the Core Cell Choice column to set
priorities.
On an HP 9000 server you can use the BCH Configuration menu COC command to set core
cell choices. On an HP Integrity server you can use the EFI Shell rootcell command to
set core cell choices.
Also see “Setting nPartition Core Cell Choices” (page 194).
•
Setting nPartition Boot Paths
On HP Integrity servers boot paths can be listed and configured only from the local nPartition.
From HP-UX use the setboot command to configure the local nPartition boot paths, or
use the parmodify -p# -b... -s... -t... command to set boot paths for a specified
nPartition (-p#, where # is the partition number).
On an HP 9000 server you can use the BCH Main menu PATH command to configure boot
paths. On an HP Integrity server you can use the EFI Shell bcfg command to configure boot
paths.
Also see “Configuring Boot Paths and Options” (page 155).
For more details and summaries see Table 6-1 (page 166).
Basics of nPartition Booting and Resetting
This section gives a brief overview of the boot process for cells and nPartitions and lists the main
nPartition boot commands and tasks.
For more details see Chapter 5 (page 87).
Boot Process for Cells and nPartitions
The nPartition boot process, on both HP 9000 servers and HP Integrity servers, includes two
phases: the cell boot phase and the nPartition boot phase.
1.
Cell Boot Phase of the nPartition Boot Process The cell boot phase occurs when cells are
powered on or reset. The main activities that occur during the cell boot phase are
power-on-self-test activities. During this phase each cell operates independently of all other
cells in the complex. Cells do not necessarily proceed through this phase at the same pace,
because each cell may have a different amount of hardware to test and discover, or cells
might be reset or powered on at different times. The main steps that occur during the cell
boot phase are:
a. A cell is powered on or reset, and the cell boot-is-blocked (BIB) flag is set.
BIB is a hardware flag on the cell board. When BIB is set, the cell is considered to be
inactive.
b.
32
Firmware on the cell performs self-tests and discovery operations on the cell hardware
components. Operations at this point include processor self-tests, memory tests, I/O
Getting Started with nPartitions
c.
2.
discovery, and discovery of interconnecting fabric (connections between the cell and
other cells, I/O, and system crossbars).
After the firmware completes cell self-tests and discovery, it reports the cell hardware
configuration to the service processor (GSP or MP), informs the service processor it is
"waiting at BIB", and then waits for the cell BIB flag to be cleared.
nPartition Boot Phase of the nPartition Boot Process The nPartition boot phase occurs when
an nPartition is booted, after its cells have completed self tests. During this phase "nPartition
rendezvous" occurs, however not all cells assigned to an nPartition are required to participate
in rendezvous. A minimum of one core-capable cell that has completed its cell boot phase
is required before the nPartition boot phase can begin. By default, all cells assigned to the
nPartition that have a "y" use-on-next-boot value are expected to participate in rendezvous,
and the service processor will wait for up to ten minutes for all such cells to reach the "waiting
at BIB" state. Cells that have a "n" use-on-next-boot value do not participate in rendezvous
and remain waiting at BIB. The main steps that occur during the nPartition boot phase are:
a. The service processor provides a copy of the relevant Complex Profile data to the cells
assigned to the nPartition.
This data includes a copy of the Stable Complex Configuration Data and a copy of the
Partition Configuration Data for the nPartition. For details see “Complex Profile”
(page 36).
b.
The service processor releases BIB for all cells assigned to the nPartition that have a "y"
use-on-next-boot value and complete the cell boot phase in time.
The service processor does not release BIB for any cell with a "n" use-on-next-boot value,
or for any cell that did not complete the cell boot phase within ten minutes of the first
cell to do so.
Once BIB is release for a cell, the cell is considered to be active.
c.
d.
e.
nPartition rendezvous begins, with the system firmware on each active cell using its
copy of complex profile data to contact other active cells in the nPartition.
The active cells in the nPartition negotiate to select a core cell.
The chosen core cell manages the rest of the nPartition boot process. A processor on the
core cell runs the nPartition system boot environment (BCH on HP 9000 servers, EFI
on HP Integrity servers). The core cell hands off control to an operating system loader
when the OS boot process is initiated.
You can view progress during the cell and nPartition boot phases by observing the Virtual Front
Panel for an nPartition, which is available from the service processor (MP or GSP) Main menu.
Common nPartition Boot Commands and Tasks
The following summary briefly describes the main nPartition boot commands and tasks. For
more summaries and details see Table 5-1 (page 96).
•
Service processor (MP or GSP) support for managing nPartition booting includes the
following commands, which are available from the service processor Command menu.
— RS — Reset an nPartition.
On HP Integrity servers you should reset an nPartition only after all self tests and
partition rendezvous have completed.
—
RR — Reset and perform a shutdown for reconfig of an nPartition.
On HP Integrity servers you should reset an nPartition only after all self tests and
partition rendezvous have completed.
—
BO — Boot the cells assigned to an nPartition past the "waiting at BIB" state and thus
begin the nPartition boot phase.
Overview of Managing nPartitions
33
—
—
TC — Perform a transfer of control reset of an nPartition.
PE — Power on or power off a cabinet, cell, or I/O chassis.
On HP Integrity rx8620 servers, rx8640 servers, rx7620 servers, and rx7640 servers,
nPartition power on and power off also is supported to manage power of all cells and
I/O chassis assigned to the nPartition using a single command.
•
EFI Shell support for managing nPartition booting includes the following commands. (EFI
is available only on HP Integrity servers.)
— bcfg — List and configure the boot options list for the local nPartition.
— autoboot — List, enable, or disable the nPartition autoboot configuration value.
— acpiconfig — List and configure the nPartition ACPI configuration setting, which
determines whether HP-UX, OpenVMS, Windows, or Linux can boot on the nPartition.
To boot HP-UX 11i v2 (B.11.23), HP-UX 11i v3 (B.11.31), or HP OpenVMS I64, the ACPI
configuration setting must be set to default.
To boot Windows Server 2003, the ACPI configuration setting for the nPartition must
be set to windows.
To boot Red Hat Enterprise Linux or SuSE Linux Enterprise Server:
◦
On HP rx7620 servers, rx8620 servers, or Integrity Superdome (SD16A, SD32A,
SD64A), the ACPI configuration must be set to single-pci-domain.
◦
On HP rx7640 servers, rx8640 servers, or Integrity Superdome (SD16B, SD32B,
SD64B), the ACPI configuration must be set to default.
—
—
—
—
•
34
acpiconfig enable softpowerdown — When set, causes nPartition hardware to
be powered off when the operating system issues a shutdown for reconfig command.
On HP rx7620, rx7640, rx8620, and rx8640 servers with a windows ACPI configuration
setting, this is the default behavior. Available only on HP rx7620, rx7640, rx8620, and
rx8640 servers.
acpiconfig disable softpowerdown — When set, causes nPartition cells to
remain at BIB when the operating system issues a shutdown for reconfig command. In
this case an OS shutdown for reconfig makes the nPartition inactive. On HP rx7620,
rx7640, rx8620, and rx8640 servers this is the normal behavior for nPartitions with an
ACPI configuration setting of default or single-pci-domain. Available only on
HP Integrity rx7620, rx7640, rx8620, and rx8640 servers.
reset — Resets the local nPartition, resetting all cells and then proceeding with the
nPartition boot phase.
reconfigreset — Performs a shutdown for reconfig of the local nPartition, resetting
all cells and then holding them at the "wait at BIB" state, making the nPartition inactive.
BCH menu support for managing nPartition booting includes the following commands.
(BCH is available only on HP 9000 servers.)
— BOOT — Initiate an operating system boot from a specified boot device path or path
variable.
— REBOOT — Resets the local nPartition, resetting all cells and then proceeding with the
nPartition boot phase.
— RECONFIGRESET — Performs a shutdown for reconfig of the local nPartition, resetting
all cells and then holding them at the "wait at BIB" state, making the nPartition inactive.
— PATH — List and set boot device path variables (PRI, HAA, ALT).
— Configuration menu, PATHFLAGS command — List and set the boot control flag for
each boot path, effectively determining the nPartition autoboot behavior.
Getting Started with nPartitions
•
HP-UX includes the following commands for shutting down and rebooting the nPartition.
— shutdown -r — Shuts down HP-UX and resets the local nPartition, resetting cells and
then proceeding with the nPartition boot phase.
On HP 9000 servers shutdown -r resets only the active cells.
On HP Integrity servers shutdown -r has the same effect as shutdown -R. All cells
are reset and nPartition reconfiguration occurs as needed.
—
shutdown -h — On HP 9000 servers, shuts down HP-UX, halts all processing on the
nPartition, and does not reset cells.
On HP Integrity servers, shutdown -h has the same effect as shutdown -R -H and
results in a shutdown for reconfig.
—
—
shutdown -R — Shuts down HP-UX and performs a reboot for reconfig of the
nPartition. All cells are reset and nPartition reconfiguration occurs as needed. The
nPartition then proceeds with the nPartition boot phase.
shutdown -R -H — Shuts down HP-UX and performs a shutdown for reconfig of the
nPartition. All cells are reset and nPartition reconfiguration occurs as needed. All cells
then remain at a "wait at BIB" state and the nPartition is inactive.
NOTE: On Superdome SX1000 PA and SX2000 PA, shutdown -R -H does not stop
at BIB if the MP has been hot swapped since the last reboot.
On HP rx7620, rx7640, rx8620, and rx8640 servers with a default (to support HP-UX)
ACPI configuration setting a "wait at BIB" state is the default behavior, but the
acpiconfig enable softpowerdown EFI Shell command can be used to instead
cause all nPartition hardware to power off.
•
HP OpenVMS I64 includes the following commands for shutting down and rebooting the
nPartition.
— @SYS$SYSTEM:SHUTDOWN.COM — Shuts down the OpenVMS I64 operating system.
The @SYS$SYSTEM:SHUTDOWN.COM command provides a series of prompts that you
use to establish the shutdown behavior, including the shutdown time and whether the
system is rebooted after it is shut down.
◦
◦
—
To perform a reboot for reconfig from OpenVMS I64 running on an nPartition,
issue @SYS$SYSTEM:SHUTDOWN.COM from OpenVMS, and then enter Yes at the
"Should an automatic system reboot be performed" prompt
To perform a shutdown for reconfig of an nPartition running OpenVMS I64: first
issue @SYS$SYSTEM:SHUTDOWN.COM from OpenVMS and enter No at the "Should
an automatic system reboot be performed" prompt, then access the MP and, from
the MP Command Menu, issue the RR command and specify the nPartition that is
to be shutdown for reconfig.
RUN SYS$SYSTEM:OPCRASH — Causes OpenVMS to dump system memory and then
halt at the P00>> prompt. To reset the nPartition following OPCRASH, access the
nPartition console and press any key to reboot.
Overview of Managing nPartitions
35
•
Microsoft® Windows® includes the following commands for shutting down and rebooting
the nPartition.
— shutdown /r — Shuts down Windows and performs a reboot for reconfig of the
nPartition. All cells are reset and nPartition reconfiguration occurs as needed. The
nPartition then proceeds with the nPartition boot phase.
— shutdown /s — Shuts down Windows and performs a shutdown for reconfig of the
nPartition. The default behavior differs on HP Integrity Superdome servers and HP
Integrity HP rx7620, rx7640, rx8620, and rx8640 servers.
On HP Integrity Superdome servers, shutdown /s causes all cells to be reset and
nPartition reconfiguration to occur as needed. All cells then remain at a "wait at BIB"
state and the nPartition is inactive
On HP Integrity HP rx7620, rx7640, rx8620, and rx8640 servers, the default behavior is
for shutdown /s to cause nPartition hardware to be powered off. On HP rx7620,
rx7640, rx8620, and rx8640 servers with a windows ACPI configuration setting, the the
acpiconfig disable softpowerdown EFI Shell command can be used to instead
cause all cells to instead remain at a "wait at BIB" state.
•
Red Hat Enterprise Linux and SuSE Linux Enterprise Server include the following commands
for shutting down and rebooting the nPartition.
— shutdown -r time — Shuts down Linux and performs a reboot for reconfig of the
nPartition. All cells are reset and nPartition reconfiguration occurs as needed. The
nPartition then proceeds with the nPartition boot phase.
The required time argument specifies when the Linux shutdown is to occur.
You can specify time in the format hh:mm, in which hh is the hour (one or two digits)
and mm is the minute of the hour (two digits); or in the format +m, in which m is the
number of minutes delay until shutdown; or specify now to immediately shut down.
—
shutdown -h time — Shuts down Linux and performs a shutdown for reconfig of the
nPartition. All cells are reset and nPartition reconfiguration occurs as needed. All cells
then remain at a "wait at BIB" state and the nPartition is inactive.
The required time argument specifies when the Linux shutdown is to occur.
On HP rx7620, rx7640, rx8620, and rx8640 servers with an ACPI configuration setting
of single-pci-domain, a "wait at BIB" state is the default OS shutdown for reconfig
behavior, but the acpiconfig enable softpowerdown EFI Shell command can be
used to instead cause all nPartition hardware to power off.
For details see Chapter 5 (page 87).
Complex Profile
The configurable aspects of a server complex are represented in a set of data called the "Complex
Profile", which determines how hardware is assigned to and used by nPartitions within a server.
36
Getting Started with nPartitions
The Complex Profile consists of three parts, or groups of data, which are described in detail in
Table 1-5 (page 40):
•
“Stable Complex Configuration Data” (page 40) — This group contains complex-wide
settings, including the complex name, serial number, the nPartition assignment for each
cell, and other details that apply to the entire server complex.
The Complex Profile contains one Stable Complex Configuration Data entry.
•
•
“Dynamic Complex Configuration Data” (page 40) — Architecturally reserved data.
“Partition Configuration Data” (page 40) — This group contains individual nPartition
settings, including the nPartition name, core cell choices, and other details that are specific
to an nPartition.
The Complex Profile contains a Partition Configuration Data entry for each possible
nPartition. (A server complex may have a maximum of sixteen nPartitions, globally numbered
from 0-15.)
The master copy of all parts of the Complex Profile resides on the service processor (MP or GSP)
for the complex. Each cell in the complex also has a copy of the Stable Complex Configuration
Data and a copy of the Partition Configuration Data for the nPartition to which it is assigned.
The service processor (MP or GSP) in the server manages all Complex Profile data and keeps all
copies of the data coherent using a locking mechanism, as described in the next sections.
Changing the Server Complex Profile
To modify the Complex Profile and thus change the server complex configuration, you use an
administration tool such as Partition Manager or one of the nPartition commands. See
“Administration Tools for nPartitions” (page 18) for details. You cannot directly edit the Complex
Profile data for a server.
The service processor maintains a set of locks that are used to ensure that only one set of changes
to the Complex Profile occurs at a time.
When you configure nPartitions, the administration tools you use revise the Complex Profile for
the server in coordination with the service processor. The tools acquire and release locks as
needed when modifying Complex Profile entries. You do not directly manage Complex Profile
locks under normal circumstances, but you can force an entry to be unlocked if required.
How the Complex Profile is Updated
A server Complex Profile is updated when you use one of the nPartition administration tools
(such as Partition Manager or commands) to create, modify, or delete an nPartition or modify
complex-wide data.
The general process by which changes to the Complex Profile occur is as follows:
1.
An administrator uses an nPartition administration tool to request that a specific configuration
change occurs.
This is a request to create, modify, or delete an nPartition or modify complex-wide data
such as the complex name.
2.
The tool acquires a lock from the service processor (MP or GSP) for the Complex Profile
entry that will be revised.
The lock ensures that no other changes to the Complex Profile entry will occur while the
tool revises it.
If the entry already is locked, that Complex Profile entry cannot be updated and the request
will fail and the tool exits with an error message.
3.
4.
The tool reads the Complex Profile entry whose lock it has acquired.
The tool revises the Complex Profile entry according to the administrator request.
Complex Profile
37
5.
6.
The tool sends the revised Complex Profile entry back to the service processor along with
the corresponding lock key.
The service processor then "pushes out" the new, revised Complex Profile entry by updating
its copy and updating all cells that have a copy of the entry.
However, the service processor will not push out a revised Complex Profile entry that affects
the nPartition assignment of an active cell. In this case the revised entry will remain pending
until the cell becomes inactive, for example during a reboot for reconfig or shutdown for
reconfig of the nPartition to which the cell is assigned.
7.
After the service processor has pushed out the revised Complex Profile entry it clears the
lock for the entry.
After the entry is unlocked then, as needed, another nPartition configuration task can lock
and revise that portion of the Complex Profile.
A single administration task can revise multiple Complex Profile entries. For example, you can
create a new nPartition and assign its name in a single action. In this case the tool you use must
lock both the Stable Complex Configuration Data and the Partition Configuration Data entry for
the new nPartition before revising the data according to the administration request.
Multiple nPartition configuration tasks can occur essentially concurrently if all tasks revise
different Complex Profile entries (thus allowing each task to acquire a lock for the entry it revises).
Complex Profile Entry Locking and Unlocking
Each Complex Profile entry has its own lock which is used to restrict access to the entry. If
necessary you can manually unlock Complex Profile entries, however in nearly all situations
you instead should allow the administration tools to automatically acquire and release locks.
CAUTION: You should generally avoid manually unlocking Complex Profile entries because
doing so can can result in the loss of configuration changes.
The locks for Complex Profile entries are managed as described here.
•
For the Stable Complex Configuration Data entry, there are slight differences in the locking
mechanisms on HP 9000 and HP Integrity servers.
— On cell-based HP 9000 servers, the Stable Complex Configuration Data has a single
lock.
— On cell-based HP Integrity servers, the Stable Complex Configuration Data has two
separate locks: a "read lock" for restricting read access to the current Stable Complex
Configuration Data entry, and a "write lock" for restricting access to a modifiable copy
of the Stable Complex Configuration Data.
•
On both HP 9000 and HP Integrity cell-based servers there is one lock for each Partition
Configuration Data entry (each nPartition has its own Partition Configuration Data entry).
The parunlock command and the service processor RL command enable you to manually
unlock Complex Profile entries.
It can be necessary to manually unlock a Complex Profile entry in the situation where an nPartition
configuration tool such as Partition Manager has prematurely exited. If such a tool exits before
it sends revised Complex Profile entries and corresponding lock keys back to the service processor,
the entries that the tool locked will remain locked indefinitely (until they are manually unlocked).
Manually Unlocking a Complex Profile Entry You can manually unlock Complex Profile entries
after an nPartition configuration tool has exited before unlocking the entries it had locked. In
this situation an attempt to modify the nPartition or complex-wide setting will fail because the
Complex Profile entries still are locked. If you are certain no authorized users are changing
configurations, use the parunlock command or the service processor RL command to unlock
38
Getting Started with nPartitions
the entries. After they are unlocked you can perform the modifications you had previously
attempted. For details see “Unlocking Complex Profile Entries” (page 198).
Aborting a Complex Profile Change A pending update of the Complex Profile can be canceled
or prevented by clearing the lock for a Complex Profile entry before the service processor has
pushed out the revised data for the entry. This occurs, for example, when you have issued a
request to change the nPartition assignment of an active cell and then manually unlock the
effected Complex Profile entries before performing a reboot for reconfig of the nPartition to
which the cell is assigned. For details see “Canceling Pending Changes to the Complex Profile”
(page 199).
Complex Profile Group Details
Table 1-5 lists details of the three groups of data that comprise the Complex Profile.
Complex Profile
39
NOTE: The Complex Profiles on cell-based HP 9000 servers and cell-based HP Integrity servers
contain slightly different sets of information.
Table 1-5 covers both types of Complex Profiles.
The Complex Profile on cell-based HP Integrity servers includes all HP 9000 server Complex
Profile data and additional components that are specific to HP Integrity servers. Some HP 9000
server Complex Profile data is unused on HP Integrity servers but is included for compatibility.
Table 1-5 Complex Profile Group Details
Complex Profile Group Description and Contents
Stable Complex
Configuration
Data Complex-wide
information.
The Stable Complex Configuration Data contains complex-wide configuration details, some
of which may be set by administrators.
Although the Stable Complex Configuration Data applies to the whole complex, the cell
assignments and cell local memory (CLM) per cell components are comprised of data that
affect the individual cells.
A copy of the Stable Complex Configuration Data resides on the service processor (MP or
GSP) and on every cell in the complex.
The system boot interfaces (the BCH and EFI environments) do not have methods for changing
Stable Complex Configuration Data. Instead, use the service processor command menu or
nPartition management tools.
The Stable Complex Configuration Data includes these components:
• Model String — Only applies to HP 9000 servers. PA-RISC model.
• Complex System Name — User-chosen name for the complex.
• Original Product Number — Set by HP manufacturing.
• Current Product Number — Originally set by HP manufacturing.
• Creator Serial Number — Set by HP manufacturing.
• Cell Assignments — User-configurable nPartition assignments for all cells in the complex;
also specifies each cell type (e.g. base).
• Cell Local Memory (CLM) Per Cell — Only on servers based on the HP sx1000 or sx2000
chipset. User-configurable setting for each cell that determines the amount of cell local
memory. The operating system on an nPartition with CLM configured must also support
CLM for the cell local memory to be accessible to the operating system.
• nPartition Configuration Privilege — Only on servers based on the HP sx1000 or sx2000
chipset. Either unrestricted or restricted. A restricted privilege means complex changes
are possible only through the service processor LAN interface, which prompts for the
IPMI password.
Dynamic Complex
Configuration
Data Architecturally
reserved information.
The Dynamic Complex Configuration Data is architecturally reserved information that applies
to the entire server complex.
A copy of the Dynamic Complex Configuration Data resides on the service processor (MP
or GSP) and on every cell in the complex. A reboot is not required for Dynamic Complex
Configuration Data changes to take effect.
The system boot interfaces (the BCH and EFI environments) do not have methods for changing
Dynamic Complex Configuration Data. Users and administrators do not directly configure
this data.
Partition
Configuration
Data nPartitionspecific information
(each nPartition has
its own data).
40
Getting Started with nPartitions
Table 1-5 Complex Profile Group Details (continued)
Complex Profile Group Description and Contents
The Partition Configuration Data contains configuration details specific to each nPartition
in the complex. Each nPartition has its own Partition Configuration Data entry, which may
be modified by administrators.
The service processor (MP or GSP) has a copy of the Partition Configuration Data for every
nPartition. Each cell has a copy of the Partition Configuration Data entry for the nPartition
to which it is assigned.
Partition Configuration Data includes this data for each nPartition:
• HP 9000 server components (unused on HP Integrity servers) — These components apply
only on HP 9000 servers, but are present on HP Integrity servers for compatibility: Primary
Boot Path, HA Alternate Boot Path, Alternate Boot Path, Console Path, Keyboard Path,
Boot Timer, Known Good Memory Requirement, Autostart and Restart Flags, and CPU
Flags (e.g. Data Prefetch setting).
• Cell use-on-next-boot values — Specifies whether the cell is to be an active or inactive
member of the nPartition to which it is assigned.
• Core Cell Choices — Up to four cells preferred to be the core cell.
• Partition Number — The partition number; not user-configurable.
• Profile Architecture — Specifies whether the current Partition Configuration Data applies
to the HP 9000 server architecture or HP Integrity server architecture; not user-configurable.
• nPartition Name — The nPartition name, used in various displays.
• Cell Failure Usage — Specifies how each cell in the nPartition is handled when a processor
or memory component fails self-tests. Only activating the cell to integrate it into the
nPartition is supported (the ri failure usage option, as specified by the parcreate and
parmodify commands).
• IP Address — If set, should be consistent with the IP address assigned to the nPartition
when HP-UX is booted. Not actually used for network configuration, but for information
only.
Remote and Local Management of nPartitions
You can remotely manage cell-based servers using either the Enhanced nPartition Commands
or Partition Manager Version 2.0.
The Enhanced nPartition Commands and Partition Manager Version 2.0 also can run on an
nPartition and manage that nPartition and the complex to which it belongs.
The ability to remotely manage a server based on the HP sx1000 chipset or HP sx2000 chipset is
enabled by two technologies: the Web-Based Enterprise Management infrastructure (WBEM)
and the Intelligent Platform Management Interface (IPMI). A brief overview of these technologies
is provided first, then explanations of how to use the tools to locally and remotely manage
cell-based servers are provided.
Intelligent Platform Management Interface (IPMI)
The nPartition management tools perform their functions by sending requests to the service
processor. These requests are either to get information about the server or to affect changes to
the server.
On the first generation of cell-based servers (the HP 9000 Superdome SD16000, SD32000, and
SD64000 models; rp7405/rp7410; and rp8400 servers) a proprietary interface to the service
processor was implemented. This interface relied on system firmware to convey information
between HP-UX and the service processor. This in turn required that the nPartition management
tools run on an nPartition in the complex being managed.
The service processor in all sx1000-based or sx2000-based servers supports the Intelligent Platform
Management Interface (IPMI) as a replacement for the proprietary interface mentioned above.
IPMI is an industry-standard interface for managing hardware. IPMI also supports value-added
capabilities, such as HP's nPartition and complex management features.
Remote and Local Management of nPartitions
41
The service processor in all sx1000-based or sx2000-based servers supports two of the
communication paths defined by the IPMI standard: the Block Transfer path and IPMI over LAN.
Some background details about each of these communication paths is provided in the next
sections. How and when these paths are used is covered in the explanations of the local and
remote management scenarios that follow.
IPMI Block Transfer (IPMI BT)
The IPMI Block Transfer (IPMI BT) path uses a driver [/dev/ipmi for HP-UX 11i v2 (B.11.23)
and HP-UX 11i v3 (B.11.31)] and a hardware buffer on each cell to provide communication
between the operating system and the service processor. Thus, each nPartition running HP-UX
11i v2 or HP-UX 11i v3 in an sx1000-based or sx2000-based server has its own private path to
the service processor; the block transfer hardware on the core cell in each nPartition is used. The
service processor always reliably knows which nPartition a request comes from.
NOTE: The IPMI BT path currently is supported only for nPartitions running the Enhanced
nPartition Commands. To use the IPMI BT interface, you must locally or remotely access the
operating system running in the target complex. For details see “Remote Management Using
WBEM” (page 44).
In many respects from an administrator's perspective the IPMI BT interface behaves like the
proprietary interface used in the first-generation cell-based servers. For example, a user with
superuser capabilities on an nPartition can manage the entire complex, including making changes
to both the local nPartition and other nPartitions in the complex.
nPartition Configuration Privilege
Because it is not always desirable to allow a user on one nPartition to make changes that affect
other nPartitions, HP provides the nPartition Configuration Privilege on sx1000-based or
sx2000-based servers.
You can control the nPartition Configuration Privilege by using the PARPERM command at the
service processor Command menu.
The nPartition Configuration Privilege has two settings:
•
•
Unrestricted — The default setting, which allows the behavior described above.
Restricted — Restricts use of the IPMI BT interface to the following capabilities:
— Retrieving information about the server. Everything that is normally displayed by
Partition Manager and the parstatus command is still available.
— Making changes to the local nPartition's Partition Configuration Data. (Details on local
versus remote nPartitions is provided later.)
— Manipulating any of the attention indicators (LEDs).
— Powering on/off cells and I/O chassis that belong to the local nPartition.
Restricting the nPartition Configuration Privilege does not restrict deallocation of processors
across nPartition boundaries.
By restricting the nPartition Configuration Privilege, you limit someone with superuser privileges
on an nPartition to doing things that affect only that nPartition. However, when the nPartition
Configuration Privilege is restricted certain changes can only be made by using the nPartition
management tools in the mode that utilizes IPMI over LAN.
IPMI over LAN
IPMI requests can be sent to the service processor's LAN port, thus eliminating the need to
involve any of the nPartitions in the server.
IPMI LAN access to a service processor may be enabled or disabled by the SA command at the
service processor Command menu.
42
Getting Started with nPartitions
The service processor will accept IPMI requests over its LAN port only if the request is
accompanied by the correct password. To set the IPMI password use the SO command at the
service processor Command menu.
Communication using IPMI over LAN is authenticated using the challenge and response protocol
defined by the IPMI specification. The MD5 message digest algorithm (RFC1321) is used to
encrypt the IPMI password and to ensure authentication of both the server and the client. All
IPMI messages are authenticated in the manner described above. In addition, appropriate methods
are implemented to protect against replay attacks.
The use of IPMI over LAN is not affected by setting the nPartition Configuration Privilege to
restricted. When the IPMI BT interfaces are restricted certain changes to a complex can only be
made by using the nPartition management tools in the mode that utilizes IPMI over LAN.
The following list describes all the actions that can be performed using IPMI over LAN.
• Retrieving information about the server.
• Changing the Stable Complex Configuration Data, including cell local memory settings and
all cell assignments (that is: creating an nPartition, assigning cells to an nPartition, unassigning
cells from an nPartition, and removing an nPartition).
• Powering on/off all cells and I/O chassis in the server, including unassigned resources.
• Manipulating any of the attention indicators (LEDs).
Web-Based Enterprise Management (WBEM)
The Enhanced nPartition Commands and Partition Manager Version 2.0 are implemented as
WBEM client applications.
The Enhanced nPartition Commands toolset for HP-UX and Linux also includes a WBEM agent
known as the nPartition Provider.
The Windows operating system includes the Windows Management Instrumentation (WMI)
software, which is the Microsoft implementation of WBEM. To support the Windows release of
the Enhanced nPartition Commands, HP also provides the WMI Mapper and the WMI nPartition
Provider software components for the Windows system. The WMI-based nPartition tools
components for Windows provides a WBEM-compliant solution.
All communication with the service processor, whether by way of the IPMI BT path [for example,
using /dev/ipmi on HP-UX 11i v2 (B.11.23) and HP-UX 11i v3 (B.11.31)] or by IPMI over LAN,
is done by the nPartition Provider. The nPartition Provider responds to requests sent to it by the
nPartition commands and Partition Manager.
Partition Manager uses the nPartition commands to make changes to a cell-based server. Partition
Manager Version 2.0 only uses WBEM directly when retrieving information about a server.
The power of WBEM is that it enables a distributed architecture. The applications (the nPartition
management tools) can be running on one system and can use the WBEM infrastructure to send
requests to other systems. See “Remote Management Using WBEM” (page 44) for more details.
Local Management
As previously mentioned, the Enhanced nPartition Commands and Partition Manager Version
2.0 can run on an nPartition to manage that nPartition and the complex that it belongs to. This
is the default behavior of the tools when run on an nPartition.
In this scenario, the nPartition management tools send WBEM requests to the nPartition Provider
running on the local nPartition (that is, the same nPartition where the tools are being run). The
nPartition Provider uses /dev/ipmi to send requests to the service processor in the local complex.
If the nPartition Configuration Privilege is unrestricted, then the server can be managed from
any nPartition and making changes to other nPartitions in the complex is supported. However,
if the privilege is set to restricted then certain operations are supported only when using the
Remote and Local Management of nPartitions
43
tools in the mode that uses IPMI over LAN (see “Remote Management Using IPMI over LAN”
(page 46)).
Local management is the only form of management supported by the older nPartition tools (the
Original nPartition Commands and Partition Manager Version 1.0). Also, because the nPartition
Configuration Privilege is a feature of the sx1000-based and sx2000-based servers it affects the
older nPartition tools when used on nPartitions in an sx1000-based or sx2000-based server, but
not when used on nPartitions in the first-generation cell-based servers.
Remote Management Using WBEM
WBEM enables one form of remote management of an nPartition complex: using nPartition
management tools (WBEM client applications) that are running on one system to communicate
with the nPartition Provider (a WBEM agent) running on an nPartition in the complex to be
managed.
When performing remote management using WBEM the following terminology is used:
•
•
•
•
The complex being managed is referred to as a "remote complex" because it is remote with
respect to the system where the tools are being run.
The remote complex is also the "target complex" as it is the complex that will be affected by
any changes requested by the tools.
The nPartition that the tools communicate with (using WBEM) is referred to as a "remote
nPartition" because it is remote with respect to the system where the tools are being run.
If the tools are used to retrieve information about or to make a change to a specific nPartition
in the target complex, then that nPartition is the "target nPartition". The target nPartition
and the remote nPartition might be the same, but don't have to be the same nPartition.
For example, the parmodify command could be used in a way where it sends requests to
an nPartition in the target complex but the -p option identifies a different nPartition to be
modified.
The following sections explain how to use the Enhanced nPartition Commands and Partition
Manager Version 2.0 to remotely manage an nPartition complex using WBEM. The system where
the tools are used could be an nPartition or other system, but where the tools are run is irrelevant
when performing remote management of an nPartition complex.
NOTE: Remote management using WBEM relys on an nPartition in the target complex being
booted to multi-user mode. The remote nPartition must be configured to accept remote WBEM
requests.
Remote management using WBEM also requires that the Trust Certificate Store file on the local
system contains a copy of the server certificate data from the SSL Certificate file on the system
being managed. See “WBEM Remote Management Files” (page 44).
WBEM Remote Management Files
WBEM systems provide secure remote management using the following files as part of the SSL
authentication process. Both files reside on all WBEM-enabled systems.
•
server.pem — WBEM SSL Certificate file The SSL Certificate file resides on the system that
is being managed and contains the local server's PRIVATE KEY and CERTIFICATE data.
On HP-UX B.11.23 systems, the SSL Certificate file is the /var/opt/wbem/server.pem
file.
44
Getting Started with nPartitions
On a Windows system, the SSL Certificate file is in the location specified by the
%PEGASUS_HOME%\cimcerver_current.conf file; in this file the
sslCertificateFilePath entry specifies the SSL Certificate file location.
•
client.pem — WBEM Trust Certificate Store file The Trust Certificate Store file resides on
the system from which WBEM remote management commands are issued.
On HP-UX B.11.23 systems, the Trust Certificate Store file is the
/var/opt/wbem/client.pem file.
On a Windows system system, the Trust Certificate Store file is the
%HP_SSL_SHARE%\client.pem file, where %HP_SSL_SHARE% specifies the directory
where the file resides.
To remotely manage a server, the Trust Certificate Store file (client.pem) on the local system
must contain a copy of the CERTIFICATE data from the SSL Certificate file (server.pem) on
the remote server. The CERTIFICATE data includes all text starting with the "-----BEGIN
CERTIFICATE-----" line through the "-----END CERTIFICATE-----" line.
By default the Trust Certificate Store file contains a copy of the CERTIFICATE data from the SSL
Certificate data for the local system.
nPartition Commands Support for Remote Management Using WBEM
Two options supported by the Enhanced nPartition Commands result in remote management
using WBEM. These options are:
•
-u username
The -u option specifies a valid username on the remote nPartition.
For the parstatus and fruled commands any user defined on the remote nPartition can
be used, but the other commands require the username to be a user with superuser privileges
on the remote nPartition.
•
-h hostname | IPaddress
The -h option specifies either the hostname or IP address of the remote nPartition.
When you use the -u... -h... set of options, the specified command sends the appropriate
WBEM requests to the remote nPartition where the requests are handled by the nPartition
Provider using /dev/ipmi to communicate with the service processor in the target complex.
Partition Manager Support for Remote Management Using WBEM
Partition Manager Version 2.0 supports remote management using WBEM in either of two ways.
•
Run Partition Manager Version 2.0 on an nPartition and then select the Switch Complexes
task from the Tools menu. In the resulting dialog enter the hostname or IP address of the
remote nPartition, and supply a username and that user's password.
If you will use Partition Manager only to display information about the target complex, then
you can specify any user defined on the remote nPartition.
However, if you will use Partition Manager to make changes to the target complex then you
must specify a user with superuser privileges on the remote nPartition.
•
Run Partition Manager Version 2.0 on a system that is not an nPartition, and Partition
Manager will immediately display the Switch Complexes dialog.
Remote and Local Management of nPartitions
45
Figure 1-1 Partition Manager Version 2.0 Switch Complexes Dialog
Remote Management Using IPMI over LAN
IPMI over LAN enables the second form of remote management of an nPartition complex: using
nPartition management tools that are running on a system to communicate directly (without
going through an nPartition) with the service processor in the complex to be managed.
When performing remote management using IPMI over LAN the following terminology is used:
•
•
•
The complex being managed is referred to as a "remote complex" because it is remote with
respect to the system where the tools are being run.
The remote complex is also the "target complex" as it is the complex that will be affected by
any changes requested by the tools.
If the tools are used to retrieve information about or to make a change to a specific nPartition
in the target complex, then that nPartition is the "target nPartition".
Note that there is no concept of a "remote nPartition" in this scenario.
The following sections explain how to use the nPartition commands and Partition Manager to
remotely manage an nPartition complex using IPMI over LAN.
The system where the tools are used could be an nPartition or other system, but where the tools
are run is irrelevant when performing remote management of an nPartition complex.
nPartition Commands Support for Remote Management Using IPMI over LAN
Two options of the Enhanced nPartition Commands result in remote management using IPMI
over LAN. These options are:
•
-g [password]
The password is the service processor's IPMI password.
•
-h hostname | IPaddress
The -h option specifies the hostname or IP address of the service processor in the target
complex.
When you use the -g... -h... set of options, the specified command sends the appropriate
WBEM requests to the local nPartition Provider, which in turn uses IPMI over LAN to
communicate with the service processor in the target complex.
46
Getting Started with nPartitions
Partition Manager Support for Remote Management Using IPMI over LAN
Partition Manager Version 2.0 can be used in this mode in either of two ways:
•
•
Run Partition Manager on an nPartition and then select the Switch Complexes task from
the Tools menu. In the resulting dialog enter the hostname or IP address of the service
processor in the target complex, and supply that service processor's IPMI password.
Run Partition Manager on a system that is not an nPartition. In this situation Partition
Manager immediately displays the Switch Complexes dialog.
Licensing Information: Getting Server Product Details
When you license a software product to run on an HP system, you may need to provide machine
or system details to the software vendor as part of the software registration process.
This section describes how to obtain information you may need when licensing non-HP software
to run on a cell-based HP server.
For complete information about software product licensing, refer to the company that
manufactures or sells the software you plan to use.
•
Unique Machine (Complex) Identifier
•
Unique nPartition Identifier
•
Unique Virtual Partition Identifier
•
Machine (Complex) Serial Number
/usr/sbin/parstatus -X
/usr/bin/getconf _CS_MACHINE_SERIAL and
•
Server (Complex) Product Number
/usr/sbin/parstatus -X
•
Machine (Complex) Hardware Model
/usr/bin/model
•
HP-UX Version and Installed Bundles
/usr/bin/getconf _CS_MACHINE_IDENT
/usr/bin/getconf _CS_PARTITION_IDENT
/usr/bin/getconf _CS_PARTITION_IDENT
/usr/bin/getconf MACHINE_MODEL and
For the HP-UX version: /usr/bin/uname -r
For all bundles installed: /usr/sbin/swlist -l bundle
nPartition and Virtual Partition Unique Identifiers
NOTE: Use the getconf command or the confstr() call to obtain unique identifiers. Do not
use the uname -i command, which does not report unique IDs for nPartition systems.
In order to guarantee compatibility on current and future platforms, use the interfaces to getconf(1)
and confstr(3C) to retrieve unique machine identifiers.
The interfaces include the _CS_PARTITION_IDENT and _CS_MACHINE_IDENT parameters:
•
For a nPartition-specific or a virtual partition-specific unique ID use this command:
/usr/bin/getconf _CS_PARTITION_IDENT
The unique partition identifier value for a virtual partition environment has virtual
partition-specific data added that does not appear for an equivalent non-vPars environment.
See the examples that follow.
•
For a complex-specific unique ID use this command:
/usr/bin/getconf _CS_MACHINE_IDENT
On cell-based HP PA-RISC servers, the complex, nPartition, and virtual partition unique IDs are
based in part on the machine serial number.
To retrieve the machine serial through these interfaces, specify the _CS_MACHINE_SERIAL
parameter to them.
Licensing Information: Getting Server Product Details
47
Refer to the confstr(3C) manpage for details on these parameters and their use.
Example 1-1 Unique IDs for an nPartition and Complex
The following examples show nPartition-unique and complex-unique IDs returned by the
getconf command, as well as the local nPartition number and machine serial number.
# parstatus -w
The local partition number is 1.
# /usr/bin/getconf _CS_PARTITION_IDENT
Z3e02955673f9f7c9_P1
# /usr/bin/getconf _CS_MACHINE_IDENT
Z3e02955673f9f7c9
# /usr/bin/getconf _CS_MACHINE_SERIAL
USR2024FP1
#
Example 1-2 Unique IDs for Virtual Partitions (vPars)
The following example shows the virtual partition-unique ID returned by the getconf command,
as well as the local nPartition number and the current virtual partition name.
# parstatus -w
The local partition number is 0.
# vparstatus -w
The current virtual partition is Shad.
# getconf _CS_PARTITION_IDENT
Z3e0ec8e078cd3c7b_P0_V00
#
For details on virtual partitions, refer to the book Installing and Managing HP-UX Virtual Partitions
(vPars).
48
Getting Started with nPartitions
2 nPartition Server Hardware Overview
This chapter describes the cell-based HP server models, including system capacities, model
strings, and differences among the cell-based server models.
Both HP 9000 servers and HP Integrity servers are discussed here.
•
The HP 9000 series of servers has HP PA-RISC processors.
The cell-based HP 9000 servers include three generations of servers: the first-generation
models, models based on the HP sx1000 chipset, and models based on the HP sx2000 chipset.
•
The HP Integrity series of servers has Intel® Itanium® 2 processors.
The cell-based HP Integrity servers either are based on the HP sx1000 chipset or are based
on the HP sx2000 chipset.
sx1000 Chipset for HP Servers
The second generation of cell-based servers is built around the HP sx1000 chipset. The sx1000
chipset supports both single-core and dual-core processors, including both HP PA-RISC and
Intel® Itanium® 2 processors.
The following servers use the HP sx1000 chipset:
•
•
PA-RISC servers — HP rp7420, HP rp8420, HP 9000 Superdome (SD16A, SD32A, and SD64A
models).
Itanium® 2-based servers — HP rx7620, HP rx7620-16, HP rx8620, HP rx8620-32, HP Integrity
Superdome (SD16A, SD32A, SD64A models).
The HP sx1000 chipset provides a scalable server architecture with high-bandwidth processor,
memory, and I/O busses. The HP sx1000 chipset includes interconnecting components such as
memory buffers, I/O bus adapters and host bridges, and cell controllers, which have built-in
low-level error correction.
One notable administration feature of HP servers built around the HP sx1000 chipset is
management processor (MP) support for access to the server using IPMI over LAN. For details
see “Remote and Local Management of nPartitions” (page 41).
sx2000 Chipset for HP Servers
The third generation of cell-based HP servers is built around the HP sx2000 chipset.
The following servers use the HP sx2000 chipset:
•
•
PA-RISC servers — HP rp7440, HP rp8440, HP 9000 Superdome (SD16B, SD32B, SD64B
models).
Itanium® 2-based servers — HP rx7640, HP rx8640, HP Integrity Superdome (SD16B, SD32B,
SD64B models).
The HP sx2000 chipset provides a scalable server architecture with high-bandwidth processor,
memory, and I/O busses. The HP sx2000 chipset includes new cell boards with core I/O, new
system and I/O backplanes, new interconneting components, and the addition of a redundant
clock source that is hot-swappable.
HP servers built around the HP sx2000 chipset include management processor (MP) support for
access to the server using IPMI over LAN. For details see “Remote and Local Management of
nPartitions” (page 41).
Model Identifiers for Machine Hardware
The machine hardware model identifies the server hardware type.
sx1000 Chipset for HP Servers
49
A summary of the supported cell-based servers and their corresponding model identifiers appears
in “Server Hardware Details: Cell-Based HP Servers” (page 51).
You can report the machine hardware model for the local server complex using the following
methods:
• From HP-UX 11i use either the /usr/bin/model command or the /usr/bin/getconf
MACHINE_MODEL command.
• From the Windows command line, use the systeminfo command to report system details
including the system model.
Different methods are used to establish the machine hardware model on HP 9000 servers and
HP Integrity servers.
• For HP 9000 servers, the reported machine hardware model is the Model String component
of the Stable Complex Configuration Data.
• For HP Integrity servers, the machine hardware model is based on the Creator Manufacturer
and Creator Product Name complex-wide settings.
On OEM versions of cell-based HP Integrity servers, the OEM Manufacturer and OEM
Product Name are the machine hardware model, if they are set.
See “Complex Profile” (page 36) for details on the Model String and Creator complex-wide
settings.
50
nPartition Server Hardware Overview
Server Hardware Details: Cell-Based HP Servers
Table 2-1 lists the cell-based HP servers. For individual server details see the sections that follow.
Table 2-1 Models of Cell-Based HP Servers
Cell Capacity
Server Model(s)
Two-Cell Servers
HP 9000 rp7405/7410 server Up to eight PA-RISC processor cores.
See “Two-Cell nPartition
Server Model” (page 55).
Description
Runs HP-UX B.11.11. Also runs the HP-UX B.11.23
September 2004 release and later. Runs HP-UX B.11.31.
model string: 9000/800/rp7410
HP 9000 rp7420 server
Up to eight dual-core PA-RISC processors (16 processor
cores total). Uses the HP sx1000 chipset.
Runs HP-UX B.11.11. Also runs the HP-UX B.11.23
September 2004 release and later. Runs HP-UX B.11.31.
model string: 9000/800/rp7420
HP 9000 rp7440 server
Up to eight dual-core PA-RISC processors (16 processor
cores total). Uses the HP sx2000 chipset.
Runs the HP-UX B.11.11 December 2006 release.
model string: 9000/800/rp7440
HP Integrity rx7620 server
Up to eight Intel® Itanium® 2 processors. Uses the HP
sx1000 chipset.
Runs HP-UX B.11.23, HP-UX B.11.31, HP OpenVMS I64,
Microsoft® Windows® Server 2003, Red Hat Enterprise
Linux, and SuSE Linux Enterprise Server.
model command output: ia64 hp rx7620 server
HP Integrity rx7620-16
server
Up to eight HP mx2 dual-processor modules with Intel®
Itanium® 2 processors (16 processor cores total). Uses the
HP sx1000 chipset.
Runs HP-UX B.11.23, HP-UX B.11.31, and Microsoft®
Windows® Server 2003.
model command output: ia64 hp rx7620 server
HP Integrity rx7640
Up to eight Intel® Itanium® 2 processors: either single
Intel® Itanium® 2 processors or dual-core Intel® Itanium®
2 processors. (Up to 16 processor cores total when using
dual-core processors.)
Uses the HP sx2000 chipset.
Runs HP-UX B.11.23, HP-UX B.11.31, and Microsoft®
Windows® Server 2003.
Servers with dual-core Intel® Itanium® 2 processors also
can run HP OpenVMS I64 8.3, Red Hat Enterprise Linux
4 Update 4, and SuSE Linux Enterprise Server 10.
model command output: ia64 hp rx7640 server
Server Hardware Details: Cell-Based HP Servers
51
Table 2-1 Models of Cell-Based HP Servers (continued)
Cell Capacity
Server Model(s)
Description
Four-Cell Servers
HP 9000 rp8400 server
Up to 16 PA-RISC processors.
See “Four-Cell nPartition
Server Model” (page 56).
Runs HP-UX B.11.11. Also runs the HP-UX B.11.23
September 2004 release and later. Runs HP-UX B.11.31.
model string: 9000/800/S16K-A
HP 9000 rp8420 server
Up to 16 dual-core PA-RISC processors (32 processor cores
total). Uses the HP sx1000 chipset.
Runs HP-UX B.11.11. Also runs the HP-UX B.11.23
September 2004 release and later. Runs HP-UX B.11.31.
model string: 9000/800/rp8420
HP 9000 rp8440 server
Up to 16 dual-core PA-RISC processors (32 processor cores
total). Uses the HP sx2000 chipset.
Runs the HP-UX B.11.11 December 2006 release.
model string: 9000/800/rp8440
HP Integrity rx8620 server
Up to 16 Intel® Itanium® 2 processors. Uses the HP sx1000
chipset.
Runs HP-UX B.11.23, HP-UX B.11.31, HP OpenVMS I64,
Microsoft® Windows® Server 2003, Red Hat Enterprise
Linux, and SuSE Linux Enterprise Server.
model command output: ia64 hp rx8620 server
HP Integrity rx8620-32
server
Up to 16 HP mx2 dual-processor modules with Intel®
Itanium® 2 processors (32 processor cores total). Uses the
HP sx1000 chipset.
Runs HP-UX B.11.23, HP-UX B.11.31, and Microsoft®
Windows® Server 2003.
model command output: ia64 hp rx8620 server
HP Integrity rx8640
Up to 16 Intel® Itanium® 2 processors: either single Intel®
Itanium® 2 processors or dual-core Intel® Itanium® 2
processors. (Up to 32 processor cores total when using
dual-core processors.)
Uses the HP sx2000 chipset.
Runs HP-UX B.11.23, HP-UX B.11.31, and Microsoft®
Windows® Server 2003.
Servers with dual-core Intel® Itanium® 2 processors also
can run HP OpenVMS I64 8.3, Red Hat Enterprise Linux
4 Update 4, and SuSE Linux Enterprise Server 10.
model command output: ia64 hp rx8640 server
52
nPartition Server Hardware Overview
Table 2-1 Models of Cell-Based HP Servers (continued)
Cell Capacity
Server Model(s)
HP 9000 Superdome
Servers
HP 9000 Superdome
Up to 64 PA-RISC processors.
SD16000, SD32000, SD64000 Runs HP-UX B.11.11. Also runs the HP-UX B.11.23
servers
September 2004 release and later. Runs HP-UX B.11.31.
See “Superdome Server
Models” (page 57).
Description
• HP 9000 Superdome 16-way server model string:
9000/800/SD16000
• HP 9000 Superdome 32-way server model string:
9000/800/SD32000
• HP 9000 Superdome 64-way server model string:
9000/800/SD64000
HP 9000 Superdome
SD16A, SD32A, SD64A
servers
Up to 64 dual-core PA-RISC processors (128 processor cores
total). Uses the HP sx1000 chipset.
Runs HP-UX B.11.11. Also runs the HP-UX B.11.23
September 2004 release and later. Runs HP-UX B.11.31.
• HP 9000 Superdome 32-way server model string:
9000/800/SD16A
• HP 9000 Superdome 64-way server model string:
9000/800/SD32A
• HP 9000 Superdome 128-way server model string:
9000/800/SD64A
HP 9000 Superdome SD16B, Up to 64 dual-core PA-RISC processors (128 processor cores
SD32B, SD64B servers
total). Uses the HP sx2000 chipset.
Runs the HP-UX B.11.11 December 2006 release.
• HP 9000 Superdome 32-way server model string:
9000/800/SD16B
• HP 9000 Superdome 64-way server model string:
9000/800/SD32B
• HP 9000 Superdome 128-way server model string:
9000/800/SD64B
Server Hardware Details: Cell-Based HP Servers
53
Table 2-1 Models of Cell-Based HP Servers (continued)
Cell Capacity
Server Model(s)
Description
HP Integrity Superdome
Servers
HP Integrity Superdome
SD16A, SD32A, SD64A
servers
Up to 64 processor sockets, four per cell, with each cell
having either single Intel® Itanium® 2 processors or HP
mx2 dual-processor modules with Itanium 2 processors.
(Up to 128 processor cores total when using HP mx2
modules.)
See “Superdome Server
Models” (page 57).
Runs HP-UX B.11.23, HP-UX B.11.31, and Microsoft®
Windows® Server 2003. nPartitions with single Itanium 2
processors also can run HP OpenVMS I64, Red Hat
Enterprise Linux, and SuSE Linux Enterprise Server.
These models use the HP sx1000 chipset:
• HP Integrity Superdome 16-way server model
command output: ia64 hp superdome server
SD16A
• HP Integrity Superdome 32-way server model
command output: ia64 hp superdome server
SD32A
• HP Integrity Superdome 64-way server model
command output: ia64 hp superdome server
SD64A
HP Integrity Superdome
SD16B, SD32B, SD64B
servers
Up to 64 processor sockets, four per cell, with each cell
having either single Intel® Itanium® 2 processors or
dual-core Intel® Itanium® 2 processors. (Up to 128
processor cores total when using dual-core processors.)
Runs HP-UX B.11.23, HP-UX B.11.31, and Microsoft®
Windows® Server 2003.
Servers with dual-core Intel® Itanium® 2 processors also
can run HP OpenVMS I64 8.3, Red Hat Enterprise Linux
4 Update 4, and SuSE Linux Enterprise Server 10.
These models use the HP sx2000 chipset:
• HP Integrity Superdome 16-way server model
command output: ia64 hp superdome server
SD16B
• HP Integrity Superdome 32-way server model
command output: ia64 hp superdome server
SD32B
• HP Integrity Superdome 64-way server model
command output: ia64 hp superdome server
SD64B
54
nPartition Server Hardware Overview
Two-Cell nPartition Server Model
The following cell-based HP servers scale from one to two cells:
•
The HP rp7405/rp7410 server has single-core HP PA-RISC processors.
The model string is: 9000/800/rp7410.
•
The HP rp7420 server has dual-core HP PA-RISC processors: PA-8800 processors, which
provide two processor cores per processor socket.
The model string is: 9000/800/rp7420.
•
The HP rp7440 server has dual-core HP PA-RISC processors: PA-8900 processors, which
provide two processor cores per processor socket.
The model string is: 9000/800/rp7440.
•
The HP rx7620 server has Intel® Itanium® 2 processors, either single-processor modules or
HP mx2 dual-processor modules.
Both HP mx2 dual-processor modules and single Itanium 2 processors can exist in the same
complex, but they cannot be mixed in the same nPartition.
The model command output is: ia64 hp rx7620 server.
•
The HP rx7640 server has single-core or dual-core Intel® Itanium® 2 processors.
The model command output is: ia64 hp rx7640 server.
Figure 2-1 shows a two-cell HP server cabinet.
Figure 2-1 Two-Cell HP Server Cabinet
On the two-cell HP servers you can configure a single nPartition using one or both cells, or can
configure up to two separate nPartitions within the server complex. In a two-nPartition complex,
you use cell 0 and its core I/O in one nPartition, and use cell 1 and its core I/O in the other
nPartition.
The two-cell HP server models includes these features:
•
•
•
A single server cabinet that includes all cells, I/O chassis, processors, memory, PCI cards,
and core I/O.
Either one or two cells. Each cell has up to four processor sockets and up to 16 DIMMs.
Two PCI I/O chassis that share the same chassis hardware.
One I/O chassis is connected to cell 0, the other is connected to cell 1.
Each I/O chassis has 8 PCI card slots, numbered from 1 to 8.
Server Hardware Details: Cell-Based HP Servers
55
NOTE: On the first-generation and HP sx1000-based two-cell servers, two PCI slots by
convention are dedicated for use by a combination LAN/SCSI card: PCI domain 0 slot 1 (the
first slot on the left) and PCI domain 1 slot 8 (the last slot on the right).
On two-cell servers based on the HP sx2000 chipset, core I/O is provided in each cell.
•
A total server complex capacity of: 2 cells, 8 processor sockets, 32 DIMMs, and 16 PCI card
slots.
Two-cell HP servers include a single server cabinet that may be rack-mounted or a stand-alone
server configuration.
Four-Cell nPartition Server Model
The following cell-based HP servers scale from one to four cells:
•
The HP rp8400 server has single-core HP PA-RISC processors.
The model string is: 9000/800/S16K-A.
•
The HP rp8420 server has dual-core HP PA-RISC processors: PA-8800 processors, which
provide two processor cores per processor socket.
The model string is: 9000/800/rp8420.
•
The HP rp8440 server has dual-core HP PA-RISC processors: PA-8900 processors, which
provide two processor cores per processor socket.
The model string is: 9000/800/rp8440.
•
The HP rx8620 server has Intel® Itanium® 2 processors, either single-processor modules or
HP mx2 dual-processor modules.
Both HP mx2 dual-processor modules and single Itanium 2 processors can exist in the same
complex, but they cannot be mixed in the same nPartition.
The model command output is: ia64 hp rx8620 server.
•
The HP rx8640 server has single-core or dual-core Intel® Itanium® 2 processors.
The model command output is: ia64 hp rx8640 server.
Figure 2-2 shows an overview of a four-cell HP server cabinet.
Figure 2-2 Four-Cell HP Server Cabinet
You can configure a single nPartition using some or all cells, or can configure up to four separate
nPartitions within the server complex when using an I/O expansion cabinet.
In a multiple-nPartition four-cell server complex, you would use cell 0 and its I/O chassis in one
nPartition, and use cell 1 and its I/O chassis in another nPartition. The other cells (cells 2 and 3)
can be assigned to either of the two nPartitions, or if connected to I/O in an expansion cabinet
can be used to create additional nPartitions.
56
nPartition Server Hardware Overview
The four-cell HP servers include these features:
•
A single server cabinet that includes cells, I/O chassis, processors, memory, PCI cards, and
core I/O.
Two PCI I/O chassis in the server cabinet share the same chassis hardware. One I/O chassis
is connected to cell 0, the other is connected to cell 1. Each I/O chassis has 8 PCI card slots,
numbered from 1 to 8.
•
An optional I/O expansion cabinet that provides an additional two core I/O cards and an
additional two I/O domains each containing eight PCI card slots (for a total of 16 more PCI
card slots).
Two PCI I/O chassis in the I/O expansion cabinet share the same chassis hardware. One I/O
chassis is connected to cell 2, the other is connected to cell 3.
•
•
From one to four cells. Each cell has four processor sockets and up to 16 DIMMs.
A total server complex capacity of: 4 cells, 16 processor sockets, 64 DIMMs, and either 16 or
32 PCI card slots.
Four-cell HP servers include a single server cabinet that can be rack-mounted or stand-alone.
An optional I/O expansion cabinet may also be used to provide I/O connected to cell 2 and cell
3.
Superdome Server Models
HP Superdome servers scale up to 16 cells. The following types of HP Superdome servers are
supported:
•
•
•
•
•
The first-generation HP 9000 Superdome: SD16000, SD32000, and SD64000
The HP sx1000-chipset-based HP 9000 Superdome: SD16A, SD32A, and SD64A
The HP sx1000-chipset-based HP Integrity Superdome server: SD16A, SD32A, and SD64A
The HP sx2000-chipset based HP 9000 Superdome server: SD16B, SD32B, and SD32B, and
SD64B
The HP sx2000-chipset based HP Integrity Superdome server: SD16B, SD32B, and SD64B
A Support Management Station (SMS) is connected to each HP Superdome server through the
service processor private LAN port. The SMS is either an HP-UX workstation or an HP ProLiant
system running Microsoft® Windows®. The SMS primarily is used for support and service
purposes. The Windows SMS supports Windows versions of Partition Manager and the nPartition
commands, thus enabling remote administration of nPartitions from the SMS. For details see
“SMS (Support Management Station) for HP Superdome Servers” (page 67).
You can add up to two Superdome I/O expansion cabinets to the Superdome 32-way/64-way
and Superdome 64-way/128-way server models. Each I/O expansion cabinet has up to six
additional 12-slot I/O chassis.
Figure 2-3 shows an overview of an HP Superdome server compute cabinet.
Figure 2-3 HP Superdome Server Cabinet
Server Hardware Details: Cell-Based HP Servers
57
The HP Superdome server models include:
•
•
•
“HP Superdome 16-/32-Way Servers: SD16000, SD16A, and SD16B” (page 58)
“HP Superdome 32-/64-Way Servers: SD32000, SD32A, and SD32B” (page 58)
“HP Superdome 64-/128-Way Servers: SD64000, SD64A, and SD64B” (page 59)
Details on these models are given in the following sections.
HP Superdome 16-/32-Way Servers: SD16000, SD16A, and SD16B
The HP Superdome 16-way/32-way server is a single-cabinet server that has from two to four
cells, each with four processor sockets and up to 32 DIMMs.
The models of HP Superdome 16-way/32-way servers are: SD16000, SD16A, SD16B.
•
The HP 9000 Superdome SD16000 server has single-core HP PA-RISC processors.
The model string for the SD16000 server is: 9000/800/SD16000
•
The HP 9000 Superdome SD16A server has dual-core HP PA-RISC processors: PA-8800
processors, which provide two processor cores per processor socket.
The model string for the HP 9000 SD16A server is: 9000/800/SD16A
•
The HP 9000 Superdome SD16B server has dual-core HP PA-RISC processors: PA-8900
processors, which provide two processor cores per processor socket.
The model string for the HP 9000 SD16B server is: 9000/800/SD16B
•
The HP Integrity Superdome SD16A server has Intel® Itanium® 2 processors, either
single-processor modules or HP mx2 dual-processor modules.
Both HP mx2 dual-processor modules and single Itanium 2 processors can exist in the same
complex, but they cannot be mixed in the same nPartition.
The model command output for the HP Integrity SD16A server is: ia64 hp superdome
server SD16A
•
The HP Integrity Superdome SD16B server has single-core or dual-core Intel® Itanium® 2
processors.
The model command output for the HP Integrity SD16B server is: ia64 hp superdome
server SD16B
The Superdome 16-way/32-way server can have up to 16 processor sockets, 128 DIMMs, and up
to four 12-slot PCI I/O chassis.
HP Superdome 32-/64-Way Servers: SD32000, SD32A, and SD32B
The Superdome 32-way/64-way server is a single-cabinet server that has from two to eight cells,
each with four processor sockets and up to 32 DIMMs.
The models of HP Superdome 32-way/64-way servers are: SD32000, SD32A, and SD32B.
•
The HP 9000 Superdome SD32000 server has single-core HP PA-RISC processors.
The model string for the SD32000 server is: 9000/800/SD32000
•
The HP 9000 Superdome SD32A server has dual-core HP PA-RISC processors: PA-8800
processors, which provide two processor cores per processor socket.
The model string for the HP 9000 SD32A server is: 9000/800/SD32A
•
The HP 9000 Superdome SD32B server has dual-core HP PA-RISC processors: PA-8900
processors, which provide two processor cores per processor socket.
The model string for the HP 9000 SD32B server is: 9000/800/SD32B
58
nPartition Server Hardware Overview
•
The HP Integrity Superdome SD32A server has Intel® Itanium® 2 processors, either
single-processor modules or HP mx2 dual-processor modules.
Both HP mx2 dual-processor modules and single Itanium 2 processors can exist in the same
complex, but they cannot be mixed in the same nPartition.
The model command output for the HP Integrity SD32A server is: ia64 hp superdome
server SD32A
•
The HP Integrity Superdome SD32B server has single-core or dual-core Intel® Itanium® 2
processors.
The model command output for the HP Integrity SD32B server is: ia64 hp superdome
server SD32B
The Superdome 32-way/64-way server can have up to 32 processor sockets, 256 DIMMs, up to
four internal 12-slot PCI I/O chassis, plus optional I/O expansion cabinet hardware.
HP Superdome 64-/128-Way Servers: SD64000, SD64A, and SD64B
The Superdome 64-way/128-way server is a tightly interconnected dual-cabinet server that has
from 4 to 16 cells, each with four processor sockets and up to 32 DIMMs.
The models of HP Superdome 64-way/128-way servers are: SD64000, SD64A, and SD64B.
•
The HP 9000 Superdome SD64000 server has single-core HP PA-RISC processors.
The model string for the SD64000 server is: 9000/800/SD64000
•
The HP 9000 Superdome SD64A server has dual-core HP PA-RISC processors: PA-8800
processors, which provide two processor cores per processor socket.
The model string for the HP 9000 SD64A server is: 9000/800/SD64A
•
The HP 9000 Superdome SD64B server has dual-core HP PA-RISC processors: PA-8900
processors, which provide two processor cores per processor socket.
The model string for the HP 9000 SD64B server is: 9000/800/SD64B
•
The HP Integrity Superdome SD64A server has Intel® Itanium® 2 processors, either
single-processor modules or HP mx2 dual-processor modules.
Both HP mx2 dual-processor modules and single Itanium 2 processors can exist in the same
complex, but they cannot be mixed in the same nPartition.
The model command output for the HP Integrity SD64A server is: ia64 hp superdome
server SD64A
•
The HP Integrity Superdome SD64B server has single-core or dual-core Intel® Itanium® 2
processors.
The model command output for the HP Integrity SD64B server is: ia64 hp superdome
server SD64B
The Superdome 64-way/128-way server can have up to 64 processor sockets, 512 DIMMs, and
up to eight internal 12-slot PCI I/O chassis. (Each of the two cabinets in a Superdome
64-way/128-way server provides up to 32 processor sockets, 256 DIMMs, and up to four 12-slot
PCI I/O chassis.) HP Superdome 64-way/128-way servers also can have optional I/O expansion
cabinet hardware.
HP Superdome I/O Expansion Cabinet
HP Superdome 32-way/64-way and Superdome 64-way/128-way servers can include I/O expansion
cabinets in addition to the server cabinet(s) in the complex.
Each I/O expansion cabinet has a cabinet number of either 8 or 9.
Server Hardware Details: Cell-Based HP Servers
59
A Superdome I/O expansion cabinet includes up to 3 I/O bays, with two 12-slot I/O chassis in
each bay. This provides for up to 6 chassis with a total of 72 PCI card slots in each I/O expansion
cabinet.
The Superdome I/O expansion cabinet is a standard-size cabinet that, space permitting, you can
mount peripherals in as well as I/O chassis.
Also refer to the book I/O Expansion Cabinet Guide for Superdome Servers.
60
nPartition Server Hardware Overview
3 Planning nPartitions
This chapter describes how you can plan nPartition configurations. Details include the nPartition
configuration requirements and recommendations.
For procedures to create and configure nPartitions, see Chapter 6 (page 165).
nPartition Hardware Requirements for Operating Systems
Table 3-1 lists the hardware requirements for operating systems running on nPartitions.
Table 3-1 Operating System Hardware Requirements
Operating System
nPartition Hardware Requirements
HP-UX B.11.11
Supports up to 64 PA-RISC processor cores.
HP-UX B.11.23, March 2004 and earlier
Supports up to 64 Intel® Itanium® 2 processor cores.
HP-UX B.11.23, September 2004 and later
Supports up to 128 PA-RISC processors.
Supports up to 128 Intel® Itanium® 2 processor cores.
HP-UX B.11.31
Supports up to 128 Intel® Itanium® 2 processor cores.
HP OpenVMS I64 8.2-1
Supports up to 4 cells (16 processor cores) on servers
based on the HP sx1000 chipset. Requires single-core
Itanium 2 processors, and does not support HP mx2
dual-processor modules.
HP OpenVMS I64 8.3
Supports up to 4 cells (16 processors, up to 32 cores) on
servers based on the HP sx1000 chipset or HP sx2000
chipset.
On servers based on the HP sx2000 chipset, supported
only in nPartitions that have dual-core Intel® Itanium®
2 processors.
Microsoft® Windows® Server 2003
Supports up to 64 Intel® Itanium® 2 processor cores.
Red Hat Enterprise Linux 3 Update 2
Supports up to eight Intel® Itanium® 2 processor cores.
Requires single-core Itanium 2 processors, and does not
support HP mx2 dual-processor modules.
Supports a maximum of two cells in an nPartition.
Supports a maximum of one I/O chassis in an nPartition.
Requires a PCI-X I/O chassis, and does not support PCI
I/O chassis.
Supports a maximum of 96 GBytes memory.
Red Hat Enterprise Linux 3 Update 3
Supports up to eight Intel® Itanium® 2 processors.
Requires single-core Itanium 2 processors, and does not
support HP mx2 dual-processor modules.
Supports a maximum of two cells in an nPartition.
Supports a maximum of 128 GBytes memory.
Supports a maximum of two I/O chassis in an nPartition.
Requires a PCI-X I/O chassis, and does not support PCI
I/O chassis.
nPartition Hardware Requirements for Operating Systems
61
Table 3-1 Operating System Hardware Requirements (continued)
Operating System
nPartition Hardware Requirements
Red Hat Enterprise Linux 4 Update 4
Supports up to eight Intel® Itanium® 2 processors.
On servers based on the HP sx2000 chipset, supported
only in nPartitions that have dual-core Intel® Itanium®
2 processors.
Supports a maximum of two cells in an nPartition.
Supports a maximum of 128 GBytes memory.
Supports a maximum of two I/O chassis in an nPartition.
Requires a PCI-X I/O chassis, and does not support PCI
I/O chassis.
SuSE Linux Enterprise Server 9
Supports up to 16 Intel® Itanium® 2 processors. Requires
single Itanium 2 processors, and does not support HP
mx2 dual-processor modules.
Supports a maximum of four cells in an nPartition.
Supports a maximum of 256 GBytes memory.
Supports a maximum of two I/O chassis in an nPartition.
Requires a PCI-X I/O chassis, and does not support PCI
I/O chassis.
SuSE Linux Enterprise Server 10
Supports up to 16 Intel® Itanium® 2 processors.
On servers based on the HP sx2000 chipset, supported
only in nPartitions that have dual-core Intel® Itanium®
2 processors.
Supports a maximum of four cells in an nPartition.
Supports a maximum of 256 GBytes memory.
Supports a maximum of two I/O chassis in an nPartition.
Requires a PCI-X I/O chassis, and does not support PCI
I/O chassis.
Configuration Requirements for nPartitions
The hardware requirements determine which cells are eligible to be assigned to an nPartition.
For configuration requirements and restrictions for Superdome hybrid servers, refer to “HP
Superdome Hybrid Servers: Intel® Itanium® 2 and PA-RISC nPartition Mixing” (page 17). HP
Superdome servers based on the HP sx1000 chipset can support hybrid configurations with both
PA-RISC nPartitions and Intel® Itanium® 2 nPartitions in the same server complex.
Every nPartition you configure must meet the following hardware requirements:
• On HP 9000 systems, all cells in an nPartition must have the same processor revision level
and clock speed. That is, the IODC_HVERSION must be identical for all PA-RISC processors.
You can view processor details, including the CPU type (revision level) and speed, by using
the parstatus -V -c# command or by using Partition Manager (select the Cell→Show
Cell Details action, CPUs/Memory tab).
•
On HP Integrity servers, all cells in an nPartition must have the same compatibility value.
The cell compatibility value is reported by the parstatus -V -c# command as "CPU
Compatibility" for the cell.
Partition Manager Version 2.0 reports the value as "Cell Compatibility" in the General Cell
Properties view for the cell, which you can display by clicking the cell location when viewing
other details about the server complex.
62
Planning nPartitions
•
On HP Integrity servers, all cells assigned to an nPartition must have either mx2
dual-processor modules or single Itanium 2 processors.
Both HP mx2 dual-processor modules and single Itanium 2 processors can exist in the same
complex, but they cannot be mixed in the same nPartition.
•
•
The same firmware revision must be present on all cells within an nPartition.
At least one cell in every nPartition must be connected to an I/O chassis that has core I/O.
Only one core I/O is active per nPartition. If an nPartition has multiple cells that are connected
to I/O chassis with core I/O, only the core I/O connected to the active core cell is active.
Recommended nPartition Configurations
For best performance and availability, configure nPartitions to meet the following guidelines.
•
On servers based on the HP sx1000 chipset or HP sx2000 chipset, the nPartition memory
configuration should meet the following guidelines:
— The number of cells participating in memory interleave should be a power of two, and
each cell participating in interleave should contribute the same amount of memory.
— The total amount of memory being interleaved should be a power of two number of
GBytes.
•
When configuring cell local memory, ensure that the amount of interleaved memory meets
the guidelines given here. (All memory not specified as being cell local will be interleaved.)
Also ensure that any nPartition that has cell local memory configured runs only operating
systems that support cell local memory.
Cell local memory can be configured on servers based on the HP sx1000 chipset or HP sx2000
chipset.
CAUTION: Memory configured as cell local memory only can be used by operating systems
that support it.
Any memory configured as cell local memory is unusable when an nPartition runs an
operating system that does not support it.
•
•
The I/O chassis containing the active core I/O also should have an operating system (OS)
boot disk and method of installing or recovering the OS (such as a CD-ROM/DVD-ROM
drive, network connection to an install server, or tape drive). This applies to first-generation
cell-based servers and HP sx1000-based servers; it allows the nPartition to boot or recover
the OS, even if only the core cell for the nPartition is functioning. On HP sx2000-based
servers, every cell has core I/O.
Assign multiple core-capable cells to each nPartition.
This allows the nPartition to boot at least to the system boot environment (either BCH or
EFI) if a core-capable cell fails to boot. On HP sx2000-based servers, every cell has core I/O.
(Disregard this recommendation if you are configuring multiple nPartitions in a cell-based
server that has only two core-capable cells.)
•
The memory configuration of all cells in an nPartition should be identical to achieve best
performance.
Each cell in an nPartition should have:
— the same number of DIMMs
— the same capacity (size) and the same locations (population) of DIMMs
This avoids cell interconnect (crossbar) "hot spots" by distributing memory evenly across
all of the cells in the nPartition.
Recommended nPartition Configurations
63
•
The memory configuration of each cell should include a multiple of two memory ranks
(first-generation cell-based HP 9000 servers) or a multiple of two memory echelons (servers
based on the HP sx1000 chipset or HP sx2000 chipset) per cell.
On the first generation of cell-based HP 9000 servers, each memory rank is 4 DIMMs. If
possible, install memory in sets of 8 DIMMs: 8 DIMMs or 16 DIMMs on HP rp7405/rp7410,
rp8400, and Superdome (SD16000, SD32000, SD64000) cells. On Superdome cells, you also
can install 24 DIMMs or 32 DIMMs per cell.
On servers based on the HP sx1000 chipset or HP sx2000 chipset, each memory echelon is
2 DIMMs. If possible, install memory in sets of 4 DIMMs: 4, 8, 12, or 16 DIMMs. On
Superdome servers, you also can install 20, 24, 28, or 32 DIMMs per cell.
This provides a performance improvement by doubling the memory bandwidth of the cell,
as compared to having one memory rank or memory echelon installed.
This also can provide an availability improvement, in that if one memory rank or echelon
fails the cell still has at least one functional rank of memory.
(Memory rank 0, or echelon 0, must be functional for a cell to boot.)
•
Each nPartition should have PRI (primary), HAA (high-availability alternate), and ALT
(alternate) boot paths defined and configured, and their path flags appropriately configured
for your purposes.
NOTE: Note that on HP Integrity servers, the PRI path corresponds to the first item in the
EFI boot options list, the HAA path is the second item in the boot options list, and ALT is
the third boot option.
The PRI and HAA paths should be configured to reference disks that are connected to
different cells, if possible, with HAA being a mirror of the root volume and PRI being the
root volume. ALT should be the path of a recovery or install device.
Under this configuration, if the cell to which the PRI disk is connected fails or is otherwise
inactive and the cell to which the HAA disk is available, then the nPartition still can boot
an operating system.
Even if the PRI and HAA devices connect to the same cell (such as on a two-cell server with
two nPartitions configured), the HAA device can be used to boot an operating system should
the PRI device fail.
Recommended HP Superdome nPartition Configurations
On HP Superdome servers, the locations of the cells you assign to each nPartition and the resulting
loads on server interconnections can affect nPartition system performance within the server.
HP offers specific guidelines for configuring nPartitions on HP Superdome servers in order to
ensure good system performance.
NOTE:
The guidelines in this section apply to HP Superdome servers only.
These guidelines follow two basic configuration principles:
1.
2.
Avoid sharing interconnecting hardware (crossbars and crossbar links) among multiple
nPartitions.
Minimize the number of crossbar links used by each nPartition, but do not overload crossbar
links by creating nPartitions that can generate more cell communications traffic across the
links than the links can support. Overloading crossbar links degrades performance.
Configuration Guidelines for HP Superdome nPartitions Use these guidelines to help determine
which cells to assign to the nPartitions you create on HP Superdome servers.
64
Planning nPartitions
•
Define nPartitions in order of size.
Assign cells to the nPartition that has the largest cell count first. Then select cells for the next
largest nPartition, and so on, and finally choose cells for the nPartition with the fewest cells
last.
This provides more appropriate cell assignments for larger nPartitions (those with more
cells). Any smaller nPartitions with fewer cells are more easily accommodated in the
remaining, available cells.
•
Place each nPartition within an empty cabinet, if possible.
This applies to nPartitions in HP Superdome 64-way servers only.
If possible, assign each nPartition cells from a cabinet whose cells have no nPartition
assignments. Do this before assigning cells from a cabinet that already has cells assigned to
an nPartition.
Recommended nPartition Configurations
65
66
4 Using Management Interfaces and Tools
This chapter presents the system management interfaces and tools available on Hewlett-Packard's
cell-based servers. Also covered here are the nPartition boot environments, management access
procedures, and detailed command references.
Management differences on HP 9000 systems and HP Integrity systems are addressed in this
chapter. For a discussion of the supported cell-based server models, see Chapter 2 (page 49).
SMS (Support Management Station) for HP Superdome Servers
The Support Management Station (SMS) is a workstation or PC that is connected to an HP
Superdome server through the service processor private LAN. The SMS may either be an HP-UX
workstation or an HP ProLiant system running Microsoft® Windows® 2000 with Service Pack
3 or later.
The SMS primarily is used by HP-certified service and support personnel for system scan,
upgrade, and hardware verification purposes.
The Windows SMS is an HP ProLiant system running the Windows operating system that has
an enhanced system support toolset, including Partition Manager and the HP nPartition
commands (such as parcreate and parstatus, among others).
Use of the nPartition commands from a Windows SMS requires specifying the remote management
command-line options (either the -u... -h... set of options or the -g... -h... options).
For details see “Specifying Remote Management Options to Commands” (page 247).
You can use the Windows versions of the nPartition commands to remotely manage servers
based on the HP sx1000 chipset or HP sx2000 chipset. Remote management using IPMI over
LAN is supported for all servers based on the HP sx1000 chipset or HP sx2000 chipset. Remote
nPartition management using WBEM is supported for nPartitions running an operating system
with the HP nPartition Provider.
Details on the Windows SMS release of nPartition commands are given in “Commands for
Configuring nPartitions” (page 19).
For more details about the SMS for Superdome servers, refer to the Service Guide for your model
of Superdome server.
Overview of nPartition Service Processor (MP or GSP) Interfaces
The service processor (MP or GSP) utility hardware is an independent support system for
cell-based servers. It provides a way for you to connect to a server complex and perform
administration or monitoring tasks for the server hardware and its nPartitions.
The main features of the service processor include:
•
•
•
•
•
Command Menu
nPartition Consoles
Console Logs
Chassis Code Viewer (on HP 9000 servers with HP PA-8700 processors) or Event Log Viewer
(on servers based on the HP sx1000 chipset or HP sx2000 chipset)
Virtual Front Panels (live displays of nPartition and cell states)
These features are described in more detail in “Service Processor (MP or GSP) Features” (page 68).
The service processor is available when its cabinet has standby power, even if the main (48-volt)
cabinet power switch is turned off.
Access to the service processor is restricted by user accounts. Each user account is password
protected and provides a specific level of access to the server complex and service processor
commands.
SMS (Support Management Station) for HP Superdome Servers
67
Multiple users can independently interact with the service processor because each service
processor login session is private. However, some output is mirrored: the Command menu and
each nPartition console permit one interactive user at a time and mirror output to all users
accessing those features. Likewise, the service processor mirrors live chassis codes to all users
accessing the Live Chassis Logs feature (or the Live Events feature).
Up to 32 users can simultaneously login to the service processor through its network (customer
LAN) interface and they can independently manage nPartitions or view the server complex
hardware states.
Two additional service processor login sessions can be supported by the local and remote serial
ports. These allow for serial port terminal access (through the local RS-232 port) and external
modem access (through the remote RS-232 port).
In general, the service processor (MP or GSP) on cell-based servers is similar to the service
processor on other HP servers, while providing enhanced features necessary for managing a
multiple nPartitions.
For example, the service processor manages the complex profile, which defines nPartition
configurations as well as complex-wide settings for the server.
The service processor also controls power, reset, and TOC capabilities, displays and records
system events (or chassis codes), and can display detailed information about the various internal
subsystems.
Service Processor (MP or GSP) Features
The following list describes the primary features available through the service processor on
cell-based HP servers.
• Command Menu The Command menu provides commands for system service, status, and
access configuration tasks.
To enter the Command menu, enter CM at the service processor Main menu. To exit the
service processor Command menu, enter MA or type ^b (Control-b) to return to the service
processor Main menu.
See “Command Reference for Service Processor Commands” (page 80) for details.
Service processor commands are restricted based on the three levels of access: Administrator,
Operator, and Single Partition User. See “Service Processor Accounts and Access Levels”
(page 69) for details.
•
Consoles
Each nPartition in a server complex has its own console.
Enter CO at the service processor Main menu to access the nPartition consoles. To exit the
console, type ^b (Control-b).
See “nPartition Console Features” (page 70) for details.
Console output for each nPartition is reflected to all users currently accessing the nPartition
console.
One console user can have interactive access to each nPartition console, and all other users
of the console have read-only access. To gain write access for a console, type ^e cf (Control-e
c f).
68
Using Management Interfaces and Tools
Each nPartition console provides access to:
—
The nPartition system boot environment: either BCH or EFI.
The BCH or EFI system boot environment is available when the nPartition is active but
has not yet loaded or booted an operating system.
◦
◦
—
The Boot Console Handler (BCH) environment is provided on HP 9000 servers
only (PA-RISC servers).
The Extensible Firmware Interface (EFI) is provided on HP Integrity servers only
(Intel® Itanium®-based servers).
HP-UX console for the nPartition.
The nPartition console provides console login access to HP-UX and serves as /dev/
console for the nPartition.
•
Console Logs Enter CL from the service processor Main menu to access the console logs
menu. To exit the console log, type ^b (Control-b).
Each nPartition has its own console log, which stores a history of console output for the
nPartition, including boot output, system boot environment (BCH or EFI) activity, and any
HP-UX console login activity.
See “Viewing Console Logs” (page 77) for details.
The console log provides a limited history; it is a circular log file that overwrites the oldest
information with the most recent.
All console activity is recorded in the console log, regardless of whether any service processor
users are connected to the console.
•
Chassis Logs and Event Logs On both HP 9000 systems and HP Integrity systems, you can
view real-time (live) system events and can view prior events that have been stored in a log
history. Use the SL ("show logs") option from the service processor Main Menu to view
events/chassis codes.
—
—
On cell-based HP 9000 servers with HP PA-8700 processors, SL provides the Chassis
Log Viewer. The chassis log viewer includes options for viewing: activity (level 1 and
greater) logs, error (level 2 and greater) logs, and live logs (which optionally may be
filtered by cell, nPartition, or alert level).
On cell-based servers based on the HP sx1000 chipset or HP sx2000 chipset, SL provides
the Event Log Viewer. The event log viewer includes options for viewing: forward
progress (level 1 and greater) logs, system event (level 2 and greater) logs, and live logs
(which optionally may be filtered by cell, nPartition, or alert level).
See “Viewing Chassis Codes or Event Logs” (page 78) for details.
•
Virtual Front Panel (VFP) for an nPartition The Virtual Front Panel (VFP) for each nPartition
displays real-time boot activity and details about all cells assigned to the nPartition. The
VFP display automatically updates as cell and nPartition status changes. A system-wide
VFP also is provided.
Enter VFP at the Main menu to access the Virtual Front Panel menu. To exit a Virtual Front
Panel, type ^b (Control-b).
See “Virtual Front Panel (VFP) nPartition Views” (page 79) for details.
Service Processor Accounts and Access Levels
To access the service processor interface for a server complex, you must have a user account that
enables you to login to the service processor.
Each server complex has its own set of service processor user accounts, which are defined for
the server complex and may differ from accounts on other complexes.
Service Processor (MP or GSP) Features
69
Service processor user accounts have a specific login name, password, and access level.
The three user account access levels are:
•
Administrator Account Provides access to all commands, and access to all nPartition consoles
and Virtual Front Panels.
Can manage user accounts (using the Command menu SO command) and can reconfigure
various service processor settings.
•
Operator Account Provides access to a subset of commands, and access to all nPartition
consoles and Virtual Front Panels.
•
Single Partition User Account Provides access to a restricted subset of commands and
provides access to the nPartition console for a single nPartition. However, allows the user
to view the Virtual Front Panel for any nPartition.
Can only execute commands that affect the assigned nPartition.
Cannot execute commands that could potentially affect multiple nPartitions or affect the
service processor configuration.
Each user account can either permit repeated login sessions (if it is a "multiple use" account), or
restrict the account to only login once (for "single use" accounts).
nPartition Console Features
The service processor Console menu provides access to all nPartition consoles within the server
complex.
Enter CO from the service processor Main menu to access an nPartition console. To exit the
nPartition console, type ^b (Control-b) to return to the Main menu.
Each nPartition in a complex has a single console. However, multiple connections to the console
are supported, allowing multiple users to simultaneously view the console output. Only one
connection per console permits write-access.
To force (gain) console write access for an nPartition console, type ^ecf (Control-e c f).
70
Using Management Interfaces and Tools
Each nPartition console can display a variety of information about the nPartition, including:
•
•
Partition startup, shutdown, and reset output.
The system boot environment: either Boot Console Handler (BCH, on HP 9000 servers) or
Extensible Firmware Interface (EFI, on HP Integrity servers).
The system boot environment is available when the nPartition has not yet booted an operating
system and has completed Power-On Self Tests (POST) and completed nPartition rendezvous
to become active.
•
The HP-UX login prompt and "console shell access".
CAUTION: When you use an nPartition console connection to login to an operating system
running on the nPartition, logout from the operating system when you have finished using it
before you type ^B (Control-b) to disconnect from the nPartition console.
If you fail to logout from the operating system console session, then any other service processor
user who has permission to access the nPartition could connect to the nPartition console and use
the open login session.
Disconnecting from an nPartition console does not close any open operating system login sessions.
nPartition Console Access versus Direct OS Login
You may need to consider the following factors when deciding whether to interact with an
nPartition through the service processor console interface or a direct operating system (OS) login
session.
•
•
Whether you want to log your activity to the console log for the nPartition (all console activity
is stored at least temporarily).
Whether the OS is installed, booted, and properly configured on the nPartition.
If the OS is not installed on an nPartition, you should access the nPartition console (through
the service processor) in order to install and configure the OS.
You should use the network to login to the OS running on an nPartition when you do not need
to use service processor features and do not want to record a log of your activity.
Before an OS has booted, the service processor nPartition consoles are the primary method of
interacting with an nPartition.
After an nPartition has booted the OS, you should be able to connect to and login to the nPartition
by using telnet or rlogin or ssh to remotely login to HP-UX or Linux, or by using remote
desktop for a remote Windows session.
Boot Console Handler System Boot Environment
Each nPartition in a server complex has its own Boot Console Handler (BCH) interface.
The BCH interface is available through an nPartition console interface before an operating system
has booted and after the cells have booted and performed nPartition rendezvous (to make the
nPartition active).
The nPartition BCH interface enables you to manage and configure the HP-UX boot process for
an nPartition. You also can configure some settings for the local nPartition, get some information
about the nPartition and its server complex, and perform other tasks such as reboot.
•
•
•
To access an nPartition console type CO from the service processor (MP or GSP) Main menu.
To force console write access, type ^ecf (Control-e c f).
To exit the console, type ^b (Control-b) to return to the Main Menu.
The BCH interface is available after one or more core-capable cells assigned to the nPartition has
been powered on; its hardware has completed all Power-On Self Tests (POST); and the cells have
booted past boot-is-blocked, rendezvoused, and BCH has started executing.
Boot Console Handler System Boot Environment
71
Once you begin the HP-UX boot process and load ISL, the BCH interface is no longer available.
The BCH menus and commands for nPartitions differ slightly from the commands menus for
BCH on other HP 9000 server systems.
To display the current BCH menu and commands, type DI.
The BCH interface HELP command lists BCH command or menu details.
Main Menu: Enter command or menu > HELP MA
---- Main Menu Help ---------------------------------------------------------The following submenus are available from the main menu:
COnfiguration------------------------------------BootID
INformation-----------------------ALL
BootTimer
SERvice-------------BAttery
BootINfo
CEllConfig
CLEARPIM
CAche
COreCell
MemRead
ChipRevisions CPUConfig
PDT
ComplexID
DataPrefetch
PIM
FabricInfo
DEfault
SCSI
FRU
FastBoot
FwrVersion
KGMemory
IO
PathFlag
LanAddress
PD
MEmory
ResTart
PRocessor
TIme
...
Extensible Firmware Interface System Boot Environment
On HP Integrity servers the system boot environment is provided by the Extensible Firmware
Interface (EFI).
EFI is available through an nPartition console interface before an operating system has booted
and after the cells have booted and performed nPartition rendezvous (to make the nPartition
active).
The EFI environment enables you to manage and configure the operating system boot process
for an nPartition. You also can configure some settings for the local nPartition, get information
about the nPartition and its server complex, and perform other tasks such as reboot.
The EFI boot environment has two main components:
•
•
EFI Boot Manager — A menu-driven interface that enables to you configure and select boot
options. From the EFI Boot Manager you can load an operating system, reset the nPartition,
and configure various system boot and console options.
EFI Shell — A command-line system boot interface that you can enter by selecting the EFI
Shell option from the EFI Boot Manager Menu.
Type exit to leave the EFI Shell interface and return to the EFI Boot Manager Menu.
The EFI Shell provides much of the same functionality as the Boot Console Handler (BCH)
interface on HP 9000 systems (PA-RISC systems).
For details on using the EFI Shell use the help command.
The following commands are supported for accessing and using the EFI system boot environment
for an nPartition:
•
•
•
To access an nPartition console type CO from the service processor (MP or GSP) Main menu.
To force console write access, type ^ecf (Control-e c f).
To exit the console, type ^b (Control-b) to return to the Main Menu.
Windows Special Administration Console (SAC)
After an nPartition has successfully loaded Microsoft® Windows® Server 2003, you can access
a text-based Windows administration interface at the nPartition console.
72
Using Management Interfaces and Tools
The Special Administration Console (SAC) interface lets you interact with the Windows operating
system running on an nPartition by using the SAC> command prompt that is provided at the
nPartition console interface. The SAC commands listed in Table 4-1 (page 73) are provided for
managing Windows.
The SAC interface enables you to have administrative access to Windows on an nPartition even
if Windows networking is not functional.
Tips for using the SAC interface and a table of SAC commands follow.
SAC Interface: Tips for Interacting with Windows Special Administration Console When using
the Windows SAC interface through an nPartition console, you can use the commands in Table 4-1
(page 73). You also can use the following tips to help complete tasks with the SAC.
• To list all commands available from the SAC, issue the ? or help command at the SAC>
prompt.
• To list basic identification and boot information about the instance of Windows running on
the nPartition whose console you are using, issue the id command.
• To switch among the "channels" provided by the SAC interface, use the channel management
command.
SAC Channel Management Commands
Esc Tab — Change channels: if multiple channels exist, typing Esc Tab switches to the
next channel and typing Space selects a channel.
ch — List all channels.
ch -? — Display the channel-management command help.
ch -si # — Switch to a channel by its number.
ch -sn name — Switch to a channel by its name.
ch -ci # — Close a channel by its number.
ch -cn name — Close a channel by its name.
•
To create a new Windows command prompt that you can interact with through the nPartition
console, issue the cmd command.
The cmd SAC command creates a new channel for the command prompt, which you can
then switch to (using Esc Tab, or other commands) in order to login to Windows running
on the nPartition.
•
When you need to type function keys and are using the SAC, type the following key sequence:
Esc #
For example, for the F3 key type Esc then 3 in quick sequence.
Table 4-1 lists the commands you can issue at the Windows SAC> prompt, which is provided
through an nPartition console after Windows has booted.
Table 4-1 Windows SAC Commands
SAC Command
Description
ch
Channel management commands. Use ch -? for more help.
cmd
Create a Command Prompt channel.
d
Dump the current kernel log.
f
Toggle detailed or abbreviated tlist (Windows process) info.
? or help
Display command help.
i
List all IP network numbers and their IP addresses.
i # ip sub gate
Set IP address, subnet, and gateway for an IP network number.
Windows Special Administration Console (SAC)
73
Table 4-1 Windows SAC Commands (continued)
SAC Command
Description
id
Display the Windows nPartition identification information.
k pid
Kill the given process.
l pid
Lower the priority of a process to the lowest possible.
lock
Lock access to Command Prompt channels.
m pid MB-allow
Limit the memory usage of a process to MB-allow.
p
Toggle paging the display.
r pid
Raise the priority of a process by one.
s
Display the current time and date (24 hour clock used).
s mm/dd/yyyy hh:mm
Set the current time and date (24 hour clock used).
t
Display tlist info (a list of Windows processes running on the nPartition).
restart
Restart the system immediately.
shutdown
Shutdown the system immediately. This puts the nPartition in a shutdown for reconfig
(inactive) state.
To boot the nPartition (make it active), use the BO command at the service processor
Command menu.
crashdump
Crash the Windows system running on the nPartition. You must have crash dump enabled.
Accessing and Using the Service Processor
This section describes how to login to the service processor (MP or GSP) for a server complex.
You can connect to the service processor for a server complex by using the following methods:
•
Connecting through the customer LAN port by using telnet, if login access through the
customer LAN is enabled for the service processor.
On HP Superdome servers, the customer LAN hardware is labeled "Customer LAN". On
HP rp8400 servers it is "GSP LAN". On HP rp7405/rp7410 servers it is the only LAN port
on the core I/O.
Use telnet to open a connection with the service processor, then login by entering the
account name and corresponding password.
•
Connecting through the local RS-232 port using a direct serial cable connection.
On HP Superdome server hardware, the local RS-232 port is labeled "Local RS-232". On HP
rp8400 servers it is the "Local Console" port. On HP rp7405/rp7410 servers it is the 9-pin
D-shaped connector (DB9) labeled "Console".
•
Connecting through the remote RS-232 port using external modem (dial-up) access, if remote
modem access is configured.
On HP Superdome server hardware, the remote RS-232 port is labeled "Remote RS-232". On
HP rp8400 servers it is the "Remote Console" port. On HP rp7405/rp7410 servers it is the
DB9 connector labeled "Remote".
74
Using Management Interfaces and Tools
Example 4-1 Overview of a Service Processor Login Session
The following output shows a sample login session for a server whose service processor hostname
is "hpsys-s".
> telnet hpsys-s
Trying...
Connected to hpsys-s.rsn.hp.com.
Escape character is '^]'.
Local flow control off
MP login: Username
MP password:
Welcome to the
S Class 16K-A
Management Processor
(c) Copyright 1995-2001 Hewlett-Packard Co., All Rights Reserved.
Version 0.23
MP MAIN MENU:
CO:
VFP:
CM:
CL:
SL:
HE:
X:
Consoles
Virtual Front Panel
Command Menu
Console Logs
Show chassis Logs
Help
Exit Connection
MP>
Procedure 4-1 Logging in to a Service Processor
This procedure connects to and logs in to the service processor (MP or GSP) for a server complex
by using telnet to access the customer LAN.
If connecting through the local RS-232 port, skip Step 1 (instead establish a direct-cable connection)
and begin with Step 2.
1.
Use the telnet command on a remote system to connect to the service processor for the
server complex.
You can connect directly from the command line, for example:
telnet sdome-g
or run telnet first, and then issue the open command (for example, open sdome-g) at
the telnet> prompt.
All telnet commands and escape options are supported while you are connected to the
service processor.
2.
Login using your service processor user account name and password.
GSP login:Username
GSP password:Password
Accessing and Using the Service Processor
75
3.
Use the service processor menus and commands as needed and log out when done.
To log out, select the Exit Connection menu item from the Main menu (enter X at the GSP>
prompt or MP> prompt).
You also can terminate a login session by issuing the telnet escape key sequence ^] (type:
Control-right bracket) and entering close at the telnet> prompt.
NOTE: If possible, you should log out of any consoles and menus before terminating your
telnet session.
If accessing an OS on an nPartition, log out of the OS before exiting the console and service
processor sessions. (Otherwise an open OS login session will remain available to any other
service processor users.)
Using Service Processor Menus
The service processor (MP or GSP) has a set of menus that give you access to various commands,
consoles, log files, and other features.
See “Navigating through Service Processor Menus” (page 76) for details on using these menus.
The following menus are available from the service processor Main menu (which is the menu
you first access when logging in):
•
•
•
•
•
•
Console Menu—Provides access to nPartition consoles for the server.
Virtual Front Panel Menu—Provides a Virtual Front Panel for each nPartition (or for the
entire server complex).
Command Menu—Includes service, status, system access, and other commands.
Console Log Viewer Menu—Allows access to the console logs for nPartitions.
Chassis Log Viewer Menu or Event Log Viewer Menu—Allows access to the server chassis
code logs (on HP 9000 servers with HP PA-8700 processors) or event logs (on servers based
on the HP sx1000 chipset or HP sx2000 chipset). Chassis logs and event logs are functionally
equivalent: they record system activities. However, event logs are more descriptive.
Help Menu—Provides online help on a variety of service processor topics and on all service
processor Command menu commands.
These menus provide a central point for managing a server complex outside of an operating
system.
The service processor menus provide many tools and details not available elsewhere. More
administration features also are available from the nPartition system boot environments (BCH
or EFI), the nPartition tools, and various operating system commands.
Navigating through Service Processor Menus
The following list includes tips for navigating through service processor menus and using various
menu features:
•
Control-b
Exit current console, console log, chassis log, or Virtual Front Panel.
When accessing the Command menu, an nPartition console, any log files, or any Virtual
Front Panel (VFP), you can exit and return to the Main menu by typing ^b (Control-b).
•
Q (or lower-case q)
Exit or cancel current menu prompt.
Enter Q (or lower-case q) as response to any menu prompt to exit the prompt and return to
the previous sub-menu.
76
Using Management Interfaces and Tools
You can do this throughout the service processor menus, including the console menus,
various command menu prompts, and the log and VFP menus.
Note that, from the Command menu prompt (GSP:CM> or MP:CM>) you must enter MA (not
Q) to return to the Main menu. However, you can enter Q or q to cancel any command.
•
Control-]
Escape the service processor connection and return to the telnet prompt.
At any time during your telnet connection to a service processor, you can type the ^]
(Control-right bracket) escape sequence.
This key sequence escapes back to the telnet prompt. When at the telnet> prompt you
can use the following commands, among others: ? (print telnet command help information),
close (close the current connection), and quit (exit telnet).
To return to the service processor connection, type enter (or return) one or more times.
Network Configuration for a Service Processor
This gives an overview of the network settings for service processor (MP or GSP) hardware.
These settings are used for connections to the service processor and are not used for HP-UX
networking.
Details on configuring service processor networking are given in the service guide for each server.
The service processor utility hardware on HP Superdome servers has two network connections:
the customer LAN and private LAN.
The service processor on other (non-Superdome) cell-based servers does not have a private LAN;
only a customer LAN connection is provided.
Features of service processor LANs are given in the following list.
•
Customer LAN for Service Processor The customer LAN is the connection for login access
to the service processor menus, consoles, commands, and other features.
All cell-based servers have a customer LAN.
On HP Superdome servers, the customer LAN port is labeled "Customer LAN". On HP
rp8400 servers it is "GSP LAN". On HP rp7405/rp7410 servers it is the only LAN connection
on each board.
•
Private LAN for Service Processor (Superdome Only) The private LAN is the connection to
the Superdome service support processor (SSP) workstation, also called the service
management station (SMS).
Only Superdome servers have a private LAN. It typically is not used on the Superdome
server models based on the HP sx1000 chipset or HP sx2000 chipset.
To list the current service processor network configuration, use the LS command. To configure
service processor network settings, use the LC command from the Command menu. For a
procedures, refer to the service guide for your server.
Viewing Console Logs
Each nPartition in a server complex has its own console log that stores a record of the most recent
nPartition console activity.
To access the console log for an nPartition, enter CL from the service processor Main menu and
select which nPartition console log you want to view. To exit the console log viewer, type ^b
(Control-b) to return to the Main menu.
When viewing an nPartition console log, type P to view the previous page of the console log, or
type N (or Enter) to view the next page.
Viewing Console Logs
77
When you enter a console log viewer it displays the oldest data in the log first and allows you
to page through the log to view the more recently recorded activity.
Each console log is a circular log file that records approximately 30 to 40 pages of data. All
nPartition console activity is written to this log file, regardless of whether a user is connected to
the nPartition console.
As a console log is written the oldest data in the log is overwritten by current data, as needed,
so that the last 30 to 40 pages of console output always is available from the console log viewer.
Viewing Chassis Codes or Event Logs
The event log and chassis code viewers enables you to view chassis codes or event logs that are
emitted throughout the entire server complex.
NOTE:
codes.
On HP 9000 servers with HP PA-8700 processors, the equivalent of event logs is chassis
To enter the event log viewer enter SL at the service processor Main menu. To exit the viewer
type ^b (Control-b) to return to the Main menu.
Event logs are data that communicate information about system events from the source of the
event to other parts of the server complex. Event log data indicates what event has occurred,
when and where it happened, and its severity (the alert level).
All event logs pass from the event source through the service processor. The service processor
takes any appropriate action and then reflects the event logs to all running nPartitions. If an
nPartition is running event monitoring software, it may also take action based on the event logs
(for example, sending notification e-mail).
System administrators, of course, may have interest in viewing various event logs—especially
event logs that indicate failures or errors.
Hardware, software, and firmware events may emit event logs as a result of a failure or error, a
major change in system state, or basic forward progress. For example: a fan failure, a machine
check abort (MCA), the start of a boot process, hardware power on or off, and test completion
all result in event logs being emitted.
NOTE: The front panel attention LED for a cell-based server cabinet is automatically turned
on when one or more event logs of alert level 2 or higher have not yet been viewed by the
administrator. When this attention LED is on, entering the chassis log viewer turns the LED off.
You can remotely check the on/off status of this attention LED by using the PS command, G
option, from the service processor Command menu.
On cell-based servers, event logs are recorded in the server complex activity log (for events of
alert level 0 or alert level 1) or the error log (for events alert level 2 or higher).
GSP> SL
Chassis Logs available:
(A)ctivity Log
(E)rror Log
(L)ive Chassis Logs
(C)lear All Chassis Logs
(Q)uit
GSP:VW> L
Entering Live Log display
78
Using Management Interfaces and Tools
A)lert filter
C)ell filter
P)artition filter
U)nfiltered
V)iew format selection
^B to Quit
Current filter: ALERTS only
Log Viewing Options: Activity, Error, and Live Chassis Logs When you enter the chassis log
viewer by entering SL at the service processor (MP or GSP) Main menu, you can select from
these viewers:
• Activity Log Viewer Allows you to browse recorded event logs of alert level 0 or 1.
•
Error Log Viewer
•
Live Chassis Logs Viewer
Allows you to browse recorded event logs of alert level 2 or higher.
Displays event logs in real time as they are emitted.
By default, the live event log viewer has the Alert filter enabled, which causes it to display
only the events of alert level 3 or higher.
To view all event logs in real-time, type U for the Unfiltered option.
You also can filter the live codes by cell (C) or nPartition (P). Cell filter: only display event
logs emitted by a specific cell in the server complex. Partition filter: only display event logs
emitted by hardware assigned to a specific nPartition.
When viewing event log logs, type V to change the display format. The viewers can show event
logs in text format (T), keyword format (K), or raw hex format (R).
Virtual Front Panel (VFP) nPartition Views
The Virtual Front Panel (VFP) provides ways to monitor the boot or run status of each cell in an
nPartition and of the nPartition itself. The VFP provides the sort of information typically displayed
on the LCD of a non-partitionable server.
The VFP presents a real-time display of activity on the selected nPartition(s) and it automatically
updates when cell and nPartition status change.
To access the VFP feature, enter VFP from the service processor Main menu. To exit the VFP,
type ^b (Control-b) to return to the Main menu.
When you access a Virtual Front Panel, you can either select the nPartition whose VFP you want
to view or select the system VFP to view summary information for all nPartitions in the server
complex.
E indicates error since last boot
Partition 0 state
-----------------Cell(s) Booting:
710 Logs
#
0
1
2
Cell state
---------Early CPU selftest
Early CPU selftest
Memory discovery
Activity
--------
Activity
-------Cell firmware test
Processor test
Physical memory test
232
230
242
Logs
Logs
Logs
GSP:VFP (^B to Quit) >
Virtual Front Panel (VFP) nPartition Views
79
Command Reference for Service Processor Commands
Table 4-2 lists the commands available from the service processor command menu (the MP:CM>
or GSP:CM> prompt).
The following categories of commands are available:
• “Service Commands — Service Processor (MP or GSP)”.
• “Status Commands — Service Processor (MP or GSP)”.
• “System and Access Configuration Commands — Service Processor (MP or GSP)”.
Some commands are restricted to users with Operator or Administrator authority. Also note that
the available set of commands may differ depending on the utility revision level and server
hardware model.
For details on these commands, use the help (HE: Help) feature at the service processor Main
Menu. Enter the command name at the MP:HELP or GSP:HELP prompt for syntax, restrictions,
and other information.
Table 4-2 Service Processor (MP or GSP) Command Reference
Command
Description
Service Commands — Service Processor (MP or GSP)
nPartition management.
Commands for general server complex administration and
BO
Boot an nPartition past Boot is Blocked (BIB).
DF
Display FRU information of an entity.
MA
Return to the Main menu.
MR
Modem reset.
PCIOLAD
Activate/deactivate a PCI card.
PE
Power entities on or off.
RE
Reset entity.
RR
Reset an nPartition for reconfiguration; the nPartition remain inactive, in the shutdown
for reconfig state.
RS
Reset an nPartition.
TC
Send a TOC signal to an nPartition.
TE
Broadcast a message to all users of the MP Command Handler.
VM
Margin the voltage in a cabinet.
WHO
Display a list of MP connected users.
Status Commands — Service Processor (MP or GSP)
Commands for displaying hardware and nPartition information.
CP
Display nPartition cell assignments.
HE
Display the list of available commands.
IO
Display IO chassis/cell connectivity.
LS
Display LAN connected console status.
MS
Display the status of the modem.
PS
Display detailed power and hardware configuration status.
SYSREV
Display revisions of all firmware entities in the complex.
System and Access Configuration Commands — Service Processor (MP or GSP)
complex accounts, security, and nPartition configuration.
80
Using Management Interfaces and Tools
Commands for managing server
Table 4-2 Service Processor (MP or GSP) Command Reference (continued)
Command
Description
PARPERM
Restrict/unrestrict nPartition Reconfiguration Privilege.
PD
Modify default nPartition for this login session.
RL
Rekey Complex Profile locks (unlock Complex Profile).
SA
Display and set (enable/disable) MP remote access methods.
SO
Configure security options and access control (user accounts and passwords).
XD
MP diagnostics and reset.
Command Reference for EFI Shell Commands
Table 4-3 lists the commands supported by the EFI Shell interface on cell-based HP Integrity
servers.
The EFI Shell is accessible from an nPartition console when the nPartition is in an active state
but has not booted an operating system.
The following categories of commands are available:
•
•
•
•
•
•
•
“Boot Commands — EFI Shell”.
“Configuration Commands — EFI Shell”.
“Device, Driver, and Handle Commands — EFI Shell”.
“Filesystem Commands — EFI Shell”.
“Memory Commands — EFI Shell”.
“Shell Navigation and Other Commands — EFI Shell”.
“Shell Script Commands / Programming Constructs — EFI Shell”.
For details on these commands, enter help command at the EFI shell prompt.
Table 4-3 EFI Shell Command Reference
Command
Description
Boot Commands — EFI Shell
Commands related to nPartition booting.
autoboot
Set/view autoboot timeout variable.
bcfg
Display/modify the driver/boot configuration.
boottest
Set/view BootTest bits.
dbprofile
Display/modify direct boot profiles for use by lanboot.
lanboot
Boot over the LAN.
reconfigreset
Reset the system (nPartition) for reconfiguration; the nPartition remains inactive, in the
shutdown for reconfig state.
reset
Reset the system (nPartition).
search
Connect drivers for bootables devices.
Configuration Commands — EFI Shell
Commands for changing and retrieving system (nPartition) information.
acpiconfig
Set/view ACPI configuration mode.
cellconfig
Deconfigure/reconfigure cells. (Set cell use-on-next-boot values.)
cpuconfig
Deconfigure/reconfigure processors and processor cores..
date
Display the current date or set the date of the system (nPartition).
Command Reference for EFI Shell Commands
81
Table 4-3 EFI Shell Command Reference (continued)
Command
Description
dimmconfig
Deconfigure/reconfigure memory (DIMMs).
err
Display/change the error level.
errdump
View/clear logs.
fru
View FRU data.
info
Display hardware information.
monarch
Set/view a monarch processor.
palproc
Make a PAL call.
romdrivers
Enable/disable PCI expansion ROM drivers.
rootcell
Set/view preferred root cells. (Set nPartition core cell choices.)
salproc
Make a SAL call.
tftp
Performs TFTP operation to a bootp/DHCP enabled Unix boot server.
time
Display the current time or set the time of the system (nPartition). EFI time is set and
presented in GMT (Greenwich mean time).
variable
Save/restore specific EFI variables.
ver
Display the version information.
Device, Driver, and Handle Commands — EFI Shell
baud
View serial port com settings.
connect
Bind a driver to a device.
dblk
Hex dump of BlkIo devices.
devices
Display devices managed by EFI drivers.
devtree
Display tree of devices.
dh
Dump handle info.
disconnect
Disconnect driver(s) from device(s).
drivers
Display list of drivers.
drvcfg
Invoke the Driver Config Protocol.
drvdiag
Invoke the Driver Diagnostics Protocol.
guid
Dump known GUID IDs.
lanaddress
Display MAC address.
load
Load EFI drivers.
map
Map shortname to device path.
openinfo
Display the open protocols for given handle.
pci
Display PCI devices or PCI function configuration space.
reconnect
Reconnect driver(s) from a device.
unload
Unload a protocol image.
Filesystem Commands — EFI Shell
attrib
82
Commands for managing devices, drivers, and handles.
Commands for managing files, directories, and attributes.
Display/change the attributes of files/directories.
Using Management Interfaces and Tools
Table 4-3 EFI Shell Command Reference (continued)
Command
Description
cd
Update/view the current directory.
comp
Compare the contents of two files.
cp
Copy one or more files/directories to another location.
edit
Edit an ASCII or UNICODE file in full screen.
eficompress
Compress infile and write to outfile.
efidecompress
Decompress infile and write to outfile.
hexedit
Edit a file, block device, or memory region using hex.
ls
Display a list of files and subdirectories in a directory.
mkdir
Create one or more directories.
mount
Mount a filesystem on a block device.
rm
Delete one or more files/directories.
setsize
Set the size of a file.
touch
Update time of file/directory with current time.
type
Display the contents of a file.
vol
Display volume information of the file system.
Memory Commands — EFI Shell
Commands for listing and managing memory, EFI variables, and NVRAM details.
default
Set the default NVRAM values.
dmem
Dump memory or memory mapped IO.
dmpstore
Display all EFI variables.
memmap
Display the memory map.
mm
Display/modify MEM/IO/PCI.
pdt
View/clear nPartition or cell memory page deallocation table (PDT).
Shell Navigation and Other Commands — EFI Shell
Commands for basic EFI Shell navigation and customization.
alias
Set/get alias settings.
cls
Clear the standard output with an optional background color.
exit
Exit EFI Shell environment.
getmtc
Display current monotonic counter value.
help or ?
Display help.
mode
Display the mode of the console output device.
set
Set/Get environment variable.
xchar
Turn on/off extended character features.
Shell Script Commands / Programming Constructs — EFI Shell
EFI shell-script commands.
echo
Echo message to stdout or toggle script echo.
else
Script-only: Use with IF THEN.
endfor
Script-only: Delimiter for FOR loop construct.
Command Reference for EFI Shell Commands
83
Table 4-3 EFI Shell Command Reference (continued)
Command
Description
endif
Script-only: Delimiter for IF THEN construct.
for
Script-only: Loop construct.
goto
Script-only: Jump to label location in script.
if
Script-only: IF THEN construct.
input
Take user input and place in EFI variable.
pause
Script-only: Prompt to quit or continue.
stall
Stall the processor for some microseconds.
Command Reference for BCH Menu Commands
Table 4-4 lists the commands available from the Boot Console Handler (BCH) menus for an
nPartition.
The BCH Menu is accessible from an nPartition console when the nPartition is in an active state
but has not booted an operating system.
The following categories of commands are available:
•
•
•
•
•
“General Commands — Boot Console Handler (BCH)”.
“Main Menu Commands — Boot Console Handler (BCH)”.
“Configuration Menu Commands — Boot Console Handler (BCH)”.
“Information Menu Commands — Boot Console Handler (BCH)”.
“Service Menu Commands — Boot Console Handler (BCH)”.
For details on these commands, use the help (HE) command. At any BCH menu enter HE command
for details about the specified command, or enter HE for general help.
Table 4-4 Boot Console Handler (BCH) Command Reference
Command
Description
General Commands — Boot Console Handler (BCH)
BOot [PRI| HAA|
ALT| path]
Boot from the specified path.
REBOOT
Restart nPartition.
RECONFIGRESET
Reset the nPartition to allow Complex Profile reconfiguration; the nPartition remains
inactive, in the shutdown for reconfig state.
DIsplay
Redisplay the current menu.
HElp [menu
|command]
Display help for the current menu or the specified menu or command.
Main Menu Commands — Boot Console Handler (BCH)
and access other BCH menus.
84
These BCH commands are available from all BCH menus.
Commands to find devices, set boot paths (PRI,HAA, ALT),
BOot [PRI |HAA
|ALT| path]
Boot from the specified path.
PAth [PRI |HAA
|ALT] [path]
Display or modify a device boot path.
SEArch [ALL |cell
|path]
Search for boot devices.
Using Management Interfaces and Tools
Table 4-4 Boot Console Handler (BCH) Command Reference (continued)
Command
Description
ScRoll [ON|OFF]
Display or change scrolling capability.
COnfiguration
Access the Configuration Menu, which displays or sets boot values.
INformation
Access the information menu, which displays hardware information.
SERvice
Access the Service Menu, which displays service commands.
Configuration Menu Commands — Boot Console Handler (BCH)
Commands to display or set boot values.
MAin
Return to the BCH Main Menu.
BootID [cell [proc
[bootid]]]
Display or set Boot Identifier.
BootTimer [0-200]
Seconds allowed for boot attempt.
CEllConfig [cell]
[ON|OFF]
Configure or deconfigure the specified cell.
COreCell [choice cell] Display or set core cell choices for the nPartition.
CPUconfig [cell [cpu
[ON|OFF]]]
Configure or deconfigure the processor (cpu) on the specified cell.
DataPrefetch
[ENABLE |DISABLE]
Display or set data prefetch behavior.
DEfault
Set the nPartition to predefined (default) values.
FastBoot [test][RUN Display or set boot tests execution (self tests).
|SKIP]
KGMemory [value]
Display or set KGMemory requirement.
PathFlags
[PRI|HAA|ALT]
[value]
Display or set boot path flags (boot actions).
PD [name]
Display or set the nPartition name.
ResTart [ON|OFF]
Set nPartition restart policy.
Read or set the real time clock, the local nPartition date/time setting. The BCH time is set
TIme
[cn:yr:mo:dy:hr:mn:[ss]] and presented in GMT (Greenwich mean time).
Information Menu Commands — Boot Console Handler (BCH)
Commands to display hardware information.
MAin
Return to the BCH Main Menu.
ALL [cell]
Display all of the information available for the nPartition.
BootINfo
Display boot-related information.
CAche [cell]
Display cache information.
ChipRevisions [cell] Display revisions of major integrated circuits.
ComplexID
Display Complex information.
FabricInfo
Display Fabric information.
FRU [cell] [CPU|MEM] Display FRU information
FwrVersion [cell]
Display versions for PDC, ICM, and complex.
Command Reference for BCH Menu Commands
85
Table 4-4 Boot Console Handler (BCH) Command Reference (continued)
Command
Description
IO [cell]
Display I/O interface information.
MEmory [cell]
Display memory information.
PRocessor [cell]
Display processor information
Service Menu Commands — Boot Console Handler (BCH)
Commands related to nPartition system service tasks.
MAin
Return to the BCH Main Menu.
BAttery [cell]
Display cell battery status.
CLEARPIM [cell]
Clear the non-volatile processor internal memory (NVM PIM) data for the nPartition.
DimmDealloc [cell]
[dimm] [ON|OFF]
Display, deallocate, or re-allocate the DIMM identified by dimm in cell number specified
by cell.
ErrorLog
[cell][MEMORY |IO
|FABRIC |CELL]
Display error log information.
LanAddress
Display Core I/O LAN station address.
MemRead address [len] Read memory locations scope of nPartition.
PDT [cell] [CLEAR]
Display or clear the memory page deallocation table (PDT).
PIM [cell [proc]]
[HPMC |LPMC |TOC]
Display the processor internal memory (PIM) data for the nPartition.
Display or set SCSI device parameters.
SCSI [path [INIT
|RATE |TERM |WIDTH
|DEFAULT [id]]]
86
Using Management Interfaces and Tools
5 Booting and Resetting nPartitions
This chapter introduces nPartition system boot and reset concepts, configuration options, and
procedures for booting and resetting nPartitions.
This chapter covers boot details for HP-UX, HP OpenVMS I64, Microsoft® Windows® Server
2003, Red Hat Enterprise Linux, and the SuSE Linux Enterprise Server operating systems.
Differences in the nPartition boot process on PA-RISC systems and Intel® Itanium®-based
systems also are addressed in this chapter.
CAUTION: An nPartition on an HP Integrity server cannot boot HP-UX virtual partitions when
in nPars boot mode. Likewise, an nPartition on an HP Integrity server cannot boot an operating
system outside of a virtual partition when in vPars boot mode.
For details, refer to “Boot Modes on HP Integrity nPartitions: nPars and vPars Modes” (page 94).
NOTE: For details on boot and reset of nPartitions running vPars software, refer to Installing
and Managing HP-UX Virtual Partitions (vPars).
Overview of nPartition System Booting
This section provides an overview of the nPartition system boot process for HP 9000 servers and
HP Integrity servers.
On cell-based HP servers, system resources are configured into one or more nPartitions. Each
nPartition includes the cells (with processors and memory) assigned to it and the I/O that is
connected to those cells.
An nPartition can boot and reboot independently of any other nPartitions in the same server
complex. Each nPartition runs its own firmware and has its own system boot environment.
nPartitions provide hardware and software fault isolation: a reset, TOC, or MCA in one nPartition
does not affect any other nPartition in most cases.
Each nPartition is effectively an independent system that follows the boot processes outlined in
the following lists. Boot Overview for Cell-Base HP 9000 Servers shows an overview of the boot
process on HP 9000 servers (PA-RISC systems). Boot Overview for Cell-Based HP Integrity
Servers shows an overview of the boot process on HP Integrity servers (Itanium® 2-based
systems).
Also refer to “Boot Process for Cells and nPartitions” (page 32) for details.
Boot Overview for Cell-Base HP 9000 Servers Cell-based HP 9000 servers have PA-RISC
processors and have the following boot process:
1. PDC Self Test
2. PDC Boot
3. Boot Console Handler (BCH, a menu-driven boot environment)
4. Initial System Loader (ISL)
5. Secondary System Loader (hpux)
6. HP-UX Operating System
Boot Overview for Cell-Based HP Integrity Servers Cell-based HP Integrity servers have Intel®
Itanium® processors and have the following boot process:
1. Processor Abstraction Layer (PAL)
2. System Abstraction Layer (SAL)
3. Extensible Firmware Interface (EFI)
4. EFI Boot Manager (menu-driven boot environment)
Overview of nPartition System Booting
87
a.
b.
EFI Shell (command-driven boot environment)
EFI Scripts and Applications
EFI scripts and EFI applications can be initiated from either EFI Boot Manager or EFI
Shell.
5.
Operating System Loader
The following OS loaders are supported on HP Integrity servers. OS loaders can be initiated
from the EFI Boot Manger or the EFI Shell.
a. HPUX.EFI Loader
Loader for the HP-UX operating system.
b.
ELILO.EFI Loader
Loader for Red Hat Enterprise Linux or SuSE Linux Enterprise Server.
c.
vms_loader.efi Loader
Loader for HP OpenVMS I64.
d.
ia64ldr.efi Loader
Loader for Microsoft Windows Server 2003. ia64ldr.efi must be initiated from EFI
Boot Manager (not from the EFI Shell).
Boot Process Differences for nPartitions on HP 9000 servers and HP Integrity servers
The following lists, “HP Integrity Server Booting” and “HP 9000 Server Booting”, describe system
boot features and differences on HP Integrity and HP 9000 servers.
HP Integrity Server Booting This list describes system boot features on cell-based HP Integrity
servers.
• The nPartition system boot environment is the Extensible Firmware Interface (EFI): the EFI
Boot Manager menu and the EFI Shell.
• The autoboot process is configured by the EFI autoboot setting and the order of items in the
boot options list.
The boot options list can include:
—
—
—
•
First boot option: configured using the setboot -p... or parmodify -b...
command.
Second boot option: configured using the setboot -h... or parmodify -s...
command
Third boot option: configured using the setboot -a... or parmodify -t...
command.
Each operating system has its own OS loader.
— The HP-UX OS loader is HPUX.EFI, which supports hpux(1M) loader options.
You can issue hpux loader commands from the HPUX> prompt.
—
—
—
The HP OpenVMS I64 loader is vms_loader.efi.
The Microsoft® Windows® loader is ia64ldr.efi and it is invoked only from the
EFI Boot Manager.
The loader for Red Hat Enterprise Linux and SuSE Linux Enterprise Server is
ELILO.EFI.
You can issue ELILO loader commands from the "ELILO boot" prompt.
•
88
The EFI system boot environment includes an ACPI configuration setting that must be set
properly for the OS being booted: either HP-UX, OpenVMS I64, Windows, or Linux. For
details see “ACPI Configuration Value—HP Integrity Server OS Boot” (page 92).
Booting and Resetting nPartitions
HP 9000 Server Booting This list describes system boot features on cell-based HP 9000 servers.
• The nPartition system boot environment is the Boot Console Handler (BCH).
• The autoboot process is configured using boot device paths (PRI, HAA, ALT) and path flags.
— PRI boot path: configured using the setboot -p... or parmodify -b... command.
— HAA boot path: configured using the setboot -h... or parmodify -s... command
— ALT boot path: configured using the setboot -a... or parmodify -t... command.
•
The HP-UX B.11.11 OS loaders are ISL and hpux. Issue commands from the ISL> prompt.
Types of Booting and Resetting for nPartitions
HP cell-based servers provide two special types of reboot and reset for managing nPartitions:
performing a reboot for reconfig, and performing a shutdown for reconfig.
The following list summarizes all types of booting, rebooting, and resetting that are supported
for HP nPartition systems. See the “Reboot for Reconfig” and “Shutdown for Reconfig State”
items for a discussion of these nPartition-specific boot processes.
NOTE: You can perform the Windows shutdown tasks either by using the shutdown command
or by using the Start→Shut Down action.
•
Reboot A reboot shuts down the operating system and reboots the nPartition. On HP 9000
systems, only the active cells in the nPartition are reset. On HP Integrity systems, all cells
are reset.
To perform a standard reboot of an nPartition use the HP-UX shutdown -r command, the
Windows shutdown /r command, the Linux shutdown -r time command, or the
OpenVMS: @SYS$SYSTEM:SHUTDOWN with an automatic system reboot.
•
Halt A halt shuts down the operating system, halts all processing on the nPartition, and
does not reboot.
To halt the operating system use the HP-UX shutdown -h command.
To reboot an nPartition that was halted from HP-UX use the RS command from the service
processor Command menu.
Halting the system is supported only on HP 9000 servers. On HP Integrity servers the effect
of the shutdown -h command or its Windows and Linux equivalents is to perform a
shutdown for reconfig (see “Shutdown for Reconfig State” in this list). On HP OpenVMS
servers, shutting down without rebooting halts OpenVMS but does not perform a shutdown
for reconfig.
•
Reset A reset resets the nPartition immediately. On HP 9000 systems, only the active cells
in the nPartition are reset. On HP Integrity systems all cells are reset.
You can reset an nPartition using the REBOOT command from the BCH interface, the reset
command from the EFI Shell, or the RS command from the service processor Command
menu.
The RS command does not check whether the specified nPartition is in use or running an
operating system—be certain to correctly specify the nPartition.
Overview of nPartition System Booting
89
NOTE: On HP Integrity servers you should reset an nPartition only after all self tests and
partition rendezvous have completed. For example, when the nPartition is inactive (all cells
are at BIB) or is at EFI.
•
Boot an nPartition from the Service Processor (GSP or MP) A boot initiated from the service
processor boots an inactive nPartition past the shutdown for reconfig state to allow it to
become active.
To boot an inactive nPartition, use the BO command from the service processor Command
menu.
The cells assigned to the nPartition proceed past boot-is-blocked (BIB), rendezvous, and the
nPartition boots to the system boot environment (BCH or EFI).
•
Reboot for Reconfig A reboot for reconfig shuts down the operating system, resets all cells
assigned to the nPartition, performs any nPartition reconfigurations, and boots the nPartition
back to the system boot environment (BCH or EFI).
To perform a reboot for reconfig of the local nPartition, use the HP-UX shutdown -R
command, Windows shutdown /r command, or the Linux shutdown -r time command.
To perform a reboot for reconfig from OpenVMS I64 running on an nPartition, issue
@SYS$SYSTEM:SHUTDOWN.COM from OpenVMS, and then enter Yes at the "Should an
automatic system reboot be performed" prompt.
All cells—including any inactive cells and all newly added or deleted cells—reset and the
nPartition is reconfigured as needed. All cells with a "y" use-on-next-boot setting participate
in partition rendezvous and synchronize to boot as a single nPartition.
After you assign a cell to an nPartition, or remove an active cell from an nPartition, you can
perform a reboot for reconfig of the nPartition to complete the cell addition or removal.
If an nPartition is configured to boot an operating system automatically, it can do so
immediately following a reboot for reconfig.
•
Shutdown for Reconfig State Putting an nPartition into the shutdown for reconfig state
involves shutting down the operating system (as required), resetting all cells assigned to
the nPartition, performing any nPartition reconfigurations, and keeping all cells at a
boot-is-blocked (BIB) state, thus making the nPartition and all of its cells inactive.
On HP rx7620, rx7640, rx8620, and rx8640 servers, you can configure the OS shutdown for
reconfig behavior for each nPartition to either power off hardware or keep cells at BIB. See
“ACPI Softpowerdown Configuration—OS Shutdown Behavior” (page 93) for details.
To put an nPartition into the shutdown for reconfig state use the shutdown -R -H HP-UX
command, the shutdown /s Windows command, or the Linux shutdown -h time
command. To perform a shutdown for reconfig of an nPartition running OpenVMS I64: first
issue @SYS$SYSTEM:SHUTDOWN.COM from OpenVMS and enter No at the "Should an
automatic system reboot be performed" prompt, then access the MP and, from the MP
Command Menu, issue the RR command and specify the nPartition that is to be shutdown
for reconfig.
From system firmware, to put an nPartition into the shutdown for reconfig state use the
RECONFIGRESET command from the BCH interface, the reconfigreset command from
the EFI Shell, or the RR command from the service processor Command menu.
To make an nPartition boot past shutdown for reconfig, use either the BO command or the
PE command from the service processor Command menu.
—
90
For an inactive nPartition whose cells are at BIB, use the BO command from the service
processor Command menu. The BO command makes the nPartition active by allowing
Booting and Resetting nPartitions
—
•
its cells to boot past BIB, rendezvous, and boot to the system boot environment (BCH
or EFI) and, if configured, automatically boot an operating system.
For an nPartition whose cells have been powered off, use the PE command to power
on the nPartition hardware.
TOC: Transfer-of-Control Reset When you initiate a transfer-of-control reset, the service
processor immediately performs a TOC reset of the specified nPartition, which resets the
nPartition and allows a crash dump to be saved.
If crash dump is configured for an OS on an nPartition, then when you TOC the nPartition
while it is running the OS, the nPartition performs a crash dump and lets you select the type
of dump.
To perform a TOC reset, use the TC command from the service processor Command menu.
HP nPartition systems do not have TOC buttons on the server cabinet hardware.
From the Windows SAC, you can initiate a crash dump by issuing the crashdump command
at the SAC> prompt
From HP OpenVMS I64, you can cause OpenVMS to dump system memory and then halt
at the P00>> prompt by issuing the RUN SYS$SYSTEM:OPCRASH command. To reset the
nPartition following OPCRASH, access the nPartition console and press any key to reboot.
System Boot Configuration Options
This section briefly discusses the system boot options you can configure on cell-based servers.
You can configure boot options that are specific to each nPartition in the server complex.
HP 9000 Boot Configuration Options
On cell-based HP 9000 servers the configurable system boot options include boot device paths
(PRI, HAA, and ALT) and the autoboot setting for the nPartition. To set these options from HP-UX,
use the setboot command. From the BCH system boot environment, use the PATH command
at the BCH Main menu to set boot device paths, and use the PATHFLAGS command at the BCH
Configuration menu to set autoboot options. For details issue HELP command at the appropriate
BCH menu, where command is the command for which you want help.
HP Integrity Boot Configuration Options
On cell-based HP Integrity servers you must properly specify the ACPI configuration value,
which affects the OS startup process and on some servers can affect the shutdown behavior. You
also can configure boot device paths and the autoboot setting for the nPartition. Details are given
in the following list.
• Boot Options List The boot options list is a list of loadable items available for you to select
from the EFI Boot Manager menu. Ordinarily the boot options list includes the EFI Shell
and one or more operating system loaders.
The following example includes boot options for HP OpenVMS, Microsoft Windows, HP-UX,
and the EFI Shell. The final item in the EFI Boot Manager menu, the Boot Configuration
menu, is not a boot option. The Boot Configuration menu allows system configuration
through a maintenance menu.
EFI Boot Manager ver 1.10 [14.61]
Please select a boot option
HP OpenVMS 8.2-1
EFI Shell [Built-in]
Windows Server 2003, Enterprise
HP-UX Primary Boot: 4/0/1/1/0.2.0
Boot Option Maintenance Menu
Use ^ and v to change option(s). Use Enter to select an option
Overview of nPartition System Booting
91
NOTE: In some versions of EFI, the Boot Configuration menu is listed as the Boot Option
Maintenance menu.
To manage the boot options list for each system use the EFI Shell, the EFI Boot Configuration
menu, or operating system utilities.
At the EFI Shell, the bcfg command supports listing and managing the boot options list for
all operating systems except Microsoft Windows. On HP Integrity systems with Windows
installed the \MSUtil\nvrboot.efi utility is provided for managing Windows boot
options from the EFI Shell. Likewise on HP Integrity systems with OpenVMS installed the
\efi\vms\vms_bcfg.efi and \efi\vms\vms_show utilities are provided for managing
OpenVMS boot options.
The EFI Boot Configuration menu provides the Add a Boot Option, Delete Boot Option(s),
and Change Boot Order menu items. (If you must add an EFI Shell entry to the boot options
list, use this method.)
Operating system utilities for managing the boot options list include the HP-UX setboot
command and the HP OpenVMS @SYS$MANAGER:BOOT_OPTIONS.COM command.
The OpenVMS I64 installation and upgrade procedures assist you in setting up and validating
a boot option for your system disk. HP recommends that you allow the procedure to do
this. Alternatively, you can use the @SYS$MANAGER:BOOT_OPTIONS.COM command (also
referred to as the OpenVMS I64 Boot Manager utility) to manage boot options for your
system disk. The OpenVMS I64 Boot Manager (BOOT_OPTIONS.COM) utility is a menu-based
utility and is easier to use than EFI. To configure OpenVMS I64 booting on Fibre Channel
devices, you must use the OpenVMS I64 Boot Manager utility (BOOT_OPTIONS.COM). For
more information on this utility and other restrictions, refer to the HP OpenVMS for Integrity
Servers Upgrade and Installation Manual.
For details refer to the following sections.
—
—
—
—
•
To set HP-UX boot options refer to “Adding HP-UX to the Boot Options List” (page 109).
To set OpenVMS boot options refer to “Adding HP OpenVMS to the Boot Options List”
(page 120).
To set Windows boot options refer to “Adding Microsoft Windows to the Boot Options
List” (page 125).
To set Linux boot options refer to “Adding Linux to the Boot Options List” (page 130).
Autoboot Setting You can configure the autoboot setting for each nPartition either by using
the autoboot command at the EFI Shell, or by using the Set Auto Boot TimeOut menu
item at the EFI Boot Option Maintenance menu.
To set autoboot from HP-UX, use the setboot command.
•
ACPI Configuration Value—HP Integrity Server OS Boot On cell-based HP Integrity servers
you must set the proper ACPI configuration for the OS that will be booted on the nPartition.
To check the ACPI configuration value, issue the acpiconfig command with no arguments
at the EFI Shell.
To set the ACPI configuration value, issue the acpiconfig value command at the EFI Shell,
where value is either default, windows, or single-pci-domain. Then reset the nPartition
by issuing the reset EFI Shell command for the setting to take effect.
92
Booting and Resetting nPartitions
The ACPI configuration settings for the supported OSes are in the following list.
—
HP-UX ACPI Configuration: default On cell-based HP Integrity servers, to boot or install
the HP-UX OS, you must set the ACPI configuration value for the nPartition to default.
For details refer to “ACPI Configuration for HP-UX Must Be default” (page 110).
—
HP OpenVMS I64 ACPI Configuration: default On cell-based HP Integrity servers, to
boot or install the HP OpenVMS I64 OS, you must set the ACPI configuration value for
the nPartition to default.
For details refer to “ACPI Configuration for HP OpenVMS I64 Must Be default”
(page 122).
—
Windows ACPI Configuration: windows On cell-based HP Integrity servers, to boot or
install the Windows OS, you must set the ACPI configuration value for the nPartition
to windows.
For details refer to “ACPI Configuration for Windows Must Be windows” (page 127).
—
Red Hat Enterprise Linux ACPI Configuration: single-pci-domain or default On cell-based
HP Integrity servers, to boot or install the Red Hat Enterprise Linux OS, you must set
the ACPI configuration value for the nPartition to either single-pci-domain or
default.
◦
On HP rx7620 servers, rx8620 servers, or Integrity Superdome (SD16A, SD32A,
SD64A), the ACPI configuration must be set to single-pci-domain.
◦
On HP rx7640 servers, rx8640 servers, or Integrity Superdome (SD16B, SD32B,
SD64B), the ACPI configuration must be set to default.
For details refer to “ACPI Configuration for Red Hat Enterprise Linux Must Be
single-pci-domain or default” (page 131).
—
SuSE Linux Enterprise Server ACPI Configuration: single-pci-domain or default On
cell-based HP Integrity servers, to boot or install the SuSE Linux Enterprise Server OS,
you must set the ACPI configuration value for the nPartition to single-pci-domain
or default.
◦
On HP rx7620 servers, rx8620 servers, or Integrity Superdome (SD16A, SD32A,
SD64A), the ACPI configuration must be set to single-pci-domain.
◦
On HP rx7640 servers, rx8640 servers, or Integrity Superdome (SD16B, SD32B,
SD64B), the ACPI configuration must be set to default.
For details refer to “ACPI Configuration for SuSE Linux Enterprise Server Must Be
single-pci-domain or default” (page 133).
•
ACPI Softpowerdown Configuration—OS Shutdown Behavior On HP rx7620, rx7640, rx8620,
and rx8640 servers, you can configure the nPartition behavior when an OS is shut down
and halted. The two options are to have hardware power off when the OS is halted, or to
have the nPartition be made inactive (all cells are in a boot-is-blocked state). The normal OS
shutdown behavior on these servers depends on the ACPI configuration for the nPartition.
You can run the acpiconfig command with no arguments to check the current ACPI
configuration setting; however, softpowerdown information is displayed only when different
from normal behavior.
To change the nPartition behavior when an OS is shut down and halted, use either the
acpiconfig enable softpowerdown EFI Shell command or the acpiconfig disable
softpowerdown command, and then reset the nPartition to make the ACPI configuration
change take effect.
— acpiconfig enable softpowerdown When set on HP rx7620, rx7640, rx8620, and rx8640
servers, acpiconfig enable softpowerdown causes nPartition hardware to be
Overview of nPartition System Booting
93
powered off when the OS issues a shutdown for reconfig command (for example,
shutdown -h or shutdown /s).
This is the normal behavior on HP rx7620, rx7640, rx8620, and rx8640 servers with a
windows ACPI configuration setting.
When softpowerdown is enabled on HP rx7620, rx7640, rx8620, and rx8640 servers, if
one nPartition is defined in the server, then halting the OS powers off the server cabinet
including all cells and I/O chassis. On HP rx7620, rx7640, rx8620, and rx8640 servers
with multiple nPartitions, halting the OS from an nPartition with softpowerdown
enabled causes only the resources on the local nPartition to be powered off.
To power on hardware that has been powered off, use the PE command at the
management processor Command menu.
—
acpiconfig disable softpowerdown When set on HP rx7620, rx7640, rx8620, and rx8640
servers, acpiconfig disable softpowerdown causes nPartition cells to remain
at a boot-is-blocked state when the OS issues a shutdown for reconfig command (for
example, shutdown -h or shutdown /s). In this case an OS shutdown for reconfig
makes the nPartition inactive.
This is the normal behavior on HP rx7620, rx7640, rx8620, and rx8640 servers with an
ACPI configuration setting of default or single-pci-domain.
To make an inactive nPartition active, use the management processor BO command to
boot the nPartition past the boot-is-blocked state.
•
Boot Modes on HP Integrity nPartitions: nPars and vPars Modes On cell-based HP Integrity
servers, each nPartition can be configured in either of two boot modes:
— nPars Boot Mode
In nPars boot mode, an nPartition is configured to boot any single operating system
in the standard environment. When an nPartition is in nPars boot mode, it cannot boot
the vPars monitor and therefore does not support HP-UX virtual partitions.
—
vPars Boot Mode
In vPars boot mode, an nPartition is configured to boot into the vPars environment.
When an nPartition is in vPars boot mode, it can only boot the vPars monitor and
therefore it only supports HP-UX virtual partitions and it does not support booting HP
OpenVMS I64, Microsoft Windows, or other operating systems. On an nPartition in
vPars boot mode, HP-UX can boot only within a virtual partition (from the vPars
monitor) and cannot boot as a standalone, single operating system in the nPartition.
CAUTION: An nPartition on an HP Integrity server cannot boot HP-UX virtual partitions
when in nPars boot mode. Likewise, an nPartition on an HP Integrity server cannot boot
an operating system outside of a virtual partition when in vPars boot mode.
To check or set the boot mode for an nPartition on a cell-based HP Integrity server, use any
of the following tools as appropriate. Refer to Installing and Managing HP-UX Virtual Partitions
(vPars), Sixth Edition, for details, examples, and restrictions.
94
Booting and Resetting nPartitions
—
parconfig EFI shell command
The parconfig command is a built-in EFI shell command. Refer to the help
parconfig command for details.
—
\EFI\HPUX\vparconfig EFI shell command
The vparconfig command is delivered in the \EFI\HPUX directory on the EFI system
partition of the disk where HP-UX virtual partitions has been installed on a cell-based
HP Integrity server. For usage details, enter the vparconfig command with no options.
—
vparenv HP-UX command
On cell-based HP Integrity servers only, the vparenv HP-UX command is installed on
HP-UX systems that have the HP-UX virtual partitions software. Refer to vparenv(1m)
for details.
NOTE: On HP Integrity servers, nPartitions that do not have the parconfig EFI shell
command do not support virtual partitions and are effectively in nPars boot mode.
HP recommends that you do not use the parconfig EFI shell command and instead use
the \EFI\HPUX\vparconfig EFI shell command to manage the boot mode for nPartitions
on cell-based HP Integrity servers.
Refer to Installing and Managing HP-UX Virtual Partitions (vPars), Sixth Edition, for details.
Tools for Booting nPartitions
The tools for booting nPartitions and configuring related settings are:
•
Service Processor (MP or GSP) Menus
Service processor menus provide a complex-wide service interface that can allow access to
all hardware and nPartitions.
See “Command Reference for Service Processor Commands” (page 80).
•
EFI Boot Manager and EFI Shell
On HP Integrity servers only, the EFI (Extensible Firmware Interface) Boot Manager and
Shell are the methods for interacting with an nPartition before it has booted an operating
system.
See “Command Reference for EFI Shell Commands” (page 81).
•
Boot Console Handler (BCH) Menu Commands
On PA-RISC servers, the BCH interface is the method for interacting with an nPartition
before it has booted HP-UX.
See “Command Reference for BCH Menu Commands” (page 84).
•
nPartition Commands
HP nPartition commands allow you to configure, manage, and monitor nPartitions and
hardware within a server complex.
The Enhanced nPartition Commands also can remotely manage complexes based on the HP
sx1000 chipset or HP sx2000 chipset.
See “Commands for Configuring nPartitions” (page 19) for details.
•
Partition Manager (/opt/parmgr/bin/parmgr)
Partition Manager provides a graphical interface for managing and monitoring nPartitions
and hardware within a server complex.
See “Partition Manager” (page 22).
Tools for Booting nPartitions
95
Task Summaries for nPartition Boot and Reset
Table 5-1 describes the main nPartition boot and reset tasks and provides brief summaries and
references for detailed procedures.
You can perform the nPartition boot tasks in Table 5-1 “nPartition Boot and Reset Task
Summaries” using various tools, including the service processor (MP or GSP), Boot Console
Handler (BCH, available only on PA-RISC servers), Extensible Firmware Interface (EFI, available
only on HP Integrity servers), HP-UX commands, or Partition Manager (
/opt/parmgr/bin/parmgr).
See “Tools for Booting nPartitions” (page 95) for details.
Table 5-1 nPartition Boot and Reset Task Summaries
Task
Summary
“Troubleshooting Boot
Problems”
This section has tips for resolving common nPartition boot issues.
See “Troubleshooting Boot Problems” (page 100).
“Accessing nPartition
Use the service processor Console Menu (CO) to access the BCH or EFI system boot
Console and System Boot environment for an nPartition.
Interfaces”
See “Accessing nPartition Console and System Boot Interfaces” (page 101).
“Monitoring nPartition
Boot Activity”
Use the VFP option from the service processor Main Menu to access a Virtual Front Panel
for monitoring the boot status of an nPartition.
See “Monitoring nPartition Boot Activity” (page 104).
“Finding Bootable
Devices”
• BCH Menu: SEARCH command.
• EFI Shell: map command.
See “Finding Bootable Devices” (page 106).
“Performing a Transfer
of Control Reset”
• CAUTION: Under normal operation you shut down the operating system before
issuing a TOC reset.
• Service Processor (MP or GSP): TC command.
See “Performing a Transfer of Control Reset” (page 107).
“Booting HP-UX”
• BCH Menu: BOOT command.
• EFI Boot Manager: select an item from the boot options list.
• EFI Shell: access the EFI System Partition (for example fs0:) for a root device and
enter HPUX to invoke the loader.
See “Booting HP-UX” (page 110). This section also covers booting HP-UX in single-user
mode and LVM-maintenance mode.
“Shutting Down HP-UX” • Issue the /sbin/shutdown command with the desired options, such as -r to shut
down and reboot automatically, or -h to shut down and halt the system.
• The -R and -H options to shutdown and reboot are used when performing nPartition
reconfigurations; see the Reboot for Reconfig and Shutdown for Reconfig details in
this table.
See “Shutting Down HP-UX” (page 117).
“Booting HP OpenVMS”
• NOTE:
Only supported on HP Integrity servers.
• EFI Boot Manager: select an item from the boot options list.
• EFI Shell: access the EFI System Partition (for example fs0:) for a root device and
enter vms_loader to invoke the loader.
See “Booting HP OpenVMS” (page 122).
96
Booting and Resetting nPartitions
Table 5-1 nPartition Boot and Reset Task Summaries (continued)
Task
Summary
“Shutting Down HP
OpenVMS”
• NOTE:
Only supported on HP Integrity servers.
• At the OpenVMS command line issue the @SYS$SYSTEM:SHUTDOWN command and
specify the shutdown options in response to the prompts given.
See “Shutting Down HP OpenVMS” (page 123).
“Booting Microsoft
Windows”
• NOTE:
Only supported on HP Integrity servers.
• EFI Boot Manager: select an item from the boot options list. (Windows does not support
being invoked from the EFI Shell.)
See “Booting Microsoft Windows” (page 126).
“Shutting Down
Microsoft Windows”
• NOTE:
Only supported on HP Integrity servers.
• Issue the shutdown command with the desired options, such as /r to shut down and
reboot automatically, /s to shut down and halt (make the nPartition inactive), or /a
to abort a system shutdown.
You also can select the Start→Shut Down action and either choose Restart or choose
Shut down from the pull-down menu.
• The /r and /s options to shutdown also are used when performing nPartition
reconfigurations; see the Reboot for Reconfig and Shutdown for Reconfig details in
this table.
See “Shutting Down Microsoft Windows” (page 128).
“Booting Red Hat
Enterprise Linux”
• NOTE:
Only supported on HP Integrity servers.
• EFI Boot Manager: select an item from the boot options list.
• EFI Shell: access the EFI System Partition (for example fs0:) for a root device and
enter ELILO to invoke the loader.
See “Booting Red Hat Enterprise Linux” (page 131).
“Booting SuSE Linux
Enterprise Server”
• NOTE:
Only supported on HP Integrity servers.
• EFI Boot Manager: select an item from the boot options list.
• EFI Shell: access the EFI System Partition (for example fs0:) for a root device and
enter ELILO to invoke the loader.
See “Booting SuSE Linux Enterprise Server” (page 132).
“Shutting Down Linux”
• NOTE:
Only supported on HP Integrity servers.
• Issue the /sbin/shutdown command with the desired options, such as -r to shut
down and reboot automatically, or -h to shut down and halt the system.
You must include the required time argument to specify when the operating system
shutdown is to occur.
See “Shutting Down Linux” (page 134).
Task Summaries for nPartition Boot and Reset
97
Table 5-1 nPartition Boot and Reset Task Summaries (continued)
Task
Summary
“Rebooting and Resetting • Service Processor (MP or GSP): RS command; under normal operation you first shut
nPartitions”
down the operating system.
On HP Integrity servers you should reset an nPartition only after all self tests and
partition rendezvous have completed.
•
•
•
•
•
BCH Menu: REBOOT command.
EFI Boot Manager: Boot Option Maintenance→Cold Reset.
EFI Shell: reset command.
HP-UX: /sbin/shutdown or /usr/sbin/reboot command.
OpenVMS: @SYS$SYSTEM:SHUTDOWN command and enter Yes at the "Should an
automatic system reboot be performed" prompt.
• Windows: shutdown /r command or the Start→Shut Down action and Restart
pull-down menu option.
• Linux: /sbin/shutdown command. You must include the required time argument
to specify when the shutdown is to occur.
See “Rebooting and Resetting nPartitions” (page 135).
“Performing a Reboot for
• NOTE: Only supported for cell-based HP servers.
Reconfig”
• HP-UX: /sbin/shutdown -R command.
• OpenVMS: @SYS$SYSTEM:SHUTDOWN command and enter Yes at the "Should an
automatic system reboot be performed" prompt.
• Windows: shutdown /r command or the Start→Shut Down action and Restart
pull-down menu option.
• Linux: /sbin/shutdown -r time command. You must include the time argument
to specify when the shutdown is to occur.
See “Performing a Reboot for Reconfig” (page 139).
“Shutting Down to a
Shutdown for Reconfig
(Inactive) State”
• NOTE:
Only supported for cell-based HP servers.
• Service Processor (MP or GSP): RR command; under normal operation you first shut
down the operating system.
• BCH Menu: RECONFIGRESET command.
• EFI Shell: reconfigreset command.
• HP-UX: /sbin/shutdown -R -H command.
• OpenVMS: @SYS$SYSTEM:SHUTDOWN command and enter No at the "Should an
automatic system reboot be performed" prompt, then at the service processor (MP or
GSP) Command menu enter the RR command and specify the nPartition.
• Windows: shutdown /s command or the Start→Shut Down action and Shut down
pull-down menu option.
• Linux: /sbin/shutdown -h time command. You must include the time argument
to specify when the shutdown is to occur.
See “Shutting Down to a Shutdown for Reconfig (Inactive) State” (page 141).
“Booting an Inactive
nPartition”
• NOTE:
Only supported for cell-based HP servers.
• Service Processor (MP or GSP): BO command.
• HP-UX: specify the -B option when using the /usr/sbin/parmodify command to
reconfigure an inactive nPartition.
See “Booting an Inactive nPartition” (page 146).
“Booting over a
Network”
• BCH Menu: BOOT LAN... command.
• EFI Boot Manager: select Boot Option Maintenance→Boot from a File and select
the "Load File" option for the LAN card that has the desired MAC address.
• EFI Shell: lanboot select command.
See “Booting over a Network” (page 147).
98
Booting and Resetting nPartitions
Table 5-1 nPartition Boot and Reset Task Summaries (continued)
Task
Summary
“Booting to the HP-UX
Initial System Loader
(ISL)”
• NOTE:
Only supported on PA-RISC systems.
• BCH Menu: issue the BOOT command and reply y (for "yes") to the Do you wish
to stop at the ISL prompt question.
See “Booting to the HP-UX Initial System Loader (ISL)” (page 149).
“Booting to the HP-UX
Loader (HPUX.EFI)”
• NOTE:
Only supported on HP Integrity servers.
• EFI Shell or EFI Boot Manager: start booting HP-UX and type any key to interrupt the
boot process, stopping it at the HP-UX Boot Loader prompt (HPUX>).
See “Booting to the HP-UX Loader (HPUX.EFI)” (page 150).
“Using HP-UX Loader
Commands”
• BCH Menu: boot to the Initial System Loader prompt (ISL>), and from ISL issue
HP-UX loader commands in the following form:
hpux command
For example: enter hpux ls to issue the ls command.
• EFI Shell or EFI Boot Manager: boot to the HP-UX Boot Loader prompt (HPUX>), and
issue HP-UX loader commands directly.
For example: enter ls to issue the ls command.
See “Using HP-UX Loader Commands” (page 151).
“Booting to the Linux
Loader (ELILO.EFI)”
• NOTE:
Only supported on HP Integrity servers.
• EFI Shell or EFI Boot Manager: start booting Linux and type any key to interrupt the
boot process, stopping it at the ELILO Linux Loader prompt ("ELILO boot").
See “Booting to the Linux Loader (ELILO.EFI)” (page 152).
“Using Linux Loader
(ELILO) Commands”
• NOTE:
Only supported on HP Integrity servers.
• EFI Shell or EFI Boot Manager: boot to the ELILO Linux Loader prompt ("ELILO
boot") and issue loader commands directly.
See “Using Linux Loader (ELILO) Commands” (page 154).
“Configuring Boot Paths • BCH Menu: PATH command.
and Options”
• EFI Boot Manager: use Boot Option Maintenance operations to add or delete boot
options, or to change the order of items in the boot options list.
• EFI Shell: bcfg command for HP-UX options.
For example: bcfg boot dump to list all boot options, or help bcfg for details
setting and reordering boot options list items.
For Windows boot options, use the MSUtil\nvrboot.efi utility.
• HP-UX: /usr/sbin/setboot or /usr/sbin/parmodify command. On HP Integrity
systems, only the boot options list for the local nPartition may be displayed and
modified.
See “Configuring Boot Paths and Options” (page 155).
Task Summaries for nPartition Boot and Reset
99
Table 5-1 nPartition Boot and Reset Task Summaries (continued)
Task
Summary
“Configuring Autoboot
Options”
• BCH Menu: the PATHFLAGS command from the BCH Configuration menu sets
boot-time actions for an nPartition.
To set the boot actions for an nPartition boot paths, enter:
PATHFLAGS VAR action
where VAR is the boot path variable (PRI, HAA, or ALT) and action is the boot action
(0 for "go to BCH", 1 for "boot, if fail go to BCH", 2 for "boot, if fail try next path", or 3
for "skip this path, try next path").
• EFI Boot Manager: Boot Option Maintenance→Set Auto Boot TimeOut operation.
• EFI Shell: autoboot command.
For example: autoboot off to disable autoboot, or autoboot 60 to enable autoboot
with a 60-second timeout period.
• HP-UX: setboot -b on or setboot -b off command, to turn on (enable) or turn
off (disable) autoboot.
See “Configuring Autoboot Options” (page 158).
“Configuring Boot-Time
• NOTE: HP recommends that all self tests be performed.
System Tests”
• BCH Menu: Configuration menu FASTBOOT command: enter FASTBOOT to list settings;
enter FASTBOOT RUN to enable all tests; enter FASTBOOT TEST RUN or FASTBOOT
TEST SKIP to enable or disable an individual test.
• EFI Shell: boottest command to list settings; boottest on to enable all tests;
boottest off to disable all tests. To configure a specific test, use the boottest
test on or boottest test off command.
• HP-UX B.11.11: setboot -t testname=value to configure the test for all following
boots, or setboot -T testname=value to configure the test for the next boot only.
setboot -v to list settings.
• HP-UX B.11.23 and B.11.31: setboot -t testname=value to configure the test for the
next boot only. setboot -v to list settings.
See “Configuring Boot-Time System Tests” (page 161).
Troubleshooting Boot Problems
On HP cell-based servers, you might encounter different boot issues than on other HP servers.
The following boot issues are possible on cell-based servers.
•
Problem: On an HP Integrity server, HP-UX begins booting but is interrupted with a panic
when launching the HP-UX kernel (/stand/vmunix).
Causes: The nPartition ACPI configuration might not be properly set for booting HP-UX.
In order to boot the HP-UX operating system an nPartition must have its acpiconfig value
set to default.
Actions: At the EFI Shell interface, enter the acpiconfig command with no arguments to
list the current ACPI configuration for an nPartition. If the acpiconfig value is set to
windows, then HP-UX cannot boot; in this situation you must reconfigure acpiconfig.
To set the ACPI configuration for HP-UX: at the EFI Shell interface enter the acpiconfig
default command, and then enter the reset command for the nPartition to reboot with
the proper (default) configuration for HP-UX.
100
Booting and Resetting nPartitions
Use the help acpiconfig command for more details.
•
Problem: Not all cells boot to join (rendezvous) an nPartition.
Causes: Some cells may have the use-on-next-boot value set to "n" (do not use), or the cells
may have been powered off, or the cells may have booted too late to participate in partition
rendezvous, or the cells have failed self-tests and cannot be used, or the cells are incompatible.
Actions: Check the cell use-on-next-boot values and change them to "y" as needed then
reboot for reconfig (HP-UX shutdown -R, or Windows shutdown /r). Check cell power
(frupower -d -C) and power on any cells as needed, then reboot for reconfig. Check the
cell processor and firmware revisions using (parstatus -V -c# where # is the cell number).
As the cells assigned to the nPartition reboot, observe the boot progress from the Virtual
Front Panel (VFP) for the nPartition and note any problems the cells have proceeding from
one boot state to the next; as needed review chassis logs or event logs using the service
processor Show Chassis Logs or Show Event Logs (SL) menu.
•
Problem: An nPartition takes a long time to boot (over ten minutes).
Causes: One or more cells assigned to the nPartition that have a "y" use-on-next-boot value
has not booted to participate in partition rendezvous, thus causing the rest of the cells
assigned to the nPartition to wait for ten minutes for the cell to report.
For example, the cell might not be installed, might be powered off, or might have been
powered on or reset too late to rendezvous with the other cells.
Actions: You can avoid the delay by performing any of the following actions, as needed.
Perform a reboot for reconfig following any changes you make.
—
—
—
•
Set the cell use-on-next-boot value to "n" (do not use).
Power on the cell.
Unassign (remove) the cell from the nPartition.
Problem: An nPartition does not boot to its system boot environment (BCH or EFI) and
instead all cells remain at a boot-is-blocked (BIB) state.
Causes: The nPartition has been reset to the shutdown for reconfig state, or no valid core
cell is available to the nPartition.
Actions: If the nPartition was reset to the shutdown for reconfig state, use the BO command
from the service processor Command menu to boot the nPartition past boot-is-blocked (to
allow it to boot to its system boot environment).
If no valid core cell was available to the nPartition when it booted, check the power for all
core cell choices (a cell might be powered off) and power it on if needed.
Also review the chassis logs for the nPartition to search for any core cell problems and
failures.
Accessing nPartition Console and System Boot Interfaces
You can access an nPartition console and its BCH or EFI system boot environment through the
service processor (GSP or MP).
On HP 9000 servers, the system boot environment is the Boot Console Handler (BCH) interface.
On HP Integrity servers, the system boot environment is the Extensible Firmware Interface (EFI).
Each nPartition has its own system boot environment that provides you a method for interacting
with the nPartition before an operating system has booted on it. The system boot environment
is accessible through the nPartition console during the time after the cells assigned to the nPartition
have booted and completed nPartition rendezvous and before the nPartition begins loading an
operating system.
Accessing nPartition Console and System Boot Interfaces
101
NOTE: Always login to the service processor from a tty (not console) login session. You can
check your current login terminal using the who -m command.
Do not login to a service processor from an nPartition console connection. Any use of the ^b
(Control-b) console exit sequence would exit the original console login—not the subsequent
console-based login to the service processor—thus potentially stranding the console-based login
(for example, if it too were accessing a console).
Procedure 5-1 Accessing nPartition Console and System Boot Interfaces (Service Processor)
Use the service processor Console Menu (CO) to access the BCH or EFI system boot environment
for an nPartition through its console.
1.
Login to the service processor (MP or GSP) for the server complex where the nPartition
resides.
You can connect to the service processor using a direct physical connection, or using telnet
for a remote connection.
In most situations, you can telnet to the service processor.
2.
Select the Console Menu (CO) from the service processor Main Menu.
The Console Menu is the method for accessing nPartition consoles.
GSP MAIN MENU:
Utility Subsystem FW Revision Level: SR_XXXX_D
CO:
VFP:
CM:
CL:
SL:
HE:
X:
Consoles
Virtual Front Panel
Command Menu
Console Logs
Show chassis Logs
Help
Exit Connection
GSP> CO
If you are accessing the service processor using a single-partition-user account, selecting the
CO (console) option takes you directly to the nPartition console.
If using an operator or administrator account, you can access the console for any of the
nPartitions within the server complex.
3.
At the Console Menu, enter the nPartition number for the nPartition whose console (and
BCH or EFI system boot environment) you wish to access.
Skip this step if you are accessing the service processor using a single-partition-user account.
If using an operator or administrator account, select the nPartition whose console you wish
to access.
GSP> CO
Partitions available:
#
--0)
1)
Q)
Name
---jules00
jules01
Quit
Please select partition number: 1
Connecting to Console: jules01
(Use ^B to return to main menu.)
102
Booting and Resetting nPartitions
[A few lines of context from the console log:]
- - - - - - - - - - - - - - - - - - - - - - - - - - - - - - SERvice menu
Displays service commands
DIsplay
HElp [<menu>|<command>]
REBOOT
RECONFIGRESET
Redisplay the current menu
Display help for menu or command
Restart Partition
Reset to allow Reconfig Complex Profile
---Main Menu: Enter command or menu >
- - - - - - - - - - - - - - - - - - - - - - - - - - - - - - -
The console displays the last 10 lines of console output when you connect to it. This provides
you a view of the most recent console activity.
Accessing nPartition Console and System Boot Interfaces
103
4.
Gain interactive access to the nPartition console.
Press Enter to access the prompt currently available from the nPartition console, if any. You
will have either interactive or non-interactive access, as described in the sections “Interactive
Console Access” and “Non-Interactive Console Access” in this step.
To exit the nPartition console and return to the service processor Main Menu, type ^b
(Control-b) at any time.
Interactive Console Access In most situations a prompt for the BCH or EFI system boot
environment, or the operating system login or command prompt, is available from the
nPartition console.
• When an nPartition is at the BCH or EFI system boot environment you can access the
BCH Menu, the EFI Boot Manager menu, or the EFI Shell from the nPartition console.
• When an nPartition has booted to ISL you can use the EXIT command to exit ISL and
return to the BCH interface for the nPartition.
• When an nPartition has booted HP-UX, in order to access the BCH or EFI system boot
environment you must reboot HP-UX and if necessary interrupt the automatic boot
process. (To reboot the nPartition, use the shutdown -r command, or use shutdown
-R if you also are changing the cell configuration of the nPartition.)
• When an nPartition has booted Windows, in order to access the EFI system boot
environment you must reboot Windows and if necessary interrupt the automatic boot
process. (To reboot the nPartition, use the shutdown /r Windows command.)
Non-Interactive Console Access In the following situations, you cannot interact with the
nPartition console. In these cases you can wait until the console is interactive or can force
interactive access.
• When the nPartition is resetting or is booting an operating system you cannot interact
with software running on the nPartition.
Once the nPartition has completed resetting, or has completed booting the operating
system, you can interact with the BCH or EFI system boot environment or with an
operating system running on the nPartition.
To determine the boot state of an nPartition use the Virtual Front Panel, which is
available from the service processor Main menu.
•
When another user already is attached to the console you can access the nPartition
console in spy (read-only) mode or can force write access by typing ^ecf (Control-e
c f).
Spy mode allows you to view console information but does not enable you to enter
commands. If you type when accessing an nPartition console in spy mode, the console
prints the following message.
[Read-only - use ^Ecf to attach to console.]
When in spy mode, you can force access to the nPartition console by typing ^ecf
(Control-e c f). Doing this provides you interactive console access and forces ("bumps")
the user who was using the console into spy mode.
[Bumped user - Admin.]
Monitoring nPartition Boot Activity
On HP cell-based servers you can monitor the nPartition boot process—from power-on or reset
to operating system start-up—using the Virtual Front Panel (VFP) view of the nPartition.
Each nPartition has its own VFP that displays details about the cells assigned to the nPartition
and the current boot state and activity.
104
Booting and Resetting nPartitions
Procedure 5-2 Monitoring Boot Activity (Service Processor)
Use the VFP option from the service processor Main Menu to access an nPartition Virtual Front
Panel for monitoring the nPartition boot status.
1.
2.
Login to the service processor (MP or GSP).
From the Main Menu, enter VFP to select the Virtual Front Panel option.
GSP MAIN MENU:
Utility Subsystem FW Revision Level: SR_XXXX_D
CO:
VFP:
CM:
CL:
SL:
HE:
X:
Consoles
Virtual Front Panel
Command Menu
Console Logs
Show chassis Logs
Help
Exit Connection
GSP> VFP
If you are accessing the service processor using a single-partition-user account, selecting the
VFP option takes you directly to the nPartition Virtual Front Panel.
If accessing the GSP using an operator or administrator account, you can select the VFP for
any single nPartition, or can select a system VFP that displays the nPartition state and activity
for all nPartitions within the server complex.
3.
Select the nPartition you wish to monitor.
Skip this step if you are accessing the service processor using a single-partition-user account.
Partition VFP's available:
#
--0)
1)
S)
Q)
Name
---jules00
jules01
System (all chassis codes)
Quit
GSP:VFP> 1
4.
View the VFP details for information about the nPartition and its current boot state.
To exit the VFP and return to the service processor main menu, type ^b (Control-b).
The VFP provides details including the nPartition state, nPartition activity, and the state
and activity for each cell assigned to the nPartition. The VFP display updates as the cell or
nPartition state and activities change.
E indicates error since last boot
Partition 1 state
-----------------Cell(s) Booting:
57 Logs
#
4
6
Cell state
---------Booting
Booting
Activity
--------
Activity
-------Cell firmware test
Cell firmware test
28
28
Logs
Logs
GSP:VFP (^B to Quit) >
5.
At the service processor (MP or GSP) Main Menu, enter X to exit the service processor
interface.
Monitoring nPartition Boot Activity
105
Finding Bootable Devices
You can find bootable devices by using any one of the following procedures:
•
•
“Finding Bootable Devices (BCH Menu)” (page 106)
“Finding Bootable Devices (EFI Shell)” (page 107)
Procedure 5-3 Finding Bootable Devices (BCH Menu)
From the BCH Main Menu, issue the SEARCH command to find bootable devices. The BCH Menu
is available only on HP 9000 systems.
1.
Access the BCH Main Menu for the nPartition whose bootable devices you want to list.
Login to the service processor (MP or GSP) and enter CO to access the Console list. Select
the nPartition console. When accessing the console, confirm that you are at the BCH Main
Menu (the Main Menu: Enter command or menu> prompt). If at a BCH menu other
than the Main Menu, then enter MA to return to the BCH Main Menu.
2.
From the BCH Main Menu, issue the SEARCH command to find and list bootable devices in
the nPartition.
The SEARCH command reports all potential boot devices it locates.
---- Main Menu --------------------------------------------------------------Command
------BOot [PRI|HAA|ALT|<path>]
PAth [PRI|HAA|ALT] [<path>]
SEArch [ALL|<path>]
ScRoll [ON|OFF]
Description
----------Boot from specified path
Display or modify a path
Search for boot devices
Display or change scrolling capability
COnfiguration menu
INformation menu
SERvice menu
Displays or sets boot values
Displays hardware information
Displays service commands
DIsplay
HElp [<menu>|<command>]
REBOOT
RECONFIGRESET
Redisplay the current menu
Display help for menu or command
Restart Partition
Reset to allow Reconfig Complex Profile
---Main Menu: Enter command or menu > SEARCH
Searching for potential boot device(s)
This may take several minutes.
To discontinue search, press any key (termination may not be immediate).
Path#
----P0
P1
P2
P3
P4
P5
Device Path (dec)
----------------0/0/1/0/0.15
0/0/1/0/0.12
0/0/1/0/0.11
0/0/1/0/0.9
0/0/1/0/0.8
0/0/1/0/0.6
Device Type
----------Random access
Random access
Random access
Random access
Random access
Random access
media
media
media
media
media
media
Main Menu: Enter command or menu >
The SEARCH command lists up to the first 20 potential boot devices that it locates, and lists
each with a path number (P0 through P19).
To boot a device that was reported by the SEARCH command, specify the path number or
the full device path. For example, BOOT P0 would boot the path listed as path number P0.
106
Booting and Resetting nPartitions
3.
Exit the console and service processor interfaces if finished using them.
To exit the BCH environment type ^B (Control-B); this exits the nPartition console and
returns to the service processor Main Menu. To exit the service processor, type X at the Main
Menu.
Procedure 5-4 Finding Bootable Devices (EFI Shell)
From the EFI Shell environment, issue the map command to list bootable devices. The EFI Shell
is available only on HP Integrity systems.
1.
Access the EFI Shell environment for the nPartition whose bootable devices you want to
list.
Login to the service processor (MP or GSP) and enter CO to access the Console list. Select
the nPartition console.
When accessing the console, confirm that you are at the EFI Boot Manager menu (the main
EFI menu). If at another EFI menu, select the Exit option from the sub-menus until you
return to the screen with the EFI Boot Manager heading.
From the EFI Boot Manager menu, select the EFI Shell menu option to access the EFI Shell
environment.
2.
At the EFI Shell, issue the map command to list all disk devices with a potentially bootable
EFI System Partition.
For details see the help map command. Also see the help search command for details
on using the search command to load drivers for bootable devices.
3.
Exit the console and service processor interfaces if finished using them.
To exit the EFI environment type ^B (Control-B); this exits the nPartition console and returns
to the service processor Main Menu. To exit the service processor, type X at the Main Menu.
Performing a Transfer of Control Reset
You can perform a transfer of control (TOC) reset by using the Service Processor (MP or GSP)
TC command, as described in the following procedure.
If crash dump is configured for the operating system on the nPartition, when you TOC the
nPartition while it is running the operating system then the nPartition performs a crash dump.
Procedure 5-5 Performing a Transfer of Control Reset (Service Processor)
Use the Command menu TC command to perform a transfer-of-control (TOC) reset of an
nPartition.
1.
2.
Login to the service processor (MP or GSP) and enter CM to access the Command Menu.
At the Command menu, enter the TC command, specify which nPartition is to be reset, and
confirm whether to TOC the nPartition.
The TC command performs a transfer-of-control reset on the specified nPartition.
If you are accessing the service processor using a single-partition-user account, the TC
command selects which nPartition is to be reset: the nPartition that your account allows you
to access.
If using an operator or administrator account, you can select which nPartitions in the server
complex you want to TOC.
Be certain to select the correct nPartition to be reset.
GSP:CM> TC
This command TOCs the selected partition.
WARNING: Execution of this command irrecoverably halts all system
processing and I/O activity and restarts the selected
Performing a Transfer of Control Reset
107
partition.
#
--0)
1)
Name
---jules00
jules01
Select a partition number: 0
Do you want to TOC partition number 0? (Y/[N]) y
-> The selected partition will be TOCed.
GSP:CM>
3.
After you initiate the TOC, you can observe its progress and select the type of crash dump
through the nPartition console.
Once the nPartition completes the dump, or once you cancel it, the nPartition reboots.
******* Unexpected TOC. Processor HPA FFFFFFFF'FC07C000 *******
GENERAL REGISTERS:
r00/03 00000000'00000000 00000000'0099CA2C 00000000'00000000 00000000'010BB790
r04/07 00000000'00000002 00000000'010BC140 00000000'0080F000 00000000'00AA2490
r08/11 00000000'00000001 00000000'0099A800 00000000'0099A800 00000000'0099C800
....
Processor 8 TOC:
pcsq.pcoq = 0'0.0'12675c
isr.ior
= 0'10340004.0'2f8bfd30
Boot device reset done.
*** The dump will be a SELECTIVE dump: 457 of 4080 megabytes.
*** To change this dump type, press any key within 10 seconds.
*** Proceeding with selective dump.
*** The dump may be aborted at any time by pressing ESC.
*** Dumping:
7% complete (32 of 457 MB) (device 64:0x2)
Booting and Shutting Down HP-UX
This section has procedures for booting and shutting down HP-UX on cell-based HP servers and
a procedure for adding HP-UX to the boot options list on HP Integrity servers.
•
•
•
•
To check whether the cell local memory (CLM) configuration is appropriate for HP-UX,
refer to “HP-UX Support for Cell Local Memory” (page 108).
To add an HP-UX entry to the nPartition boot options list on an HP Integrity server refer to
“Adding HP-UX to the Boot Options List” (page 109).
To boot HP-UX refer to “Booting HP-UX” (page 110).
To shut down HP-UX refer to “Shutting Down HP-UX” (page 117).
HP-UX Support for Cell Local Memory
On servers based on the HP sx1000 chipset or HP sx2000 chipset, each cell has a cell local memory
(CLM) parameter, which determines how firmware interleaves memory residing on the cell.
108
Booting and Resetting nPartitions
NOTE: HP-UX 11i Version 1 (B.11.11) does not support using CLM. Before booting HP-UX 11i
Version 1 on an nPartition, you must ensure that the CLM parameter for each cell in the nPartition
is set to zero (0). Although you might be able to boot HP-UX 11i Version 1 on an nPartition with
CLM configured, any memory configured as cell local is unusable, and such a configuration is
untested and unsupported.
HP-UX 11i Version 2 (B.11.23) and HP-UX 11i Version 3 (B.11.31) support using CLM. The optimal
CLM settings depend on the applications and workload the OS is running.
To check CLM configuration details from an OS, use Partition Manager or the parstatus
command. For example, the parstatus -V -c# command and parstatus -V -p# command
report the CLM amount requested and CLM amount allocated for the specified cell (-c#, where
# is the cell number) or the specified nPartition (-p#, where # is the nPartition number).
To check CLM configuration details from the EFI Shell on a cell-based HP Integrity server, use
the info mem command. If the amount of "NonInterleaved Memory" reported is less than 512
MB then no CLM is configured for any cells in the nPartition (and the indicated amount of
noninterleaved memory is used by system firmware). If the info mem command reports more
than 512 MB of noninterleaved memory then use use Partition Manager or the parstatus
command to confirm the CLM configuration details.
To set the CLM configuration, use Partition Manager or the parmodify command.
Adding HP-UX to the Boot Options List
This section describes how to add an HP-UX entry to the system boot options list.
You can add the \EFI\HPUX\HPUX.EFI loader to the boot options list from the EFI Shell or EFI
Boot Configuration menu (or in some versions of EFI, the Boot Option Maintenance menu).
NOTE: On HP Integrity servers, the operating system installer automatically adds an entry to
the boot options list.
Procedure 5-6 Adding an HP-UX Boot Option
This procedure adds an HP-UX item to the boot options list from the EFI Shell.
To add an HP-UX boot option when logged in to HP-UX use the setboot command. For details
refer to the setboot(1M) manpage.
1.
Access the EFI Shell environment.
Log in to the management processor and enter CO to access the system console.
When accessing the console, confirm that you are at the EFI Boot Manager menu (the main
EFI menu). If at another EFI menu, select the Exit option from the sub-menus until you
return to the screen with the EFI Boot Manager heading.
From the EFI Boot Manager menu, select the EFI Shell menu option to access the EFI Shell
environment.
2.
Access the EFI System Partition (fsX: where X is the file system number) for the device
from which you want to boot HP-UX.
For example, enter fs2: to access the EFI System Partition for the bootable file system
number 2. The EFI Shell prompt changes to reflect the file system currently accessed.
The full path for the HP-UX loader is \EFI\HPUX\HPUX.EFI and it should be on the device
you are accessing.
Booting and Shutting Down HP-UX
109
3.
At the EFI Shell environment, use the bcfg command to manage the boot options list.
The bcfg command includes the following options for managing the boot options list:
•
•
•
•
bcfg boot dump — Display all items in the boot options list for the system.
bcfg boot rm # — Remove the item number specified by # from the boot options
list.
bcfg boot mv #a #b — Move the item number specified by #a to the position specified
by #b in the boot options list.
bcfg boot add # file.efi "Description" — Add a new boot option to the position in
the boot options list specified by #. The new boot option references file.efi and is listed
with the title specified by Description.
For example, bcfg boot add 1 \EFI\HPUX\HPUX.EFI "HP-UX 11i"adds an
HP-UX 11i item as the first entry in the boot options list.
See the help bcfg command for details.
4.
Exit the console and management processor interfaces if you are finished using them.
To exit the EFI environment press ^B (Control-B); this exits the system console and returns
to the management processor Main Menu. To exit the management processor, type X at the
Main Menu.
Booting HP-UX
This section covers the following methods of booting HP-UX:
•
•
•
“HP-UX Booting” (page 110) — The standard ways to boot HP-UX. Typically this results in
booting HP-UX in multiuser mode.
“Single-User Mode HP-UX Booting” (page 114) — How to boot HP-UX in single-user mode.
“LVM-Maintenance Mode HP-UX Booting” (page 116) — How to boot HP-UX in
LVM-maintenance mode.
Refer to “Shutting Down HP-UX” (page 117) for details on shutting down the HP-UX OS.
CAUTION:
ACPI Configuration for HP-UX Must Be default On cell-based HP Integrity servers, to boot the
HP-UX OS an nPartition must have its ACPI configuration value set to default.
At the EFI Shell interface, enter the acpiconfig command with no arguments to list the current
ACPI configuration. If the acpiconfig value is not set to default, then HP-UX cannot boot;
in this situation you must reconfigure acpiconfig or booting will be interrupted with a panic
when launching the HP-UX kernel.
To set the ACPI configuration for HP-UX: At the EFI Shell interface enter the acpiconfig
default command, and then enter the reset command for the nPartition to reboot with the
proper (default) configuration for HP-UX.
HP-UX Booting
This section describes how to boot HP-UX on cell-based HP 9000 servers and cell-based HP
Integrity servers.
•
•
110
On HP 9000 servers, to boot HP-UX refer to “HP-UX Booting (BCH Menu)” (page 111).
On HP Integrity servers, to boot HP-UX use either of the following procedures:
— “HP-UX Booting (EFI Boot Manager)” (page 112)
— “HP-UX Booting (EFI Shell)” (page 112)
Booting and Resetting nPartitions
Procedure 5-7 HP-UX Booting (BCH Menu)
From the BCH Menu, use the BOOT command to boot the HP-UX OS. The BCH Menu is available
only on HP 9000 servers.
1.
Access the BCH Main Menu for the nPartition on which you want to boot HP-UX.
Log in to the management processor (MP) and enter CO to access the Console list. Choose
the nPartition console. When accessing the console, confirm that you are at the BCH Main
Menu (the Main Menu: Enter command or menu> prompt). If you are at a BCH menu
other than the Main Menu, then enter MA to return to the BCH Main Menu.
2.
Choose which device you want to boot.
From the BCH Main Menu, use the PATH command to list any boot path variable settings.
The primary (PRI) boot path normally is set to the main boot device for the nPartition. You
also can use the SEARCH command to find and list potentially bootable devices for the
nPartition.
Main Menu: Enter command or menu > PATH
Primary Boot Path:
HA Alternate Boot Path:
Alternate Boot Path:
0/0/2/0/0.13
0/0/2/0/0.d
(hex)
0/0/2/0/0.14
0/0/2/0/0.e
(hex)
0/0/2/0/0.0
0/0/2/0/0.0
(hex)
Main Menu: Enter command or menu >
3.
Boot the device using the BOOT command from the BCH interface.
You can issue the BOOT command in any of the following ways:
• BOOT
Issuing the BOOT command with no arguments boots the device at the primary (PRI)
boot path.
•
BOOT bootvariable
This command boots the device indicated by the specified boot path, where bootvariable
is the PRI, HAA, or ALT boot path.
For example, BOOT PRI boots the primary boot path.
•
BOOT LAN INSTALL or BOOT LAN.ip-address INSTALL
The BOOT... INSTALL commands boot HP-UX from the default HP-UX install server
or from the server specified by ip-address.
•
BOOT path
This command boots the device at the specified path. You can specify the path in HP-UX
hardware path notation (for example, 0/0/2/0/0.13) or in path label format (for example,
P0 or P1) .
If you specify the path in path label format, then path refers to a device path reported
by the last SEARCH command.
After you issue the BOOT command, the BCH interface prompts you to specify whether you
want to stop at the ISL prompt.
To boot the /stand/vmunix HP-UX kernel from the device without stopping at the ISL
prompt, enter n to automatically proceed past ISL and execute the contents of the AUTO file
on the chosen device. (By default the AUTO file is configured to load /stand/vmunix.)
Booting and Shutting Down HP-UX
111
Main Menu: Enter command or menu > BOOT PRI
Primary Boot Path:
0/0/1/0/0.15
Do you wish to stop at the ISL prompt prior to booting? (y/n) >> n
ISL booting
hpux
Boot
: disk(0/0/1/0/0.15.0.0.0.0.0;0)/stand/vmunix
To boot an HP-UX kernel other than /stand/vmunix, or to boot HP-UX in single-user or
LVM-maintenance mode, stop at the ISL prompt and specify the appropriate arguments to
the hpux loader.
4.
Exit the console and management processor interfaces if you are finished using them.
To exit the BCH environment, press ^B (Control-B); this exits the nPartition console and
returns to the management processor Main Menu. To exit the management processor, type
X at the Main Menu.
Procedure 5-8 HP-UX Booting (EFI Boot Manager)
From the EFI Boot Manager menu, choose an item from the boot options list to boot HP-UX using
that boot option. The EFI Boot Manager is available only on HP Integrity servers.
Refer to “ACPI Configuration for HP-UX Must Be default” (page 110) for required configuration
details.
1.
Access the EFI Boot Manager menu for the nPartition on which you want to boot HP-UX.
Log in to the management processor (MP) and enter CO to access the Console list. Choose
the nPartition console.
When accessing the console, confirm that you are at the EFI Boot Manager menu (the main
EFI menu). If you are at another EFI menu, choose the Exit option from the submenus until
you return to the screen with the EFI Boot Manager heading.
2.
At the EFI Boot Manager menu, choose an item from the boot options list.
Each item in the boot options list references a specific boot device and provides a specific
set of boot options or arguments to be used when booting the device.
3.
4.
Press Enter to initiate booting using the chosen boot option.
Exit the console and management processor interfaces if you are finished using them.
To exit the EFI environment, press ^B (Control-B); this exits the nPartition console and
returns to the management processor Main Menu. To exit the management processor, type
X at the Main Menu.
Procedure 5-9 HP-UX Booting (EFI Shell)
From the EFI Shell environment, to boot HP-UX on a device first access the EFI System Partition
(for example fs0:) for the root device and then enter HPUX to initiate the loader. The EFI Shell
is available only on HP Integrity servers.
Refer to “ACPI Configuration for HP-UX Must Be default” (page 110) for required configuration
details.
112
Booting and Resetting nPartitions
1.
Access the EFI Shell environment for the nPartition on which you want to boot HP-UX.
Log in to the management processor (MP) and enter CO to access the Console list. Choose
the nPartition console.
When accessing the console, confirm that you are at the EFI Boot Manager menu (the main
EFI menu). If you are at another EFI menu, choose the Exit option from the submenus until
you return to the screen with the EFI Boot Manager heading.
From the EFI Boot Manager menu, choose the EFI Shell menu option to access the EFI Shell
environment.
2.
At the EFI Shell environment, issue the acpiconfig command to list the current ACPI
configuration for the local nPartition.
On cell-based HP Integrity servers, to boot the HP-UX OS an nPartition must have its ACPI
configuration value set to default. If the acpiconfig value is not set to default, then
HP-UX cannot boot; in this situation you must reconfigure acpiconfig or booting will be
interrupted with a panic when launching the HP-UX kernel.
To set the ACPI configuration for HP-UX: At the EFI Shell interface enter the acpiconfig
default command, and then enter the reset command for the nPartition to reboot with
the proper (default) configuration for HP-UX.
3.
At the EFI Shell environment, issue the map command to list all currently mapped bootable
devices.
The bootable file systems of interest typically are listed as fs0:, fs1:, and so on.
4.
Access the EFI System Partition (fsX: where X is the file system number) for the device
from which you want to boot HP-UX.
For example, enter fs2: to access the EFI System Partition for the bootable file system
number 2. The EFI Shell prompt changes to reflect the file system currently accessed.
The file system number can change each time it is mapped (for example, when the nPartition
boots, or when the map -r command is issued).
5.
When accessing the EFI System Partition for the desired boot device, issue the HPUX command
to initiate the HPUX.EFI loader on the device you are accessing.
The full path for the loader is \EFI\HPUX\HPUX.EFI and when initiated it references the
\EFI\HPUX\AUTO file and proceeds to boot HP-UX using the default boot behavior specified
in the AUTO file.
You are given 10 seconds to interrupt the automatic booting of the default boot behavior.
Pressing any key during this 10-second period stops the HP-UX boot process and enables
you to interact with the HPUX.EFI loader. To exit the loader (the HPUX> prompt), enter
exit (this return you to the EFI Shell).
To boot the HP-UX OS, do not type anything during the 10-second period given for stopping
at the HPUX.EFI loader.
Shell>
Device
fs0
blk0
blk1
blk2
blk3
blk4
map
mapping table
: Acpi(000222F0,269)/Pci(0|0)/Scsi(Pun8,Lun0)/HD(Part1,Sig72550000)
: Acpi(000222F0,269)/Pci(0|0)/Scsi(Pun8,Lun0)
: Acpi(000222F0,269)/Pci(0|0)/Scsi(Pun8,Lun0)/HD(Part1,Sig72550000)
: Acpi(000222F0,269)/Pci(0|0)/Scsi(Pun8,Lun0)/HD(Part2,Sig72550000)
: Acpi(000222F0,2A8)/Pci(0|0)/Scsi(Pun8,Lun0)
: Acpi(000222F0,2A8)/Pci(0|1)/Scsi(Pun2,Lun0)
Shell> fs0:
fs0:\> hpux
(c) Copyright 1990-2002, Hewlett Packard Company.
All rights reserved
Booting and Shutting Down HP-UX
113
HP-UX Boot Loader for IA64
Revision 1.723
Press Any Key to interrupt Autoboot
\efi\hpux\AUTO ==> boot vmunix
Seconds left till autoboot 9
6.
Exit the console and management processor interfaces if you are finished using them.
To exit the EFI environment, press ^B (Control-B); this exits the nPartition console and
returns to the management processor Main Menu. To exit the management processor, type
X at the Main Menu.
Single-User Mode HP-UX Booting
This section describes how to boot HP-UX in single-user mode on cell-based HP 9000 servers
and cell-based HP Integrity servers.
•
•
On HP 9000 servers, to boot HP-UX in single-user mode refer to “Single-User Mode HP-UX
Booting (BCH Menu)” (page 114).
On HP Integrity servers, to boot HP-UX in single-user mode refer to “Single-User Mode
HP-UX Booting (EFI Shell)” (page 115).
Procedure 5-10 Single-User Mode HP-UX Booting (BCH Menu)
From the BCH Menu, you can boot HP-UX in single-user mode by issuing the BOOT command,
stopping at the ISL interface, and issuing hpux loader options. The BCH Menu is available only
on HP 9000 servers.
1.
Access the BCH Main Menu for the nPartition on which you want to boot HP-UX in
single-user mode.
Log in to the management processor (MP) and enter CO to access the Console list. Choose
the nPartition console. When accessing the console, confirm that you are at the BCH Main
Menu (the Main Menu: Enter command or menu> prompt). If you are at a BCH menu
other than the Main Menu, then enter MA to return to the BCH Main Menu.
2.
Boot the desired device using the BOOT command at the BCH interface, and specify that the
nPartition stop at the ISL prompt prior to booting (reply y to the "stop at the ISL prompt"
question).
Main Menu: Enter command or menu > BOOT 0/0/2/0/0.13
BCH Directed Boot Path: 0/0/2/0/0.13
Do you wish to stop at the ISL prompt prior to booting? (y/n) >> y
Initializing boot Device.
....
ISL Revision A.00.42
JUN 19, 1999
ISL>
3.
From the ISL prompt, issue the appropriate Secondary System Loader (hpux) command to
boot the HP-UX kernel in the desired mode.
Use the hpux loader to specify the boot mode options and to specify which kernel (such as:
/stand/vmunix) to boot on the nPartition.
•
To boot HP-UX in single-user mode:
ISL> hpux -is boot /stand/vmunix
•
To boot HP-UX at the default run level:
ISL> hpux boot /stand/vmunix
114
Booting and Resetting nPartitions
To exit the ISL prompt and return to the BCH interface, issue the EXIT command instead
of specifying one of the hpux loader commands.
Refer to the hpux(1M) manpage for a detailed list of hpux loader options.
Example 5-1 Single-User HP-UX Boot
ISL Revision A.00.42
JUN 19, 1999
ISL> hpux -is /stand/vmunix
Boot
: disk(0/0/2/0/0.13.0.0.0.0.0;0)/stand/vmunix
8241152 + 1736704 + 1402336 start 0x21a0e8
....
INIT: Overriding default level with level 's'
INIT: SINGLE USER MODE
INIT: Running /sbin/sh
#
4.
Exit the console and management processor interfaces if you are finished using them.
To exit the BCH environment, press ^B (Control-B); this exits the nPartition console and
returns to the management processor Main Menu. To exit the management processor, type
X at the Main Menu.
Procedure 5-11 Single-User Mode HP-UX Booting (EFI Shell)
From the EFI Shell environment, boot in single-user mode by stopping the boot process at the
HPUX.EFI interface (the HP-UX Boot Loader prompt, HPUX>) entering the boot -is vmunix
command. The EFI Shell is available only on HP Integrity servers.
Refer to “ACPI Configuration for HP-UX Must Be default” (page 110) for required configuration
details.
1.
Access the EFI Shell environment for the nPartition on which you want to boot HP-UX in
single-user mode.
Log in to the management processor (MP) and enter CO to access the Console list. Choose
the nPartition console.
When accessing the console, confirm that you are at the EFI Boot Manager menu (the main
EFI menu). If you are at another EFI menu, choose the Exit option from the submenus until
you return to the screen with the EFI Boot Manager heading.
From the EFI Boot Manager menu, choose the EFI Shell menu option to access the EFI Shell
environment.
2.
3.
4.
Access the EFI System Partition (fsX: where X is the file system number) for the device
from which you want to boot HP-UX.
When accessing the EFI System Partition for the desired boot device, issue the HPUX command
to initiate the \EFI\HPUX\HPUX.EFI loader on the device you are accessing.
Boot to the HP-UX Boot Loader prompt (HPUX>) by pressing any key within the 10 seconds
given for interrupting the HP-UX boot process. You will use the HPUX.EFI loader to boot
HP-UX in single-user mode in the next step.
After you press any key, the HPUX.EFI interface (the HP-UX Boot Loader prompt, HPUX>)
is provided. For help using the HPUX.EFI loader, enter the help command. To return to
the EFI Shell, enter exit.
Booting and Shutting Down HP-UX
115
fs0:\> hpux
(c) Copyright 1990-2002, Hewlett Packard Company.
All rights reserved
HP-UX Boot Loader for IA64
Revision 1.723
Press Any Key to interrupt Autoboot
\efi\hpux\AUTO ==> boot vmunix
Seconds left till autoboot 9
[User Types A Key to Stop the HP-UX Boot Process and Access the HPUX.EFI Loader ]
Type 'help' for help
HPUX>
5.
At the HPUX.EFI interface (the HP-UX Boot Loader prompt, HPUX>) enter the boot -is
vmunix command to boot HP-UX (the /stand/vmunix kernel) in single-user (-is) mode.
HPUX> boot -is vmunix
> System Memory = 4063 MB
loading section 0
................................................... (complete)
loading section 1
........ (complete)
loading symbol table
loading System Directory(boot.sys) to MFS
....
loading MFSFILES Directory(bootfs) to MFS
......
Launching /stand/vmunix
SIZE: Text:25953K + Data:3715K + BSS:3637K = Total:33306K
Console is on a Serial Device
Booting kernel...
6.
Exit the console and management processor interfaces if you are finished using them.
To exit the EFI environment, press ^B (Control-B); this exits the nPartition console and
returns to the management processor Main Menu. To exit the management processor, type
X at the Main Menu.
LVM-Maintenance Mode HP-UX Booting
This section describes how to boot HP-UX in LVM-maintenance mode on cell-based HP 9000
servers and cell-based HP Integrity servers.
•
•
On HP 9000 servers, to boot HP-UX in LVM-maintenance mode refer to “LVM-Maintenance
Mode HP-UX Booting (BCH Menu)” (page 116).
On HP Integrity servers, to boot HP-UX in LVM-maintenance mode refer to
“LVM-Maintenance Mode HP-UX Booting (EFI Shell)” (page 117).
Procedure 5-12 LVM-Maintenance Mode HP-UX Booting (BCH Menu)
From the BCH Menu, you can boot HP-UX in LVM-maintenance mode by issuing the BOOT
command, stopping at the ISL interface, and issuing hpux loader options. The BCH Menu is
available only on HP 9000 servers.
1.
Access the BCH Main Menu for the nPartition on which you want to boot HP-UX in
LVM-maintenance mode.
Log in to the management processor (MP) and enter CO to access the Console list. Choose
the nPartition console. When accessing the console, confirm that you are at the BCH Main
Menu (the Main Menu: Enter command or menu> prompt). If you are at a BCH menu
other than the Main Menu, then enter MA to return to the BCH Main Menu.
116
Booting and Resetting nPartitions
2.
3.
Boot the desired device using the BOOT command at the BCH interface, and specify that the
nPartition stop at the ISL prompt prior to booting (reply y to the "stop at the ISL prompt"
question).
From the ISL prompt, issue the appropriate Secondary System Loader (hpux) command to
boot the HP-UX kernel in the desired mode.
To boot HP-UX in LVM-maintenance mode:
ISL> hpux -lm boot /stand/vmunix
4.
Exit the console and management processor interfaces if you are finished using them.
To exit the BCH environment, press ^B (Control-B); this exits the nPartition console and
returns to the management processor Main Menu. To exit the management processor, type
X at the Main Menu.
Procedure 5-13 LVM-Maintenance Mode HP-UX Booting (EFI Shell)
From the EFI Shell environment, boot in LVM-maintenance mode by stopping the boot process
at the HPUX.EFI interface (the HP-UX Boot Loader prompt, HPUX>) entering the boot -lm
vmunix command. The EFI Shell is available only on HP Integrity servers.
Refer to “ACPI Configuration for HP-UX Must Be default” (page 110) for required configuration
details.
1.
Access the EFI Shell environment for the nPartition on which you want to boot HP-UX in
LVM-maintenance mode.
Log in to the management processor (MP) and enter CO to access the Console list. Choose
the nPartition console.
When accessing the console, confirm that you are at the EFI Boot Manager menu (the main
EFI menu). If you are at another EFI menu, choose the Exit option from the submenus until
you return to the screen with the EFI Boot Manager heading.
From the EFI Boot Manager menu, choose the EFI Shell menu option to access the EFI Shell
environment.
2.
3.
4.
5.
6.
Access the EFI System Partition (fsX: where X is the file system number) for the device
from which you want to boot HP-UX.
When accessing the EFI System Partition for the desired boot device, issue the HPUX command
to initiate the \EFI\HPUX\HPUX.EFI loader on the device you are accessing.
Type any key within the 10 seconds given for interrupting the HP-UX boot process. This
stops the boot process at the HPUX.EFI interface (the HP-UX Boot Loader prompt, HPUX>).
At the HPUX.EFI interface, enter the boot -lm vmunix command to boot HP-UX (the
/stand/vmunix kernel) in LVM-maintenance (-lm) mode.
Exit the console and management processor interfaces if you are finished using them.
To exit the EFI environment, press ^B (Control-B); this exits the nPartition console and
returns to the management processor Main Menu. To exit the management processor, type
X at the Main Menu.
Shutting Down HP-UX
When HP-UX is running on an nPartition, you can shut down HP-UX using the shutdown
command.
On nPartitions you have the following options when shutting down HP-UX:
Booting and Shutting Down HP-UX
117
•
To shut down HP-UX and reboot an nPartition: shutdown -r
On cell-based HP Integrity servers, the shutdown -r command is equivalent to the
shutdown -R command.
•
To shut down HP-UX and halt an nPartition: shutdown -h
On cell-based HP Integrity servers, the shutdown -h command is equivalent to the
shutdown -R -H command.
•
•
To perform a reboot for reconfig of an nPartition: shutdown -R
To hold an nPartition at a shutdown for reconfig state: shutdown -R -H
NOTE: On Superdome SX1000 PA and SX2000 PA, shutdown -R -H does not stop at BIB if
the MP has been hot swapped since the last reboot.
For details refer to the shutdown(1M) manpage.
NOTE: On HP rx7620, rx7640, rx8620, and rx8640 servers, you can configure the nPartition
behavior when an OS is shutdown and halted (shutdown -h or shutdown -R -H). The two
options are to have hardware power off when the OS is halted, or to have the nPartition be made
inactive (all cells are in a boot-is-blocked state).
The normal behavior for HP-UX shutdown and halt is for the nPartition to be made inactive.
For details refer to “ACPI Softpowerdown Configuration—OS Shutdown Behavior” (page 93).
Procedure 5-14 Shutting Down HP-UX
From the HP-UX command line, issue the shutdown command to shut down the HP-UX OS.
1.
Log in to HP-UX running on the nPartition that you want to shut down.
You should log in to the MP for the server and use the Console menu to access the system
console. Accessing the console through the MP enables you to maintain console access to
the system after HP-UX has shut down.
118
Booting and Resetting nPartitions
2.
Issue the shutdown command with the appropriate command-line options.
The command-line options you specify dictate the way in which HP-UX is shut down,
whether the nPartition is rebooted, and whether any nPartition configuration changes
(adding or removing cells) take place.
Use the following list to choose an HP-UX shutdown option for your nPartition:
•
Shut down HP-UX and halt the nPartition.
On HP 9000 servers only, issue the shutdown -h command to shut down and halt the
nPartition. This leaves the nPartition and all its cells in an active state after HP-UX shuts
down and halts.
To reboot a halted nPartition, you must reset the nPartition using the RS command at
the GSP command menu.
On cell-based HP Integrity servers, the shutdown -h command puts an nPartition
into the shutdown for reconfig state; for details refer to the discussion of shutdown
-R -H in this list.
•
Shut down HP-UX and reboot the nPartition.
Issue the shutdown -r command to shut down and reboot the nPartition.
On cell-based HP Integrity servers, the shutdown -r command is equivalent to the
shutdown -R command.
•
Perform a reboot for reconfig of the nPartition.
Issue the HP-UX shutdown -R command to perform a reboot for reconfig.
This shuts down HP-UX, reconfigures the nPartition if needed, and reboots the
nPartition.
•
Reboot the nPartition and put it into the shutdown for reconfig state.
Use the HP-UX shutdown -R -H command to hold the nPartition in the shutdown
for reconfig state.
This leaves the nPartition and all its cells in an inactive state (the nPartition can be
reconfigured remotely), unless the normal behavior has been modified. For details on
changing OS halt behavior on rx8620 and rx7620 servers, refer to “ACPI Softpowerdown
Configuration—OS Shutdown Behavior” (page 93).
To reboot the nPartition, you must do so manually by using the BO command at the
management processor Command menu.
If HP-UX is halted on the nPartition, thus not allowing you to use the shutdown command,
you can reboot or reset the nPartition by issuing commands from the management processor
Command menu.
Booting and Shutting Down HP OpenVMS I64
This section has procedures for booting and shutting down HP OpenVMS I64 on cell-based HP
Integrity servers and procedures for adding HP OpenVMS to the boot options list.
•
•
•
•
To check whether the cell local memory (CLM) configuration is appropriate for HP OpenVMS,
refer to “HP OpenVMS I64 Support for Cell Local Memory” (page 120).
To add an HP OpenVMS entry to the boot options list refer to “Adding HP OpenVMS to
the Boot Options List” (page 120).
To boot HP OpenVMS on a cell-based HP Integrity server refer to “Booting HP OpenVMS”
(page 122).
To shut down HP OpenVMS refer to “Shutting Down HP OpenVMS” (page 123).
Booting and Shutting Down HP OpenVMS I64
119
HP OpenVMS I64 Support for Cell Local Memory
On servers based on the HP sx1000 chipset or HP sx2000 chipset, each cell has a cell local memory
(CLM) parameter, which determines how firmware interleaves memory residing on the cell.
NOTE: HP OpenVMS I64 does not support using CLM. Before booting OpenVMS on an
nPartition, you must ensure that the CLM parameter for each cell in the nPartition is set to zero
(0). Although you might be able to boot OpenVMS on an nPartition with CLM configured, any
memory configured as cell local is unusable, and such a configuration is untested and
unsupported.
To check CLM configuration details from an OS, use Partition Manager or the parstatus
command. For example, the parstatus -V -c# command and parstatus -V -p# command
report the CLM amount requested and CLM amount allocated for the specified cell (-c#, where
# is the cell number) or the specified nPartition (-p#, where # is the nPartition number).
To check CLM configuration details from the EFI Shell on a cell-based HP Integrity server, use
the info mem command. If the amount of "NonInterleaved Memory" reported is less than 512
MB then no CLM is configured for any cells in the nPartition (and the indicated amount of
noninterleaved memory is used by system firmware). If the info mem command reports more
than 512 MB of noninterleaved memory then use use Partition Manager or the parstatus
command to confirm the CLM configuration details.
To set the CLM configuration, use Partition Manager or the parmodify command.
Adding HP OpenVMS to the Boot Options List
On HP Integrity servers, you can use the following procedures to manage boot options list entries
for HP OpenVMS.
You can add the \efi\vms\vms_loader.efi loader to the boot options list from the EFI Shell
or EFI Boot Configuration menu (or in some versions of EFI, the Boot Option Maintenance
menu).
NOTE: OpenVMS I64 installation and upgrade procedures assist you in setting up and validating
a boot option for your system disk. HP recommends that you allow the procedure to do this.
To configure booting on Fibre Channel devices, you must use the OpenVMS I64 Boot Manager
utility (BOOT_OPTIONS.COM). For more information on this utility and other restrictions, refer
to the HP OpenVMS for Integrity Servers Upgrade and Installation Manual.
Procedure 5-15 Adding an HP OpenVMS Boot Option
This procedure adds an HP OpenVMS item to the boot options list from the EFI Shell.
To add an HP OpenVMS boot option when logged in to OpenVMS use the
@SYS$MANAGER:BOOT_OPTIONS.COM command.
1.
Access the EFI Shell environment.
Log in to the management processor and enter CO to access the system console.
When accessing the console, confirm that you are at the EFI Boot Manager menu (the main
EFI menu). If at another EFI menu, select the Exit option from the sub-menus until you
return to the screen with the EFI Boot Manager heading.
From the EFI Boot Manager menu, select the EFI Shell menu option to access the EFI Shell
environment.
120
Booting and Resetting nPartitions
2.
Access the EFI System Partition (fsX: where X is the file system number) for the device
from which you want to boot HP OpenVMS.
For example, enter fs2: to access the EFI System Partition for the bootable file system
number 2. The EFI Shell prompt changes to reflect the file system currently accessed.
The full path for the HP OpenVMS loader is \efi\vms\vms_loader.efi and it should
be on the device you are accessing.
3.
At the EFI Shell environment, use the bcfg command to manage the boot options list.
You can also accomplish this step by using the \efi\vms\vms_bcfg.efi and
\efi\vms\vms_show.efi utilities, which are available on the EFI System Partition for
HP OpenVMS. Both vms_bcfg and vms_show are unique utilities for OpenVMS I64. The
vms_bcfg utility differs from the bcfg EFI command in that vms_bcfg enables you to
specify boot devices using VMS-style device names.
The bcfg command includes the following options for managing the boot options list:
•
•
•
•
bcfg boot dump — Display all items in the boot options list for the system.
bcfg boot rm # — Remove the item number specified by # from the boot options
list.
bcfg boot mv #a #b — Move the item number specified by #a to the position specified
by #b in the boot options list.
bcfg boot add # file.efi "Description" — Add a new boot option to the position in
the boot options list specified by #. The new boot option references file.efi and is listed
with the title specified by Description.
For example, bcfg boot add 1 \efi\vms\vms_loader.efi "HP OpenVMS"adds
an HP OpenVMS item as the first entry in the boot options list.
See the help bcfg command for details.
4.
Exit the console and management processor interfaces if you are finished using them.
To exit the EFI environment, press ^B (Control-B); this exits the nPartition console and
returns to the management processor Main Menu. To exit the management processor, type
X at the Main Menu.
Booting and Shutting Down HP OpenVMS I64
121
Booting HP OpenVMS
To boot HP OpenVMS I64 on a cell-based HP Integrity server use either of the following
procedures.
•
•
“Booting HP OpenVMS (EFI Boot Manager)” (page 122)
“Booting HP OpenVMS (EFI Shell)” (page 122)
CAUTION:
ACPI Configuration for HP OpenVMS I64 Must Be default On cell-based HP Integrity servers,
to boot the HP OpenVMS OS an nPartition must have its ACPI configuration value set to default.
At the EFI Shell interface, enter the acpiconfig command with no arguments to list the current
ACPI configuration. If the acpiconfig value is not set to default, then OpenVMS cannot
boot; in this situation you must reconfigure acpiconfig or booting will fail and report the
INCONSTATE code when launching OpenVMS.
To set the ACPI configuration for HP OpenVMS I64: At the EFI Shell interface enter the
acpiconfig default command, and then enter the reset command for the nPartition to
reboot with the proper (default) configuration for OpenVMS.
Procedure 5-16 Booting HP OpenVMS (EFI Boot Manager)
From the EFI Boot Manager menu, select an item from the boot options list to boot HP OpenVMS
using the selected boot option.
1.
Access the EFI Boot Manager menu for the system on which you want to boot HP OpenVMS.
Log in to the management processor (MP) and enter CO to select the system console.
When accessing the console, confirm that you are at the EFI Boot Manager menu (the main
EFI menu). If at another EFI menu, select the Exit option from the sub-menus until you
return to the screen with the EFI Boot Manager heading.
2.
At the EFI Boot Manager menu, select an item from the boot options list.
Each item in the boot options list references a specific boot device and provides a specific
set of boot options or arguments to use when booting the device.
3.
4.
Press Enter to initiate booting using the selected boot option.
Exit the console and management processor interfaces when finished using them.
To exit the EFI environment type ^B (Control-B); this exits the system console and returns
to the management processor Main Menu. To exit the management processor, type X at the
Main Menu.
Procedure 5-17 Booting HP OpenVMS (EFI Shell)
From the EFI Shell environment, to boot HP OpenVMS on a device first access the EFI System
Partition (for example fs0:) for the root device and enter \efi\vms\vms_loader to initiate
the OpenVMS loader.
1.
Access the EFI Shell environment for the system on which you want to boot HP OpenVMS.
Log in to the management processor (MP) and enter CO to select the system console.
When accessing the console, confirm that you are at the EFI Boot Manager menu (the main
EFI menu). If at another EFI menu, select the Exit option from the sub-menus until you
return to the screen with the EFI Boot Manager heading.
From the EFI Boot Manager menu, select the EFI Shell menu option to access the EFI Shell
environment.
2.
At the EFI Shell environment, issue the map command to list all currently mapped bootable
devices.
The bootable file systems of interest typically are listed as fs0:, fs1:, and so on.
122
Booting and Resetting nPartitions
3.
Access the EFI System Partition (fsX: where X is the file system number) for the device
from which you want to boot HP OpenVMS.
For example, enter fs2: to access the EFI System Partition for the bootable file system
number 2. The EFI Shell prompt changes to reflect the file system currently accessed.
Also, the file system number might change each time it is mapped (for example, when the
system boots, or when the map -r command is issued).
4.
When accessing the EFI System Partition for the desired boot device, issue the
\efi\vms\vms_loader command to initiate the vms_loader.efi loader on the device
you are accessing.
fs5:> \efi\vms\vms_loader.efi
HP OpenVMS Industry Standard 64 Operating System, Version V8.2-1
Copyright 1976-2005 Hewlett-Packard Development Company, L.P.
%PKA0, Copyright (c) 1998 LSI Logic PKW V3.2.20 ROM 4.19
%PKA0, SCSI Chip is SYM53C1010/66, Operating mode is LVD Ultra3 SCSI
%SMP-I-CPUTRN, CPU #01 has joined the active set.
%SMP-I-CPUTRN, CPU #02 has joined the active set.
...
5.
Exit the console and management processor interfaces when finished using them.
To exit the EFI environment type ^B (Control-B); this exits the system console and returns
to the management processor Main Menu. To exit the management processor, type X at the
Main Menu.
Shutting Down HP OpenVMS
This section describes how to shut down the HP OpenVMS OS on cell-based HP Integrity servers.
Procedure 5-18 Shutting Down HP OpenVMS
From the HP OpenVMS command line, issue the @SYS$SYSTEM:SHUTDOWN command to shut
down the OpenVMS OS.
1.
Log in to HP OpenVMS running on the system that you want to shut down.
You should log in to the MP for the server and use the Console menu to access the system
console. Accessing the console through the MP enables you to maintain console access to
the system after HP OpenVMS has shut down.
Booting and Shutting Down HP OpenVMS I64
123
2.
At the OpenVMS command line, issue the @SYS$SYSTEM:SHUTDOWN command and specify
the shutdown options in response to the prompts given.
>@SYS$SYSTEM:SHUTDOWN
SHUTDOWN -- Perform an Orderly System Shutdown
on node RSNVMS
How many minutes until final shutdown [0]:
Reason for shutdown [Standalone]:
Do you want to spin down the disk volumes [NO]?
Do you want to invoke the site-specific shutdown procedure [YES]?
Should an automatic system reboot be performed [NO]? yes
When will the system be rebooted [shortly via automatic reboot]:
Shutdown options (enter as a comma-separated list):
REBOOT_CHECK
Check existence of basic system files
SAVE_FEEDBACK
Save AUTOGEN feedback information from this boot
DISABLE_AUTOSTART
Disable autostart queues
POWER_OFF
Request console to power-off the system
Shutdown options [NONE]:
%SHUTDOWN-I-OPERATOR, this terminal is now an operator's console
...
NOTE:
HP OpenVMS I64 currently does not support the POWER_OFF shutdown option.
The @SYS$SYSTEM:SHUTDOWN.COM command prompts establish the shutdown behavior,
including the shutdown time and whether the system is rebooted after it is shut down.
•
•
To perform a reboot for reconfig from OpenVMS I64 running on an nPartition, issue
@SYS$SYSTEM:SHUTDOWN.COM from OpenVMS, and then enter Yes at the "Should
an automatic system reboot be performed" prompt
To perform a shutdown for reconfig of an nPartition running OpenVMS I64: first issue
@SYS$SYSTEM:SHUTDOWN.COM from OpenVMS and enter No at the "Should an
automatic system reboot be performed" prompt, then access the MP and, from the MP
Command Menu, issue the RR command and specify the nPartition that is to be
shutdown for reconfig.
Booting and Shutting Down Microsoft Windows
This section has procedures for booting and shutting down Microsoft Windows on cell-based
HP Integrity servers and a procedure for adding Windows to the boot options list.
•
•
•
•
To check whether the cell local memory (CLM) configuration is appropriate for Windows,
refer to “Microsoft Windows Support for Cell Local Memory” (page 124).
To add a Windows entry to the boot options list refer to “Adding Microsoft Windows to the
Boot Options List” (page 125).
To boot Windows refer to “Booting Microsoft Windows” (page 126).
To shut down Windows refer to “Shutting Down Microsoft Windows” (page 128).
Microsoft Windows Support for Cell Local Memory
On servers based on the HP sx1000 chipset or HP sx2000 chipset, each cell has a cell local memory
(CLM) parameter, which determines how firmware interleaves memory residing on the cell.
124
Booting and Resetting nPartitions
NOTE: Microsoft Windows supports using CLM on cell-based HP Integrity servers. For best
performance in an nPartition running Windows, HP recommends that you configure the CLM
parameter to 100% for each cell in the nPartition.
To check CLM configuration details from an OS, use Partition Manager or the parstatus
command. For example, the parstatus -V -c# command and parstatus -V -p# command
report the CLM amount requested and CLM amount allocated for the specified cell (-c#, where
# is the cell number) or the specified nPartition (-p#, where # is the nPartition number).
To check CLM configuration details from the EFI Shell on a cell-based HP Integrity server, use
the info mem command. If the amount of "NonInterleaved Memory" reported is less than 512
MB then no CLM is configured for any cells in the nPartition (and the indicated amount of
noninterleaved memory is used by system firmware). If the info mem command reports more
than 512 MB of noninterleaved memory then use use Partition Manager or the parstatus
command to confirm the CLM configuration details.
To set the CLM configuration, use Partition Manager or the parmodify command.
Adding Microsoft Windows to the Boot Options List
To add a Microsoft Windows entry to the system boot options list you must do so from EFI by
using the \MSUtil\nvrboot.efi utility to import boot options from the
EFI\Microsoft\WINNT50\Boot00... file on the device from which Windows is loaded.
NOTE: On HP Integrity servers, the operating system installer automatically adds an entry to
the boot options list.
Procedure 5-19 Adding a Microsoft Windows Boot Option
This procedure adds the Microsoft Windows item to the boot options list.
1.
Access the EFI Shell environment.
Login to the management processor and enter CO to access the system console.
When accessing the console, confirm that you are at the EFI Boot Manager menu (the main
EFI menu). If at another EFI menu, select the Exit option from the sub-menus until you
return to the screen with the EFI Boot Manager heading.
From the EFI Boot Manager menu, select the EFI Shell menu option to access the EFI Shell
environment.
2.
Access the EFI System Partition (fsX: where X is the file system number) for the device
from which you want to boot Microsoft Windows.
For example, enter fs2: to access the EFI System Partition for the bootable file system
number 2. The EFI Shell prompt changes to reflect the file system currently accessed.
The full path for the Microsoft Windows loader is \efi\microsoft\winnt50\
ia64ldr.efi and it should be on the device you are accessing. (However, you must only
initiate this loader from the EFI Boot Menu and not from the EFI Shell.)
3.
List the contents of the \EFI\Microsoft\WINNT50 directory to identify the name of the
Windows boot option file (Boot00nn) that you want to import into the system boot options
list.
fs0:\> ls EFI\Microsoft\WINNT50
Directory of: fs0:\EFI\Microsoft\WINNT50
09/18/03
09/18/03
12/18/03
11:58a <DIR>
11:58a <DIR>
08:16a
1 File(s)
1,024
1,024
354
354 bytes
.
..
Boot0001
Booting and Shutting Down Microsoft Windows
125
2 Dir(s)
fs0:\>
4.
At the EFI Shell environment, issue the \MSUtil\nvrboot.efi command to launch the
Microsoft Windows boot options utility.
fs0:\> msutil\nvrboot
NVRBOOT: OS Boot Options Maintenance Tool [Version 5.2.3683]
1.
2.
* 3.
4.
SUSE SLES 9
HP-UX Primary Boot: 0/0/1/0/0.2.0
Windows Server 2003, Datacenter
EFI Shell [Built-in]
* = Windows OS boot option
(D)isplay (M)odify (C)opy E(x)port (I)mport (E)rase (P)ush (H)elp (Q)uit
Select>
5.
Use the Import command to import the Windows boot option file.
Select> i
Enter IMPORT file path: \EFI\Microsoft\WINNT50\Boot0001
Imported Boot Options from file: \EFI\Microsoft\WINNT50\Boot0001
Press enter to continue
6.
Type Q to quit the NVRBOOT utility, and exit the console and management processor
interfaces if you are finished using them.
To exit the EFI environment press ^B (Control-B); this exits the system console and returns
to the management processor Main Menu. To exit the management processor, type X at the
Main Menu.
Booting Microsoft Windows
You can boot the Windows Server 2003 OS on an HP Integrity server by using the EFI Boot
Manager to choose the appropriate Windows item from the boot options list.
126
Booting and Resetting nPartitions
Refer to “Shutting Down Microsoft Windows” (page 128) for details on shutting down the
Windows OS.
CAUTION:
ACPI Configuration for Windows Must Be windows On cell-based HP Integrity servers, to boot
the Windows OS an nPartition must have its ACPI configuration value set to windows.
At the EFI Shell, enter the acpiconfig command with no arguments to list the current ACPI
configuration. If the acpiconfig value is not set to windows, then Windows cannot boot; in
this situation you must reconfigure acpiconfig or booting will be interrupted with a panic
when launching Windows.
To set the ACPI configuration for Windows: At the EFI Shell enter the acpiconfig windows
command, and then enter the reset command for the nPartition to reboot with the proper
(windows) configuration for Windows.
NOTE:
Microsoft Windows Booting on HP Integrity Servers The recommended method for booting
Windows is to use the EFI Boot Manager menu to choose a Windows entry from the boot options
list. Using the ia64ldr.efi Windows loader from the EFI Shell is not recommended.
Procedure 5-20 Windows Booting
From the EFI Boot Manager menu, choose an item from the boot options list to boot Windows
using that boot option. The EFI Boot Manager is available only on HP Integrity servers.
Refer to “ACPI Configuration for Windows Must Be windows” (page 127) for required
configuration details.
1.
Access the EFI Boot Manager menu for the system on which you want to boot Windows.
Log in to the management processor and enter CO to access the Console list. Choose the
nPartition console.
When accessing the console, confirm that you are at the EFI Boot Manager menu (the main
EFI menu). If you are at another EFI menu, choose the Exit option from the submenus until
you return to the screen with the EFI Boot Manager heading.
2.
At the EFI Boot Manager menu, choose an item from the boot options list.
Each item in the boot options list references a specific boot device and provides a specific
set of boot options or arguments to be used when booting the device.
3.
4.
Press Enter to initiate booting using the chosen boot option.
When Windows begins loading, wait for the Special Administration Console (SAC) to become
available.
The SAC interface provides a text-based administration tool that is available from the
nPartition console. For details refer to the SAC online help (type ? at the SAC> prompt).
Loading.: Windows Server 2003, Datacenter
Starting: Windows Server 2003, Datacenter
Starting Windows...
********************************************************************************
Computer is booting, SAC started and initialized.
Use the "ch -?" command for information about using channels.
Use the "?" command for general help.
SAC>
Booting and Shutting Down Microsoft Windows
127
5.
Exit the console and management processor interfaces if you are finished using them.
To exit the console environment, press ^B (Control-B); this exits the console and returns to
the management processor Main menu. To exit the management processor, type X at the
Main menu.
Shutting Down Microsoft Windows
You can shut down the Windows OS on HP Integrity servers using the Start menu or the
shutdown command.
CAUTION: Do not shut down Windows using Special Administration Console (SAC) restart
or shutdown commands under normal circumstances.
Issuing restart or shutdown at the SAC> prompt causes the system to restart or shut down
immediately and can result in the loss of data.
Instead use the Windows Start menu or the shutdown command to shut down gracefully.
To shut down Windows use either of the following methods.
•
Choose Shut Down from the Start menu and choose either Restart or Shut down from the
pull-down menu.
The Restart menu item shuts down and restarts the system. The Shut down menu item
shuts down the system.
You can use this method when using a graphical interface to the system.
•
Issue the shutdown command from the Windows command line.
Refer to the procedure “Windows Shutdown from the Command Line” (page 128) for details.
You can issue this command from a command prompt through the Special Administration
Console (SAC) or from any other command line.
The Windows shutdown command includes the following options:
/s
Shut down the system. This is the equivalent of Start→Shut Down→Shut down.
/r
Shut down and restart the system. This is the equivalent of Start→Shut
Down→Restart.
/a
Abort a system shutdown.
/t xxx
Set the timeout period before shutdown to xxx seconds. The timeout period can
range from 0-600, with a default of 30.
Refer to the help shutdown Windows command for details.
NOTE: On HP rx7620, rx7640, rx8620, and rx8640 servers, performing a shutdown using
shutdown /s (or the equivalent Start→Shut Down→Shut down) powers off the server cabinet
or powers off the cells and I/O chassis assigned to the nPartition. On these servers you can
customize this behavior. For details refer to “ACPI Softpowerdown Configuration—OS Shutdown
Behavior” (page 93).
On HP Integrity Superdome servers, the Windows shutdown /s command shuts down the
system and keeps all cells at BIB (the boot-is-blocked, inactive state).
Procedure 5-21 Windows Shutdown from the Command Line
From the Windows command line, issue the shutdown command to shut down the OS.
128
Booting and Resetting nPartitions
1.
Log in to Windows running on the system that you want to shut down.
For example, access the system console and use the Windows SAC interface to start a
command prompt, from which you can issue Windows commands to shut down the the
system.
2.
Check whether any users are logged in.
Use the query user or query session command.
3.
Issue the shutdown command and the appropriate options to shut down the Windows
Server 2003 on the system.
You have the following options when shutting down Windows:
•
To shut down Windows and reboot:
shutdown /r
Alternatively, you can choose the Start→Shut Down action and choose Restart from
the pull-down menu.
•
To shut down Windows and not reboot (either power down server hardware or put an
nPartition into a shutdown for reconfig state):
shutdown /s
Alternatively, you can choose the Start→Shut Down action and choose Shut down
from the pull-down menu.
•
To abort a shutdown (stop a shutdown that has been initiated): shutdown /a
For example:
shutdown /r /t 60 /c "Shut down in one minute."
This command initiates a Windows system shutdown-and-reboot after a timeout period of
60 seconds. The /c option specifies a message that is broadcast to any other users of the
system.
Booting and Shutting Down Linux
This section has procedures for booting and shutting down Linux on cell-based HP Integrity
servers and a procedure for adding Linux to the boot options list.
•
•
•
•
•
To check whether the cell local memory (CLM) configuration is appropriate for Red Hat
Enterprise Linux or SuSE Linux Enterprise Server, refer to “Linux Support for Cell Local
Memory” (page 129).
To add a Linux entry to the nPartition boot options list refer to “Adding Linux to the Boot
Options List” (page 130).
To boot Red Hat Enterprise Linux refer to “Booting Red Hat Enterprise Linux” (page 131).
To boot SuSE Linux Enterprise Server refer to “Booting SuSE Linux Enterprise Server”
(page 132).
To shut down Linux refer to “Shutting Down Linux” (page 134).
Linux Support for Cell Local Memory
On servers based on the HP sx1000 chipset or HP sx2000 chipset, each cell has a cell local memory
(CLM) parameter, which determines how firmware interleaves memory residing on the cell.
Booting and Shutting Down Linux
129
NOTE: Red Hat Enterprise Linux does not support using CLM. Before booting Red Hat
Enterprise Linux on an nPartition, you must ensure that the CLM parameter for each cell in the
nPartition is set to zero (0). Although you might be able to boot Red Hat Enterprise Linux on an
nPartition with CLM configured, any memory configured as cell local is unusable, and such a
configuration is untested and unsupported.
SuSE Linux Enterprise Server supports using CLM. The optimal CLM settings for SuSE Linux
Enterprise Server depend on the applications and workload the OS is running.
To check CLM configuration details from an OS, use Partition Manager or the parstatus
command. For example, the parstatus -V -c# command and parstatus -V -p# command
report the CLM amount requested and CLM amount allocated for the specified cell (-c#, where
# is the cell number) or the specified nPartition (-p#, where # is the nPartition number).
To check CLM configuration details from the EFI Shell on a cell-based HP Integrity server, use
the info mem command. If the amount of "NonInterleaved Memory" reported is less than 512
MB then no CLM is configured for any cells in the nPartition (and the indicated amount of
noninterleaved memory is used by system firmware). If the info mem command reports more
than 512 MB of noninterleaved memory then use use Partition Manager or the parstatus
command to confirm the CLM configuration details.
To set the CLM configuration, use Partition Manager or the parmodify command.
Adding Linux to the Boot Options List
This section describes how to add a Linux entry to the system boot options list. The processes
for adding both Red Hat Enterprise Linux and SuSE Linux Enterprise Servers are given here.
You can add the \EFI\redhat\elilo.efi loader or the \efi\SuSE\elilo.efi loader to
the boot options list from the EFI Shell or EFI Boot Configuration menu (or in some versions
of EFI, the Boot Option Maintenance menu).
NOTE: On HP Integrity servers, the operating system installer automatically adds an entry to
the boot options list.
Procedure 5-22 Adding a Linux Boot Option
This procedure adds a Linux item to the boot options list.
1.
Access the EFI Shell environment.
Log in to the management processor and enter CO to access the system console.
When accessing the console, confirm that you are at the EFI Boot Manager menu (the main
EFI menu). If at another EFI menu, select the Exit option from the sub-menus until you
return to the screen with the EFI Boot Manager heading.
From the EFI Boot Manager menu, select the EFI Shell menu option to access the EFI Shell
environment.
2.
Access the EFI System Partition (fsX: where X is the file system number) for the device
from which you want to boot Linux.
For example, enter fs2: to access the EFI System Partition for the bootable file system
number 2. The EFI Shell prompt changes to reflect the file system currently accessed.
The full path for the Red Hat Enterprise Linux loader is \EFI\redhat\elilo.efi and it
should be on the device you are accessing.
The full path for the SuSE Linux Enterprise Server loader is \efi\SuSE\elilo.efi and
it should be on the device you are accessing.
130
Booting and Resetting nPartitions
3.
At the EFI Shell environment, use the bcfg command to manage the boot options list.
The bcfg command includes the following options for managing the boot options list:
•
•
•
•
bcfg boot dump — Display all items in the boot options list for the system.
bcfg boot rm # — Remove the item number specified by # from the boot options
list.
bcfg boot mv #a #b — Move the item number specified by #a to the position specified
by #b in the boot options list.
bcfg boot add # file.efi "Description" — Add a new boot option to the position in
the boot options list specified by #. The new boot option references file.efi and is listed
with the title specified by Description.
For example, bcfg boot add 1 \EFI\redhat\elilo.efi "Red Hat
Enterprise Linux"adds a Red Hat Enterprise Linux item as the first entry in the
boot options list.
Likewise, bcfg boot add 1 \efi\SuSE\elilo.efi "SLES 9"adds a SuSE Linux
item as the first entry in the boot options list.
See the help bcfg command for details.
4.
Exit the console and management processor interfaces if you are finished using them.
To exit the EFI environment press ^B (Control-B); this exits the system console and returns
to the management processor Main Menu. To exit the management processor, type X at the
Main Menu.
Booting Red Hat Enterprise Linux
You can boot the Red Hat Enterprise Linux OS on HP Integrity servers using either of the methods
described in this section.
Refer to “Shutting Down Linux” (page 134) for details on shutting down the Red Hat Enterprise
Linux OS.
CAUTION:
ACPI Configuration for Red Hat Enterprise Linux Must Be single-pci-domain or default On cell-based
HP Integrity servers, to boot the Red Hat Enterprise Linux OS an nPartition must have its ACPI
configuration value set to single-pci-domain or default.
• On HP rx7620 servers, rx8620 servers, or Integrity Superdome (SD16A, SD32A, SD64A), the
ACPI configuration must be set to single-pci-domain.
• On HP rx7640 servers, rx8640 servers, or Integrity Superdome (SD16B, SD32B, SD64B), the
ACPI configuration must be set to default.
At the EFI Shell, enter the acpiconfig command with no arguments to list the current ACPI
configuration. If the acpiconfig value is not set correctly then Red Hat Enterprise Linux could
panic; in this situation you must reconfigure acpiconfig to eliminate any bus address conflicts
and ensure all I/O slots have unique addresses.
To set the ACPI configuration for Red Hat Enterprise Linux: At the EFI Shell enter the
acpiconfig value command, where value is either single-pci-domain (for rx7620 and
rx8620 servers) or default (for rx7640 and rx8640 servers). Then enter the reset command
for the nPartition to reboot with the proper configuration for Red Hat Enterprise Linux.
Use either of these methods to boot Red Hat Enterprise Linux:
•
Choose a Red Hat Enterprise Linux entry from the EFI Boot Manager menu.
To load the Red Hat Enterprise Linux OS at the EFI Boot Manager menu, choose its entry
from the list of boot options.
Booting and Shutting Down Linux
131
Choosing a Linux entry from the boot options list boots the OS using ELILO.EFI loader
and the elilo.conf file.
•
Initiate the ELILO.EFI Linux loader from the EFI Shell.
Refer to the procedure “Booting Red Hat Enterprise Linux (EFI Shell)” (page 132) for details.
On a Red Hat Enterprise Linux boot device EFI System Partition, the full paths to the loader
and configuration files are:
\EFI\redhat\elilo.efi
\EFI\redhat\elilo.conf
After choosing the file system for the boot device (for example, fs0:) you can initiate the
Linux loader from the EFI Shell prompt by entering the full path for the ELILO.EFI loader.
By default the ELILO.EFI loader boots Linux using the kernel image and parameters specified
by the default entry in the elilo.conf file on the EFI System Partition for the boot device.
To interact with the ELILO.EFI loader, interrupt the boot process (for example, type a space)
at the ELILO boot prompt. To exit the ELILO.EFI loader, use the exit command.
Procedure 5-23 Booting Red Hat Enterprise Linux (EFI Shell)
Use this procedure to boot Red Hat Enterprise Linux from the EFI Shell.
Refer to “ACPI Configuration for Red Hat Enterprise Linux Must Be single-pci-domain or default”
(page 131) for required configuration details.
1.
Access the EFI Shell.
From the system console, choose the EFI Shell entry from the EFI Boot Manager menu to
access the shell.
2.
Access the EFI System Partition for the Red Hat Enterprise Linux boot device.
Use the map EFI Shell command to list the file systems (fs0, fs1, and so on) that are known
and have been mapped.
To choose a file system to use, enter its mapped name followed by a colon (:). For example,
to operate with the boot device that is mapped as fs3, enter fs3: at the EFI Shell prompt.
3.
Enter ELILO at the EFI Shell command prompt to launch the ELILO.EFI loader.
If needed, you can specify the loader's full path by entering \EFI\redhat\elilo at the
EFI Shell command prompt.
4.
Allow the ELILO.EFI loader to proceed with booting the Red Hat Enterprise Linux kernel.
By default, the ELILO.EFI loader boots the kernel image and options specified by the
default item in the elilo.conf file.
To interact with the ELILO.EFI loader, interrupt the boot process (for example, type a
space) at the ELILO boot prompt. To exit the loader, use the exit command.
Booting SuSE Linux Enterprise Server
You can boot the SuSE Linux Enterprise Server OS on HP Integrity servers using either of the
methods described in this section.
132
Booting and Resetting nPartitions
Refer to “Shutting Down Linux” (page 134) for details on shutting down the SuSE Linux Enterprise
Server OS.
CAUTION:
ACPI Configuration for SuSE Linux Enterprise Server Must Be single-pci-domain or default On
cell-based HP Integrity servers, to boot the SuSE Linux Enterprise Server OS an nPartition must
have its ACPI configuration value set to single-pci-domain or default.
• On HP rx7620 servers, rx8620 servers, or Integrity Superdome (SD16A, SD32A, SD64A), the
ACPI configuration must be set to single-pci-domain.
• On HP rx7640 servers, rx8640 servers, or Integrity Superdome (SD16B, SD32B, SD64B), the
ACPI configuration must be set to default.
At the EFI Shell, enter the acpiconfig command with no arguments to list the current ACPI
configuration. If the acpiconfig value is not set correctly then SuSE Linux Enterprise Server
could panic.
To set the ACPI configuration for SuSE Linux Enterprise Server: at the EFI Shell enter the
acpiconfig value command, where value is either single-pci-domain (for rx7620 and
rx8620 servers) or default (for rx7640 and rx8640 servers). Then enter the reset command
for the nPartition to reboot with the proper configuration for SuSE Linux Enterprise Server.
Use either of these methods to boot SuSE Linux Enterprise Server:
•
Choose a SuSE Linux Enterprise Server entry from the EFI Boot Manager menu.
To load the SuSE Linux Enterprise Server OS at the EFI Boot Manager menu, choose its entry
from the list of boot options.
Choosing a Linux entry from the boot options list boots the OS using ELILO.EFI loader
and the elilo.conf file.
•
Initiate the ELILO.EFI Linux loader from the EFI Shell.
Refer to the procedure “Booting SuSE Linux Enterprise Server (EFI Shell)” (page 133) for
details.
On a SuSE Linux Enterprise Server boot device EFI System Partition, the full paths to the
loader and configuration files are:
\efi\SuSE\elilo.efi
\efi\SuSE\elilo.conf
After choosing the file system for the boot device (for example, fs0:) you can initiate the
Linux loader from the EFI Shell prompt by entering the full path for the ELILO.EFI loader.
By default the ELILO.EFI loader boots Linux using the kernel image and parameters specified
by the default entry in the elilo.conf file on the EFI System Partition for the boot device.
To interact with the ELILO.EFI loader, interrupt the boot process (for example, type a space)
at the ELILO boot prompt. To exit the ELILO.EFI loader, use the exit command.
Procedure 5-24 Booting SuSE Linux Enterprise Server (EFI Shell)
Use this procedure to boot SuSE Linux Enterprise Server from the EFI Shell.
Refer to “ACPI Configuration for SuSE Linux Enterprise Server Must Be single-pci-domain or
default” (page 133) for required configuration details.
1.
Access the EFI Shell.
From the system console, choose the EFI Shell entry from the EFI Boot Manager menu to
access the shell.
Booting and Shutting Down Linux
133
2.
Access the EFI System Partition for the SuSE Linux Enterprise Server boot device.
Use the map EFI Shell command to list the file systems (fs0, fs1, and so on) that are known
and have been mapped.
To choose a file system to use, enter its mapped name followed by a colon (:). For example,
to operate with the boot device that is mapped as fs3, enter fs3: at the EFI Shell prompt.
3.
Enter ELILO at the EFI Shell command prompt to launch the ELILO.EFI loader.
If needed, you can specify the loader's full path by entering \efi\SuSE\elilo at the EFI
Shell command prompt.
4.
Allow the ELILO.EFI loader to proceed with booting the SuSE Linux kernel.
By default, the ELILO.EFI loader boots the kernel image and options specified by the
default item in the elilo.conf file.
To interact with the ELILO.EFI loader, interrupt the boot process (for example, type a
space) at the ELILO boot prompt. To exit the loader, use the exit command.
Shutting Down Linux
Use the shutdown command to shut down Red Hat Enterprise Linux or SuSE Linux Enterprise
Server.
The Red Hat Enterprise Linux and SuSE Linux Enterprise Server shutdown command includes
the following options:
-h
Halt after shutdown.
On cell-based HP Integrity servers, this will either power down server hardware or put
the nPartition into a shutdown for reconfig state.
Use the PE command at the management processor Command menu to manually power
on or power off server hardware, as needed.
-r
Reboot after shutdown.
-c
Cancel an already running shutdown.
time
When to shut down. (Required.) You can specify the time option in any of the following
ways:
• Absolute time in the format hh:mm, in which hh is the hour (one or two digits) and
mm is the minute of the hour (two digits).
• Number of minutes to wait in the format +m, in which m is the number of minutes.
• now to immediately shut down; this is equivalent to using +0 to wait zero minutes.
Refer to the shutdown(8) Linux manpage for details. Also refer to the Linux manpage for the
poweroff command.
NOTE: On HP rx7620, rx7640, rx8620, and rx8640 servers, you can configure the nPartition
behavior when an OS is shut down and halted (shutdown -h or poweroff). The two options
are to have hardware power off when the OS is halted, or to have the nPartition be made inactive
(all cells are in a boot-is-blocked state).
The normal behavior for Red Hat Enterprise Linux or SuSE Linux Enterprise Server shutdown
and halt is for the nPartition to be made inactive.
For details refer to “ACPI Softpowerdown Configuration—OS Shutdown Behavior” (page 93).
Procedure 5-25 Shutting Down Linux
From the command line for Red Hat Enterprise Linux or SuSE Linux Enterprise Server, issue the
shutdown command to shut down the OS.
134
Booting and Resetting nPartitions
1.
Log in to Linux running on the system you want to shut down.
You should log in to the MP for the server and use the Console menu to access the system
console. Accessing the console through the MP enables you to maintain console access to
the system after Linux has shut down.
2.
Issue the shutdown command with the desired command-line options, and include the
required time argument to specify when the operating shutdown is to occur.
For example, shutdown -r +20 will shut down and reboot the system starting in 20
minutes.
Rebooting and Resetting nPartitions
You can reboot and reset nPartitions by using any one of the following procedures:
•
•
•
•
•
•
•
•
“Rebooting and Resetting nPartitions (Service Processor)” (page 135)
“Rebooting and Resetting nPartitions (BCH Menu)” (page 136)
“Rebooting and Resetting nPartitions (EFI Boot Manager)” (page 136)
“Rebooting and Resetting nPartitions (EFI Shell)” (page 137)
“Rebooting and Resetting nPartitions (HP-UX)” (page 137)
“Rebooting and Resetting nPartitions (OpenVMS)” (page 137)
“Rebooting and Resetting nPartitions (Windows)” (page 138)
“Rebooting and Resetting nPartitions (Linux)” (page 138)
When you perform a reboot or reset of an nPartition, all active cells in the nPartition reboot and
the nPartition returns to the system boot environment (BCH or EFI). On PA-RISC systems, any
inactive cells in the nPartition are not rebooted in this procedure.
NOTE:
If possible shut down the operating system before resetting an nPartition.
Procedure 5-26 Rebooting and Resetting nPartitions (Service Processor)
From the service processor issue the RS command to reset an nPartition. Under normal operation
you first shut down the operating system.
1.
2.
Login to the service processor (MP or GSP) and enter CM to access the Command Menu.
At the Command menu, enter the RS command, specify which nPartition is to be reset, and
confirm whether to reset it.
The RS command resets all active cells in the nPartition and reboots them past partition
rendezvous to the system boot environment (BCH or EFI) or an operating system.
NOTE: On HP Integrity servers you should reset an nPartition only after all self tests and
partition rendezvous have completed. For example, when the nPartition is inactive (all cells
are at BIB) or is at EFI.
Be certain to correctly select which nPartition to be reset.
GSP:CM> RS
This command resets the selected partition.
WARNING: Execution of this command irrecoverably halts all system
processing and I/O activity and restarts the selected
partition.
#
--0)
1)
Name
---jules00
jules01
Rebooting and Resetting nPartitions
135
Select a partition number: 1
Do you want to reset partition number 1? (Y/[N]) y
-> The selected partition will be reset.
GSP:CM>
If you are accessing the service processor using a single-partition-user account, the RS
command selects which nPartition is to be reset: the nPartition that your account allows you
to access.
If using an operator or administrator service processor account, you can select which of the
nPartitions in the server complex you want to reset.
3.
To exit the service processor Command Menu, enter MA to return to the service processor
Main Menu.
At the Main Menu, enter X to exit the service processor interface.
Procedure 5-27 Rebooting and Resetting nPartitions (BCH Menu)
From the BCH Menu, issue the REBOOT command to reset the local nPartition. The BCH Menu
is available only on HP 9000 systems.
1.
Access the BCH Main Menu for the nPartition that you want to reboot.
Login to the service processor (MP or GSP) and enter CO to access the Console list. Select
the nPartition console. When accessing the console, confirm that you are at the BCH Main
Menu (the Main Menu: Enter command or menu> prompt). If at a BCH menu other
than the Main Menu, then enter MA to return to the BCH Main Menu.
2.
From the BCH main menu for the nPartition, enter the REBOOT command to reboot the
nPartition.
The BCH REBOOT command resets all active cells in the nPartition and reboots them past
partition rendezvous to BCH or HP-UX.
Main Menu: Enter command or menu > REBOOT
Rebooting the partition ...
3.
Exit the console and service processor interfaces if finished using them.
To exit the BCH environment type ^B (Control-B); this exits the nPartition console and
returns to the service processor Main Menu. To exit the service processor, type X at the Main
Menu.
Procedure 5-28 Rebooting and Resetting nPartitions (EFI Boot Manager)
From the EFI Boot Manager menu, select the Boot Option Maintenance→Cold Reset menu to
reset the local nPartition.
The EFI Boot Manager is available only on HP Integrity systems.
1.
Access the EFI Boot Manager menu for the nPartition that you want to reboot.
Login to the service processor (MP or GSP) and enter CO to access the Console list. Select
the nPartition console.
When accessing the console, confirm that you are at the EFI Boot Manager menu (the main
EFI menu). If at another EFI menu, select the Exit option from the sub-menus until you
return to the screen with the EFI Boot Manager heading.
2.
From the EFI Boot Manager menu, select the Boot Option Maintenance menu. Then from
the Boot Option Maintenance menu select the Cold Reset menu to reset the local nPartition.
The Cold Reset menu item resets all active cells in the nPartition and reboots them.
136
Booting and Resetting nPartitions
3.
Exit the console and service processor interfaces if finished using them.
To exit the EFI environment type ^B (Control-B); this exits the nPartition console and returns
to the service processor Main Menu. To exit the service processor, type X at the Main Menu.
Procedure 5-29 Rebooting and Resetting nPartitions (EFI Shell)
From the EFI Shell environment, issue the reset command to reset the local nPartition. The EFI
Shell is available only on HP Integrity systems.
1.
Access the EFI Shell environment for the nPartition that you want to reboot.
Login to the service processor (MP or GSP) and enter CO to access the Console list. Select
the nPartition console.
When accessing the console, confirm that you are at the EFI Boot Manager menu (the main
EFI menu). If at another EFI menu, select the Exit option from the sub-menus until you
return to the screen with the EFI Boot Manager heading.
From the EFI Boot Manager menu, select the EFI Shell menu option to access the EFI Shell
environment.
2.
From the EFI Shell environment, issue the reset command to reset the local nPartition.
The reset command resets all active cells in the nPartition and reboots them.
3.
Exit the console and service processor interfaces if finished using them.
To exit the EFI environment type ^B (Control-B); this exits the nPartition console and returns
to the service processor Main Menu. To exit the service processor, type X at the Main Menu.
Procedure 5-30 Rebooting and Resetting nPartitions (HP-UX)
From the HP-UX command line, issue the /sbin/shutdown or /usr/sbin/reboot command
to reset the local nPartition.
1.
2.
Login to HP-UX running on the nPartition that you want to reboot.
Issue the shutdown -r command to reset the nPartition.
The shutdown -r command shuts down HP-UX and reboots the nPartition. All active cells
in the nPartition are reset.
Procedure 5-31 Rebooting and Resetting nPartitions (OpenVMS)
To reset the local nPartition from the HP OpenVMS command line, issue the
@SYS$SYSTEM:SHUTDOWN command to shut down OpenVMS, then enter Yes at the "Should
an automatic system reboot be performed" prompt.
1.
Log in to HP OpenVMS running on the system that you want to shut down.
You should log in to the MP for the server and use the Console menu to access the system
console. Accessing the console through the MP enables you to maintain console access to
the system after HP OpenVMS has shut down.
Rebooting and Resetting nPartitions
137
2.
At the OpenVMS command line, issue the @SYS$SYSTEM:SHUTDOWN command and enter
Yes at the "Should an automatic system reboot be performed" prompt.
>@SYS$SYSTEM:SHUTDOWN
SHUTDOWN -- Perform an Orderly System Shutdown
on node RSNVMS
How many minutes until final shutdown [0]:
Reason for shutdown [Standalone]:
Do you want to spin down the disk volumes [NO]?
Do you want to invoke the site-specific shutdown procedure [YES]?
Should an automatic system reboot be performed [NO]? yes
When will the system be rebooted [shortly via automatic reboot]:
Shutdown options (enter as a comma-separated list):
REBOOT_CHECK
Check existence of basic system files
SAVE_FEEDBACK
Save AUTOGEN feedback information from this boot
DISABLE_AUTOSTART
Disable autostart queues
POWER_OFF
Request console to power-off the system
Shutdown options [NONE]:
%SHUTDOWN-I-OPERATOR, this terminal is now an operator's console
...
NOTE:
HP OpenVMS I64 currently does not support the POWER_OFF shutdown option.
Procedure 5-32 Rebooting and Resetting nPartitions (Windows)
To reset the local nPartition from Windows issue the shutdown /r command (or select the
Start→Shut Down action and choose Restart from the pull-down menu).
CAUTION: Do not shut down Windows using Special Administration Console (SAC) restart
or shutdown commands under normal circumstances.
Issuing restart or shutdown at the SAC> prompt causes the system to restart or shutdown
immediately and can result in the loss of data.
Instead use the Windows Start menu or the shutdown command to shut down gracefully.
1.
Login to Windows running on the nPartition that you want to shut down.
For example, access the nPartition console and use the Windows SAC interface to start a
command prompt, from which you can issue Windows commands to shut down the
nPartition.
2.
Issue the shutdown /r command to shut down the Windows Server 2003 operating system
on the nPartition and reboot. You also can perform this procedure by selecting the
Start→Shut Down action and choosing Restart from the pull-down menu
For example:
shutdown /r /t 60 /c "Shut down and reboot."
This command initiates a Windows system shutdown-and-reboot after a timeout period of
60 seconds. The /c option specifies a message that is broadcast to any other users of the
system.
For more details use the help shutdown command.
Procedure 5-33 Rebooting and Resetting nPartitions (Linux)
To reset the local nPartition from Linux, issue the shutdown -r time command, where time is
the time when the system will be shut down and rebooted.
138
Booting and Resetting nPartitions
1.
2.
Login to Linux running on the system you want to shut down.
Issue the shutdown -r time command with the required time argument to specify when
the shutdown is to occur.
You can specify time in the format hh:mm, in which hh is the hour (one or two digits) and
mm is the minute of the hour (two digits); or in the format +m, in which m is the number of
minutes delay until shutdown; or specify now to immediately shut down.
Performing a Reboot for Reconfig
You can perform a reboot for reconfig by using the following procedures:
•
•
•
•
“Reboot for Reconfig from HP-UX (/sbin/shutdown -R command)” (page 139)
“Reboot for Reconfig from OpenVMS” (page 139)
“Reboot for Reconfig from Windows (shutdown /r command)” (page 140)
“Reboot for Reconfig from Linux (shutdown -r time command)” (page 140)
During a reboot for reconfig of an nPartition, the command that you issue performs the following
tasks:
1.
2.
3.
Shuts down the operating system and resets all cells that are assigned to the nPartition,
including any inactive cells.
Reconfigures the nPartition if necessary (if there is a pending change to the Stable Complex
Configuration Data, it occurs during the reboot for reconfig).
Boots all cells in the nPartition. Any cells with a "n" use-on-next-boot value remain inactive
at BIB, and all other cells can rendezvous to form the nPartition.
Perform a reboot for reconfig of an nPartition whenever you add cells or remove active cells
from the nPartition, and whenever you need to allow an inactive cell to join the nPartition (such
as after changing a cell use-on-next-boot value from "n" to "y").
Procedure 5-34 Reboot for Reconfig from HP-UX (/sbin/shutdown -R command)
From the HP-UX command line use the shutdown -R command to perform a reboot for reconfig
for an nPartition.
1.
2.
Login to HP-UX running on the nPartition where you want to perform the reboot for reconfig.
Issue the shutdown -R command to perform a reboot for reconfig of the nPartition.
The shutdown -R command shuts down HP-UX, reboot all cells assigned to the nPartition,
performs any nPartition reconfigurations, and boot all cells that have "y" use-on-next-boot
values.
Procedure 5-35 Reboot for Reconfig from OpenVMS
To perform a reboot for reconfig of the local nPartition from the HP OpenVMS command line,
issue the @SYS$SYSTEM:SHUTDOWN command to shut down OpenVMS, then enter Yes at the
"Should an automatic system reboot be performed" prompt.
1.
Log in to HP OpenVMS running on the system that you want to shut down.
You should log in to the MP for the server and use the Console menu to access the system
console. Accessing the console through the MP enables you to maintain console access to
the system after HP OpenVMS has shut down.
Performing a Reboot for Reconfig
139
2.
At the OpenVMS command line, issue the @SYS$SYSTEM:SHUTDOWN command and enter
Yes at the "Should an automatic system reboot be performed" prompt.
>@SYS$SYSTEM:SHUTDOWN
SHUTDOWN -- Perform an Orderly System Shutdown
on node RSNVMS
How many minutes until final shutdown [0]:
Reason for shutdown [Standalone]:
Do you want to spin down the disk volumes [NO]?
Do you want to invoke the site-specific shutdown procedure [YES]?
Should an automatic system reboot be performed [NO]? yes
When will the system be rebooted [shortly via automatic reboot]:
Shutdown options (enter as a comma-separated list):
REBOOT_CHECK
Check existence of basic system files
SAVE_FEEDBACK
Save AUTOGEN feedback information from this boot
DISABLE_AUTOSTART
Disable autostart queues
POWER_OFF
Request console to power-off the system
Shutdown options [NONE]:
%SHUTDOWN-I-OPERATOR, this terminal is now an operator's console
...
NOTE:
HP OpenVMS I64 currently does not support the POWER_OFF shutdown option.
Procedure 5-36 Reboot for Reconfig from Windows (shutdown /r command)
From the Windows command line use the shutdown /r command (or select the Start→Shut
Down action and choose Restart from the pull-down menu) to perform a reboot for reconfig for
an nPartition.
CAUTION: Do not shut down Windows using Special Administration Console (SAC) restart
or shutdown commands under normal circumstances.
Issuing restart or shutdown at the SAC> prompt causes the system to restart or shutdown
immediately and can result in the loss of data.
Instead use the Windows Start menu or the shutdown command to shut down gracefully.
1.
Login to Windows running on the nPartition that you want to shut down.
For example, access the nPartition console and use the Windows SAC interface to start a
command prompt, from which you can issue Windows commands to shut down the
nPartition.
2.
Issue the shutdown /r command to shut down the Windows Server 2003 operating system
on the nPartition and reboot. You also can perform this task by selecting the Start→Shut
Down action and choosing Restart from the pull-down menu.
For example:
shutdown /r /t 60 /c "Reboot for reconfig."
This command initiates a Windows system shutdown-and-reboot after a timeout period of
60 seconds. The /c option specifies a message that is broadcast to any other users of the
system.
For more details use the help shutdown command.
Procedure 5-37 Reboot for Reconfig from Linux (shutdown -r time command)
To perform a reboot for reconfig of an nPartition from Linux, issue the shutdown -r time
command, where time is the time when the system will be shut down and rebooted.
140
Booting and Resetting nPartitions
1.
2.
Login to Linux running on the nPartition you want to shut down.
Issue issue the shutdown -r time command with the required time argument to specify
when the shutdown is to occur.
You can specify time in the format hh:mm, in which hh is the hour (one or two digits) and
mm is the minute of the hour (two digits); or in the format +m, in which m is the number of
minutes delay until shutdown; or specify now to immediately shut down.
Shutting Down to a Shutdown for Reconfig (Inactive) State
You can shut down to a shutdown for reconfig (inactive) state by using any one of the following
procedures:
•
•
•
•
•
•
•
“Shutting Down to Shutdown for Reconfig (Service Processor)” (page 141)
“Shutting Down to Shutdown for Reconfig (BCH Menu)” (page 142)
“Shutting Down to Shutdown for Reconfig (EFI Shell)” (page 143)
“Shutting Down to Shutdown for Reconfig (HP-UX)” (page 143)
“Shutting Down to Shutdown for Reconfig (OpenVMS)” (page 143)
“Shutting Down to Shutdown for Reconfig (Windows)” (page 145)
“Shutting Down to Shutdown for Reconfig (Linux)” (page 145)
On all HP 9000 servers and on all HP Superdome servers, performing a shutdown for reconfig
always keep all cells assigned to the nPartition at a boot-is-blocked state.
NOTE: On HP rx7620, rx7640, rx8620, and rx8640 servers, you can configure the nPartition
behavior when an OS shuts down to the shutdown for reconfig state. The two options are to
have hardware power off when the OS is halted, or to have the nPartition be made inactive (all
cells are in a boot-is-blocked state).
On these servers, the normal behavior for HP-UX and Linux shutdown for reconfig is for the
nPartition be made inactive, and the normal Windows shutdown for reconfig (shutdown /s)
behavior is for the nPartition hardware to be powered off.
For details see “ACPI Softpowerdown Configuration—OS Shutdown Behavior” (page 93).
When you use any of the methods to hold an nPartition at the shutdown for reconfig state, the
command you issue performs the following tasks:
1. Shut down the operating system (if using the shutdown command) and reset all cells that
are assigned to the nPartition, including any inactive cells.
2. Reconfigure the nPartition if necessary (if there is a pending change to the Stable Complex
Configuration Data, it occurs during the reboot for reconfig).
3. Either keep all cells at a boot-is-blocked state (the nPartition and all cells assigned to it are
inactive) or power off all cells and I/O chassis assigned to the nPartition.
HP rx7620, rx7640, rx8620, and rx8640 servers can be configured to power off hardware
upon shutdown for reconfig. For details see “ACPI Softpowerdown Configuration—OS
Shutdown Behavior” (page 93).
You can reset an nPartition to shutdown for reconfig whenever you need for the nPartition and
its cells to be inactive.
Procedure 5-38 Shutting Down to Shutdown for Reconfig (Service Processor)
From the service processor Command Menu, issue the RR command to shut an nPartition down
to a shutdown for reconfig (inactive) state. Under normal operation you first shut down the
operating system.
1.
Login to the service processor (MP or GSP) and enter CM to access the Command Menu.
Shutting Down to a Shutdown for Reconfig (Inactive) State
141
2.
At the service processor Command menu, enter the RR command, specify which nPartition
is to be reset, and confirm whether to reset it to the shutdown for reconfig state.
The service processor RR command resets all cells in the nPartition, performs any nPartition
reconfigurations, and halts all cells at a boot-is-blocked state, thus making the nPartition
and all its cells inactive.
Be certain to select the correct nPartition to be reset.
GSP:CM> RR
This command resets for reconfiguration the selected partition.
WARNING: Execution of this command irrecoverably halts all system
processing and I/O activity and restarts the selected
partition in a way that it can be reconfigured.
#
--0)
1)
Name
---jules00
jules01
Select a partition number: 1
Do you want to reset for reconfiguration partition number 1? (Y/[N]) y
-> The selected partition will be reset for reconfiguration.
GSP:CM>
If you are accessing the service processor using a single-partition-user account, the RR
command selects which nPartition is to be reset: the nPartition that your account allows you
to access.
If using an operator or administrator account, you can select which nPartition in the server
complex you want to reset.
3.
To exit the service processor Command Menu, enter MA to return to the service processor
Main Menu.
At the Main Menu, enter X to exit the service processor interface.
Procedure 5-39 Shutting Down to Shutdown for Reconfig (BCH Menu)
From the BCH Menu issue the RECONFIGRESET command to shut an nPartition down to a
shutdown for reconfig (inactive) state. The BCH Menu is available only on HP 9000 systems.
1.
Access the BCH Main Menu for the nPartition that you want to shut down to a shutdown
for reconfig (inactive) state.
Login to the service processor (MP or GSP) and enter CO to access the Console list. Select
the nPartition console. When accessing the console, confirm that you are at the BCH Main
Menu (the Main Menu: Enter command or menu> prompt). If at a BCH menu other
than the Main Menu, then enter MA to return to the BCH Main Menu.
2.
From the BCH interface for the nPartition, enter the RECONFIGRESET command to reset
the nPartition to the shutdown for reconfig state.
The RECONFIGRESET command resets all cells in the nPartition, performs any nPartition
reconfigurations, and halts all cells at a boot-is-blocked state, thus making the nPartition
and all its cells inactive.
Main Menu: Enter command or menu > RECONFIGRESET
Reset the partition for reconfiguration of Complex Profile ...
142
Booting and Resetting nPartitions
3.
Exit the console and service processor interfaces if finished using them.
To exit the BCH environment type ^B (Control-B); this exits the nPartition console and
returns to the service processor Main Menu. To exit the service processor, type X at the Main
Menu.
Procedure 5-40 Shutting Down to Shutdown for Reconfig (EFI Shell)
From the EFI Shell environment issue the reconfigreset command to shut an nPartition down
to a shutdown for reconfig (inactive) state. The EFI Shell is available only on HP Integrity systems.
1.
Access the EFI Shell environment for the nPartition that you want to shut down to a shutdown
for reconfig (inactive) state.
Login to the service processor (MP or GSP) and enter CO to access the Console list. Select
the nPartition console.
When accessing the console, confirm that you are at the EFI Boot Manager menu (the main
EFI menu). If at another EFI menu, select the Exit option from the sub-menus until you
return to the screen with the EFI Boot Manager heading.
From the EFI Boot Manager menu, select the EFI Shell menu option to access the EFI Shell
environment.
2.
At the EFI Shell environment, issue the the reconfigreset command to reset the local
nPartition to a shutdown for reconfig state.
The reconfigreset command resets all cells in the nPartition, performs any nPartition
reconfigurations, and halts all cells at a boot-is-blocked state, thus making the nPartition
and all its cells inactive.
3.
Exit the console and service processor interfaces if finished using them.
To exit the EFI environment type ^B (Control-B); this exits the nPartition console and returns
to the service processor Main Menu. To exit the service processor, type X at the Main Menu.
Procedure 5-41 Shutting Down to Shutdown for Reconfig (HP-UX)
From the HP-UX command line issue the /sbin/shutdown -R -H command to shut an
nPartition down to a shutdown for reconfig (inactive) state.
NOTE: On Superdome SX1000 PA and SX2000 PA, shutdown -R -H does not stop at BIB if
the MP has been hot swapped since the last reboot.
NOTE: On HP rx7620, rx7640, rx8620, and rx8640 servers, you can configure the nPartition
behavior when HP-UX initiates a shutdown for reconfig (shutdown -h or shutdown -R -H).
The two options are to have hardware power off when the OS is halted, or to have the nPartition
be made inactive (all cells are in a boot-is-blocked state).
The normal behavior for HP-UX shutdown for reconfig is for the nPartition be made inactive.
For details see “ACPI Softpowerdown Configuration—OS Shutdown Behavior” (page 93).
1.
2.
Login to HP-UX running on the nPartition that you want to shut down to a shutdown for
reconfig (inactive) state.
Issue the shutdown -R -H command to reset the nPartition to the shutdown for reconfig
state.
The shutdown -R -H command shuts down HP-UX, reset all cells in the nPartition, perform
any nPartition reconfigurations, and halt all cells at a boot-is-blocked state, thus making the
nPartition and all its cells inactive.
Procedure 5-42 Shutting Down to Shutdown for Reconfig (OpenVMS)
To perform a shutdown for reconfig of an nPartition running OpenVMS I64: first issue
@SYS$SYSTEM:SHUTDOWN.COM from OpenVMS and enter No at the "Should an automatic system
Shutting Down to a Shutdown for Reconfig (Inactive) State
143
reboot be performed" prompt, then access the MP and, from the MP Command Menu, issue the
RR command and specify the nPartition that is to be shutdown for reconfig.
1.
Log in to HP OpenVMS running on the system that you want to shut down.
You should log in to the MP for the server and use the Console menu to access the system
console. Accessing the console through the MP enables you to maintain console access to
the system after HP OpenVMS has shut down.
2.
At the OpenVMS command line, issue the @SYS$SYSTEM:SHUTDOWN command and enter
No at the "Should an automatic system reboot be performed" prompt.
>@SYS$SYSTEM:SHUTDOWN
SHUTDOWN -- Perform an Orderly System Shutdown
on node RSNVMS
How many minutes until final shutdown [0]:
Reason for shutdown [Standalone]:
Do you want to spin down the disk volumes [NO]?
Do you want to invoke the site-specific shutdown procedure [YES]?
Should an automatic system reboot be performed [NO]? no
When will the system be rebooted [shortly via automatic reboot]:
Shutdown options (enter as a comma-separated list):
REBOOT_CHECK
Check existence of basic system files
SAVE_FEEDBACK
Save AUTOGEN feedback information from this boot
DISABLE_AUTOSTART
Disable autostart queues
POWER_OFF
Request console to power-off the system
Shutdown options [NONE]:
%SHUTDOWN-I-OPERATOR, this terminal is now an operator's console
...
NOTE:
3.
4.
HP OpenVMS I64 currently does not support the POWER_OFF shutdown option.
Login to the service processor (MP or GSP) and enter CM to access the Command Menu.
At the service processor Command menu, enter the RR command, specify which nPartition
is to be reset, and confirm whether to reset it to the shutdown for reconfig state.
The service processor RR command resets all cells in the nPartition, performs any nPartition
reconfigurations, and halts all cells at a boot-is-blocked state, thus making the nPartition
and all its cells inactive.
Be certain to select the correct nPartition to be reset. If you are accessing the service processor
using a single-partition-user account, the RR command selects which nPartition is to be reset:
the nPartition that your account allows you to access. If using an operator or administrator
account, you can select which nPartition in the server complex you want to reset.
5.
To exit the service processor Command Menu, enter MA to return to the service processor
Main Menu.
At the Main Menu, enter X to exit the service processor interface.
144
Booting and Resetting nPartitions
Procedure 5-43 Shutting Down to Shutdown for Reconfig (Windows)
From the Windows command line issue the shutdown /s command (or select the Start→Shut
Down action and choose Shut down from the pull-down menu) to shut an nPartition down to
a shutdown for reconfig (inactive) state or power off the nPartition hardware.
CAUTION: Do not shut down Windows using Special Administration Console (SAC) restart
or shutdown commands under normal circumstances.
Issuing restart or shutdown at the SAC> prompt causes the system to restart or shutdown
immediately and can result in the loss of data.
Instead use the Windows Start menu or the shutdown command to shut down gracefully.
NOTE: On HP rx7620, rx7640, rx8620, and rx8640 servers, performing a shutdown using
shutdown /s (or the equivalent Start→Shut Down→Shut down) powers off the server cabinet
or powers off the cells and I/O chassis assigned to the nPartition. On these servers this behavior
can be customized. For details see “ACPI Softpowerdown Configuration—OS Shutdown Behavior”
(page 93).
On HP Integrity Superdome servers, the Windows shutdown /s command shuts down the
system and keeps all cells at BIB (the boot is blocked, inactive state).
1.
Login to Windows running on the nPartition that you want to shut down.
For example, access the nPartition console and use the Windows SAC interface to start a
command prompt, from which you can issue Windows commands to shut down the
nPartition.
2.
Issue the shutdown /s command to shut down the Windows Server 2003 operating system
on the nPartition and reset the nPartition to the shutdown for reconfig state. You also can
perform this task by selecting the Start→Shut Down action and choosing Shut down from
the pull-down menu.
For example:
shutdown /s /c "Shut down for reconfig (inactive)."
This command initiates a Windows system shutdown-and-stop after a timeout period of 60
seconds. The /c option specifies a message that is broadcast to any other users of the system.
The shutdown /s command and option shuts down Windows, reset all cells in the
nPartition, perform any nPartition reconfigurations, and halt all cells at a boot-is-blocked
state, thus making the nPartition and all its cells inactive.
For more details use the help shutdown command.
Procedure 5-44 Shutting Down to Shutdown for Reconfig (Linux)
To perform a shutdown for reconfig of an nPartition from Linux, issue the shutdown -h time
command, where time is the time when the system will be shutdown for reconfig.
NOTE: On HP rx7620, rx7640, rx8620, and rx8640 servers, you can configure the nPartition
behavior when Linux initiates a shutdown for reconfig (shutdown -h time). The two options
are to have hardware power off when the OS is halted, or to have the nPartition be made inactive
(all cells are in a boot-is-blocked state).
The normal behavior for Linux shutdown for reconfig is for the nPartition be made inactive.
For details see “ACPI Softpowerdown Configuration—OS Shutdown Behavior” (page 93).
1.
Login to Linux running on the system you want to shut down.
Shutting Down to a Shutdown for Reconfig (Inactive) State
145
2.
Issue issue the shutdown -h time command with the required time argument to specify
when the shutdown is to occur.
You can specify time in the format hh:mm, in which hh is the hour (one or two digits) and
mm is the minute of the hour (two digits); or in the format +m, in which m is the number of
minutes delay until shutdown; or specify now to immediately shut down.
Booting an Inactive nPartition
You can boot an inactive nPartition by using any one of the following procedures:
•
•
“Booting an Inactive nPartition (Service Processor)” (page 146)
“Booting an Inactive nPartition (nPartition Commands)” (page 147)
When all cells in an nPartition are at boot-is-blocked, the nPartition is inactive. This is the case,
for example, when an nPartition is held at the shutdown for reconfig state.
You can boot an nPartition past the shutdown for reconfig state to make it active by using the
BO (boot) command at the service processor Command menu.
To determine whether an nPartition is in a boot-is-blocked (shutdown for reconfig) state, use the
Virtual Front Panel for the nPartition to check the nPartition boot status. If all cells assigned to
the nPartition are at boot-is-blocked, the nPartition is halted at the shutdown for reconfig state.
Procedure 5-45 Booting an Inactive nPartition (Service Processor)
Use the service processor Command menu BO command to boot an nPartition past the shutdown
for reconfig state to make the nPartition active.
If you use the BO command to attempt to boot an nPartition that already is active, the command
has no effect.
1.
2.
Login to the service processor (MP or GSP) and enter CM to access the Command Menu.
From the Command menu, enter the BO command and specify which nPartition is to be
booted (released from boot-is-blocked).
As a result of the BO command, the service processor for the complex releases the cells
assigned to the selected nPartition from boot-is-blocked: the cells proceed to rendezvous to
form an active nPartition, which no longer is in the shutdown for reconfig state.
GSP:CM> BO
This command boots the selected partition.
#
--0)
1)
Name
---jules00
jules01
Select a partition number: 0
Do you want to boot partition number 0? (Y/[N]) y
-> The selected partition will be booted.
GSP:CM>
Any of the cells assigned to the nPartition that are not configured (those with a "n"
use-on-next-boot value) remain inactive at boot-is-blocked.
When the nPartition becomes active it proceeds through the normal boot process.
3.
To exit the service processor Command Menu, enter MA to return to the service processor
Main Menu.
At the Main Menu, enter X to exit the service processor interface.
146
Booting and Resetting nPartitions
Procedure 5-46 Booting an Inactive nPartition (nPartition Commands)
You can cause an inactive nPartition to be booted (made active) by using the parmodify
command with the -B option when changing the configuration of an inactive nPartition.
1.
Login to HP-UX running on any nPartition in the server complex, or login to any remote
system with the Enhanced nPartition Commands (ParCLI) installed.
When using the nPartition commands from a remote system, you can specify the -g...
-h... set of options to configure a remote complex.
2.
When modifying an inactive nPartition, specify the -B option when using the
/usr/sbin/parmodify command to reconfigure the inactive nPartition.
For example, when adding or removing cells from an inactive nPartition, specifying the -B
option causes the nPartition to boot (become active) immediately following the nPartition
modification.
For details refer to the parmodify(1M) manpage.
Booting over a Network
You can boot over a network by using any one of the following procedures:
•
•
•
“Booting over a Network (BCH Menu)” (page 147)
“Booting over a Network (EFI Boot Manager)” (page 147)
“Booting over a Network (EFI Shell)” (page 148)
Procedure 5-47 Booting over a Network (BCH Menu)
From the BCH Menu, use the BOOT LAN... command to boot HP-UX over a network. The BCH
Menu is available only on HP 9000 systems.
1.
Access the BCH Main Menu for the nPartition that you want to boot over a network.
Login to the service processor (MP or GSP) and enter CO to access the Console list. Select
the nPartition console. When accessing the console, confirm that you are at the BCH Main
Menu (the Main Menu: Enter command or menu> prompt). If at a BCH menu other
than the Main Menu, then enter MA to return to the BCH Main Menu.
2.
Issue the BOOT LAN INSTALL command or the BOOT LAN.ip-address INSTALL command
to boot over a network and perform an HP-UX installation.
The BOOT... INSTALL commands boot HP-UX from the default HP-UX install server or
from the server specified by ip-address.
3.
Exit the console and service processor interfaces if finished using them.
To exit the BCH environment type ^B (Control-B); this exits the nPartition console and
returns to the service processor Main Menu. To exit the service processor, type X at the Main
Menu.
Procedure 5-48 Booting over a Network (EFI Boot Manager)
From the EFI Boot Manager, to boot from a network device select the Boot Option
Maintenance→Boot from a File menu option and then select the "Load File" option for the LAN
card that has the desired MAC address. The EFI Boot Manager is available only on HP Integrity
systems.
1.
Access the EFI Boot Manager menu for the nPartition that you want to boot over a network.
Login to the service processor (MP or GSP) and enter CO to access the Console list. Select
the nPartition console.
When accessing the console, confirm that you are at the EFI Boot Manager menu (the main
EFI menu). If at another EFI menu, select the Exit option from the sub-menus until you
return to the screen with the EFI Boot Manager heading.
Booting over a Network
147
2.
3.
At the EFI Boot Manager menu, select the Boot Option Maintenance option.
At the Boot Option Maintenance menu, select the Boot from a File menu option and then
select the network card whose MAC address you want to use when booting.
Highlight the desired network card, then press Return or Enter to initiate booting using
the selected card.
EFI Boot Maintenance Manager ver 1.10 [14.60]
Boot From a File.
Select a Volume
IA64_EFI [Acpi(000222F0,269)/Pci(0|0)/Scsi(Pun8,Lun0)/HD(Part1,S
Removable Media Boot [Acpi(000222F0,2A8)/Pci(0|1)/Scsi(Pun2,Lun0
Load File [Acpi(000222F0,200)/Pci(1|0)/Mac(001083FD5D9B)]
Load File [EFI Shell [Built-in]]
Exit
4.
Exit the console and service processor interfaces if finished using them.
To exit the EFI environment type ^B (Control-B); this exits the nPartition console and returns
to the service processor Main Menu. To exit the service processor, type X at the Main Menu.
Procedure 5-49 Booting over a Network (EFI Shell)
From the EFI Shell environment, use the lanboot select command to boot over a network.
The EFI Shell is available only on HP Integrity systems.
NOTE: To perform a directed lanboot on HP Integrity servers, use the EFI Shell dbprofile
command and the lanboot command -dn option.
First use the dbprofile EFI Shell command to list or create direct boot profiles. Then use the
lanboot select -dn profile command to perform a directed lanboot using the specified
direct boot profile (profile).
For details use the help dbprofile command and the help lanboot command from the
EFI Shell.
1.
Access the EFI Shell environment for the nPartition that you want to boot over a network.
Login to the service processor (MP or GSP) and enter CO to access the Console list. Select
the nPartition console.
When accessing the console, confirm that you are at the EFI Boot Manager menu (the main
EFI menu). If at another EFI menu, select the Exit option from the sub-menus until you
return to the screen with the EFI Boot Manager heading.
From the EFI Boot Manager menu, select the EFI Shell menu option to access the EFI Shell
environment.
2.
At the EFI Shell, issue the lanboot select command to boot from the selected networking
card.
For details see the help lanboot command.
Shell> lanboot select
01 Acpi(000222F0,0)/Pci(1|0)/Mac(00306E0E5268)
02 Acpi(000222F0,800)/Pci(1|0)/Mac(00108327549F)
Select Desired LAN: 1
Selected Acpi(000222F0,0)/Pci(1|0)/Mac(00306E0E5268)
Running LoadFile()
CLIENT MAC ADDR: 00 30 6e 0e 52 68
148
Booting and Resetting nPartitions
3.
Exit the console and service processor interfaces if finished using them.
To exit the EFI environment type ^B (Control-B); this exits the nPartition console and returns
to the service processor Main Menu. To exit the service processor, type X at the Main Menu.
Booting to the HP-UX Initial System Loader (ISL)
On HP 9000 servers, you can boot to the HP-UX Initial System Loader (ISL) by using the following
procedure.
NOTE: The Initial System Loader (ISL) interface is available only from HP-UX boot devices on
HP 9000 servers (PA-RISC systems).
See “Using HP-UX Loader Commands” (page 151) for details in issuing commands to the HP-UX
Boot Loader (hpux) from the Initial System Loader (the ISL> prompt).
Procedure 5-50 Initial System Loader (ISL) Booting of HP-UX
From the BCH Menu, to access the ISL prompt issue the BOOT command and and reply y (for
"yes") to the Do you wish to stop at the ISL prompt question. The BCH Menu is
available only on HP 9000 systems.
1.
Access the BCH Main Menu for the nPartition from which you will be running and accessing
the ISL interface.
Login to the service processor (MP or GSP) and enter CO to access the Console list. Select
the nPartition console. When accessing the console, confirm that you are at the BCH Main
Menu (the Main Menu: Enter command or menu> prompt). If at a BCH menu other
than the Main Menu, then enter MA to return to the BCH Main Menu.
2.
Boot the desired device using the BOOT command at the BCH interface, and specify that the
nPartition stop at the ISL prompt prior to booting (reply y to the "stop at the ISL prompt"
question).
Main Menu: Enter command or menu > BOOT 0/0/2/0/0.13
BCH Directed Boot Path: 0/0/2/0/0.13
Do you wish to stop at the ISL prompt prior to booting? (y/n) >> y
Initializing boot Device.
....
ISL Revision A.00.42
JUN 19, 1999
ISL>
Replying "n" (no, do not stop at ISL) skips the ISL prompt and proceeds to execute the AUTO
file, which by default will boot HP-UX (/stand/vmunix) on the nPartition.
ISL: Initial System Loader Replying "y" (yes, do stop at ISL) allows you to interact directly
with the Initial System Loader (ISL) and the Secondary System Loader (hpux) for the boot
device. Enter all ISL commands from the ISL> prompt.
hpux: Secondary System Loader From the ISL prompt you also can enter commands that
are executed by the Secondary System Loader (hpux). Preface your Secondary System Loader
command with hpux. For example: hpux ls /stand to list the contents of the /stand
directory on the booted device.
Refer to the isl(1M) and hpux(1M) manpages for details.
3.
Issue commands from the ISL prompt (ISL>), or enter the EXIT command to leave the ISL
interface and return to the BCH Menu.
Booting to the HP-UX Initial System Loader (ISL)
149
4.
Exit the console and service processor interfaces if finished using them.
To exit the BCH environment type ^B (Control-B); this exits the nPartition console and
returns to the service processor Main Menu. To exit the service processor, type X at the Main
Menu.
Booting to the HP-UX Loader (HPUX.EFI)
On HP Integrity servers, you can boot to the HP-UX Loader (HPUX.EFI) by using the following
procedure.
NOTE:
The HP-UX Loader (HPUX.EFI) is available only on HP Integrity servers.
See “Using HP-UX Loader Commands” (page 151) for details on issuing commands from the
HP-UX Boot Loader (HPUX.EFI, the HPUX> prompt).
Procedure 5-51 HPUX.EFI Access: Booting to the HP-UX Loader (EFI Boot Manager or EFI Shell)
The EFI system boot environment is available only on HP Integrity systems.
1.
Access the EFI Shell environment for the nPartition from which you will be running and
accessing the HP-UX Loader (HPUX.EFI) interface.
Login to the service processor (MP or GSP) and enter CO to access the Console list. Select
the nPartition console.
When accessing the console, confirm that you are at the EFI Boot Manager menu (the main
EFI menu). If at another EFI menu, select the Exit option from the sub-menus until you
return to the screen with the EFI Boot Manager heading.
From the EFI Boot Manager menu, select the EFI Shell menu option to access the EFI Shell
environment.
2.
3.
4.
Access the EFI System Partition (fsX: where X is the filesystem number) for the device
from which you want to boot HP-UX.
When accessing the EFI System Partition for the desired boot device, issue the HPUX command
to invoke the \EFI\HPUX\HPUX.EFI loader on the selected device.
Boot to the HP-UX Boot Loader prompt (HPUX>) by typing any key within the ten seconds
given for interrupting the HP-UX boot process. You will use the HPUX.EFI loader to boot
HP-UX in single-user mode in the next step.
After you type a key, the HPUX.EFI interface (the HP-UX Boot Loader prompt, HPUX>) is
provided.
fs0:\> hpux
(c) Copyright 1990-2002, Hewlett Packard Company.
All rights reserved
HP-UX Boot Loader for IA64
Revision 1.723
Press Any Key to interrupt Autoboot
\efi\hpux\AUTO ==> boot vmunix
Seconds left till autoboot 9
[User Types A Key to Stop the HP-UX Boot Process and Access the HPUX.EFI Loader ]
Type 'help' for help
HPUX>
5.
Issue HP-UX Boot Loader commands at the HPUX> prompt, or enter the EXIT command to
return to the EFI Shell interface.
Refer to the help command or the hpux(1M) manpage for details.
150
Booting and Resetting nPartitions
6.
Exit the console and service processor interfaces if finished using them.
To exit the EFI environment type ^B (Control-B); this exits the nPartition console and returns
to the service processor Main Menu. To exit the service processor, type X at the Main Menu.
Using HP-UX Loader Commands
This section gives details on issuing HP-UX Boot Loader commands using the following two
methods:
•
•
“HPUX.EFI Boot Loader Commands” (page 151) — On HP Integrity servers (Intel®
Itanium®-based systems), you can issue HP-UX Boot Loader commands using HPUX.EFI
(the HPUX> prompt).
“HPUX Boot Loader Commands Issued from ISL” (page 151) — On HP 9000 servers (PA-RISC
systems), you can issue HP-UX Boot Loader commands from the HP-UX Initial System
Loader (the ISL> prompt).
HPUX.EFI Boot Loader Commands
On HP Integrity servers, you can issue HP-UX Boot Loader commands using HPUX.EFI (the
HPUX> prompt), as described in the following procedure.
Procedure 5-52 Issuing HP-UX Boot Loader Commands (HP Integrity Servers)
Issue HP-UX Loader commands directly from the HPUX> prompt. The EFI system boot
environment and HPUX.EFI boot loader are available only on HP Integrity systems.
1.
Access the nPartition console, EFI Shell, and desired boot device, then boot to the HP-UX
Loader (HPUX.EFI) interface.
See “HPUX.EFI Access: Booting to the HP-UX Loader (EFI Boot Manager or EFI Shell)”
(page 150) for details.
2.
Issue HP-UX Loader commands directly from the HPUX> prompt.
For example, to list files in /stand enter: ls
To exit the HP-UX Loader interface, enter the EXIT command to return to the EFI Shell
environment.
Refer to the help command or the hpux(1M) manpage for command details.
3.
Exit the console and service processor interfaces if finished using them.
To exit the EFI environment type ^B (Control-B); this exits the nPartition console and returns
to the service processor Main Menu. To exit the service processor, type X at the Main Menu.
HPUX Boot Loader Commands Issued from ISL
On HP 9000 servers, you can issue HP-UX Boot Loader commands from the HP-UX Initial System
Loader (the ISL> prompt), as described in the following procedure.
Procedure 5-53 Issuing HP-UX Boot Loader Commands (HP 9000 Servers)
Issue HP-UX Loader commands from the ISL prompt by prefacing them with "hpux". The BCH
Menu and ISL interface are available only on HP 9000 systems.
1.
Access the nPartition console, use the BOOT command to boot the desired device, then
interrupt the boot process at the ISL interface.
See “Initial System Loader (ISL) Booting of HP-UX” (page 149) for details.
2.
Issue HP-UX Loader commands by prefacing them with "hpux" so that ISL invokes the hpux
secondary system loader to execute the commands you specify.
From ISL issue HP-UX loader commands in the following form:
hpux command
Using HP-UX Loader Commands
151
where command is one of the the hpux secondary system loader commands.
For example: enter hpux ls to issue the ls command.
Refer to the isl(1M) and hpux(1M) manpages for details.
3.
Exit the console and service processor interfaces if finished using them.
To exit the BCH environment type ^B (Control-B); this exits the nPartition console and
returns to the service processor Main Menu. To exit the service processor, type X at the Main
Menu.
Booting to the Linux Loader (ELILO.EFI)
On HP Integrity servers you can access the Linux loader (ELILO.EFI) by using the following
procedure to boot ELILO.EFI and type any key to stop the boot process at the "ELILO boot"
prompt.
From ELILO you can boot Linux, list devices and configuration entries, or exit ELILO by typing
Esc (the escape key) then Enter.
The ELILO loader and configuration files are at the following locations on the EFI System Partition
for the Linux boot device.
• ELILO Loader Files for Red Hat Enterprise Linux On a Red Hat Enterprise Linux boot device
EFI System Partition, the full paths to the loader and configuration files are: \EFI\redhat\
elilo.efi and \EFI\redhat\elilo.conf
•
ELILO Loader Files for SuSE Linux Enterprise Server On a SuSE Linux Enterprise Server boot
device EFI System Partition, the full paths to the loader and configuration files are: \efi\
SuSE\elilo.efi and \efi\SuSE\elilo.conf
NOTE: The Linux loader (ELILO.EFI) is available only on HP Integrity servers (Intel®
Itanium®-based systems).
See “Using Linux Loader (ELILO) Commands” (page 154) for details on issuing Linux loader
commands. Also see “Linux Boot Option Management” (page 153) for information about ELILO
and elilo.conf.
Procedure 5-54 Linux Loader (ELILO.EFI) Booting and Access
Use this procedure to access the ELILO Linux loader.
1.
Load the ELILO.EFI Linux loader.
Either select a Linux entry from the EFI Boot Manager menu (the boot options list for the
nPartition), or invoke the ELILO.EFI Linux loader from the EFI Shell.
2.
Type any key when the "ELILO boot" prompt is displayed to stop the boot process at
ELILO.
After you type a key (for example, space) the ELILO loader remains at the "ELILO boot"
prompt, rather than loading the default Linux kernel entry in the elilo.conf file.
3.
Issue ELILO loader commands or enter the kernel path or label (from the elilo.conf file)
that you wish to boot.
To exit the ELILO loader, type Esc then Enter at the "ELILO boot" prompt. To list labels
in the current elilo.conf file, type Tab. For details see “Using Linux Loader (ELILO)
Commands” (page 154).
152
Booting and Resetting nPartitions
Linux Boot Option Management
You can manage Linux boot options by interacting with the Linux loader interface (elilo.efi,
the "ELILO boot" prompt) and by editing the Linux loader configuration file (elilo.conf).
•
The elilo.efi Linux loader boots a Linux kernel and can apply boot options that are
specified in an elilo.conf file entry or are manually specified.
— You can select any of the Linux kernel boot configuration entries in the boot device's
elilo.conf file. To select a boot entry, enter its label at the "ELILO boot" prompt
along with any additional boot options to be passed to the kernel.
— You also can directly specify a kernel file to be loaded at the "ELILO boot" prompt
along with any kernel boot options.
See “Using Linux Loader (ELILO) Commands” (page 154) for details.
•
The elilo.conf Linux loader configuration file defines the kernel boot configurations that
are available to be selected from a Linux boot device.
Each boot configuration has a multiple-line entry in the elilo.conf file that included the
label used to identify the entry, the kernel image to be booted, and other details such as
kernel boot options.
This file also can specify the default boot entry to be loaded from the boot device and the
amount of time given before automatically loading the default.
See “Linux Loader Configuration File (elilo.conf)” (page 153) for details.
Refer to the following Linux manpages for more details, but note that specific details may differ
on your particular system:
bootparam(7) — Introduction to Linux boot time kernel parameters.
grubby(8) — Information about boot loader configuration files.
init(8) — Introduction to process initialization and runlevel details.
Linux Loader Configuration File (elilo.conf)
Boot configuration entries in the elilo.conf file enable you to establish a collection of bootable
Linux configuration, any one of which can be selected at the "ELILO boot" prompt.
CAUTION:
the file.
Save a backup copy of the elilo.conf file before making changes to customize
Sample elilo.conf File The following sample elilo.conf file has two boot entries, labeled
"linux" and "linux-up".
prompt
timeout=50
default=linux
image=vmlinuz-2.4.18-e.12smp
label=linux
initrd=initrd-2.4.18-e.12smp.img
read-only
root=/dev/sda2
append="console=ttyS0"
image=vmlinuz-2.4.18-e.12
label=linux-up
initrd=initrd-2.4.18-e.12.img
read-only
root=/dev/sda2
append="console=ttyS0"
Booting to the Linux Loader (ELILO.EFI)
153
elilo.conf File Boot Options You can specify the following options, among others, in an
elilo.conf file to configure a Linux device's boot behavior. For more details refer to the
documentation for the Linux distribution you are using.
• prompt — Specifies to make the "ELILO boot" prompt available without requiring anything
to be typed.
• timeout=tsecs — Sets the timeout duration in tenths of seconds. Following the timeout period,
either the default boot entry is selected, or if no default is specified the first boot entry is
selected.
• default=name — Sets the boot option entry that is selected by default. The name listed
must match the name specified by a label option in the same elilo.conf file. When no
default is specified, then the first boot entry is chosen if no other boot entry is requested.
• image=kernel — Specifies the Linux kernel to boot. Typically, the kernel specified is a vmlinuz
file. For example, the file vmlinuz-2.4.18-e.12smp is a kernel that resides on the EFI
partition as \efi\redhat\vmlinuz-2.4.18-e.12smp.
• label=name — The name defined by the label option is the identifier you can reference
to invoke the boot entry for loading.
You can use the specified name at the "ELILO boot" prompt, or in a default option line
in the same elilo.conf file, to cause the boot entry to be used for loading Linux.
•
•
•
•
initrd=image — Specifies the initial RAM disk image used to initialize and start services
for booting the Linux kernel. The image file typically resides on the EFI partition in the same
directory as the corresponding Linux kernel file specified by the image option.
read-only — Specifies that the root disk partition (specified by the root option) cannot
be modified during the Linux boot process.
root=diskptn — Indicates which device (diskptn) to mount as the root disk partition.
append="options" — Specifies boot-time kernel options that are passed to the Linux kernel
when it is loaded.
Using Linux Loader (ELILO) Commands
You can control the Linux boot process by using the ELILO Linux loader commands to select a
non-default Linux boot configuration, specify additional boot options, or load a Linux kernel
whose path you explicitly specify.
See “Booting to the Linux Loader (ELILO.EFI)” (page 152) for details on accessing ELILO, using
ELILO and elilo.conf, and managing the elilo.conf file.
ELILO Linux Loader Commands The following commands are available for use when interacting
with the ELILO Linux loader (the "ELILO boot" prompt).
Exit the ELILO Linux loader.
Esc Enter
Tab
List all entries (labels) in the current elilo.conf file.
? (question mark)
List all disk devices available to the ELILO Linux loader.
Linux Booting Using ELILO Commands and Options The following list describes uses of ELILO
to load Linux.
• Select a non-default Linux boot configuration to be loaded.
1. Access the "ELILO boot" prompt.
2. Type the Tab key to list all boot configuration entries in the elilo.conf file.
3. Enter the name of the boot entry you want to load.
ELILO boot: Tab
linux linux-up
(or any kernel file name: [dev_name:]/path/file)
ELILO boot: linux-up
154
Booting and Resetting nPartitions
Uncompressing Linux... done
Loading initrd initrd-2.4.18-e.12.img...done
•
Specify additional boot options when loading a Linux boot configuration.
1. Access the "ELILO boot" prompt.
2. Type the Tab key to list all boot configuration entries in the elilo.conf file.
3. Enter the name of the boot entry you want to load, followed by any additional boot
options to apply. See bootparam(7) or other Linux manpages for details on kernel boot
options.
ELILO boot: linux S
Uncompressing Linux... done
Loading initrd initrd-2.4.18-e.12smp.img...done
•
Load a kernel by explicitly specifying the kernel path and any boot options to be used.
1. Access the "ELILO boot" prompt.
2. Type ? (question mark) to list all boot devices.
3. Enter the full path to the Linux kernel you wish to load, and specify any kernel boot
options to apply.
ELILO boot: scsi0:/efi/redhat/vmlinuz-2.4.18-e.12 root=/dev/sda2 console=ttyS0
Uncompressing Linux... done
Linux version 2.4.18-e.12 ([email protected]) (gcc version 2.96 2
0000731 (Red Hat Linux 7.2 2.96-112.7.2)) #1 Thu Oct 17 15:22:28 EDT 2002
Configuring Boot Paths and Options
You can configure boot paths and boot options by using any one of the following procedures:
•
•
•
•
•
•
•
•
“Configuring Boot Paths and Options (BCH Menu)” (page 155)
“Configuring Boot Paths and Options (EFI Boot Manager)” (page 156)
“Configuring Boot Paths and Options (EFI Shell)” (page 157)
“Configuring Boot Paths and Options (HP-UX)” (page 157)
“Adding an HP-UX Boot Option” (page 109)
“Adding an HP OpenVMS Boot Option” (page 120)
“Adding a Microsoft Windows Boot Option” (page 125)
“Adding a Linux Boot Option” (page 130)
CAUTION: The nPartition ACPI configuration must be set to the proper value for the operating
system when configuring boot options on HP Integrity servers. This must be done for the device
paths to be properly established in the boot options list. Use the acpiconfig command to check
and set this value. For details refer to “ACPI Configuration Value—HP Integrity Server OS Boot”
(page 92).
Procedure 5-55 Configuring Boot Paths and Options (BCH Menu)
Use the PATH command from the BCH Main Menu to configure boot paths for an nPartition.
The BCH Menu is available only on HP 9000 systems.
1.
Access the BCH Main Menu for the nPartition whose boot paths and options you want to
configure.
Login to the service processor (MP or GSP) and enter CO to access the Console list. Select
the nPartition console. When accessing the console, confirm that you are at the BCH Main
Menu (the Main Menu: Enter command or menu> prompt). If at a BCH menu other
than the Main Menu, then enter MA to return to the BCH Main Menu.
2.
At the BCH Main menu, set the boot path values using the PATH command.
To list the current boot path settings, enter PATH with no arguments.
Configuring Boot Paths and Options
155
To set a boot path, enter PATH VAR hwpath, where VAR is the boot path variable (PRI,
HAA, or ALT) and hwpath is a boot device hardware path.
For example, to set the PRI boot path to a new value (4/0/2/0/0.10, in this case) enter PATH
PRI 4/0/2/0/0.10, as shown below.
Main Menu: Enter command or menu > PATH PRI 4/0/2/0/0.10.0
Primary Boot Path:
4/0/2/0/0.10
4/0/2/0/0.a
(hex)
Main Menu: Enter command or menu >
3.
Exit the console and service processor interfaces if finished using them.
To exit the BCH environment type ^B (Control-B); this exits the nPartition console and
returns to the service processor Main Menu. To exit the service processor, type X at the Main
Menu.
Procedure 5-56 Configuring Boot Paths and Options (EFI Boot Manager)
From the EFI Boot Manager environment, use the use Boot Option Maintenance operations to
add or delete boot options, or to change the order of items in the boot options list. The EFI Boot
Manager is available only on HP Integrity systems.
1.
Access the EFI Boot Manager menu for the nPartition whose boot paths (the EFI boot options
list items) and options you want to configure.
Login to the service processor (MP or GSP) and enter CO to access the Console list. Select
the nPartition console.
When accessing the console, confirm that you are at the EFI Boot Manager menu (the main
EFI menu). If at another EFI menu, select the Exit option from the sub-menus until you
return to the screen with the EFI Boot Manager heading.
2.
3.
Select the Boot Option Maintenance option from the main EFI Boot Manager menu.
At the Boot Option Maintenance menu use the Add a Boot Option, Delete Boot Option(s),
and Change Boot Order menu items to add or delete boot options or change the order of
items in the boot options list.
EFI Boot Maintenance Manager ver 1.10 [14.60]
Main Menu. Select an Operation
Boot from a File
Add a Boot Option
Delete Boot Option(s)
Change Boot Order
Manage BootNext setting
Set Auto Boot TimeOut
Select Active Console Output Devices
Select Active Console Input Devices
Select Active Standard Error Devices
Cold Reset
Exit
4.
Exit the console and service processor interfaces if finished using them.
To exit the EFI environment type ^B (Control-B); this exits the nPartition console and returns
to the service processor Main Menu. To exit the service processor, type X at the Main Menu.
156
Booting and Resetting nPartitions
Procedure 5-57 Configuring Boot Paths and Options (EFI Shell)
From the EFI Shell environment, use the bcfg command to add or delete boot options, or to
change the order of items in the boot options list. The EFI Shell is available only on HP Integrity
systems.
1.
Access the EFI Shell environment for the nPartition whose boot paths (the EFI boot options
list items) and options you want to configure.
Login to the service processor (MP or GSP) and enter CO to access the Console list. Select
the nPartition console.
When accessing the console, confirm that you are at the EFI Boot Manager menu (the main
EFI menu). If at another EFI menu, select the Exit option from the sub-menus until you
return to the screen with the EFI Boot Manager heading.
From the EFI Boot Manager menu, select the EFI Shell menu option to access the EFI Shell
environment.
2.
At the EFI Shell environment, use the bcfg command to manage the boot options list for
the local nPartition.
The bcfg command include the following options for managing the boot options list:
•
•
•
•
bcfg boot dump — Display all items in the boot options list for the local nPartition.
bcfg boot rm # — Remove the item number specified by # from the boot options
list.
bcfg boot mv #a #b — Move the item number specified by #a to the position specified
by #b in the boot options list.
bcfg boot add # file.efi "Description" — Add a new boot option to the position in
the boot options list specified by #. The new boot option references file.efi and is listed
with the title specified by Description.
See the help bcfg command for details.
3.
Exit the console and service processor interfaces if finished using them.
To exit the EFI environment type ^B (Control-B); this exits the nPartition console and returns
to the service processor Main Menu. To exit the service processor, type X at the Main Menu.
Procedure 5-58 Configuring Boot Paths and Options (HP-UX)
From the HP-UX command line you can configure boot options for an nPartition by using the
/usr/sbin/setboot or /usr/sbin/parmodify command.
NOTE: On HP Integrity systems, the boot options list for only the local nPartition may be
displayed and modified.
1.
Login to HP-UX running on the nPartition whose boot paths and options you want to
configure.
On HP-UX B.11.11 nPartition systems, you can configure boot paths for any nPartition in
the complex, including remote nPartitions.
On HP-UX running on cell-based HP Integrity servers, you can configure boot paths (the
EFI boot options list items) for only the local nPartition.
Configuring Boot Paths and Options
157
2.
Configure boot path settings using the parmodify -p#... command.
Use the following commands to set the boot path variables for a specified partition number
(-p#):
•
PRI path— parmodify -p# -b PRI where PRI is the hardware path.
•
HAA path—parmodify -p# -s HAA where HAA is the hardware path.
•
ALT path—parmodify -p# -t ALT where ALT is the hardware path.
If using the setboot command to set boot paths for the local nPartition, you can specify
setboot -p PRI or the setboot -a ALT command. You also can set the HAA boot path
using the setboot -h HAA command.
You can list the current boot path settings for an nPartition by issuing the parstatus -V
-p# | grep Path command and specifying the partition number (-p#). The setboot
command with no arguments lists the PRI and ALT settings for the local nPartition as well
as the PRI path flags (boot actions) for the local nPartition.
For example, to set the PRI boot path to 0/0/4/0/0.8.0 and the HAA boot path to 0/0/4/0/0.9.0
for partition number 0, issue the parmodify -p0 -b 0/0/4/0/0.8.0 -s
0/0/4/0/0.9.0 command, as shown below.
# parmodify -p0 -b 0/0/4/0/0.8.0 -s 0/0/4/0/0.9.0
Command succeeded.
#
Boot Path Notes for HP Integrity servers On HP Integrity servers, parmodify and setboot
considers the first item in the boot options list to be the PRI boot path, the second item to
be the HAA boot path, and the third boot option list item to be the ALT boot path. When you
use parmodify or setboot to configure the first (PRI) or second (HAA) or third (ALT) item
in the boot options list, the new device path that you specify either replaces the original boot
option, or it is inserted in the original item's place (with the original item being shifted
toward the end of the boot options list):
• If the boot option currently is not set to an HP-UX device, the new boot device path is
inserted as a new item in the boot options list.
In this case the original list item, if any, moves toward the end of the boot options list
and the new boot device path becomes the first (PRI) or second (HAA) or third (ALT)
item in the list, as specified by parmodify or setboot.
•
•
If the boot option currently is set to an HP-UX device and the list item has the standard
description (such as "HP-UX Primary Boot" for PRI, or "HP-UX Alternate Boot" for ALT)
then the new boot device path replaces the original item in the boot options list.
If the boot option currently is set to an HP-UX device and the list item's description is
not standard for its place in the boot options list, then the new boot device setting is
inserted as a new item in the boot options list.
In this case the original list item is moved toward the end of the boot options list.
Configuring Autoboot Options
You can configure autoboot options by using any one of the following procedures:
•
•
•
•
158
“Configuring Autoboot Options (BCH Menu)” (page 159)
“Configuring Autoboot Options (EFI Boot Manager)” (page 159)
“Configuring Autoboot Options (EFI Shell)” (page 160)
“Configuring Autoboot Options (HP-UX)” (page 161)
Booting and Resetting nPartitions
Procedure 5-59 Configuring Autoboot Options (BCH Menu)
From the BCH Menu, use the PATHFLAGS command at the BCH Configuration menu to set the
boot-time actions for an nPartition. The BCH Menu is available only on HP 9000 systems.
1.
Access the BCH Main Menu for the nPartition whose autoboot options you want to configure.
Login to the service processor (MP or GSP) and enter CO to access the Console list. Select
the nPartition console. When accessing the console, confirm that you are at the BCH Main
Menu (the Main Menu: Enter command or menu> prompt). If at a BCH menu other
than the Main Menu, then enter MA to return to the BCH Main Menu.
2.
Access the BCH Configuration menu by entering CO at the Main menu, and set the boot
action for each boot path, as desired, by using the PATHFLAGS command.
At the BCH Configuration menu, you can list the path flags (boot actions) for all boot path
variables by entering PATHFLAGS with no arguments.
To set the boot action for each of the boot paths, enter PATHFLAGS VAR action, where
VAR is the boot path variable (PRI, HAA, or ALT) and action is the boot action (0 for "go to
BCH", 1 for "boot, if fail go to BCH", 2 for "boot, if fail try next path", or 3 for "skip this path,
try next path").
For example, to configure an nPartition to boot from the PRI device or (if PRI fails to boot)
the HAA device, use the following two BCH Configuration commands: PATHFLAGS PRI
2 and PATHFLAGS HAA 1, as shown below.
Configuration Menu: Enter command > PATHFLAGS PRI 2
Primary Boot Path Action
Boot Actions: Boot from this path.
If unsuccessful, go to next path.
Configuration Menu: Enter command > PATHFLAGS HAA 1
HA Alternate Boot Path Action
Boot Actions: Boot from this path.
If unsuccessful, go to BCH.
Configuration Menu: Enter command >
For other help in setting path flags, enter HELP PATHFLAGS at the BCH Configuration menu
prompt.
3.
Exit the console and service processor interfaces if finished using them.
To exit the BCH environment type ^B (Control-B); this exits the nPartition console and
returns to the service processor Main Menu. To exit the service processor, type X at the Main
Menu.
Procedure 5-60 Configuring Autoboot Options (EFI Boot Manager)
From the EFI Boot Manager environment use the Boot Option Maintenance→Set Auto Boot
TimeOut menu operation to configure an nPartitions autoboot setting. The EFI Boot Manager is
available only on HP Integrity systems.
1.
Access the EFI Boot Manager menu for the nPartition whose autoboot options you want to
configure.
Login to the service processor (MP or GSP) and enter CO to access the Console list. Select
the nPartition console.
When accessing the console, confirm that you are at the EFI Boot Manager menu (the main
EFI menu). If at another EFI menu, select the Exit option from the sub-menus until you
return to the screen with the EFI Boot Manager heading.
2.
Select the Boot Option Maintenance option from the main EFI Boot Manager menu.
Configuring Autoboot Options
159
3.
4.
Select the Set Auto Boot TimeOut menu operation from the Boot Option Maintenance
menu.
At the Set Auto Boot TimeOut menu, either disable autoboot by selecting the Delete/Disable
Timeout menu item, or enable autoboot by setting the autoboot timeout through the Set
Timeout Value menu item.
When autoboot is enabled on an HP Integrity server, the local nPartition boot options are
attempted to be loaded automatically at boot time, starting with the first item in the boot
options list.
See the Help menu for details.
EFI Boot Maintenance Manager ver 1.10 [14.60]
Set Auto Boot Timeout. Select an Option
Set Timeout Value
Delete/Disable Timeout
Help
Exit
5.
Exit the console and service processor interfaces if finished using them.
To exit the EFI environment type ^B (Control-B); this exits the nPartition console and returns
to the service processor Main Menu. To exit the service processor, type X at the Main Menu.
Procedure 5-61 Configuring Autoboot Options (EFI Shell)
From the EFI Shell environment configure the autoboot setting for the local nPartition by using
the autoboot command. The EFI Shell is available only on HP Integrity systems.
1.
Access the EFI Shell environment for the nPartition whose autoboot options you want to
configure.
Login to the service processor (MP or GSP) and enter CO to access the Console list. Select
the nPartition console.
When accessing the console, confirm that you are at the EFI Boot Manager menu (the main
EFI menu). If at another EFI menu, select the Exit option from the sub-menus until you
return to the screen with the EFI Boot Manager heading.
From the EFI Boot Manager menu, select the EFI Shell menu option to access the EFI Shell
environment.
2.
At the EFI Shell environment, use the autoboot command to enable or disable autoboot
for the nPartition.
When autoboot is enabled for an nPartition in an HP Integrity server, items in the boot
options list are attempted to be loaded automatically at boot time, starting with the first
item in the boot options list.
Enter the autoboot command with no arguments to list the current autoboot configuration
for the local nPartition.
You also can specify off to disable autoboot, or specify a timeout duration to enable autoboot
with a specific number of seconds during which automatic booting from the boot options
list can be canceled.
For example: autoboot off to disable autoboot, or autoboot 60 to enable autoboot
with a 60-second timeout period.
See the help autoboot command for details.
3.
Exit the console and service processor interfaces if finished using them.
To exit the EFI environment type ^B (Control-B); this exits the nPartition console and returns
to the service processor Main Menu. To exit the service processor, type X at the Main Menu.
160
Booting and Resetting nPartitions
Procedure 5-62 Configuring Autoboot Options (HP-UX)
From the HP-UX command line use the setboot -b on or setboot -b off command, to
turn on (enable) or turn off (disable) autoboot.
1.
2.
Login to HP-UX running on the nPartition whose autoboot options you want to configure.
On HP Integrity servers only, the setboot -b on command enables autoboot, and the
setboot -b off command disables autoboot.
When autoboot is enabled for an nPartition in an HP Integrity server, items in the boot
options list are attempted to be loaded automatically at boot time, starting with the first
item in the boot options list.
3.
On HP 9000 servers only, the setboot command configures the boot action for the PRI
boot path.
Configure the PRI boot action for the local nPartition by using the setboot -b Autoboot
-s Autosearch command.
The setboot command supports the following options for setting local nPartition boot
actions:
-b
Autoboot setting for the local nPartition:
-b on to automatically boot the PRI path.
-b off to not boot PRI.
-s
Autosearch setting for the local nPartition:
-s on to attempt to perform the HAA path boot action when PRI is not booted (either
when -b is off, or when PRI fails to boot when -b is on).
-s off to never attempt to perform the HAA action.
For example, to always stop the local nPartition at BCH when booting, issue the setboot
-b off -s off command.
Configuring Boot-Time System Tests
You can configure boot-time system tests (self tests) for an nPartition by using any one of the
following procedures:
•
•
•
•
“Configuring Boot-Time System Tests (BCH Menu)” (page 161)
“Configuring Boot-Time System Tests (EFI Shell)” (page 162)
“Configuring Boot-Time System Tests (HP-UX B.11.11)” (page 163)
“Configuring Boot-Time System Tests (HP-UX B.11.23 and HP-UX 11.31)” (page 164)
Procedure 5-63 Configuring Boot-Time System Tests (BCH Menu)
From the BCH Configuration Menu use the FASTBOOT command to configure fast boot settings
for an nPartition. The BCH interface is available only on HP 9000 systems.
1.
Access the BCH Main Menu for the nPartition whose boot-time tests you want to configure.
Login to the service processor (MP or GSP) and enter CO to access the Console list. Select
the nPartition console. When accessing the console, confirm that you are at the BCH Main
Menu (the Main Menu: Enter command or menu> prompt). If at a BCH menu other
than the Main Menu, then enter MA to return to the BCH Main Menu.
2.
At the BCH Configuration menu use the FASTBOOT command to list or configure the
nPartition fast boot settings.
Enter FASTBOOT with no arguments to display the current fast boot settings. This lists which
self tests are set to be performed or skipped.
Configuring Boot-Time System Tests
161
NOTE:
HP recommends that all self tests be performed for all nPartitions.
To enable all tests for an nPartition, use the FASTBOOT RUN command at the BCH
Configuration menu.
To disable an individual test, enter FASTBOOT test SKIP, where test is the name of the self
test ("PDH", "EARLY", or "LATE").
To enable an individual test, enter FASTBOOT test RUN.
For details on setting self tests, enter HELP FASTBOOT at the Configuration menu.
3.
Exit the console and service processor interfaces if finished using them.
To exit the BCH environment type ^B (Control-B); this exits the nPartition console and
returns to the service processor Main Menu. To exit the service processor, type X at the Main
Menu.
Procedure 5-64 Configuring Boot-Time System Tests (EFI Shell)
From the EFI Shell environment use the boottest command to manage the self test configuration
for the local nPartition. The EFI Shell is available only on HP Integrity systems.
1.
Access the EFI Shell environment for the nPartition whose boot-time tests you want to
configure.
Login to the service processor (MP or GSP) and enter CO to access the Console list. Select
the nPartition console.
When accessing the console, confirm that you are at the EFI Boot Manager menu (the main
EFI menu). If at another EFI menu, select the Exit option from the sub-menus until you
return to the screen with the EFI Boot Manager heading.
From the EFI Boot Manager menu, select the EFI Shell menu option to access the EFI Shell
environment.
2.
At the EFI Shell environment use the boottest command to list, enable, or disable boot-time
system tests for the local nPartition.
To display the list of supported boot-time system tests, enter the boottest -h command
at the EFI Shell prompt.
Shell> boottest -h
Usage: BOOTTEST [on|off] | [[test] [on|off]]
test : early_cpu, late_cpu, platform, chipset
io_hw, mem_init, mem_test
Shell>
You can enable or disable any of the boot-time tests by specifying the name of the test to
boottest. The test names include: early_cpu, late_cpu, platform, chipset, io_hw,
mem_init, and mem_test.
System Tests: Configuring and Deconfiguring Tests from the EFI Shell
• boottest — Display the current boot-time system test configuration.
• boottest testname — Display the current setting for the specified test (testname).
For example: boottest mem_test displays the memory selftest settings.
•
boottest on — Enable all boot-time system tests.
Enabling all tests is recommended.
•
boottest off — Disable all boot-time system tests.
Disabling all selftests is usually not recommended; ordinarily all tests are enabled.
162
Booting and Resetting nPartitions
•
boottest testname on — Enable the specified test (testname).
For example: boottest io_hw on enables I/O hardware selftests.
•
boottest testname off — Disable the specified test (testname).
For example: boottest io_hw off disables I/O hardware selftests.
3.
Exit the console and service processor interfaces if finished using them.
To exit the EFI environment type ^B (Control-B); this exits the nPartition console and returns
to the service processor Main Menu. To exit the service processor, type X at the Main Menu.
Procedure 5-65 Configuring Boot-Time System Tests (HP-UX B.11.11)
From the HP-UX B.11.11 command line use the setboot command to configure the self test
configuration for an nPartition.
1.
2.
Login to HP-UX running on the nPartition whose boot-time tests you want to configure.
Enter the setboot -v command to list the current self test configuration for the local
nPartition.
The self test details listed by setboot -v include:
TEST—The keyword names of self tests that you can enable or disable.
CURRENT—The test setting in stable storage for the nPartition: on means the test is normally
executed on each boot, off means the test is normally omitted on each boot, partial means
some subtests normally are executed on each boot. This may differ from the NEXT BOOT
settings.
SUPPORTED—Whether the server supports the test completely (yes), partially (partial),
or not at all (no).
DEFAULT—The default setting for the test, either on, off, or partial.
NEXT BOOT—The self test behavior for the next boot of the nPartition only. If these settings
differ from CURRENT, then the CURRENT settings are reestablished after the next boot.
The following example shows setboot -v output for an nPartition in an HP 9000 server.
# setboot -v
Primary bootpath : 0/0/6/0/0.6.0
Alternate bootpath : 0/0/1/0/0.8.0
Autoboot is OFF (disabled)
Autosearch is OFF (disabled)
Note: The interpretation of Autoboot and Autosearch has changed for
systems that support hardware partitions. Please refer to the manpage.
TEST
CURRENT
SUPPORTED
DEFAULT
NEXT BOOT
-------------------------------all
partial
partial
partial
partial
SELFTESTS
on
yes
on
on
early_cpu
on
yes
on
on
late_cpu
on
yes
on
on
FASTBOOT
partial
partial
partial
partial
full_memory off
no
off
off
PDH
on
yes
on
on
CEC
off
no
off
off
#
Configuring Boot-Time System Tests
163
3.
Use the setboot... command to enable or disable boot-time self tests for the local
nPartition.
You can use the following commands to configure tests:
setboot -t test_name=[on|off|default]
setboot -T test_name=[on|off|default]
test_name is the name of the self test ("PDH", "early_cpu", "late_cpu") or is "all" (for all tests).
The setboot command's -t option changes the test setting in stable storage and affects all
following boots. The -T option changes the test setting for the next boot only.
NOTE:
HP recommends that all self tests be performed for all nPartitions.
To enable all tests for an nPartition, use the following command: setboot -t all=on
For example, to enable the early CPU tests and PDH tests but disable the late CPU tests issue
the following command:
setboot -t early_cpu=on -t PDH=on -t late_cpu=off
This changes the settings for these tests in stable storage for the nPartition and uses these
test configurations for all following boots.
After modifying the self test configuration for an nPartition, you can list the new settings
with the setboot -v command.
For more details refer to the setboot(1M) manpage.
Procedure 5-66 Configuring Boot-Time System Tests (HP-UX B.11.23 and HP-UX 11.31)
From the HP-UX B.11.23 or HP-UX 11.31 command line use the setboot command to configure
the self test configuration for an nPartition.
1.
2.
Login to HP-UX running on the nPartition whose boot-time tests you want to configure.
Enter the setboot -v command to list the current self test configuration for the local
nPartition.
The self test details listed by setboot -v include:
TEST—The keyword names of self tests that you can enable or disable.
CURRENT—The setting for the test in stable storage for the nPartition: on means the test is
normally executed on each boot, off means the test is normally omitted on each boot,
partial means some subtests normally are executed on each boot.
DEFAULT—The default setting for the test, either on, off, or partial.
3.
Use the setboot... command to enable or disable boot-time self tests for the local
nPartition.
You can use the following command to configure tests on HP Integrity systems:
setboot -T test_name=[on|off|default]
test_name is the name of the self test or is "all" (for all tests).
The -T option changes the test setting for the next boot only.
NOTE:
The setboot command's -t option is not supported for HP Integrity systems.
After modifying the self test configuration for an nPartition, you can list the new settings
with the setboot -v command.
For more details refer to the setboot(1M) manpage.
164
Booting and Resetting nPartitions
6 Creating and Configuring nPartitions
This chapter has procedures for creating, configuring, and managing nPartitions on
Hewlett-Packard servers that support them.
For an introduction to nPartition features, see Chapter 1 (page 15).
For nPartition configuration requirements and recommendations, see Chapter 3 (page 61).
Tools for Configuring nPartitions
You can configure and manage nPartitions using the tools listed here.
•
Service Processor (MP or GSP) Menus
Service processor menus provide a complex-wide service interface that can allow access to
all hardware and nPartitions.
See “Command Reference for Service Processor Commands” (page 80).
•
EFI Boot Manager and EFI Shell
On HP Integrity servers only, the EFI (Extensible Firmware Interface) Boot Manager and
Shell are the methods for interacting with an nPartition before it has booted an operating
system.
See “Command Reference for EFI Shell Commands” (page 81).
•
Boot Console Handler (BCH) Menu Commands
On PA-RISC servers, the BCH interface is the method for interacting with an nPartition
before it has booted an operating system.
See “Command Reference for BCH Menu Commands” (page 84).
•
nPartition Commands
HP nPartition commands allow you to configure, manage, and monitor nPartitions and
hardware within a server complex.
The Enhanced nPartition Commands also can remotely manage complexes based on the HP
sx1000 chipset or HP sx2000 chipset.
See “Commands for Configuring nPartitions” (page 19) for details.
•
Partition Manager (/opt/parmgr/bin/parmgr)
Partition Manager provides a graphical interface for managing and monitoring nPartitions
and hardware within a server complex.
See “Partition Manager” (page 22).
Task Summaries for Creating and Configuring nPartitions
Table 6-1 describes the main nPartition configuration tasks and provides brief summaries and
references for detailed procedures.
You can perform the tasks in Table 6-1 “nPartition Configuration Task Summaries” using various
tools, including the service processor (MP or GSP), Boot Console Handler (BCH, available only
on PA-RISC servers), Extensible Firmware Interface (EFI, available only on HP Integrity servers),
nPartition commands, or Partition Manager (/opt/parmgr/bin/parmgr).
See “Tools for Configuring nPartitions” (page 165) for details.
Tools for Configuring nPartitions
165
Table 6-1 nPartition Configuration Task Summaries
Task
Summary
“Creating a Genesis
Partition”
• Creating a Genesis Partition overwrites all nPartition-related complex profile data for
the server and establishes one single-cell nPartition.
• Service Processor (MP or GSP): CC command.
See “Creating a Genesis Partition” (page 170).
“Creating a New
nPartition”
• nPartition Commands: parcreate command.
• Partition Manager:
— Version 1.0 — Partition→Create Partition action.
— Version 2.0 — nPartition→Create nPartition action.
See “Creating a New nPartition” (page 172).
“Removing (Deleting) an
• NOTE: When an inactive nPartition is specified to be removed, its removal occurs
nPartition”
immediately. When an active nPartition is specified to be removed, for the nPartition
removal (deletion) to occur, the nPartition must be put into a shutdown for reconfig
state (HP-UX: shutdown -R -H; Windows: shutdown /s; Linux: shutdown -h
time; OpenVMS: @SYS$SYSTEM:SHUTDOWN with no automatic system reboot then
MP Command menu RR command).
• nPartition Commands: parremove -p# command removes the specified nPartition
(-p#, where # is the nPartition number).
When removing an active nPartition you must specify the -F option.
• Partition Manager:
— Version 1.0 — Select an nPartition, then select the Partition→Delete Partition
action.
— Version 2.0 — Select an nPartition, then select the nPartition→Delete nPartition
action.
See “Removing (Deleting) an nPartition” (page 176).
“Assigning (Adding)
Cells to an nPartition”
• NOTE: When a cell is assigned to an inactive nPartition the assignment completes
immediately. To complete new cell assignments to an active nPartition, you must
perform a reboot for reconfig (HP-UX: shutdown -R; Windows: shutdown /r;
Linux: shutdown -r time; OpenVMS: @SYS$SYSTEM:SHUTDOWN with an automatic
system reboot).
• nPartition Commands: parmodify -p# -a#....command, which adds a cell (-a#,
where # is the cell number) to the specified nPartition (-p#, where # is the nPartition
number).
• Partition Manager:
— Version 1.0 — Select an nPartition, and use the Partition→Modify Partition action,
Add/Remove Cells tab.
— Version 2.0 — Select an nPartition, and use the nPartition→Modify nPartition
action, Add/Remove Cells tab.
See “Assigning (Adding) Cells to an nPartition” (page 179).
166
Creating and Configuring nPartitions
Table 6-1 nPartition Configuration Task Summaries (continued)
Task
Summary
“Unassigning
(Removing) Cells from an • NOTE: When an inactive cell is specified to be removed from an nPartition the
removal occurs immediately. When an active cell is specified to be removed from an
nPartition”
nPartition, to complete the cell removal the nPartition must perform a reboot for
reconfig (HP-UX: shutdown -R; Windows: shutdown /r; Linux: shutdown -r
time; OpenVMS: @SYS$SYSTEM:SHUTDOWN with an automatic system reboot).
• nPartition Commands: parmodify -p# -d#command, which unassigns the cell
(-d#, where # is the cell number) from the specified nPartition (-p#, where # is the
nPartition number).
When removing an active cell, you must specify the -B option if you want the nPartition
to be active after the reboot for reconfig.
• Partition Manager:
— Version 1.0 — Select an nPartition, and use the Partition→Modify Partition action,
Add/Remove Cells tab.
— Version 2.0 — Select an nPartition, and use the nPartition→Modify nPartition
action, Add/Remove Cells tab.
See “Unassigning (Removing) Cells from an nPartition” (page 182).
“Renaming an
nPartition”
• BCH Menu: Configuration menu, PD NewName command, where NewName specifies
the new name for the nPartition. Quotation marks are not needed, even if the name
includes spaces.
• nPartition Commands: parmodify -p# -P name command, where -P name specifies
the new name for the nPartition (-p#, where # is the nPartition number).
If the nPartition name includes spaces you must specify it in quotation mark (for
example: "nPar Name 1").
• Partition Manager:
— Version 1.0 — Partition→Modify Partition , General tab.
— Version 2.0 — nPartition→Modify nPartition , General tab.
See “Renaming an nPartition” (page 185).
“Renaming a Server
Complex”
• nPartition Commands: cplxmodify -N name command.
Only the Enhanced nPartition Commands support the cplxmodify command.
If the complex name includes spaces you must specify it in quotation mark (for example:
"Cplx Name 1").
• Partition Manager: Complex→Set Complex Name action.
See “Renaming a Server Complex” (page 187).
Task Summaries for Creating and Configuring nPartitions
167
Table 6-1 nPartition Configuration Task Summaries (continued)
Task
Summary
“Setting Cell Attributes” • BCH Menu: Configuration menu, CELLCONFIG command to list or set cell
use-on-next-boot values.
• EFI Shell: cellconfig command to list or set cell use-on-next-boot values.
• nPartition Commands: parmodify -p# -m#... command to modify cell attributes
(-m#..., where # is the cell number) for the specified nPartition (-p#, where # is the
nPartition number).
— Original nPartition Commands — For the cell modify (-m) option, specify:
-m#:base:[y|n]:ri
where: # is the cell number, base always is the cell type, the cell use-on-next-boot
value is either y (the default, make active) or n (inactive), and ri always is the cell
failure usage.
For the Original nPartition Commands, all attributes are optional and if not specified
the default values (base:y:ri) are assigned.
— Enhanced nPartition Commands — For the -m option:
-m#:base:[y|n]:ri[:clm]
where all Original nPartition Commands attributes are supported, and clm is the
cell local memory value: the amount of memory on the cell that is not interleaved.
The clm attribute may be an absolute number of GBytes in 0.5 GByte increments,
or a percentage (in 12.5% increments, or in 25% increments for cells with less than
4 GBytes).
• Partition Manager:
— Version 1.0 — Select the nPartition to which the cell belongs, select the
Partition→Modify Partition action, Change Cell Attributes tab, select the cell(s),
and click Modify Cell(s).
— Version 2.0 — Select the nPartition to which the cell belongs, select the
nPartition→Modify nPartition action, and then configure attributes using the Set
Cell Options tab and the Configure Memory tab.
See “Setting Cell Attributes” (page 189).
“Setting nPartition Core
Cell Choices”
• BCH Menu: Configuration menu, COC command.
COC choice cell, where choice is 0-3 (with 0 being the highest-priority choice) and where
cell is the cell number.
• EFI Shell: rootcell command.
rootcell clear to clear the list of preferred core cells.
rootcell c0 c1... to specify up to four choices, with c0 being the highest-priority
choice and c0-c3 being the cell numbers.
• nPartition Commands: parmodify -p# -r# -r#... command to specify up to
four core cell choices (-r#, where # is the cell number) in priority order for the specified
nPartition (-p#, where # is the nPartition number)
• Partition Manager:
— Version 1.0 — Select the nPartition to configure, select the Partition→Modify
Partition action, Core Cell Choices tab.
— Version 2.0 — Select the nPartition to configure, select the nPartition→Modify
nPartition action, Set Cell Options tab, and use the Core Cell Choice column to
set priorities.
See “Setting nPartition Core Cell Choices” (page 194).
168
Creating and Configuring nPartitions
Table 6-1 nPartition Configuration Task Summaries (continued)
Task
Setting nPartition Boot
Paths
Summary
• NOTE: On HP Integrity servers, nPartition boot paths can be listed and configured
only from the local nPartition.
See Chapter 5 (page 87) for detailed nPartition boot configuration tasks and related
information.
• BCH Menu: BCH Main menu, PATH command.
• EFI Boot Manager: Boot Option Maintenance menu.
• EFI Shell: bcfg command.
• HP-UX: setboot command, or parmodify -p# -b... -s... -t... command.
Setting the Date and Time
• NOTE: The Service Processor (MP or GSP) date and time is stored and managed
separately from nPartition times, and each nPartition has independently stored and
managed date and time settings. Changes to the date and time for an nPartition do
not affect other nPartitions or the MP.
• Service Processor (MP or GSP): DATE command configures the MP date and time.
• BCH Menu: Configuration menu, TIME command configures the local nPartitions
date and time. The BCH time is set and presented in GMT (Greenwich mean time).
• EFI Shell: date command and time command configure the local nPartition date and
time. The EFI time is set and presented in GMT (Greenwich mean time).
• HP-UX: date command configures the local nPartition date and time. Use set_parms
timezone to set the HP-UX system time zone.
Restricting nPartition
Configuration Privilege
• NOTE: nPartition Configuration Privilege is supported on servers based on the HP
sx1000 chipset or HP sx2000 chipset.
When the nPartition Configuration Privilege for a complex is restricted the following
nPartition configuration actions are prohibited (except when using the MP IMPI LAN
access):
— Changes to the complex name, cell assignments, and cell local memory parameters.
— Powering on/off non-local cells.
— Changes to Partition Configuration Data for non-local nPartitions.
When nPartition Configuration Privilege is unrestricted the above actions are permitted.
• Service Processor (MP or GSP): the PARPERM command restricts and unrestricts
nPartition Configuration Privilege.
Task Summaries for Creating and Configuring nPartitions
169
Table 6-1 nPartition Configuration Task Summaries (continued)
Task
Configuring Remote
Administration
Summary
• NOTE: This coverage of remote nPartition administration addresses features of HP
Integrity Superdome, rx8620, and rx7620 servers.
• Service Processor (MP or GSP): Remote security features.
— SO command — Set MP security, including IPMI password.
— SA command — Set MP network access, including IMPI LAN.
— PARPERM command — Set nPartition Configuration Privilege.
• HP-UX B.11.23 and HP-UX B.11.31: Features affecting remote administration.
— The /opt/wbem/sbin/cimconfig command lists and sets CIM Server
configuration properties, which determine the types of users and connections
permitted. To list the current properties: cimconfig -l -c command.
— The /opt/wbem/sbin/cimserver command starts and stops the CIM Server.
To stop the CIM Server: cimserver -s command; to start the CIM Server:
cimserver command.
— The /opt/wbem/bin/cimprovider command lists, enables, disables, or removes
CIM provider modules, such as HP_NParProviderModule. To list CIM provider
modules: cimprovider -l -s command.
— The WBEM Services SSL certificates files (client.pem, server.pem) determine
whether a client is trusted to connect to a server.
◦ /var/opt/wbem/client.pem file — The Trust Store file on the local system,
which contains a CERTIFICATE entry from every server to which it is trusted
to connect.
◦ /var/opt/wbem/server.pem file — Contains the PRIVATE KEY and
CERTIFICATE entry for the local system.
— The /opt/parmgr/bin/parmgr command starts or stops the HP-UX
Tomcat-based Servlet Engine, in which Partition Manager runs. To start: parmgr
-s start; to stop: parmgr -s stop; to check status: parmgr -s status; to
restart: parmgr -s restart.
“Unlocking Complex
Profile Entries”
• CAUTION: These commands should only be used when recovering from a hung
complex reconfiguration.
• Service Processor (MP or GSP): RL command.
• HP-UX: parunlock command.
See “Unlocking Complex Profile Entries” (page 198).
“Canceling Pending
Only changes involving the unassignment (deletion) of an active cell from an nPartition
Changes to the Complex can practically be canceled.
Profile”
• Service Processor (MP or GSP): RL command.
• HP-UX: parunlock command.
See “Canceling Pending Changes to the Complex Profile” (page 199).
Restoring the Prior
Complex Profile
• NOTE: All nPartitions in the complex must be inactive (put in a shutdown for reconfig
state) before restoring a prior complex profile.
• Service Processor (MP or GSP): CC command, L option.
Creating a Genesis Partition
Creating a Genesis Partition overwrites all nPartition-related complex profile data for the server
and establishes one single-cell nPartition.
Procedure 6-1 Genesis Partition Creation (Service Processor)
Use the CC command and G option at the service processor Command menu to create a Genesis
Partition on a cell-based server.
170
Creating and Configuring nPartitions
As a result of this procedure, all existing nPartition configurations are deleted and are replaced
with a single, one-cell nPartition (the Genesis Partition).
You can revert to the previous nPartition configuration—if any existed before you created the
Genesis Partition—by using the CC command and L option to restore the last configuration.
1.
Save all current nPartition configuration details, if any nPartitions are configured in the
complex.
Saving the current nPartition information provides you the details you would need to
re-create all nPartitions as they currently exist.
Use the parstatus -V -p# command (or an equivalent Partition Manager procedure) to
save configuration details about each nPartition.
For each nPartition, enter the parstatus -V -p# command to display detailed information
about the partition number (-p#) specified.
2.
Determine which cell will be configured as the Genesis Partition.
The cell must be connected to an I/O chassis. The I/O chassis must have a core I/O card
installed, and it should have a bootable disk (or a method for installing an operating system
and a disk onto which it can be installed).
3.
Ensure that all nPartitions within the complex are in the shutdown for reconfig (inactive)
state.
If an nPartition is running HP-UX, you can shut down the nPartition to the shutdown for
reconfig state by using the shutdown -R -H command.
If an nPartition is running Windows you can put it in a shutdown for reconfig state by using
the shutdown /s command.
Or, you can put an nPartition into the shutdown for reconfig state by using the
RECONFIGRESET command at the BCH interface, the reconfigreset command at the
EFI Shell, or using the RR command at the service processor Command menu.
4.
Login to the service processor (GSP or MP) for the server complex.
Login as a user with administrator privileges, which are required for creating a Genesis
Partition.
5.
6.
Enter CM to access the service processor Command menu.
Issue the CC command, select G for Genesis Complex Profile, and specify the cabinet and
cell slot for the cell that will comprise the Genesis Partition.
GSP:CM> CC
This command allows you to change the complex profile.
WARNING: You must shut down all Protection Domains before executing
this command.
G - Genesis Complex Profile
L - Last Complex Profile
Select Profile: g
Enter Cabinet number: 0
Enter Slot number: 0
Do you want to modify the complex profile? (Y/[N]) y
-> The complex profile will be modified.
GSP:CM>
Creating a Genesis Partition
171
You can confirm that the Genesis Partition was successfully created if the CC command
reports that the "complex profile will be modified".
If the CC command reports "Sorry, command failed", then the Genesis Partition was not
created, possibly because one or more nPartitions are not at the shutdown for reconfig state.
If this is the case, go back to Step 3 and ensure all nPartitions are inactive at the shutdown
for reconfig state.
7.
Issue the BO command to boot the Genesis Partition past its shutdown for reconfig state and
make it an active nPartition.
When a Genesis Partition is created, it remains at boot-is-blocked (in an inactive, shutdown
for reconfig state), so you must boot it manually.
The Genesis Partition always is assigned partition number 0, because when it is created it
is the first and only nPartition in the server complex.
Using the BO command to boot partition 0 will boot the Genesis Partition to its system boot
environment: either Boot Console Handler (BCH, on HP 9000 servers) or Extensible Firmware
Interface (EFI, on HP Integrity servers).
GSP:CM> BO
This command boots the selected partition.
#
--0)
Name
---Partition 0
Select a partition number : 0
Do you want to boot partition number 0,
named Partition 0 ? (Y/[N]) y
-> The selected partition will be booted.
GSP:CM>
8.
Access the console for the Genesis Partition and configure the nPartition as appropriate and
necessary.
From the service processor Command menu, enter MA to return to the Main menu, then
enter CO to access the Console menu. The Genesis Partition is partition 0 and by default is
named "Partition 0".
You will need to set the boot paths or options, any core cell choices, the nPartition name,
and other settings as appropriate. You also may need to add cells to the Genesis Partition if
you want it to have more than one cell.
Creating a New nPartition
You can create a new nPartition by using any one of the following procedures:
• “Creating a New nPartition (nPartition Commands)” (page 173)
• “Creating a New nPartition (Partition Manager)” (page 175)
Creating a new nPartition involves specifying one or more cells in a server complex, setting
various attributes for the cells, and optionally specifying other nPartition settings. The settings
you specify then are used to create a new nPartition, which has assigned to it the cells you selected.
At least one cell in each nPartition must be connected to an I/O chassis that has core I/O attached.
To boot an operating system from disk, the nPartition also must have a boot device and associated
PCI card.
When creating an nPartition, follow the HP nPartition requirements and guidelines. HP
recommends only specific sets of nPartition configurations.
172
Creating and Configuring nPartitions
Procedure 6-2 Creating a New nPartition (nPartition Commands)
From the command line, use the parcreate command to create a new nPartition. You also can
use the parstatus and parmodify commands to list nPartition and complex details and modify
nPartition settings.
NOTE: You can remotely perform this task using remote administration options supported by
the Enhanced nPartition Commands or Partition Manager Version 2.0. Remote administration
is supported by the Partition Manager Tools→Switch Complexes action and by the nPartition
command -u... -h... options or -g... -h... options.
For details see “Tools for Configuring nPartitions” (page 165).
1.
Login to a system that enables you to list the current cell assignments and details. For
example, login to HP-UX running on an existing nPartition in the server complex, or login
to a system with the Enhanced nPartition Commands or Partition Manager Version 2.0.
Plan your nPartition configuration by selecting which cells will comprise the new nPartition.
Use the parstatus -AC command to list all unassigned (available) cells in the server
complex.
# parstatus -AC
[Cell]
CPU
OK/
Hardware
Actual
Failed/
Location
Usage
Max
========== ============ =======
cab0,cell1 absent
cab0,cell3 absent
cab0,cell4 power on
4/0/4
cab0,cell5 absent
cab0,cell6 power on
4/0/4
cab0,cell7 absent
-
Memory
(GB)
OK/
Failed
=======
2.0/0.0
2.0/0.0
-
Core
cell
Connected To
Capable
=================== =======
cab 0,bay0,chassis3 yes
cab 0,bay1,chassis1 yes
-
Use
On
Next
Boot
====
-
Par
Num
===
-
#
You can select any of the cells listed to create the new nPartition; only the cells that are not
"absent" are present within the server complex.
All cells that you choose must meet the hardware requirements for nPartitions (for example,
they all must have the same firmware revision). The cells also must form an HP-recommended
nPartition configuration. At least one cell must have an I/O chassis with core I/O.
2.
After confirming that cells you have chosen would establish a valid nPartition configuration,
use the parcreate -c... command to create a new nPartition with the cells. The -c...
option differs slightly for the nPartition command releases.
When using the parcreate command, only specify the -B option if you want the nPartition
to be booted and become active. The -B option causes parcreate to immediately boot the
newly-created nPartition past the default shutdown for reconfig state.
By not specifying -B, the new nPartition can be further modified because it will remain
inactive at the shutdown for reconfig state (until you boot it using the BO command at the
service processor Command Menu).
If creating a single-cell nPartition, use just one -c option.
To create a multiple-cell nPartition, specify the -c option multiple times (once for each cell)
issuing a single command line.
For example, with the Original nPartition Commands, the following command creates a
one-cell nPartition:
# parcreate -c4:base:y:ri -c6:base:y:ri
Partition Created. The partition number is : 1
#
Creating a New nPartition
173
When parcreate successfully creates a new nPartition, it reports "Partition Created" and
reports the nPartition number ("partition number is...").
If parcreate detects any problems or issues when creating an nPartition, it lists them in
its output. If it cannot create the nPartition, parcreate reports "Command failed" along
with more details.
parcreate Command: Cell Attributes Differences for nPartition Command Releases The
parcreate command's -c... option specifies the cell number(s) and attributes to be used
when creating the new nPartition. For the Enhanced nPartition Commands, an additional
cell local memory attribute is optional. Both the syntaxes are given in the following list.
• For the Original nPartition Commands, the parcreate command's -c option is as
follows:
-c cell:[cell_type]:[use_on_next_boot]:[failure_usage]
This option specifies the cell ID (cell) to be assigned to the nPartition.
— The only valid cell_type value is: base (base cell, the default).
— The valid use_on_next_boot values for cells are:
y Participate in reboot (the default).
n
—
Do not participate in reboot.
The only valid failure_usage value is: ri (reactivate with interleave, the default).
For details, refer to the parcreate(1M) manpage.
•
For the Enhanced nPartition Commands, the parcreate command's -c option is as
follows:
-c cell:[cell_type]:[use_on_next_boot]:[failure_usage][:clm]
This option specifies the cell ID (cell) to be assigned to the nPartition.
— The cell_type, use_on_next_boot, and failure_usage attributes are the same as supported
with the Original nPartition Commands.
— You can specify the clm value in either of two forms: percentage or absolute amount
of memory.
◦
Percentage cell-local memory (CLM).
The percent number can be any number in the range 0-100 with a suffix of %.
This number is rounded to 12.5%, 25%, 37.5%, 50%, 62.5%, 75%, 87.5% or 100%.
If the cell contains less than 4 GBytes of memory, then the percentage is
rounded to 25%, 50%, 75% or 100%. Percentages are rounded up or down to
the nearest value, but are not rounded up to 100%.
◦
Absolute CLM specification. (The default.)
The absolute number is interpreted as an absolute number of gigabytes of
memory and can optionally have a suffix of GB.
As needed, an absolute CLM specification is rounded up to the nearest 0.5
GBytes.
If the clm value is rounded, the command reports the final value used.
For details, refer to the parcreate(1M) manpage.
3.
Use the parmodify command to modify the configuration of the new nPartition and set
the nPartition name (-P), boot paths (-b, -s, and -t), and any core cell choices (-r). On HP
Integrity servers, nPartition boot paths must be set from the local nPartition.
When using the parmodify command, you must use the -p# option to specify the partition
number for the nPartition. Use the partition number that the parcreate command reported
in the previous step.
174
Creating and Configuring nPartitions
# parmodify -p1 -P "hostname05"
Command succeeded.
# parmodify -p1 -r0/4 -r0/6
Command succeeded.
# parmodify -p1 -b 4/0/1/0/0.9
Command succeeded.
#
When each modification takes place, parmodify reports "Command succeeded". Otherwise
it reports any problems.
You can specify each configuration option on a separate command line or can combine all
options into a single, longer command line.
For details on the various options for modifying nPartition settings, refer to the parmodify(1M)
manpage.
4.
Use the parstatus -V -p# command to list all details about your newly created and
configured nPartition.
If any configuration details need to be modified, use the parmodify command before you
boot the nPartition in the next step.
# parstatus -V -p1
[Partition]
Partition Number
: 1
Partition Name
: hostname05
Status
: inactive
IP address
:
Prmary Boot Path
: 4/0/1/0/0.9
ALternate Boot Path
: 0/0/0/0/0/0/0/0.0.0
HA Alternate Boot Path : 0/0/0/0/0/0/0/0.0.0
PDC Revision
: 104.1
IODCH Version
: 23664
CPU Speed
: 552 MHz
Core Cell
: ?
Core Cell Alternate
:
0. cab0,cell4
1. cab0,cell6
[Cell]
CPU
Memory
OK/
(GB)
Hardware
Actual
Failed/ OK/
Location
Usage
Max
Failed
Connected To
========== ============ ======= ========= ===================
cab0,cell4 inactive
4/0/4
2.0/ 0.0 cab 0,bay0,chassis3
cab0,cell6 inactive
4/0/4
2.0/ 0.0 cab 0,bay1,chassis1
....
5.
Core
cell
Capable
=======
yes
yes
Use
On
Next
Boot
====
yes
yes
Par
Num
===
1
1
Boot your newly-created nPartition past boot-is-blocked to make it active and make its
system boot environment available.
(The BCH environment is provided on HP 9000 servers; the EFI environment is provided
on HP Integrity servers.)
Use the BO command at the service processor Command menu to boot the nPartition.
Once the nPartition is booted, you can access its system boot environment through its console.
Use the service processor Console menu (enter CO at the service processor Main Menu).
Procedure 6-3 Creating a New nPartition (Partition Manager)
You can create a new nPartition by using Partition Manager.
When using Partition Manager Version 1.0, use the Partition→Create Partition action.
When using Partition Manager Version 2.0, use the nPartition→Create nPartition action.
1.
Access Partition Manager.
For details on accessing Partition Manager or other tools, see “Tools for Configuring
nPartitions” (page 165).
Creating a New nPartition
175
2.
Run the Partition Manager task wizard for creating a new nPartition.
From Partition Manager Version 1.0, select the Partition→Create Partition action.
From Partition Manager Version 2.0, select the nPartition→Create nPartition action.
Partition Manager guides you through the steps it requires for creating a new nPartition.
3.
Exit Partition Manager.
From Partition Manager Version 1.0, select the File→Exit action.
From Partition Manager Version 2.0, select Log off parmgr or exit the Web browser when
finished.
Removing (Deleting) an nPartition
You can remove an nPartition by using any one of the following procedures:
• “Deleting an nPartition (nPartition Commands)” (page 176)
• “Deleting an nPartition (Partition Manager)” (page 179)
Deleting an nPartition causes all cells (and any I/O resources connected to the cells) that were
assigned to the nPartition to be unassigned. As a result, all of these cells become available resources
which can be assigned to any nPartition in the server complex.
When removing an active nPartition, you must complete the procedure by performing a shutdown
for reconfig (the HP-UX shutdown -R -H command or Windows shutdown /s command)
as soon as possible after initiating the nPartition removal.
When using the Original nPartition Commands or Partition Manager Version 1.0, you can delete
only the local nPartition and inactive remote nPartitions.
Procedure 6-4 Deleting an nPartition (nPartition Commands)
From the command line, use the parremove command to delete (remove) an nPartition.
176
Creating and Configuring nPartitions
NOTE: You can remotely perform this task using remote administration options supported by
the Enhanced nPartition Commands or Partition Manager Version 2.0. Remote administration
is supported by the Partition Manager Tools→Switch Complexes action and by the nPartition
command -u... -h... options or -g... -h... options.
For details see “Tools for Configuring nPartitions” (page 165).
1.
Use the parstatus -P command to list all nPartitions, and check the status (active or
inactive) for the nPartition you plan to remove.
To check the local partition number, use the parstatus -w command. The local nPartition
always is active when it is running HP-UX.
If you are planning to remove a remote nPartition, check to see whether the remote nPartition
is inactive.
• If using Original nPartition Commands to remove a remote nPartition, the remote
nPartition must be inactive.
To make a remote nPartition inactive, put the nPartition into a shutdown for reconfig
state by performing any of the following tasks:
—
—
—
—
—
—
•
2.
Login to HP-UX running on the remote nPartition and issue the shutdown -R
-H command
Login to Windows running on the remote nPartition and issue the shutdown /s
command.
Login to Linux running on the remote nPartition and issue the shutdown -h time
command.
Login to OpenVMS running on the remote nPartition, first issue
@SYS$SYSTEM:SHUTDOWN from OpenVMS and enter No at the "Should an
automatic system reboot be performed" prompt, then access the MP and, from the
MP Command Menu, issue the RR command and specify the nPartition that is to
be shutdown for reconfig.
Access the console for the remote nPartition and use the RECONFIGRESET command
at the BCH Menu (on HP 9000 systems) or the reconfigreset command at the
EFI Shell (on HP Integrity systems).
Use the RR command at the service processor Command Menu to reset the nPartition
to a shutdown for reconfig state.
To remove an active remote nPartition, you must use the Enhanced nPartition Commands
remote administration options and the remote nPartition must be in a complex based
on the HP sx1000 chipset or HP sx2000 chipset.
Save all current configuration details about the nPartition you plan to remove.
Use the parstatus -V -p# command to display all current configuration information
related to the nPartition you plan to remove.
Save this information, as you can use it to manually recreate the nPartition if necessary at a
later time.
Removing (Deleting) an nPartition
177
3.
Remove the nPartition.
Use one of the following procedures to remove the nPartition: “Removing an Inactive Remote
nPartition”, “Removing a Local nPartition”, or “Removing an Active Remote nPartition”.
•
Removing an Inactive Remote nPartition
1. Issue the parremove -p# command to remove the inactive remote nPartition
(-p# where # is the nPartition number). For example:
#parremove -p1
2.
Issue the parstatus -P command to confirm that the nPartition was removed.
If the nPartition was removed, it no longer is listed in the parstatus command
output.
•
Removing a Local nPartition To remove the local nPartition (the nPartition on which
you currently are issuing commands), perform the following steps.
1.
2.
Shut down all applications and warn users. Follow the same procedures you would
use if you were to reboot the nPartition.
Issue the parremove -F -p# command to force-remove (-F) the local nPartition
(-p# where # is the number of the local nPartition).
Note that the local nPartition remains active following the parremove -F -p#
command, until you perform a shutdown for reconfig to complete the removal.
As soon as possible proceed with the shutdown for reconfig because the server
Complex Profile will remain locked—and no other changes can occur—until the
pending nPartition removal is completed.
3.
Perform a shutdown for reconfig of the local nPartition (HP-UX: shutdown -R
-H; Windows: shutdown /s; Linux: shutdown -h time; OpenVMS:
@SYS$SYSTEM:SHUTDOWN with no automatic system reboot then MP Command
menu RR command).
The shutdown for reconfig command shuts down the nPartition and all cells so
that the configuration changes occur and the nPartition is deleted.
•
Removing an Active Remote nPartition To remove an active remote nPartition, you
must use the Enhanced nPartition Commands or Partition Manager Version 2.0 and
the remote nPartition must be in a complex based on the HP sx1000 chipset or HP sx2000
chipset.
1. Shut down all applications and warn users. Follow the same procedures you would
use if you were to reboot the nPartition.
2. Issue the parremove -F -p# command and specify either the -u... -h...
options or -g... -h... options. For details see “Tools for Configuring
nPartitions” (page 165).
You must specify both the force-remove option (-F) and the nPartition number
(-p# where # is the number for the nPartition being removed).
3.
Perform a shutdown for reconfig of the nPartition that is being removed.
Use any of the following methods, as appropriate, to perform the shutdown for
reconfig.
—
178
From the operating system, put the nPartition into a shutdown for reconfig
state (HP-UX: shutdown -R -H; Windows: shutdown /s; Linux: shutdown
-h time; OpenVMS: @SYS$SYSTEM:SHUTDOWN with no automatic system
reboot then MP Command menu RR command).
Creating and Configuring nPartitions
—
—
—
From the EFI Shell for the nPartition, use reconfigreset to put the nPartition
into a shutdown for reconfig state.
From the BCH menu for the nPartition, use RECONFIGRESET to put the
nPartition into a shutdown for reconfig state.
From the service processor Command Menu for the server complex where the
nPartition resides, use the Command menu RR command to put the nPartition
into a shutdown for reconfig state.
After you complete the nPartition removal, the nPartition no longer exists. All cells (and
associated I/O chassis) that used to be assigned to the deleted nPartition now are unassigned
and can be assigned for other uses.
Procedure 6-5 Deleting an nPartition (Partition Manager)
You can delete an nPartition by using Partition Manager.
When using Partition Manager Version 1.0, select an nPartition, then select the Partition→Delete
Partition action.
When using Partition Manager Version 2.0, select an nPartition, then select the nPartition→Delete
nPartition action.
1.
Access Partition Manager.
For details on accessing Partition Manager or other tools, see “Tools for Configuring
nPartitions” (page 165).
2.
In Partition Manager, select the nPartition you want to remove.
If using Partition Manager Version 1.0, you must select either the local nPartition or a inactive
remote nPartition (where all hardware assigned to the nPartition must be listed as having
an Actual Usage of "inactive").
If using Partition Manager Version 2.0, you also can remove an active remote nPartition
either when managing the complex where nPartition resides, or when managing the remote
nPartition. Both remote management features involve using the Tools→Switch Complexes
action.
3.
Select the Partition Manager action to request that the nPartition be removed (deleted).
From Partition Manager Version 1.0, select the Partition→Delete Partition action.
From Partition Manager Version 2.0, select the nPartition→Delete nPartition action.
4.
5.
Proceed with the nPartition deletion by clicking the OK button when Partition Manager
requests confirmation for deleting the nPartition.
If removing an active nPartition, perform a shutdown for reconfig of the nPartition. (You
do not need to perform a shutdown for reconfig if removing an inactive nPartition.)
Login to the nPartition being removed, and issue the HP-UX shutdown -R -H command
or Windows shutdown /s command to perform the shutdown for reconfig. Following the
shutdown, the nPartition no longer exists—its configuration information is deleted.
6.
Exit Partition Manager.
From Partition Manager Version 1.0, select the File→Exit action.
From Partition Manager Version 2.0, select Log off parmgr or exit the Web browser when
finished.
Assigning (Adding) Cells to an nPartition
You can add cells to an nPartition by using any one of the following procedures:
•
•
“Adding Cells to an nPartition (nPartition Commands)” (page 180)
“Adding Cells to an nPartition (Partition Manager)” (page 181)
Assigning (Adding) Cells to an nPartition
179
Adding cells to an nPartition involves selecting available cells (those not currently assigned to
an nPartition) and assigning them to an existing nPartition. Both the selected cells and any I/O
chassis connected to the cells are assigned to the designated nPartition.
NOTE: Adding or removing cells from an nPartition will change the amount of memory available
to the nPartition, possibly significantly. You should consider how the memory change may affect
the amount of swap space necessary for the nPartition and if needed adjust the swap space size.
You can add cells to the local nPartition or to any remote nPartitions in the same server complex.
Reboot for Reconfig Guidelines for Adding Cells In some situations, you must immediately
perform a reboot for reconfig of a modified nPartition after adding cells to it.
• You must perform a reboot for reconfig of an active nPartition after you have added a cell
to it (HP-UX: shutdown -R; Windows: shutdown /r; Linux: shutdown -r time;
OpenVMS: @SYS$SYSTEM:SHUTDOWN with an automatic system reboot). The reboot for
reconfig enables the newly assigned cell to rendezvous and be actively used when the
nPartition reboots.
• Perform a reboot for reconfig of an nPartition as soon as possible after you have added a
cell to an active nPartition and have specified a "y" use-on-next-boot value for the new cell.
• You need not perform a reboot for reconfig of an nPartition in these situations:
— When you have added a cell to an inactive nPartition.
— When you have added a cell with a "n" use-on-next-boot value and you did not specify
the -B option to the parmodify command.
Procedure 6-6 Adding Cells to an nPartition (nPartition Commands)
From the command line, use the parmodify command to add cells to an nPartition. You also
can use the parstatus command to list nPartition and complex details, such as available cells.
NOTE: You can remotely perform this task using remote administration options supported by
the Enhanced nPartition Commands or Partition Manager Version 2.0. Remote administration
is supported by the Partition Manager Tools→Switch Complexes action and by the nPartition
command -u... -h... options or -g... -h... options.
For details see “Tools for Configuring nPartitions” (page 165).
1.
2.
Use the parstatus -A -C command to list all available cells (the unassigned cells) in the
server complex.
Choose one or more eligible cells from the list to add to the nPartition.
Adding the cell(s) to the nPartition must create a configuration that meets the hardware
requirements and performance guidelines.
3.
Modify the nPartition by issuing the parmodify -p# -a#... command to add the cell
(-a#... where # is the cell number) to the specified nPartition (-p# where # is the nPartition
number). The -a... option differs slightly for the nPartition command releases.
To add multiple cells, you can specify the -a option multiple times in the same command.
parmodify Command: -a Option Differences for nPartition Command Releases The
parmodify command's -a... option specifies a cell number and attributes, which are
used when adding the cell to an existing nPartition. For the Enhanced nPartition Commands,
an additional cell local memory attribute is optional. Both syntaxes are given in the following
list.
• For the Original nPartition Commands, the parmodify command's -a... option is
as follows:
-a cell:[type]:[use]:[fail]
where:
180
Creating and Configuring nPartitions
cell
The cell to be added to the nPartition. You can specify the cell in global (cell)
format or in hardware location (cabinet/slot) format.
type
The cell type: base is the only supported cell type and it is the default.
use
The cell use-on-next-boot value: y or n. Use y (the default) if the cell is to be an
active member of the nPartition, or use n if the cell is to remain an inactive
member.
fail
The cell failure usage: ri (reactivate with interleave) is the only supported
failure usage policy and it is the default.
For details, refer to the parmodify(1M) manpage.
•
For the Enhanced nPartition Commands, the parmodify command's -a... option is
as follows:
-a cell:[type]:[use]:[fail][:clm]
where the cell, type, use, and fail attributes are the same as supported by the Original
nPartition Commands.
The clm value specifies the amount of memory that will be configured as cell local
memory for the cell.
You can specify the clm value in either of two forms: percentage or absolute amount of
memory.
— Percentage cell-local memory (CLM).
The percent number can be any number in the range 0-100 with a suffix of %.
This number is rounded to 12.5%, 25%, 37.5%, 50%, 62.5%, 75%, 87.5% or 100%. If
the cell contains less than 4 GBytes of memory, then the percentage is rounded to
25%, 50%, 75% or 100%. Percentages are rounded up or down to the nearest value,
but are not rounded up to 100%.
—
Absolute CLM specification. (The default.)
The absolute number is interpreted as an absolute number of gigabytes of memory
and can optionally have a suffix of GB.
As needed, an absolute CLM specification is rounded up to the nearest 0.5 GBytes.
If the clm value is rounded, the command reports the final value used. For details, refer
to the parmodify(1M) manpage.
parmodify Command: -B Option for nPartition Booting You can optionally specify the
parmodify command's -B option to require that the modified nPartition be rebooted.
• When you specify -B to modify an inactive nPartition, the changes to the inactive
nPartition are completed immediately and the nPartition then boots and becomes active.
• When you specify -B to modify an active nPartition, you must perform a reboot for
reconfig for the changes to be completed. After the reboot for reconfig occurs the
nPartition boots and becomes active (because the parmodify command -B option was
specified).
Refer to the parmodify(1M) manpage for details on all options.
4.
As needed, perform a reboot for reconfig on the modified nPartition (HP-UX: shutdown
-R; Windows: shutdown /r; Linux: shutdown -r time; OpenVMS:
@SYS$SYSTEM:SHUTDOWN with an automatic system reboot).
See “Reboot for Reconfig Guidelines for Adding Cells” (page 180) for details on when to
perform a reboot for reconfig.
Procedure 6-7 Adding Cells to an nPartition (Partition Manager)
You can add cells to an nPartition by using Partition Manager.
Assigning (Adding) Cells to an nPartition
181
When using Partition Manager Version 1.0, select an nPartition, and use the Partition→Modify
Partition action, Add/Remove Cells tab.
When using Partition Manager Version 2.0, select an nPartition, and use the nPartition→Modify
nPartition action, Add/Remove Cells tab.
1.
Access Partition Manager.
For details on accessing Partition Manager or other tools, see “Tools for Configuring
nPartitions” (page 165).
2.
3.
Select the nPartition to which you want to add cells.
Specify for Partition Manager to add one or more cells to the nPartition.
From Partition Manager Version 1.0, use the Partition→Modify Partition action and select
the Add/Remove Cells tab. To add cells to the nPartition, select the cells from the Available
Cells list and click the Add button.
From Partition Manager Version 2.0, use the nPartition→Modify nPartition action and
select the Add/Remove Cells tab. To add cells to the nPartition, click on the checkbox for
the new cells so that a checkmark appears.
4.
5.
After selecting the new cells to add to the nPartition, click the OK button.
Review all information presented in the Notes and Warnings, the Summary of Changes,
and the HA Checks tabs and either cancel or proceed with the changes.
Click the Cancel button to cancel the changes.
To proceed with adding the cells, click the Finish button or click the OK button.
6.
As needed, perform a reboot for reconfig on the modified nPartition (HP-UX: shutdown
-R; Windows: shutdown /r; Linux: shutdown -r time; OpenVMS:
@SYS$SYSTEM:SHUTDOWN with an automatic system reboot) .
See “Reboot for Reconfig Guidelines for Adding Cells” (page 180) for details on when to
perform a reboot for reconfig.
Unassigning (Removing) Cells from an nPartition
You can remove cells from an nPartition by using any one of the following procedures:
• “Removing Cells from an nPartition (nPartition Commands)” (page 183)
• “Removing Cells from an nPartition (Partition Manager)” (page 184)
Removing a cell from an nPartition involves unassigning the cell from the nPartition to which
it is assigned and, if necessary, performing a reboot for reconfig of the nPartition.
NOTE: Adding or removing cells from an nPartition will change the amount of memory available
to the nPartition, possibly significantly. You should consider how the memory change may affect
the amount of swap space necessary for the nPartition and if needed adjust the swap space size.
When not using remote administration features, you can remove any cell from the local nPartition
and can remove inactive cells from remote nPartitions in the same server complex. However, at
least one core-capable cell must remain in each nPartition.
The remote administration features supported by the Enhanced nPartition Commands or Partition
Manager Version 2.0 also enable you to remove any cell from any nPartition in an HP Integrity
server complex. Still, at least one core-capable cell must remain in each nPartition.
Reboot for Reconfig Guidelines for Removing Cells In some situations, after removing cells from
a modified nPartition you must immediately perform a reboot for reconfig (HP-UX: shutdown
-R; Windows: shutdown /r; Linux: shutdown -r time; OpenVMS: @SYS$SYSTEM:SHUTDOWN
with an automatic system reboot). Performing a required reboot for reconfig completes cell
assignment changes and unlocks the Complex Profile for the server.
182
Creating and Configuring nPartitions
•
•
•
You must immediately perform a reboot for reconfig of an nPartition when you have removed
an active cell from the nPartition.
You must immediately perform a reboot for reconfig of an nPartition when you have removed
a cell from an active nPartition and specified the -B option to the parmodify command.
You do not need to perform a reboot for reconfig of an nPartition when you have removed
an inactive cell from an nPartition and did not specify the -B option to the parmodify
command.
In the cases where you must immediately perform a reboot for reconfig after removing a cell,
not doing so will leave the Complex Profile locked and thus will prevent any other changes to
the server complex configuration. In these cases, the reboot for reconfig is required to complete
the cell assignment changes and permit other changes to occur.
Procedure 6-8 Removing Cells from an nPartition (nPartition Commands)
From the command line, use the parmodify command to remove cells from an nPartition. You
also can use the parstatus command to list current nPartition details such as cell assignments.
NOTE: You can remotely perform this task using remote administration options supported by
the Enhanced nPartition Commands or Partition Manager Version 2.0. Remote administration
is supported by the Partition Manager Tools→Switch Complexes action and by the nPartition
command -u... -h... options or -g... -h... options.
For details see “Tools for Configuring nPartitions” (page 165).
1.
Login to a system with the nPartition commands installed.
If using remote administration features to modify an nPartition, you can login to any system
with Enhanced nPartition Commands installed.
If removing an inactive cell from an nPartition, you can use local management from any
nPartition in the complex. For example, you can login to HP-UX running on any nPartition
in the same server complex.
If removing an active cell from an nPartition and not using remote administration features,
you must login to the nPartition from which the cell is to be removed.
2.
Issue the parstatus -c#... command to list the current nPartition assignments and
status for each cell (-c# where # is the cell number) that you plan to remove from its assigned
nPartition.
Specify each cell you plan to remove with a separate -c option. For example, to list details
on cells 0, 1, and 2, issue the parstatus -c0 -c1 -c2 command.
The cells must all be assigned to the same nPartition in order to remove them using a single
procedure. Otherwise, if the cells are assigned to different nPartitions, you must perform
this procedure separately for each nPartition.
3.
Remove the cell from the nPartition to which it is assigned by using the parmodify -p#
-d#... command.
Specify the nPartition (-p# where # is the nPartition number) and each cell (-d# where # is
the cell number) that you want to remove from the nPartition.
If you are performing this task using the Enhanced nPartition Commands to remotely
administer a server, also specify the -u... -h... options or the -g... -h... options
as appropriate.
If removing multiple cells from an nPartition, specify each cell with a separate -d# option
on the same command line (such as: parmodify -p1 -d0 -d2... to remove cells 0 and
2 from partition number 1).
Unassigning (Removing) Cells from an nPartition
183
Slightly different procedures are required for removing active cells and inactive cells. See
the following information for details (“Guidelines for Removing an Active Cell” and
“Guidelines for Removing an Inactive Cell”).
If at least one of the cells you plan to remove is currently active, then follow the guidelines
for removing active cells.
•
Guidelines for Removing an Active Cell Specify the -B option to parmodify when
removing an active cell from an nPartition if you want the nPartition to become active
following its reboot for reconfig.
For example, the following command removes cell 4 from partition 0 and the -B option
ensures that the nPartition will be active following its reboot for reconfig.
# parmodify -p0 -d4 -B
Cell 4 is active.
Use shutdown -R to shutdown the system to ready for reconfig state.
Command succeeded.
#
You must perform a reboot for reconfig after you issue the parmodify command to
remove active cell(s) from the nPartition. (This is covered in the step that follows.)
•
Guidelines for Removing an Inactive Cell When removing an inactive cell from an
nPartition you do not need to specify the -B option to parmodify and do not need to
perform a reboot for reconfig of the nPartition to which the cell is assigned.
When you use parmodify to remove an inactive cell, the cell is immediately unassigned
from its nPartition.
If you specify the -B option when removing an inactive cell from an inactive nPartition,
then the cell is immediately removed and the modified nPartition is booted past its
inactive shutdown for reconfig state and becomes an active nPartition.
For example, the following command removes cell 2 from partition 0. Because cell 2 is
inactive, it is immediately unassigned.
# parmodify -p0 -d2
Command succeeded.
#
4.
As needed, perform a reboot for reconfig of the nPartition being modified (HP-UX: shutdown
-R; Windows: shutdown /r; Linux: shutdown -r time; OpenVMS:
@SYS$SYSTEM:SHUTDOWN with an automatic system reboot).
You must perform a reboot for reconfig if you have removed an active cell or have specified
the -B option when modifying an active nPartition.
See “Reboot for Reconfig Guidelines for Removing Cells” (page 182) for details on when to
perform a reboot for reconfig.
This reboot for reconfig enables the cell removal to complete and the Complex Profile to be
unlocked.
If you have removed an active cell and you did not specify the -B option to parmodify,
then the nPartition will remain inactive in the shutdown for reconfig state after you perform
the reboot for reconfig. To make the inactive nPartition active, use the BO (boot) command
at the service processor Command menu.
Procedure 6-9 Removing Cells from an nPartition (Partition Manager)
You can remove cells from an nPartition by using Partition Manager.
When using Partition Manager Version 1.0, select an nPartition, and use the Partition→Modify
Partition action, Add/Remove Cells tab.
When using Partition Manager Version 2.0, select an nPartition, and use the nPartition→Modify
nPartition action, Add/Remove Cells tab.
184
Creating and Configuring nPartitions
1.
Access Partition Manager.
For details on accessing Partition Manager or other tools, see “Tools for Configuring
nPartitions” (page 165).
2.
3.
Select the nPartition from which you want to remove cells.
Specify for Partition Manager to remove one or more cells from the nPartition.
From Partition Manager Version 1.0, use the Partition→Modify Partition action and select
the Add/Remove Cells tab. To remove cells from the nPartition, select the cells from the
"Cells in the Partition" list and click the Remove button.
From Partition Manager Version 2.0, use the nPartition→Modify nPartition action and
select the Add/Remove Cells tab. To remove cells from the nPartition, click on the checkbox
for the cells so that no checkmark appears (the checkbox is empty).
4.
5.
6.
After specifying that the cells be removed from the nPartition, click the OK button.
Review all information presented in the Notes and Warnings, the Summary of Changes,
and the HA Checks tabs.
Either check or leave unchecked the option for booting the nPartition after the reconfiguration
occurs.
For Partition Manager Version 1.0, this option is the Automatically boot partition... checkbox.
For Partition Manager Version 2.0, this option is the Boot nPartition to system firmware...
checkbox.
If removing an active cell, leaving this option unchecked (not selected) results in the nPartition
being inactive after its reboot for reconfig occurs.
If removing a cell from an inactive nPartition, selecting this option results in the nPartition
becoming active after its reconfiguration occurs.
7.
Either cancel or proceed with the changes (the removal of cell).
Click the Cancel button to cancel the changes.
To proceed with removing the cells, click the Finish button or click the OK button.
8.
As needed, perform a reboot for reconfig on the modified nPartition (HP-UX: shutdown
-R; Windows: shutdown /r; Linux: shutdown -r time; OpenVMS:
@SYS$SYSTEM:SHUTDOWN with an automatic system reboot).
• If you have removed only inactive cells from an nPartition, then you do not need to
perform a reboot for reconfig of the nPartition.
• If you have removed any active cells from the nPartition, then you must perform a
reboot for reconfig and will have seen a detailed message about rebooting from Partition
Manager.
Issue the reboot for reconfig command.
If you did not select the option for automatically booting the nPartition to system
firmware, then the nPartition is inactive (at the shutdown for reconfig state) after the
reboot for reconfig occurs. In this situation, you can make the nPartition active by using
the BO command at the service processor Command Menu.
Renaming an nPartition
You can change the name of an nPartition by using any one of the following procedures:
• “Renaming an nPartition (BCH Menu)” (page 186)
• “Renaming an nPartition (nPartition Commands)” (page 186)
• “Renaming an nPartition (Partition Manager)” (page 187)
Each nPartition has both an nPartition name and an nPartition number. The nPartition name is
a short description useful for identifying the nPartition. You can customize nPartition names to
Renaming an nPartition
185
help you distinguish among the nPartition in a server complex. (You cannot change the nPartition
number, which is a permanent unique identifier that is automatically assigned for each nPartition
in a server complex.)
Each nPartition name can have from 1 to 64 characters, including upper- and lowercase letters;
numbers; and dashes, underscores, and spaces ("-" "_" and " ").
nPartition names are displayed (along with nPartition numbers) in various reports and menus
provided by the service processor, Boot Console Handler (BCH), and other nPartition tools. Note
that some tools display only the first 30 characters of nPartition names.
Procedure 6-10 Renaming an nPartition (BCH Menu)
From the BCH Configuration Menu, use the PD command to display and change the name of
the local nPartition. The BCH Menu is available only on HP 9000 systems.
1.
Access the BCH Main Menu for the nPartition whose name you want to change.
Login to the service processor (MP or GSP) and enter CO to access the Console list. Select
the nPartition console. When accessing the console, confirm that you are at the BCH Main
Menu (the Main Menu: Enter command or menu> prompt). If at a BCH menu other
than the Main Menu, then enter MA to return to the BCH Main Menu.
2.
3.
Enter CO to access the BCH Configuration Menu.
At the BCH Configuration Menu, enter the PD NewName command to change the nPartition
name to NewName. No quotation marks are needed when specifying the name, even if it
includes spaces.
To display the nPartition number and its current name, enter the PD command (PD not
followed by any text).
4.
Exit the console and service processor interfaces if finished using them.
To exit the BCH environment type ^B (Control-B); this exits the nPartition console and
returns to the service processor Main Menu. To exit the service processor, type X at the Main
Menu.
Procedure 6-11 Renaming an nPartition (nPartition Commands)
From the command line, rename an nPartition by using the parmodify -p# -P name command,
where -P name specifies the new name for the nPartition (-p#, where # is the nPartition number).
NOTE: You can remotely perform this task using remote administration options supported by
the Enhanced nPartition Commands or Partition Manager Version 2.0. Remote administration
is supported by the Partition Manager Tools→Switch Complexes action and by the nPartition
command -u... -h... options or -g... -h... options.
For details see “Tools for Configuring nPartitions” (page 165).
1.
Login to a system with the nPartition commands installed.
If using remote administration features to rename an nPartition in a complex, you can login
to any system with Enhanced nPartition Commands installed.
186
Creating and Configuring nPartitions
2.
Use the parmodify -p# -P name command to set the nPartition name for any of the
nPartitions in the server complex.
Specify both the nPartition number (-p#, where # is the nPartition number) and the new
name for the nPartition (-P name).
If the nPartition name contains spaces then quotation marks must surround the name.
# parmodify -p1 -P "New Name"
Command succeeded.
#
You can list the new name of the nPartition by using the parstatus -p# command (where
# is the nPartition number) or parstatus -P.
Procedure 6-12 Renaming an nPartition (Partition Manager)
You can change an nPartition name by using Partition Manager. Select an nPartition, then select
either the Partition→Modify Partition action (Partition Manager Version 1.0) or the
nPartition→Modify nPartition action (Partition Manager Version 2.0). Then use the General
tab to rename the nPartition.
1.
Access Partition Manager.
For details on accessing Partition Manager or other tools, see “Tools for Configuring
nPartitions” (page 165).
2.
Select the nPartition you want to rename, then perform the actions to rename it.
From Partition Manager Version 1.0, select the Partition→Modify Partition action and use
the General tab to rename the nPartition.
From Partition Manager Version 2.0, select the nPartition→Modify nPartition action and
use the General tab to rename the nPartition.
3.
Exit Partition Manager.
From Partition Manager Version 1.0, select the File→Exit action.
From Partition Manager Version 2.0, select Log off parmgr or exit the Web browser when
finished.
Renaming a Server Complex
You can rename a server complex by using any one of the following procedures:
• “Renaming a Server Complex (Service Processor)” (page 187)
• “Renaming a Server Complex (nPartition Commands)” (page 188)
• “Renaming a Server Complex (Partition Manager)” (page 188)
You can assign a name for each server complex in order to better identify the complex as you
work with it. The server complex name serves as a helpful identifier; changing the name does
not affect the way in which commands and utilities interact with the complex.
Several commands and utilities display the server complex name as part of their output and
interfaces. For example, some nPartition commands and Partition Manager list the complex
name.
Each server complex name has up to 20 characters, which can include upper- and lowercase
letters; numbers; and dashes, underscores, periods, and spaces ("-" "_" "." and " ").
The server complex name is stored as part of the Complex Profile for the server (part of its Stable
Complex Configuration Data).
Procedure 6-13 Renaming a Server Complex (Service Processor)
From the service processor Command Menu, use the ID command to list and modify the server
complex name.
Renaming a Server Complex
187
1.
2.
Login to the service processor (MP or GSP) and enter CM to access the Command Menu.
At the Command Menu, issue the ID command to list the complex name.
The ID command lists some of the Stable Complex Configuration Data for the current server,
including the complex name.
GSP:CM> ID
This command allows you to change certain fields in the Stable complex
configuration portion of the complex profile.
Retrieving the stable complex configuration portion of the complex profile.
GSP modifiable stable complex configuration data fields.
Model String
: 9000/800/SD64000
Complex System Name
: feshd5
Complex Serial Number : USR2024FP1
Original Product Number: A5201A
Current Product Number : A5201A
Enterprise Id
:
Do you want to modify any of this information? (Y/[N])
3.
Specify whether you want to modify the complex profile, including its name.
Only modify the "Complex System Name". Do not change the model string, serial number,
or other details used by commands, utilities, and licensing tools.
To cancel the changes at any time enter q to quit the ID command without modifying the
complex profile.
4.
To exit the service processor Command Menu, enter MA to return to the service processor
Main Menu.
At the Main Menu, enter X to exit the service processor interface.
Procedure 6-14 Renaming a Server Complex (nPartition Commands)
From the command line, use the cplxmodify -N name command to rename a server complex.
The cplxmodify command currently only is supported by the Enhanced nPartition Commands.
NOTE: You can remotely perform this task using remote administration options supported by
the Enhanced nPartition Commands or Partition Manager Version 2.0. Remote administration
is supported by the Partition Manager Tools→Switch Complexes action and by the nPartition
command -u... -h... options or -g... -h... options.
For details see “Tools for Configuring nPartitions” (page 165).
1.
Login to a system with the nPartition commands installed.
If using remote administration features to rename a complex, you can login to any system
with Enhanced nPartition Commands installed.
2.
Issue the the cplxmodify -N name command to rename the local server complex.
To list the current complex name, issue the parstatus -X command.
Procedure 6-15 Renaming a Server Complex (Partition Manager)
You can rename a server complex from Partition Manager by selecting the Complex→Set
Complex Name action.
1.
Access Partition Manager.
For details on accessing Partition Manager or other tools, see “Tools for Configuring
nPartitions” (page 165).
188
Creating and Configuring nPartitions
2.
Select the Complex→Set Complex Name action.
Enter the new name for the complex in the text box provided, which shows the current
complex name. If no name was previously assigned, the default name is "MyComplex".
3.
Exit Partition Manager.
From Partition Manager Version 1.0, select the File→Exit action.
From Partition Manager Version 2.0, select Log off parmgr or exit the Web browser when
finished.
Setting Cell Attributes
You can set the attributes for a cell by using any one of the following procedures:
• “Setting Cell Attributes (BCH Menu)” (page 189)
• “Setting Cell Attributes (EFI Shell)” (page 190)
• “Setting Cell Attributes (nPartition Commands)” (page 191)
• “Setting Cell Attributes (Partition Manager)” (page 193)
Each cell assigned to an nPartition has attributes including use-on-next-boot that determine how
the cell is used within the nPartition. On servers based on the HP sx1000 chipset or HP sx2000
chipset, each cell also has a cell local memory attribute that determines the amount of memory
on the cell that is not interleaved.
CAUTION: Memory configured as cell local memory only can be used by operating systems
that support it.
Any memory configured as cell local memory is unusable when an nPartition runs an operating
system that does not support it.
NOTE: Changing a cell use-on-next-boot attribute may be restricted on any server complex
that is under an Instant Capacity contract.
NOTE: After changing cell attributes, in order to use the new settings you must reboot the
nPartition to which the cell is assigned (HP-UX: shutdown -r; Windows: shutdown /r; Linux:
shutdown -r time; OpenVMS: @SYS$SYSTEM:SHUTDOWN with an automatic system reboot).
If modifying an inactive cell to be active, perform a reboot for reconfig (HP-UX: shutdown -R;
Windows: shutdown /r; Linux: shutdown -r time; OpenVMS: @SYS$SYSTEM:SHUTDOWN
with an automatic system reboot).
Procedure 6-16 Setting Cell Attributes (BCH Menu)
From the BCH Configuration Menu, use the CELLCONFIG command to list or set the
use-on-next-boot value for each cell in the local nPartition. The BCH Menu is available only on
HP 9000 systems.
1.
Access the BCH Main Menu for the nPartition whose cell use-on-next-boot attributes you
want to list or set.
Login to the service processor (MP or GSP) and enter CO to access the Console list. Select
the nPartition console. When accessing the console, confirm that you are at the BCH Main
Menu (the Main Menu: Enter command or menu> prompt). If at a BCH menu other
than the Main Menu, then enter MA to return to the BCH Main Menu.
2.
Enter CO to access the BCH Configuration Menu.
Setting Cell Attributes
189
3.
From the BCH Configuration menu, use the CELLCONFIG command to list or set the
use-on-next-boot value for each cell.
• To list the use-on-next-boot values for all cells in the nPartition, issue the CELLCONFIG
command with no arguments.
• To change the use-on-next-boot value for a cell, issue the following command:
CELLCONFIG cell [ON|OFF]
where cell is the cell number, ON sets the cell use-on-next-boot value to "y" (yes, do use
the cell), or OFF sets the cell use-on-next-boot value to "n" (no, do not use the cell).
A cell that boots with a "y" (ON) use-on-next-boot value is permitted to rendezvous and
join its nPartition, thus becoming an active cell whose resources are used.
A cell that boots with a "n" (OFF) use-on-next-boot value does not rendezvous and thus
becomes an inactive cell whose resources are not used by its nPartition, although the
cell still is assigned to its nPartition.
4.
Reboot the nPartition to use the cells' new use-on-next-boot settings.
If you have changed any cell use-on-next-boot settings for the nPartition then reboot the
nPartition in either of two ways:
•
Use the REBOOT command at the BCH interface to perform a reboot.
If you have only changed cell configurations from ON to OFF, then perform a reboot
using the REBOOT command. Any cells set to not be used will still be assigned to the
nPartition but will not be used (will not rendezvous) in the nPartition.
•
Use the RECONFIGRESET command at the BCH interface to put the nPartition in the
shutdown for reconfig state, then use the BO command at the service processor Command
menu to boot the nPartition.
If you have changed any cell from OFF ("n", do not use on next boot) to ON ("y", use the
cell on next boot), then you must perform these two tasks; this resets and reconfigures
the nPartition and boots it.
5.
Exit the console and service processor interfaces if finished using them.
To exit the BCH environment type ^B (Control-B); this exits the nPartition console and
returns to the service processor Main Menu. To exit the service processor, type X at the Main
Menu.
Procedure 6-17 Setting Cell Attributes (EFI Shell)
From the EFI Shell environment, use the cellconfig command to list or set the use-on-next-boot
value for each cell in the local nPartition. The EFI Shell is available only on HP Integrity systems.
NOTE: Use of the cellconfig command at the EFI Shell is restricted. See the help
cellconfig command for details.
1.
Access the EFI Shell environment for the nPartition whose cell use-on-next-boot attributes
you want to list or set.
Login to the service processor (MP or GSP) and enter CO to access the Console list. Select
the nPartition console.
When accessing the console, confirm that you are at the EFI Boot Manager menu (the main
EFI menu). If at another EFI menu, select the Exit option from the sub-menus until you
return to the screen with the EFI Boot Manager heading.
From the EFI Boot Manager menu, select the EFI Shell menu option to access the EFI Shell
environment.
190
Creating and Configuring nPartitions
2.
Use the cellconfig command to list or set the use-on-next-boot value for each cell.
• To list the use-on-next-boot values for all cells in the nPartition, issue the cellconfig
command with no arguments.
• To change the use-on-next-boot value for a cell, issue the following command:
cellconfig cell [on|off]
where cell is the cell number, on sets the cell use-on-next-boot value to "y" (yes, do use
the cell), or off sets the cell use-on-next-boot value to "n" (no, do not user the cell).
A cell that boots with a "y" (on) use-on-next-boot value is permitted to rendezvous and
join its nPartition, thus becoming an active cell whose resources are used.
A cell that boots with a "n" (off) use-on-next-boot value does not rendezvous and thus
becomes an inactive cell whose resources are not used by its nPartition, although the
cell still is assigned to its nPartition.
3.
Reboot the nPartition to use the cells' new use-on-next-boot settings.
If you have changed any cell use-on-next-boot settings for the nPartition then reboot the
nPartition in either of two ways:
•
Use the reset command at the EFI Shell to perform a reboot.
If you have only changed cell configurations from on to off, then perform a reboot
using the reset command. Any cells set to not be used will still be assigned to the
nPartition but will not be used (will not rendezvous) in the nPartition.
•
Use the reconfigreset command at the EFI Shell to put the nPartition in the shutdown
for reconfig state, then use the BO command at the service processor Command Menu
to boot the nPartition.
If you have changed any cell from off ("n", do not use on next boot) to on ("y", use the
cell on next boot), then you must perform these two tasks; this resets and reconfigures
the nPartition and boots it.
4.
Exit the console and service processor interfaces if finished using them.
To exit the EFI environment type ^B (Control-B); this exits the nPartition console and returns
to the service processor Main Menu. To exit the service processor, type X at the Main Menu.
Procedure 6-18 Setting Cell Attributes (nPartition Commands)
From the command line, use the parmodify -p# -m#... command to configure cell attributes.
You also can use the parstatus -V -c# command to list attribute details for a specific cell
(-c# where # is the cell number).
NOTE: You can remotely perform this task using remote administration options supported by
the Enhanced nPartition Commands or Partition Manager Version 2.0. Remote administration
is supported by the Partition Manager Tools→Switch Complexes action and by the nPartition
command -u... -h... options or -g... -h... options.
For details see “Tools for Configuring nPartitions” (page 165).
1.
Login to a system with the nPartition commands installed.
If using remote administration features to set cell attributes, you can login to any system
with Enhanced nPartition Commands installed.
2.
To list current cell attribute settings, use the parstatus -C command to list the
use-on-next-boot values for all cells, or use the parstatus -V -c# command to list all
attribute values for a specific cell (-c# where # is the cell number)
Setting Cell Attributes
191
3.
To modify cell attribute values, use the parmodify -p# -m#... command and specify
the new attributes for a cell as part of the -m option. The -m... option differs slightly for
the nPartition command releases.
You must specify both the nPartition (-p# where # is the nPartition number) and the cell
(-m#... where # is the cell number).
To modify multiple cells, you can specify the -m option multiple times in the same command.
parmodify Command: -m Option Differences for nPartition Command Releases The
parmodify command's -m... option specifies a cell number and attributes, which are
used to modify the configuration of the specified cell. Both syntaxes are given in the following
list.
• For the Original nPartition Commands, the parmodify command's -m... option is
as follows:
-m cell:[type]:[use]:[fail]
where:
cell
The cell to be added to the nPartition. You can specify the cell in global (cell)
format or in hardware location (cabinet/slot) format.
type
The cell type: base is the only supported cell type and it is the default.
use
The cell use-on-next-boot value: y or n. Use y (the default) if the cell is to be an
active member of the nPartition, or use n if the cell is to remain an inactive
member.
fail
The cell failure usage: ri (reactivate with interleave) is the only supported
failure usage policy and it is the default.
For details, refer to the parmodify(1M) manpage.
•
For the Enhanced nPartition Commands, the parmodify command's -m... option is
as follows:
-m cell:[type]:[use]:[fail][:clm]
where the cell, type, use, and fail attributes are the same as supported by the Original
nPartition Commands.
The clm value specifies the amount of memory that will be configured as cell local
memory for the cell.
CAUTION: Memory configured as cell local memory only can be used by operating
systems that support it.
Any memory configured as cell local memory is unusable when an nPartition runs an
operating system that does not support it.
Cell Local Memory Specification You can specify the clm value in either of two forms:
percentage or absolute amount of memory.
— Percentage cell-local memory (CLM).
The percent number can be any number in the range 0-100 with a suffix of %.
This number is rounded to 12.5%, 25%, 37.5%, 50%, 62.5%, 75%, 87.5% or 100%. If
the cell contains less than 4 GBytes of memory, then the percentage is rounded to
25%, 50%, 75% or 100%. Percentages are rounded up or down to the nearest value,
but are not rounded up to 100%.
—
Absolute CLM specification. (The default.)
The absolute number is interpreted as an absolute number of gigabytes of memory
and can optionally have a suffix of GB.
192
Creating and Configuring nPartitions
As needed, an absolute CLM specification is rounded up to the nearest 0.5 GBytes.
If the clm value is rounded, the command reports the final value used. For details, refer
to the parmodify(1M) manpage.
4.
Reboot the nPartition to use the cells' new attribute values.
On cell-based servers based on the HP sx1000 chipset or HP sx2000 chipset, if you have
changed cell local memory (CLM) values then you must reboot the nPartition whose CLM
values have changed (HP-UX: shutdown -r; Windows: shutdown /r; Linux: shutdown
-r time; OpenVMS: @SYS$SYSTEM:SHUTDOWN with an automatic system reboot). If you
also are changing use-on-next-boot values then also use the following guidelines.
If you have changed any cell use-on-next-boot settings for the nPartition then reboot the
nPartition in either of two ways:
•
Perform a standard reboot (HP-UX: shutdown -r; Windows: shutdown /r; Linux:
shutdown -r time; OpenVMS: @SYS$SYSTEM:SHUTDOWN with an automatic system
reboot).
If you have only changed use-on-next-boot values from y to n, then perform a reboot.
Any cells set to not be used will still be assigned to the nPartition but will not be used
(will not rendezvous) in the nPartition.
•
Perform a reboot for reconfig (HP-UX: shutdown -R; Windows: shutdown /r; Linux:
shutdown -r time; OpenVMS: @SYS$SYSTEM:SHUTDOWN with an automatic system
reboot).
If you have changed any use-on-next-boot values from n (do not use on next boot) to
y (use the cell on next boot), then you must perform a reboot for reconfig to allow the
currently inactive cells to reboot and rendezvous when the nPartition reboots.
Procedure 6-19 Setting Cell Attributes (Partition Manager)
You can set cell attributes by using Partition Manager.
When using Partition Manager Version 1.0, select the nPartition to which the cell belongs, select
the Partition→Modify Partition action, Change Cell Attributes tab, select the cell(s), and click
Modify Cell(s).
When using Partition Manager Version 2.0, select the nPartition to which the cell belongs, select
the nPartition→Modify nPartition action, and then configure attributes using the Set Cell
Options tab and the Configure Memory tab.
1.
Access Partition Manager.
For details on accessing Partition Manager or other tools, see “Tools for Configuring
nPartitions” (page 165).
2.
3.
Select the nPartition whose cell attribute values you want to modify.
Initiate the nPartition modify action.
If using Partition Manager Version 1.0, the Partition→Modify Partition action.
If using Partition Manager Version 2.0, select the nPartition→Modify nPartition action.
4.
Access the Partition Manager section(s) for configuring cell attributes.
From Partition Manager Version 1.0, select the Change Cell Attributes tab, then select the
cell and click the Modify Cell button. This enables you to configure the use-on-next-boot
value for the selected cell.
Setting Cell Attributes
193
From Partition Manager Version 2.0, use the Set Cell Options tab to configure cell
use-on-next-boot values, and use the Configure Memory tab to configure cell local memory
values.
CAUTION: Memory configured as cell local memory only can be used by operating systems
that support it.
Any memory configured as cell local memory is unusable when an nPartition runs an
operating system that does not support it.
5.
6.
7.
After changing attribute values for all the cells you plan to modify, click the OK button.
Review all information presented in the Notes and Warnings, the Summary of Changes,
and the HA Checks tabs.
Either cancel or proceed with the cell attribute changes.
Click the Cancel button to cancel the changes.
To proceed with the cell attribute changes, click the Finish button or click the OK button.
8.
Reboot the nPartition to use the cells' new attribute values.
On cell-based servers based on the HP sx1000 chipset or HP sx2000 chipset, if you have
changed cell local memory (CLM) values then you must reboot the nPartition whose CLM
values have changed. If you also are changing use-on-next-boot values then also use the
following guidelines.
If you have changed any cell use-on-next-boot settings for the nPartition then reboot the
nPartition in either of two ways:
•
Perform a standard reboot (HP-UX: shutdown -r; Windows: shutdown /r; Linux:
shutdown -r time; OpenVMS: @SYS$SYSTEM:SHUTDOWN with an automatic system
reboot).
If you have only changed use-on-next-boot values from y to n, then perform a reboot.
Any cells set to not be used will still be assigned to the nPartition but will not be used
(will not rendezvous) in the nPartition.
•
Perform a reboot for reconfig (HP-UX: shutdown -R; Windows: shutdown /r; Linux:
shutdown -r time; OpenVMS: @SYS$SYSTEM:SHUTDOWN with an automatic system
reboot).
If you have changed any use-on-next-boot values from n (do not use on next boot) to
y (use the cell on next boot), then you must perform a reboot for reconfig to allow the
currently inactive cells to reboot and rendezvous when the nPartition reboots.
Setting nPartition Core Cell Choices
You can set the core cell choices for an nPartition by using any one of the following procedures:
• “Setting Core Cell Choices (BCH Menu)” (page 195)
• “Setting Core Cell Choices (EFI Shell)” (page 195)
• “Setting Core Cell Choices (nPartition Commands)” (page 196)
• “Setting Core Cell Choices (Partition Manager)” (page 197)
The core cell choice settings for an nPartition are optional preferences that establish which cells
in the nPartition are preferred to be selected as the core cell for the nPartition.
194
Creating and Configuring nPartitions
NOTE:
You do not need to specify core cell choices for a valid core cell to be chosen.
By default on four-cell and HP Superdome servers, system firmware selects the lowest numbered
eligible cell to be the active core cell for the nPartition.
By default on two-cell servers, cell 1 is selected as the core cell.
Procedure 6-20 Setting Core Cell Choices (BCH Menu)
From the BCH Menu, use the Configuration menu, COC command to configure core cell choices
for the nPartition. The BCH Menu is available only on HP 9000 systems.
1.
Access the BCH Main Menu for the nPartition whose core cell choices you want to configure.
Login to the service processor (MP or GSP) and enter CO to access the Console list. Select
the nPartition console. When accessing the console, confirm that you are at the BCH Main
Menu (the Main Menu: Enter command or menu> prompt). If at a BCH menu other
than the Main Menu, then enter MA to return to the BCH Main Menu.
2.
3.
Enter CO to access the BCH Configuration Menu.
Enter the COC command to list or set the core cell choices for the local nPartition.
Entering COC with no arguments lists all core cell choice preferences.
The COC command syntax is:
COC choice cell
where choice is 0-3 (with 0 being the highest-priority choice) and where cell is the cell ID.
For example, COC 0 2 sets the most preferred core cell choice to be cell ID 2. Likewise, COC
1 4 sets the next (second-highest priority) core preference to be cell ID 4.
Use the HELP COC command for other details about the COC command.
4.
Exit the console and service processor interfaces if finished using them.
To exit the BCH environment type ^B (Control-B); this exits the nPartition console and
returns to the service processor Main Menu. To exit the service processor, type X at the Main
Menu.
Procedure 6-21 Setting Core Cell Choices (EFI Shell)
From the EFI Shell environment, use the rootcell command to set core cell choices for the
local nPartition. The EFI Shell is available only on HP Integrity systems.
1.
Access the EFI Shell environment for the nPartition whose core cell choices you want to
configure.
Login to the service processor (MP or GSP) and enter CO to access the Console list. Select
the nPartition console.
When accessing the console, confirm that you are at the EFI Boot Manager menu (the main
EFI menu). If at another EFI menu, select the Exit option from the sub-menus until you
return to the screen with the EFI Boot Manager heading.
From the EFI Boot Manager menu, select the EFI Shell menu option to access the EFI Shell
environment.
2.
At the EFI Shell interface enter the rootcell command to list or set the core cell choices
for the local nPartition.
Enter the rootcell command with no arguments to display the current core cell choice
list.
Enter the rootcell clear command to clear the list of preferred core cells.
Enter rootcell c0 c1... to specify up to four choices, with c0 being the highest-priority
choice and c0-c3 being the cell numbers.
Setting nPartition Core Cell Choices
195
3.
Exit the console and service processor interfaces if finished using them.
To exit the EFI environment type ^B (Control-B); this exits the nPartition console and returns
to the service processor Main Menu. To exit the service processor, type X at the Main Menu.
Procedure 6-22 Setting Core Cell Choices (nPartition Commands)
From the command line, use the parmodify command to configure the core cell choices for an
nPartition. You also can use the parstatus -V -p# command to list the core cell choices for
an nPartition (-p# where # is the nPartition number).
NOTE: You can remotely perform this task using remote administration options supported by
the Enhanced nPartition Commands or Partition Manager Version 2.0. Remote administration
is supported by the Partition Manager Tools→Switch Complexes action and by the nPartition
command -u... -h... options or -g... -h... options.
For details see “Tools for Configuring nPartitions” (page 165).
1.
Login to a system with the nPartition commands installed.
If using remote administration features to set core cell choices, you can login to any system
with Enhanced nPartition Commands installed.
2.
Issue the parstatus -V -p# command to list the current core cell choices and core cell
use for an nPartition.
The parstatus -V -p# command list detailed status for the specified nPartition (-p#
where # is the nPartition number).
The nPartition status includes the current active core cell ("Core Cell"), and any core cell
choice settings.
The core cell choice preferences are listed by parstatus as the "Core Cell Alternate" settings
with "1" being the highest priority and "2" through "4" as the lower priority core cell choices.
# parstatus -V -p0
[Partition]
Partition Number
:
Partition Name
:
Status
:
IP address
:
Primary Boot Path
:
Alternate Boot Path
:
HA Alternate Boot Path :
PDC Revision
:
IODCH Version
:
CPU Speed
:
Core Cell
:
Core Cell Alternate [1]:
Core Cell Alternate [2]:
0
jules00
active
0.0.0.0
0/0/2/0/0.13.0
0/0/2/0/0.0.0
0/0/2/0/0.14.0
6.0
23664
552 MHz
cab0,cell0
cab0,cell0
cab0,cell2
....
Hardware Location
===================
cab0,bay0,chassis1
cab0,bay1,chassis3
#
196
Creating and Configuring nPartitions
Usage
============
active
active
Core
IO
====
yes
yes
Connected
To
==========
cab0,cell0
cab0,cell2
Par
Num
===
0
0
3.
Modify the nPartition core cell choices using the parmodify -p# -r#... command.
You can modify the core cell choices for the local nPartition or any remote nPartition in the
server complex.
Use the following command: parmodify -p# -r# -r#...
Specify the nPartition number (-p#) and the cell ID (-r#) for all cells you wish to designate
as core cell choices.
# parmodify -p0 -r2 -r0
Command succeeded.
#
The order in which you list the cells is the order in which the nPartition core cell choices are
established; the first cell listed is the first preferred core cell (choice 1), and the subsequent
cells are lower-priority core cell choices (choices 2 through 4, if specified).
Procedure 6-23 Setting Core Cell Choices (Partition Manager)
You can set core cell choices by using Partition Manager.
When using Partition Manager Version 1.0, select the nPartition to configure, select the
Partition→Modify Partition action, and use the Core Cell Choices tab.
When using Partition Manager Version 2.0, select the nPartition to configure, select the
nPartition→Modify nPartition action, select the Set Cell Options tab, and use the Core Cell
Choice column to set priorities.
1.
Access Partition Manager.
For details on accessing Partition Manager or other tools, see “Tools for Configuring
nPartitions” (page 165).
2.
3.
Select the nPartition whose core cell choices you want to configure.
Initiate the nPartition modify action.
If using Partition Manager Version 1.0, the Partition→Modify Partition action.
If using Partition Manager Version 2.0, select the nPartition→Modify nPartition action.
4.
Access the Partition Manager area for setting core cell choices and then make any changes
to the core choices for the nPartition.
From Partition Manager Version 1.0, select the Core Cell Choices tab. Highlight the cell
whose core cell choice you want to configure, select the desired choice priority (1st, 2nd,
none, etc.) from the Core Cell Choice pop-up list, and click the Modify button to modify the
priority.
From Partition Manager Version 2.0, select Set Cell Options tab, and use the Core Cell
Choice column to set priorities.
5.
6.
7.
After changing attribute values for all the cells you plan to modify, click the OK button.
Review all information presented in the Notes and Warnings, the Summary of Changes,
and the HA Checks tabs.
Either cancel or proceed with changing the core cell choices.
Click the Cancel button to cancel the changes.
To proceed with the core cell changes, click the Finish button or click the OK button.
8.
Exit Partition Manager.
From Partition Manager Version 1.0, select the File→Exit action.
From Partition Manager Version 2.0, select Log off parmgr or exit the Web browser when
finished.
Setting nPartition Core Cell Choices
197
Unlocking Complex Profile Entries
You can manually unlock a Complex Profile entry by using either of the following procedures:
•
•
“Complex Profile Unlocking (Service Processor)” (page 198)
“Complex Profile Unlocking (nPartition Commands)” (page 198)
The Complex Profile is a set of data that determines how hardware is assigned to and used by
nPartitions in an server complex. Each Complex Profile entry has its own lock which is used to
restrict access to the entry.
In certain situations you might need to manually unlock a Complex Profile entry, for example
when an nPartition configuration tool such as Partition Manager has prematurely exited before
it sends revised Complex Profile entries and corresponding lock keys back to the service processor.
For details see “Complex Profile” (page 36).
CAUTION: You should generally avoid manually unlocking Complex Profile entries because
doing so can can result in the loss of configuration changes.
Procedure 6-24 Complex Profile Unlocking (Service Processor)
This procedure unlocks a Complex Profile entry by using the RL command at the service processor
Command menu.
1.
2.
3.
Login to the service processor (MP or GSP) and enter CM to access the Command menu.
At the service processor Command menu, issue the RL command.
Select the Complex Profile entry you want to unlock.
[feshd4-u] MP:CM> rl
WARNING: This command should only be used to recover from a hung
complex reconfiguration.
Random breaking of locks will cause unpredictable results
and could cause your system to crash.
A - Stable complex configuration data
B - Dynamic complex configuration data
C - Partition configuration data
Select configuration data: A
Do you want to break stable complex configuration data lock? (Y/[N]) y
-> The selected lock will be broken.
Procedure 6-25 Complex Profile Unlocking (nPartition Commands)
This procedure unlocks a Complex Profile entry by using the parunlock nPartition configuration
command.
NOTE: You can remotely perform this task using remote administration options supported by
the Enhanced nPartition Commands or Partition Manager Version 2.0. Remote administration
is supported by the Partition Manager Tools→Switch Complexes action and by the nPartition
command -u... -h... options or -g... -h... options.
For details see “Tools for Configuring nPartitions” (page 165).
1.
198
Login to HP-UX running on an existing nPartition in the server complex, or login to a system
with the Enhanced nPartition Commands.
Creating and Configuring nPartitions
2.
Issue the parunlock command with the command-line option appropriate for the Complex
Profile entry or entries you want to unlock.
parunlock Options for Original nPartition Commands The Original nPartition Commands
parunlock command supports the following options:
-s
Unlock the Stable Complex Configuration Data.
-p#
Unlock the Partition Configuration Data for the nPartition whose number (#) is
specified.
-A
Unlock the Stable Complex Configuration Data and the Partition Configuration Data
for all nPartitions in the complex.
parunlock Options for Enhanced nPartition Commands The Enhanced nPartition
Commands parunlock command supports the following options:
-s
Unlock the Stable Complex Configuration Data. On HP Integrity servers the -s option
unlocks the "read lock" that controls read access to the current Stable Complex
Configuration Data. See also the -P option.
-d
Unlock the Dynamic Complex Configuration Data.
-p#
Unlock the Partition Configuration Data for the nPartition whose number (#) is
specified.
-P
Cancel any pending changes to the Stable Complex Configuration Data. On HP
Integrity servers the -P option unlocks the "write lock" that controls write access to
a modifiable copy of the Stable Complex Configuration Data. See also the -s option.
-A
Unlock the Stable Complex Configuration Data, Dynamic Complex Configuration
Data, and the Partition Configuration Data for all nPartitions in the complex. On HP
Integrity servers the -A option unlocks both the "read lock" and "write lock" for the
Stable Complex Configuration Data.
Canceling Pending Changes to the Complex Profile
You can cancel a pending change to the Stable Complex Configuration Data for a cell-based
server by unlocking the the Stable Complex Configuration Data before the service processor has
pushed out the revised data for the entry.
For example, you can abort a cell assignment change when you have issued a request to unassign
an active cell but manually unlock the effected Complex Profile entries before performing a
reboot for reconfig of the nPartition to which the cell originally is assigned.
For background details see “Complex Profile” (page 36).
CAUTION: You should generally avoid manually unlocking Complex Profile entries because
doing so can can result in the loss of configuration changes.
Procedure 6-26 Aborting Cell Assignment Changes
You can cancel a pending change to an active cell by using this procedure. Only changes involving
the unassignment (deletion) of an active cell from an nPartition can practically be canceled.
1.
After issuing a request to unassign an active cell from its nPartition, do not perform a
shutdown or reset of the nPartition.
When the cell assignment of an active cell is pending, the Stable Complex Configuration
Data is not pushed out until the cell is at the boot is blocked (BIB) state, which occurs during
a reboot for reconfig or shutdown for reconfig of its nPartition.
2.
Issue a request to unlock the Stable Complex Configuration Data for the server where the
cell assignment change is pending.
Use one of the the procedures given in “Unlocking Complex Profile Entries” (page 198).
Canceling Pending Changes to the Complex Profile
199
200
7 Managing Hardware Resources
This chapter covers the procedures for managing the hardware resources in nPartitions and their
server complexes.
The topics covered include power and LED (attention indicator) management, hardware
configuration and deconfiguration, and analysis of the current complex status.
Tools for Managing Hardware
You can list and manage server hardware using the following tools.
•
Service Processor (MP or GSP) Menus
Service processor menus provide a complex-wide service interface that can allow access to
all hardware and nPartitions.
See “Command Reference for Service Processor Commands” (page 80).
•
EFI Boot Manager and EFI Shell
On HP Integrity servers only, the EFI (Extensible Firmware Interface) Boot Manager and
Shell are the methods for interacting with an nPartition before it has booted an operating
system.
See “Command Reference for EFI Shell Commands” (page 81).
•
Boot Console Handler (BCH) Menu Commands
On PA-RISC servers, the BCH interface is the method for interacting with an nPartition
before it has booted an operating system.
See “Command Reference for BCH Menu Commands” (page 84).
•
nPartition Commands
HP nPartition commands allow you to configure, manage, and monitor nPartitions and
hardware within a server complex.
The Enhanced nPartition Commands also can remotely manage complexes based on the HP
sx1000 chipset or HP sx2000 chipset.
See “Commands for Configuring nPartitions” (page 19) for details.
•
Partition Manager (/opt/parmgr/bin/parmgr)
Partition Manager provides a graphical interface for managing and monitoring nPartitions
and hardware within a server complex.
See “Partition Manager” (page 22).
Task Summaries for Hardware Resource Management
Table 7-1 describes the main hardware management tasks and provides brief summaries and
references for detailed procedures.
You can perform the hardware tasks in Table 7-1 “Hardware Management Task Summaries”
using various tools, including the service processor (MP or GSP), Boot Console Handler (BCH,
available only on PA-RISC servers), Extensible Firmware Interface (EFI, available only on HP
Integrity servers), nPartition commands, or Partition Manager ( /opt/parmgr/bin/parmgr).
See “Tools for Managing Hardware” (page 201) for details.
Tools for Managing Hardware
201
Table 7-1 Hardware Management Task Summaries
Task
“Powering Server
Cabinets On and Off”
Summary
• CAUTION: Before powering off system hardware, you first must check whether it
is being used and also inspect the hardware.
• Cabinet Power Switch: use the 48-volt power switch on the front of the cabinet.
• Service Processor (MP or GSP): PE command.
See “Powering Server Cabinets On and Off” (page 205).
“Powering Cells and I/O
• NOTE: Powering on a cell also powers on any I/O chassis attached to the cell, and
Chassis On and Off”
powering off a cell also powers off any I/O chassis attached to the cell. Powering on
or off an I/O chassis connected to a powered-on cell causes the cell to reset if the cell
located and mapped the I/O chassis during its cell boot process.
• Service Processor (MP or GSP): PE command.
• nPartition Commands: frupower command, and specify -o or -f and a cell or I/O
chassis: -o option to turn power on, -f option to turn power off, -c# for a cell (where
# is the cell number), -i #/#/# for an I/O chassis (where #/#/# is the
cabinet/bay/chassis).
• Partition Manager:
— Version 1.0 — Select an inactive cell or I/O chassis, and use the Cell→Power Off
Cell or I/O→Power Off I/O Chassis action (or a similar "Power On..." action).
— Version 2.0 — Select an inactive cell or I/O chassis, and use the Cell→Power Off
Cell or I/O→Power Off I/O Chassis action (or a similar "Power On..." action).
See “Powering Cells and I/O Chassis On and Off” (page 206).
“Turning Attention
• nPartition Commands: fruled command and specify -o or -f and a cabinet, cell, or
Indicators (LEDs) On and
I/O chassis: -o option to blink the LED, -f option to turn off the LED, -b# for a cabinet
Off”
(where # is the cabinet number), -c# for a cell (where # is the cell number), -i #/#/#
for an I/O chassis (where #/#/# is the cabinet/bay/chassis)
HP-UX B.11.11 supports the rad command for controlling PCI card slot attention
indicators and other tasks.
HP-UX B.11.23 and HP-UX B.11.31 support the olrad command for controlling PCI
card slot attention indicators and other tasks.
• Partition Manager:
— Version 1.0 — Select a cell or I/O chassis, and use the Cell→Light Cell LED or
I/O→Light I/O Chassis LED action. To turn off all LEDs use the Complex→Clear
All LEDs action.
— Version 2.0 — Select a cell or I/O chassis, and use the Cell→Turn On Cell LED or
I/O→Turn On Chassis LED action (or a similar "Turn Off..." action). To turn off
all LEDs use the Complex→Clear All LEDs action.
See “Turning Attention Indicators (LEDs) On and Off” (page 209).
202
Managing Hardware Resources
Table 7-1 Hardware Management Task Summaries (continued)
Task
“Configuring and
Deconfiguring Cells”
Summary
• NOTE: Configuring and deconfiguring cells may be restricted based on any Instant
Capacity contract for the server complex.
To make an inactive cell active (configured), its use-on-next-boot value must be "y"
and its nPartition must perform a reboot for reconfig (shutdown -R). To make an
active cell inactive (deconfigured) its use-on-next-boot value must be "n" and its
nPartition must perform a normal reboot (shutdown -r).
• BCH Menu: Configuration Menu, CELLCONFIG command.
• EFI Shell: cellconfig command; use of this command is restricted.
• nPartition Commands: parmodify -p# -m#... command to modify attributes of
the specified cell (-m#..., where # is the cell number) for the specified nPartition (-p#,
where # is the nPartition number).
— Original nPartition Commands — For the cell modify (-m) option, specify:
-m#::y: to configure the cell to be used the next time the nPartition boots, or
-m#::n: to deconfigure the cell.
— Enhanced nPartition Commands — For the cell modify (-m) option, specify:
-m#::y::clm to configure the cell to be used the next time the nPartition boots, or
-m#::n::clm to deconfigure the cell. The clm parameter specifies the amount of
cell local memory.
• Partition Manager:
— Version 1.0 — Select the nPartition to which the cell belongs, select the
Partition→Modify Partition action, Change Cell Attributes tab, select the cell(s),
and click Modify Cell(s).
— Version 2.0 — Select the nPartition to which the cell belongs, select the
nPartition→Modify nPartition action, Set Cell Options tab, and configure the
use-on-next-boot value.
See “Configuring and Deconfiguring Cells” (page 213).
“Configuring and
Deconfiguring
Processors”
• NOTE: Configuring and deconfiguring processors may be restricted based on any
Instant Capacity contract for the server complex.
After a processor configuration is changed the nPartition in which the processor resides
must be rebooted to use the new configuration.
• BCH Menu: Configuration Menu, CPUCONFIG command.
CPUCONFIG cell cpu OFF deconfigures the specified processor (cpu) on the specified
cell (cell).
CPUCONFIG cell cpu ON configures the processor on the cell.
• EFI Shell: cpuconfig command.
cpuconfig cell cpu off deconfigures the specified processor (cpu) on the specified
cell (cell).
cpuconfig cell cpu on configures the processor on the cell.
See “Configuring and Deconfiguring Processors” (page 217).
Task Summaries for Hardware Resource Management
203
Table 7-1 Hardware Management Task Summaries (continued)
Task
Summary
“Enabling and Disabling
• CAUTION: Some operating systems do not support Hyper-Threading. Problems can
Hyper-Threading on
occur when running an OS that does not support Hyper-Threading on an nPartition
Dual-Core Intel®
that has Hyper-Threading enabled.
Itanium® 2 Processors”
• NOTE: You must reset an nPartition when changing its Hyper-Threading status.
Hyper-Threading will not be enabled or disabled until after the nPartition is reset.
• EFI Shell: cpuconfig threads command.
cpuconfig threads on to schedule Hyper-Threading to be enabled after the
nPartition is reset.
cpuconfig threads off to schedule Hyper-Threading to be disabled after the
nPartition is reset.
• HP-UX: setboot command.
setboot -m on to schedule Hyper-Threading to be enabled after the nPartition is
reset.
setboot -m off to schedule Hyper-Threading to be disabled after the nPartition
is reset.
• Enhanced nPartition Commands: parmodify -pn -T [y|n] command to enable
(-T y) or disable (-T n) Hyper-Threading for the specified nPartition (-pn, where n
is the nPartition number) the next time the nPartition is reset.
• Partition Manager: When performing the Create nPartition or Modify nPartition tasks,
select or deselect the Enable Hyper-Threading check box on the Configure Memory
tab to configure the Hyper-Threading status the next time an nPartition is reset.
See “Enabling and Disabling Hyper-Threading on Dual-Core Intel® Itanium® 2
Processors” (page 218).
“Configuring and
Deconfiguring Memory
(DIMMs)”
• NOTE: DIMMs operate either in ranks of four or echelons of two, depending on the
memory architecture of the server. When you deallocate a DIMM, all other DIMMs
in the rank or echelon also will not be used the next time the nPartition boots.
Each rank or echelon is numbered (0, 1, 2, and so on up to hexadecimal number F as
needed). The DIMMs in the rank or echelon are lettered (A to D). For example, rank
0 includes DIMMs 0A, 0B, 0C, and 0D; echelon 1 has DIMMs 1A and 1B.
After the DIMM configuration is changed the nPartition in which it resides must be
rebooted to use the new configuration.
• BCH Menu: Service Menu, DIMMDEALLOC command.
DIMMDEALLOC cell dimm OFF deconfigures the specified DIMM (dimm) on the cell
(cell) indicated.
DIMMDEALLOC cell dimm ON configures the DIMM on the cell.
Use DIMMDEALLOC cell to display the DIMM configuration for the specified cell.
• EFI Shell: dimmconfig command.
dimmconfig cell dimm OFF deconfigures the specified DIMM (dimm) on the cell
(cell) indicated.
dimmconfig cell dimm ON configures the DIMM on the cell.
Use dimmconfig cell to display the DIMM configuration for the specified cell.
See “Configuring and Deconfiguring Memory (DIMMs)” (page 220).
“Complex Health
Analysis of a Server”
• Complex health analysis provides both an evaluation of the complex hardware and
an evaluation its nPartition configurations.
• Partition Manager: Use the Complex→Analyze Complex Health action.
See “Complex Health Analysis of a Server” (page 222).
204
Managing Hardware Resources
Powering Server Cabinets On and Off
You can power on or power off server cabinets by using any one of the following procedures:
• “Powering Server Cabinets On and Off (Cabinet Power Switch)” (page 205)
• “Powering Server Cabinets On and Off (Service Processor)” (page 205)
When powering off a cabinet, you turn off 48-volt power to the cabinet thus causing all cells and
all I/O chassis to power off, and causing most fans to turn off.
Changes in cabinet power status do not affect the standby power that supplies system utilities
such as the service processor (GSP or MP) and keeps some fans running. These utilities and fans
can receive power as long as standby power is enabled.
CAUTION: When you power on or off HP Superdome 64-way compute cabinets, you must
power off and power on cabinet 0 and cabinet 1 in such a way that both cabinets are off for an
overlapping interval.
If either Superdome 64-way cabinet is powered off then powered on while the other cabinet
remains on, then communications between the two cabinets is lost.
CAUTION:
Before powering off system hardware, you first must check whether it is being used.
The cabinet power switch and the PE command at the service processor Command menu do not
check whether system hardware is in use before powering it off.
Procedure 7-1 Powering Server Cabinets On and Off (Cabinet Power Switch)
Use the Virtual Front Panel to check status, and then use the cabinet power switch to manage
48-volt power for a cabinet with the cabinet hardware.
1.
Login to the service processor for the server complex and access the Virtual Front Panel for
the system.
From the service processor Main menu, enter VFP to access the Virtual Front Panel menu,
then enter S to access the "system VFP" that displays the current status for all nPartitions.
2.
Check the VFP status to see whether any cabinet hardware is running an operating system
(OS).
Any nPartition whose state is "OS heartbeat" is running an OS and thus should not have its
hardware powered off until after the OS is shut down.
Type ^b (Control-b) to exit the VFP.
3.
4.
Shut down the OS running on any cabinet hardware that you plan to power off.
Confirm that nobody else is using or servicing the cabinet hardware you plan to power on
or off.
Both physically inspect the hardware and check whether others are remotely accessing the
service processor (using the WHO command at the Command menu).
5.
Access the cabinet hardware and flip the power switch (located on the front of the cabinet)
to the on or off position in order to power the cabinet on or off.
Procedure 7-2 Powering Server Cabinets On and Off (Service Processor)
Use the Virtual Front Panel, and then use the Command menu PE command to turn 48-volt
cabinet power on or off from the service processor (GSP or MP).
1.
Login to the service processor for the server and access the Virtual Front Panel for the system.
From the service processor Main menu, enter VFP to access the Virtual Front Panel menu,
then enter S to access the "system VFP" that displays the current status for all nPartitions.
Powering Server Cabinets On and Off
205
2.
Check the VFP status to see whether any cabinet hardware is running an operating system
(OS).
Any nPartition whose state is "OS heartbeat" is running an OS and thus should not have its
hardware powered off until after the OS is shut down.
Type ^b (Control-b) to exit the VFP.
3.
4.
Shut down the OS running on any cabinet hardware that you plan to power off.
Confirm that nobody else is using or servicing the cabinet hardware you plan to power on
or off.
Both physically inspect the hardware and check whether others are remotely accessing the
service processor (using the WHO command at the Command menu).
5.
Access the service processor Command menu, issue the PE command, then select the cabinet
to power on or power off.
From the service processor Main menu, enter CM to access the Command menu. To exit the
Command menu enter MA.
When using the PE command enter B to power on or off a cabinet; specify the cabinet number;
and then enter ON (power on), OFF (power off), or Q (quit without changing the power status).
GSP:CM> PE
This command controls power enable to a hardware device.
B - Cabinet
C - Cell
I - IO Chassis
Select Device: b
Enter cabinet number: 1
The power state is ON for Cabinet 1.
In what state do you want the power? (ON/OFF)
Powering Cells and I/O Chassis On and Off
You can power on or power off cells and I/O chassis by using any one of the following procedures:
• “Powering Cells and I/O Chassis On and Off (Service Processor)” (page 207)
• “Powering Cells and I/O Chassis On and Off (nPartition Commands)” (page 208)
• “Powering Cells and I/O Chassis On and Off (Partition Manager)” (page 208)
You can control power for cells and I/O chassis from remote locations, without physically accessing
the system hardware.
NOTE: On HP nPartition systems, powering on a cell also powers on any I/O chassis attached
to the cell, and powering off a cell also powers off any I/O chassis attached to the cell.
Powering on or off an I/O chassis connected to a powered-on cell causes the cell to reset if the
cell located and mapped the I/O chassis during its cell boot process.
The frupower command and Partition Manager permit you to power on or off inactive cells
and I/O chassis that are assigned to the current nPartition or are not assigned to any nPartition.
The PE command at the service processor Command menu permits you to power on or off any
hardware in the complex, including active cells and I/O chassis. The PE command does not check
the current usage of components.
206
Managing Hardware Resources
Procedure 7-3 Powering Cells and I/O Chassis On and Off (Service Processor)
Use the Command menu PE command to power on and power off cells, I/O chassis, and cabinets
from the service processor interface (GSP or MP).
CAUTION: When using the PE command at the service processor Command menu to power
on or off hardware, be certain to specify the correct component to power on or off.
The PE command does not check whether the hardware is actively being used.
You can manage the power for all components within the server complex by using the PE
command at the service processor Command menu, regardless of any nPartition assignment or
the status (active or inactive) for the hardware components.
1.
Login to the service processor for the server and access the Command menu.
From the service processor Main menu, enter CM to access the Command menu. To exit the
Command menu enter MA.
2.
Issue the PE command and specify the type of hardware whose power you want to turn on
or turn off.
You can manage power to cells, I/O chassis, and cabinets.
3.
Specify the hardware device to power on or power off.
The service processor does not check whether the specified component is currently being
used.
•
•
Cabinets—When you power on or off a cabinet, the firmware also powers on or off all
cells and I/O chassis in the cabinet.
Cells—When you power on or off a cell, the firmware also powers on or off any I/O
chassis attached to the cell.
When specifying a cell, you indicate both the cabinet number and the slot in which the
cell resides.
•
I/O Chassis—When you power off an I/O chassis from the service processor Command
menu, the system firmware resets the cell attached to the I/O chassis (if the cell located
and mapped the I/O chassis during its cell boot process).
When specifying an I/O chassis, you indicate the cabinet, bay, and chassis numbers to
identify it.
In the following example, the service processor powers off cell 2 in cabinet 0.
GSP:CM> PE
This command controls power enable to a hardware device.
B - Cabinet
C - Cell
I - IO Chassis
Select Device: c
Enter cabinet number: 0
Enter slot number: 2
The power is ON for the Cell in Cabinet 0, Slot 2.
In what state do you want the power for the
Cell in Cabinet 0, Slot 2? (ON/OFF) OFF
GSP:CM>
Powering Cells and I/O Chassis On and Off
207
Procedure 7-4 Powering Cells and I/O Chassis On and Off (nPartition Commands)
From the command line, use the frupower -o -c# and frupower -f -c# commands to
power on and power off cells (and their associated I/O chassis).
NOTE: You can remotely perform this task using remote administration options supported by
the Enhanced nPartition Commands or Partition Manager Version 2.0. Remote administration
is supported by the Partition Manager Tools→Switch Complexes action and by the nPartition
command -u... -h... options or -g... -h... options.
For details see “Tools for Managing Hardware” (page 201).
1.
Login to a system with the nPartition commands installed.
To manage power for a cell, you must login to the nPartition to which the cell is assigned
or use the Enhanced nPartition Commands remote administration features.
If the cell is not assigned to an nPartition, you can manage its power from any nPartition or
from a remote system.
2.
Use the frupower command to turn on or turn off the cell power.
Specify the frupower -f -c# command to power off a cell. (-c#). This also powers off
any I/O chassis connected to the cell.
Specify the frupower -o -c# command to power on a cell (-c#). This also powers on any
I/O chassis connected to the cell.
The following example shows several sample frupower commands and their results.
# frupower -f -c0
Error: Can not power off active cell 0.
# frupower -f -c2
# frupower -o -c2
# frupower -f -c6
Error: Cell 6 belongs to partition 1. Can not power off cell.
#
# frupower -f -i0/1/1
Error: I/O chassis 0/1/1 is attached to a powered-on free
cell 4. Please power off the free cell.
#
In the above example, cell 0 is active and thus cannot be powered off using frupower. Cell
2 is inactive and is powered off (frupower -f -c2) and then powered back on (frupower
-o -c2). Cell 6 is assigned to a remote nPartition (partition number 1) and thus cannot be
powered off. I/O chassis 0/1/1 is attached to cell 4, so to power it off cell 4 must be powered
off.
Procedure 7-5 Powering Cells and I/O Chassis On and Off (Partition Manager)
You can power cells and I/O chassis on and off by using Partition Manager.
When using Partition Manager Version 1.0, select an inactive cell or I/O chassis, and use the
Cell→Power Off Cell or I/O→Power Off I/O Chassis action (or a similar "Power On..." action)
When using Partition Manager Version 2.0, select an inactive cell or I/O chassis, and use the
Cell→Power Off Cell or I/O→Power Off Chassis action (or a similar "Power On..." action).
208
Managing Hardware Resources
NOTE:
You can use Partition Manager to power on or off inactive cells.
You cannot power off active cells. To power on or off cells assigned to a remote nPartition when
using Partition Manager, you must use Partition Manager Version 2.0 remote administration
features.
1.
Access Partition Manager.
For details on accessing Partition Manager or other tools, see “Tools for Managing Hardware”
(page 201).
2.
Select the cell or I/O chassis you want to power on or off.
In Partition Manager Version 1.0, select the nPartition containing the item you want to power
on or off, then select the item.
In Partition Manager Version 2.0, select the cell (or I/O chassis) that you want to power on
or off.
3.
Select the Partition Manager action to power on or off the selected item.
Select the Cell→Power On Cell action, or select the Cell→Power Off Cell action. If powering
on or off an I/O chassis, instead use the I/O→Power On... or I/O→Power Off... actions.
4.
Exit Partition Manager.
From Partition Manager Version 1.0, select the File→Exit action.
From Partition Manager Version 2.0, select Log off parmgr or exit the Web browser when
finished.
Turning Attention Indicators (LEDs) On and Off
You can turn hardware attention indicators (LEDs) on or off by using any one of the following
procedures:
•
•
“Turning Attention Indicators On and Off (nPartition Commands)” (page 210)
“Turning Attention Indicators On and Off (Partition Manager)” (page 212)
HP's nPartition systems provide attention indicators (LEDs) to help you to visually select and
confirm which hardware you want to perform operations on. Attention indicators are amber
(orange) lights.
Table 7-2 lists the meanings for the various attention indicator states. When all components of a
system are functioning and no service operations are occurring, every attention indicator should
be turned off. (HP Superdome cabinet number LCDs remain lit or blinking when cabinet power
is on.)
Table 7-2 Attention Indicator (LED) States and Meanings
Attention Indicator State Meaning
OFF
Not selected.
BLINKING
Selected to be used in a service operation.
ON
Supported for PCI card slot LEDs only.
Service required, problems have been identified with the component.
LEDs for Hardware Components You can control (turn off, blink, and/or turn on) attention
indicators for the following hardware components.
• Cell LEDs Each cell or cell slot has its own attention indicators.
Turning Attention Indicators (LEDs) On and Off
209
—
—
On HP Superdome servers, each cell attention indicator is located on the server cabinet
hardware below the cell slot, just to the right of the power LED for the cell slot.
On other Partition-capable servers, each cell attention indicator is located on the cell
hardware, to the outside of the power LEDs for the cell.
•
I/O Chassis LEDs On HP Superdome servers only, each I/O chassis has a attention indicator,
which is located on the cabinet above the I/O chassis.
•
PCI Card Slot LEDs On all HP nPartition systems, each PCI card slot has an attention
indicator that you can use to select the card slot. You can view the attention indicator for a
PCI card slot when accessing the card cage.
On HP rp7405/rp7410, rp7420, rx7620, rp8400, rp8420, and rx8620 servers only, you also can
view the attention indicator for each PCI slot beneath the corresponding slot, on the external
chassis at the rear of the server cabinet.
•
Cabinet Number LCDs On HP Superdome servers only, each cabinet has a cabinet number
LCD that serves as the attention indicator for the cabinet.
NOTE:
The cabinet "attention" light on HP's nPartition capable servers is not user-controllable.
The cabinet attention light automatically turns on when one or more alert level 6 (or higher)
chassis codes has been recorded in the error logs and has not yet been read. This light
automatically turns off when a user enters the service processor (GSP or MP) chassis logs or
event logs viewer.
Procedure 7-6 Turning Attention Indicators On and Off (nPartition Commands)
From the command line, you can turn attention indicators on or off by using the fruled
command, the rad command (HP-UX B.11.11 only), and the olrad command (HP-UX B.11.23
and HP-UX B.11.31).
You can use the fruled command and specify -o or -f and a cabinet, cell, or I/O chassis: -o
option to blink the LED, -f option to turn off the LED, -b# for a cabinet (where # is the cabinet
number), -c# for a cell (where # is the cell number), -i #/#/# for an I/O chassis (where #/#/#
is the cabinet/bay/chassis).
HP-UX B.11.11 supports the rad command for controlling PCI card slot attention indicators and
other tasks.
HP-UX B.11.23 and HP-UX B.11.31 support the olrad command for controlling PCI card slot
attention indicators and other tasks.
NOTE: You can remotely perform this task using remote administration options supported by
the Enhanced nPartition Commands or Partition Manager Version 2.0. Remote administration
is supported by the Partition Manager Tools→Switch Complexes action and by the nPartition
command -u... -h... options or -g... -h... options.
For details see “Tools for Managing Hardware” (page 201).
1.
Login to a system with the nPartition commands installed.
If using remote administration features to turn attention indicators on or off, you can login
to any system with Enhanced nPartition Commands installed.
To manage PCI slot attention indicators, you must access HP-UX in the local nPartition
where the PCI slot resides (the nPartition to which the cell attached to the I/O chassis
containing the PCI slot is assigned).
210
Managing Hardware Resources
2.
Use the fruled command and either the rad command (HP-UX B.11.11) or the olrad
command (HP-UX B.11.23 and HP-UX B.11.31) to manage (turn on, off, or blink) the attention
indicator for a system hardware component.
From the command line you can manage LEDs for the following hardware components:
•
Cells—Use fruled to blink or turn off a cell attention indicator.
— Turn Off: The fruled -f -c# command turns off the attention indicator for the
specified cell (-c#). To turn off all cell attention indicators use the fruled -f -C
command.
— Blink: The fruled -o -c# command blinks the attention indicator for the specified
cell (-c#).
•
I/O Chassis—Use fruled to blink or turn off HP Superdome I/O chassis attention
indicators.
Specify the I/O chassis using cabinet/bay/chassis notation (#/#/#).
—
—
•
Cabinet Numbers—Use fruled to blink or not-blink (keep lit) the cabinet number LCD
for an HP Superdome cabinet.
— Not-Blink: The fruled -f -b# command stops blinking (keeps it lit) the cabinet
number LCD for the specified cabinet (-b#).
—
•
Turn Off: The fruled -f -i#/#/# command turns off the attention indicator for
the specified I/O chassis (-i#/#/#). To turn off all I/O chassis attention indicators
use the fruled -f -I command.
Blink: The fruled -o -i#/#/# command blinks the attention indicator for the
specified I/O chassis (-i#/#/#).
Blink: The fruled -o -b# command blinks the cabinet number LCD for the
specified cabinet (-b#).
PCI Card Slots—Managing the attention indicator for a PCI card slot is supported from
HP-UX only.
Use the rad command (HP-UX B.11.11 only) or olrad command (HP-UX B.11.23 and
HP-UX B.11.31) to turn on, off, or blink the attention indicator for a PCI card slot.
Specify the PCI slot using cabinet-bay-chassis-slot (#-#-#-#) notation.
—
Turn Off PCI Card Slot Attention Indicator
The HP-UX B.11.11 rad -f off slot command turns off the attention indicator
for the specified PCI card slot (slot).
The HP-UX B.11.23 and HP-UX B.11.31 olrad -I OFF slot command turns off
the attention indicator for the specified PCI card slot (slot).
—
Blink PCI Card Slot Attention Indicator
The HP-UX B.11.11 rad -f attention slot command blinks the attention
indicator for the specified PCI card slot (slot).
The HP-UX B.11.23 and HP-UX B.11.31 olrad -f ATTN slot command blinks
the attention indicator for the specified PCI card slot (slot).
—
Turn On PCI Card Slot Attention Indicator
The HP-UX B.11.11 rad -f on slot command turns on the attention indicator
for the specified PCI card slot (slot).
The HP-UX B.11.23 and HP-UX B.11.31 olrad command does not support turning
on a PCI card slot's attention indicator to a steady-on state.
Turning Attention Indicators (LEDs) On and Off
211
For details refer to the fruled(1), rad(1M), or olrad(1M) manpage.
The following HP-UX B.11.11 example turns off and blinks various attention indicators on
an HP Superdome system, including cell, I/O chassis, PCI slot, and cabinet LEDs.
Example 7-1 Turning Attention Indicators On and Off
# fruled -f -C
# fruled -f -I
1
# fruled -o -c0 -c2 -c4 2
# fruled -o -i0/0/1 -i0/0/3
# fruled -o -b0
# fruled -f -C 3
# fruled -f -I
# fruled -f -b0
# rad -f attention 0-0-1-2
# rad -f off 0-0-1-2
#
1
2
3
4
4
Turn off all cell and I/O chassis attention indicators.
Blink attention indicators for cells 0, 2, and 4 and I/O chassis 0/0/1 and 0/0/3. Blink
the cabinet number LCD for cabinet 0.
Turn off all cell and I/O chassis attention indicators and stop blinking the cabinet
number LCD.
Blink the attention indicator for PCI slot 2 in cabinet 0, bay 0, chassis 1. Then turn
off the same PCI slot attention indicator.
Procedure 7-7 Turning Attention Indicators On and Off (Partition Manager)
You can turn attention indicators (LEDs) on and off by using Partition Manager.
When using Partition Manager Version 1.0, select a cell or I/O chassis, and use the Cell→Light
Cell LED or I/O→Light I/O Chassis LED action. To turn off all LEDs use the Complex→Clear
All LEDs action.
When using Partition Manager Version 2.0, select a cell or I/O chassis, and use the Cell→Turn
On Cell LED or I/O→Turn On Chassis LED action (or a similar "Turn Off..." action). To turn
off all LEDs use the Complex→Clear All LEDs action.
1.
Access Partition Manager.
For details on accessing Partition Manager or other tools, see “Tools for Managing Hardware”
(page 201).
2.
Select the cell or I/O chassis whose attention indicator you want to control.
In Partition Manager Version 1.0, select the nPartition that contains the cell or I/O chassis,
and then select the cell or I/O chassis.
In Partition Manager Version 2.0, select the cell (or I/O chassis) whose attention indicator
you want to control.
3.
Select the Partition Manager action to turn on (blink) or turn off (stop blinking) the attention
indicator (LED) for the selected cell or I/O chassis.
From Partition Manager Version 1.0, use the Cell→Light Cell LED or I/O→Light I/O Chassis
LED action. To turn off all LEDs use the Complex→Clear All LEDs action.
From Partition Manager Version 2.0, use the Cell→Turn On Cell LED or I/O→Turn On
Chassis LED action (or a similar "Turn Off..." action). To turn off all LEDs use the
Complex→Clear All LEDs action.
212
Managing Hardware Resources
4.
Exit Partition Manager.
From Partition Manager Version 1.0, select the File→Exit action.
From Partition Manager Version 2.0, select Log off parmgr or exit the Web browser when
finished.
Configuring and Deconfiguring Cells
You can configure and deconfigure cells by using any one of the following procedures:
• “Configuring and Deconfiguring Cells (BCH Menu)” (page 213)
• “Configuring and Deconfiguring Cells (EFI Shell)” (page 214)
• “Configuring and Deconfiguring Cells (nPartition Commands)” (page 215)
• “Configuring and Deconfiguring Cells (Partition Manager)” (page 216)
You can deconfigure (make inactive) a cell that is assigned to an nPartition by setting its
use-on-next-boot value to "n" (do not use). This causes the cell to remain assigned to the nPartition,
but the cell will be inactive the next time its nPartition boots, meaning the cell hardware resources
will not be used.
Whenever you configure or deconfigure cells, you must reboot the corresponding nPartition for
the configuration change to take effect.
NOTE: Configuring and deconfiguring cells may be restricted based on any Instant Capacity
contract for the server complex.
Procedure 7-8 Configuring and Deconfiguring Cells (BCH Menu)
From the BCH Configuration Menu use the CELLCONFIG command to configure and deconfigure
cells assigned to the local nPartition. The BCH Menu is available only on HP 9000 systems.
1.
Access the BCH Main Menu for the nPartition whose cells you want to configure or
deconfigure.
Login to the service processor (MP or GSP) and enter CO to access the Console list. Select
the nPartition console. When accessing the console, confirm that you are at the BCH Main
Menu (the Main Menu: Enter command or menu> prompt). If at a BCH menu other
than the Main Menu, then enter MA to return to the BCH Main Menu.
2.
3.
Enter CO to access the Configuration Menu.
From the BCH Configuration menu, use the CELLCONFIG command to list or set the
use-on-next-boot value for each cell.
• To list the use-on-next-boot values for all cells in the nPartition, issue the CELLCONFIG
command with no arguments.
• To change a cell use-on-next-boot value, issue the following command:
CELLCONFIG cell [ON|OFF]
where cell is the cell number, ON sets the cell use-on-next-boot value to "y" (yes, do use
the cell), or OFF sets the cell use-on-next-boot value to "n" (no, do not user the cell).
A cell that boots with a "y" (ON) use-on-next-boot value is permitted to rendezvous and
join its nPartition, thus becoming an active cell whose resources are used.
A cell that boots with a "n" (OFF) use-on-next-boot value does not rendezvous and thus
becomes an inactive cell whose resources are not used by its nPartition, although the
cell still is assigned to its nPartition.
Configuring and Deconfiguring Cells
213
4.
Reboot the nPartition to use the cells' new use-on-next-boot settings.
If you have changed any cell use-on-next-boot settings for the nPartition then reboot the
nPartition in either of two ways:
•
Use the REBOOT command at the BCH interface to perform a reboot.
If you have only changed cell configurations from ON to OFF, then perform a reboot
using the REBOOT command. Any cells set to not be used will still be assigned to the
nPartition but will not be used (will not rendezvous) in the nPartition.
•
Use the RECONFIGRESET command at the BCH interface to put the nPartition in the
shutdown for reconfig state, then use the BO command at the service processor Command
menu to boot the nPartition.
If you have changed any cell from OFF ("n", do not use on next boot) to ON ("y", use the
cell on next boot), then you must perform these two tasks; this resets and reconfigures
the nPartition and boots it.
5.
Exit the console and service processor interfaces if finished using them.
To exit the BCH environment type ^B (Control-B); this exits the nPartition console and
returns to the service processor Main Menu. To exit the service processor, type X at the Main
Menu.
Procedure 7-9 Configuring and Deconfiguring Cells (EFI Shell)
From the EFI Shell environment, use the use the cellconfig command to configure or
deconfigure cells in the local nPartition. The EFI Shell is available only on HP Integrity systems.
NOTE: Use of the cellconfig command at the EFI Shell is restricted. See the help
cellconfig command for details.
1.
Access the EFI Shell environment for the nPartition whose cells you want to configure or
deconfigure.
Login to the service processor (MP or GSP) and enter CO to access the Console list. Select
the nPartition console.
When accessing the console, confirm that you are at the EFI Boot Manager menu (the main
EFI menu). If at another EFI menu, select the Exit option from the sub-menus until you
return to the screen with the EFI Boot Manager heading.
From the EFI Boot Manager menu, select the EFI Shell menu option to access the EFI Shell
environment.
2.
Use the cellconfig command to list or set the configuration setting (the use-on-next-boot
value) for each cell.
• To list the use-on-next-boot values for all cells in the nPartition, issue the cellconfig
command with no arguments.
• To change a cell use-on-next-boot value, issue the following command:
cellconfig cell [on|off]
where cell is the cell number, on sets the cell use-on-next-boot value to "y" (yes, do use
the cell), or off sets the cell use-on-next-boot value to "n" (no, do not user the cell).
A cell that boots with a "y" (on) use-on-next-boot value is permitted to rendezvous and
join its nPartition, thus becoming an active cell whose resources are used.
A cell that boots with a "n" (off) use-on-next-boot value does not rendezvous and thus
becomes an inactive cell whose resources are not used by its nPartition, although the
cell still is assigned to its nPartition.
214
Managing Hardware Resources
3.
Reboot the nPartition to use the cells' new configuration settings.
If you have changed any cell use-on-next-boot settings for the nPartition then reboot the
nPartition in either of two ways:
•
Use the reset command at the EFI Shell to perform a reboot.
If you have only changed cell configurations from on to off, then perform a reboot
using the reset command. Any cells set to not be used will still be assigned to the
nPartition but will not be used (will not rendezvous) in the nPartition.
•
Use the reconfigreset command at the EFI Shell to put the nPartition in the shutdown
for reconfig state, then use the BO command at the service processor Command Menu
to boot the nPartition.
If you have changed any cell from off ("n", do not use on next boot) to on ("y", use the
cell on next boot), then you must perform these two tasks; this resets and reconfigures
the nPartition and boots it.
4.
Exit the console and service processor interfaces if finished using them.
To exit the EFI environment type ^B (Control-B); this exits the nPartition console and returns
to the service processor Main Menu. To exit the service processor, type X at the Main Menu.
Procedure 7-10 Configuring and Deconfiguring Cells (nPartition Commands)
From the command line, use the parmodify -p# -m#... command to configure or deconfigure
a cell by setting its use-on-next-boot attribute value. You also can use the parstatus -V -c#
command to list attribute details for a specific cell (-c# where # is the cell number).
NOTE: You can remotely perform this task using remote administration options supported by
the Enhanced nPartition Commands or Partition Manager Version 2.0. Remote administration
is supported by the Partition Manager Tools→Switch Complexes action and by the nPartition
command -u... -h... options or -g... -h... options.
For details see “Tools for Managing Hardware” (page 201).
1.
Login to a system with the nPartition commands installed.
If using remote administration features to configure and deconfigure cells, you can login to
any system with Enhanced nPartition Commands installed.
2.
To list current cell attribute settings, use the parstatus -C command to list the
use-on-next-boot values for all cells, or use the parstatus -V -c# command to list all
attribute values for a specific cell (-c# where # is the cell number)
3.
To modify cell attribute values, use the parmodify -p# -m#... command and specify
the new cell attributes as part of the -m option. The -m... option differs slightly for the
nPartition command releases.
You must specify both the nPartition (-p# where # is the nPartition number) and the cell
(-m#... where # is the cell number).
See “Setting Cell Attributes” (page 189) for details on modifying cell attributes, including
the use-on-next-boot value that determines whether a cell is configured or deconfigured
during the nPartition boot process.
Configuring and Deconfiguring Cells
215
4.
Reboot the nPartition to use the cells' new configuration (the new use-on-next-boot values).
If you have changed any cell use-on-next-boot settings for the nPartition then reboot the
nPartition in either of two ways:
•
Perform a standard reboot (HP-UX: shutdown -r; Windows: shutdown /r; Linux:
shutdown -r time; OpenVMS: @SYS$SYSTEM:SHUTDOWN with an automatic system
reboot).
If you have only changed use-on-next-boot values from y to n, then perform a reboot.
Any cells set to not be used will still be assigned to the nPartition but will not be used
(will not rendezvous) in the nPartition.
•
Perform a reboot for reconfig (HP-UX: shutdown -R; Windows: shutdown /r; Linux:
shutdown -r time; OpenVMS: @SYS$SYSTEM:SHUTDOWN with an automatic system
reboot).
If you have changed any use-on-next-boot values from n (do not use on next boot) to
y (use the cell on next boot), then you must perform a reboot for reconfig to allow the
currently inactive cells to reboot and rendezvous when the nPartition reboots.
Procedure 7-11 Configuring and Deconfiguring Cells (Partition Manager)
You can set configure and deconfigure cell by using Partition Manager to set each cell
use-on-next-boot value.
When using Partition Manager Version 1.0, select the nPartition to which the cell belongs, select
the Partition→Modify Partition action, Change Cell Attributes tab, select the cell(s), and click
Modify Cell(s).
When using Partition Manager Version 2.0, select the nPartition to which the cell belongs, select
the nPartition→Modify nPartition action, and then configure attributes using the Set Cell
Options tab.
1.
Access Partition Manager.
For details on accessing Partition Manager or other tools, see “Tools for Managing Hardware”
(page 201).
2.
3.
Select the nPartition whose cells you want to configure or deconfigure.
Initiate the nPartition modify action.
If using Partition Manager Version 1.0, the Partition→Modify Partition action.
If using Partition Manager Version 2.0, select the nPartition→Modify nPartition action.
4.
Access the Partition Manager section(s) for configuring cell attributes.
From Partition Manager Version 1.0, select the Change Cell Attributes tab, then select the
cell and click the Modify Cell button. This enables you to configure the use-on-next-boot
value for the selected cell.
From Partition Manager Version 2.0, use the Set Cell Options tab to configure cell
use-on-next-boot values.
5.
6.
7.
After changing attribute values for all the cells you plan to modify, click the OK button.
Review all information presented in the Notes and Warnings, the Summary of Changes,
and the HA Checks tabs.
Either cancel or proceed with the cell attribute changes.
Click the Cancel button to cancel the changes.
To proceed with the cell use-on-next-boot changes, click the Finish button or click the OK
button.
216
Managing Hardware Resources
8.
Reboot the nPartition to use the cells' new attribute values.
If you have changed any cell use-on-next-boot settings for the nPartition then reboot the
nPartition in either of two ways:
•
Perform a standard reboot (HP-UX: shutdown -r; Windows: shutdown /r; Linux:
shutdown -r time; OpenVMS: @SYS$SYSTEM:SHUTDOWN with an automatic system
reboot).
If you have only changed use-on-next-boot values from y to n, then perform a reboot.
Any cells set to not be used will still be assigned to the nPartition but will not be used
(will not rendezvous) in the nPartition.
•
Perform a reboot for reconfig (HP-UX: shutdown -R; Windows: shutdown /r; Linux:
shutdown -r time; OpenVMS: @SYS$SYSTEM:SHUTDOWN with an automatic system
reboot).
If you have changed any use-on-next-boot values from n (do not use on next boot) to
y (use the cell on next boot), then you must perform a reboot for reconfig to allow the
currently inactive cells to reboot and rendezvous when the nPartition reboots.
Configuring and Deconfiguring Processors
You can configure and deconfigure processors by using any one of the following procedures:
•
•
“Configuring and Deconfiguring Processors (BCH Menu)” (page 217)
“Configuring and Deconfiguring Processors (EFI Shell)” (page 218)
You can configure and deconfigure processors from any cell that is assigned to an nPartition.
Deconfiguring a processor causes it to not be available for use by the cell or its nPartition.
Whenever you configure or deconfigure processors, you must reboot the corresponding nPartition
for the configuration change to take effect.
NOTE: Configuring and deconfiguring processors may be restricted based on any Instant
Capacity contract for the server complex.
Procedure 7-12 Configuring and Deconfiguring Processors (BCH Menu)
From the BCH Configuration Menu, use the CPUCONFIG command to configure or deconfigure
processors in the local nPartition. The BCH Menu is available only on HP 9000 systems.
1.
Access the BCH Main Menu for the nPartition whose processors you want to configure or
deconfigure.
Login to the service processor (MP or GSP) and enter CO to access the Console list. Select
the nPartition console. When accessing the console, confirm that you are at the BCH Main
Menu (the Main Menu: Enter command or menu> prompt). If at a BCH menu other
than the Main Menu, then enter MA to return to the BCH Main Menu.
2.
3.
Enter CO to access the BCH Configuration Menu.
From the Configuration Menu, use the CPUCONFIG command to configure or deconfigure
a processor on a cell in the nPartition.
Enter CPUCONFIG with no arguments to list the current processor configurations for all cells
assigned to the local nPartition.
CPUCONFIG cell cpu OFF deconfigures the specified processor (cpu) on the specified cell
(cell).
CPUCONFIG cell cpu ON configures the specified processor on the cell
Enter HELP CPUCONFIG for details.
Configuring and Deconfiguring Processors
217
4.
Reboot the nPartition using the REBOOT command.
Whenever changing processor configurations you must reboot the corresponding nPartition
to allow the configuration changes to take place.
5.
Exit the console and service processor interfaces if finished using them.
To exit the BCH environment type ^B (Control-B); this exits the nPartition console and
returns to the service processor Main Menu. To exit the service processor, type X at the Main
Menu.
Procedure 7-13 Configuring and Deconfiguring Processors (EFI Shell)
From the EFI Shell environment, use the cpuconfig command to configure or deconfigure
processors in the local nPartition. The EFI Shell is available only on HP Integrity systems.
1.
Access the EFI Shell environment for the nPartition whose processors you want to configure
or deconfigure.
Login to the service processor (MP or GSP) and enter CO to access the Console list. Select
the nPartition console.
When accessing the console, confirm that you are at the EFI Boot Manager menu (the main
EFI menu). If at another EFI menu, select the Exit option from the sub-menus until you
return to the screen with the EFI Boot Manager heading.
From the EFI Boot Manager menu, select the EFI Shell menu option to access the EFI Shell
environment.
2.
3.
Enter the cpuconfig command with no arguments to list the current processor
configurations for all cells assigned to the local nPartition.
Use the cpuconfig command to change processor configurations for any of the cells assigned
to the local nPartition.
cpuconfig cell cpu off deconfigures the specified processor (cpu) on the specified cell
(cell).
cpuconfig cell cpu on configures the processor on the cell.
Enter help cpuconfig for more details on configuring and deconfiguring processors from
the EFI Shell.
4.
Reboot the nPartition using the reset command.
Whenever changing processor configurations you must reboot the corresponding nPartition
to allow the configuration changes to take place.
5.
Exit the console and service processor interfaces if finished using them.
To exit the EFI environment type ^B (Control-B); this exits the nPartition console and returns
to the service processor Main Menu. To exit the service processor, type X at the Main Menu.
Enabling and Disabling Hyper-Threading on Dual-Core Intel® Itanium® 2
Processors
nPartitions with dual-core Intel® Itanium® 2 processors support Hyper-Threading.
Hyper-Threading provides the ability for processors to create a second logical CPU on a single
218
Managing Hardware Resources
core that can allow additional efficiencies of processing. For example, a dual-core processor with
Hyper-Threading active provides four logical processors, two on each processor core.
CAUTION: Some operating systems do not support Hyper-Threading. Problems can occur
when running an OS that does not support Hyper-Threading on an nPartition that has
Hyper-Threading enabled.
NOTE: You must reset an nPartition when changing its Hyper-Threading status.
Hyper-Threading will not be enabled or disabled until after the nPartition is reset.
Checking the Hyper-Threading Status for an nPartition To check the current Hyper-Threading
status for an nPartition:
• From the EFI Shell: cpuconfig or cpuconfig threads
• From HP-UX: setboot
• Using the Enhanced nPartition Commands: parstatus -T
Example 7-2 Checking the Hyper-Threading Status for an nPartition
# setboot
Primary bootpath : 0/0/1/1/0.12.0
HA Alternate bootpath : 0/0/0/1/0
Alternate bootpath : 0/0/0/1/1
Autoboot is ON (enabled)
Hyperthreading : ON 1
: OFF (next boot)
#
1
2
2
The HP-UX setboot command indicates that Hyper-Threading currently is enabled (ON)
for the nPartition.
The next time the nPartition is booted (after it is reset), Hyper-Threading will be disabled
(OFF) for the nPartition.
Enabling Hyper-Threading for an nPartition To enable Hyper-Threading, use any of the following
methods and then reset the nPartition whose Hyper-Threading status you have changed:
• From the EFI Shell: cpuconfig threads on
• From HP-UX: setboot -m on
• Using the Enhanced nPartition Commands: parmodify -pn -T y, where n is the nPartition
number.
• Using Partition Manager: Perform the Modify nPartition task and select the Enable
Hyper-Threading check box on the Configure Memory tab.
You must reset an nPartition after changing its Hyper-Threading status.
Enabling and Disabling Hyper-Threading on Dual-Core Intel® Itanium® 2 Processors
219
Example 7-3 Enabling Hyper-Threading for an nPartition
Shell> cpuconfig threads 1
cpuconfig: Threads are turned off.
Shell>
Shell> cpuconfig threads on 2
cpuconfig: Threads will be on after a reset.
Shell>
1
2
The EFI Shell cpuconfig threads command indicates that Hyper-Threading currently
is disabled (turned off) for the nPartition.
This EFI Shell command configures Hyper-Threading to be enable after the nPartition is
reset.
Disabling Hyper-Threading for an nPartition To disable Hyper-Threading, use any of the
following methods and then reset the nPartition whose Hyper-Threading status you have changed:
• From the EFI Shell: cpuconfig threads off
• From HP-UX: setboot -m off
• Using the Enhanced nPartition Commands: parmodify -pn -T n, where n is the nPartition
number.
• Using Partition Manager: Perform the Modify nPartition task and deselect the Enable
Hyper-Threading check box on the Configure Memory tab.
You must reset an nPartition after changing its Hyper-Threading status.
Configuring and Deconfiguring Memory (DIMMs)
You can configure and deconfigure memory by using any one of the following procedures:
•
•
“Configuring and Deconfiguring Memory (BCH Menu)” (page 220)
“Configuring and Deconfiguring Memory (EFI Shell)” (page 221)
You can configure and deconfigure memory modules (DIMMs) from any cell that is assigned to
an nPartition. Deconfiguring memory causes it to not be available for use by the cell or its
nPartition.
Whenever you configure or deconfigure memory, you must reboot the corresponding nPartition
for the configuration change to take effect.
NOTE: DIMMs operate either in ranks of four or echelons of two, depending on memory
architecture of the server. When you deallocate a DIMM, all other DIMMs in the rank or echelon
also will not be used the next time the nPartition boots.
Each rank or echelon is numbered (0, 1, 2, and so on up to hexadecimal number F as needed).
The DIMMs in the rank or echelon are lettered (A to D). For example, rank 0 includes DIMMs
0A, 0B, 0C, and 0D; echelon 1 has DIMMs 1A and 1B.
Procedure 7-14 Configuring and Deconfiguring Memory (BCH Menu)
From the BCH Service Menu, use the DIMMDEALLOC command to configure or deconfigure
memory modules (DIMMs) in cells assigned to the local nPartition. The BCH Menu is available
only on HP 9000 systems.
220
Managing Hardware Resources
1.
Access the BCH Main Menu for the nPartition whose memory you want to configure or
deconfigure.
Login to the service processor (MP or GSP) and enter CO to access the Console list. Select
the nPartition console. When accessing the console, confirm that you are at the BCH Main
Menu (the Main Menu: Enter command or menu> prompt). If at a BCH menu other
than the Main Menu, then enter MA to return to the BCH Main Menu.
2.
3.
Enter SER to access the BCH Service Menu.
From the Service Menu, use the DIMMDEALLOC command to list the current configurations
of memory modules (DIMMs) in the cells assigned to the local nPartition. Also use the
DIMMDEALLOC command to configure and deconfigure DIMMs for cells in the local nPartition.
NOTE: When you deallocate a DIMM, all other DIMMs in the rank or echelon also will
not be used the next time the nPartition boots.
Enter DIMMDEALLOC with no arguments to list the current DIMM configurations for all cells
in the local nPartition.
DIMMDEALLOC cell dimm OFF deconfigures the specified DIMM (dimm) on the cell (cell)
indicated.
DIMMDEALLOC cell dimm ON configures the DIMM on the cell.
Use DIMMDEALLOC cell to display the DIMM configuration for a cell.
Enter HELP DIMMDEALLOC for details.
4.
Reboot the nPartition using the REBOOT command.
Whenever changing memory configurations you must reboot the corresponding nPartition
to allow the configuration changes to take place.
5.
Exit the console and service processor interfaces if finished using them.
To exit the BCH environment type ^B (Control-B); this exits the nPartition console and
returns to the service processor Main Menu. To exit the service processor, type X at the Main
Menu.
Procedure 7-15 Configuring and Deconfiguring Memory (EFI Shell)
From the EFI Shell environment, use the dimmconfig command to configure or deconfigure
memory modules (DIMMs) in cells assigned to the local nPartition. The EFI Shell is available
only on HP Integrity systems.
1.
Access the EFI Shell environment for the nPartition whose memory you want to configure
or deconfigure.
Login to the service processor (MP or GSP) and enter CO to access the Console list. Select
the nPartition console.
When accessing the console, confirm that you are at the EFI Boot Manager menu (the main
EFI menu). If at another EFI menu, select the Exit option from the sub-menus until you
return to the screen with the EFI Boot Manager heading.
From the EFI Boot Manager menu, select the EFI Shell menu option to access the EFI Shell
environment.
2.
3.
Enter the dimmconfig command with no arguments to list a current summary of the
memory configuration for the local nPartition.
Use the dimmconfig command to change memory configurations for any of the cells
assigned to the local nPartition.
Configuring and Deconfiguring Memory (DIMMs)
221
NOTE: When you deallocate a DIMM, all other DIMMs in the echelon also will not be used
the next time the nPartition boots.
dimmconfig cell dimm OFF deconfigures the specified DIMM (dimm) on the cell (cell)
indicated.
dimmconfig cell dimm ON configures the DIMM on the cell.
Use dimmconfig cell to display the DIMM configuration for a cell.
Enter the help dimmconfig command for more details.
4.
Reboot the nPartition using the reset command.
Whenever changing memory configurations you must reboot the corresponding nPartition
to allow the configuration changes to take place.
5.
Exit the console and service processor interfaces if finished using them.
To exit the EFI environment type ^B (Control-B); this exits the nPartition console and returns
to the service processor Main Menu. To exit the service processor, type X at the Main Menu.
Complex Health Analysis of a Server
You can analyze the general hardware and configuration status of a cell-based server by using
the Partition Manager Complex→Analyze Complex Health action, as described in the following
procedure.
This feature scans the server complex and uses problem detectors to check the operating status
of cells, I/O chassis, fans and blowers, and power supplies.
Procedure 7-16 Complex Health Analysis of a Server (Partition Manager)
Use the Complex→Analyze Complex Health action to quickly check the operating status of a
server complex from Partition Manager.
1.
Access Partition Manager.
For details on accessing Partition Manager or other tools, see “Tools for Managing Hardware”
(page 201).
2.
Use the Complex→Analyze Complex Health action to have Partition Manager analyze the
general hardware and configuration status for the server complex.
Partition Manager displays a report of the hardware analysis results. To re-analyze the server
health click the Refresh button.
3.
Exit Partition Manager.
From Partition Manager Version 1.0, select the File→Exit action.
From Partition Manager Version 2.0, select Log off parmgr or exit the Web browser when
finished.
222
Managing Hardware Resources
8 Listing nPartition and Hardware Status
This chapter covers procedures for listing the current status of nPartitions and server hardware
components.
For an introduction to nPartition system hardware features, see Chapter 1 (page 15).
Tools for Listing Status
You list hardware and nPartition status using the following tools.
•
Service Processor (MP or GSP) Menus
Service processor menus provide a complex-wide service interface that can allow access to
all hardware and nPartitions.
See “Command Reference for Service Processor Commands” (page 80).
•
EFI Boot Manager and EFI Shell
On HP Integrity servers only, the EFI (Extensible Firmware Interface) Boot Manager and
Shell are the methods for interacting with an nPartition before it has booted an operating
system.
See “Command Reference for EFI Shell Commands” (page 81).
•
Boot Console Handler (BCH) Menu Commands
On PA-RISC servers, the BCH interface is the method for interacting with an nPartition
before it has booted an operating system.
See “Command Reference for BCH Menu Commands” (page 84).
•
nPartition Commands
HP nPartition commands allow you to configure, manage, and monitor nPartitions and
hardware within a server complex.
The Enhanced nPartition Commands also can remotely manage complexes based on the HP
sx1000 chipset or HP sx2000 chipset.
See “Commands for Configuring nPartitions” (page 19) for details.
•
Partition Manager (/opt/parmgr/bin/parmgr)
Partition Manager provides a graphical interface for managing and monitoring nPartitions
and hardware within a server complex.
See “Partition Manager” (page 22).
Task Summaries for nPartition and Hardware Status
Table 8-1 describes the main hardware and nPartition status tasks and provides brief summaries
and references for detailed procedures.
You can perform the status tasks in Table 8-1 “Hardware and nPartition Status Task Summaries”
using various tools, including the service processor (MP or GSP), Boot Console Handler (BCH,
available only on PA-RISC servers), Extensible Firmware Interface (EFI, available only on HP
Integrity servers), nPartition commands, or Partition Manager ( /opt/parmgr/bin/parmgr).
See “Tools for Listing Status” (page 223) for details.
Tools for Listing Status
223
Table 8-1 Hardware and nPartition Status Task Summaries
Task
Summary
“Listing Cell
Configurations”
• Service Processor (MP or GSP): CP command for cell nPartition assignments. PS
command and select a cell for detailed information about any cell in the complex.
• nPartition Commands: parstatus -C command.
• Partition Manager:
Version 1.0 — Details→Show Complex Details action, Cells tab.
Version 2.0 — Select the Cells tab.
See “Listing Cell Configurations” (page 226).
“Listing Processor
Configurations”
• Service Processor (MP or GSP): PS command, and select the cell whose processor
configuration you wish to view.
• BCH Menu: Information menu, PR command.
• EFI Shell: info cpu command.
• nPartition Commands:
— parstatus -C for processor summaries for all cells.
— parstatus -V -c# for detailed processor information for the specified cell (-c#
where # is the cell number).
— Processor information about the local nPartition: ioscan -C processor (HP-UX
only) or mpsched -s (HP-UX B.11.23 and HP-UX B.11.31).
• Partition Manager:
— Version 1.0 — Details→Show Complex Details action, CPUs/Memory tab.
— Version 2.0 — Select the Cells tab.
See “Listing Processor Configurations” (page 227).
“Listing Memory
Configurations”
• Service Processor (MP or GSP): PS command, and select the cell whose memory
configuration you wish to view.
• BCH Menu: Information menu, ME command.
• EFI Shell: info mem command, and the dimmconfig # command (where # is the
cell number) for memory module (DIMM) details for a specific cell.
• nPartition Commands:
— parstatus -C for memory summaries for all cells.
— parstatus -V -c# for detailed memory information for the specified cell (-c#
where # is the cell number). Includes cell local memory (CLM) details.
— parstatus -V -p# for detailed memory information for the specified nPartition
(-p# where # is the nPartition number). Includes cell local memory (CLM) details.
• Partition Manager:
— Version 1.0 — Details→Show Complex Details action, CPUs/Memory tab.
— Version 2.0 — Select the Cells tab.
See “Listing Memory Configurations” (page 229).
“Listing Input/Output
(I/O) Configurations”
• Service Processor (MP or GSP): IO command to list connections from cells to I/O
chassis. PS command and the cabinet option to list I/O details for an entire cabinet.
• BCH Menu: Information menu, IO command.
• EFI Shell: info io command.
• nPartition Commands: parstatus -I command, for complex-wide details.
— HP-UX B.11.11 — rad -q command.
— HP-UX B.11.23 and HP-UX B.11.31 — olrad -q command.
• Partition Manager:
— Version 1.0 — Details→Show Complex Details action, I/O Chassis tab.
— Version 2.0 — Select the I/O tab.
See “Listing Input/Output (I/O) Configurations” (page 231).
224
Listing nPartition and Hardware Status
Table 8-1 Hardware and nPartition Status Task Summaries (continued)
Task
Summary
“Listing Cabinets in a
Server Complex”
• Service Processor (MP or GSP): PS command and B option to list cabinet details for
the desired cabinet.
• nPartition Commands: parstatus -B command for summaries about all cabinets,
or the parstatus -V -b# command for detailed status for the specified cabinet (-b#
where # is the cabinet number).
• Partition Manager:
— Version 1.0 — Details→Show Complex Details action, Cabinet Info tab.
— Version 2.0 — Hardware tab for an overview of cabinets in the complex.
Complex→Show Complex Details for complete details about all hardware in the
complex.
See “Listing Cabinets in a Server Complex” (page 234).
“Listing Product and
Serial Numbers”
•
•
•
•
Service Processor (MP or GSP): ID command.
BCH Menu: Information menu, CID command.
nPartition Commands: parstatus -X command.
Partition Manager:
— Version 1.0 — Complex→Show Complex Details, General tab.
— Version 2.0 — General tab.
See “Listing Product and Serial Numbers” (page 235).
“Listing nPartition
Configurations”
• Service Processor (MP or GSP): CP command.
• nPartition Commands: parstatus -P command, or the parstatus -V -p#
command for details about specific nPartition (-p# where # is the nPartition number)
• Partition Manager:
— Version 1.0 — View the left side of the primary window to see a display of all
nPartitions in the server; for details select an nPartition and the Details→Show
Complex Details action.
— Version 2.0 — nPartitions tab.
See “Listing nPartition Configurations” (page 236).
“Listing the Local
nPartition Number”
• BCH Menu: Configuration menu, PD command.
• EFI Shell: info sys command.
• nPartition Commands: parstatus -w command.
See “Listing the Local nPartition Number” (page 237).
Task Summaries for nPartition and Hardware Status
225
Table 8-1 Hardware and nPartition Status Task Summaries (continued)
Task
Summary
“Listing Power Status
and Power Supplies”
• Service Processor (MP or GSP): PS command and the cabinet option for detailed power
status for the specified cabinet.
• nPartition Commands: parstatus -B command for a power status summary for all
cabinets, or parstatus -V -b# for detailed power status for the specified cabinet
(-b#, where # is the cabinet number).
frupower -d -C command for cell power status.
frupower -d -I command for I/O chassis power status.
• Partition Manager:
— Version 1.0 — Details→Show Complex Details action, Power/Cooling tab.
— Version 2.0 — Power and Cooling tab.
See “Listing Power Status and Power Supplies” (page 238).
“Listing Fan and Blower • Service Processor (MP or GSP): PS command, B option for detailed fan and blower
Status”
status for the specified cabinet.
• nPartition Commands: parstatus -B command for a summary of fans and blowers
for all cabinets, or parstatus -V -b# for detailed fan and blower status for the
specified cabinet (-b#, where # is the cabinet number).
• Partition Manager:
— Version 1.0 — Details→Show Complex Details action, Power/Cooling tab.
— Version 2.0 — Power and Cooling tab.
See “Listing Fan and Blower Status” (page 240).
Listing Cell Configurations
You can list the cell configurations in a cell-based server by using any one of the following
procedures:
• “Listing Cell Configurations (Service Processor)” (page 226)
• “Listing Cell Configurations (nPartition Commands)” (page 226)
• “Listing Cell Configurations (Partition Manager)” (page 227)
Cell configuration details include the list of the cells installed in the server, and cell assignments
to nPartitions.
Procedure 8-1 Listing Cell Configurations (Service Processor)
From the service processor Command Menu, use the CP and PS commands to list cell configuration
details.
1.
2.
3.
Login to the service processor (MP or GSP) and enter CM to access the Command Menu.
At the Command Menu, enter the CP command to list cell nPartition assignments, or use
the PS command to list details about the individual cells in the server complex. The PS
command's C option displays detailed information about a specified cell.
To exit the service processor Command Menu, enter MA to return to the service processor
Main Menu.
At the Main Menu, enter X to exit the service processor interface.
Procedure 8-2 Listing Cell Configurations (nPartition Commands)
From the command line, use the parstatus -C command to list cell configuration details.
1.
Login to a system with the nPartition commands installed.
If using remote administration features to list cell configurations, you can login to any system
with Enhanced nPartition Commands installed.
226
Listing nPartition and Hardware Status
2.
Issue the parstatus -C command to list details about the cells installed in the server
complex and their nPartition assignments.
Procedure 8-3 Listing Cell Configurations (Partition Manager)
From Partition Manager, select the Cells tab to list cell configuration details.
When using Partition Manager Version 1.0, first select the Details→Show Complex Details
action, then select the Cells tab.
1.
Access Partition Manager.
For details on accessing Partition Manager or other tools, see “Tools for Listing Status”
(page 223).
2.
Use the Cells tab to list cell configurations, including details about which cell are installed
in the server and any cell nPartition assignments.
From Partition Manager Version 1.0, select the Details→Show Complex Details action,
then select the Cells tab.
From Partition Manager Version 2.0, select the Cells tab to list these details.
3.
Exit Partition Manager.
From Partition Manager Version 1.0, select the File→Exit action.
From Partition Manager Version 2.0, select Log off parmgr or exit the Web browser when
finished.
Listing Processor Configurations
You can list processor configurations by using any one of the following procedures:
•
•
•
•
•
“Listing Processor Configurations (Service Processor)” (page 227)
“Listing Processor Configurations (BCH Menu)” (page 227)
“Listing Processor Configurations (EFI Shell)” (page 228)
“Listing Processor Configurations (nPartition Commands)” (page 228)
“Listing Processor Configurations (Partition Manager)” (page 229)
Processor (CPU) configuration details include the CPU population, CPU type, and the clock
speed.
Procedure 8-4 Listing Processor Configurations (Service Processor)
From the service processor Command Menu, use the PS command to list details about the cell
whose processor configuration you want to view.
1.
2.
3.
Login to the service processor (MP or GSP) and enter CM to access the Command Menu.
At the Command Menu, enter the PS command, select the C option, and specify the cell
whose processor configuration you want to view.
To exit the service processor Command Menu, enter MA to return to the service processor
Main Menu.
At the Main Menu, enter X to exit the service processor interface.
Procedure 8-5 Listing Processor Configurations (BCH Menu)
From the BCH Information Menu use the PR command to list processor details for the local
nPartition. The BCH Menu is available only on HP 9000 systems.
Listing Processor Configurations
227
1.
Access the BCH Main Menu for the nPartition whose processor configuration you want to
list.
Login to the service processor (MP or GSP) and enter CO to access the Console list. Select
the nPartition console. When accessing the console, confirm that you are at the BCH Main
Menu (the Main Menu: Enter command or menu> prompt). If at a BCH menu other
than the Main Menu, then enter MA to return to the BCH Main Menu.
2.
3.
4.
Enter IN to access the BCH Information Menu.
Enter the PR command to list processor information for all active cells in the local nPartition.
Exit the console and service processor interfaces if finished using them.
To exit the BCH environment type ^B (Control-B); this exits the nPartition console and
returns to the service processor Main Menu. To exit the service processor, type X at the Main
Menu.
Procedure 8-6 Listing Processor Configurations (EFI Shell)
From the EFI Shell environment, use the info cpu command to list processor details for the
local nPartition. The EFI Shell is available only on HP Integrity systems.
1.
Access the EFI Shell environment for the nPartition whose processor configuration you want
to list.
Login to the service processor (MP or GSP) and enter CO to access the Console list. Select
the nPartition console.
When accessing the console, confirm that you are at the EFI Boot Manager menu (the main
EFI menu). If at another EFI menu, select the Exit option from the sub-menus until you
return to the screen with the EFI Boot Manager heading.
From the EFI Boot Manager menu, select the EFI Shell menu option to access the EFI Shell
environment.
2.
3.
Enter the info cpu command to list processor details for all active cells in the local
nPartition.
Exit the console and service processor interfaces if finished using them.
To exit the EFI environment type ^B (Control-B); this exits the nPartition console and returns
to the service processor Main Menu. To exit the service processor, type X at the Main Menu.
Procedure 8-7 Listing Processor Configurations (nPartition Commands)
From the command line, use parstatus -C for processor summaries for all cells in the server
complex; or use parstatus -V -c# for detailed processor information for the specified cell
(-c# where # is the cell number). Use the HP-UX ioscan -C processor command or the
HP-UX B.11.23 and HP-UX B.11.31 mpsched -s command for processor information about the
local nPartition.
1.
Login to a system with the nPartition commands installed.
If using remote administration features to list processor configurations, you can login to any
system with Enhanced nPartition Commands installed.
2.
Issue the command to list processor details.
•
•
•
•
228
parstatus -C — Cell and processor summaries for all cells in the server complex.
parstatus -V -c# — Detailed processor information for the specified cell (-c# where
# is the cell number).
ioscan -C processor — HP-UX only. Processor HP-UX Hardware Paths for all
configured processors in all active cells in the local nPartition.
mpsched -s — HP-UX B.11.23 and HP-UX B.11.31. Processor and "locality domain"
summary for all configured processors in all active cells in the local nPartition.
Listing nPartition and Hardware Status
Procedure 8-8 Listing Processor Configurations (Partition Manager)
You can list the processor configuration for any of the cells or nPartitions in a server complex by
using Partition Manager.
When using Partition Manager Version 1.0, select the Details→Show Complex Details action,
then select the CPUs/Memory tab.
When using Partition Manager Version 2.0, select the Cells tab.
1.
Access Partition Manager.
For details on accessing Partition Manager or other tools, see “Tools for Listing Status”
(page 223).
2.
List processor configuration details for any cell in the complex you currently are accessing.
From the Partition Manager Version 1.0, select the Details→Show Complex Details action,
then select the CPUs/Memory tab to view processor details about all cells in the complex.
For additional details on any cell, use the Show Details button.
From Partition Manager Version 2.0, select the Cells tab to view details about all cells in the
complex, including processor details.
3.
Exit Partition Manager.
From Partition Manager Version 1.0, select the File→Exit action.
From Partition Manager Version 2.0, select Log off parmgr or exit the Web browser when
finished.
Listing Memory Configurations
You can list memory configurations by using any one of the following procedures:
•
•
•
•
•
“Listing Memory Configurations (Service Processor)” (page 229)
“Listing Memory Configurations (BCH Menu)” (page 229)
“Listing Memory Configurations (EFI Shell)” (page 230)
“Listing Memory Configurations (nPartition Commands)” (page 230)
“Listing Memory Configurations (Partition Manager)” (page 231)
Memory configuration details include summaries of the total memory in a cell or nPartition, the
amounts of interleaved memory and cell local memory (where supported) per cell or nPartition,
and the number and locations of memory modules (DIMMs) within the cells in a server complex.
Procedure 8-9 Listing Memory Configurations (Service Processor)
From the service processor Command Menu, use the PS command to list details about the cell
whose memory configuration you want to view.
1.
2.
3.
Login to the service processor (MP or GSP) and enter CM to access the Command Menu.
At the Command Menu, enter the PS command, select the C option, and specify the cell
whose memory configuration you want to view.
To exit the service processor Command Menu, enter MA to return to the service processor
Main Menu.
At the Main Menu, enter X to exit the service processor interface.
Procedure 8-10 Listing Memory Configurations (BCH Menu)
From the BCH Information Menu, use the ME command to list memory details for the local
nPartition. The BCH Menu is available only on HP 9000 systems.
Listing Memory Configurations
229
1.
Access the BCH Main Menu for the nPartition whose memory configuration you want to
list.
Login to the service processor (MP or GSP) and enter CO to access the Console list. Select
the nPartition console. When accessing the console, confirm that you are at the BCH Main
Menu (the Main Menu: Enter command or menu> prompt). If at a BCH menu other
than the Main Menu, then enter MA to return to the BCH Main Menu.
2.
3.
4.
Enter IN to access the BCH Information Menu.
Enter the ME command to list memory details for all active cells in the local nPartition.
Exit the console and service processor interfaces if finished using them.
To exit the BCH environment type ^B (Control-B); this exits the nPartition console and
returns to the service processor Main Menu. To exit the service processor, type X at the Main
Menu.
Procedure 8-11 Listing Memory Configurations (EFI Shell)
From the EFI Shell environment, use the info mem command to list memory details for the local
nPartition. Also use the dimmconfig # command (where # is the cell number) for memory
module (DIMM) details for a specific cell. The EFI Shell is available only on HP Integrity systems.
1.
Access the EFI Shell environment for the nPartition whose memory configuration you want
to list.
Login to the service processor (MP or GSP) and enter CO to access the Console list. Select
the nPartition console.
When accessing the console, confirm that you are at the EFI Boot Manager menu (the main
EFI menu). If at another EFI menu, select the Exit option from the sub-menus until you
return to the screen with the EFI Boot Manager heading.
From the EFI Boot Manager menu, select the EFI Shell menu option to access the EFI Shell
environment.
2.
Enter the info mem command to list memory details for all active cells in the local nPartition.
For additional details about memory modules (DIMMs) in an individual cell use the
dimmconfig # command (where # is the cell number).
The info mem command lists memory totals for each active cell in the local nPartition, and
includes a summary of the current interleaved memory and non-interleaved (cell local)
memory.
The dimmconfig # command shows DIMM locations, sizes, and current status for all
memory in the specified cell (where # is the cell number).
3.
Exit the console and service processor interfaces if finished using them.
To exit the EFI environment type ^B (Control-B); this exits the nPartition console and returns
to the service processor Main Menu. To exit the service processor, type X at the Main Menu.
Procedure 8-12 Listing Memory Configurations (nPartition Commands)
From the command line, issue the parstatus -C command for memory summaries for all
cells; use parstatus -V -c# for detailed memory information for the specified cell (-c# where
# is the cell number); or use parstatus -V -p# for detailed memory information for the
specified nPartition (-p# where # is the nPartition number).
1.
Login to a system with the nPartition commands installed.
If using remote administration features to list memory configurations, you can login to any
system with Enhanced nPartition Commands installed.
230
Listing nPartition and Hardware Status
2.
Issue the command to list memory details.
• parstatus -C — Cell and memory summaries for all cells in the server complex.
• parstatus -V -c# — Detailed memory information for the specified cell (-c# where
# is the cell number), including memory module (DIMM) locations and sizes. For HP
Integrity servers, this includes details about the interleaved memory in the cell as well
as the requested and allocated cell local memory (CLM) amounts.
• parstatus -V -p# — Detailed information about the specified nPartition (-p# where
# is the nPartition number), including summaries for all assigned cells including their
amounts of memory. For HP Integrity servers, the nPartition details include the total
good memory size, total interleaved memory, and the total requested and allocated cell
local memory (CLM) amounts.
Procedure 8-13 Listing Memory Configurations (Partition Manager)
You can list the memory configuration for any of the cells or nPartitions in a server complex by
using Partition Manager.
When using Partition Manager Version 1.0, select the Details→Show Complex Details action,
then select the CPUs/Memory tab.
When using Partition Manager Version 2.0, select the Cells tab.
1.
Access Partition Manager.
For details on accessing Partition Manager or other tools, see “Tools for Listing Status”
(page 223).
2.
List memory configuration details for any cell in the complex you currently are accessing.
From Partition Manager Version 1.0, select the Details→Show Complex Details action,
then select the CPUs/Memory tab to view memory details about all cells in the complex.
For additional details on any cell, use the Show Details button.
From Partition Manager Version 2.0, select the Cells tab to view details about all cells in the
complex, including memory details.
3.
Exit Partition Manager.
From Partition Manager Version 1.0, select the File→Exit action.
From Partition Manager Version 2.0, select Log off parmgr or exit the Web browser when
finished.
Listing Input/Output (I/O) Configurations
You can list I/O configurations by using any one of the following procedures:
•
•
•
•
•
“Listing Input/Output (I/O) Configurations (Service Processor)” (page 231)
“Listing Input/Output Configurations (BCH Menu)” (page 232)
“Listing Input/Output Configurations (EFI Shell)” (page 232)
“Listing Input/Output (I/O) Configurations (nPartition Commands)” (page 233)
“Listing Input/Output (I/O) Configurations (Partition Manager)” (page 233)
nPartition input/output (I/O) configuration details include the I/O chassis population,
cell-to-chassis connections, PCI card slot capabilities, and PCI card details.
Procedure 8-14 Listing Input/Output (I/O) Configurations (Service Processor)
From the service processor Command Menu, use the IO command to list connections from cells
to I/O chassis, or use the PS command and the cabinet option to list I/O chassis population and
power status for an entire cabinet.
1.
Login to the service processor (MP or GSP) and enter CM to access the Command Menu.
Listing Input/Output (I/O) Configurations
231
2.
At the Command Menu, enter the IO command to list the connections from I/O chassis to
cells; the IO command is supported for HP Superdome servers only.
To list the power status for I/O chassis, and the locations of installed I/O chassis, issue the
PS command, and select the cabinet option for the server cabinet whose I/O configuration
you want to view:
•
•
3.
On HP Superdome servers, select the B (cabinet) option, and specify the cabinet whose
information you want to view.
On all other systems, select the T (cabinet) option.
To exit the service processor Command Menu, enter MA to return to the service processor
Main Menu.
At the Main Menu, enter X to exit the service processor interface.
Procedure 8-15 Listing Input/Output Configurations (BCH Menu)
From the BCH Information Menu use the IO command to list I/O details for the local nPartition.
The BCH Menu is available only on HP 9000 systems.
1.
Access the BCH Main Menu for the nPartition whose I/O configuration you want to list.
Login to the service processor (MP or GSP) and enter CO to access the Console list. Select
the nPartition console. When accessing the console, confirm that you are at the BCH Main
Menu (the Main Menu: Enter command or menu> prompt). If at a BCH menu other
than the Main Menu, then enter MA to return to the BCH Main Menu.
2.
3.
Enter IN to access the BCH Information Menu.
Enter the IO command to list I/O details for all active cells in the local nPartition.
The IO command provides details that include I/O chassis information, I/O module (PCI
card slot) details, and information about PCI devices (installed PCI cards).
4.
Exit the console and service processor interfaces if finished using them.
To exit the BCH environment type ^B (Control-B); this exits the nPartition console and
returns to the service processor Main Menu. To exit the service processor, type X at the Main
Menu.
Procedure 8-16 Listing Input/Output Configurations (EFI Shell)
From the EFI Shell environment, use theinfo io command to list I/O details for the local
nPartition. The EFI Shell is available only on HP Integrity systems.
1.
Access the EFI Shell environment for the nPartition whose I/O configuration you want to
list.
Login to the service processor (MP or GSP) and enter CO to access the Console list. Select
the nPartition console.
When accessing the console, confirm that you are at the EFI Boot Manager menu (the main
EFI menu). If at another EFI menu, select the Exit option from the sub-menus until you
return to the screen with the EFI Boot Manager heading.
From the EFI Boot Manager menu, select the EFI Shell menu option to access the EFI Shell
environment.
2.
Enter the info io command to list I/O details for all active cells in the local nPartition.
The info io command reports details that include I/O chassis information, I/O module
(PCI card slot) details, and information about PCI devices (installed PCI cards).
3.
Exit the console and service processor interfaces if finished using them.
To exit the EFI environment type ^B (Control-B); this exits the nPartition console and returns
to the service processor Main Menu. To exit the service processor, type X at the Main Menu.
232
Listing nPartition and Hardware Status
Procedure 8-17 Listing Input/Output (I/O) Configurations (nPartition Commands)
From the command line, use the parstatus -I command to list details about all I/O chassis
in the server complex.
From HP-UX B.11.11 use the rad -q command, or from HP-UX B.11.23 and HP-UX B.11.31 use
the olrad -q command, to list details about PCI cards and slots in the local nPartition.
1.
Login to a system with the nPartition commands installed.
If using remote administration features, you can login to any system with Enhanced nPartition
Commands installed.
If listing I/O chassis status (using parstatus -I) you can login to any nPartition in the
complex or remotely list details. To list details about the cards and slots in an I/O chassis
you must login to the nPartition to which the cell connected to the I/O chassis is assigned.
2.
Issue the commands to list details about I/O chassis and PCI slots.
• parstatus -I — List details about all I/O chassis in the server complex, including
the usage (absent, active, inactive), whether the chassis has Core I/O, and which cell
the I/O chassis is connected to.
• rad -q — HP-UX B.11.11 only. Displays the status of all PCI card slots in the system.
Includes details about each PCI card slot, HP-UX Hardware Paths, and power and
driver status.
• olrad -q — HP-UX B.11.23 and HP-UX B.11.31. Displays the status of all PCI card
slots in the system. Includes details about each PCI card slot, HP-UX Hardware Paths,
and power and driver status.
Procedure 8-18 Listing Input/Output (I/O) Configurations (Partition Manager)
You can list the I/O configuration for a server complex or any nPartition in the complex by using
Partition Manager.
When using Partition Manager Version 1.0, select the Details→Show Complex Details action,
then select the I/O Chassis tab.
When using Partition Manager Version 2.0, select the I/O tab.
1.
Access Partition Manager.
For details on accessing Partition Manager or other tools, see “Tools for Listing Status”
(page 223).
2.
List I/O configuration details for the server complex.
From Partition Manager Version 1.0, select the Details→Show Complex Details action,
then select the I/O Chassis tab to view I/O chassis details for the complex. For additional
details on any I/O chassis, use the Show Details button to display a list of PCI slots and
cards.
From Partition Manager Version 2.0, select the I/O tab to view details about the I/O chassis
in the complex. You can view further details about individual cards by clicking on the card
or by selecting the card(s) and using actions available from the I/O menu. Viewing these
additional details requires running pdweb (the HP-UX Peripheral Device tool) on the local
nPartition to which the cell connected to the I/O chassis is assigned.
3.
Exit Partition Manager.
From Partition Manager Version 1.0, select the File→Exit action.
From Partition Manager Version 2.0, select Log off parmgr or exit the Web browser when
finished.
Listing Input/Output (I/O) Configurations
233
Listing Cabinets in a Server Complex
You can list the cabinets in a server complex by using any one of the following procedures:
•
•
•
“Listing Cabinets in a Server Complex (Service Processor)” (page 234)
“Listing Cabinets in a Server Complex (nPartition Commands)” (page 234)
“Listing Cabinets in a Server Complex (Partition Manager)” (page 234)
Cabinet details include the cabinet type, a list of cells, I/O chassis, power supplies, utilities, fans,
firmware components, interconnecting hardware. Other information such as the power status,
faults, and LED states also are given.
Procedure 8-19 Listing Cabinets in a Server Complex (Service Processor)
From the service processor Command Menu, use the PS command and the cabinet option to list
the current status for the desired cabinet.
1.
2.
Login to the service processor (MP or GSP) and enter CM to access the Command Menu.
To list the current status for a cabinet in the server complex, issue the PS command and
select the cabinet option for the server cabinet whose configuration and details you want to
view:
• On HP Superdome servers, select the B (cabinet) option, and specify the cabinet whose
information you want to view.
• On all other systems, select the T (cabinet) option.
3.
To exit the service processor Command Menu, enter MA to return to the service processor
Main Menu.
At the Main Menu, enter X to exit the service processor interface.
Procedure 8-20 Listing Cabinets in a Server Complex (nPartition Commands)
From the command line, use the parstatus -B command to list all cabinets in the server
complex, or use the parstatus -V -b# command to view a detailed status for the specified
cabinet (-b# where # is the cabinet number).
1.
Login to a system with the nPartition commands installed.
If using remote administration features to list cabinet details, you can login to any system
with Enhanced nPartition Commands installed.
2.
Issue commands to list details about cabinets in the target complex.
• parstatus -B — List all cabinets in the server complex.
• parstatus -V -b# — View a detailed status for the specified cabinet (-b# where #
is the cabinet number).
Procedure 8-21 Listing Cabinets in a Server Complex (Partition Manager)
You can list details about the cabinets in a server complex by using Partition Manager.
When using Partition Manager Version 1.0, select the Details→Show Complex Details action;
the General tab and the Cabinet Info tab provide cabinet-related information.
When using Partition Manager Version 2.0, select the Hardware tab for an overview of cabinets
in the complex. For complete details about all hardware in the complex, select the
Complex→Show Complex Details action.
1.
Access Partition Manager.
For details on accessing Partition Manager or other tools, see “Tools for Listing Status”
(page 223).
2.
List cabinet details for the server complex.
From Partition Manager Version 1.0, select the Details→Show Complex Details action,
then select the Cabinet Info tab. The General tab also provides cabinet-related information.
234
Listing nPartition and Hardware Status
From Partition Manager Version 2.0, select the Hardware tab for an overview of cabinets in
the complex. For complete details about all hardware in the complex, select the
Complex→Show Complex Details action.
3.
Exit Partition Manager.
From Partition Manager Version 1.0, select the File→Exit action.
From Partition Manager Version 2.0, select Log off parmgr or exit the Web browser when
finished.
Listing Product and Serial Numbers
You can list product and serial numbers by using any one of the following procedures:
•
•
•
•
“Listing Product and Serial Numbers (Service Processor)” (page 235)
“Listing Product and Serial Numbers (BCH Menu)” (page 235)
“Listing Product and Serial Numbers (nPartition Commands)” (page 235)
“Listing Product and Serial Numbers (Partition Manager)” (page 236)
Product and serial number information is stored in the Stable Complex Configuration Data
portion of the Complex Profile for a cell-based server.
Procedure 8-22 Listing Product and Serial Numbers (Service Processor)
From the service processor Command Menu, use the ID command to list product and serial
number information for the server complex.
1.
2.
Login to the service processor (MP or GSP) and enter CM to access the Command Menu.
At the Command Menu, enter the ID command to list product and serial number information
for the server complex.
In response to the Do you want to modify any of this information? prompt,
type n (or type q) to not modify the server complex information that was displayed.
3.
To exit the service processor Command Menu, enter MA to return to the service processor
Main Menu.
At the Main Menu, enter X to exit the service processor interface.
Procedure 8-23 Listing Product and Serial Numbers (BCH Menu)
From the BCH Information Menu, use the CID command to list the product number and serial
number for the server complex. The BCH Menu is available only on HP 9000 systems.
1.
Access the BCH Main Menu for any nPartition in the complex.
Login to the service processor (MP or GSP) and enter CO to access the Console list. Select
the nPartition console. When accessing the console, confirm that you are at the BCH Main
Menu (the Main Menu: Enter command or menu> prompt). If at a BCH menu other
than the Main Menu, then enter MA to return to the BCH Main Menu.
2.
3.
4.
Enter IN to access the BCH Information Menu.
Enter the CID command to list the product number and serial number for the server complex.
Exit the console and service processor interfaces if finished using them.
To exit the BCH environment type ^B (Control-B); this exits the nPartition console and
returns to the service processor Main Menu. To exit the service processor, type X at the Main
Menu.
Procedure 8-24 Listing Product and Serial Numbers (nPartition Commands)
From the command line, issue the parstatus -X command to display the product number
and serial number for the server complex.
Listing Product and Serial Numbers
235
1.
Login to a system with the nPartition commands installed.
If using remote administration features, you can login to any system with Enhanced nPartition
Commands installed.
2.
Issue the parstatus -X command to display the product number and serial number.
Procedure 8-25 Listing Product and Serial Numbers (Partition Manager)
You can list the product number and serial number for a complex by using Partition Manager.
When using Partition Manager Version 1.0, select the Complex→Show Complex Details action
and General tab.
When using Partition Manager Version 2.0, select the General tab.
1.
Access Partition Manager.
For details on accessing Partition Manager or other tools, see “Tools for Listing Status”
(page 223).
2.
From Partition Manager Version 1.0, select the Complex→Show Complex Details action
and General tab to list the product number and serial number for the server complex.
From Partition Manager Version 2.0, select the General tab to list the product number and
serial number.
3.
Exit Partition Manager.
From Partition Manager Version 1.0, select the File→Exit action.
From Partition Manager Version 2.0, select Log off parmgr or exit the Web browser when
finished.
Listing nPartition Configurations
You can list nPartition configurations by using any one of the following procedures:
•
•
•
“Listing nPartition Configurations (Service Processor)” (page 236)
“Listing nPartition Configurations (nPartition Commands)” (page 236)
“Listing nPartition Configurations (Partition Manager)” (page 237)
nPartition configuration information includes a list of which cells are assigned to which
nPartitions, and additional details such as the core cell choices, boot device paths, and nPartition
names.
Procedure 8-26 Listing nPartition Configurations (Service Processor)
From the service processor Command Menu, use the CP command to list the nPartition
configurations for the server complex. The CP command reports information including the
nPartition numbers and corresponding cells assignments.
1.
2.
3.
Login to the service processor (MP or GSP) and enter CM to access the Command Menu.
At the Command Menu, enter the CP command to list the nPartition configurations: the
nPartition numbers and corresponding cells assignments for the server complex.
To exit the service processor Command Menu, enter MA to return to the service processor
Main Menu.
At the Main Menu, enter X to exit the service processor interface.
Procedure 8-27 Listing nPartition Configurations (nPartition Commands)
From the command line, issue the parstatus -P command to list a summary of all nPartitions
in the server complex. For detailed information issue the parstatus -V -p# command for
more information about a specific nPartition (-p# where # is the nPartition number).
236
Listing nPartition and Hardware Status
1.
Login to a system with the nPartition commands installed.
If using remote administration features to list nPartition configurations, you can login to
any system with Enhanced nPartition Commands installed.
2.
Issue the parstatus -P command to list a summary of all nPartitions in the server complex.
For detailed information issue the parstatus -V -p# command for more information
about a specific nPartition (-p# where # is the nPartition number).
Procedure 8-28 Listing nPartition Configurations (Partition Manager)
You can list nPartition configurations for a server complex by using Partition Manager.
When using Partition Manager Version 1.0, view the left side of the primary window to see a
display of all nPartitions in the server, and for details select an nPartition and select the
Details→Show Complex Details action.
When using Partition Manager Version 2.0, use the nPartitions tab to view details about all
nPartitions in the complex.
1.
Access Partition Manager.
For details on accessing Partition Manager or other tools, see “Tools for Listing Status”
(page 223).
2.
From Partition Manager Version 1.0, view the left side of the primary window to see a
display of all nPartitions in the server. For further details about a specific nPartition, select
the nPartition and select the Details→Show Complex Details action.
From Partition Manager Version 2.0, use the nPartitions tab to view details about all
nPartitions in the complex.
3.
Exit Partition Manager.
From Partition Manager Version 1.0, select the File→Exit action.
From Partition Manager Version 2.0, select Log off parmgr or exit the Web browser when
finished.
Listing the Local nPartition Number
You can list the local nPartition number by using any one of the following procedures:
•
•
•
“Listing the Local nPartition Number (BCH Menu)” (page 237)
“Listing the Local nPartition Number (EFI Shell)” (page 238)
“Listing the Local nPartition Number (nPartition Commands)” (page 238)
The local nPartition number is the numerical identifier for the nPartition currently being accessed
(where the command executes).
Procedure 8-29 Listing the Local nPartition Number (BCH Menu)
From the BCH Configuration Menu, use the PD command to list the local nPartition number and
its name. The BCH Menu is available only on HP 9000 systems.
1.
Access the BCH Main Menu for the nPartition whose name and number you want to list.
Login to the service processor (MP or GSP) and enter CO to access the Console list. Select
the nPartition console. When accessing the console, confirm that you are at the BCH Main
Menu (the Main Menu: Enter command or menu> prompt). If at a BCH menu other
than the Main Menu, then enter MA to return to the BCH Main Menu.
2.
3.
Enter CO to access the BCH Configuration Menu.
Enter the PD command to list the local nPartition number and its name.
Listing the Local nPartition Number
237
4.
Exit the console and service processor interfaces if finished using them.
To exit the BCH environment type ^B (Control-B); this exits the nPartition console and
returns to the service processor Main Menu. To exit the service processor, type X at the Main
Menu.
Procedure 8-30 Listing the Local nPartition Number (EFI Shell)
From the EFI Shell, use the info sys command to list the local nPartition number; this command
also displays a list of active cells, CPUs, and the current memory configuration. The EFI Shell is
available only on HP Integrity systems.
1.
Access the EFI Shell environment for the nPartition whose nPartition number you want to
list.
Login to the service processor (MP or GSP) and enter CO to access the Console list. Select
the nPartition console.
When accessing the console, confirm that you are at the EFI Boot Manager menu (the main
EFI menu). If at another EFI menu, select the Exit option from the sub-menus until you
return to the screen with the EFI Boot Manager heading.
From the EFI Boot Manager menu, select the EFI Shell menu option to access the EFI Shell
environment.
2.
Enter the info sys command to list the nPartition number for the local nPartition.
The info sys command also displays a list of active cells, CPUs, and the current memory
configuration.
3.
Exit the console and service processor interfaces if finished using them.
To exit the EFI environment type ^B (Control-B); this exits the nPartition console and returns
to the service processor Main Menu. To exit the service processor, type X at the Main Menu.
Procedure 8-31 Listing the Local nPartition Number (nPartition Commands)
From the command line, issue the parstatus -w command to list the local nPartition number.
1.
Login to a system with the nPartition commands installed.
If using remote administration features to list a local nPartition number, you can login to
any system with Enhanced nPartition Commands installed.
Only remote management using WBEM involves remote management on a local nPartition.
Remote management using IPMI over LAN does not support listing a local nPartition
number, because the remote access point is the service processor (MP or GSP) of a remote
complex.
2.
Issue the parstatus -w command to list the local nPartition number.
Listing Power Status and Power Supplies
You can list power status and power supply details by using any one of the following procedures:
•
•
•
“Listing Power Status and Power Supplies (Service Processor)” (page 238)
“Listing Power Status and Power Supplies (nPartition Commands)” (page 239)
“Listing Power Status and Power Supplies (Partition Manager)” (page 239)
Power status and power supply information includes the power status (on or off) for cabinets,
cells, and I/O chassis; the status (ok or failed) for power supplies; and related details.
Procedure 8-32 Listing Power Status and Power Supplies (Service Processor)
From the service processor Command Menu, use the PS command and the cabinet option to list
power status and power supply details for the specified cabinet.
1.
238
Login to the service processor (MP or GSP) and enter CM to access the Command Menu.
Listing nPartition and Hardware Status
2.
At the Command Menu, enter the PS command and select the cabinet option for the cabinet
whose power status and related details you want to view:
• On HP Superdome servers, select the B (cabinet) option, and specify the cabinet whose
information you want to view.
• On all other systems, select the T (cabinet) option.
3.
To exit the service processor Command Menu, enter MA to return to the service processor
Main Menu.
At the Main Menu, enter X to exit the service processor interface.
Procedure 8-33 Listing Power Status and Power Supplies (nPartition Commands)
From the command line, issue the parstatus -B command for a power status summary for
all cabinets, or parstatus -V -b# for detailed power status for the specified cabinet (-b#,
where # is the cabinet number). You also can issue the frupower -d -C command for cell
power status, or the frupower -d -I command for I/O chassis power status.
1.
Login to a system with the nPartition commands installed.
If using remote administration features to list power status, you can login to any system
with Enhanced nPartition Commands installed.
2.
Issue commands to list details about system power status.
• parstatus -B — Power status summary for all cabinets.
• parstatus -V -b# — Detailed power status for the specified cabinet (-b#, where #
is the cabinet number).
• frupower -d -C — Cell power status.
• frupower -d -I — I/O chassis power status.
Procedure 8-34 Listing Power Status and Power Supplies (Partition Manager)
You can list power status and power supply details by using Partition Manager.
When using Partition Manager Version 1.0, use the Details→Show Complex Details action,
Power/Cooling tab to list power details.
When using Partition Manager Version 2.0, use the Power and Cooling tab to list power details.
1.
Access Partition Manager.
For details on accessing Partition Manager or other tools, see “Tools for Listing Status”
(page 223).
2.
List power status and power supply details for the server complex.
From Partition Manager Version 1.0, select the Details→Show Complex Details action and
the Power/Cooling tab to view power status. For specific details, select the backplane
power boards or bulk power supplies entries in the Power/Cooling summary list.
From Partition Manager Version 2.0, select the Power and Cooling tab to view power status
details.
3.
Exit Partition Manager.
From Partition Manager Version 1.0, select the File→Exit action.
From Partition Manager Version 2.0, select Log off parmgr or exit the Web browser when
finished.
Listing Power Status and Power Supplies
239
Listing Fan and Blower Status
You can list fan and blower status by using any one of the following procedures:
•
•
•
“Listing Fan and Blower Status (Service Processor)” (page 240)
“Listing Fan and Blower Status (nPartition Commands)” (page 240)
“Listing Fan and Blower Status (Partition Manager)” (page 240)
Fan and blower status includes lists of cabinet blowers and I/O fans, and their status (whether
ok or failed).
Procedure 8-35 Listing Fan and Blower Status (Service Processor)
From the service processor Command Menu, use the PS command and the cabinet option to list
fan and blower status for the specified cabinet.
1.
2.
Login to the service processor (MP or GSP) and enter CM to access the Command Menu.
At the Command Menu, enter the PS command and select the cabinet option for the cabinet
whose fan and blower status you want to view:
• On HP Superdome servers, select the B (cabinet) option, and specify the cabinet whose
information you want to view.
• On all other systems, select the T (cabinet) option.
3.
To exit the service processor Command Menu, enter MA to return to the service processor
Main Menu.
At the Main Menu, enter X to exit the service processor interface.
Procedure 8-36 Listing Fan and Blower Status (nPartition Commands)
From the command line, issue the parstatus -B command for a fan and blower status summary
for all cabinets, or parstatus -V -b# for detailed fan and blower status for the specified
cabinet (-b#, where # is the cabinet number).
1.
Login to a system with the nPartition commands installed.
If using remote administration features to list fan and blower status, you can login to any
system with Enhanced nPartition Commands installed.
2.
Issue commands to list details about fan and blower status.
• parstatus -B — Fan and blower status summary for all cabinets.
• parstatus -V -b# — Detailed fan and blower status for the specified cabinet (-b#,
where # is the cabinet number).
Procedure 8-37 Listing Fan and Blower Status (Partition Manager)
You can list fan and blower status by using Partition Manager.
When using Partition Manager Version 1.0, use the Details→Show Complex Details action,
Power/Cooling tab to list fan and blower details.
When using Partition Manager Version 2.0, use the Power and Cooling tab to list fan and blower
details.
1.
Access Partition Manager.
For details on accessing Partition Manager or other tools, see “Tools for Listing Status”
(page 223).
2.
List fan and blower details for the server complex.
From Partition Manager Version 1.0, select the Details→Show Complex Details action and
the Power/Cooling tab to view fan and blower status. For specific details, select the cabinet
blowers or I/O fans entries in the Power/Cooling summary list.
From Partition Manager Version 2.0, select the Power and Cooling tab to view fan and
blower status details.
240
Listing nPartition and Hardware Status
3.
Exit Partition Manager.
From Partition Manager Version 1.0, select the File→Exit action.
From Partition Manager Version 2.0, select Log off parmgr or exit the Web browser when
finished.
Listing Fan and Blower Status
241
242
A nPartition Commands
This appendix has details and command-line syntax for the HP nPartition Commands, including
both the Original nPartition Commands and the Enhanced nPartition Commands.
• The Original nPartition Commands were distributed as part of HP-UX 11i v1 (B.11.11)
releases prior to the December 2004 release.
• The Enhanced nPartition Commands are distributed with current HP-UX releases, including
HP-UX 11i v3 (B.11.31), all releases of HP-UX 11i v2 (B.11.23), and releases of HP-UX 11i v1
(B.11.11) beginning with the December 2004 release.
The Enhanced nPartition Commands also are distributed as bundles on the HP Smart Setup
CD for Windows, and as bundles on the HP Integrity Essentials Foundation Pack for Linux.
For an introduction to the nPartition Commands, see “Commands for Configuring nPartitions”
(page 19). This appendix provides the following reference information for using HP nPartition
Commands:
• “parcreate Command” (page 249)
• “parmodify Command” (page 252)
• “parremove Command” (page 256)
• “parstatus Command” (page 258)
• “parunlock Command” (page 260)
• “fruled Command” (page 262)
• “frupower Command” (page 264)
• “cplxmodify Command” (page 266) — Only supported by the Enhanced nPartition
Commands.
NOTE: For the most current information for these commands, refer to the online manpages:
parcreate(1M), parmodify(1M), parremove(1M), parstatus(1), parunlock(1M), fruled(1M), frupower(1M),
and cplxmodify(1M).
On a Windows system, refer to Start→Programs→Hewlett-Packard→nPar Management→nPar
Commands Manual.
Specifying Cells and I/O Chassis to Commands
Use the cell and I/O chassis notation described in this section when you manage, configure, and
inquire about cells and I/O chassis using the nPartition configuration commands.
Details are in the “Cell Specification Formats” and “I/O Specification Format” sections that follow.
Cell Specification Formats
Use either of the following two formats to specify cells when using the nPartition configuration
commands: “Global Cell Number Format” or “Cell Hardware Location Format”.
• Global Cell Number Format The global cell number format is identical to the cells' HP-UX
hardware path, as reported by the HP-UX ioscan command. In global format, each cell is
given a single unique number that indicates the relative location of the cell in the entire
server complex.
Table A-1 Cell IDs in Global Cell Number Format
Cell Slot
0
1
2
3
4
5
6
7
Global Format for
rp7405/rp7410, rp7420,
rp7440, rx7620, and
rx7640
0
1
—
—
—
—
—
—
Specifying Cells and I/O Chassis to Commands
243
Table A-1 Cell IDs in Global Cell Number Format (continued)
•
Global Format for
rp8400, rp8420, rp8440,
rx8620, and rx8640
0
1
2
3
—
—
—
—
Superdome Cabinet 0
Global Format
0
1
2
3
4
5
6
7
Superdome Cabinet 1
Global Format
8
9
10
11
12
13
14
15
Cell Hardware Location Format In cell hardware location format, each cell is identified
using two numbers that specify the cabinet and the cell slot with the cabinet where the cell
resides: cabinet/slot.
Table A-2 Cell IDs in Hardware Location Format
Cell Slot
0
1
2
3
4
5
6
7
Hardware Location
Format for
rp7405/rp7410, rp7420,
rp7440, rx7620, and
rx7640
0/0
0/1
—
—
—
—
—
—
Hardware Location
Format for rp8400,
rp8420, rp8440, rx8620,
and rx8640
0/0
0/1
0/2
0/3
—
—
—
—
Superdome Cabinet 0
Hardware Location
Format
0/0
0/1
0/2
0/3
0/4
0/5
0/6
0/7
Superdome Cabinet 1
Hardware Location
Format
1/0
1/1
1/2
1/3
1/4
1/5
1/6
1/7
Both cell ID formats specify the location of a cell in a complex. For example, parstatus -c9
and parstatus -c1/1 specify the same cell.
# parstatus -c9
[Cell]
CPU
OK/
Hardware
Actual
Deconf/
Location
Usage
Max
========== ============ =======
cab1,cell1 active base 4/0/4
Memory
(GB)
OK/
Deconf
Connected To
========= ===================
8.2/ 0.0 -
Core
Cell
Capable
=======
no
Use
On
Next
Boot
====
yes
Par
Num
===
1
Memory
(GB)
OK/
Deconf
Connected To
========= ===================
8.2/ 0.0 -
Core
Cell
Capable
=======
no
Use
On
Next
Boot
====
yes
Par
Num
===
1
# parstatus -c1/1
[Cell]
CPU
OK/
Hardware
Actual
Deconf/
Location
Usage
Max
========== ============ =======
cab1,cell1 active base 4/0/4
#
I/O Specification Format
Use the following I/O hardware location format when specifying an I/O chassis to the nPartition
configuration commands:
cabinet/bay/chassis
244
nPartition Commands
The cabinet, bay, and chassis fields specify the physical location of the I/O chassis. The values of
these fields are as follows.
• cabinet
specifies the cabinet number where the I/O chassis resides.
On HP rp7405/rp7410, rp7420, rp7440, rx7620, rx7640, rp8400, rp8420, rp8440, rx8620, and
rx8640 servers, the server cabinet number always is 0.
In HP rp8400, rp8420, rp8440, rx8620, and rx8640 complexes the I/O Expansion cabinet, if
present, is 8.
On HP Superdome servers, the cabinet number can be:
— 0 — the left Compute cabinet.
— 1 — the right Compute cabinet, if present.
— 8 — an I/O Expansion cabinet, if present.
— 9 — an I/O Expansion cabinet, if present.
• bay
specifies the I/O bay (within a cabinet) where the I/O chassis resides.
On HP rp7405/rp7410, rp7420, rp7440, rx7620, rx7640, rp8400, rp8420, rp8440, rx8620, and
rx8640 servers, the bay number always is 0.
On HP Superdome servers, the bay number can be:
— 0 — the front bay of a Compute cabinet, or the bottom bay of an I/O Expansion cabinet.
— 1 — the rear bay of a Compute cabinet, or the middle bay of an I/O Expansion cabinet.
— 2 — the top bay in an I/O Expansion cabinet.
• chassis
specifies the I/O chassis (within a bay).
On HP rp7405/rp7410, rp7420, rx7620, rp8400, rp8420, and rx8620 servers, the chassis number
is:
— 0 — Chassis 0, which connects to cell 0 and is the left chassis as viewed from the cabinet
rear: the left eight PCI card slots.
— 1 — Chassis 1, which connects to cell 1 and is the right chassis as viewed from the
cabinet rear: the right eight PCI card slots.
On HP Superdome servers, the chassis number is:
— 1 — Chassis 1, the left chassis in the bay, as viewed when facing the bay/chassis.
— 3 — Chassis 3, the right chassis in the bay, as viewed when facing the bay/chassis.
In HP Superdome servers all chassis are 12-slot I/O chassis, both in Compute cabinets and
in I/O Expansion cabinets.
The example below shows the parstatus command listing details about two different I/O
chassis (cabinet 0/bay 0/chassis 1, and cabinet 0/bay 1/chassis 3).
# parstatus -i0/0/1
[Chassis]
Core
Hardware Location
Usage
IO
=================== ============ ====
cab0,bay0,chassis1 absent
-
Connected
To
==========
-
Par
Num
===
-
Connected
To
==========
cab0,cell0
Par
Num
===
0
# parstatus -i0/1/3
[Chassis]
Core
Hardware Location
Usage
IO
=================== ============ ====
cab0,bay1,chassis3 active
yes
#
Specifying Cells and I/O Chassis to Commands
245
Use the parstatus -I command to list all I/O chassis within a server complex, regardless of
the chassis cell connections and nPartition assignments.
Use the HP-UX rad -q command or olrad -q command to list the currently available PCI
I/O slots in the local nPartition and their status. The rad command is available with HP-UX
B.11.11, and olrad is available with HP-UX B.11.23 and HP-UX B.11.31.
In Example A-1, both the parstatus and rad commands show details for various chassis and
slots, including chassis 0/1/3.
246
nPartition Commands
Example A-1 I/O Specification Formats for Cabinets, Bays, and Chassis
# parstatus -I
[Chassis]
1
Hardware Location
===================
cab0,bay0,chassis0
cab0,bay0,chassis1
cab0,bay0,chassis2
cab0,bay0,chassis3
cab0,bay1,chassis0
cab0,bay1,chassis1
cab0,bay1,chassis2
cab0,bay1,chassis3
cab1,bay0,chassis0
cab1,bay0,chassis1
cab1,bay0,chassis2
cab1,bay0,chassis3
cab1,bay1,chassis0
cab1,bay1,chassis1
cab1,bay1,chassis2
cab1,bay1,chassis3
cab8,bay0,chassis1
cab8,bay0,chassis3
cab8,bay1,chassis1
cab8,bay1,chassis3
cab8,bay2,chassis1
cab8,bay2,chassis3
cab8,bay3,chassis1
cab8,bay3,chassis3
# rad -q
Slot
0-1-3-0
0-1-3-1
0-1-3-2
0-1-3-3
0-1-3-4
0-1-3-5
0-1-3-6
0-1-3-7
0-1-3-8
0-1-3-9
0-1-3-10
0-1-3-11
8-0-3-0
8-0-3-1
8-0-3-2
8-0-3-3
8-0-3-4
8-0-3-5
8-0-3-6
8-0-3-7
8-0-3-8
8-0-3-9
8-0-3-10
8-0-3-11
#
1
2
Usage
============
absent
absent
absent
inactive
absent
absent
absent
active
absent
inactive
absent
absent
absent
absent
absent
active
inactive
active
inactive
inactive
absent
absent
absent
absent
Core
IO
====
yes
yes
yes
yes
yes
-
Connected
To
==========
cab0,cell4
cab0,cell0
cab1,cell2
cab0,cell2
cab1,cell0
-
Par
Num
===
0
1
0
-
2
Path
0/0/0
0/0/1/0
0/0/2/0
0/0/3/0
0/0/4/0
0/0/6/0
0/0/14/0
0/0/12/0
0/0/11/0
0/0/10/0
0/0/9/0
0/0/8/0
2/0/0
2/0/1/0
2/0/2/0
2/0/3/0
2/0/4/0
2/0/6/0
2/0/14/0
2/0/12/0
2/0/11/0
2/0/10/0
2/0/9/0
2/0/8/0
Bus
0
8
16
24
32
48
112
96
88
80
72
64
0
8
16
24
32
48
112
96
88
80
72
64
Speed
33
33
33
33
33
33
33
33
33
33
33
33
33
33
33
33
33
33
33
33
33
33
33
33
Power
On
On
On
On
On
On
On
On
On
On
On
On
On
On
On
On
On
On
On
On
On
On
On
On
Occupied
Yes
No
No
No
No
Yes
No
No
Yes
No
No
No
Yes
No
No
No
No
No
Yes
No
No
No
No
No
Suspended
No
N/A
N/A
N/A
N/A
No
N/A
N/A
No
N/A
N/A
N/A
No
N/A
N/A
N/A
N/A
N/A
No
N/A
N/A
N/A
N/A
N/A
Driver(s)
Capable
No
N/A
N/A
N/A
N/A
Yes
N/A
N/A
Yes
N/A
N/A
N/A
No
N/A
N/A
N/A
N/A
N/A
Yes
N/A
N/A
N/A
N/A
N/A
The parstatus -I command reports cabinet 0, bay 1, chassis 3 as cab0,bay1,chassis3.
The rad -q command and olrad -q command report cabinet 0, bay 1, chassis 3 as 0-1-3.
Specifying Remote Management Options to Commands
Two sets of remote management options are supported by the Enhanced nPartition Commands:
Specifying Remote Management Options to Commands
247
•
The -u... -h... set of options may be specified to cause the command to send its
management request using WBEM to an nPartition other than the local nPartition (but can
also be used as a "loopback access" to the local nPartition).
NOTE: When specifying the -u... -h... options, the host specified by -h must be have
the Enhanced nPartition Commands installed and have WBEM configured. Also, the
client.pem file on the system from which the command is issued must have a copy of the
SSL certificate entry (including the BEGIN and END lines) from specified host's server.pem
file.
See “Remote Management Using WBEM” (page 44) for details.
•
The -g... -h... options may be specified to cause the command to send its management
request using IPMI over LAN to a service processor in another server complex (but can also
be used as a "loopback access" to the service processor in the local complex).
NOTE: When specifying the -g... -h... options, the host specified by -h must have
IPMI LAN access enabled. Also, the user who issues the command must correctly specify
the host's IPMI password in order for the command to be able to successfully complete.
See “Remote Management Using IPMI over LAN” (page 46) for details.
The -u and -g options are mutually exclusive.
For more details about remote management, see “Remote and Local Management of nPartitions”
(page 41).
248
nPartition Commands
parcreate Command
The parcreate command creates a new nPartition.
This command assigns the specified cells (and any attached I/O chassis) to an nPartition, assigns
a number to the new nPartition, and returns the partition number of the newly created nPartition.
Root permission or IPMI LAN access is required to use parcreate.
NOTE: On servers based on the HP sx1000 chipset or HP sx2000 chipset, when the nPartition
Configuration Privilege is restricted the parcreate command cannot create a new nPartition.
This restriction does not apply when using the -g... -h... options.
Refer to the parcreate(1M) manpage for complete details.
Synopsis
The parcreate command supports slightly different options for the HP-UX B.11.11 and other
releases.
Original nPartition Commands
parcreate [-P PartitionName] [-I IPaddress]
-c cell:[type]:[use_on_next_boot]:[failure_usage] [-c...]
[-b path] [-t path] [-s path] [-r cell] [-r...] [-B]
Enhanced nPartition Commands
parcreate [-P PartitionName] [-I IPaddress] [-L clm_value]
-c cell:[type]:[use_on_next_boot]:[failure_usage][:clm] [-c...]
[-b path] [-t path] [-s path] [-r cell] [-r...] [-T flag] [-B]
[-u username -h IPaddress|hostname |-g -h IPaddress|hostname ]
•
The -u... -h... set of options may be specified to cause the command to send its
management request using WBEM to an nPartition other than the local nPartition (but can
also be used as a "loopback access" to the local nPartition).
• The -g... -h... options may be specified to cause the command to send its management
request using IPMI over LAN to a service processor in another server complex (but can also
be used as a "loopback access" to the service processor in the local complex).
The -u and -g options are mutually exclusive.
Options
-P PartitionName
Specifies the name of the new nPartition.
Specifies the IP address that can be used by management
tools to address this nPartition. This value should be
consistent with the IP address used for the nPartition when
an operating system is booted.
Specifies the amount of the memory that will be used as
-L clm_value
cell local memory per cell. The clm_value specified using
the -c option takes precedence over the clm_value specified
using the -L option. See the -c option for a description of
the clm_value formats.
Specifies the cell(s) to be added to the nPartition.
-c
cell:[type]:[use_on_next_boot]:[failure_usage][:clm] • The only valid type value is:
base Base cell. (The default.)
-I IPaddress
•
The valid use_on_next_boot values for cells are:
y Participate in reboot. (The default.)
n Do not participate in reboot.
•
The only valid failure_usage value is:
parcreate Command
249
ri
•
Reactivate with memory interleave (the default).
Specifies to integrate the cell into the nPartition
as normally occurs.
Enhanced nPartition Commands only.
The clm value specifies the amount of memory that
will be configured as cell local memory for the cell.
The clm value specified using the -c option takes
precedence over the clm value specified using the -L
option.
You can specify the clm value in either of two forms:
percentage or absolute amount of memory. The default
is 0 (no cell local memory).
— Percentage cell-local memory (CLM).
The percent number can be any number in the
range 0-100 with a suffix of %.
This number is rounded to 12.5%, 25%, 37.5%,
50%, 62.5%, 75%, 87.5% or 100%. If the cell
contains less than 4 GBytes of memory, then the
percentage is rounded to 25%, 50%, 75% or 100%.
Percentages are rounded up or down to the
nearest value, but are not rounded up to 100%.
—
Absolute CLM specification. (The default.)
The absolute number is interpreted as an absolute
number of gigabytes of memory and can
optionally have a suffix of GB.
As needed, an absolute CLM specification is
rounded up to the nearest 0.5 GBytes.
If the clm value is rounded, the command reports the
final value used.
250
-b path
Specifies the primary boot path.
For HP 9000 servers, this is the PRI boot path.
For HP Integrity servers, only boot options for the local
nPartition can be modified—therefore, boot paths for a
newly created nPartition cannot be set using parcreate.
Instead use the EFI system boot interface, available through
the nPartition console.
-t path
Specifies the alternate boot path.
For HP 9000 servers, this is the ALT boot path.
For HP Integrity servers, only boot options for the local
nPartition can be modified—therefore, boot paths for a
newly created nPartition cannot be set using parcreate.
Instead use the EFI system boot interface, available through
the nPartition console.
-s path
Specifies the secondary boot path.
For HP 9000 servers, this is the HAA boot path.
For HP Integrity servers, only boot options for the local
nPartition can be modified—therefore, boot paths for a
newly created nPartition cannot be set using parcreate.
Instead use the EFI system boot interface, available through
the nPartition console.
nPartition Commands
-rcell
-T flag
-B
-u username
-g
-h IPaddress|hostname
Specifies the core cell choices. One to four cells can be
specified.
Specifies whether Hyper-Threading should be enabled or
not (only if cells support this feature). By default
Hyper-Threading is disabled.
The valid values for flag are:
y Enable Hyper-Threading, which allows multiple
threads to run concurrently on each processor core.
n Disable Hyper-Threading. This is the default value.
Specifies to boot the nPartition. The default is not to boot
the nPartition and leave it in the shutdown for reconfig
state.
Enhanced nPartition Commands only. Specifies the account
and authorization to access an nPartition other than the
local nPartition.
The -h option is required if this option is used.
username specifies a configured user name on the target
nPartition.
Enhanced nPartition Commands only. Allows access to
the complex specified by the -h option. The accessed
complex is then considered the target complex. Access is
through the service processor LAN port.The -h option is
required if this option is used.
Enhanced nPartition Commands only. This option is only
used in combination with either the -u or -g option.
IPaddress|hostname specifies the IP address or hostname of
the target nPartition (-u) or service processor (-g).
parcreate Command
251
parmodify Command
You can use the parmodify command to modify the following attributes of an existing nPartition:
• Partition name
• Cell assignments (add cells or remove cells)
• Attributes of existing cells:
— Cell type
— Use-on-next-boot value
— Failure usage
— Enhanced nPartition Commands only: Cell local memory (CLM) value
• Core cell choices
• Enable or disable Hyper-Threading (only on supported cells)
• Boot paths (the primary, alternate, and HA alternate paths)
• IP address (if set, this value should be consistent with the IP address assigned to the nPartition
when HP-UX is booted)
Root permission or IPMI LAN access is required to use this command.
NOTE: On servers based on the HP sx1000 chipset or HP sx2000 chipset, when the nPartition
Configuration Privilege is restricted the parmodify command cannot add or remove cells from
an nPartition and cannot modify the CLM value of any cell. These restrictions do not apply when
using the -g... -h... options.
Refer to the parmodify(1M) manpage for complete details.
Synopsis
The parmodify command supports slightly different options for the Original nPartition
Commands and Enhanced nPartition Commands.
Original nPartition Commands
parmodify -p PartitionNumber
-a cell:[type]:[use_on_next_boot]:[failure_usage] [-a...] |
-m cell:[type]:[use_on_next_boot]:[failure_usage] [-m...] |
-I IPaddress | -r cell [-r...] | -d cell [-d...] | -b path | -t path |
-s path | -P PartitionName | -B
Enhanced nPartition Commands
parmodify -p PartitionNumber
-a cell:[type]:[use_on_next_boot]:[failure_usage][:clm] [-a...] |
-m cell:[type]:[use_on_next_boot]:[failure_usage][:clm] [-m...] |
-I IPaddress | -r cell [-r...] | -d cell [-d...] | -b path | -t path |
-s path | -P PartitionName | -B | -T flag |
[-u username -h IPaddress|hostname | -g -h IPaddress|hostname ]
•
The -u... -h... set of options may be specified to cause the command to send its
management request using WBEM to an nPartition other than the local nPartition (but can
also be used as a "loopback access" to the local nPartition).
• The -g... -h... options may be specified to cause the command to send its management
request using IPMI over LAN to a service processor in another server complex (but can also
be used as a "loopback access" to the service processor in the local complex).
The -u and -g options are mutually exclusive.
The -p option is required.
Options
The parmodify command supports the following command-line options.
252
nPartition Commands
-p PartitionNumber
Specifies the nPartition to be modified. PartitionNumber
specifies the unique number (integer) assigned to the
nPartition.
The -p option is required.
Note that you must also to specify any one or more of the
following options.
Specifies the cell(s) to be added to the nPartition.
-a
cell:[type]:[use_on_next_boot]:[failure_usage][:clm] • The only valid type value is:
base Base cell. (The default.)
•
The valid use_on_next_boot values for cells are:
y Participate in reboot. (The default.)
n Do not participate in reboot.
•
The only valid failure_usage value is:
ri Reactivate with memory interleave (the default).
Specifies to integrate the cell into the nPartition
as normally occurs.
•
Enhanced nPartition Commands only. The clm value
specifies the amount of memory that will be
configured as cell local memory for the cell.
You can specify the clm value in either of two forms:
percentage or absolute amount of memory. The default
is 0 (no cell local memory).
— Percentage cell-local memory (CLM).
The percent number can be any number in the
range 0-100 with a suffix of %.
This number is rounded to 12.5%, 25%, 37.5%,
50%, 62.5%, 75%, 87.5% or 100%. If the cell
contains less than 4 GBytes of memory, then the
percentage is rounded to 25%, 50%, 75% or 100%.
Percentages are rounded up or down to the
nearest value, but are not rounded up to 100%.
—
Absolute CLM specification. (The default.)
The absolute number is interpreted as an absolute
number of gigabytes of memory and can
optionally have a suffix of GB.
As needed, an absolute CLM specification is
rounded up to the nearest 0.5 GBytes.
If the clm value is rounded, the command reports the
final value used.
Modifies attributes of a cell already assigned to the
-m
cell:[type]:[use_on_next_boot]:[failure_usage][:clm] nPartition.
See the -a option descriptions for details on the type,
use_on_next_boot, failure_usage, and clm cell attributes.
-I IPaddress
-r cell
Specifies the IP address that can be used by management
tools to address this nPartition. This value should be
consistent with the IP address used by the nPartition when
an operating system is booted.
Specifies the core cell choices. One to four core cell choices
can be specified.
parmodify Command
253
-d cell
Remove the specified cell from the nPartition.
-b path
Specifies the primary boot path.
For HP 9000 servers, this is the PRI boot path.
For HP Integrity servers -b sets the first item in the boot
options list displayed by the EFI Boot Manager, and only
boot options for the local nPartition can be modified.
-t path
Specifies the alternate boot path.
For HP 9000 servers, this is the ALT boot path.
For HP Integrity servers -t sets the third item in the boot
options list displayed by the EFI Boot Manager, and only
boot options for the local nPartition can be modified.
-s path
Specifies the secondary boot path.
For HP 9000 servers, this is the HAA boot path.
For HP Integrity servers -s sets the second item in the boot
options list displayed by the EFI Boot Manager, and only
boot options for the local nPartition can be modified.
-P PartitionName
Specifies the name of the nPartition.
-B
Specifies whether to boot the nPartition. The default is not
to boot.
When you modify an inactive nPartition and specify the
-B option, the nPartition is booted (and becomes active)
immediately after it is modified.
When you modify an active nPartition and specify the -B
option, you must perform a reboot for reconfig of the
modified nPartition. You must perform this reboot for
reconfig before any other cell assignments can take place
in the server complex.
-T flag
Specifies whether Hyper-Threading should be enabled or
not (only if cells support this feature). If this option is not
specified, the Hyper-Threading property will not be
changed.
The valid values for flag are:
y Enable Hyper-Threading, which allows multiple
threads to run concurrently on each processor core.
n Disable Hyper-Threading.
-u username
Enhanced nPartition Commands only. Specifies the account
and authorization to access an nPartition other than the
local nPartition.
The -h option is required if this option is used.
username specifies a configured user name on the target
nPartition.
-g
Enhanced nPartition Commands only. Allows access to
the complex specified by the -h option. The accessed
complex is then considered the target complex. Access is
through the service processor LAN port.The -h option is
required if this option is used.
Enhanced nPartition Commands only. This option is only
used in combination with either the -u or -g option.
-h IPaddress|hostname
254
nPartition Commands
IPaddress|hostname specifies the IP address or hostname of
the target nPartition (-u) or service processor (-g).
parmodify Command
255
parremove Command
The parremove command removes an existing nPartition. This removes all cells from the
nPartition and destroys the nPartition definition. Root permission or IPMI LAN access is required
to run this command.
• To remove the local nPartition, you must specify the -F option.
For the Original nPartition Commands, the local nPartition is the one from which you issue
the parremove command.
For the Enhanced nPartition Commands, the local nPartition either is the one where the
command is issued, or if the -u... -h... options are specified it is the nPartition whose
host is specified by -h.
•
To remove a remote nPartition using the Original nPartition Commands, the remote nPartition
must be inactive: it must be shutdown for reconfig or the parremove command will not be
able to remove the nPartition.
When using the Enhanced nPartition Commands, parremove can remove an active, remote
nPartition when both the -Foption and the -g... -h... set of options are specified.
NOTE: On servers based on the HP sx1000 chipset or HP sx2000 chipset, when the nPartition
Configuration Privilege is restricted the parremove command cannot remove an nPartition
unless the command is issued with the -g... -h... options.
Refer to the parremove(1M) manpage for complete details.
Synopsis
parremove -p PartitionNumber [-F]
Enhanced nPartition Commands Notes
• The -u... -h... set of options may be specified to cause the command to send its
management request using WBEM to an nPartition other than the local nPartition (but can
also be used as a "loopback access" to the local nPartition).
• The -g... -h... options may be specified to cause the command to send its management
request using IPMI over LAN to a service processor in another server complex (but can also
be used as a "loopback access" to the service processor in the local complex).
The -u and -g options are mutually exclusive.
Options
256
-p PartitionNumber
Specifies the nPartition number to be removed.
-F
Forcibly remove the nPartition. If the nPartition is inactive, the
nPartition is removed. If the nPartition is active and if it is the
local nPartition, the nPartition is removed.
If the nPartition is active but is not the local nPartition, then
the nPartition will not be removed.
-u username
Enhanced nPartition Commands only. Specifies the account
and authorization to access an nPartition other than the local
nPartition.
The -h option is required if this option is used.
username specifies a configured user name on the target
nPartition.
-g
Enhanced nPartition Commands only. Allows access to the
complex specified by the -h option. The accessed complex is
then considered the target complex. Access is through the
service processor LAN port.The -h option is required if this
option is used.
nPartition Commands
-h IPaddress|hostname
Enhanced nPartition Commands only. This option is only used
in combination with either the -u or -g option.
IPaddress|hostname specifies the IP address or hostname of the
target nPartition (-u) or service processor (-g).
parremove Command
257
parstatus Command
The parstatus command displays information about the nPartitions or hardware within a
server complex. If you specify no arguments, parstatus lists information about several of the
major components of the server complex.
You can specify an individual entity (cell, I/O chassis, cabinet, or nPartition) to restrict the output
to information about that component.
All users can issue this command.
Refer to the parstatus(1) manpage for complete details.
Synopsis
parstatus
parstatus
parstatus
parstatus
parstatus
parstatus
parstatus
parstatus
parstatus
parstatus
-s
-w
[-X]
[-A] [-M] -C|-I
[-M] -B|-P
[-M] -i IOchassis [-i...]
[-V|-M] -c cell [-c...]
[-V|-M] -b cabinet [-b...]
[-V|-M] -p PartitionNumber [-p...]
-T
Enhanced nPartition Commands Notes
• The -u... -h... set of options may be specified to cause the command to send its
management request using WBEM to an nPartition other than the local nPartition (but can
also be used as a "loopback access" to the local nPartition).
• The -g... -h... options may be specified to cause the command to send its management
request using IPMI over LAN to a service processor in another server complex (but can also
be used as a "loopback access" to the service processor in the local complex).
The -u and -g options are mutually exclusive.
Options
-s
-w
-X
-A
-V
-c cell
Produce output suitable for machine parsing.
Show information for all the cells in the complex.
Show information for all I/O chassis in the complex.
Show information for all cabinets in the complex.
Show information for all nPartitions in the complex.
Show information about the specified cell.
-i IOchassis
Show information about the specified I/O chassis.
-b cabinet
Show information about the specified cabinet.
-M
-C
-I
-B
-P
258
Indicate (through parstatus exit status) whether the system
is an HP server that supports nPartitions. Not supported with
the -g... -h... options.
Display the nPartition number for the local nPartition. Not
supported with the -g... -h... options.
Display the server complex attributes.
Only display the available resources in the complex.
Increase the amount of information displayed.
For Enhanced nPartition Commands, this option includes
interleaved and cell local memory settings when cell (-c cell)
or nPartition (-p partition) details are displayed.
nPartition Commands
-p partition
Show information about the specified nPartition.
-T
Only display the Hyper-Threading information for supported
systems. If the -T option is used with other options, an error
occurs except when the -T option is used with its related
options. If the -T option is used on a non-supported system,
an error occurs.
Enhanced nPartition Commands only. Specifies the account
and authorization to access an nPartition other than the local
nPartition.
The -h option is required if this option is used.
username specifies a configured user name on the target
nPartition.
-u username
-g
-h IPaddress|hostname
Enhanced nPartition Commands only. Allows access to the
complex specified by the -h option. The accessed complex is
then considered the target complex. Access is through the
service processor LAN port.The -h option is required if this
option is used.
Enhanced nPartition Commands only. This option is only used
in combination with either the -u or -g option.
IPaddress|hostname specifies the IP address or hostname of the
target nPartition (-u) or service processor (-g).
parstatus Command
259
parunlock Command
The parunlock command unlocks the Stable Complex Configuration Data or Partition
Configuration Data.
The Enhanced nPartition Commands version of parunlock also can unlock Dynamic Complex
Configuration Data and cell data and can cancel pending changes to the Stable Complex
Configuration Data.
Use this command with caution.
Root permission is required to run this command.
NOTE: On servers based on the HP sx1000 chipset or HP sx2000 chipset, when the nPartition
Configuration Privilege is restricted the parunlock command
• cannot unlock the Partition Configuration Data of non-local nPartitions,
• cannot unlock the Dynamic Complex Configuration Data or Stable Complex Configuration
Data for the local complex,
• cannot cancel pending changes to the Stable Complex Configuration Data, and
• cannot unlock the cell data of cells not assigned to the local nPartition.
These restrictions do not apply when using the -g... -h... options.
Refer to the parunlock(1M) manpage for details.
Synopsis
parunlock [-p PartitionNumber] [-s]
parunlock -A
Enhanced nPartition Commands only:
parunlock [-d] [-c cell] [-P]
Enhanced nPartition Commands Notes
• The -u... -h... set of options may be specified to cause the command to send its
management request using WBEM to an nPartition other than the local nPartition (but can
also be used as a "loopback access" to the local nPartition).
• The -g... -h... options may be specified to cause the command to send its management
request using IPMI over LAN to a service processor in another server complex (but can also
be used as a "loopback access" to the service processor in the local complex).
The -u and -g options are mutually exclusive.
Options
-p PartitionNumber
-s
-d
-c cell
-P
260
nPartition Commands
Unlock the Partition Configuration Data of the specified
nPartition.
Unlocks the Stable Complex Configuration Data of the target
complex.
Enhanced nPartition Commands only. Unlocks the Dynamic
Complex Configuration Data of the target complex.
Enhanced nPartition Commands only. Unlocks the cell data of
the specified cell.
Enhanced nPartition Commands only. Cancels any pending
changes to the Stable Complex Configuration Data of the target
complex.
-A
This option differs slightly for the Original nPartition
Commands and Enhanced nPartition Commands releases.
• For the Original nPartition Commands release, -A unlocks
the Stable Complex Configuration Data and the Partition
Configuration Data of all the nPartitions in the complex.
• For the Enhanced nPartition Commands release, -A
unlocks the Complex Configuration Data, the Dynamic
Complex Configuration Data, and the Partition
Configuration Data of all the nPartitions in the target
complex.
-u username
Enhanced nPartition Commands only. Specifies the account
and authorization to access an nPartition other than the local
nPartition.
The -h option is required if this option is used.
username specifies a configured user name on the target
nPartition.
-g
Enhanced nPartition Commands only. Allows access to the
complex specified by the -h option. The accessed complex is
then considered the target complex. Access is through the
service processor LAN port.The -h option is required if this
option is used.
Enhanced nPartition Commands only. This option is only used
in combination with either the -u or -g option.
IPaddress|hostname specifies the IP address or hostname of the
target nPartition (-u) or service processor (-g).
-h IPaddress|hostname
parunlock Command
261
fruled Command
The fruled command blinks hardware attention indicators (LEDs) or turns them off.
This command can control the cell attention LEDs in all cell-based servers, as well as the I/O
chassis LEDs on Superdome servers. The fruled command also can start and stop blinking the
cabinet number LCDs on HP Superdome compute cabinets and I/O expansion cabinets.
Refer to the fruled(1) manpage for details.
Synopsis
fruled
fruled
fruled
fruled
fruled
[-f|-o]
[-f|-o]
[-f|-o]
[-f] -C
[-f] -I
[-B] -c cell [-c...]
[-B] -i IOchassis [-i...]
-b cabinet [-b...]
[-l cabinet] [-l...]
[-l cabinet] [-l...]
Enhanced nPartition Commands Notes
• The -u... -h... set of options may be specified to cause the command to send its
management request using WBEM to an nPartition other than the local nPartition (but can
also be used as a "loopback access" to the local nPartition).
• The -g... -h... options may be specified to cause the command to send its management
request using IPMI over LAN to a service processor in another server complex (but can also
be used as a "loopback access" to the service processor in the local complex).
The -u and -g options are mutually exclusive.
Options
-f
Turn off specified attention LED(s). This is the default.
The -f and -o options are mutually exclusive.
-o
Start blinking the specified attention LED(s). The -o option is
unavailable with -C or -I.
Start or stop blinking the cabinet number LCD of the cabinet
that contains the cell or I/O chassis.
The -B option is only available with -c and -i.
-B
-c cell
Blink or turn off the specified cell attention LED.
cell can be specified either in the local (cabinet/slot) or global
(cell_ID) format.
-i IOchassis
Blink or turn off the specified IOchassis attention LED.
-b cabinet
Start or stop blinking the cabinet number LCD of the specified
cabinet.
Turn off all cell attention LEDs.
Limit the scope of the -C or -I option to a given cabinet.
-C
-l cabinet
262
-u username
Enhanced nPartition Commands only. Specifies the account
and authorization to access an nPartition other than the local
nPartition.
The -h option is required if this option is used.
username specifies a configured user name on the target
nPartition.
-g
Enhanced nPartition Commands only. Allows access to the
complex specified by the -h option. The accessed complex is
then considered the target complex. Access is through the
service processor LAN port.The -h option is required if this
option is used.
nPartition Commands
-h IPaddress|hostname
Enhanced nPartition Commands only. This option is only used
in combination with either the -u or -g option.
IPaddress|hostname specifies the IP address or hostname of the
target nPartition (-u) or service processor (-g).
fruled Command
263
frupower Command
The frupower command turns on, turns off, or displays the current status of power for cells
and I/O chassis in cell-based servers.
Root permission is required to run this command.
• By default, the frupower command permits you to power on or off inactive cells and I/O
chassis that either are assigned to the target nPartition or are not assigned to any nPartition.
• I/O chassis power is turned on or off when the cell to which it is connected is powered on
or off. However, you also can control I/O chassis power separately from cell power in certain
situations.
— You can turn on I/O chassis power when a powered-off I/O chassis is attached to an
active cell assigned to the target nPartition. The nPartition must be rebooted for the
power on to become effective.
— You can turn off I/O chassis power when the I/O chassis is not assigned to an nPartition
and (on HP Integrity Superdome servers) when nPartition Configuration Privilege is
unrestricted.
• When using the Original nPartition Commands, the target and local nPartition are the same.
When using the Enhanced nPartition Commands, the target nPartition may be different
from the local nPartition when the -u... -h... options are specified.
CAUTION: When using the Enhanced nPartition Commands, the frupower -g... -h...
command and options allow all power operations on all cells and I/O chassis in the target complex,
even if this results in turning power off for a component of an active nPartition.
NOTE: On servers based on the HP sx1000 chipset or HP sx2000 chipset, you cannot turn cell
or I/O chassis power on or off for free cells or I/O chassis when nPartition Configuration Privilege
is restricted and when not using the -g... -h... options.
The nPartition Configuration Privilege setting does not affect the ability to control power using
the frupower -g... -h... command and option.
Command syntax and options for frupower follow. Refer to the frupower(1M) manpage for
details.
Syntax
frupower
frupower
frupower
frupower
[ -d
[ -d
[-d]
[-d]
| -o |
| -o |
-C [-l
-I [-l
-f ] -c cell [-c...]
-f ] -i IOchassis [-i...]
cabinet] [-l...]
cabinet] [-l...]
Enhanced nPartition Commands Notes
• The -u... -h... set of options may be specified to cause the command to send its
management request using WBEM to an nPartition other than the local nPartition (but can
also be used as a "loopback access" to the local nPartition).
• The -g... -h... options may be specified to cause the command to send its management
request using IPMI over LAN to a service processor in another server complex (but can also
be used as a "loopback access" to the service processor in the local complex).
The -u and -g options are mutually exclusive.
Options
-d
-o
264
nPartition Commands
Display power status of the specified cells or I/O chassis. This
is the default.
Power on the specified cells or I/O chassis.
The -o and -f options are mutually exclusive. The -o and -f
options are unavailable with -C and -I.
-f
-c cell
-i IOchassis
-C
-I
-l cabinet
Power off the specified cells or I/O chassis.
The specified cell is powered on/off or the power status is
displayed.
A cell can be specified either in the local (cabinet/slot) or global
(cell_ID) format.
The specified IOchassis is powered on/off or the power status
is displayed.
Display power status of all cells. By default the scope is the
entire complex if the -l option is not specified.
Display power status of all I/O chassis. The scope is the entire
complex if the -l option is not specified.
Limit the scope of the -C or -I option to the specified cabinet.
-u username
Enhanced nPartition Commands only. Specifies the account
and authorization to access an nPartition other than the local
nPartition.
The -h option is required if this option is used.
username specifies a configured user name on the target
nPartition.
-g
Enhanced nPartition Commands only. Allows access to the
complex specified by the -h option. The accessed complex is
then considered the target complex. Access is through the
service processor LAN port.The -h option is required if this
option is used.
Enhanced nPartition Commands only. This option is only used
in combination with either the -u or -g option.
IPaddress|hostname specifies the IP address or hostname of the
target nPartition (-u) or service processor (-g).
-h IPaddress|hostname
frupower Command
265
cplxmodify Command
The cplxmodify command modifies attributes of a cell-based server complex, such as the
complex name.
NOTE:
The cplxmodify command is only supported by the Enhanced nPartition Commands.
Root permission is required to run this command.
Refer to the cplxmodify(1M) manpage for details.
Synopsis
cplxmodify -N ComplexName [ -u username -h IPaddress|hostname |
-g -h IPaddress|hostname ]
•
The -u... -h... set of options may be specified to cause the command to send its
management request using WBEM to an nPartition other than the local nPartition (but can
also be used as a "loopback access" to the local nPartition).
• The -g... -h... options may be specified to cause the command to send its management
request using IPMI over LAN to a service processor in another server complex (but can also
be used as a "loopback access" to the service processor in the local complex).
The -u and -g options are mutually exclusive.
Options
-N ComplexName
Changes the name of the target complex to ComplexName.
-u username
Specifies the account and authorization to access an nPartition
other than the local nPartition.
The -h option is required if this option is used.
username specifies a configured user name on the target
nPartition.
-g
Allows access to the complex specified by the -h option. The
accessed complex is then considered the target complex. Access
is through the service processor LAN port.The -h option is
required if this option is used.
This option is only used in combination with either the -u or
-g option. IPaddress|hostname specifies the IP address or
hostname of the target nPartition (-u) or service processor (-g).
-h IPaddress|hostname
266
nPartition Commands