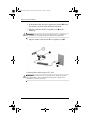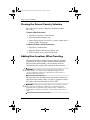
1
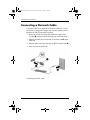
HP_MN_316748-002.book Page i Friday, February 14, 2003 11:23 AM
Modem and Networking
HP Notebook Series
Document Part Number: 316748-002
February 2003
This guide explains how to connect a modem cable and a network
cable to your notebook. The guide also provides instructions for
using the modem when traveling internationally.
HP_MN_316748-002.book Page ii Friday, February 14, 2003 11:23 AM
© 2003 Hewlett-Packard Company
Microsoft and Windows are trademarks of Microsoft Corporation in the
U.S. and other countries.
HP shall not be liable for technical or editorial errors or omissions
contained herein or for incidental or consequential damages in connection
with the furnishing, performance, or use of this material. The information
in this document is provided “as is” without warranty of any kind, and is
subject to change without notice. The warranties for HP products are set
forth in the express limited warranty statements accompanying such
products. Nothing herein should be construed as constituting an additional
warranty.
This document contains proprietary information that is protected by
copyright. No part of this document may be photocopied, reproduced, or
translated to another language without the prior written consent of
Hewlett-Packard Company.
Modem and Networking
HP Notebook Series
First Edition February 2003
Document Part Number: 316748-002
HP_MN_316748-002.book Page iii Friday, February 14, 2003 11:23 AM
Contents
1 Using an Internal Modem
Connecting the Modem Cable . . . . . . . . . . . . . . . . . . . . .
Using the RJ-11 Cable. . . . . . . . . . . . . . . . . . . . . . . .
Using a Country-Specific Modem Cable Adapter. . .
Viewing the Current Country Selection . . . . . . . . . .
Adding New Locations When Traveling. . . . . . . . . .
Solving Travel Connection Problems . . . . . . . . . . . .
Accessing Preinstalled Communication Software . . . . . .
1–1
1–1
1–3
1–4
1–4
1–5
1–8
2 Connecting to a Network
Connecting a Network Cable . . . . . . . . . . . . . . . . . . . . . . 2–2
Modem and Networking
iii
HP_MN_316748-002.book Page 1 Friday, February 14, 2003 11:23 AM
1
Using an Internal Modem
Your notebook has an internal modem, an RJ-11 telephone jack,
preinstalled modem drivers, and a modem cable.
Connecting the Modem Cable
Using the RJ-11 Cable
The modem cable may have noise suppression circuitry that
prevents interference with TV and radio reception. The modem
cable must be connected to an analog telephone line.
Ä
CAUTION: Jacks for digital PBX systems may resemble analog
telephone jacks, but are not compatible with the modem.
Modem and Networking
1–1
HP_MN_316748-002.book Page 2 Friday, February 14, 2003 11:23 AM
Using an Internal Modem
1. If the modem cable has noise suppression circuitry 1, orient
the circuitry end of the cable toward the notebook.
2. Plug the cable into the RJ-11 telephone jack 2 on the
notebook.
Å
WARNING: To reduce the risk of electrical shock, fire, or damage to
the equipment, do not plug a telephone cable into the RJ-45 jack.
3. Plug the modem cable into the RJ-11 telephone jack 3.
Connecting the modem using an RJ-11 jack
Å
1–2
WARNING: To reduce the risk of electrical shock, always ensure that
the modem cable is disconnected from the telephone network when
opening the notebook’s enclosure.
Modem and Networking
HP_MN_316748-002.book Page 3 Friday, February 14, 2003 11:23 AM
Using an Internal Modem
Using a Country-Specific Modem Cable
Adapter
Software for the internal modem supports multiple countries, but
telephone jacks vary by country. To use the modem and the RJ-11
cable outside the country in which you purchased the notebook,
you must obtain a country-specific modem adapter and define
your location in Dialing Properties.
To connect the modem to an analog telephone line that does not
have an RJ-11 telephone jack:
1. If the modem cable has noise suppression circuitry 1, orient
the circuitry end of the cable toward the notebook.
2. Plug the modem cable into the RJ-11 telephone jack 2 on the
notebook.
3. Plug the modem cable 3 into the country-specific modem
adapter.
4. Plug the country-specific modem adapter 4 into the
telephone jack.
Connecting the modem using a country-specific modem adapter
Modem and Networking
1–3
HP_MN_316748-002.book Page 4 Friday, February 14, 2003 11:23 AM
Using an Internal Modem
Viewing the Current Country Selection
To see the current country setting for your modem, follow
these steps:
Windows 2000 Professional:
1. Select Start > Settings > Control Panel.
2. Select the Regional Options icon.
3. Under Settings for the Current User, view the country that is
displayed under Your Locale.
Windows XP Home and XP Professional:
1. Select Start > Control Panel.
2. Select the Regional & Language Options icon.
3. Under Location, view your present location.
Adding New Locations When Traveling
The internal modem is configured to meet only the operating
standards in the country where you purchased the notebook.
When traveling internationally, you can add new location
configurations that comply with standards in other countries.
Ä
CAUTION: Do not delete your current modem country settings. To
enable modem use in other countries while preserving your home
country configuration, add a new configuration for each location in
which you will use the modem.
The drop-down lists described below may include countries not
supported by the modem. Unless you select a supported country,
the country selection will default to USA or UK.
Ä
1–4
CAUTION: Selecting a country other than the one in which it is located
may cause your modem to be configured in a way that violates the
telecommunications regulations/laws of that country. In addition, your
modem may not function properly if the correct country selection is not
made.
Modem and Networking
HP_MN_316748-002.book Page 5 Friday, February 14, 2003 11:23 AM
Using an Internal Modem
To add a new country location, follow these steps:
Windows 2000 Professional:
1. Select Start > Settings > Control Panel.
2. Select the Phone and Modem Options icon > Select New.
3. Assign the New Location Name (home, work, etc.).
4. Select the Country/Region from the drop-down list.
5. Select OK > OK.
Windows XP Home and XP Professional:
1. Select Start > Control Panel.
2. Select the Network and Internet Connections icon.
3. Select Phone and Modem Properties (menu in the left
column) > Dialing Rules tab.
4. Select the New button and assign it a name (home,
work, etc.).
5. Select the Country/Region from the drop-down list.
6. Select OK > OK.
Solving Travel Connection Problems
If you experience connection problems while using the modem
outside your home country, the following suggestions may help:
■
Check the telephone line type
The modem requires an analog, not a digital, telephone line.
A line described as a PBX line is usually a digital line. A
telephone line described as a data line, fax machine line,
modem line, or standard telephone line is probably an
analog line.
■
Check for pulse or tone dialing
Dial a few digits on the telephone and listen for clicks
(pulses) or tones. Then select:
Modem and Networking
1–5
HP_MN_316748-002.book Page 6 Friday, February 14, 2003 11:23 AM
Using an Internal Modem
Windows 2000 Professional:
1. Select Start > Settings > Control panel.
2. Select the Phone and Modem Options icon.
3. Select your location > Edit > Tone or Pulse Dialing.
4. Select OK > OK.
Windows XP Home and XP Professional:
1. Select Start > Control Panel.
2. Select the Network and Internet Connections icon >
Phone and Modem Properties (menu in the left column).
3. Select the Dialing Rules tab.
4. Select your location.
5. Select Edit > Tone or Pulse Dialing.
6. Select OK > OK.
■
Check the telephone number you are dialing and the
response of the remote modem
Dial the telephone number on the telephone, wait for the
remote modem to answer, then hang up.
■
Set the modem to ignore dial tones
If the modem receives a dial tone it does not recognize, it will
not dial and will display a No Dial Tone error message. Use
the following procedures to set the modem to ignore all dial
tones before dialing:
Windows 2000 Professional:
1. Select Start > Settings > Control Panel.
2. Select the Phone and Modem Options icon > Modem tab.
3. Select your modem.
4. Select Properties > General tab.
5. Clear the Wait for Dial Tone Before Dialing check box.
1–6
Modem and Networking
HP_MN_316748-002.book Page 7 Friday, February 14, 2003 11:23 AM
Using an Internal Modem
6. If you continue to receive the No Dial Tone error
message after clearing the check box:
a. Select Start > Settings > Control Panel > Phone and
Modems Options icon.
b. Select the Dialing Rules tab.
c. In the Locations list, select the location from which
you are dialing.
d. Select Edit.
e. Select your location from the drop-down list in the
Country/Region box.
f.
Select Apply > OK.
g. Select the Modem tab.
h. Select your modem.
i.
Select Properties > General tab.
j.
Clear the Wait for Dial Tone Before Dialing
check box.
Windows XP Home and XP Professional:
1. Select Start > Control Panel > Network and Internet
Connections icon.
2. Select Phone and Modem Properties (menu in the left
column) > Modem Tab.
3. Select your modem > Properties > Modem tab.
4. Clear the Wait for Dial Tone Before Dialing check box.
5. If you continue to receive the No Dial Tone error
message after clearing the check box:
a. Select Start > Control Panel > Network and Internet
Connections icon.
b. Select Phone and Modem Properties (menu in the
left column).
c. Select the Dialing Rules tab.
Modem and Networking
1–7
HP_MN_316748-002.book Page 8 Friday, February 14, 2003 11:23 AM
Using an Internal Modem
d. Select your location > Edit.
e. Select your location from the drop-down list in the
Country/Region box.
f.
Select Apply > OK.
g. Select the Modem tab.
h. Select your modem > Properties.
i.
Clear the Wait for Dial Tone Before Dialing
check box.
Accessing Preinstalled Communication
Software
To use preinstalled modem software for terminal emulation and
data transfer, follow these steps:
Windows 2000 Professional:
1. Select Start > Programs > Accessories > Communications.
2. Select the appropriate terminal emulation program or Internet
connection wizard.
Windows XP Home or Windows XP Professional:
1. Select Start > All Programs > Accessories >
Communications.
2. Select the appropriate fax or terminal emulation program or
Internet connection wizard.
1–8
Modem and Networking
HP_MN_316748-002.book Page 1 Friday, February 14, 2003 11:23 AM
2
Connecting to a Network
Your notebook has an RJ-45 network jack, an internal NIC
(network interface card), preinstalled network drivers, and may
have a network cable.
networking requires connection to domains, networking
✎ Because
is not supported in Windows XP Home Edition.
your notebook is connected to a network, confer with your
✎ Ifnetwork
administrator before changing network settings.
Modem and Networking
2–1
HP_MN_316748-002.book Page 2 Friday, February 14, 2003 11:23 AM
Connecting to a Network
Connecting a Network Cable
A network cable has an 8-pin RJ-45 network connector at each
end and may contain noise suppression circuitry, which prevents
interference with TV and radio reception.
1. Orient the end of a network cable with noise suppression
circuitry 1 toward the RJ-45 network jack on the notebook.
2. Plug the network cable into the RJ-45 network jack 2 on the
notebook.
3. Plug the other end of the cable into an RJ-45 network jack 3.
4. Start or restart the notebook.
Connecting a network cable
2–2
Modem and Networking