1
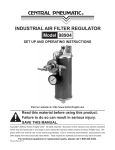
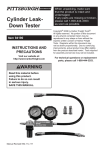
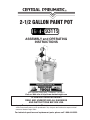
2-1/2 GALLON PAINT POT
93119
ASSEMBLY and OPERATING
INSTRUCTIONS
®
3491 Mission Oaks Blvd., Camarillo, CA 93011
Visit our Web site at http://www.harborfreight.com
To prevent serious injury,
Read and understand all warnings
and instructions before use.
Copyright© 2005 by Harbor Freight Tools® . All rights reserved. No portion of this manual or any
artwork contained herein may be reproduced in any shape or form without the express written
consent of Harbor Freight Tools.
For technical questions and replacement parts, please call 1-800-444-3353.
Specifications
Maximum Pressure
80 PSI
Air Inlet
1/4” NPT
Working Pressure
30-60 PSI
Net Weight
20.5 lb.
Tank Capacity
2.5 gallons
Dimensions
93/4” Diameter x 181/2”
Save This Manual
You will need the manual for the safety warnings and precautions, assembly instructions,
operating and maintenance procedures, parts list and diagram. Keep your invoice with this
manual. Write the invoice number on the inside of the front cover. Keep the manual and
invoice in a safe and dry place for future reference.
Safety Warnings and Precautions
WARNING: When using tool, basic safety precautions should always be followed to reduce
the risk of personal injury and damage to equipment. Failure to observe these warnings
and precautions could result in explosive failure of the pot, its components or attachments
and in serious injury to self or others.
Read all instructions before using this tool!
1.
Keep work area clean. Cluttered areas invite injuries.
2.
Observe work area conditions. Do not use machines or power tools in damp or wet
locations. Don’t expose to rain. Keep work area well lighted. Do not use electrically
powered tools in the presence of flammable gases or liquids.
3.
Keep children and animals away. Children must never be allowed in the work area.
Do not let them handle machines, tools, or hoses.
4.
Store idle equipment. When not in use, tools must be stored in a dry location to inhibit
rust. Always lock up tools and keep out of reach of children.
5.
Do not force tool. It will do the job better and more safely at the rate for which it was
intended. Do not use inappropriate attachments in an attempt to exceed the tool capacity.
6.
Use the right tool for the job. Do not attempt to force a small tool or attachment to do
the work of a larger industrial tool. Do not use a tool for a purpose for which it was not
intended.
7.
Dress properly. Do not wear loose clothing or jewelry as they can be caught in moving
parts. Protective, electrically nonconductive clothes and nonskid footwear are recommended when working. Wear restrictive hair covering to contain long hair.
8.
Use eye and ear protection. Always wear ANSI-approved impact and chemical splash
safety goggles. Coatings can produce eye irritation. When cleaning tools exercise
caution when using solvents. They can be forcefully ejected from the tool’s nozzle and
REV 06/06
SKU 93119
For technical questions, please call 1-800-444-3353.
Page air passages. Wear an ANSI-approved dust mask or respirator when working around
chemical mist.
9.
Do not overreach. Keep proper footing and balance at all times. Do not reach over or
across running machines.
10.
Maintain tools with care. Keep tools clean for better and safer performance. Follow
instructions for lubricating and changing accessories. Inspect tool hoses periodically
and, if damaged, have them repaired by an authorized technician. The handle must be
kept clean, dry, and free from oil and grease at all times.
11.
Disconnect power. Unplug compressor when not in use.
12.
Remove adjusting keys and wrenches. Check that keys and adjusting wrenches are
removed from the tool or machine work surface before plugging it in.
13.
Avoid unintentional starting. Do not carry any tool with your finger on the trigger,
whether it is plugged in or not.
14.
Stay alert. Watch what you are doing. Use common sense. Do not operate any tool
when you are tired.
15.
Check for damaged parts. Before using any tool, any part that appears damaged
should be carefully checked to determine that it will operate properly and perform its
intended function. Check for alignment and binding of moving parts; any broken parts
or mounting fixtures; and any other condition that may affect proper operation. Any part
that is damaged should be properly repaired or replaced by a qualified technician. Do
not use the tool if any valve does not operate properly.
16.
Replacement parts and accessories. When servicing, use only identical replacement
parts. Use of any other parts will void the warranty. Only use accessories intended for
use with this tool. Approved accessories are available from Harbor Freight Tools.
17.
Do not operate tool if under the influence of alcohol or drugs. Read warning labels
on prescriptions to determine if your judgment or reflexes are impaired while taking drugs.
If there is any doubt, do not operate the tool.
18.
Do not spray near open flames, pilot lights or heaters, or any other heat source.
Most solvents and coatings are highly flammable, particularly when sprayed. Always
make sure that the work area is well ventilated.
19.
Do not smoke while working with spraying tools. Do not spray in an area where lit
cigarettes or cigars are present. Extinguish all smoking materials before using or cleaning the spray tool.
20.
Do not use air pressure loads which exceed the working pressure (60 PSI). Exceeding the working pressure will cause the safety valve to release air, if it is working
properly, in order to prevent the tank from exceeding it’s maximum pressure. Exceeding
the Tank’s maximum pressure can cause the pressure pot to rupture or explode.
21.
During each use, pull the ring on the safety valve to check that it operates freely
and relieves air pressure. If the safety valve is stuck, does not operate freely, or does
not relieve air pressure, replace the valve.
REV 06/06
SKU 93119
For technical questions, please call 1-800-444-3353.
Page 22.
Do not discard or make any alterations to the safety valve. Tampering with, welding
or drilling the pot can weaken it.
23.
CAUTION: Do not use abrasive, corrosive or rust inducing materials with this pot. It is
not designed for those materials. To use them can damage the pot’s internal parts.
24.
Industrial applications must follow OSHA requirements.
25.
Read all information concerning coating products and cleaning solvents. Chlorinated solvents, such as 1-1-1 Trichloroethane and Methylene Chloride (also known as
methyl chloride) can chemically react with aluminum and explode. Many paint sprayers
contain aluminum. If you are in doubt about potential chemical reactions, contact the
coating or solvent manufacturer.
26.
Check all seals before connecting the spray tool to the air supply.
27.
Always ensure that the lid is fully attached to the can.
28.
Always ensure that the retaining ring is screwed past the first thread.
29.
Always ensure that the air supply is fully attached.
30.
Do not use wrenches, pliers or other tools to tighten pot clamps. Use only the torque
you can apply with your hands.
31.
WARNING: Never release the lid while the pot is pressurized.
Unpacking
When unpacking, check to make sure that all the parts are included. If any parts are missing or broken, please call Harbor Freight Tools at the number on the cover of this manual. If
any part of the machine is missing or broken, please, call Harbor Freight Tools at the number on the front cover, as soon as possible.
SKU 93119
For technical questions, please call 1-800-444-3353.
Page Operation
Efficient and easy use of the pressurized pot depends on the careful performance of the
steps required to prepare the pot for use, to fill the pot, and to operate the pot.
Preparing the Pot for Use
1.
Follow the manufacturer’s directions when mixing and preparing the paint or coating.
2.
Strain the paint using a fine mesh screen to keep foreign matter and lumps from clogging the pot’s passageways.
NOTE: Before using, it is recommended that the air supply line be passed
through a filter to remove any possible dirt, water, or oil from the line.
Filling the Pot
Refer to the parts assembly illustration and the parts list on page 9 while performing the following steps:
1.
Relieve all air pressure in the pot by pulling the ring on the safety valve (9). Pull the ring
until the pressure bleeds down.
2.
Remove the lid assembly by loosening the thumb screws (13) and tipping the lid clamps
back.
3.
Set the lid assembly aside.
4.
Pour the prepared and strained paint into the pot.
5.
Replace the lid assembly (3), and tighten the clamps and thumb screws.
6.
Connect the air supply hose to the air inlet fitting on the pot regulator.
7.
Attach the atomization air hose to the air outlet fitting, which is directly opposite the air
inlet fitting.
Gauge (5)
Handle (10)
Adapter, Air Inlet (4)
T-handle Adjusting
Screw
Safety Valve (9)
Regulator (6)
Adapter, Air Outlet (4)
Fluid Outlet Adapter (18)
Thumb screw (13)
Yoke Assy
Lid Clamp (14)
SKU 93119
For technical questions, please call 1-800-444-3353.
Page WARNING: Always make sure that the equipment connected to the pot
or hose outlet has a higher pressure rating than the regulated air pressure in the pot.
Operating the Pot
1.
Turn ON the air supply at the recommended PSI range (30-60 PSI).
2.
Adjust the paint pressure by turning the T-handle adjusting screw (on regulator) clockwise
to increase pressure and counterclockwise to decrease the pressure.
3.
Adjust the atomization air for the spray by using the regulator on the pot.
4.
Operate the spray gun according to the manufacturer’s instructions.
5.
Clean the pot, paint hose and spray gun as soon as the job is done or is finished for the
day.
6.
If the pot is not operating properly, refer to the Troubleshooting section on page 8.
Maintenance
Maintenance of the Paint Pot consists of cleaning it thoroughly after each use by performing
the following procedures:
1.
Turn OFF the main air supply to the pot.
2.
Relieve all pressure from the pot by turning the regulator T-handle counterclockwise, and
then pull the ring on the safety valve until the pressure bleeds down.
3.
Loosen the Thumb Screws and tip the lid clamps back.
4.
Tip the pot lid to one side.
5.
Loosen the spray gun air cap retaining ring about three turns.
6.
Turn on the air supply.
7.
Cup a cloth over the spray gun air cap and pull the trigger. This forces the paint back
through the hose and into the pot.
8.
Empty and clean the pot, and clean the parts that come into contact with the paint. Use
a suitable solvent.
9.
Pour the solvent into the pot.
10.
Replace the lid and tighten the thumb screws and clamps.
11.
Spray until clean solvent appears.
12.
Repeat steps 4 through 7.
13.
Ensure that the ports to the safety valve, gauge, and outlets are free of hardened paint
or other materials which could prevent the free movement of air.
Note: Occasionally check the gauge. The needle should return to zero
with the pressure off.
SKU 93119
For technical questions, please call 1-800-444-3353.
Page Troubleshooting
In the event the pot is not operating properly, refer to the following table for troubleshooting
procedures.
Problem
Possible Cause
Air escapes from the port on
the regulator cap.
A broken or damaged diaphragm.
Replace the diaphragm.
Pressure drops slowly on the
gauge.
A dirty or worn valve seat in
the regulator.
Clean or replace the valve
seat.
Paint tends to settle in can
rapidly.
Insufficient
paint.
Mix or thin the paint according
to the manufacturer’s instructions before spraying.
Fluid or air leaks from the lid
gasket.
A defective lid gasket or loosened thumb screw.
Replace the gasket or tighten
the thumb screw.
Safety valve is stuck, does not
operate freely or does not relieve pressure.
Damaged valve.
Replace the safety valve.
Safety valve popping off.
Tank pressure too high.
Reduce tank pressure 30-60
PSI.
mixing
of
Possible Solution
the
Accessories
The following accessories are available for use with the Paint Pressure Pot:
An Air Regulator Kit can be used as an independent monitor of both air and fluid pressure.
It can be used with portable air compressors or with air lines when no other means of air
pressure regulation (air filters or regulators) is available.
An Air Adjusting Valve gives the operator more control and reduces air use at the gun.
The valve is ideal for low pressure spraying.
A Rubber Lid Gasket can be used when the material being sprayed is not compatible with
the supplied gasket.
An Intake Strainer connects to the fluid inlet tube, preventing lumps and foreign matter
from entering the fluid lines.
SKU 93119
For technical questions, please call 1-800-444-3353.
Page Parts List
Part
Description
Qty
Part
Description
Qty
1
Tank Shell Assembly
1
10
Handle
1
2
Lid Gasket
1
11
Hex Nut
1
3
Lid Assembly
1
12
Street Elbow
1
4
Adapter
3
13
Thumb Screw
4
5
Gauge
1
14
Yoke Assembly
4
6
Regulator
1
15
Cotter Pin
4
7
Swivel Adapter
1
16
Hinge Pin
4
8
Branch Tree
1
17
Fluid Tube
1
9
Safety Valve
1
18
Fluid Outlet Adapter
1
Assembly Diagram
SKU 93119
For technical questions, please call 1-800-444-3353.
Page