1
AIR STAPLER
1/4” CROWN
Model 54425
ASSEMBLY AND OPERATING INSTRUCTIONS
®
3491 Mission Oaks Blvd., Camarillo, CA 93011
Visit our Web site at http://www.harborfreight.com
Copyright 2003 by Harbor Freight Tools®. All rights reserved. No portion of this
manual or any artwork contained herein may be reproduced in any shape or form
without the express written consent of Harbor Freight Tools.
For technical questions, please call 1-800-444-3353.
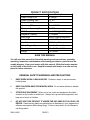
PRODUCT SPECIFICATIONS
!"##
$$
%
&!'()
!
&!*+
$
-)
6
/#-)
!
78:
7!$;&
<:
:
=#$$
?
;
$;76#
">7"7
@+)$
SAVE THIS MANUAL
You will need this manual for the safety warnings and precautions, assembly,
operating, inspection, maintenance and cleaning procedures, parts list and assembly diagram. Keep your invoice with this manual. Write the invoice number
on the inside of the front cover. Keep this manual and invoice in a safe and dry
place for future reference.
GENERAL SAFETY WARNINGS AND PRECAUTIONS
1.
KEEP WORK AREA CLEAN AND DRY. Cluttered, damp, or wet work areas
invite injuries.
2.
KEEP CHILDREN AWAY FROM WORK AREA. Do not allow children to handle
this product.
3.
STORE IDLE EQUIPMENT. When not in use, tools and equipment should be
stored in a dry location to inhibit rust. Always lock up tools and equipment, and
keep out of reach of children.
4.
DO NOT USE THIS PRODUCT IF UNDER THE INFLUENCE OF ALCOHOL OR
DRUGS. Read warning labels on prescriptions to determine if your judgement or
reflexes are impaired while taking drugs. If there is any doubt, do not attempt to
use this product.
SKU 54425
PAGE 2
5.
USE EYE AND HEARING PROTECTION. Wear an ANSI approved, safety
impact, full face shield and hearing protectors when using this product. An ANSI
approved, safety impact, full face shield and hearing protectors are available
from Harbor Freight Tools.
6.
DRESS SAFELY. Do not wear loose clothing or jewelry, as they can become
caught in moving parts. Wear a protective hair covering to prevent long hair from
becoming caught in moving parts. If wearing a long-sleeve shirt, roll sleeves up
above elbows.
7.
DO NOT OVERREACH. Keep proper footing and balance at all times to prevent
tripping, falling, back injury, etc.
8.
INDUSTRIAL APPLICATIONS MUST FOLLOW OSHA REQUIREMENTS.
9.
STAY ALERT. Watch what you are doing at all times. Use common sense. Do
not use this product when you are tired or distracted from the job at hand.
10.
CHECK FOR DAMAGED PARTS. Before using this product, carefully check that
it will operate properly and perform its intended function. Check for damaged
parts and any other conditions that may affect the operation of this product.
Replace or repair damaged or worn parts immediately.
11.
REPLACEMENT PARTS AND ACCESSORIES: When servicing, use only identical replacement parts. Only use accessories intended for use with this product.
Approved accessories are available from Harbor Freight Tools.
12.
MAINTAIN THIS PRODUCT WITH CARE. Keep this product clean and dry for
better and safer performance. For your safety, service and maintenance should
be performed regularly by a qualified technician.
13.
USE THE RIGHT TOOL FOR THE JOB. Do not attempt to force a small tool or
attachment to do the work of a larger industrial tool. There are certain applications for which this tool was designed. It will do the job better and more safely at
the rate for which it was intended. Do not modify this tool, and do not use this
tool for a purpose for which it was not intended.
14.
WARNING: The warnings, precautions, and instructions discussed in this
manual cannot cover all possible conditions and situations that may occur. The
operator must understand that common sense and caution are factors, which
cannot be built into this product, but must be supplied by the operator.
SKU 54425
PAGE 3
SPECIFIC PRODUCT WARNINGS AND PRECAUTIONS
1.
IMPORTANT CONSUMER INFORMATION: This Air Stapler is equipped with a
Contact Trip Trigger. This Trigger mechanism is designed primarily for high
volume work where exact placement of the Staple is not critical. By holding the
Trigger, the Air Stapler will fire each time the nosepiece contacts the wood. A
characteristic of this design is the tendency to “double-fire” if used to shoot one
Staple at a time. This can be caused by the recoil produced and lingering finger
pressure on the Trigger. To avoid this occurrence, hold the Air Stapler firmly
against the wood and give the Trigger one quick squeeze. A single shot Air
Stapler, equipped with a sequential Trip Trigger, may be considered if high volume, rapid stapling is not required. This Air Stapler should give the owner long,
dependable service. However, failure to understand its operating characteristics,
or careless use, can result in property damage or serious personal injury.
2.
USE ONLY CLEAN, DRY, REGULATED, COMPRESSED AIR AT BETWEEN 60
TO 115 PSI. Never use oxygen, carbon dioxide, combustible gases, or any other
bottled gas as a power source for this tool.
3.
NOTE: An air compressor is not provided. You will need an air compressor with
a minimum rating of 4 to 6 CFM delivery at 90 PSI.
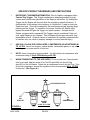
4.
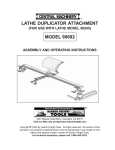
WHEN CONNECTING TO THE AIR SUPPLY: Prior to each use, if an automatic
oiler is not used, add two drops of Air Tool Oil (part #95) into the Air Plug
(part #33) of the Air Stapler. Attach the air compressor hose to the Air Plug. Turn
on the air compressor, and set the regulator to the recommended 60 to 115 PSI
for this tool. (See Figure A.)
PSI AIR REGULATOR
TO
AIR
STAPLER
ADJUST
FROM
60 PSI TO 115 PSI
FIGURE A
SKU 54425
PAGE 4
TO
AIR
COMPRESSOR
5.
ALWAYS DISCONNECT THE AIR SUPPLY HOSE FROM THE AIR STAPLER
BEFORE LOADING THE STAPLES TO PREVENT A STAPLE FROM BEING
ACCIDENTALLY FIRED DURING CONNECTION. The Air Stapler’s driving
mechanism may cycle when the tool is connected to the air supply. When not in
use, disconnect from air supply and remove all Stapes from the Moving Rail (part
#76) of the Air Stapler.
6.
DO NOT LOAD STAPLES WITH THE TRIGGER (part #31) OR SAFETY ELEMENT (part #55) DEPRESSED. Doing so may cause accidental firing of a
Staple.
ALWAYS KEEP YOUR FINGER OFF THE TRIGGER (part #31) WHEN NOT
DRIVING STAPLES. Never carry the Air Stapler with your finger on the Trigger,
as the tool will fire a Staple if the Safety Element (part #55) is bumped while the
Trigger is depressed.
7.
8.
ALWAYS ASSUME THE AIR STAPLER IS LOADED. Keep the tool pointed
away from yourself and others at all times.
9.
NEVER ATTEMPT TO DRIVE A STAPLE INTO MATERIAL THAT IS TOO
HARD, AT TOO STEEP AN ANGLE, OR NEAR THE EDGE OF THE
WORKPIECE. The Stapler may ricochet, causing personal injury to you or
others nearby.
10.
GRIP THE AIR STAPLER FIRMLY WITH BOTH HANDS TO MAINTAIN
CONTROL, WHILE ALLOWING THE TOOL TO SLIGHTLY RECOIL AWAY
FROM THE WORKPIECE AS A STAPLE IS DRIVEN.
11.
MAKE SURE ALL ADJUSTING WRENCHES ARE REMOVED FROM THE
AIR STAPLER BEFORE USING.
12.
MAINTAIN A SAFE WORKING ENVIRONMENT. Keep the work area well lit.
Make sure there is adequate surrounding workspace. Always keep the work
area free of obstructions, grease, oil, trash, and other debris. Do not use the Air
Stapler in areas near flammable chemicals, dusts, and vapors.
13.
ALWAYS DISCONNECT THE AIR STAPLER FROM ITS AIR SUPPLY before
performing any maintenance or cleaning of the tool, leaving the work area, moving the tool to another location, or handing the tool to another person.
UNPACKING
When unpacking, check to make sure all the parts shown on the Parts List on page 9 are
included. If any parts are missing or broken, please call Harbor Freight Tools at the number shown on the cover of this manual as soon as possible.
SKU 54425
PAGE 5
ASSEMBLY INSTRUCTIONS
NOTE: For additional references to the parts listed on the following pages, refer to the
Assembly Diagram on page 10.
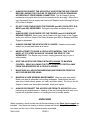
To Attach A Quick Connector To The Air Stapler:
1.
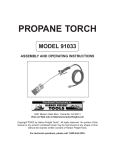
The Air Stapler requires the attachment of a 1/4”-18 NPT Quick Connector (not
included) to the Air Plug (part #33) of the Air Stapler. To do so, wrap the
threaded portion of the Quick Connector with about 3” of pipe thread seal tape
(not included). Then, wrench tighten the Quick Connector into the Air Plug
(See Figure B.)
AIR PLUG (#33)
QUICK CONNECTOR
(NOT INCLUDED)
TRIGGER
(#31)
FIGURE B
NOSE
WRAP THREADED PORTION
WITH 3” PIPE THREAD SEAL
(NOT INCLUDED)
SAFETY ELEMENT (#55)
OPERATING INSTRUCTIONS
To Prepare The Air Stapler For Use:
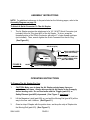
1.
CAUTION: Make sure to keep the Air Stapler pointed away from you
and others at all times. Always disconnect the Air Stapler to its air supply
before loading nails. Do not load nails with the Trigger (part #31) or
Safety Element (part #55) depressed. (See Figure C, next page.)
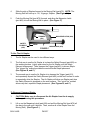
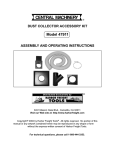
2.
Lift the Magazine Latch (part #39) up, and pull the Moving Rail (part #76) all the
way to the rear until it latches. (See Figure C.)
3.
Orient a strip of Staples with the points down, and drop the strip of Staples into
the Moving Rail (part #76). (See Figure C.)
SKU 54425
PAGE 6
4.
Slide the strip of Staples forward in the Moving Rail (part #76). NOTE: The
Moving Rail will hold up to 110, 18 gauge, Staples. (See Figure C.)
5.
Push the Moving Rail (part #76) forward, and allow the Magazine Latch
(part #39) to lock the Moving Rail in place. (See Figure C.)
AIR HOSE (NOT INCLUDED)
MAGAZINE LATCH (#39)
TRIGGER
(#31)
SAFETY
ELEMENT
(#55)
NOSE
MOVING RAIL (#76)
FIGURE C
To Use The Air Stapler:
1.
The Air Stapler can be used in two different ways.
2.
The first way to use the Air Stapler is to place the Safety Element (part #55) on
the working surface. Lightly push down on the Air Stapler until the Safety
Element is depressed. Then, depress the Trigger (part #31) to drive a Staple.
This “trigger fire” method provides the most accurate Staple placement.
(See Figures B, and C.)
3.
The second way to use the Air Stapler is to depress the Trigger (part #31),
and repeatedly impact the Safety Element (part #55) on the work surface in order
to repeatedly drive the Staples. The Air Stapler will drive one Staple each time
the Safety Element is impacted on the work surface. This “quick fire” method
allows very fast, repetitive Staple placement. (See Figures B, and C.)
To Remove A Jammed Staple:
1.
CAUTION: Make sure to disconnect the Air Stapler from its air supply
before performing this procedure.
2.
Lift up on the Magazine Latch (part #39) and pull the Moving Rail (part #76) all
the way to the rear until it latches. Then, remove all of the Staples from the
Moving Rail). (See Figure C.)
SKU 54425
PAGE 7
3.
Use a pair of needle nose pliers and/or a screwdriver (both not included) to
remove the jammed Staple from the lower portion of the Nose of the Air Stapler.
(See Figure C.)
INSPECTION, MAINTENANCE, AND CLEANING
1.
CAUTION: Always disconnect the Air Stapler from its compressed air supply source before performing any inspection, maintenance, or cleaning.
2.
BEFORE EACH USE, inspect the general condition of the Air Stapler. Check for
loose screws, misalignment or binding of moving parts, jammed Staples, cracked
or broken parts, damaged air supply hose, and any other condition that may
affect the safe operation of this tool. If abnormal noise or vibration occurs, immediately disconnect the Air Stapler from its compressed air supply source and
have the problem corrected before further use.
Do not use damaged equipment.
3.
PERIODICALLY, use a premium quality, lightweight oil to lubricate all moving
parts.
4.
When necessary, wipe with a damp cloth, using a mild detergent.
5.
When storing, keep the Air Stapler covered with a clean cloth.
PLEASE READ THE FOLLOWING CAREFULLY
THE MANUFACTURER AND/OR DISTRIBUTOR HAS PROVIDED THE PARTS LIST AND ASSEMBLY
DIAGRAM IN THIS MANUAL AS A REFERENCE TOOL ONLY. NEITHER THE MANUFACTURER OR
DISTRIBUTOR MAKES ANY REPRESENTATION OR WARRANTY OF ANY KIND TO THE BUYER THAT
HE OR SHE IS QUALIFIED TO MAKE ANY REPAIRS TO THE PRODUCT, OR THAT HE OR SHE IS
QUALIFIED TO REPLACE ANY PARTS OF THE PRODUCT. IN FACT, THE MANUFACTUER AND/OR
DISTRIBUTOR EXPRESSLY STATES THAT ALL REPAIRS AND PARTS REPLACEMENTS SHOULD BE
UNDERTAKEN BY CERTIFIED AND LICENSED TECHNICIANS, AND NOT BY THE BUYER. THE BUYER
ASSUMES ALL RISK AND LIABILITY ARISING OUT OF HIS OR HER REPAIRS TO THE ORIGINAL
PRODUCT OR REPLACEMENT PARTS THERETO, OR ARISING OUT OF HIS OR HER INSTALLATION
OF REPLACEMENT PARTS THERETO.
SKU 54425
PAGE 8
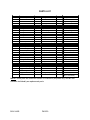
PARTS LIST
%
>
+
%
>
+
%
>
+
%
%
%
){
}";$=<
6
)
7'
7'
7'
&
~{$
7'
{'
){
$
7'
:
!/)
={/$;
|)
7'
7'
'#|$
7'
'#
'#|$
7'
}"$
:
)
/$;
:
%%
%
%
%
%>
%
%+
%
>
+
%
>
+
%
6
'
?
=
}";${
!<<
!
-;
-;
-;
'
7'
!$
$={
={/)
<)
<
?$;
<{
<}#
&
&")/
?$;
!{
/
&);
>
+
>
>
>
>%
>
>
>
>>
>
>+
%
>
+
+
+
+
+%
+
+
+
|)
!
8
!
&")'
?
&)
!
@|$;
-;
!{
'
-
-
)6$$@
|)~{$
)
:
~{
:
$
)6$$@
=$
6:$;
|"$
@$;
NOTE: Some parts are listed and shown for illustration purposes only, and are not
available individually as replacement parts.
SKU 54425
PAGE 9
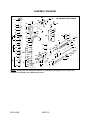
ASSEMBLY DIAGRAM
94
1
83
93
84
77
15
38
4
16
5
81
6
17
7
8
19
9
20
21
22
23
24
25
26
27
28
29
30
31
32
40
44
45
41
46
47
66
92
48
49
82
36
53
68
67
69
70
10
86
9
13
87
14
39
37
88
18
78
12
42
43
11
85
33
34
2
3
95: AIR TOOL OIL NOT SHOWN
96: HEX KEYS NOT SHOWN
35
50
59
58
56 57
51
88
90
52
54 55
84
72
73
85
74
79
53
80
60 62
61 62
63
57
58
71
75
76
91
NOTE: Some parts are listed and shown for illustration purposes only, and are not
available individually as replacement parts.
SKU 54425
PAGE 10