1
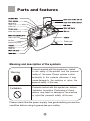
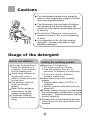
Twin-tub Washing Machine
This manual is for
XPB60-287S
Please read this manual
carefully before using.
Retain it for future reference.
User manual
Contents
Parts and features
Important safety instructions
Installation
Preparation before washing
Cautions
Usage of the detergent
Washing sequence
Additional spinning
Rinsing
Spinning
Care and cleaning
Trouble-Shooting
Accessories supplied
14
Specification
14
Parts and features
Water inlet
Water filling switch
Drain hose hook
Lint filter
(Installed by user)
Power cord
Meaning and description of the symbols
Warning
Forbidden
Contents marked with this symbol are related
to the safety of the product and the personal
safety of the users. Please operate in strict
conformity to the contents, otherwise it may
cause damage to the machine or injure the
personal safety of the user.
Contents marked with this symbol are actions
forbidden to perform. Performing of those
actions may result in damage to the machine
or injure the personal safety of the user.
Please check that the power supply has good earthing connection
condition before using to guarantee your safety.
1
Important safety instructions
Important!
Warning - to reduce the risk of fire, electric shock, or injury when using your
appliance, follow basic precautions, including the following:
Read all instructions before using the appliance.
This appliance is not intended for use by persons (including children) with
reduced physical, sensory or mental capabilities, or lack of experience and
knowledge, unless they have been given supervision or instruction concerning
use of the appliance by a person responsible for their safety.
Children should be supervised to ensure that they do not play with the
appliance.
If the supply cord is damaged, it must be replaced by the manufacturer, its
service agent or similarly qualified persons in order to avoid a hazard.
This appliance must be properly installed in accordance with the installation
instructions before it is used.
Never unplug your appliance by pulling on the power cord. Always grasp the
plug firmly and pull straight out from the outlet.
Replace worn power cords, loose plugs/power outlets immediately. The power
cord must be replaced by an Authorised repairer.
Unplug your appliance before cleaning or before making any repairs.
Do not operate your appliance in the presence of explosive fumes.
Do not use hot water that exceeds 65 C.
Do not use this appliance to wash clothes soaked, spotted or washed in petrol,
dry cleaning solvents, or any other explosive or flammable substances that
could ignite and explode.
Clothes or rags used to clean flammable or explosive materials should not be
washed in this appliance until all traces of this material has been removed.
Do not add or mix any flammable or explosive substances to the wash.
Do not try to remove clothes while the tub is moving. Let it come to a
complete stop.
The lid must be closed when the bowl is spinning.
Do not operate your appliance when parts are missing or parts are broken.
Do not use this appliance for commercial clothes washing.
Do not operate this appliance unless all enclosure panels are properly in place.
Do not tamper with the controls.
To reduce risk of injury do not allow children to play with the appliance. Close
supervision of children is necessary when the appliance is used near children.
This appliance must be connected to a proper electrical outlet socket with the
correct electrical supply.
Do not repair or replace any part of the appliance or attempt any servicing
unless specifically recommended in the user-repair instructions that you
understand and have skills to carry out.
To reduce the risk of electric shock or fire, do not use extension cords or
adapters to connect the unit to an electrical power source.
SAVE THESE INSTRUCTIONS
2
Installation
Please install and adjust the machine in accordance with this manual. It
is very important for your safety and for the correct operating of your
machine.
Install the lint filter
After opening the package , please take out the lint
filter from the bag , install it to the overflow
filter of the wash tub. See the figure.
Overflow filter
Lint filter
Connecting the hoses & Selecting the water level
Use the new hose-sets supplied with the appliance. Do not use
old hose sets from your previous appliances.
Connect the water inlet hose into the water inlet on the
control panel.
Water inlet hose
Select water level suitable to
the quantity of the laundry.
Set the water level indicator
to a suitable level.
The temperature of water
must be under 60 C.
Water inlet
Water level
indicator
Maximum
Medium
Minimum
Max
Med
Min
Set up the drain hose
Before using, hang the drain hose
in a suitable location.
0.8 H 1.2m
The height of the drain hose should be between
0.8-1.2m .
3
Installation
How to change the direction of the drain hose
Figure 1 indicates the ex factory
installation position of the drain hose. Soft cloth
Back
Front
Extend the drain hose from the side of the spin tub
Figure 1
Put a soft cloth on the ground. Lean
the machine down gently with the
front surface facing the ground.
Unhook the drain hose from the
cabinet. Take the hose out of the
Soft cloth
fixing groove.(See to Figure 2).
Figure 2
Place the drain hose into the groove
along the side of the spin tub in the
direction of (1)~(3), towards the side
of the spin tub. (See to Figure 3).
Place the drain hose into the
groove by hand. Take care not
to damage the drain hose in
fastening the fixing clamp.
Extend to the
spin tub side
Embed into the
groove in turn
Figure 3
Extend the drain hose from the rear
Take out the drain hose from the fixing groove. Extend it from the
rear as per the direction of the arrow. (When the drain hose
is extended from the rear, it can
be hung on either side of the
cabinet.)(See to Figure 4).
Figure 4
4
Preparation
Ï ´
Ç ° × ¼before
± ¸ washing
Positioning your washer
1.Connect the water inlet hose.
2.Select a suitable location for the washer on a hard,
even surface away from direct sunlight or heat
sources, e.g radiators, cooking appliances etc.
3.The washer must not be placed in an area where
the temperature is below freezing point.
0.8m H 1.2m
4.Any floor unevenness may result in unstable
working or abnormal noise. Please ensure
the machine is level.
Check the following before washing
Check if the
laundry has
any special
washing
instructions.
Clear the
Tie any
pockets.
long strips,
Take out loose fasten
items such
buttons
as coins, sand, and close
hairpins etc.
zippers.
The weight of When the machine
the laundry
is running buttons
shall not
may cause noise.
exceed the
To reduce the noise
rated capacity. turn clothes inside
Loosen the
out or place them
laundry before in a laundry bag.
placing it
evenly in the
tub.
a. Check if the laundry is suitable for machine washing.
b. Divide the laundry into colour fast and non-colour fast items.
c. Place items that do not absorb water easily into the water by hand.
d. For heavily soiled items, please first remove loose dirt, then apply
detergent directly to the stain before washing.
e. For those items that may get lint or are furry or fluffy, please turn
them inside out before washing
f . Do not put laundry polluted by chemicals into the washing machine.
5
Cautions
Ï ´ µ Ó Ð ë Ö ª
The rated washing/spinning capacity
refers to the largest dry weight of a load
that can be washed/spun.
The thickness, size and type of clothes
will influence the actual capacity. Be
careful to only load a reasonable amount
of laundry.
Do not select "Maximum" water level for
clothes less than 2.4kg, to avoid splashing
of water.
It is suggested not to use high sudsing
detergent. Choose a low suds or high
efficiency detergent.
Ï ´ µ Ó Î ï µ Ä ² Î ¿ ¼ Ö Ø Á ¿
Usage of the detergent
Ï ´ µ Ó Adding
¼ Áthe washing
µ Ä powder
Ê ¹ Ó Ã
How to use whitener
Fill water to desired level.
Dilute the whitener in a
container. Pour it slowly
into the washing tub.
Avoid using whitener on
laundry with color or
pattern as they are prone
to lose color.
The whitener shall not
touch the laundry
directly.
Refer to the whitener
instructions for the
usage and quantity.
For powder whitener,
please dissolve it before
using.
Dissolve in the machine:
1.Fill small quantity of water.
2.Add the powder. Run for 30
seconds to dissolve it completely.
3.Put in the laundry. Select a
suitable water level.
Instant dissolving of the washing
powder:
1.Prepare warm water of 30 C in a
container.
2.Add the powder while stirring to fully
dissolve it.
Powder is more likely to contaminate
the laundry with residue than a liquid
detergent. Therefore please use the
correct quantity.
Please refer to the washing powder
instructions for the correct use and
dosage.
6
Washing sequence
Wash timer
Water inlet
Wash selector
(To set to below 2 minutes, (Delicate, normal,
first set to 6 minutes then Drain)
turn it back. This can increase
the service life of the timer.)
Spin timer
(to set to below 1 minute,
first set to 2 minutes then
turn it back. This can increase
the service life of the timer.)
Ç ¿ Ï ´
OFF
NORMAL
OFF
±
ê × ¼
DELICATE
DRAIN
Å Å
Ë ®
WASH SELECTOR
WASH TIMER
SPIN TIMER
Wash
SPIN
WASH
1.Water-filling selector
Set the water inlet selector to the "WASH" side.
(Figure 1)
2.Fill with water to the set level and add the
dissolved washing powder. (Figure 2)
3.Place the clothes into the water.
4.Select the wash mode, either "delicate"
or "normal". (Figure 3)
Figure 2
Ç ¿ Ï ´
NORMAL
DELICATE
±
ê × ¼
DRAIN
Å Å
5.Select the washing time
Select the washing time according to the load
size and how dirty the clothes are. (Figure 4)
Note: For a full load on the normal cycle first
wash for 3 minutes, the clothes will absorb
the water. At the end of 3 minutes add extra
water up to the maximum water level mark.
Then wash for a further 15 minutes using
the wash timer.
6.After washing, set the "WASH
SELECTOR" at "DRAIN". (Figure 5).
Ë ®
Figure 3
WASH SELECTOR
OFF
Figure 4
WASH TIMER
Ç ¿ Ï ´
NORMAL
± ê × ¼
DELICATE
DRAIN
Å Å
WASH SELECTOR
Ë ®
Figure 5
Energy test program 18 min Normal Warm Wash (35'C), 9 min Rinse, 5 min spin (1/2 load).
Add the clothes load. Fill the wash tub to the maximum water level. Water at 35'C.
While it is filling (half) add the detergent/PBIS mixed with 1 litre of Min.35'C water.
Wash on "normal" for 3 minutes. Then fill the wash tub again to the maximum water level. Water at 35'C.
Wash on "normal" for 15 minutes. Drain for 5 minutes. Divide load into two halves.
Spin each half load for 5 minutes. Place the clothes in the wash tub and then fill with cold
(20'C) water to the maximum level.
Wash/rinse for 9 minutes. Drain for 5 minutes.
Divide load into two halves. Spin each half load for 5 minutes. Program end.
Detergent : drum type .
For best results , we recommend mixing detergent with warm water ,and using max anti-foam .
7
Additional spinning
Additional spinning
If you want to remove more foam, you can use this function.
1.Put the clothes into the spin tub evenly.
2.Spin
(1) Put the retainer in properly.
Please use the retainer even if the
clothes quantity is small.
Push retainer down
Push
Correct The laundry
Correct
No retainer
is slanting
(2) Close the inner and outer cover of the spin tub.
Outer cover of
The spin tub
Inner cover of
(3) Spin for 1-2 minutes. The spin tub
3.To remove foam during spinning.
(1) Open the outer cover of the spin tub.
(2) Set the water-filling selector control
rod to the "SPIN" side. Fill water for
about 1 minute.
If the water flow is too fast, the water
may flow out from the wash tub side.
You may turn the water tap down to
limit the flow of water.
(3) Close the outer cover of the spin tub.
Spin for 1-2 minutes.
8
WASH
SPIN
Rinsing
Rinsing
1. Put the clothes into the wash tub. Select suitable mode
according to the clothes load.
2.Adjust the water level
Set the water level using the water level adjusting
lever according to the clothes quantity. Then fill.
3.Rinse
Adjust the wash timer to a suitable rinse length.
Use 9 minutes for a full wash. A partial wash
load may only require 5-7 minutes.
Spinning
Spinning
1. Put the clothes into the spin
tub evenly and smoothly.
Note that a full wash load will
need to be split into two equal
loads for spinning.
Spin time
Clothes
Normal full load,
bed sheet
or blanket
Underwear
(knitwear)
2. Press the retainer into the tub
properly. Close the inner and
outer cover of the spin tub.
Sweater
(synthetic fiber)
3. Spin
Set the WASH TIMER at
OFF and WASH
SELECTOR at DRAIN .
Spin a full load.
Mixed
light loads
Spin Time
(minutes)
About 4~5
About 2~4
About 1~2
Within 1 minute
During spinning, spinning will stop if the outer cover of the spin tub
is opened. Close the cover to continue spinning.
If you want to fill water during spinning to remove the foam, we
recommend spinning the laundry first for about 1 minute, then
add water to the spin tub. Otherwise the spinning will stop
because of too much water.
9
Ï Care
´ º and
ó ´cleaning
¦ À í
Please first pull out the power plug from the electrical supply
before cleaning.
Cleaning the lint filter
The lint filter must be used during washing.
It must be cleaned after each wash.
1. Remove the lint filter
Put hand at the indicated position.
Push down to take it off. ( See
Figure 1)
Figure 1
2. Clean the lint filter
Put it in water and clean while it is
still wet.(See Figure 2)
Figure 2
3. Install the lint filter
After cleaning, insert the bottom
of the lint filter ( marked with
"down side") into the overflow filter ,
then push the upper part of the
filter in ( marked with " up side ").
(See Figure 3)
Figure 3
10
Care and cleaning
Cleaning the overflow filter
Too much lint on the overflow filter will influence
the normal usage of the machine. Please
clean it every two months.
1
Take off the overflow filter.
As indicated in the figure, squeeze
the elastic fixing claw and pull it in Elastic fixing
claw
the direction of the arrow .
(See to Figure 1)
Figure 1
2. Remove the corrugated pipe.
Dismantle the upper part of the
corrugated pipe inside the
overflow filter ( as indicated in
Figure 2).
Water level
adjusting lever
Corrugated
Pipe
3. Cleaning the overflow filter
Clean the lint around the filter
and flush with tap water.
Figure 2
4. Install the overflow filter.
(1).Install the corrugated pipe.
(2).Insert the mounting plate at
the bottom of the filter into
the valve cover.
(3).Hang up the hook at the left
upper side.
(4).Push the upper part in as
indicated in Figure 3.
Hook
Figure 3
11
Care
and
cleaning
Ï
´
º
ó
´
¦ À í
Clean the cabinet
Use only a damp cloth for cleaning the control panel.
To avoid any kind of damage to cabinet finish, use a
Petrol Thinner
small amount of liquid dishwashing detergent with
Alcohol
warm water to wipe the washer cabinet as required.
If fabric softener, bleach or detergent is accidently spilt on the
cabinet, wipe the cabinet immediately.
Do not use any abrasive, harsh chemicals, ammonia, chlorine
bleach, concentrated detergent, solvents or metal scouring pads.
Some of these chemicals may dissolve, damage and/or discolour
your washer.
Leave the lid open after completing the wash cycle to allow the
inside of the washer to dry out and prevent bad odours from forming.
Transporting or storing your washer
Drain any water from the inlet hoses.
Disconnect the power cord from the electrical supply.
Dry out the inner wash bowl and, if putting the machine into
storage or going on holiday, leave the lid open or propped ajar to
allow air to circulate.
If moving the washer, disconnect the drain hose.
Always transport or store your washer in an upright position only.
The washer must be stored at room temperature.
Trouble-shooting
If clothes fall to the outer side of the spin tub
If clothes fall to the outer side of the spin tub, please contact an
authorised service agent. Do not repair it yourself.
12
Trouble-shooting
When the remaining water is frozen
To prevent freezing drain after using.
After complete draining, set the "WASH SELECTOR" at "STRONG"
or "STANDARD". If it is set at "DRAIN", it will be more difficult for
the frozen water to melt.
Below 50 c
When the water is frozen
2~3L
Pour warm water below 50 into the
wash tub. After several minutes,
turn the pulsator on gently. Please
ensure the drain is working normally
before using again.
(Always unplug your washer to avoid an electrical shock before checking)
The following problems may not require a service call. Please confirm the
fault before calling an Authorised Service Agent. Do not repair it yourself.
Operating problems
The reasons
The machine does
not start.
Is there power failure?
Is the power plug loose?
Is the pulsator blocked?
Water will not drain
Is the drain hose blocked ?
Check the position of the drain hose, make
sure that the drain hose is fitted into a tub or
drain standpipe 0.8-1.2m above the floor.
There's abnormal
sound during washing
Coins, loose change, or buttons could cause
noises if caught in the wash.
There's abnormal
sound and violent
vibration during
spinning
Is the machine placed on a flat floor?
Is the retainer in the spin tub pressed evenly?
Is the amount of laundry in spin tub too much?
Water left in the drain
hose when first use
of the machine.
It is the water remaining from the factory
inspection of performance.
13
Accessories supplied
× ° Ï ä Ë µ Ã ÷
Name
Quantity
User's manual
One piece
Warranty manual
One piece
Water inlet hose
One piece
Lint filter
One piece
Retainer
One piece
Specification
Maximum/41L Medium/36L
Water level/Water quantity (about)
Water pressure(MPa)
Minimum/30L
0.02-0.2
Rated washing / spinning capacity(kg) 6.0/3.0 (weight of standard dry clothes)
14