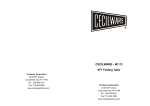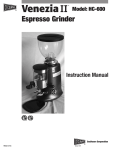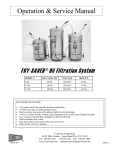
1
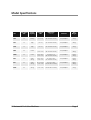
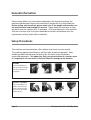
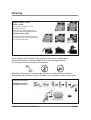
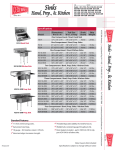
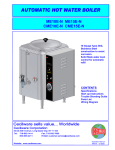
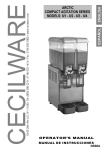
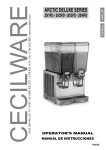
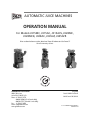
®
AUTOMATIC JUICE MACHINES
OPERATION MANUAL
For Models JX15MC, JX15AC, JX15ACS, JX28MC,
JX28MCB, JX28AC, JX45AF, JX45AFR
Prior authorization must be obtained from Grindmaster-Cecilware™
for all warranty claims.
GRINDMASTER-CECILWARE™
4003 Collins Lane
Louisville, KY 40245 USA
Phone:+1.502.425.4776
800.695.4500 (USA & Canada Only)
800.568.5715 (Technical Service Only)
Fax: +1.502.425.4664
Email: [email protected]
www.grindmaster.com
Aug 2010
Part # NS40A Revision B
0810 Form # CW-302-02
© 2010 GRINDMASTER-CECILWARE™
PRINTED IN USA
Contents
Model Specifications . . . . . . . . . . . . . . . . . . . . . . . . . . . . . . . 3
General Information . . . . . . . . . . . . . . . . . . . . . . . . . . . . . . . 4
Setup Procedures . . . . . . . . . . . . . . . . . . . . . . . . . . . . . . . . . . 4
Warnings . . . . . . . . . . . . . . . . . . . . . . . . . . . . . . . . . . . . . . . . 6
Operation . . . . . . . . . . . . . . . . . . . . . . . . . . . . . . . . . . . . . . . . 7
Cleaning . . . . . . . . . . . . . . . . . . . . . . . . . . . . . . . . . . . . . . . . . 7
Page 2
JX Automatic Fruit Juice Machines
Model Specifications
Model
Fruit Output
/ Min
Feeder
Capacity
Flow Rate
/ Min
Dimensions
Electrical
Ship
Weight
JX15MC
15
6 Orange
25 oz. - 45 oz.
(.7 L - 1.3 L)
33'' x 19.3'' x 17.7''
(84 cm x 49 cm x 45 cm)
120V, .55KW, 9A
111 lbs.
(51 kg)
JX15AC
15
13 lbs.
(6 kg)
34 oz. - 66 oz.
(1 L - 2 L)
36.6'' x 19.3'' x 17.7''
(93 cm x 49 cm x 45 cm)
120V, .55KW, 9A
119 lbs.
(54 kg)
JX15ACS
15
13 lbs.
(6 kg)
34 oz. - 66 oz.
(1 L - 2 L)
36.6'' x 19.3'' x 19.7''
(93 cm x 49 cm x 50 cm)
120V, .55KW, 9A
120 lbs.
(55 kg)
JX28MC
28
6 Fruit
42 oz. - 84 oz.
(1.2 L - 2.5 L)
34'' x 28.7'' x 17''
(86 cm x 73 cm x 43 cm)
120V, .55KW, 9A
96 lbs.
(44 kg)
JX28MCB
28
6 Fruit
42 oz. - 84 oz.
(1.2 L - 2.5 L)
34'' x 28.7'' x 17''
(86 cm x 73 cm x 43 cm)
120V, .55KW, 9A
103 lbs.
(47 kg)
JX28AC
28
40 lbs.
(18 kg)
48 oz. - 96 oz.
(1.4 L - 2.8 L)
39'' x 24.4'' x 19.7''
(99 cm x 62 cm x 50 cm)
120V, .55KW, 9A
109 lbs.
(49 kg)
JX45AF
45
40 lbs.
(18 kg)
57 oz. - 114 oz.
(1.7 L - 3.4 L)
71.3'' x 23'' x 29.5''
(181 cm x 58 cm x 75 cm)
120V, .55KW, 9A
185 lbs.
(84 kg)
JX45AFR
45
40 lbs.
(18 kg)
57 oz. - 114 oz.
(1.7 L - 3.4 L)
71.3'' x 23'' x 29.5''
(181 cm x 58 cm x 75 cm)
120V, .55KW, 9A
214 lbs.
(97 kg)
JX Automatic Fruit Juice Machines
(H x W x D)
Page 3
General Information
Please closely follow the instructions indicated in this manual to achieve the
maximum performance from your Cecilware JX Automatic Fruit Juice Machine.
Before setting up the machine, please make sure all the people authorized to use
the machine have read through this manual. Please keep this manual in a clean
dry place near the machine so it is accessible. All the components of the machine
that are in contact with fruit juice should be sanitized in accordance with the
requirements of any local health authorities.
Setup Procedures
The machine must be placed on a flat surface away from any heat source.
The machine requires ventilation on all four sides to perform properly. Floor
standing models should have the lock set on the front casters to prevent
unwanted movement. For Indoor Use Only, using the machine in a location were
it is exposed to rain can result in Electrical Shock or damage to the machine.
JX15MC
Unscrew the thumbscrew
and connect the feeder tube.
Place the peel bucket and
the drip tray.
JX15AC / JX15ACS
Unscrew the thumbscrew
and the screw on the auto
feeder, connect the feeder
tube. Place the peel bucket
and the drip tray.
Page 4
JX Automatic Fruit Juice Machines
Setup Procedures
JX28MC / JX28MCB
Remove the pulp strainer
and front cover. Connect the
feeder tube and replace the
pulp strainer and front cover.
Connect the peel buckets
and the drip tray.
JX28AC
Connect the auto feeder to
the top of the machine and
remove the pulp strainer and
front cover. Connect the
feeding hose and replace the
pulp strainer and front cover.
Connect the peel buckets
and the drip tray.
JX45AF
Follow the steps above for
the JX28AC. Place the
machine on the floor stand,
then connect the ramps and
down tubes. Connect the
dispenser support and place
the dispenser. Connect the
pulp strainer and the drip
tray.
JX Automatic Fruit Juice Machines
Page 5
Setup Procedures
JX45AFR
Follow the steps on page 5
for the JX45AF. Connect the
caddy as illustrated.
Before connecting the machine, please read the electrical information printed on
the machine data plate. Make sure electrical supply matches the machines
requirement.
Plug the machine into a
grounded electrical outlet.
NEMA 5-15R
Warnings
• Don’t operate the machine without verifying that all the parts have been
assembled and connected.
• The machine will not operate without the front cover attached.
DON’T OPERATE THE MACHINE IF THE DOOR DETECTOR IS MALFUNCTIONING –
DISCONNECT THE MACHINE AND CALL TECHNICAL SUPPORT AT 800-568-5715.
• The machine should be cleaned before using.
FOR BEST RESULTS, ORANGES WITH A DIAMETER OF 2.36” - 3.2” (60-80 MM)
SHOULD BE USED.
• In compliance with the requirements of local health authorities, the fruit must
be washed before using.
Page 6
JX Automatic Fruit Juice Machines
Operation
Depending on the model, add fruit to either the feeding tube or the auto feed
carousel.
TO BEGIN PROCESSING FRUIT:
Press the switch on the upper right side of the machine (Position I).
JX15ACS / JX45AF / JX45AFR: Once the machine has been started, press the faucet
handle to activate the squeezing process.
TO STOP PROCESSING FRUIT:
Stop the machine by pressing the 0 red button on the upper right side of the
machine.
JX15ACS / JX45AF / JX45AFR: Close the faucet and then press the 0 red button on
the upper right side of the machine.
Cleaning
Once the juice extraction has completed, stop
the machine according to the model type.
Leave the rods of the squeezer double drum in
a vertical position.
Make sure that the squeezer male parts are
horizontal.
Turn To Page 8
JX Automatic Fruit Juice Machines
Page 7
Cleaning
Remove the pulp strainer.
JX15MC / JX15AC / JX15ACS / JX28MC / JX28MCB / JX28AC: Empty the peel bucket.
JX45AF / JX45AFR: Remove the down tubes.
Remove the front cover.
JX15MC / JX15AC / JX15ACS
JX28MC / JX28MCB / JX28AC
JX45AF / JX45AFR
JX15MC / JX15AC / JX15ACS
Remove the positioner, pushing it upwards.
Remove the knife by unscrewing the knife
screw (CAUTION! KNIFE IS SHARP).
Remove the squeezer male part by unscrewing
the screw.
Remove the squeezer drum by unscrewing the
screw. Remove the second squeezer male part.
Remove the ejector.
For models with auto feeder: Remove the
carousel by unscrewing the screw.
Turn To Page 9
Page 8
JX Automatic Fruit Juice Machines
Cleaning
JX28MC / JX28MCB / JX28AC
JX45AF / JX45AFR
Unscrew the five thumbscrews of the
squeezing system parts.
Remove the two squeezing drums, the two
male parts and the knife by pulling outwards.
(CAUTION! KNIFE IS SHARP)
For models with auto feeder: First remove the
metal basket, then the carousel by unscrewing
the screw towards the right.
Clean all parts and the body of the machine with water and detergent.
Do Not Use Abrasive Cleaning Products, they can damage the parts.
Dry the parts and the interior of the machine.
Assemble all the parts in reverse order. No tools are required to assemble or
disassemble the machine. All parts should fit with ease and without undue force.
For machines with faucet,
IMPORTANT: Clean faucet
according to illustration.
JX Automatic Fruit Juice Machines
Page 9
GRINDMASTER-CECILWARE™
4003 Collins Lane
Louisville, KY 40245 USA
Phone: +1.502.425.4776
800.695.4500 (USA & Canada Only)
800.568.5715 (Technical Service Only)
Fax: +1.502.425.4664
Email: [email protected]
www.grindmaster.com