1
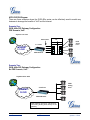
Analog IP Gateway GXW-400x
Quick Installation Guide
SW version 1.0.0.17
Grandstream Analog IP Gateway GXW-400x
Quick Installation Guide
SW version 1.0.0.17
WARNING: Please DO NOT power cycle the GXW-400x when LED lights are flashing during
system boot up or firmware upgrade. You may corrupt firmware images and cause the unit to
malfunction.
WARNING: use only the power adapter included in the GXW-400x package. Using an alternative
power adapter may permanently damage the unit.
Overview
The new GXW-400x series has a compact and quiet design (no fans) and offers superb audio
quality, rich feature functionality, strong security protection, and good manageability. It is autoconfigurable, remotely manageable and scalable.
The GXW-400x features 4 or 8-port FXS interface for analog telephones, dual 10M/100Mbps
network ports with integrated router, PSTN life line in case of power failure, and an RS232 serial
port for administration. In addition, it supports 2 SIP account profiles, caller ID for various
countries/regions, T.38 fax, 1 or 2-stage dialing, flexible dialing plans, security protection
(SIPS/TLS), comprehensive voice codecs including G.711 (a/u-law), G.723.1, G.726, G.728,
G.729A/B/E and iLBC.
Package
Unpack and check all accessories. Equipment included in the package:
•
•
•
one 12V universal power adapter
one Ethernet cable
one device unit
GXW- 400xv
Display
FXS port
www.grandstream.com
Firmware 1.0.0.17
[email protected]
GXW-400x Quick Install Guide, p. 2
Updated: 11/2006
APPLICATION Diagram
There are three scenarios where the GXW-400x series can be effectively used to enable any
business to leverage the benefits of VoIP and the Internet.
Scenario One:
GXW- 400x FXS Gateway Configuration
PBX Scenario, VoIP
Anywhere in the world
PB
FXS Trunks
Trun
PSTN
Analog
Lines
Lin
4 or 8 Ports
INTERNET
CLOUD
GXW FXS Series
Scenario Two:
GXW- 400x FXS Gateway Configuration
No PBX Scenario, VoIP
Anywhere in the world
4 or 8 Ports
PSTN
Analog
Lines
INTERNET
CLOUD
GXW FXS Series
FXS Gateway acts as a ‘virtual office’,
connecting analog lines directly to the
gateway
www.grandstream.com
Firmware 1.0.0.17
[email protected]
GXW-400x Quick Install Guide, p. 3
Updated: 11/2006
Scenario Three:
GXW-400x & GXW-410x Scenario
(maintain toll-free calling between locations)
Branch A - Boston, MA
6 employees
PSTN
Analog
Lines
FX0
Internet
Cloud
PST N
Cloud
GXW 400x
GXW 410x
Branch B – Denver, CO
4 employees
GXW-410x can also
directly connect to
the line-side of a
ACCESSING THE WEB CONFIGURATION PAGES
1.
2.
3.
4.
Connect the Power to the GXW-4008 unit.
Connect an Ethernet cable between the LAN port on GXW-400x to your PC.
Your PC will be assigned an IP address like 192.168.2.100
Launch web browser and type http://192.168.2.1 at Address of web browser. This
will let you to connect to build-in web server of GXW-400x.
You can login using either admin or 123 as the password.
GXW- 400x
LAN/WAN
RJ-45 Ethernet
Ports
Power
Supply
PSTN
Console Line
Connection
(PC
connection)
FXS
Ports
CONFIGURATION
www.grandstream.com
Firmware 1.0.0.17
[email protected]
GXW-400x Quick Install Guide, p. 4
Updated: 11/2006
1.
After you login, you will see six different tabs (Status, Basic Settings, Advanced Settings,
Profile 1, Profile 2 and FXS Ports) on the top of the screen. By clicking on each tab, you
can open that page for configuration.
2.
In order to enter your SIP Server/ SIP Proxy/Registrar information, click on Profile 1. Enter
the IP Address (or FQDN) of the Server under:SIP Server and/or Outbound Proxy.
3.
Now, to enter the extensions or account information, click on FXS ports.
As requested, you will need to fill in the information for each extension.
FXS
Port
1
2
3
4
5
6
7
8
SIP
User ID
601
602
603
604
605
606
607
608
Auth
ID
601
602
603
604
605
606
607
608
Authentication
Password
***
***
***
***
***
***
***
***
Name
Profile
Ext 1
Ext 2
Ext 3
Ext 4
Ext 5
Ext 6
Ext 7
Ext 8
Profile1
Profile1
Profile1
Profile1
Profile1
Profile1
Profile1
Profile1
4.
Once the extensions are configured, you are finished. Click Update after changing any
setting and then Reboot to let the changes take effect.
5.
After reboot, check under Status page whether the extensions are successfully registered.
You can then start using your Standard Phones connected to ports FXS1 to FXS8 to make
calls.
IMPORTANT Settings
The end-user must configure the following settings according to the local environment. NOTE:
Most settings on the web configuration pages are set to the default values.
A. NAT Settings
If you plan to keep the gateway within a private network behind a firewall, we recommend using
STUN Server. Here are 3 settings that can be useful in such a scenario:1.
STUN Server (under Advanced Settings webpage)
Enter a STUN Server IP (or FQDN) that you may have, or look up a free public STUN
Server on the internet and enter it on this field. If using Public IP, keep this field blank.
2.
Use Random Ports (under Advanced Settings webpage)
This is a tricky setting. It really depends on your network settings, so set this parameter to
Yes or No, whichever works. If using a Public IP address, set this parameter to No.
www.grandstream.com
Firmware 1.0.0.17
[email protected]
GXW-400x Quick Install Guide, p. 5
Updated: 11/2006
3.
NAT Traversal (under the Profile webpages)
Set this to Yes when gateway is behind firewall on a private network.
B. DTMF Methods
Under Profile pages, you will find DTMF Settings:
• DTMF in-audio
• DTMF via RTP (RFC2833)
• DTMF via SIP INFO
Enable one or more DTMF methods based on your PBX system.
C. Preferred VOCODER (Codec)
The GXW-400x supports a broad range of voice codecs. Under Profile webpages, you can
choose your preferred order of different codecs: PCMU (or G711u), PCMA (or G711a),
G729A/B, G723, G726-32, iLBC, G728 and G729E.
D. FIRMWARE UPGRADE
To upgrade your unit firmware, follow these steps:
1.
Under Advanced Settings webpage, enter your TFTP or HTTP Server IP address (or
FQDN) next to the “Firmware Upgrade: Upgrade Server” field.
2.
Select via TFTP or HTTP accordingly.
3.
If you plan to use Automatic Upgrade, set it to Yes, otherwise No (this will make it check
for upgrade every time you reboot).
E. FACTORY RESET
The ONLY way to reset default factory settings is to follows these four (4) steps:
1.
Unplug the Ethernet cable.
2.
Locate a needle-sized hole on the back panel of the gateway unit next to the power
connection.
3.
Insert a pin in this hole, and press for about 7 seconds.
4.
Take out the pin. All unit settings are restored to factory settings.
For any questions, please email [email protected] OR call our technical support at our
Brookline or LA offices.
Grandstream Networks, Inc.
Corporate Headquarters
www.grandstream.com
Firmware 1.0.0.17
[email protected]
GXW-400x Quick Install Guide, p. 6
Updated: 11/2006
1297 Beacon Street
Brookline, MA 02446
Tel: +1 (617) 566 – 9300
Fax: +1 (617) 247 – 1987
www.grandstream.com
[email protected]
Grandstream Networks, Inc. is an award-winning designer and manufacturer of next generation
IP voice & video products for broadband networks. Our products are consistently recognized by
industry experts for their innovation, affordability and superior value. Grandstream’s products
deliver superb sound and picture quality, rich telephony features and are fully interoperable and
compatible with most service providers, IP-PBXs, Softswitches and PBXs. Grandstream
Networks is headquartered in Brookline, MA with offices in Los Angeles, Dallas and China. For
more information, please visit www.grandstream.com.
Dallas, TX
2828 W. Parker Rd, Ste 102
Plano, TX 75075
469-241-0260
www.grandstream.com
Firmware 1.0.0.17
Los Angeles, CA
1301 John Reed Court
City of Industry, CA 91745
626-956-0260
[email protected]
Shenzhen, China
Bldg #1 Industrial Zone
Nan Shan Industrial Park
Shenzhen, China 518057
GXW-400x Quick Install Guide, p. 7
Updated: 11/2006