1
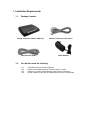
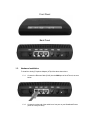
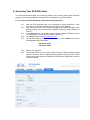
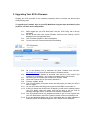
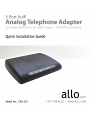
1. Installation Requirements
1.1.
Package Contents
Analog Telephone Adapter (CRA-210)
Ethernet Cable (RJ45)
1.2.
Standard Telephone Cable (RJ11)
Power Adapter
You will also need the following:
1.2.1.
1.2.2.
1.2.3.
1.2.4.
A standard corded or wireless telephone
Access to a Broadband Internet connection (DSL or Cable)
A Router (if you have multiple devices using Internet connections)
Regular Landline Connection (if available and you want to connect that)
Front Panel
Back Panel
1.3.
Hardware Installation
To install the Analog Telephone Adapter (ATA) follow these instructions.
1.3.1.
Connect the Ethernet Cable (RJ45) into the WAN port of the ATA unit, as seen
below:
1.3.2.
Connect the other end of the cable into a free port on your Broadband Router
(such as Linksys of Dlink)
1.3.3.
Connect the Standard Telephone Cable (RJ11) into the phone port labeled
PHONE1 (FXS1 below) as seen below (If you have a secondary account, or
T.38 Fax line, you can plug another phone or fax machine into PHONE2):
1.3.4.
Connect the other end of the cable to your telephone
1.3.5.
Connect another Standard Telephone Cable into the phone port labeled LINE
(FXO above) (this is to connect your PSTN line, if you wish to use your
Landline)
1.3.6.
Connect the other end of the cable to the regular phone jack in the wall
(optional)
1.3.7.
You may now plug the Power Adapter into an AC outlet which will power up the
ATA unit, as seen below:
WARNING: Use only the Power Adapter included in this package.
Wait until the POWER, VOIP and WAN LED's turn green and remain stable on the Front Panel of your
ATA (LAN LED might also be green).
The ATA will get provisioned with your account information and you will be able to place and receive calls
as soon as the PHONE1 LED is red and stable (if you have two accounts, then both PHONE1 and
PHONE2 should be red). If you have not setup your VOIP account, then you must do that next, in order to
have it provisioned and working.
2. Accessing Your ATA Web Panel
Your ATA Web Panel will allow you to check the status of your account, modify network and SIP
settings (if you have purchased an Unlocked ATA), and upgrade your ATA's Firmware.
2.1. To access your ATA Web Panel, follow these simple guidelines:
2.1.1.
2.1.2.
2.1.3.
2.1.4.
2.1.5.
With your ATA connected, pick up your telephone’s receiver and press ** (Star
key, twice). You will hear a woman’s voice giving you an IP Address.
After writing down the ATA’s IP Address using the procedure described in the
previous section, open a web browser application (such as Internet Explorer or
FireFox).
In the Address Bar of your browser, type the following: http://<IP Address> where
the <IP address> is the IP we noted earlier in step 2.1.1).
An example would be this: http://192.168.1.101
You will be brought to a Login screen. Be sure to select "Admin" and use the
following default login information:
Username: admin
Password: admin
2.1.6.
2.1.7.
Now you are logged in!
On the main screen, you can access, modify or view your SIP Proxy Status, along
with your username. Once configured properly (please contact your SIP or VOIP
provider for all required pieces of data) It should then show “Registered”, as in the
screen shot below:
3. Upgrading Your ATA’s Firmware
Keeping your ATA up-to-date is very important, especially when we release new features and
modify existing ones.
To upgrade your Firmware, login to your ATA Web Panel using the steps described in point
(2) above, and then use the steps below:
3.1.1.
3.1.2.
3.1.3.
3.1.4.
3.1.5.
3.1.6.
3.1.7.
3.1.8.
3.1.9.
3.1.10.
3.1.11.
3.1.12.
3.1.13.
3.1.14.
While logged into your ATA Web Panel, click the “ATA Config” tab in the top
navigation
Be sure to take note of the current Firmware Version you are running. It will be
displayed in the top right-hand corner
Click “Firmware Upgrade” in the sub navigation
You will come to a screen that looks like the following:
Go to the following link to download the latest Firmware from Allo.com:
http://www.allo.com (select ATA and check the Firmware section)
If anything newer is available to download, save the file to your local PC (for
example, on your Desktop – so it’s easy to remember where you saved it!)
Go back to your ATA Web Panel, and click the “Browse” button
Locate the Firmware file you just saved, and select it
Press the “Update” button
Your ATA will display a Progress Screen and will prompt you when your ATA is
about to reboot
Let your ATA reboot, and wait for the green and red LED’s to come back on
If after 2-3 minutes the red LED’s do not appear, you will have to manually reboot
your ATA. Simply unplug the power cord from the back of the unit, wait 30
seconds, and plug it back in. It will take a few minutes to load back up
Your ATA should now be fully updated and ready to go! You can log back into
your ATA Web Panel to check the Firmware Version to ensure everything is fine
If you have problems getting your ATA to work again after you have updated the
firmware, please call Technical Support at 1-877-339-ALLO for assistance.
4. Warranty Information
One Year Limited Hardware Warranty
Allo.com provides a one (1) year hardware warranty. Allo.com warrants to customer that this
product will conform to its published specifications and will be free from defects in material and
workmanship at the time of delivery and for a period of one year thereafter. Without limiting the
foregoing, this warranty does not cover any defect resulting from, (i.) any design or specification
supplied by an entity other than Allo.com, (ii.) non observance of technical operating parameters
(e.g., exceeding limiting values), or (iii.) misuse, abuse to abnormal conditions or alteration by
anyone other than Allo.com.
Replacement, Repair and Refund
After a receipt of an RMA request (Return Merchandise Authorization), Allo.com may replace,
repair or refund the Analog Telephone Adapter unit depending on the condition of the returned
unit. In order to receive an RMA number, please contact the store where you purchased the
product, or visit our website at http://www.allo.com/support/.
5. Compliance and Safety Information
5.1.
Installation Precautions
5.1.1.
5.1.2.
5.1.3.
5.1.4.
Never install the device during a lightning storm
Never install Telephone or Ethernet jacks in wet locations unless the jack is
specifically designed for wet locations
Never touch un-insulated Telephone / Ethernet wires or terminals unless the line
has been disconnected at the network interface
Use caution when installing or modifying Telephone / Ethernet lines
To prevent fire or shock hazard, do not expose this product to rain or any type of excess
moisture. If accidentally dropped into water, the Power Adapter should immediately be unplugged from the wall along with the Telephone and Ethernet cables.
5.2.
FCC and CE Notice
5.2.1.
5.2.2.
5.2.3.
5.2.4.
5.2.5.
This equipment has been tested and found to be in compliance with the limits for
a Class B Digital device in accordance with the specifications in part 15 of the
FCC rules
This device has also been granted a registration number by the FCC under part
68 rules and regulations for direct connection to the telephone lines
This product bears the CE marking indicating compliance with the 89/336/ EEC
directive
Modifications to this product not authorized by Allo.com could void FCC Approval
terminating end user’s authority to use this product
The REN is useful to determine the quantity of devices you may connect to your
telephone line and still have those entire devices ring when your number is called.
In most, but not all cases, the sum of the RENs of all devices should not exceed
five (5). To be certain of the number of devices you may connect to your line, as
determined by the REN, you should call your local telephone company to
determine the maximum REN for your calling area
5.2.6.
5.2.7.
If your telephone causes harm to the telephone network, the telephone company
may discontinue your service temporarily. If possible, they will notify you in
advance. But if advance notice is not practical, you will be notified as soon as
possible. You will be advised of your right to file a complaint with the FCC
Your telephone company may make changes to its facilities, equipment,
operations or procedures that could affect the proper operation of your
equipment. If they do, you will be given advance notice so as to give you an
opportunity to maintain uninterrupted service
For more information about the ATA and other products we have
please visit our website: http://www.allo.com
For direct support, please contact [email protected]
or visit www.cem-solutions.net to use the Online Live Support
Thank you for choosing Allo.com!
http://www.allo.com | 1-877-339-ALLO