1
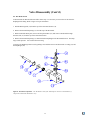
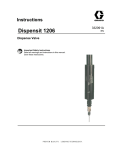
Instructions Dispensit 1230 Dispense Valve Important Safety Instructions Read all warnings and instructions in this manual. Save these instructions. 332092B EN WELCOME Thank you for purchasing a Dispensit 1230 Series Positive Displacement Dispense Valve. This manual explains the steps for proper setup, operation, and maintenance of the dispense valve. This manual is an overview of the valve and how it works. You have also received (where applicable), other manufacturer’s guides and technical references that detail the specifics of their particular products which have been integrated into the dispense valve. The information in this manual is designed to help you get the most use out of your dispense valve. This manual is written with the ease of understanding for not only you, but maintenance personnel, and management. Support tasks and procedures in this manual require that you have some mechanical knowledge and a “working “ knowledge of basic pneumatics. If you do not have this basic knowledge, obtain the proper training before attempting any of the tasks and/or procedures detailed in this manual. Only properly trained, authorized personnel should operate or maintain this dispense valve. It is important that you keep this manual in an easily accessible place for future reference. 2 Table of Contents Introduction .................................................................................................................................................... 4 Safety Precautions .......................................................................................................................................... 5 Main Components .......................................................................................................................................... 7 Valve Operation ............................................................................................................................................. 8 Optional Equipment........................................................................................................................................ 9 Valve Disassembly ........................................................................................................................................10 Subassemblies ...............................................................................................................................................14 Valve Assembly ............................................................................................................................................16 Operation Adjustments ..................................................................................................................................17 Troubleshooting.............................................................................................................................................17 Glossary of Terms .........................................................................................................................................19 Graco Standard Warranty ..............................................................................................................................20 Graco Information .........................................................................................................................................20 3 Introduction This manual is for the 1230 Series Positive Displacement Dispense Valves, designed and manufactured by Dispensit. This manual addresses the setup, operation, maintenance and adjustment of all aspects of the valve, which will be useful for management, support technicians as well as the operator. Its design also permits quick change out of the wetted module (wet head), allowing the drive module (power head) to remain permanently fixed to its mounting, assuring a minimal downtime for material change or replacement. The valve has a linear shot adjustment scale which provides volumetric consistency in shot applications. The 1230, made of corrosion resistant plastic and has either plastic or stainless steel metering rods and is offered in three different Metering Rod sizes and volume output ranges. The .125 valve has a dispense range of 0.010cc’s-0.126cc’s, the .188 valve has a dispense range of 0.022cc’s-0.283cc’s, and the .250 valve has a dispense range of 0.040cc’s-0.503cc’s. The 1230 will allow the operator to place a precise amount of material on a specific part with excellent repeatability, with cycle times as fast as 1.5 shots per second (depending on the application). This valve is capable of handling pressures, up to 60psi (.41MPa), and non-metallic material viscosities ranging from water type materials to medium viscosity fluxes. Material can be supplied by means of different types of material transfer systems, ranging from low-pressure syringes or cartridges to 55-Gallon transfer pump systems. The 1230’s modular design and lightweight allow it to easily integrate into a variety of applications. The valve is most commonly mounted vertically (with two 8-32 machine screws) however; it may be necessary to mount it at other angles, depending on the application. This valve has a variety of uses ranging from a simple bench top dispense system to robotic cells or conveyorized systems. This valve can dispense through a single luer lock needle, or a custom designed needle block configuration. NOTE: Mounting the valve vertically will enable the use of the wet cups, while mounting the valve on an angle will disable the use of the wet cups. Safety considerations are an extremely important element in the proper operation of this dispense valve. Actively thinking about the safety of yourself and others, as well as the condition of the equipment, is of most importance. Regard all warnings, cautions, and notices that are listed (on the left margins) throughout this manual and in any accompanying literature. CAUTION To avoid damage to property, equipment, and/or personal injury, please adhere to common safety practices. Failure to do so may result in such damage or injury. 4 Safety Precautions This manual provides installation, operation, and maintenance instructions for Graco Ohio Inc. meter, mix, and dispense machines. Read this manual before you install and operate your machine. Use your machine only as directed. Safety Terms within our manuals Cautions are given where failure to observe the instruction could result in damage to the equipment, associated equipment, and/or process. Warnings are given where failure to observe the instruction could result in injury or death to people. Some examples follow. Caution WARNING ! EMERGENCY STOP is Make sure Snuff-back can be monitored with DV MODE in AUTO, but must be adjusted with DV MODE in OPEN locked in before manually aligning the ratio block to the ratio beam. Safety Labeling on our machinery All our machines carry the following safety labels wherever necessary: • Danger Labels indicate an imminently hazardous situation, which, if not avoided, could result in death or serious injury. • Warning Labels indicate potentially hazardous situations which, if not avoided, could result in death or serious injury. • Caution Labels indicate an unsafe practice that may result in moderate or minor injury. • Notice Labels state a company policy. Some examples are: DANGER WARNING NOTICE DO NOT OPERATE THIS MACHINE WITH GUARD(S) DETACHED UNPLUG MACHINE BEFORE OPENING ENCLOSURE OVERCURRENT PROTECTION PROVIDED AT MACHINE SUPPLY TERMINALS CAUTION CAUTION WEAR EAR PROTECTION WEAR EYE PROTECTION 5 Safety Precautions (Cont’d) Dispensit recommends, as many companies require, that the primary air source to the dispense valve be disconnected before being serviced. It is the users responsibility to ensure that the primary air pressure is OFF. If the valve is controlled by an electrical system, (e.g., solenoid valve or PLC), the electrical system should be placed in a position where the air supply to the dispense valve is OFF. All personnel working with this system should observe the following precautionary guidelines: • Abide by all OSHA and NEC safety guidelines • All operators, at minimum, must have proper instruction and practice in the use of pneumatics • All maintenance personnel must have proper instruction and practice in the proper operation of this dispense valve. • Observe all company safety guidelines pertaining to dispensing equipment • Remove watches, rings, and all other jewelry • If the unit is to be moved or serviced, wear protective eyewear and, depending on the material used, any necessary protective clothing (e.g., gloves, long sleeved shirt or smock). CAUTION: It is the users responsibility to ensure that the primary air pressure is OFF before servicing the dispense valve. CAUTION: Always be alert of other potential hazards within your work area. 6 Main Components As figure 2 shows, the main components of the 1230 dispense valve are easily recognized. For more valve specifics, refer to p11-1, . AND ACCESS TO THE WET CUP FOR FILLING Figure 2. Main Components: The main components of the 1230 dispense valve are easily recognizable and accessible. Detailed drawings can be found in the back of this manual. The 1230 standard valve components are manufactured of high quality and wear resistant plastic, and the metering rod is manufactured of high quality stainless steel. Other materials are available for different material compatibilities. Refer to the, “Optional Equipment” section, for a complete list of available component materials. 7 Valve Operation Figure 3 is an illustrated description of the sequential steps in the cycling of the 1230 dispense valves. Material fills the valve through the material inlet port located on the inlet block and fills the spool and dispense chamber. Air is supplied to the dispense port which moves the metering rod down. The metering rod moves down, pushing material through the diaphragm check valve, and out the dispense needle. Air is shifted back to the fill position. The metering rod moves back up, drawing material through the inlet port. Figure 3. Valve Operation Sequence. The 1230 Dispense Valve has a simple fourstep operation, Normal (Home), Shift, Dispense, and Reload. 8 Optional Equipment 5.1 Controller Operation of the 1230 dispense valve, requires the use of a pneumatic, cycle sequencing, controller. Dispensit offers the optional 4134 Pneumatic Controller, as seen in figure 4, which when triggered by either a foot switch or toggle switch, can control the dispense valve and the optional Dispensit 1105 Z-Lift station. The 4134 Controller can operate the following: • Time/cycle speeds • Cycle sequencing • Independent air pressure regulators for material reservoir, valve cycling and Z-Lift operations • Automatic or semi-automatic applications Figure 4. Pneumatic Controller The yellow port will extend the metering rod allowing the valve to dispense material, and the green port will retract the metering rod allowing the valve to reload with material. The auxiliary port will apply a constant flow of air pressure for the diaphragm check valve. The auxiliary port air pressure (for the diaphragm check valve) is typically set to 5 to 10 psi above material inlet port pressure. NOTE: The auxiliary port (for the diaphragm check valve) air pressure is not to exceed 70 psi. Lowering the diaphragm check valve air pressure until material flows will purge the 1230 valve. 5.2 Plastic Metering Rod Use of a high quality, wear resistant, plastic metering rod provides a wetted section (Wet Head) free of metallic components. Such a configuration can be beneficial for applications handling especially strong acids (certain fluxes), and for anaerobic materials (thread lockers). 5.3 Needle Blocks The 1230 dispense valve has the option of dispensing material through a single luer lock needle of various gauges, or a custom designed multi-needle block as illustrated in figure 5. An adapter block is used to accommodate custom designed single or multiple needle dispense blocks for applications requiring precise needle lengths or, more than one dispense location or height. Figure 5. Adapter with Multi-Needle Block Assembly 9 Valve Disassembly 6.1 Removing the Valve To remove the valve from its work position requires a few steps to assure that the valve can be replaced in the same manner. Use care when servicing! This valve contains plastic components. Complete these few steps to remove the dispense valve: • Purge residual pressure from material line, and then remove the material line from the dispense valve. • Carefully remove the incoming air line from the diaphragm. Do not break the plastic barbs. • Move the metering rod to its lower position by setting the maximum stroke on the adjustment knob. • Remove the dispense valve by removing the two 8-32 machine screws from the front of the valve. • Carefully slide the metering head from the slot in the drive piston. • Take the valve to a clean work area for disassembly. 6.2 Required Tooling The following tools will be required to rebuild either dispense valve: • 1/8” Straight Screwdriver • Hooked Dental Pick • 1/4” Open-End Box Wrench • Internal Snap Ring Pliers • 3/32” Allen Wrench • 5/64” Allen Wrench • Small Bar Clamp. WARNING: Remove residual material pressure before removing the material line from the valve. CAUTION: Use caution when handling the valve so the needle(s) don’t get damaged or broke. 10 Valve Disassembly (Cont’d) 6.3 Main Sections The 1230 Valve can first be broken down into two main sections, the “Power Head”, and the “Wet Head.” For simplicity sake, this manual will describe the procedures for a valve containing a luer-lock needle and adapter. To disassemble the 1230 into its main sections, refer to figure 6 and follow these steps. 1. Remove the Luer-Lock Adapter (24) and with the Luer-Lock Needle (25) from the bottom of the Valve. 2. Unscrew the Adjustment Knob (1) until it reaches the top of the scale, then press the Adjustment Knob down until it bottoms out. 3. Remove the two lower 8-32 BHCS (9) from the front of the Valve and pull the Wet Head (B) section from the Base (8), separate the Metering Rod from the Piston Rod, and remove the Wet Head. 4. Remove the two upper 8-32 BHCS from the front of the Valve and pull the Power Head (A) from the Base. 1 Figure 6. Main Sections. The 1230 is built with three main components, the Power Head, Wet Head, and the Base Section. The three sections can easily be seperated and each can be easily disassembled. 11 Valve Disassembly (Cont’d) 6.4 Power Head Section Typically the power head section will only require servicing if material leaks into the air chamber or the air chamber is leaking pressurized air. To disassemble the Power Head Section follow these steps. It is not necessary to remove the air lines if still attached. Refer to figure 7 for part orientation. 1. Loosen the Set Screw (13) on the Adjustment Knob (1), and remove the Adjustment Knob by turning it counter clockwise until it comes off the Rod Assembly (4). 2. Remove the Internal Snap Ring (2) from the top of the Power Head. 3. Remove the Rod Assembly by pulling it out the top of the Power Head. The Insert (12) will come out with the Rod Assembly. 4. Remove and discard the Pressure Seal (11) and “O” Ring (3) from the Insert. 5. Remove and discard the Pressure Seal (6) from the Rod Assembly. 6. Remove and discard the “U” Cup Seal (7) from the bottom of the Power Head Body (5). Figure 7. Power Head Components. The Power Head section of the 1230 dispense valve has a small number of components which makes maintenance easy. 12 Valve Disassembly (Cont’d) 6.5 Wet Head Section To disassemble the Wet Head Section follow these steps. It is necessary to remove the air line from the diaphragm barb fitting. Refer to figure 8 for part orientation. 1. Pull the Metering Rod (14) from the top of the Wet Head Section (14). 2. Remove the Internal Snap Ring (15) from the top of the Wet Head. 3. With a small dull dental pick, remove and keep the Washer (16) and remove and discard the High Pressure Seal (17) from the top of the Wet Head Section. 4. Remove the Internal Snap Ring (15) which holds the Diaphragm in the Wet Head Section. This snap ring is under pressure. Use Caution when removing. 5. Remove the Diaphragm Insert (20) by pulling it out and then remove and discard the “O” Ring (21) and the Diaphragm (22). Figure 8. Wet Head Components. The Wet Head section of the 1230 dispense valve has a small number of components which makes maintenance easy. 13 Subassemblies 7.1 Component Cleaning WARNING: Clean the valve components with a solvent or cleaner that is compatible with the material that was dispensed through the valve. Personal injury or damage to the valve may occur if the wrong cleaner or solvent is used. With the valve completely disassembled, the individual components can be cleaned. Using a solvent or cleaning solution that is compatible with the material dispensed with this valve, thoroughly clean all the components. The “O” Rings , “U” Cup Seals, and High Pressure Seals should be discarded and replaced. Do not discard the plastic Washer (16), or the Diaphragm Insert (20), unless they are being replaced. While cleaning the components, be sure that all material is removed. Cured or old material left in the valve may cause the valve to operate improperly. Dry all components and make sure there is no cleaning solution or material film/residue, left on the components. Inspect the metering rod (#14 Fig.8), replace if there are any surface imperfections on the metering rod. NOTE: Any surface imperfections on the metering rod will cause material leakage prematurely. 7.2 Seal Replacement Replacement seals are available in complete kits. Each seal kit has all the necessary seals needed to rebuild one valve. After the components have been cleaned, new seals can be installed, cylinders can be lubricated with KRYTOX® lubricant (included in the Seal Kit), and subassemblies can be reassembled as described below. 7.2.1 Pressure Head Seals Install one High Pressure “Quad” Seal (6) onto the Rod Assembly (4) as shown in figure 9. Install the other “U” Cup (7) into the groove on the inside of the Power Head Body, with the open side of the “U” Cup Seal facing in, as shown in figure10. Likewise, using a seal installation tool or small screwdriver with no sharp edges, install the smaller “U” Cup Seal (11) into the groove on the inside of the Insert (12) with the open side of the “U” Cup Seal facing out, and then install the “O” Ring (3) on the outside of the Insert, as shown in figure 11. After installation, lubricate the outside of the “U” Cup Seals with a liberal amount of KRYTOX® lubricant (included in the Seal Kit). Assemble item in the reverse order per figure 8. NOTICE: Do not cut, tear or damage the Seals when installing them. The slightest nick or cut will cause the valve to leak. 14 Subassemblies (Cont’d) 7.2 Seal Replacement NOTICE: Do not cut, tear or damage the Seals when installing them. The slightest nick or cut will cause the valve to leak. 7.2.2 Wet Head Install a High Pressure Seal (17) with the “O” Ring side facing in, into the smaller pocket in the top of the Wet Head (18). Place the plastic Washer (16) over the High Pressure Seal and gently press the two components into place. Refer to figure 12 for the proper component orientation. Install the internal Snap Ring (15) into the groove above the plastic Washer. Lubricate inside if seals and Insert the Metering Rod (14) into the top of the Wet Head. Gently press the Metering Rod in until it just passes the High Pressure Seal. The opposite end of the Metering Rod needs to extend as far as possible for the final assembly. Lay the Wet Head on its side with the diaphragm cavity facing up, as seen in figure 13. Making sure that the surface is clean; insert the Diaphragm (22) into the pocket. Place the “O” Ring (21), then the Diaphragm Insert (20), followed by the internal Snap Ring (15), on top of the Diaphragm. To install the Snap Ring, place a 10-32 x 1.0 SHCS into the insert (20), then use a small Bar Clamp (with a soft protective material between the clamp and Wet Head), to compress the components as figure 14 shows. When the components are compressed and the snap ring groove is accessible, install the Snap Ring. Be sure the Snap Ring is securely installed before removing the bar clamp. When the clamp is removed, install the Barb Fitting (10). Roll the “O” Ring (23) over the threads of the Luer Lock Adapter (24) as shown in figure 15. Screw the Adapter into the bottom of the Wet Head until it is snug. Do not use PTFE tape on the threads and do not over tighten. NOTICE: Do not use PTFE tape on the Adapter threads and do not over tighten the Adapter when installing. 15 Valve Assembly 8.1 Final Assembly Complete the following steps to assemble the Power Head and Wet Head to the Base Section. Refer to figures 16 and 17 for the proper orientation of these parts. 1. Attach the Power Head Assembly (A) to the top of the Base Section (8) by sliding it into the Base section. Align the two sections with the cut outs on the same side, and secure them together with two BHCS (9). Attach the Adjustment Knob (1) to the threaded end of the Rod Assembly (4) which is protruding from the top of the Power Head. After a few turns of the Adjustment Knob (1), press the Rod Assembly down as far as it will go. This will aid in the assembly with the Wet Head Assembly. 2. Attach the Wet Head Assembly to the bottom of the Base Section by connecting the Metering Rod (14) to the Rod Assembly (which is extending through the bottom of the Base Section) and sliding the Wet Head into the Base Section. Square up the two sections with the diaphragm assembly facing the front, and secure them together with two BHCS (9). 3. Connect air lines, reset adjustment knob, cycle valve for leaks and connect material and purge valve. The valve is ready to resume production. 16 Operation Adjustments Adjust the Dispense Head for proper operation as follows. See step 6 for volume adjustment. 1. Make sure that all the Dispense Head pneumatic connections are in place. 2. Fill wet cup (if equipped) with compatible material. 3. Connect the material for dispensing. Position a container to catch the dispensed material. Cycle the Dispense Head until you are getting consistent dispensing (no inconsistencies in the dispensed material, symmetrical deposit shape). 4. Weigh at measure a sample of the dispensed material to see if the volume is correct. 5. Continue to observe the cycling of the Dispense Head to see if the material has caused any change in the dispense and reload strokes. 6. To adjust the volume; loosen the set screw on the shot adjustment and change the volume by turning shot adjustment (raise the collar to increase volume). Snug the set screw and reconnect the air line after adjusting the stroke adjustment collar 7. Repeat the above steps until you obtain the correct stroke and volume. 8. Adjust the operation timing so that the Dispense Head is able to dispense completely before moving the part. AND ACCESS TO THE WET CUP FOR FILLING 17 Troubleshooting Although good housekeeping, preventive maintenance and proper operating procedures will lengthen the life of the valve, all mechanical devices will develop problems from normal wear. Following are some of the possible difficulties and likely causes that may arise with the valve. If these do not correct the situation, call the technical service department at Dispensit®. Problem Nothing Happens Valve Cycles but Material is Not Dispensed Possible Cause Solution 1. Pneumatic or electrical problems with the controller or controlling device. 2. Foot switch or cycle start switch are not working properly. 3. Valve is locked up. 1. Material line is closed off at the valve. 1. Have the controller or controlling devices checked and serviced as needed. 2. Have the foot switch or cycle start switch checked and serviced as needed. 3. See problem “Valve Locked Up” below. 1. Open any “in-line” restrictions so material flows smoothly to the dispense valve. 2. Adjust air pressure to proper determined setting, which is needed to dispense the material involved. 3. Adjust material output pressure to proper determined setting, which is needed to dispense the material involved. 4. Replace the dispense needle with a new one. 5. Increase the stroke of the Metering Rod to get more material. 1. Replace the material supply. 2. Low air pressure on the material transfer system. 3. Low material pressure setting on material transfer system. 4. Material is cured in the needle or needle block. 5. Not enough M.R. stroke Irregular Dispense Sluggish Cycle Time Valve Drools Dispense Valve is Locked Up Material build upon metering rod. 1. Inconsistent material (cured, dried, or separated) 2. Air in the material. 3. Valve is cycling too fast, not allowing the metering rod chamber to fill. 4. Cycle timing on the controller or controlling device is improperly set. 1.Pistons and/or cylinder walls are poorly lubricated. 2. Replace the material supply. 3. Controller timing needs to be adjusted. 3. Too low air pressure on valve. 4. Adjust as needed, as per manufacturers recommendations. 1.Disassemble the Drive Cylinder Assembly and the End Cap Assemblies, lubricate, align, and reassemble. 1. Replace the material supply. 2. Replace Metering Rod. 3. Rebuild valve with a new seal kit. 4. Replace the diaphragm. 1. Make sure the wetted components and spool/sleeve assembly are compatible with material. Refer to p5-2, “Optional Equipment”. 2.Disassemble, clean and/or rebuild valve. Use only NON-lubricated air with this valve. 3. Increase air pressure. 1. Material getting past the upper seal due to a lack of fluid in the wet cup. 1. Rebuild the valve and pay special attention to the metering rod. 1. Air in the material. 2. Worn Metering Rod. 3. Worn seals. 4. Worn diaphragm. 1. Wrong material for this particular valve design. 2. Oil buildup on cylinder walls from air supply. 18 Glossary of Terms Not all terms listed below are part of your system. ANSI (American National Standards Institute): an association of industry representatives which develops technical standards including safety. These standards comprise a consensus from a variety of industries on good practice and design. ANSI standard relevant to Dispensit is ANSI/RIA R15.06 (industrial robots and robot systems). AUTHORIZED PERSONNEL: properly trained individual who has been given permission from a supervisor or management personnel, to operate or service a particular piece of equipment. BASE SECTION: the center section of the dispense valve which seals the material from coming out the top of the dispense valve body. BHCS: button head cap screw CC’S: a volumetric unit of measure. DISPENSE VALVE: a mechanical devise used to apply a precise amount of a specified material. Depending on the specifics, the material can be placed in a predetermined location or on a predetermined path on a specified part. DRY CYCLE: the process of operating the valve under normal working conditions, except material is not dispensed. This process is done to verify that the valve is cycling correctly before applying material. FLOW CONTROL: a mechanical devise that controls (or restricts) the air flow which travels through it. Controlling the air flow at both sides of the dispense piston, regulates how fast the piston moves up and down. HIGH PRESSURE SEAL: a type of seal which combines an O-ring with a U-cup seal. This combination provides a superior seal in high and low pressure circumstances. INLET BLOCK: a component between the body of the valve and the needle block, where the material enters the dispense valve. MAINTENANCE PERSONNEL: an specific individual or group who’s properly trained to fix and/or adjust a particular piece(s) of equipment when problems occur. METERING ROD: a component which draws material into the metering chamber and presses material out of the metering chamber. METERING CHAMBER: an area where a certain amount of material is stored within the dispense valve before dispensing. MPa: a unit of measure which is equal to 1000 Pascals. 1Pa =1Newton of weight per square meter. NEC (National Electrical Code): a publication put out by the National Fire Protection Association which contains guidelines for proper installations of electrical products, in order to safeguard personnel and property. NEEDLE BLOCK: a component on the bottom of the dispense valve where the material is dispensed from. The needle block may consist of a simple single needle or a complex configuration of multiple different needle sizes and lengths. 19 Glossary of Terms (Cont’d) OSHA (Occupational Safety and Health Administration): a division of the U.S. Department of Labor, responsible for the regulation of workplace safety. OSHA regulations often follow ANSI standards which become law when adopted by OSHA and must be followed. PLC (PROGRAMMABLE LOGIC CONTROLLER): an electronic device used to decipher electrical signals from input devices and energizes output devices. A PLC also gives you the ability to manipulate how and when the output devices are energized by the information being sent by the input devices. PNEUMATIC: a devise which is being controlled by the use of compressed air. POSITIVE DISPLACEMENT: a process of where a known precise volume of material is displaced (dispensed) during a given motion of the dispense valve. POWER HEAD ASSEMBLY: the top section of the dispense valve which controls the length of stroke and the volume of material being dispensed. PRIMARY AIR SOURCE: the main supply of air pressure which is being used to operate the dispense valve. PSI: pounds of pressure per square inch. QUALIFIED PERSONNEL: a person who by possession of a recognized degree or certificate of professional training, or who, by extensive knowledge, training, and experience, has successfully demonstrated the ability to solve problems related to the subject matter and work (ANSI B30.2-1983). RESIDUAL PRESSURE: pressure that is still in the material or airlines that has not been reduced even though the primary source of the pressure has been turned off. RHMS: round head machine screw ROBOTIC MOTION SYSTEM: a complex device which uses robotic arms to precisely move the dispense valve or other components about the dispense valve. SEAL PLATE CUP: a block on each side of the body, used to lubricate the sides of the spool. SHCS: socket head cap screw. SOLENOID VALVE: an electrical devise used for turning the flow of air on and off. SHCS: socket head cap screw. U-CUP: a pneumatic seal used in low pressure-low speed situations. VISCOSITY: a numerical measure of the degree to which a fluid resists flow under an applied force. Wet Cup: Place to put compatible lubricant fluid to keep air from being drawn into the material chamber, and to lubricate seals. WET HEAD ASSEMBLY: the lower section of the dispense valve which is where the material flow takers place. Z-AXIS: a pneumatic slide which moves the dispense valve down onto a part for dispensing, and back up into a neutral position. 20 21 Graco Standard Warranty Graco warrants all equipment referenced in this document which is manufactured by Graco and bearing its name to be free from defects in material and workmanship on the date of sale to the original purchaser for use. With the exception of any special, extended, or limited warranty published by Graco, Graco will, for a period of twelve months from the date of sale, repair or replace any part of the equipment determined by Graco to be defective. This warranty applies only when the equipment is installed, operated and maintained in accordance with Graco’s written recommendations. This warranty does not cover, and Graco shall not be liable for general wear and tear, or any malfunction, damage or wear caused by faulty installation, misapplication, abrasion, corrosion, inadequate or improper maintenance, negligence, accident, tampering, or substitution of nonGraco component parts. Nor shall Graco be liable for malfunction, damage or wear caused by the incompatibility of Graco equipment with structures, accessories, equipment or materials not supplied by Graco, or the improper design, manufacture, installation, operation or maintenance of structures, accessories, equipment or materials not supplied by Graco. This warranty is conditioned upon the prepaid return of the equipment claimed to be defective to an authorized Graco distributor for verification of the claimed defect. If the claimed defect is verified, Graco will repair or replace free of charge any defective parts. The equipment will be returned to the original purchaser transportation prepaid. If inspection of the equipment does not disclose any defect in material or workmanship, repairs will be made at a reasonable charge, which charges may include the costs of parts, labor, and transportation. . Graco’s sole obligation and buyer’s sole remedy for any breach of warranty shall be as set forth above. The buyer agrees that no other remedy (including, but not limited to, incidental or consequential damages for lost profits, lost sales, injury to person or property, or any other incidental or consequential loss) shall be available. Any action for breach of warranty must be brought within two (2) years of the date of sale. . These items sold, but not manufactured by Graco (such as electric motors, switches, hose, etc.), are subject to the warranty, if any, of their manufacturer. Graco will provide purchaser with reasonable assistance in making any claim for breach of these warranties. In no event will Graco be liable for indirect, incidental, special or consequential damages resulting from Graco supplying equipment hereunder, or the furnishing, performance, or use of any products or other goods sold hereto, whether due to a breach of contract, breach of warranty, the negligence of Graco, or otherwise. The Parties acknowledge that they have required that the present document, as well as all documents, notices and legal proceedings entered into, given or instituted pursuant hereto or relating directly or indirectly hereto, be drawn up in English. Les parties reconnaissent avoir convenu que la rédaction du présente document sera en Anglais, ainsi que tous documents, avis et procédures judiciaires exécutés, donnés ou intentés, à la suite de ou en rapport, directement ou indirectement, avec les procédures concernées. Graco Information For the latest information about Graco products, visit www.graco.com. 612-623-6921 contact your Graco distributor or call to identify the nearest distributor. 1-800-746-1334 330-966-3006 Original Instructions. This manual contains English. MM 332092 • Minneapolis Belgium, China, Japan, Korea • 22 www.graco.com Revised September 2014 •