1
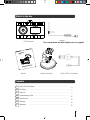
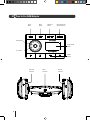
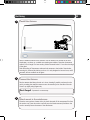
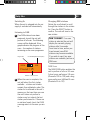
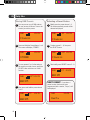
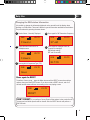
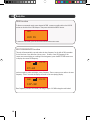
GFMTDAB10
In-Car DAB Adaptor
User Guide
IMPORTANT: Please read all instructions carefully before use and keep for future use
Introduction
Thank you for purchasing this Goodmans In Car DAB Adaptor.
Not only does it receive DAB radio stations and transmit them to your In Car Audio system using
an in-built FM transmitter,you can also connect an auxiliary device to it.
Safety is important
Use of any electrical equipment should be undertaken with care. Please read the safety
section on page 14 before using this In Car DAB Adaptor.
2
03
What’s
in the
box?
What’s
in the
box
DAB Transmitter
Antenna
”The antenna shown may differ slightly to the one supplied”
s
n
dma
Goo
0
DAB1
tor
GFMT
Adap
r DAB
In Ca
Guide
User
e
T: Pleas
ns
instructio
read all
carefully
before
future
keep for
use and
use
RTAN
IMPO
Manual
Windscreen Mount
12/24V- 5V DC In Car Adaptor
Contents
01 Your In-Car DAB adaptor
................................................................................. 4
02 Get Going
...................................................................................................... 5
03 Daily Use
.....................................................................................................
7
04 Troubleshooting Guide .......................................................................................... 12
05 Specifications
..................................................................................................... 13
06 Warnings
....................................................................................................... 14
07 Guarantee
....................................................................................................... 15
3
01 Your In Car DAB Adaptor
Power
Button
Menu
Button
DAB Scan
Button
Best Frequency for
FM Transmission
Select Button
Graphical LCD
Display
Scroll Wheel
PRESET
Buttons
AUX input
Connector
4
Power
Connector
Antenna
Connector
Get Going
1
02
Install the Antenna
Select a suitable location for the antenna. This can either be at one side of the front
windscreen, as shown, or a suitable non-opening rear window. Note that the antenna
cable is 2.0m in length. For best results, position the aerial wires 2-3 cms from the edge
of the glass.
Peel the backing off the antenna and attach the antenna to the inside of the window,
ensuring it is clean and dry before you do so. It is only designed to be used once, and if
removed, will not re-adhere to the glass.
2
Connect the Antenna
Run the antenna lead along the trim so it is not showing if possible, and attach to the
unit by screwing the antenna connector onto the antenna jack on the side of the unit.
Screw it up tightly using fingers only.
Don't Forget! A spanner is not necessary.
3
Attach mount to the windscreen
Clean the area you have chosen with a dry cloth then peel off the transparent film from
the suction cap. Press the suction cap firmly onto the windscreen and push down the
catch to securely fasten the mount to the windscreen.
5
02 Get Going
4
Attach the unit to the mount
Slide the clip on the back of the unit onto the windscreen mount. Adjust the mount for
the best view of the unit.
5
Attach the Power cable
The power cable is a miniature USB socket on the bottom of the unit. Attach one end to
the unit and plug the other end into a 12 volt lighter socket.
When the unit powers up for the first time, or after a factory RESET, it will perform a full
scan for DAB stations after displaying the best FM frequency. Tune your car radio to the
frequency shown.
V1.0
GFMTDAB10
03
FM
87.60
03
SCAN
Found : 15
03
6
DAB
BBC R5
If there are no DAB stations within range, the display will show:
DAB
03
12A
NO DAB
P1 13:25
Daily Use
Use
Daily
03
03
Switching On
When the unit is plugged into the car
supply it switches on automatically.
Listening to DAB
1 If no DAB stations have been
previously stored, the unit will
perform a full scan. The following
screen will be displayed. A bar
graph indicates the progress of the
scan – the number of stations
increasing as the scan progresses.
Progress Bar
Current Multiplex block frequency
03
SCAN
12A
Found : 15
Number of stations found
2 When the scan is complete, the
unit will select the first station
available - stations are listed in
numeric then alphabetic order. The
station list is retained in the unit’s
memory so that next time you use
the unit it does not perform a
station scan, but selects the last
station you listened to. If there are
no stations found, check that DAB
coverage exists in the area you are
in.
Changing DAB stations
Rotate the scroll wheel to scroll
through the stations in the station
list. Press the SELECT button to
confirm. The unit will tune to the
new station.
DON’T FORGET! If no new
station is selected the unit will
display the currently playing
stations after 5 seconds.
From time to time, and as you
travel around, new DAB
stations may become available.
If you wish to see if any new
stations are available, perform a
DAB scan.
DAB Scan
The DAB SCAN button enables the
unit to perform a full or a UK scan.
A short press performs a UK scan
(Channels 10A to 12D) and a long
press performs a full Band III scan
(Channels 5A to 13F)
7
03 Daily Use
Selecting a Preset Station
Storing DAB Presets
1 You can pre-set up to 8 DAB stations
for easy access as follows. Tune to the
station you wish to preset.
DAB
15:35
Classic
The screen will display “STORED.”
03
15:35
3 To store presets 5 to 8, after tuning to
the station you wish to store, press the
SELECT button which acts as a shift
function.
SFT 15:35
BBC R5
5 to 8
BBC R5
8
P3 15:35
2 To select preset 5 – 8, first press
the SELECT button.
DAB
SFT 15:35
3 Then briefly press PRESET button 5 – 8.
DAB
P7 15:35
BBC R5
DON’T FORGET! If you select a
4 Then press and hold the preset button
DAB
DAB
Classic
STORED
DAB
The station previously stored will be
selected and played.
Classic
2 Press and Hold the Preset Button 1 to 4.
DAB
1 Briefly press the preset button 1-4.
P7
15:35
preset location that has not been
programmed with a station, “Empty” will
be displayed.
DAB
Empty
15:35
Daily Use
03
Changing the DAB station Information
It is possible to change the information displayed on the second line of the display when
listening to a DAB station. There are 6 different types of information available as listed below:
They are selected by pressing the menu button.
1 Station Name – Normally Displayed.
DAB
4 Press again for FM Transmitter Frequency.
DAB
15:35
87.60
Classic
2 Press the menu button once for
5 Press Again for backlight.There are
Multiplex name.
DAB
3 options for backlight.
ON (default setting),
OFF and 10 seconds.
15:35
DAB
S Hamps
Press FREQUENCY
again for ProgrammeFunction
Type (PTY).
3BEST
DAB
15:35
15:35
BLT ON
15:35
News
Press again for RESET
To perform a factory reset , press the Menu button until the RESET screen shown below
appears, then press the SELECT button. If you do not wish to RESET the unit, wait for 5
seconds and the menu will time out returning to the now playing screen.
DAB
15:35
RESET
DON’T FORGET! If you perform a Factory Reset all the stations in the station list will
be removed, and all the presets will be cleared. After the RESET the unit will perform a
Full DAB scan.
9
03 Daily Use
03
AUX Function
To listen to an external music source instead of DAB, connect an audio cable to the AUX IN
socket on the side of the DAB Adaptor. Then press and hold the MENU button.
AUX
AUX IN
To return to DAB mode, press and hold the MENU button once more.
BEST FREQUENCY Function
The unit will automatically scan and select the best frequency for the built in FM transmitter
for the first time of use and after a factory reset . To select a new FM frequency if the
current one causes hissing or crackling in the background, press the BEST FREQ button once
03
BEST
Function
to
displayFREQUENCY
the current FM frequency.
DAB
15:35
87.60
and once again to select and display a new frequency. Then re-tune your car radio to the new
frequency.
After 5 seconds the
display will revert to the now playing display.
03
BEST FREQUENCY
Function
DAB
15:35
107.80
Best Frequency can also be manually set using in steps of 10 MHz using the scroll wheel.
10
DailyUse
Use
Daily
03
Power ON/OFF
The unit can be turned on and off using the POWER button. To turn the unit off, press and
hold the POWER button for 3 seconds. The display will show “SHUTDOWN”.
Shutdown
To turn the unit on, press and hold the POWER button. The unit will start up by displaying the
start-up screen which includes the software version number on the top left of the display.
V1.0
GFMTDAB10
RDS Display
The unit not only transmits audio to your car radio using the built in FM transmitter, but also
sends additional information to the display on your car radio using RDS. If you car radio has
RDS (for example, it displays the name of the station rather than just the FM frequency) then
the unit will display the name of the DAB station on your car radio. If you are listening to
audio plugged into the AUX socket, then the car radio will display AUX IN. Please note that it
takes about 4 seconds for the car radio RDS display to change, so during this period the
information displayed may be out of date.
DON’T FORGET! Some car radio head units have a very sophisticated database
stored which might mean that some DAB station names are not correctly displayed. In this
case the unit will display a previously listened to station name. This is not a fault, but due
to the way some head units operate.
11
04 Troubleshooting Guide
PROBLEM
POSSIBLE CAUSE
Hissing noise or crackling in
the background
The FM frequency being used Press the BEST FREQ button to
already has a station
select a new FM frequency and
on or close to it.
re-tune the car radio to the
new frequency.
DAB station cannot be heard
Car Radio not tuned to the
correct FM Frequency
Press the BEST FREQ button
once to display the FM
frequency and re-tune the car
radio.
DAB signal very weak
Use the SCAN button to scan
for DAB stations available in
your area.
Unit is in AUX mode
Press and hold the AUX button
to return to DAB mode
Need extra help?
Don’t worry we are just at the
other end of the phone. If you are
experiencing problems using your
new product, before returning it to
the retailer, just call 0871 230 1777.
12
REMEDY
Need a spare part?
If you need a spare part, please
contact our spares department on:
0871 230 0790
Specifications
05
In-car DAB radio adapter with full DAB Band III reception. Compliant with ETS 300 401 and
capable of decoding all DAB transmission modes 1-4.
Frequency range
DAB Band III 174 - 240 MHz.
FM transmit range
87.5 – 108.0 MHz.
Input connectors
5V mini USB DC power connector
3.5mm line in, 2.0mm antenna connector
Presets
8 DAB station presets
LCD display
Orange backlit graphics LCD display
In-car power supply
12-24V DC to 5V DC (0.5A) mini USB power adapter.
Power consumption
5V, DAB Mode : 80mA ~ 120mA
Dimensions
104 mm wide, 65 mm tall, 34 mm deep
Weight
78 g
IMPORTANT: Due to continual revision and improvements to our products design,
specifications are subject to change without notice.
13
06 Warnings
WEEE
General Safety
This appliance is labelled in accordance
with European Directive 2002/96/EG
concerning used electrical and
electronic appliances (Waste Electrical
and Electronic Equipment - WEEE).
The guideline determines the
framework for the return and
recycling of used appliances.
This DAB Radio has been designed and
manufactured to meet European safety standards,
but like any electrical equipment, care must be
taken if you are to obtain the best results and
safety is to be assured.
Sound levels
Do ensure that all electrical connections
(including extension leads and interconnections
between pieces of equipment)
are properly made in accordance with the
manufacturer’s instructions.
Your hearing is very important to you and to
us, so please take care when using this DAB
Radio.
It is strongly recommended that you follow the
listed guidelines in order to prevent possible
damage or loss of hearing.
Establish a safe sound level
Over time your hearing will adapt to
continuous loud sounds and will give the
impression that the volume has in fact been
reduced. What seems normal to you may in
fact be harmful. To guard against this before
your hearing adapts, set the volume to a
low level.
Slowly increase the level until you can hear
comfortably and clearly and without distortion.
Damage to your hearing is accumulative and is
irreversible. Any ringing or discomfort in the
ears indicates that the volume is too loud.
Once you have established a comfortable
listening level, do not increase the sound
level.
Do read these operating instructions before you
attempt to use the DAB Radio.
Switch off and remove the power plug when
making or changing any connections.
Do consult your dealer if you are ever in doubt
about the installation, operation or safety of your
DAB Radio.
Don’t continue to operate the DAB Radio if you are
ever in doubt about it working normally, or if it is
damaged in any way. Switch it off, withdraw the
power plug and consult your dealer.
Don’t remove any fixed covers as this may expose
you to dangerous voltages.
Don’t leave the DAB Radio switched On when it is
unattended for long periods of time, unless it is
specifically stated that it is designed for unattended
operation or has a standby mode.
Don’t obstruct the ventilation vents on the
DAB Radio, for example with curtains or soft
furnishings.
Overheating will cause damage and shorten the
life of the product.
Don’t allow electrical equipment to be exposed to
rain or moisture.
14
Guarantee
07
The DAB Radio is guaranteed for twelve months from the date of original purchase. If there are
any defects due to faulty materials or workmanship, contact the Goodmans Helpline. Have your
receipt of purchase on hand.
The guarantee is subject to the following provisions:
• It is only valid within the boundaries of the country of purchase.
• The product must be correctly installed and operated in accordance with the instructions
contained in this User Guide.
• The DAB Radio must be used solely for domestic purposes.
• The guarantee will be rendered invalid if the DAB Radio is re-sold or has been damaged by
inexpert repair.
• The manufacturer disclaims any liability for incidental or consequential damages.
15
Helpline 0871 230 1777
www.thesupportsite.co.uk