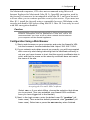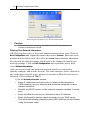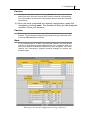
1
GB-Ware
SOFTWARE
Firewall
powered by
GNAT Box
System Software
Product Guide
GBWA200501-01
Copyright
© 1996-2004, Global Technology Associates, Incorporated (GTA). All rights reserved.
Except as permitted under copyright law, no part of this manual may be reproduced or distributed in any form or by any
means without the prior permission of Global Technology Associates, Incorporated.
Technical Support
GTA includes 30 days “up and running” installation support from the date of purchase. See GTA’s web site for more
information. GTA’s direct customers in the USA should call or email GTA using the telephone and email address below.
International customers should contact a local GTA authorized channel partner.
Tel:
+1.407.380.0220
Email:
[email protected]
Disclaimer
Neither GTA, nor its distributors and dealers, make any warranties or representations, either expressed or implied, as
to the software and documentation, including without limitation, the condition of software and implied warranties of its
merchantability or fitness for a particular purpose. GTA shall not be liable for any lost profits or for any direct, indirect,
incidental, consequential or other damages suffered by licensee or others resulting from the use of the program or
arising out of any breach of warranty. GTA further reserves the right to make changes to the specifications of the
program and contents of the manual without obligation to notify any person or organization of such changes.
Mention of third-party products is for informational purposes only and constitutes neither an endorsement nor a recommendation for their use. GTA assumes no responsibility with regard to the performance or use of these products.
Every effort has been made to ensure that the information in this manual is accurate. GTA is not responsible for printing
or clerical errors.
Trademarks & Copyrights
GNAT Box, GB-Commander and Surf Sentinel are registered trademarks of Global Technology Associates, Incorporated.
RoBoX, GB-Ware and Firewall Control Center are trademarks of Global Technology Associates, Incorporated. Global
Technology Associates and GTA are registered service marks of Global Technology Associates, Incorporated.
Microsoft, Internet Explorer, Microsoft SQL and Windows are either trademarks or registered trademarks of Microsoft
Corporation in the United States and/or other countries.
Adobe and Adobe Acrobat Reader are either registered trademarks or trademarks of Adobe Systems Incorporated in the
United States and/or other countries.
UNIX is a registered trademark of The Open Group.
Linux is a registered trademark of Linus Torvalds.
BIND is a trademark of the Internet Systems Consortium, Incorporated and University of California, Berkeley.
WELF and WebTrends are trademarks of NetIQ.
Sun, Sun Microsystems, Solaris and Java are trademarks or registered trademarks of Sun Microsystems, Inc. in the
United States and other countries.
Java software may include software licensed from RSA Security, Inc.
Some products contain software licensed from IBM are available at http://oss.software.ibm.com/icu4j/.
SurfControl is a registered trademark of SurfControl plc. Some products contain technology
All other products are trademarks of their respective companies.
Global Technology Associates, Inc.
3505 Lake Lynda Drive, Suite 109 • Orlando, FL 32817 USA
Tel: +1.407.380.0220 • Fax: +1.407.380.6080 • Web: http://www.gta.com • Email: [email protected]
Table of Contents iii
Contents
1 INTRODUCTION ............................................................................................... 1
About GTA Firewalls ....................................................................................... 1
About GB-Ware ............................................................................................... 1
Features ..................................................................................................... 1
Additional Software Products ..................................................................... 2
Optional Features ....................................................................................... 2
Additional Options for 10-User Version ................................................... 2
Software Specifications .............................................................................. 3
Hardware Specifications ............................................................................. 3
System Requirements ............................................................................. 4
Optional Components ............................................................................. 5
Memory Recommendations .................................................................... 5
PPP Hardware......................................................................................... 5
Support ............................................................................................................ 6
Support Options.......................................................................................... 6
Upgrades .................................................................................................... 7
About This Guide ............................................................................................ 7
Documentation Conventions ...................................................................... 7
Additional Documentation........................................................................... 8
Mailing List .............................................................................................. 8
2 INSTALLATION ................................................................................................. 9
Registration ..................................................................................................... 9
Getting Your Activation Code ...................................................................... 9
Installing GB-Ware on PC Hardware ............................................................. 10
Requirements ............................................................................................. 10
Setup for GB-Ware Installation ................................................................... 11
Setting the Boot Sequence ..................................................................... 11
Installing the Compact Flash Card Reader or IDE Adapter ..................... 11
Selecting a GB-Ware Runtime ................................................................ 13
Selecting an Installation Disk .................................................................. 14
Installing the Runtime .............................................................................. 15
Completing Installation ............................................................................... 16
Attaching the Hardware Key Block .......................................................... 16
3 CONFIGURATION ............................................................................................. 19
Setting the Boot Sequence ............................................................................ 19
Loading the Correct Memory Slice (Partition)............................................. 19
Selecting a User Interface .............................................................................. 19
Physically Connecting Your GB-Ware Firewall ............................................ 20
Requirements ............................................................................................. 21
Making a Temporary Peer Network Connection ......................................... 21
Making a Serial Connection........................................................................ 23
Making a Video Connection........................................................................ 23
Configuring Your Firewall .............................................................................. 24
Requirements ............................................................................................. 24
Browser Compatibility ............................................................................. 24
Configuration Using a Web Browser .......................................................... 25
Entering Your Network Information ......................................................... 26
iv GB-Ware Firewall Product Guide
Re-configuring Your Computer ................................................................ 28
Accessing the Firewall ............................................................................ 28
Configuration Using GBAdmin.................................................................... 29
Entering Your Network Information ......................................................... 30
Re-configuring Your Computer ................................................................ 31
Accessing the Firewall ............................................................................ 31
Configuration Using the Serial Console...................................................... 31
Configuration Using the Video Console...................................................... 32
Video Console Navigation ....................................................................... 33
Using the Setup Wizard .......................................................................... 33
Accessing Your GTA Firewall .................................................................. 37
4 TROUBLESHOOTING ...................................................................................... 39
Troubleshooting Basics ................................................................................. 39
Frequently Asked Questions (FAQ)............................................................... 39
APPENDIX .............................................................................................................. 47
Installing the Compact Flash Card ................................................................ 47
Requirements ............................................................................................. 47
Assembling the Compact Flash IDE Adapter ............................................. 48
Installing the Compact Flash IDE Adapter .................................................. 48
Locating IDE Controller Ports .................................................................. 48
Mounting the Compact Flash Card ......................................................... 49
Connecting the IDE Cable ....................................................................... 50
Connecting the Power Supply ................................................................. 50
Moving an Old Configuration to GB-Ware .................................................... 50
Merging Configurations Using GBAdmin .................................................... 51
INDEX...................................................................................................................... 55
1 - Introduction 1
1 Introduction
About GTA Firewalls
Global Technology Associates, Inc. (GTA) has been designing and building
Internet firewalls since 1994. In 1996, GTA developed the first truly
affordable commercial-grade firewall, the GNAT Box®. Since then, ICSAcertified GNAT Box System Software has become the engine that drives all
GTA hardware appliance and software firewall systems.
About GB-Ware
GB-Ware is a complete software firewall system that runs from a Compact
Flash module or hard drive installed on x86 (PC) hardware. After software
installation, GB-Ware must be configured for local network requirements
using either the setup wizard (video console) or manually (serial console,
GBAdmin or browser).
Features
•
10/100/1000 Mbps Ethernet WAN/LAN speed support
•
ICSA-certified GNAT Box System Software (version 3.5 and higher)
•
Stateful packet inspection
•
User authentication (GTA, LDAP & RADIUS)
•
SSL encrypted management
•
DES, 3DES, AES, and Blowfish VPN encryption
•
IPSec VPN with 1 mobile user license
•
PPP, PPPoE and PPTP support
•
SMTP email proxy
•
Transparent NAT (network address translation)
•
Async Modem and ISDN TA support
•
RIP (Routing Information Protocol)
•
Remote logging using WELF
•
Gateway routing failover
•
DMZ (PSN, Private Service Network; optional on 10 user version)
2 GB-Ware Firewall Product Guide
•
Dynamic DNS
•
DNS proxy
•
Transparent and traditional web proxy with script blocking
•
DNS server (optional on 10 user version)
•
DHCP server
•
Web and GBAdmin user interfaces for remote management
•
SNMP (read-only)
•
Traffic shaping (bandwidth limiting)
•
NTP (network time protocol) server
Additional Software Products
•
GTA Reporting Suite™ (firewall log reporting)
•
GB-Commander™ (firewall management)
Optional Features
•
VPN hardware acceleration
•
Additional mobile VPN clients
•
Surf Sentinel® content filtering
•
Mail Sentinel™ Anti-Spam email filtering
•
Mail Sentinel™ Anti-Virus email filtering
•
GTA-certified 512 MB Compact Flash disk
•
Multi-Interface option (up to 20 network interfaces)
•
Support contracts
Additional Options for 10-User Version
•
25, 50 or unlimited user license upgrades
•
GB-Ware Plus Package (DNS Server and DMZ (PSN))
1 - Introduction 3
Software Specifications
Specification
Concurrent connections (standard)
GB-Ware 10 users GB-Ware unrestricted users
1,000
128,000
Concurrent outbound users (standard)
10
Unrestricted
Network interfaces
(standard)
2
3
User authentication
50
750
Address objects
50
600
Aliases
5
300
Pass-through hosts
10
300
Filters, outbound
& remote access
objects
75
400
Traffic shaping
objects
5
50
Static outbound
maps
25
300
Static routes
10
300
Time groups
75
100
Tunnels
25
300
Protocols
255
255
URL access lists
10
300
Local content lists
25
250
DNS domains
Optional
20
DNS hosts
Optional
500
DNS networks
Optional
80
VPN objects
5
100
VPN security associations
20
600
Concurrent Mobile
VPN (max)
10
300
Hardware Specifications
The GB-Ware firewall is designed to operate efficiently on a broad spectrum of hardware, but the hardware you select will impact GB-Ware’s
performance. This is especially true when GB-Ware is used in an intranet
4 GB-Ware Firewall Product Guide
configuration with full network speeds on all interfaces. The best possible
performance can be obtained by using a Pentium class or higher CPU with
PCI network cards.
Network performance bottlenecks usually occur at the connection to the
Internet when using DSL or T1 class connectivity. GB-Ware with 10 Mbps
Ethernet cards easily provides enough throughput for network connectivity
of up to T1 speeds (1.5 Mbps). However, when the WAN connectivity is a
T3 or faster, GTA recommends that 100 Mbps network cards be used.
If you encounter problems, check your motherboard and IRQ assignments.
Make sure any unused devices, such as IDE and SCSI controllers, sound
cards and serial ports are disabled. Scan the hardware configuration report
for error messages–often the cause of a problem is indicated in this report.
Note
Check gta.com for an up-to-date list of compatible network interface
cards and drivers.
System Requirements
•
x86 architecture processor (Intel 486, Pentium, or Xeon; compatible
AMD or Cyrix CPUs); Pentium-class or faster CPU recommended
•
64 MB RAM (128 MB if using Mail Sentinel Anti-Virus and/or Mail
Sentinel Anti-Spam options)
•
512 MB ATA (IDE) compliant hard disk drive or 512 MB GTA-certified Compact Flash card with Compact Flash IDE adapter
•
2 compatible network cards (NICs)
•
1 Serial (RS-232/COM) port
•
1 USB port or parallel (printer) port on the motherboard (for hardware key block installation)
Note
PCI cards with USB or parallel ports will not function correctly. The
USB or parallel ports must be located directly “on-board” (as an
integrated part of the motherboard).
•
1 ATAPI (IDE) CD-ROM (installation and recovery only)
•
1 Video card, 1 monitor and 1 keyboard (for video console use only;
keyboard may not be required for operation if the motherboard’s
BIOS supports booting without a keyboard)
•
Ethernet cables: crossover cables for connections to routers or
computers; straight-through sables for connections to hubs or
switches
For installation requirements, see page 10.
1 - Introduction 5
Optional Components
•
1-18 additional network cards (if using the Multi-Interface Option)
•
Async modem (PPP connections or pager only)
•
ISDN TA with RS-232 interface (PPP connections only)
•
Cable modem
•
Serial ports for COM 1-4 (1645x/1655x UARTs only)
Note
GTA recommends installing only the GB-Ware required or GB-Ware
optional components in the system. Devices such as SCSI controllers
and sound cards remain unused and may decrease performance.
Memory Recommendations
Adding RAM is an easy way to boost system performance. Using 64 MB
RAM, the physically possible maximum number of concurrent sessions is
32,765; using 128 MB RAM, the physically possible maximum is 128,000
connections. Generally, the more features that are being utilized (e.g. DNS
server or Mail Sentinel email proxy), the more RAM is recommended for
optimum performance.
Note
Some GB-Ware options may require additional RAM.
PPP Hardware
GNAT Box System Software supports the use of a PPP network connection
in place of a network interface card for the external network interface. The
PPP interface supports only a dial-up connection and a single remote system
configuration. Once of the following should be used:
•
An external asynchronous modem. COM ports 1-4 are supported;
only COM ports based on the 1645x/1655x UARTs are supported.
•
An internal asynchronous modem. Only modems that use
1645x/1655x compliant UARTs are supported.
•
An ISDN external modem/terminal adapter. COM ports 1-4 are
supported; only COM ports based on the 1645x/1655x compliant
UARTs are supported.
•
Network interface card (NIC) for use with PPPoE (ADSL) or PPTP.
Serial Port Hardware
Most serial ports will easily support any asynchronous modem or a single
BRI 64Kbps ISDN connection. If both channels of a BRI line are used to
achieve 128Kbps, throughput may be limited to 115Kbps due to serial port
limitations.
6 GB-Ware Firewall Product Guide
Modem/ISDN TA Hardware
GTA recommends configuring the modem or ISDN TA on another system
before installing it on GB-Ware. Most modems allow the storage of a user
configuration and the recall of this configuration using a specific command
(e.g. ATZ). It is usually easiest to configure the modem before installation, and then to recall that configuration and set the modem with a few
commands.
Note
The default configuration for most modems will generally work with
GB-Ware.
You should configure the modem to use a fixed DTE speed (the speed
at which the computer talks to the modem). If the modem supports DTE
speeds of 38,400 or 57,600 baud, use whichever of these values will ensure
the highest throughput. Configure your serial port to the highest possible
speed when using an ISDN TA. Unless you wish to connect at a specific
speed, set DCE (the speed at which the modem talks to a remote modem) to
auto-negotiate.
Cable Modems and xDSL Hardware
Cable modems and DSL (ADSL etc.) configurations utilize a passive interconnection device (cable modem, xDSL box) that is typically connected
to an Ethernet network interface card via a special network patch cable
(crossover cable).
Support
Installation ("up and running") support is available to registered users. If
you have registered your product and need installation assistance during
the first 30 days, contact the GTA Support team by email to support@gta.
com. Include your product name, serial number, activation code, feature
activation code numbers for your optional/subscription features, and a
Configuration Report (available in Reports under Configuration in the web user
interface), if possible.
Installation support only covers installation and default configuration of the
firewall. For further assistance, contact an authorized GTA Channel Partner
or GTA Sales staff for information about support offerings.
Support Options
If you need support after installation and default configuration, a variety of
support contracts are available. Contact an authorized GTA Channel Partner
or GTA Sales staff for more information. Support ranges from support per
incident to annual contract coverage.
1 - Introduction 7
Other avenues for assistance are available through authorized GTA Channel
Partners, the GNAT Box Mailing List, or the GTA web site (www.gta.com).
Upgrades
Once registered, you can view available upgrades in the GTA online support
center section of the GTA web site (www.gta.com/support/center/login/).
Click on the serial number of your registered product to see if an upgrade is
available for that specific unit.
Click on the DOWNLOADS link to view all available software versions.
Caution
Back up your configuration before upgrading!
About This Guide
This Product Guide describes how to set up and install GB-Ware and
change the factory settings to your network’s configuration scheme. The
GNAT Box System Software User’s Guide includes configuration functions,
descriptions of GBAdmin and the web interface, administrative tools and
GNAT Box-specific terms.
User’s guides, product guides and feature guides are available for GTA
products. These manuals and other documentation for registered products
can be found at www.gta.com and on installation CDs.
Look in your firewall’s product guide or the GNAT Box System Software
User’s Guide for instructions on installation, registration and setup from
default configuration. Look in feature guides for instructions on using
optional firewall features.
Documentation Conventions
A few conventions are used in this guide to help you recognize specific
elements of the text.
Bold Italics
emphasis
Italics
publications
SMALL CAPS
field names
Monospace Font
screen text
Condensed Bold
menus, menu items
BOLD SMALL CAPS
buttons, links
8 GB-Ware Firewall Product Guide
Additional Documentation
For additional instructions on installation, registration and setup of a
GTA product, see applicable Quick Guides, FAQs or technical papers.
For optional features, see the appropriate feature guide. Documentation is
included on installation CDs, and is available for download from the GTA
web site.
Note
Check the GTA web site for the latest PDFs and other
documentation.
These manuals and other documentation can also be found on the GTA
web site (www.gta.com). Documents on the web site are either in plain text
(*.txt) or portable document format (*.pdf) which requires Adobe Acrobat
Reader version 5.0, Apple Preview or ghostview. A free copy of Adobe
Acrobat Reader can be obtained from www.adobe.com.
Document
Topics
GNAT Box System Software User’s
Guide
GNAT Box system software features;
web user interface, GBAdmin
Console Interface User’s Guide
console interface
GB-Commander Product Guide
GB-Commander for GTA firewalls
GTA Reporting Suite Product Guide
stand-alone reporting software
Mail Sentinel Feature Guide
email anti-spam and anti-virus filtering
optional feature
Surf Sentinel Content Filtering
Feature Guide
content filtering optional feature
H2A High Availability Feature Guide
high availability optional feature
GNAT Box VPN Feature Guide
VPN (virtual private networks) optional
feature
FAQs on www.gta.com
frequently asked questions (FAQs)
www.gta.com
hardware specifications, current documentation, examples
Mailing List
To learn more about GNAT Box System Software, join the GTA staff-monitored GNAT Box email mailing list at [email protected] .
2 – Installation 9
2 Installation
Registration
To get technical support and software updates, you must register your GTA
firewall.
1) To register, go to www.gta.com. Click on SUPPORT and then the
SUPPORT CENTER link to visit https://gta.com/support/center/login/.
2) If you do not have an online support account, click on the CREATE
AN ACCOUNT NOW link and enter your information. Once you have
completed the form, click the SUBMIT button to save the profile.
3) Enter your user ID and password on the login page. Click on the
REGISTER A PRODUCT link. Enter your serial number and installation code, then click the SUBMIT button. Write down the activation
code and store it with your serial number and installation code
records. To view your registered products, click the VIEW YOUR
REGISTERED PRODUCTS link.
In addition to qualifying you for installation support, your product registration will allow GTA to inform you about software updates and special
offers.
Note
If you cannot retrieve your activation code, or a code does not appear
under VIEW YOUR REGISTERED PRODUCTS, please email
support with a brief description of your problem in the body of the
email. Include the product serial number and your online support
account’s user ID in the message subject.
Getting Your Activation Code
All commercial GTA firewalls use an activation code to protect system
software. Optional features require separate feature activation codes. Serial
numbers and installation codes are included with the packaging and are also
available under VIEW REGISTERED PRODUCTS on the GTA Support site,
http://www.gta.com/support/center/login/; GB-Ware serial numbers and
installation codes are required to retrieve GB-Ware activation codes.
Note
GNAT Box System Software may be copied for backup purposes.
10 GB-Ware Firewall Product Guide
Installing GB-Ware on PC Hardware
GB-Ware software must be installed on x86 (Intel-compatible) computer
hardware before you can use your firewall. The GB-Ware installation CD
will install the firewall software onto your computer hardware.
Requirements
GB-Ware can be installed either on a bootable Compact Flash disk or hard
drive on the intended firewall, or installed onto a Compact Flash disk using
a USB reader/writer on a proxy computer, and then later inserted into the
intended firewall.
See the Appendix for instructions on installing a Compact Flash card and
Compact Flash adapter.
To install GB-Ware directly onto the Compact Flash card or hard drive of
the intended firewall, you will need the following components:
•
x86 (Intel-compatible) computer with 64 MB RAM
•
USB or parallel port (on the motherboard only)
•
ATAPI (IDE) CD-ROM drive
•
video card, monitor and keyboard (video console only)
•
ATA (IDE) compliant hard disk drive or a GTA-certified 512 MB
Compact Flash disk and Compact Flash IDE adapter
•
GB-Ware software and hardware key block with activation code
To copy GB-Ware onto a Compact Flash disk using a computer other than
the intended firewall (for later installation in the intended firewall), you will
need these components:
•
x86 (Intel-compatible) computer with a USB port and ATAPI (IDE)
CD-ROM drive
•
GTA-certified 512 MB Compact Flash card
•
USB Compact Flash card reader/writer, such as SanDisk®
ImageMate™
•
GB-Ware software and hardware key block with activation code
Note
GTA recommends installing only hardware required by GB-Ware- or
GB-Ware options. Superfluous devices such as SCSI controllers
and sound cards remain unused and may in some cases decrease
firewall performance.
2 – Installation 11
Setup for GB-Ware Installation
The computer (either the intended firewall or an installation proxy
computer) must be modified to boot using a CD-ROM drive. This enables
the GNAT Box System Software installation CD to activate and install the
GB-Ware firewall software when powering on the PC.
Caution
If installing GB-Ware using a proxy computer, temporarily disconnect
other (non-GB-Ware) writable drives to prevent accidental erasure
during firewall installation. GB-Ware will irrevocably erase the
installation’s target disk, and cannot be installed alongside any other
disk contents.
Setting the Boot Sequence
Using the appropriate process for your computer system, change the
sequence so that the system boots from an IDE CD-ROM drive.
1. Power on the computer and enter the CMOS (BIOS). Do this before
any installed operating system (like Windows) boots.
2. Change the boot sequence so that a CD-ROM drive attempts to
boot first, before other CD-ROM or hard drives in the IDE controller.
This will enable the GNAT Box System installation CD to boot upon
powering up the computer.
3. Save the settings and exit the BIOS. Power off the computer.
Note
Setting the boot sequence varies by the computer. Please consult
your computer’s hardware guide to set the boot sequence on your
computer.
Installing the Compact Flash Card Reader or IDE Adapter
1. Attach the USB Compact Flash card reader or Compact Flash IDE
adapter and insert the Compact Flash card. Alternately, attach a
hard drive. See the Appendix for detailed instructions. (Skip this
step if installing on an existing hard drive.)
Warning
Only install the Compact Flash IDE adapter when your computer is
powered off and unplugged. Failure to unplug the computer could
result in destruction of equipment, or serious harm or death due to
electrical current. Never install internal computer hardware while it
is plugged in or powered on!
12 GB-Ware Firewall Product Guide
Caution
Installing GB-Ware on a hard drive will erase its contents and replace
them with GB-Ware. If you wish to keep the data on a hard drive,
do not install GB-Ware on it; instead, install GB-Ware on a different
hard drive. You may also wish to temporarily disconnect other (nonGB-Ware) hard drives to prevent accidental erasure during firewall
installation.
2. Power on the computer. Insert the GNAT Box System installation
CD into the system’s CD-ROM drive.
3. Restart the computer using a cold reboot. (In a cold reboot, shut
down, turn off, and then turn your computer back on.)
If the boot sequence is correctly set to boot from CD-ROM, the system will
boot from the GNAT Box System installation CD.
Using GB-Ware’s GNAT Box Installer
After setting the BIOS, inserting the installation CD and restarting the
computer, you will see the About GNAT Box System Software Runtime Installer
screen for the installation CD. Press the SPACE BAR or ENTER key to
continue and install GB-Ware.
About the GNAT Box System Software Runtime Installer
The GNAT Box System Software Licensing Agreement will appear. Use the
TAB or arrow key to move to the selection. Press the SPACE BAR or ENTER
to select your answer. Select VIEW LICENSE to read the terms of the software and hardware license. If you agree with the terms, select ACCEPT to
continue the installation. The DO NOT ACCEPT selection cancels installation
and closes the program.
2 – Installation 13
GNAT Box System Software Licensing Agreement
Selecting a GB-Ware Runtime
The GNAT Box System Software Runtime Installer screen will appear. If
you are upgrading, verify that your configuration has been backed up to
another location. Any information currently on the disk will be over-written
during the installation.
Select the desired GB-Ware runtime (executable) version from the list of
products in step 2. Use the SPACE BAR to cycle through available options,
or use the F2 key to display a list of runtimes and the arrow keys to move
through the list. Once you have selected the desired option, use the TAB key
to move to the OK selection and press the SPACE BAR to begin the installation.
The default selection is the GB-Ware SIO runtime (the “serial interface
only” console version). Your selections will also include the GB-Ware video
console runtime, the BootManager SIO (which allows the user to change
console output from video to serial during boot), and BootManager video,
which allows the user to change console output from serial to video during
boot.
Note
If you want to manage the firewall remotely using either GBAdmin
or the web user interface instead of a console, don’t worry. Both
runtimes will provide this functionality, so you may choose either the
serial or video runtime. Because some advanced firewall functionality
is not configurable in the serial and video console interfaces, it’s
best to use them as a failsafe when network connectivity is down,
or for initial network interface configuration.
Note
The video version of the GB-Ware runtime does not have factory
default network settings, and hence does not initially allow any
network or serial connections. If you chose to install the video version
of the GB-Ware runtime, you will need to run the Setup Wizard to
enter basic network information before you can use your firewall.
14 GB-Ware Firewall Product Guide
The serial version of the GB-Ware runtime installs factory default
settings; a serial or temporary peer Ethernet connection can be used
to change these settings. If you prefer to perform initial firewall
configuration over the web or with GBAdmin, choose this option.
The selection list also includes the Erase Disk function. This allows the user
to clear all the disk data from the selected disk.
Caution
Using the ERASE DISK choice will erase a drive’s contents. Only
use it if you are sure you want to destroy all data on the destination
disk.
GNAT Box Runtime System Software Runtime Installer
Selecting an Installation Disk
The software will ask you to select a drive that should receive the GB-Ware
installation. From the list of available devices, select the Compact Flash
card or hard drive device where you wish to install GB-Ware.
Note
The Compact Flash card, once mounted using an adapter or USB
card reader, is considered a disk drive by the system.
Press the SPACE BAR to cycle through available options, or use the F2 key
to display a list of devices and the ARROW keys to move through the list.
The prefix da indicates a direct access USB device. A USB Compact Flash
card reader/writer containing a Compact Flash card might be designated
da0. Any additional USB devices recognized by the installation will be
designated as da1, da2, etc.
The prefix ad identifies an IDE device. Any recognized IDE device
installed on the primary IDE controller master will be designated ad0,
whether it’s a hard drive or a Compact Flash card mounted in a Compact
Flash IDE adapter. Any additional recognized IDE device will be designated
by the IDE controller slot it occupies; if you have not disconnected your
firewall’s hard drive, and you put a Compact Flash card and IDE adapter on
the primary IDE controller slave port, the hard drive will be recognized as
ad0, while the Compact Flash card will be designated ad1.
2 – Installation 15
Note
USB pen drives may appear, but should not be selected for
installation as they are not IDE-bootable devices. CD-ROM or DVDROM drives will not be displayed by the GB-Ware system installation
process, as they are not writable discs. Other drives will not
display.
Device Designations
Designation
Description
Device Geometry*
da0
USB storage device
(Generic storage
device)
[978/4/32]
ad0
IDE storage device
(with device manufacturer identification)
[978/4/32]
*If there is an indication of the device size in the description, this
can be used to help identify the correct drive. Device Geometry
format is in cylinders/heads/sectors.
Once you have selected the desired device, press tab to OK, then press the
SPACE BAR or ENTER to continue.
Caution
Carefully select the correct storage device, especially when using
a USB Compact Flash reader/writer to install GB-Ware on a separate
system. Installing GB-Ware on the wrong device will overwrite the
disk (e.g. selecting the system hard drive will overwrite your operating
system or other data, destroying it). You may wish to disconnect
non-GB-Ware hard drives before installing to prevent accidental
erasure.
Installation Device Selection
Installing the Runtime
The next dialog will display the warning: Installing will destroy any
existing data on <device number>!!! Are you sure you want to install GBWare? where “device number” is the Compact Flash card or hard drive you
will be writing to, and “runtime version” is the GNAT Box runtime version
you have selected.
Tab to OK, then press SPACE BAR or ENTER when you are sure you have
selected the correct drive and are ready to install the runtime.
16 GB-Ware Firewall Product Guide
Disk Re-formatting Warning
It may take several minutes for the runtime to install. A pipe indicator
(|) will be animated while the system installs. A message similar to the
following will display when the system installation is complete:
Loading runtime image for
<runtime number>
– succeeded
Initializing disklabel for da0 – succeeded
Initializing runtime slice 2 – succeeded
Initializing runtime slice 1 – succeeded
Completing Installation
Your Compact Flash disk or hard disk should now have GB-Ware firewall
software installed. Remove the GNAT Box System installation CD and
press ENTER to reboot. Power off the computer.
If you have installed GB-Ware using a proxy computer, remove the GBWare disk from the computer and install it as the boot disk on the intended
firewall.
Note
See the Appendix for instructions on installing a Compact Flash card
and Compact Flash IDE adapter on your intended firewall.
If you installed GB-Ware using a proxy computer, restore the BIOS boot
settings to the computer and re-connect any drives you may have disconnected during GB-Ware installation.
Attaching the Hardware Key Block
After installing the GB-Ware Compact Flash card or hard drive, but before
initial configuration, plug the hardware key block (USB or parallel) into
your GB-Ware firewall.
Note
Without the key block, the software will operate in an unregistered
mode during which the system is operational for only 60 minutes.
GTA's hardware key block is different from other key blocks because it is
attached only to the GB-Ware firewall and not to client computers. The key
block also provides freedom to upgrade or change system hardware: simply
2 – Installation 17
attach the hardware key block to a prospective GB-Ware firewall and boot
the GB-Ware disk.
18 GB-Ware Firewall Product Guide
3 – Configuration 19
3 Configuration
The following sections describe how to change GB-Ware from the default
configuration, in which all internal users are allowed outbound connections,
but no unsolicited inbound connections are allowed.
Use either the web user interface, GBAdmin, the video console, or the serial
console to configure the GB-Ware firewall.
Setting the Boot Sequence
After installing GB-Ware and attaching the hardware key block, power up
the GB-Ware firewall.
1. Boot into the firewall’s CMOS (BIOS).
2. Set the boot sequence so that the GB-Ware drive is first, before any
other drives in the IDE controller slots. This will enable GB-Ware to
boot upon powering up.
3. Save your settings and exit the BIOS.
4. Restart the computer using a cold reboot. (In a cold reboot, shut
down, power off, and then power your computer back on.)
Note
GTA recommends disconnecting or disabling any unnecessary
hardware in the GB-Ware firewall system. This prevents accidental
access of other drives and simplifies hardware configuration.
If the boot sequence is correctly set, the firewall will boot from the GBWare drive.
Loading the Correct Memory Slice (Partition)
Both memory slice and 1 and slice 2 of the disk image have already been
written during installation and are, at this point, identical. The first time the
GNAT Box System is loaded, slice 1 will boot up by default.
Selecting a User Interface
Your GB-Ware firewall can be accessed in many ways. Choose one which
best suits your available hardware, network situation, GB-Ware runtime
version and preferences.
20 GB-Ware Firewall Product Guide
During installation, you chose the video or the serial console version of the
GNAT Box runtime. These methods can be used during setup, or when you
have direct physical access to the firewall, or as a failsafe if the network is
down and you can no longer administer your firewall remotely. Additionally, you may choose to set up your firewall over a peer Ethernet connection
using GBAdmin or a web user interface.
Note
You do not have to install separate GNAT Box runtimes to activate
the GBAdmin or web user interfaces; they are included with the
installation of a video or serial console runtime version. However, if
you installed GB-Ware’s video runtime version, you will have to use
the video console’s Setup Wizard before your firewall will allow you
to connect any other way.
Note
If you installed the serial console version of the GB-Ware runtime,
the video console connection mode may not be available. Conversely,
if you installed the video console version of GB-Ware, the serial
console version may not be available to you.
User Interface Name
Style
web
browser-contained HTML GUI application over Ethernet connection to a
computer
GBAdmin
Windows-only GUI application over
Ethernet connection to a computer
serial console
DOS-like text menus with keyboard
commands over DB-9 serial connection to a computer
video console
DOS-like text menus with keyboard
commands only using a monitor and
keyboard connected directly to your
firewall
Each style of user interface has unique requirements for physical setup
before they can be used for firewall configuration.
Physically Connecting Your GB-Ware Firewall
Depending upon which user interface (UI) you choose to use for initial
firewall configuration, you may need to attach different hardware to your
GB-Ware firewall.
3 – Configuration 21
Requirements
If using the web user interface, you will need:
•
1 crossover Ethernet cable to connect with the computer directly,
or 1 straight-through Ethernet cable to connect with the computer
through a hub or switch
•
2 straight-through Ethernet cables, one for each required network
connection
•
1 computer with a SSL-compatible and frames-enabled browser
If using GBAdmin, you will need:
•
1 crossover Ethernet cable to connect with the computer directly,
or 1 straight-through Ethernet cable to connect with the computer
through a hub or switch
•
2 straight-through Ethernet cables, one for each required network
connection
•
1 Windows computer
If using the video console, you will need:
•
1 keyboard
•
1 monitor
If using the serial console, you will need:
•
1 null-modem serial cable
•
1 computer with a serial port
Making a Temporary Peer Network Connection
If you want to initially configure your firewall using GBAdmin or a
browser, you will need to construct a temporary peer Ethernet network.
Note
The video console version of the GB-Ware runtime does not have
factory default network settings, and hence does not initially allow
any network or serial connections; you will need to run the video
Setup Wizard before you can use your firewall. This will perform
initial network setup on your firewall so that you can then connect
remotely with either GBAdmin or the web UI.
GBAdmin and the web user interface for the GB-Ware firewall occur over
an Ethernet network connection. Because the factory network information settings on the serial version of the GB-Ware firewall are unlikely to
match your existing network, your firewall will not automatically join your
network.
You will need to temporarily join a computer to the firewall’s default
network. This allows you to configure the firewall’s network settings to
22 GB-Ware Firewall Product Guide
match the network address scheme. Then you may add the firewall to your
network and connect remotely (by web or GBAdmin) through your normal
network.
1) Use a crossover Ethernet cable to connect a computer to the firewall’s first network interface card. Alternately, use straight-through
cables to connect your computer and the firewall’s first network
interface to a hub or switch.
2) Note or back-up your computer’s network configurations. Temporarily change your computer’s network configuration to join the
firewall’s default network:
IP ADDRESS: 192.168.71.253 (or any address on the default network)
GATEWAY:
192.168.71.254
NET MASK:
255.255.255.0
DNS:
none
Temporary Network Configuration for Connection
with Firewall Defaults - Windows
3 – Configuration 23
Temporary Network Configuration for Connection
with Firewall Defaults - Mac OS X
3) Reboot your computer if necessary to put your new network configuration into effect.
Note
Please refer to the GNAT Box System Software User’s Guide for specific
information about editing network information.
Making a Serial Connection
If you want to initially configure your firewall using the serial console, use
a null-modem serial cable to connect a computer’s COM port to the COM
port of your firewall. Wiring diagrams and further information are available
in the Console Guide.
The computer will use terminal software over the serial cable to emulate
attaching a keyboard and monitor directly to the firewall.
Making a Video Connection
If you want to initially configure your firewall using the video console,
attach a monitor and a keyboard directly to your firewall. A mouse will not
be used.
24 GB-Ware Firewall Product Guide
Configuring Your Firewall
You will need to configure your firewall to match your network scheme
before installing it.
Requirements
If using a web browser, you will need:
•
an SSL-compatible, frames-enabled web browser
•
a temporary peer network connection between the firewall and
a computer (first configuration only; otherwise, connect over the
network normally)
If using GBAdmin, you will need:
•
GBAdmin software, pre-installed on a Windows PC
•
a temporary peer network connection between the firewall and a
Windows computer (first configuration only; otherwise, connect over
the network normally)
If using the serial console, you will need:
•
terminal emulation software such as TeraTerm or Microsoft
HyperTerminal
•
a serial connection between the firewall and a computer
If using the video console, you will need:
•
a monitor and keyboard directly attached to your firewall
Additionally, you will need:
•
the GB-Ware firewall you installed
•
an understanding of TCP/IP networking
•
network IP addresses for all network interfaces used
•
net masks for each attached network
•
default route to the external network
•
a list of services/ports to allow inbound (if any)
•
a list of services/ports to restrict outbound (if any)
Browser Compatibility
GTA recommends using Apple Safari (www.apple.com), Microsoft Internet
Explorer for Windows (http://www.microsoft.com/windows/ie/), Mozilla
(www.mozilla.org), Netscape Navigator (www.netscape.com), Opera (www.
opera.com), or another SSL-compatible and frame-enabled browser to
administer your firewall.
3 – Configuration 25
On Macintosh computers, GTA does not recommend using Microsoft
Internet Explorer for Macintosh (Mac IE 5). OpenSSL encryption, used by
the firewall, is known to be incompatible with Mac IE 5, and your browser
will not allow you to continue past the security alert screen. If you must use
Mac IE 5, install the firewall using a compatible browser, GBAdmin or the
console and disable SSL before using Mac IE 5. Mac IE 5 can only be used
with SSL encryption disabled.
Caution
Administration of the firewall without SSL is insecure and may send
sensitive information such as passwords in clear text, and is not
recommended if you have a hub or other network device between
your computer and the firewall appliance.
Configuration Using a Web Browser
1) Start a web browser on your computer and enter the firewall’s URL
into the browser’s location/address field: https://192.168.71.254.
2) If your network and cables are set up correctly, you will be prompted
with a security alert dialog indicating that the certificate authority is
not one you have chosen to trust; that the security certificate date is
valid; and that the name on the security certificate does not match
the name of the site.
Accepting the Firewall’s SSL Certificate
Select YES, or if your alert differs, choose the selection that allows
you to proceed. (You may establish your firewall SSL certificate
once you have logged on to the firewall.)
3) Next, in the login screen, enter the default user ID, "gnatbox" (all
lower case). Then enter the default password, also "gnatbox" (all
lower case). Select OK or press the RETURN key when finished.
26 GB-Ware Firewall Product Guide
Entering the Default User ID and Password
Caution
GTA recommends changing the default user ID and password to
prevent unauthorized access.
Entering Your Network Information
GB-Ware requires entry of the serial number and activation code. Click on
Basic Configuration and expand the menu, then select Features. Enter the serial
number and activation code, then click the SAVE button then the OK button.
The firewall has default settings which need to be changed to match your
network settings. Click on Basic Configuration and expand the menu, then
select Network Information.
Only one external and one protected network interface is required to
initially configure and test the firewall. The other interface can be defined as
any of the three network types: protected, external or PSN (Private Service
Network, GTA's enhanced DMZ).
1) On the Network Information section:
•
Enter IP addresses and net masks (in either dotted decimal or
CIDR notation) for your external and protected networks on each
network interface.
•
Disable the DHCP option on the external network interface if necessary.
•
Enter the default route to your Internet router’s IP address.
•
Enter the firewall’s domain name according to your DNS server.
This will automatically generate a new SSL certificate for the firewall
using its domain name.
3 – Configuration 27
Caution
Closing the browser without clicking SAVE will cause the entered
data to be lost, and your firewall will remain in default configuration.
You will need to re-connect to the firewall and re-enter the network
information.
2) Once you have completed the network configuration, apply the
changes by clicking SAVE. The firewall will then join the assigned
network. Close your browser.
Caution
Failure to close the browser may allow unauthorized access to the
firewall. To prevent this, always log out and close your browser after
a firewall administration session.
Note
If you changed the IP of NIC 0’s protected network, the firewall will
now be on a different logical network than your computer, and you
will not be able to access the firewall from your computer. You must
restore your computer’s original network settings to access the
firewall again.
Entering a Network Configuration Using a Browser
28 GB-Ware Firewall Product Guide
Using CIDR-based or Slash (/) Notation
CIDR (Classless Inter-Domain Routing) aggregates routes so that one
IP address represents thousands served by a backbone provider. GNAT Box
System Software uses CIDR-based notation as the default for subnet masks,
instead of dotted decimal (e.g. 255.255.255.0) notation.
Instead of the fixed 8, 16 and 24 bits used in dotted decimal Class A, B, or C
net masks, CIDR-based notation can further divide the network into subnets
by using bit masking of any number from 1 to 32 to determine network
class (/32 representing one IP address). For example, the CIDR address
204.12.01.42/24 indicates that the first 24 bits are used for the network class
ID. The /24 mask includes 254 hosts on the network, and is equivalent to
255.255.255.0 in dotted-decimal notation.
Calculate a CIDR-based notation net mask by converting the dotted decimal
net mask to binary and count the ones. For a Class C network, the dotted
decimal net mask is 255.255.255.0. The binary notation of that net mask is
11111111.11111111.11111111.00000000. There are 24 ones, so the CIDR
notation would be /24. Using a 255.255.255.240 net mask, the binary representation would be: 11111111.11111111.11111111.11110000. The notation
would be /28.
You may also enter a host address that is defined by not including a bit mask
(e.g. 192.168.123.1). This is equivalent to a /32 bit mask. To enter a range
of addresses, use a hyphen (-) between the two extremes of the range (e.g.
192.168.123.0-192.168.123.255).
Dotted decimal may still be used by entering the dotted decimal net mask
after the forward slash.
Re-configuring Your Computer
If you temporarily changed your computer’s network configuration to
connect to the firewall, restore the original configuration now. If you formed
a temporary peer network during network configuration, disassemble it
now; reconnect your computer and the firewall to your network. Now your
computer and firewall should both be members of your network. Reboot
your computer if necessary to affect the network configuration change.
Accessing the Firewall
Access the firewall using the IP address you assigned to the protected
network.
The firewall should now be active and functioning in default security mode
(all internal users are allowed outbound and no unsolicited inbound connections are allowed). You can now perform any additional configuration tasks,
including changing the administrative password.
3 – Configuration 29
Caution
Failure to change the default password is a serious security
weakness. GTA recommends changing the default user ID and
password to prevent unauthorized access.
Configuration Using GBAdmin
If your computer’s operating system is Microsoft Windows, you can choose
to configure your firewall by using the GBAdmin software you installed
earlier instead of using the web interface.
Note
GBAdmin can only be installed on a local computer that uses
Windows 98, NT 4.0, XP, Me, 2000 or 2003.
1) Select GBAdmin from the Windows Start menu to start GBAdmin.
2) Select File from the tool bar, then select Open. In the dialog box’s
SOURCE area, select NETWORK. In the SERVER field, enter the default
IP address for the firewall (192.168.71.254). Make sure that there is
a check in the box next to CONFIGURATION in the INFORMATION TO LOAD
section. Once this is complete, press the RETURN key or click OK.
Opening a GBAdmin Firewall Connection
3) GBAdmin will prompt you for a user ID and password to the firewall.
Enter the default USER ID, which is "gnatbox" (all lower case) and
enter the default PASSWORD, which is also "gnatbox" (all lower case),
then press the RETURN key or select OK when finished.
Entering the Default User ID and Password
Caution
GTA recommends changing the default user ID and password to
prevent unauthorized access.
30 GB-Ware Firewall Product Guide
GBAdmin Network Information Window
Entering Your Network Information
GB-Ware requires entry of the serial number and activation code. Click on
Basic Configuration and expand the menu, then select Features. Enter the serial
number and activation code, then click the SAVE button then the OK button.
The firewall has default settings which need to be changed to match your
network settings. Click on Basic Configuration and expand the menu to select
Network Information.
Only one external and one protected network are required to initially
configure and test the firewall. The other interface can be defined as any
of the three network types: protected, external or PSN (Private Service
Network, GTA's DMZ).
1) On the Network Information section:
•
Enter IP addresses and net masks (in either dotted decimal or
CIDR notation, as described in the web setup method) for your
external and protected networks on each port.
•
Disable the DHCP option on the external network if necessary.
•
Enter the default route to your Internet router’s IP address.
•
Enter the firewall’s domain name according to your DNS server.
This will automatically generate a new SSL certificate for the firewall
using its domain name.
3 – Configuration 31
Caution
Closing GBAdmin without clicking SAVE will cause the entered data
to be lost, and your firewall will remain in default configuration. You
will need to re-connect to the firewall and re-enter the network
information.
2) Once you have completed the Network Information form, apply the
changes by clicking SAVE. The firewall will then join the assigned
network. Close GBAdmin.
Note
If you changed the IP of network interface 0’s protected network,
the firewall will now be on a different logical network than your
computer, and you will not be able to access the firewall from your
computer. You must restore your computer’s original network settings
to access the firewall again.
Re-configuring Your Computer
If you temporarily changed your computer’s network configuration to
connect to the firewall, restore the original configuration now. If you formed
a temporary peer network during network configuration, disassemble it
now; reconnect your computer and the firewall to your network. Now your
computer and firewall should both be members of your network. Reboot
your computer if necessary to affect the network configuration change.
Accessing the Firewall
Access the firewall using the IP address you assigned to the protected
network interface.
The firewall should now be active and functioning in default security mode
(all internal users are allowed outbound and no unsolicited inbound connections are allowed). You can now perform any additional configuration tasks.
Configuration Using the Serial Console
Use this user interface only if you have installed the serial version of the
GB-Ware runtime.
Because the factory network information settings on the GB-Ware firewall
are unlikely to match your existing network, your firewall will not automatically join your network. You will need to temporarily join a computer to the
firewall using a null-modem serial cable. This allows you to configure the
firewall’s network settings to match the local area network (LAN) address
scheme. Then you may add the firewall to your network and connect
remotely (by web or GBAdmin).
Note
The serial console user interface is suitable for initial firewall network
interface configuration. It cannot, however, perform some of the
more advanced firewall configuration tasks.
32 GB-Ware Firewall Product Guide
1) On your computer, open terminal emulator software such as Tera
Term or Microsoft HyperTerminal and enter the following settings for
a new connection:
EMULATION
PORT
BAUD RATE
DATA / BIT RATE
PARITY
STOP
FLOW CONTROL
VT-100
Computer serial (COM) port connected to the firewall
via a DB-9 cable
38400
8
None
1
Hardware*
* Set flow control to “None” as an alternative to hardware flow
control.
2) Enter registration (preferences) information and basic configuration
for network information. Set a new user ID and password.
Note
See Console Guide for more information on key commands and
features, including entry of routing information and firewall rules.
3) Basic configuration is complete. If you add the firewall to your
network, you should now be able to remotely administer it using
GBAdmin or a web browser.
Configuration Using the Video Console
Use this user interface only if you have installed the video version of the
GB-Ware runtime.
Note
The video version of the GB-Ware runtime does not have factory
default network settings, and hence does not initially allow any
network or serial connections. If you chose to install the video version
of the GB-Ware runtime, you will need to run the Setup Wizard to
enter basic network information before you can use your firewall.
1) The firewall will probe for hardware. To verify that the system has
detected and recognized your network cards, press ALT+F1 to see
the log messages. To scroll through the messages, engage the
SCROLL LOCK key, and use either the PAGE UP and PAGE DOWN
keys, or the UP/DOWN arrow keys.
You can also view this information using the Configuration Verification
item on the console interface or View Log Messages under the System
Activity menu using GBAdmin or the web user interface.
3 – Configuration 33
2) If you specified the video console version during installation and
your hardware was configured correctly, and the system did not
encounter any problems, the Setup Wizard should now appear.
Video Console Navigation
There are three modes on the video console: log messages, the main interface and statistics. View log messages by pressing ALT+F1. Press ALT+F2
to switch to the main interface. These keys are always active. After initial
setup, see firewall statistics by pressing ALT+F3.
Note
See Console Guide for more information on key commands and
features, including entry of routing information and firewall rules.
Video Console Keystroke Guide
Function
Keystroke
Exit/Abort
ESC
Clear field
F6
Previous field
F7
Next field
F8 or TAB
Delete/Backspace
DEL or BACKSPACE
Toggle choice list
SPACE BAR
Display choice list
F2
Toggle color
F12
Save
F10
Insert
INSERT
Select a button
SPACE BAR
Using the Setup Wizard
Complete the Setup Wizard to perform initial configuration of your firewall’s network interfaces.
1. GNAT Box Licensing Agreement
Move the cursor to VIEW LICENSE. If you agree to the terms, press
ESC to return to the previous dialog box, then select ACCEPT; if you
don’t agree to the terms, select DO NOT ACCEPT to terminate the
software installation.
2. GNAT Box Wizard
Select OK to use the GNAT Box Wizard. If you choose not to use
the Wizard, select CANCEL.
34 GB-Ware Firewall Product Guide
Note
If you cancel the Setup Wizard, go to Basic Configuration then Features
to enter your serial number and activation code. Next, enter your
initial configuration information in Basic Configuration then Network
Information. Your firewall will not be functional until these steps are
performed, either by hand or Setup Wizard.
Setup Wizard
3. Host Name
Enter the host name of the firewall. The host name should be a
fully-qualified domain name registered with your domain name
server. Select NEXT.
4. Contact Information
Fill in the contact information for your firewall. Select NEXT.
5. Serial Number and Activation
Enter your firewall’s serial number and activation code, which are
retrievable from the GTA Support web site (https://gta.com/support/
center/login/) under VIEW PRODUCTS after registering your product.
Select NEXT.
6a. PPP/PPPoE/PPTP
Select NO if you will not be using PPP on the external network interface, and go to step 6b. To use PPP/PPPoE/PPTP, toggle the field
value to YES and click NEXT, then go to PPP Configuration.
Use PPP?
6b. DHCP
If your system will not utilize DHCP on the external network interface, select NO, and go to step 6c. If your system will use DHCP
on the external network interface, select YES, and skip to step 7.
(Typically, cable modem and xDSL sites use DHCP.)
3 – Configuration 35
Run DHCP?
6c. IP Address
You will reach this option if you rejected use of dynamic IP address
services. Enter the static IP address and subnet mask of the external network interface.
The IP address for the external network interface should be a valid
ISP-registered IP address if you will be connecting your firewall to
the Internet.
7. Network Interface Card for the External, Protected Network or PSN
Select an available NIC to assign to the external interface. Use F2
or the SPACE BAR to select from the device list. Each NIC detected
on your system is listed at the bottom of the screen with its MAC
address.
Note
All networks or sub-networks attached to a firewall interface should
be on logically different networks from one another.
Selecting a Network Interface Card
8. Protected Network Interface
Use steps 6b, 6c, and 7 to select DHCP and NIC or assign a
static IP address, subnet and NIC for the protected interface. (The
protected interface is required: it defines hosts protected by the
firewall.)
If you are setting up a new network, GTA recommends choosing
network addresses described in RFC 1918. The Internet Assign-
36 GB-Ware Firewall Product Guide
ment Numbers Authority (IANA) has specified network addresses in
RFC 1918 that are designated exclusively for internal networks.
IANA Private Network IP Address Rules
Quantity of Addresses
Available
Network Class
IP Address Range
1
A
10.0.0.0 10.255.255.255
16
B
172.16.0.0 172.31.255.255
256
C
192.168.0.0 192.168.255.255
Note
Because GTA firewalls perform NAT, the IP address and any network
addresses behind the firewall (i.e., attached to, or on the protected
network or PSN) can be unregistered. IANA compliance is largely
a matter of convenience in NATted networks.
9. Gateway/Default Route on External Interface (No DHCP or PPP/
PPPoE/PPTP)
If your external network interface is not using DHCP (which
automatically fetches gateway information), enter a default route
for outbound traffic. Once the IP address, net mask, and device
assignment have been made, the wizard will prompt for the default
route. The wizard attempts to determine the network segment of the
IP address automatically.
10. Password
Assign a password to your firewall (required). Initially, the user ID
and password is set to “gnatbox.” The user ID can be changed
later in Authorization then Admin Accounts.
Caution
GTA recommends changing the default user ID and password to
prevent unauthorized access. See the GNAT Box System Software
User's Guide for instructions.
10. Saving Your Settings
The summary screen displays all your configuration settings. If you
need to make changes, use the PREVIOUS button to move back to
the desired dialog and make corrections. Once you are satisfied
with your settings, select SAVE and allow the firewall to boot up.
Initial configuration is now complete.
3 – Configuration 37
Accessing Your GTA Firewall
After completing the initial configuration in the setup wizard, your GTA
firewall should be active and functioning in default security mode (all
internal users are allowed outgoing connections, and no unsolicited connections are allowed in).
After testing connectivity, you can now perform any additional configuration tasks using GBAdmin or the web interface. See the GNAT Box System
Software User's Guide for more information.
38 GB-Ware Firewall Product Guide
4 – Troubleshooting 39
4 Troubleshooting
Troubleshooting Basics
GTA Support recommends the following guidelines as a starting point when
troubleshooting network problems:
•
Start with the simplest case of locally attached hosts.
•
Use IP addresses, not names. Your problem could be DNS.
•
Work with one network segment at a time.
•
Verify your firewall system configuration by using Verify Configuration.
The verification check is the best method of ensuring that your system is configured correctly. Correct all errors and warnings listed.
•
Your first tests should be connectivity tests. Ping and traceroute are
very useful tools for testing connectivity.
•
Make sure the network cabling is connected to the correct network
interface. Some useful guidelines are:
•
Verify the network interface numbers, MAC addresses and
logical names listed on the Network Information screen and in the
Configuration Report.
•
Use the logical elimination method. Connect a network cable
to the first network interface and use the ping facility to test for
connectivity with a host on the desired network. If unsuccessful, move the cable to the next network interface and perform
the test again. Repeat until successful, or all network interfaces
have been tested.
•
Generate a Configuration Report. Check the report to ensure all
your network devices have been recognized by the system at
boot time.
Frequently Asked Questions (FAQ)
1. Why can't all hosts (computers and devices) behind the firewall reach the
Internet?
This is usually a routing problem. The traceroute facility can be very useful in
debugging routing problems. Check for these problems:
•
Are the hosts that can’t reach the Internet on a different network
subnet from the firewall?
40 GB-Ware Firewall Product Guide
•
Have you added a static route on the firewall to tell it which router is
used to reach the Internet? Have you set the router’s default route
to be the firewall? Have you set the default route for hosts on the
problem network to be the router or firewall?
•
Is the wrong IP address assigned to the hosts or firewall? All network interfaces on the firewall must be on different logical networks.
•
Is the default route assigned incorrectly? The default route should
always be on the same subnet as the network interface of the host
(this is true for all hosts, not just the firewall). For a firewall, the default route must be an IP address on the network which is attached
to the network interface.
Note
When using PPP, PPTP or PPPoE, the default route is not necessarily
on the same subnet. The route is assigned by your PPP provider.
2. Why can't one host (computers and devices) behind the firewall reach the
Internet?
This may indicate that the default route is assigned incorrectly (or not at all)
to hosts on the protected or Private Service networks. All hosts protected
by the firewall must use the IP address of the firewall’s network interface for
the respective network. Hosts that reside behind routers or other gateways
on these networks generally use the IP address of the gateway or router
instead.
3. Why can't I access the web user interface from the protected network?
The default remote access filter set is generated from the configuration
parameters entered in the Network Information screen. It is possible that
the firewall’s protected network interface is on a different subnet from your
host. Check the remote access filter for the web interface; it may need to be
adjusted.
4. Why do I get errors when starting GBAdmin? Why is online help not
displayed?
GBAdmin requires Microsoft Windows and Microsoft Internet Explorer 5.x or
later. Components from Internet Explorer are used to display the online help
information. Errors will occur if Internet Explorer for Windows is not correctly
installed.
5. Why can't I “see” or ping the protected network interface?
First check for proper network configuration settings. If the network configuration is correct for the network interface, you may have the wrong cable for
your connection.
•
For a direct connection (firewall to host or router), you need a
crossover cable.
•
For a connection through a hub or switch, you need a straightthrough cable.
4 – Troubleshooting 41
Note
Distinguish between crossover cables and straight-through cables
by comparing the connection ends. On a straight-through cable, the
wire order matches; on a crossover cable, the first three of the four
wires are in reverse order.
6a. How do I install the parallel port hardware key block?
The parallel port hardware key block must be installed in the parallel (printer)
port. The side to be attached to the port is labeled COMPUTER, with arrows
pointing in the direction of the computer. Screws are provided to connect
the key block securely to the port. If the computer is close to a wall or other
obstacle, you can attach an extension cable to the port, then attach the hardware key block to the cable. Use a straight-through, 25-pin, male-to-female
cable.
If the hardware key block is not recognized once you have booted the
system, and the serial number and activation code are both entered correctly, make sure that your system’s parallel port is set to the values below.
Hardware Key Block
Settings
Mode:
EPP, SPP or Both
Address (Hex Value)
IRQ
0x378
7
0x278
5
6b. How do I install the USB hardware key block?
USB Key Block
In order to use GB-Ware, you must first install the hardware key block. Do
this after you install GB-Ware, but before configuration.
1. Register your GB-Ware firewall and retrieve your activation code.
(For more information, see the registration section.)
2. Plug the USB key block in to your GB-Ware firewall.
42 GB-Ware Firewall Product Guide
Installation of the USB Key Block
3. Enter the GB-Ware serial number and activation code in the Basic
Configuration then Features section of the GB-Ware web interface or
wizard.
Note
If the hardware key block is not recognized once you have booted
the system, and the serial number and activation code are both
entered correctly, make sure that your firewall’s USB port is active
and functional according to your hardware’s BIOS. These settings
may be checked during the boot process before operating system
software is loaded.
Refer to your system’s hardware guide for specific instructions.
7. Why is my system booting up in unregistered mode instead of going to the
Setup Wizard?
Check your serial number and activation code. If both of these numbers are
correct, it may mean that the hardware key block is not being recognized by
your system. See #6, above, for more information.
8. I selected the video console, but now I would like to use the serial interface.
Always back up your configuration before uploading a new runtime or reinstalling the operating system.
To switch from the video console interface to the serial console interface,
access the system on the Web interface and use the Upload Runtime feature to
install the SIO (“serial interface only”) version from the installation CD.
Optionally, re-install the operating system using the steps outlined in the
manual for selecting the SIO version. After loading the SIO runtime, upload
the backup configuration to the firewall.
9. My computer is not booting from the installation CD.
Make sure you are using the GB-Ware installation CD, that the boot
sequence is set properly, and that you are using an IDE CD-ROM.
10. My system does not see the USB Compact Flash card.
Make sure you are using a GTA-certified Compact Flash card and that the
USB Compact Flash card reader is properly connected to your PC.
4 – Troubleshooting 43
11. The warning message “Initializing runtime slice 2 failed; No space left on
device” is displayed.
1. The Compact Flash card is too small; GTA only supports GTA-certified Compact Flash cards.
2. The Compact Flash card no longer functions correctly; contact GTA
or a GTA Channel Partner for hardware warranty.
12. I lost my user name and/or password. How can I log on to my firewall ?
If login information has been irretrievably lost, a firewall can be reset to
factory defaults, erasing all current configuration data and resetting both the
case-sensitive user name and password to “gnatbox”.
Caution
Resetting the firewall will cause it to lose current configuration data.
The configuration data can only be restored by loading a saved
configuration with a known user name and password, or by manually
entering the information.
To reset your firewall to factory defaults, attach either a terminal (using a
serial console cable), or a computer with terminal emulation software (using
a DB-9 null-modem cable). Enter these settings for the console connection:
EMULATION
PORT
BAUD RATE
DATA / BIT RATE
PARITY
STOP
FLOW CONTROL
VT-100
Computer serial (COM) port connected to the firewall
via a DB-9 cable
38400
8
None
1
Hardware*
* Set flow control to “None” as an alternative to hardware flow control.
Power on the firewall. The following words will display:
GNAT Box System Software x.x.x
loading ...
When the word “loading” appears, immediately press CONTROL-R. The
system will begin to load, and configuration and hardware data will appear
on screen. Finally, a confirmation question displays:
Are you sure you want to reset your firewall configuration?:
(“yes” or “no”)
To reset to factory defaults, type the word “yes” in lower case letters. Typing
any other key will reboot the system without resetting to defaults. There is no
time out; the reset confirmation question will remain until a key is pressed.
44 GB-Ware Firewall Product Guide
13. How do I revert to my previous configuration after a version upgrade?
The firewall’s Compact Flash or hard drive memory is in two sections
(“slices”); one contains the current software version plus any saved configuration, the other contains the previous software version and configuration. A
new firewall’s two memory slices are identical.
When the firewall is upgraded to a new runtime, the upgrade process
automatically overwrites the memory slice not in use with the new software
version and the existing configuration, leaving the production firewall version
and configuration intact. When the firewall is rebooted, the updated memory
slice will load by default.
To select a memory slice other than the default, set up the console interface
as described in Troubleshooting question #7.
When the system boots up, the memory slice information will load. When the
word “Default” appears, immediately type the number of the slice you wish
to load.
1
GNAT Box slice 1
2
GNAT Box slice 2
Default: 1
14. How do I use the memory section feature for live configuration testing?
The memory section (“slice”) feature can be used to test a new firewall configuration in production while preserving the current configuration in the other
memory slice. In the following example, memory slice 1 contains the current
configuration, and memory slice 2 is used for testing a configuration.
1. Save a copy of the test configuration.
2. Reboot the firewall using the console interface.
3. Select and boot memory slice 2.
Caution
The test configuration will now be your active firewall.
4. Upload the configuration saved in step #1.
5. Switch to the web interface or GBAdmin to make advanced configuration changes; the currently selected slice will load by default until
another is selected.
6. To revert to the last configuration, reboot the firewall using the console interface and select memory slice 1.
Note
For more Troubleshooting suggestions, see the GNAT Box System
Software User’s Guide and GTA's web site at www.gta.com.
16. When I try to boot from the GB-Ware installation CD to install the system, I
get the error message, “Mounting CD – failed: Input/output error.” What steps
can I take to locate the problem?
Use these troubleshooting steps:
4 – Troubleshooting 45
1. If you have more than one CD-ROM drive installed, either disconnect the additional CD-ROM drives and retry, or verify that the
installation CD-ROM drive is detected first in the boot sequence,
before other CD-ROM drives in the IDE controller ports.
2. Connect a different CD-ROM drive and retry.
3. Try installing GB-Ware into a different hardware system.
16. My system did not auto-detect the Compact Flash.
Use these troubleshooting steps:
1. If the Compact Flash module was not auto-detected, make sure
that the card is fully seated in the adapter board.
2. Enter the system BIOS of the target system for GB-Ware. Once in
the BIOS, load the setup defaults and/or the BIOS defaults. Locate
and run IDE auto-detection. The Compact Flash module should be
auto-detected on the primary IDE controller port. Select SAVE.
4. If you have an older system (e.g. Compaq Pentium II 450 686T3
and Desk Pro EN), try setting the PIO mode to 0, then retry autodetect.
17. When I boot GB-Ware, GB-Ware hangs after the memory slice default
number displays. (You may also hear a beeping sound coming from the firewall
or serial console computer.)
Enter the firewall’s BIOS. Load the setup defaults and/or the BIOS defaults.
Disable logical block access (LBA) in the BIOS, if the option is available. LBA
may also be referred to as “logical” or “logical block,” or it may be indicated
with an option to change to CHS (cylinders/heads/sectors).
Note
For more troubleshooting suggestions, see the GNAT Box System
Software User's Guide.
18. When I boot GB-Ware, I receive the error message “rl0: Couldn’t map ports/
memory”.
Enter the firewall’s BIOS. Disable plug-and-play. Reboot. If the error
message still appears, enter the BIOS again and load the setup defaults
and/or the BIOS defaults.
46 GB-Ware Firewall Product Guide
4 – Troubleshooting 47
Appendix
Installing the Compact Flash Card
If you are installing your GB-Ware firewall on a Compact Flash card, use
these instructions to install the Compact Flash card for your firewall. The
instructions assume that the Compact Flash IDE adapter is being installed
in the intended firewall; modification is necessary to install the GB-Ware
firewall Compact Flash IDE adapter on an installation proxy computer.
Requirements
Required components include (clockwise from the left of the illustration):
•
mounting posts
•
Compact Flash IDE adapter board
•
IDE cable
•
512 MB GTA-certified Compact Flash card
This component kit is available for purchase from GTA; GB-Ware may also
be installed to a hard drive instead of using a Compact Flash card kit.
Compact Flash IDE Adapter Components
Before beginning, do not plug in any part of the system; make sure that you
are properly grounded to prevent static electricity discharge before opening
the case.
48 GB-Ware Firewall Product Guide
Warning
Improper grounding can damage your system or Compact Flash
card, and may cause physical injury or death. Never service your
GB-Ware system while it is plugged in or powered on!
Assembling the Compact Flash IDE Adapter
1) Insert the four white nylon mounting posts into the mounting holes in
the adapter board. (You can also mount the adapter board in a hard
disk drive bay using 3.5” hard disk drive mounting hardware.)
Inserting the Mounting Posts into the IDE Adapter Board
2) Holding the Compact Flash card with the label up, slide the card into
the slot on the adapter board, pinholes in, until firmly and evenly
seated.
Inserting the Compact Flash Card into the IDE Adapter Board
Installing the Compact Flash IDE Adapter
Open the case of your intended firewall. (Please contact the case manufacturer if you have questions on how to complete this step.)
Locating IDE Controller Ports
Locate the IDE controller ports on the motherboard, and remove anything
that is plugged into them. The Compact Flash module may not function
properly with other components plugged into the IDE controller ports.
4 – Troubleshooting 49
(Refer to the motherboard’s user guide if you cannot locate the IDE
controller ports.)
Locating the Primary IDE Controller Port
Mounting the Compact Flash Card
Mount the adapter board securely inside the firewall’s case; find a place
where the components fit easily and securely, and where the IDE cable can
easily reach from the adapter board to the primary IDE controller port. DO
NOT mount the adapter board onto or near other electronic components
inside the case.
Warning
The Compact Flash card is NOT hot-swappable. Never insert or
remove the Compact Flash card while the power is on. Doing so
can damage the Compact Flash card, and electrical discharge could
cause injury. Never open your GB-Ware firewall’s chassis while it
is plugged in or powered on!
Mounting the Compact Flash IDE Adapter Inside the Intended Firewall
50 GB-Ware Firewall Product Guide
Connecting the IDE Cable
Insert one end of the IDE cable into the primary IDE controller port with the
red-striped side of the cable lined up with pin #1 of the IDE controller port.
Insert the other end of the IDE cable into the IDE port of the adapter board
with the red-striped side of the IDE cable nearest to the 4-pin power port.
Attaching the IDE Cable to the Compact Flash IDE Adapter Board
Connecting the Power Supply
Locate a 4-pin power connector on your system’s power supply, and
connect a power cable from it to the 4-pin power port of the adapter board.
Connecting the Power Supply to the 4-pin Power Port of the IDE Adapter Board
Close the case and power on your firewall to test for operational error.
If you have not yet installed GB-Ware on the Compact Flash card, see the
installation chapter to continue installing GB-Ware.
Moving an Old Configuration to GB-Ware
These instructions guide an upgrade to GB-Ware from another GNAT Box
firewall (including another GB-Ware firewall). To upgrade, you must have
an existing viable GNAT Box System Software configuration file from
another firewall and an installed GB-Ware firewall
4 – Troubleshooting 51
Note
Those upgrading from GNAT Box System Software version 2.x or
lower should record all configuration data and use it as a guide to
enter new configuration data manually. You may use the web
interface to print the configuration or manually record it.
1) Once you have installed GB-Ware on a Compact Flash card or hard
drive, power up the GB-Ware firewall.
2) Overwrite the default GB-Ware configuration with your network information. See the configuration chapter for instructions on entering
this information.
If you have installed the SIO (“serial console only”) version of the
runtime, when the boot process is complete, the firewall will be unregistered and configured with factory default settings; use the web
interface, GBAdmin or the serial console to enter your network settings. If you have installed the video console version of the GNAT
Box runtime, use the video console’s Setup Wizard.
3) Access the GB-Ware firewall on its protected network interface to
test firewall connectivity.
Note
For the upgrade, connectivity with the protected network interface
is particularly important; you will use the protected interface to
connect to the GB-Ware firewall using GBAdmin or the web interface,
and transfer the GB-Ware firewall configuration.
Merging Configurations Using GBAdmin
Unless you are uploading a new version of GNAT Box System Software
to the same firewall, you will need to merge the configuration of the old
firewall with the new GB-Ware configuration. Configuration merging can
currently only be achieved by using GBAdmin.
1) Start your new version of GBAdmin. (In Windows, go to Start Menu/
Programs/GTA/GB-Ware 3.x.x/GBAdmin.)
2) Make sure the GB-Ware firewall is powered on and connectivity is
possible.
3) In GBAdmin, click File then Open. Select the NETWORK radio button.
In the SOURCE field, enter the GB-Ware firewall’s protected network
interface IP address. Click the OK button.
File>Open the Firewall’s Protected Network IP Address using GBAdmin
52 GB-Ware Firewall Product Guide
4) GBAdmin will connect to the GB-Ware firewall and prompt you for
the user ID and password selected during installation; when successfully authenticated, GBAdmin will load the GB-Ware configuration.
5) Merge the old configuration with the GB-Ware firewall configuration.
Click File then Merge. A warning will ask if you wish to overwrite your
current settings. Click YES. In the MERGE dialog box, select FILE in
the SOURCE field. In the INFORMATION TO MERGE field, select CONFIGURATION. Do not check the RUNTIME check box.
File>Merge the GB360.GBcfg using GBAdmin
6) Click Browse and find the directory where you saved the old GNAT
Box firewall configuration. Select the configuration file and click OK.
7) Enter the login for your old configuration file. After entering it, press
RETURN to load the GB-Ware firewall configuration.
8) Click Basic Configuration then Features. Enter the GB-Ware serial number
and activation code if necessary. (This step should be completed
during installation of GB-Ware.)
Entering the Serial Number and Activation Codes using GBAdmin
9) Click Basic Configuration then Network Information. Verify that all your interfaces have been recognized and that they have the proper NICs
selected.
Configuring Logical Interfaces using GBAdmin
4 – Troubleshooting 53
Note
If your NIC is not listed, it’s possible that you are upgrading from an
older version in which that NIC was supported. Please contact
support with any questions. If you are placing the configuration on
new hardware with different NICs, you will need to select your
cards.
10) Save the configuration to the firewall by clicking on the SAVE ALL
button on the tool bar or by selecting File then Save All. This will save
the entire configuration and any changes you have made to the
GB-Ware firewall.
Note
If your firewall’s logical network differs from the previous network
that you used to access the firewall, you may not be able to access
the firewall until you alter your computer’s network settings to join
the firewall’s new logical network.
54 GB-Ware Firewall Product Guide
Index 55
Index
default user ID 36.
Desk Pro 45.
dial-up connection 5.
DSL 34.
E
email address
support
Symbols
4-pin power port
52.
A
activation code 34, 41, 47.
adapter board 49.
ADSL 5.
asterisk. See wildcard symbol.
auto-detect IDE 45.
B
ii.
C
cable 40, 41, 43.
cable modem 34.
case-sensitive 43.
compact flash 10, 16, 42.
49.
Compaq 45.
components 5, 51.
COM port 43.
Configuration
19.
configuration
testing
Factory settings 31.
feet, adapter board 49.
filter, remote access 40.
flash card 42.
flow control 43.
G
errors
Internet Explorer
default
F
gateway 40.
GBAdmin 25, 40, 44.
Baud Rate 43.
boot 39, 44.
browsers
installation
7, 40, 43, 44.
console 43, 44.
Console interface 20.
crossover cable 6, 21, 40.
D
data source. See DSNs.
DB-9 43.
Default
19.
default route 40.
default settings 47.
40.
GNAT Box System Software 1, 43,
44.
H
hardware key block
hex value 41.
hot swap, no 52.
hub 40.
41.
I
IANA 36.
IDE
cable, red stripe, pin #1
installation
compact flash 49.
hardware key block
44.
configuration
route 30.
ii.
EPP 41.
41.
Internet Explorer ii, 40.
Intranet 3.
IP address 40.
IRQ assignments 4.
ISDN 5.
J
Java
ii.
L
loading
slice
43.
52.
56 GB-Ware Firewall Product Guide
Serial Console interface 20, 42, 47.
serial number 34, 41, 47.
slice 44.
SPP 41.
straight-through cable 40.
switch 40.
log 43.
Login 26.
login 43.
lost
43.
lost 43.
lower case
43.
M
T
mailing list 8.
memory 43, 44.
memory slice 16, 43.
Microsoft 40.
modem 6, 43.
mounting posts 49, 50.
T-1, T-3 4.
terminal emulation
testing 44.
traceroute 39.
U
N
network configuration 40.
Note 9, 23.
notes & warnings 4, 5, 6, 10, 35.
warning
50.
Video Console interface
VT-100 emulation 43.
O
P
R
reboot 44.
red stripe
IDE cable
52.
remote access filter 40.
reset 43.
revert 44.
router 40.
runtime (executable) 44.
runtime slice 16, 43.
S
serial console
43.
42, 47.
W
40.
parity 43.
password 36, 43.
ping 40.
power cable, port, supply
PPP 40.
PPPoE 40.
PPTP 40.
protected 40.
UARTs 5.
unregistered IP address 36.
unregistered mode 16, 42.
upgrade 16, 47.
User ID 36.
V
null-modem 43.
number, serial 34.
online help
43.
52.
WAN 4.
warning 50.
web site 44.
web user interface 40.
WELF (WebTrends Enhanced Log
Format) ii.
Windows 40.