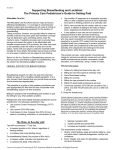
1
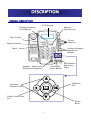
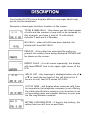
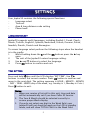
Telephone INDEX INSTALLATION………………………………………………………….…….….3-4 CHECK THE CONTENTS OF THE BOX………………………...…....…….3 BATTERIES INSTALLATION……………………………………………….…3 CONNECTING LINE CORDS…………………………………………………3 CONNECTION THE ADAPTOR………………………………………………4 DESCRIPTION…………………………………………………………….…….. 5-7 GENERAL DESCRIPTION……………………………………………………..5 LCD SCREEN…………………………………………………………………..6 RECEIVING CALL RECORDS………………………………………………...6 LCD MESSAGES……………………………………………………………….7 SETTINGS……………………………………………………………………….8-10 LANGUAGE SELECT…………………………………………………………..8 TIME SETTING………………………………………………………………….8 AREA AND LONG DISTANCE CODE SETTING……………………………9 PHONE BOOK SETTING………………………………………………………9 REVIEWING PHONE BOOK NUMBER/NAME…………………………….10 DELETING AN ENTRY FROM THE PHONE BOOK.………………………10 SPEED DIAL FROM THE PHONE BOOK…………………………………..10 MODIFYING PHONE BOOK ENTRY………………………………………..10 COPYING CALLER’S NUMBER TO YOUR PHONE BOOK……………….10 USING THE TELEPHONE……………………………………………….….…11-12 RINGER LEVEL ADJUSTMENT…………………………………………...…11 SPEAKER VOLUME ADJUSTMENT………………………………………….11 ANSWERING A CALL……………………………………………….………..11 MAKING A CALL…………………………………………………….……….12 REDIAL MODE……………………………………………………….……….12 FUNCTIONS………………………………………………………………..….13-14 MUTE FUNCTION…………………………………………………….……...13 FLASH FUNCTION…………………………………………………….……..13 PAUSE FUNCTION…………………………………………………….…..…13 MESSAGE WAITING………………………………………………..….…….13 CALL BACK FUNCTION……………………………………………….…….14 MEMORY…………………………………………………………………….…15-16 STORING AND REVIEWING A NUMBER IN ONE-TOUCH MEMORY…15 STORING AND REVIEWING A NUMBER IN TWO-TOUCH MEMORY...15 COPYING THE NUMBERS TO ONE-TOUCH MEMORY…………………16 DIALING A NUMBER FROM MEMORY…………………………………... 16 CALLER ID SYSTEM OPERATION………………………………………..…17-19 CALLER ID SERVICE………………………………………………………….17 RECEIVING CALL RECORDS……………………………………….……….17 NEW CALL INDICATOR…………………………………………….……….17 REVIEWING CALL RECORDS……………………………………………….18 REMOVING RECORDS FROM CALL LIST………………………………….18 CALLER ID ON CALL WAITING…………………………………………….19 TROUBLESHOOTING………………………………………………………………20 GUARANTEE…………………………………………………………………………21 2 INSTALLATION CHECK THE CONTENTS OF THE BOX Your box contains: • Jupiter50 unit • Handset with curly cord • Line cord • User Guide BATTERIES INSTALLATION The caller ID phone requires four 1.5V AA size batteries for LCD Display (batteries are not supplied). • Remove the battery cover from the back of your Jupiter50 phone. • Insert four 1.5V AA size batteries into the compartment. • Replace battery compartment cover. You can also insert adaptor for LCD display. Note: Do not use rechargeable batteries, do not dispose batteries in household waste. Pay attention to your local battery disposal regulations. CONNECTING LINE CORDS Plug one end of the supplied modular cord into the line socket marked “LINE” at the back of the Jupiter50 (see the diagram below). Then plug the other end into Telephone line jack. Adaptor socket classified “hazardous voltage” according to EN60950 standard Line cord socket classified TNV-3 according to EN60950 standard 3 INSTALLATION CONNECTING THE ADAPTOR Connect the adaptor plug to the adaptor socket located on the back of your Jupiter50 next to the line cord socket. Then connect the adaptor to the wall socket (classified “hazardous voltage” according to EN60950 standard). Please choose an adaptor wall socket near your line plug to enable you to unplug the adaptor quickly in case of a problem. Note: The adaptor is required for the telephone to work properly. Batteries are necessary in case of network power failure. If the adaptor is accidentally unplugged (or in case of power failure) and the batteries are empty or not in place, restricted phone features only will work (make a call or answer incoming call). 4 DESCRIPTION GENERAL DESCRIPTION LCD Display Flashing Incoming Call Indicator Memory Selection key Time Set Key Direct Memory Memory Set Key Mute Volume Reception Adjustment Buttons Speaker - Hands Free Dialing and Amplifier Time Break Recall Button Last Number Redial Key / Pause SS Up/Down Selection keys X ´ OK ok Validation Key T T Delete/Cancel/Exit Key Phone Book 5 DESCRIPTION LCD SCREEN Screen example (incoming call position) : time date number of call records received caller’s name caller’s number RECEIVING CALL RECORDS A caller ID record consists of the following information: Number of call records received, time and date of the call Total calls and current date Caller’s number Caller’s name 6 DESCRIPTION Your Jupiter50 LCD screen displays different messages which help you to use the telephone. Examples of messages and their location on the screen: TOTAL & NEW CALLS – this shows you the total number of calls and the number of new calls to be reviewed. In this example, you have a total of 10 calls which includes 2 new and it is Monday. NO CALLS – when all calls have been deleted, the display will show NO CALLS. PRIVATE – if the caller has exercised the option to prevent his number from being displayed, PRIVATE will be shown on the screen. REPEAT CALLS – if a call comes repeatedly, the display will show REPEAT icon in the upper right corner of the LCD. END OF LIST – this message is displayed when use of S or T to reach the top (end) of the call history list. If there is no call, then LCD shows NO CALL. OUT OF AREA – will display when someone calls from an area where the telephone company is not offering the caller identification services or an area that is not yet providing name and number delivery to your area via the long distance network. BATTERY LOW INDICATOR – if there is low battery, the battery low icon will turn on and flash. 7 SETTINGS Your Jupiter50 contains the following special functions: • Language select • Time set • Area & long distance code setting • Phone book LANGUAGE SELECT Jupiter50 supports multi languages, including English1, Greek, Czech, Slovak, Turkish, English2, Spanish, Nederland, French, German, Polish, Swedish, Danish, Finnish and Norwegian. To access language select perform the following steps when the handset is in the cradle: 1. Whilst holding down the X and the OK buttons press the S key once. 2. The unit of the Jupiter50 enters language setting. 3. Use S and T buttons to select the language. 4. Press OK button to confirm and exit. TIME SETTING Press and hold key until the LCD displays “SET TIME”. Use TS buttons to select the correct number. Press OK button to confirm and move to the next digit. The setting sequence is HOUR – MINUTE – MONTH – DAY – YEAR – WEEK (day of the week, e.g. Sunday is 1, Monday is 2 etc.) Press X button to exit. Notes: 1. When you receive a first call to this unit, time and date will be automatically set if you have Caller ID Service. 2. The Year & Month should be selected correctly to ensure proper Week display. 3. If you do not select any digit in the Week field, your Jupiter50 will not show the week on the LCD in standby mode, and will show TOTAL CALLS in the Week field. 8 SETTINGS AREA & LONG DISTANCE CODE SETTING Your telephone needs to distinguish between local and long distance calls. First of all you have to program your area code: Press X button together with T button and hold them both for 2-3 seconds until the display shows “SET AREA CODE”. Use T and S buttons to select the correct area code. Press OK button to pass from one digit to another. When the area code setting has been completed, press OK button once – the display will show “SET LDS CODE”. The unit enters the long distance code. Press X button to exit the setting. • • • PHONE BOOK SETTING When the phone is ON-HOOK, press and hold key for 2-3 seconds to enter the number setting mode. Enter telephone number (maximum 18 digits). If the number is longer than18 digits, the display will show “TOO LONG” message. To correct wrong digit press X. After completing the number setting, press key again to enter the name setting mode. In the bottom left hand corner a flashing line will appear. Enter the name corresponding to the number according to character keys below. To enter continuous letters on the same button press OK to pass to the next character. When number and name setting is completed, press key once to store the desired entry in your phone book. • • • • Key Characters Key Characters 1 .,?–1 6 M N O 6 Ö ØÑ 2 ABC2?ÄÆ 7 PQRS7 3 DEF3 8 TUV8Ü 4 GHI4 9 WXYZ9 5 JKL5 0 0+:; 9 Note: If you want to exit during the setting, use X button. Otherwise, the system will exit the phone book mode automatically after 20 seconds of inactive sate. SETTINGS REVIEWING PHONE BOOK NUMBER/NAME 1. 2. 3. Press key once and the unit will show the last phone book name and number. Use T and S to review the entries of your phone book. You can also quickly find the number by name by pressing the first letter of the stored name. To review the entries by their location in the phone book, with the phone in the on-hook position press the location number + #, e.g. if you want to review the seventh entry located in your phone book, just press 7# and the LCD will show the seventh number and name. DELETING AN ENTRY FROM THE PHONE BOOK Select the number you wish to delete and press X. The unit will ask you DEL? – confirm this by pressing X button again. SPEED DIAL FROM THE PHONE BOOK With the phone off hook, select the preset number (see number 3. above), then press OK or Speaker button once and the number will be dialed automatically. MODIFYING PHONE BOOK ENTRY 1. 2. 3. Press key and find the number using TS keys or by pressing the first letter of the name you require. Press and hold key until the first letter of the name blinks. Type the new name by using the keypad (as described in section “Phone Book Setting”, p.8). COPYING CALLER’S NUMBER TO YOUR PHONE BOOK When the LCD shows Caller ID or last 10 dialed numbers, press and hold key for about 3 seconds, this will add the number to the Phone book, and the name first letter will flash to indicate possibility to modify it – you can either do it using the keypad or leave it as it is. Then press again the key to store and X to exit. 10 USING THE TELEPHONE RINGER LEVEL ADJUSTMENT You can change the ringer volume to the desired level. To have the maximum ringer volume, move the ringer switch on the back of your Jupiter50 to (big bell icon) position. If you prefer a gentle ring, move the ringer switch to (small bell icon) position. SPEAKER VOLUME ADJUSTMENT To adjust the speaker volume to desirable level, use the volume reception adjustment buttons vol+ and volM4 vol+ vol- ANSWERING A CALL You can speak either by picking up the handset or hands free. When the phone rings, the Name/Number of the caller will appear on the screen, if you have subscribed to the CID service. 1. Lift the handset and speak, or press the ; to speak hands free. 2. On completion of the call, carefully replace the handset in the cradle to release the line, or press the ; again. 11 USING THE TELEPHONE MAKING A CALL 1. Lift the handset 2. Await the dial tone and dial required number (it will be displayed on the screen). 3. On completion of the call, carefully replace the handset in the cradle to release the line. OR You can also use the HANDS FREE function to make a call. 1. Dial the required number in the on-hook position. 2. Press the ; key and the number will be automatically dialed. 3. When the person answers you, speak with the phone in the hands free mode. You can adjust the speaker volume to desirable level by using the volume reception adjustment buttons vol+ and vol-. Note: To deactivate the HANDS FREE function during a call, lift the handset. To activate the HANDS FREE function again during the call, press and hold the ; key and replace the handset on the cradle at the same time. REDIAL MODE: Lift the handset or press ; key, then press redial the last telephone number you dialed. 12 button to FUNCTIONS MUTE FUNCTION If you wish, you can speak privately to someone else in the room without your caller overhearing. You will still be able to hear the caller but the caller cannot hear you during the mute operation. To switch on the mute mode during a call just press once. Your caller will not hear you anymore. Press resume the conversation with your caller. button key again to RECALL FUNCTION This function is related to CALL WAITING telephone service. If you have this service, press R (time break Recall) button during a conversation. This will institute a dialing tone for another call or, otherwise, will allow you to get another call from CALL WAITING service without disconnecting from your current conversation. PAUSE FUNCTION This function allows you to insert a pause in dialing sequence. E.g. when you dial an international number, some telephone company systems will not identify the entire number entry without a pause between the prefix digits and the number itself. When you store, for example, number 00-886-22-795-1234, you may have to dial 00, then, then , then 886 and again, and then the remaining digits. This allows adequate timing for the sequence of the phone number to register with the telephone company system and complete the dialing. MESSAGE WAITING If you have voicemail service provided by your telephone company, the screen will display MESSAGE WAITING message when a message is left. The icon MSG will also appear in the upper left corner of the screen. The icon will remain until you access your voice mail and hear the message. Note: This function should be supported by your telephone company. 13 FUNCTIONS CALL BACK FUNCTION 1. This function allows you to CALL BACK a previously dialed number. Your Jupiter50 unit can store up to 10 dialed numbers. To CALL BACK your dialed numbers you should do the following: a. In the ON-HOOK position press OK button once, then use Tand S buttons to select the number you wish to dial. b. Pick up the handset or press ; button and the phone number will be dialed automatically. 2. This function also allows you to dial the number of the person who has called previously. To perform this you should do the following: OPTION 1 a. Pick up the handset or press ; button, wait for a dial tone. b. Select the caller number you wish to call back by the use of Tand S buttons. c. Press OK to automatically dial caller’s phone number, displayed on the LCD. OPTION 2 a. In the ON-HOOK position press S or T to select the number you wish to call back. b. Pick up the handset or press ; button and the phone number will be dialed automatically. Notes: 1. The call back feature will not dial the phone number in case the selected call record is blocked or not available. 2. This function is related to Caller ID Service. Check with your local telephone company if you have this service. 14 MEMORY STORING A NUMBER IN ONE-TOUCH MEMORY OPTION 1: In the ON-HOOK position either lift the handset or press ; key. Then press button and the LCD will show -->. Enter the telephone number you wish to store. Enter desired one-touch memory location from M1 to M4 and the LCD will show SAVE OK. This means that the number has been stored in one-touch memory. OPTION 2: In the ON-HOOK position dial the number you want to store, then press and hold one of memory location keys M1-M4 until the LCD shows SAVE OK. REVIEWING NUMBERS IN ONE-TOUCH MEMORY When the phone is ON-HOOK, press one of one-touch location numbers M1-M4 and the LCD will show the number stored in it. STORING A NUMBER IN TWO-TOUCH MEMORY In the ON-HOOK position either lift the handset or press ; key. Then press button and the LCD will show -->. Enter the telephone number you wish to store, press button again and the LCD will show -->? , enter the desired location number from 0 to 9 and the LCD will show SAVE OK. REVIEWING NUMBERS IN TWO-TOUCH MEMORY When the telephone is ON-HOOK press and hold location number (0-9) you wish to review or press MEM button once and then the location number. The LCD will show the number stored in the memory under this location number. 15 MEMORY COPYING THE NUMBERS TO ONE-TOUCH MEMORY You can copy CID or last 10 dialed numbers or phone book number to one-touch memory. When the number is shown on the LCD, press and hold one of one-touch memory keys M1-M4 until the LCD shows SAVE OK. Now the number has been stored in M1-M4 onetouch memory. DIALING A NUMBER FROM ONE-TOUCH MEMORY In the on-hook position either lift the handset or press ; key. Then press one of one-touch memory keys M1-M4 and the number stored in it will be dialed automatically. DIALING A NUMBER FROM TWO-TOUCH MEMORY OPTION 1 With the phone in the ON-HOOK position press the location number (0-9) and hold until the stored number is displayed on the screen. Then either lift the handset or press ; key. OPTION 2 Press MEM button once and the location number (0-9). The number stored under desirable location will appear on the screen. Then either lift the handset or press ; key. 16 CALLER ID SYSTEM OPERATION CALLER ID SERVICE If you have been subscribed to Caller ID service at your local telephone company, your Jupiter50 will show incoming call information on the display screen. The information includes caller name and number. Jupiter50 also provides Caller ID on CALL WAITING. Notes: 1. Caller’s name function should be supported by your Caller ID Service provider. 2. Caller ID on CALL WAITING should be supported by your Caller ID Service provider. RECEIVING CALL RECORDS A Caller ID record consists of the following information: Number of call records received, time and date of the call Total calls and current date Caller’s name Caller’s number NEW CALL INDICATOR The red incoming call indicator on the bottom of your LCD display will flash when you have a NEW CALL. The indicator will continue to flash until you review all the new calls displayed on the screen. 17 CALLER ID SYSTEM OPERATION REVIEWING CALL RECORDS Use S and T buttons to browse your caller list. If the incoming number is more than 13 digits, an arrow sign will appear in the right corner of the LCD, press S or T button once to review the other digits. Press S and T buttons again to pass to next call. At the end of the call record list the LCD will display END OF LIST message. Note: The storing capacity of your Jupiter50 unit is up to 66 Call Records. When the memory gets full and a new call comes in, the oldest record will automatically drop off to make room for the New Call Record. In order to leave more room in your storing memory for new incoming call records, delete old or unnecessary records. REMOVING RECORDS FROM CALLER LIST In the ON-HOOK position select the number you wish to remove using S and T buttons, then press X button. The LCD will show: DEL? Press X button again to validate your choice and the number will be removed from your caller list. Press any other button to exit. If you decide to remove all the records from the list, press and hold X button until the LCD shows ALL DEL? Press X button again and the LCD will show NO CALL. Press any other button to exit. 18 CALLER ID SYSTEM OPERATION CALLER ID ON CALL WAITING CALL WAITING function works as follows: 1. A new call comes in. Caller ID info is displayed on the LCD: Caller 1 436-1234 2. Second incoming call is received. Waiting tone (beep) is heard and the Second caller info is displayed on the LCD: Caller 1 Caller 2 436-1234 291-5678 3. Press the phone hook switch or R key to put Caller 1 on hold and connect Caller 2. While you are speaking with Caller 2, Caller 1 will not be disconnected. You may switch between callers as often as you like by pressing the telephone hook switch or R key. Note: If you decide to ignore Caller 2 while speaking to Caller 1, the Caller 2 record will be registered in the automatic call log. When your conversation with Caller 1 is completed you will see the Caller 2 info on the screen and may call him back using speed dial. Remember: For CID to operate you must subscribe to this service through your Service provider. 19 TROUBLESHOOTING If you are having problems with your Jupiter50, please check below for possible solutions: PROBLEM SOLUTION BLANK OR FAINT SCREEN •Check the power adapter is connected properly. •Check the batteries are in place and fully charged. CALLER ID FUNCTION DOES NOT WORK PROPERLY •Call your local telephone company to verify that your Caller ID service is activated. JUPITER50 DOES NOT RING •Verify that the Line Cord is plugged in properly. •You may have too many communication devices hooked to a single line. Communication devices can be another phone, modem or facsimile machine. Contact your telephone company for help in calculating the limit for your home or business line NO DIAL TONE •Verify that the Line Cord connection is correct. NO RESPONSE ON LCD DISPLAY •If you have experienced a power failure the batteries of memory backup could become weak. If the power is restored and the display screen still does not respond then you should replace the batteries with new ones. 20 GARANTEE From the moment your Geemarc product is purchased, Geemarc guarantee is for the period of one year. During this time, all repairs or replacements (at our discretion) are free of charge. Should you experience a problem then contact our helpline or visit our website at www.geemarc.com. The guarantee does not cover damage to the product due to abuse, mishandling, improper packaging by you, alteration, accident, electrical current fluctuations or failure to follow operating, maintenance or environmental instructions. Any cosmetic damage and/or other damage that does not affect functionality are not covered. The Geemarc guarantee does not affect your legal rights. IMPORTANT: Your receipt is a part of your warranty and must be retained and produced in the event of a warranty claim. Only authorized TE technicians may perform service and support to TE products. All services performed by unauthorized technicians will void your TE warranty. PLEASE NOTE: The guarantee applies to the United Kingdom only. DECLARATION: Geemarc Telecom SA hereby declares that this product is in compliance with the essential requirements and other relevant provisions of the Radio and Telecommunications Terminal Directive 1999/5/EEC and in particular Article 3 Section 1a, 1b and Section 3. The telephone does not operate if the line current is lower than 18 mA. ELECTRICAL CONNECTION: The apparatus is designed to operate from a 230V 50Hz supply only (classified as “hazardous voltage” according to EN60950 standard). The apparatus does not incorporate an integral power on/off switch. To disconnect the power, either switch off supply at the mains power socket or unplug the AC adaptor. When installing the apparatus, ensure that the mains power socket is readily accessible. TELEPHONE CONNECTION: Voltages present on the telecommunication network are classified TNV-3 (Telecommunication Network Voltage) according to the EN60950 standard. 21