1
contents
Anti-Tip Bracket
Appliance Registration
Care and Cleaning
Control Panel
Features
Flooring under the Range
Leveling
Lift-Up/Off Cooktop
Model and Serial Numbers
Oven
Air Adjustment
Baking, Baking Guide
Broiling, Broiling Guide
Control Settings
Lighting Instructions
Oven Bottom Removal
3,5
2
14-17
14
6
5
5
14
2
8,9
9
10, 11
18
19
Problem Solver
Repair Service
Safety Instructions
Surface Cooking
2-5
7
Air Adjustment
Burners, Burner Grates
8
14, 15
7
Control Settings
Cookware Tips
8
Flame Size
Lighting Instructions
‘7
7
Warranty
Back Cover
13
9
8,9
16
Preheating
Roasting, Roasting Guide
10, 11
12
Shelves
Thermostat Adjustment
9,15
16
Models JGAS02PK
JGAS02EK
GEAppBaflces
‘6’FD4T&
~
-22-k9
q9-q77s
;
....=....——-.————
....——
—
—.,
.-——
. -:=:=:.
u=:.==>=L.,=:
=-=-: -“=
-=
:.:V.=--‘-‘-”:==–
=
,.’-“”.,.
....-. . .—
—--.
..-,~
$/.qf..fl
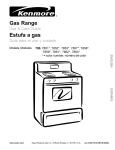
Readtwfi
bookcarefully.
It isintendedtohelpyouoperate
andmaintainyournewrange
p~.operly.
Keepit handyfor answersto your
questions.
momm
If youdon’tunderstandsomething
or needmorehelp,write(include
yourphonenumber):
ConsumerAffairs
GE Appliances
AppliancePark
Louisville,KY40225
smm
The~aEfO~nia safe
Drintig
Water andToxicEdorcimcnt
ActrequirestheGovernor
of
. ‘California
topublishalistof
Subsmnces
boyn totie Sbii
tocauseemcer,andrequhes
busi~esses
tomm CUStO~~rS
ofpotentid
eiposureto’such
write down the model
and serial nmbene
You’llfindthemon a labellocated
in theburnerboxunderthe
coo~op.
Seepage6.
Thesenumbersare alsoon the
ConsumerProductOwnership
RegistrationCardthatcamewith
yourrange.Beforesendingin this
card, pleasewritethesenumbers
here:
—
ModeiNumber
SerialNumber
Usethesenumbersin any
correspondenceor servicecalls
concerningyourrange.
If you received
a am.wed
mwe.
~ma
oe
Immediatelycontactthe dealer(or
builder)thatsoldyouthe range.
save time and money.
Before
e you request
~g~~~~g~
~~*
C;hecl<
the ProblemSolveron
page 18. It listscausesof minor
operatingproblemsthatyoucan
Co?rec!yourself.
2
—
—
s If yOUr range haselectric
ignition,plugitintoa UO-volt
grounded
outletonly.Donot
remove
theroundgrounding
prong
fromtheplug.Ifindoubtabout
thegrounding
ofthehomeelectrical
system,it isyourpersonal
respons~bility
andobligation
to
haveanungrounded
outletreplaced
withaproperly-grounded
threeprongoutletinaccordance
with
theNationalElectricalCode.Do
notuseanextension
cordwith
thisappliance.
~Besureallpackingmaterials
* Don’taliowanyone
toclimb,
standorhangonthedoor9
broilercompartment
orrange
top.Theycoulddamagetherange
andeventipitovercausingsevere
personalinjury.
e CAUT~~N:
ITEMSOF
~TE~T
TOC~LDWl”d
sHomD NOTBE sTom m
CAB~~ ABOWAMGE
ORONT~ BACKSPLASH
OFA WNGE-C’HILDWN
CLIMB~GONTHEWNGE
~ ~ACH ITEMSCOULDBE
SEWOUSLY
INJU~D.
are removed from the range
beforeoperatingit,topreventfire
orsmokedamageshouldthe
packingmaterialignite.
@Locaterangeoutof kitchen
—
—
traffic path and out of drafty
locations to prevent pilot outage
(on model so equipped) and
poor air circulation.
@Besure your range is correctly
adjusted by a qualified service
technician or installer for the
type of gas (NaturaI or LP) on
which it is to be used. Your
rangecanbeconverted
foruseon
eithertypeofgas.SeeInstallation
Instructions.
@After prolonged use of a
range$high floor temperatures
may result and many floor
coverings will not withstand
this kind of use. Never installthe
rangeover vinyl tile or linoleum
that cannot withstand such type of
use. Never install it directly over
interior kitchen carpeting.
using
Yourw~e
e ~~~>t ~~~~~ ~~i~~r~~
a~~~~
or
unattended
wherearangeishot
or in operation. Theycouldbe
seriouslyburned.
—
W-NG–M1
I
ranges
I cantiDand
injur~cbuld
result.To
prevent .
accidental
,’iippingofthe
range,atti~h
~ittothewall
orfloorby ~
instilingt~e
ANTI-TIP
bracketsupplied.TO
checkifthebracketisinstalled
~~
andengagedproperly,carefilly
tiptherangeforwardtocheckif
theANTI-TIP
bracketi?engaged
withthelevelingleg.
Ifyoupulltherangeoutfrom ~
thewallforanyreason,make suretherearlegisreturnedtoits
positioninthebracketwhenyou’
pushtherangeback.
~
@Letburnergratesandother.
surfacescoolbeforetouching
themorleavingthemwhere
childrencanreachthem.
~Neverwearloosefittingor
hanginggarments
whileusing
theappliance.
Flammable
materialcouldbeignitedif
broughtincontactwithflame
orhotovensurfacesandmay
causesevereburns.
@Never
useyourappliance
for
warming
orheatingtheroom.
Prolonged
useoftherange
withoutadquateventilation
canbehazardous.
* Donotusewaterongrease
fires.Neverpickupaflaming
pan.~rn offburner,then
smotherflamingpanbycovering
pancompletely
withwellfitting
lid,cookiesheetor flattray.
Flaminggreaseoutsidea pan
canbeputoutbycoveringwith
bting sodaor,ifavailable,
a
multi-purpose
drychemical“’ ~~
orfoamtype‘fireextinguisher.~ -*Do.notstorkflm-mabie.
materitisinanovtin.or
near . ~.
thecopktop. ‘ ‘.
~ =e Do’notlet cooking ~ease or. ~
~
otherfitimable~at~~i~ls
accumulate
inornearthe~
‘ ~
range4 . . . . . ... . .
‘ , mf0men Cooking’pork,”follow ‘-‘ ‘E=
the directionsexactly,an~’always~-’~~~
cook the rmeat:to.aninternd
;. ~tem~ratu~eof atleast-.~70°F,.: ~~‘. =
Thisassuresthat;intheremote~- ~,=
possibility
thattrichinamaybe ‘ —
presen~
in~hemeat;itwill.be, ~~=
killedandMeatw.,.
illbes~fe’to
eat:~ ~—.
.,, , ,.
,.,.., ., ,- .
,S$face..; d~w.
‘‘:.” ‘ . -.:=”
-~mr_
,
~Aiway$,~se
theLI~ @itiom”
.when.ig@ting
topburnersand
makesuretheburnershave~
ignited. ‘
‘
- ~
s Never~gave
surface~~~~ers“.~;
unattended
tit~ flme sett~ngs.
Boilover
causes~moking
and ‘
greasyspillovers
thatmaycatch
onfire.
e Adjustt6pburnerflame‘size
soitdoesnotextendbeyondthe
edgeofthecookingutemti.
Excessiveflame is hazardous.
(contirluedtzextpage)
3
wommT
smETY msTRucTIoNs
(cQ~tinu~d)
@If ~ com~i~~~i~~
of~i]s~~
~IfyousrneU
gas,andyouhave
* use only dry ~t holders—”
alreadymadesurepilotsarelit,
fa~wiUbeusedinfrying,stir
moistordamppotholdersonhot
togetherbeforeheating,orasfats
“turnoffthegastotherangeand
surfacesmayresultinbumsfrom
callaqualifiedservicetahnician.
steam.Donotletpotholders , meltslowly.
Neveruseanopenflametolocate
comenearopenflameswhen
~Use deep fatthermometer
aleak.
Iifiingutensils.Donotuseatowel whenever
possibletoprevent
orotherbulkyclothinplaceofa
overheating
&tbeyondthe
potholder.
smokingpoint. ,
*T. mi~* thepossibility
tif
s Useproperpansize—Av~id
burns,igniti~nofflammable
pansthatareuns~bleoreasily
@Donotuseovenforastorage
materials,andspi~age,turnthe
tipped.Selwtutensilshavingflat
area.
cookware
handlestowardtheside
bottomslargeenoughtoproperly
*Standawayfromtherange
orbackoftherangewithout
containfoodavoiding
boilovers
when
openingthedoorofahot
extending
overadjacentburner..‘
andspillovers,
butlargeenough
~oven.m
e hotairorsteamwhich
@Nwaysturnsurfaceburner,to tocoverburnergrate.Thiswill
escapes
c
ancauseburnsto
bothsavecleaningandprevent
OFFbeforeremoving
utensil.
hands,faceand/oreyes.
hazardous’accumulations
offwd,
*CarefuHy
watchf~ds being
o Keep oven free’frorn grease
since
heavy
spattering
orspfiovers”
friedat~ flamesetting. ‘
buildup.
leftonrangecanignite.Usepans
e Neverbio~k~~events(air
withhan~esthatcanbeeasily ‘ * &~~ing out shelftotheshelf
openings)oftherange.Theygraspedandremaincool.
stopisaconvenience,@
lifting
providetheairinletandoutiet
hea~
foods.
I
tisalsoa
@Useonlyglass-cookware
that
~
whichisnecessary
fortherange
pr&au~ion
ag~instburnsfrom
isreconnnend?d
foruseongas
tooperatepropkrlywithcorrect
touching.hpt.s~~ces
oftie
burners.
combustion.
doororoven
walls.
*KeepaMplasticsawayfrom~
~Do~o~we ~Wokon~~e
o ~On9t hea~
unopened.~qod
cookingsurfaceifthewokhasa
‘‘“~b-*rtierS* ~ ‘
~‘
c~ntainersin
th~oven..Ressure
~TOavoidthepossibility
ofa
roundrnetiringwhichisplaced
cotidbuildup
atidthecohtainer
overtheburnergratetosupport burn7alwaysbecerhinthatthe
cotid’burst
causing
aninjury.
controlsforal~burnersareat ~
thewok.Thisringactsasaheat
e,~on~t
use~~mi~~ foil
trapwhichmaydamagethe
0~ positionandaIIgratesare
coo[before
attern~ting$o
rempvk apytihereintheovenexceptas
burnergrateandburnerhead;
described
inthisbook.Misuse
Also,itmaygausetheburnerto ~ thegiate.
,,
cbuld.result
in’sfirehazardor .
‘.
workimproperly.
Thismaycause
@When
fobdsunder
. f.laming
.
damage
t
other~ge.
~
a carbonmonoxide
levelabove
thehoo~,turnthef~nOff=
The
, currentstindards,resultitigina
fan,ifoperattig,tiayspread
~~whenusingctikingor . .
healthhazard.
roastingbagsinoven,followthe
theflame.
.
manufacturer’s
direction.
~FMdsforfrying should tie as
* If range is located near a
e
use
OMly
g
lass
Cookware
dry as possible. Frost on frozen
window9
donotuselongcurtains ~
foodsormoistureonfreshfoods ‘ whichcouldblowoverthetop
thatisreqomtiended
foruse
cancausehotfattobubbleupand
ingasovens.
burnersandcreateafirehazard.
oversidesofpan.
*Mwhysremovebroilerpan
@Whena pilot goes out, (on
@Use Iewt possible amount of
frombroiler
compartment
as
modelsoequipped),youwill
fat for efleetive shallow or deepsoonasyoufinishbroiling.
detecta faintodorofgasasyour
fatfrying.Ffllingthepantoofull
signaltorelightpilot.,When
~ GreaseIefiinthepancancatch
offatcancausespillovers
when”,
fireifoven’isusedwithout
relightingpilot,makesureburner
foodisadded,
removing
thegreasebornthe
controlsareinOFFnositionand
broiler
pan.
@Always
heatfatslowly,and
followinstructions
describedon
watchasitheats.
following
pagestorelight.
-4
—
mooriw
under
Mlot System
theRange
Yourgasrangeis equippedwith
eithera StandingPilotor Electric
PilotIgnitionSystem.
Yourrange, likeso many other
householditems, is heavyand
can settle into soft floor coverings
such as cushionedvinyl. When
movingthe rangeon thistypeof
flooring,usecare.
—
ModeIJGAS02PK
StandingPilot Systemhas a
continuousflameburningat
alltimes.
ModelJGM02EK
ElectricPilotIgnitionSystemuses
anelectricsparktoignitetheburners
and doesnotrequireuseof a match
unlesselectricalcurrentto your
rangeis intermpted.
e Read46The
Problems@Iver99
onpage18 Ofthisbook.
Men thefloor coveringendsat
thefront of the range,theareathat
the rangewill reston shouldbe
builtup withplywoodor similar
materialto the samelevelor higher
thanthe floorcovering.Thiswill
allowtherangeto be movedfor
cleaningor servicing.
hveling theRange
‘
m“
m
~–
—–
——
-.—
-—
—
~~
~NsmucTIoNs
~
5
.
m<----—.
—
—.
—-
Levelinglegsare locatedon each
cornerof the baseof the range.
m
=~
Yourrangemustbe levelin orderto -producepropercookingandbaking results.Afierit isinitsfinallocation, -—
~
—placea levelhorizontallyon an
~=.
ovenshelfand checkthe levelness -–—
frontto back and sideto side.Level —therangeby adjustingthe leveling ES
legsor byplacingshimsunderthe
cornersas needed.
Oneofthe rear levelinglegswill
engagetheANTI-TIPbracket(allow
for somesideto sideadjustment).
Allowa minimumclearanceof 1/8”
betweenthe rangeand the leveling
legthatis to be installedinto
theANTI-TIPbracket.
reeimmendedin thisbook.-All
otherservicingshouldbereferred
toa qualifiedtechnicim.
SAW TmE
Do not install the range over
kitchencarpeting unlessyou
placean insulatingpad or sheetof
l/4-inch-thickplywoodbetween
therangeand carpeting.
—...-—
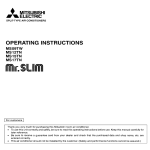
FeaturesofYour Ra~e
I
I
I II
Y/
Ill>
Model JGAS02EK
Elwtric Igfition
ModeI JGAS02PK
Stantig mot
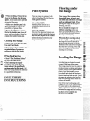
Feature Index
1 Modeland SerialNumbers
(in burner boxundercooktop)
I 2 SurfaceBurnerControls
I 3 SurfaceBurnersand Grates
I 4 OVENTEMP Knob
I
5 Oven Vent
(located in center of rear of range)
Explained
on page
Feature Index
2
6 OvenShelves
(easilyremovedor repositioned
on shelfsupports)
7
I 14,15,17 I
9
9
I
6
Explained
on page
9, 15
7 OvenShelfSupports
9
8 BroilerPanand Rack
13,15,17
9 Lift-Up/OffCooktop
14
10 RemovableOvenBottom
16
11Anti-TipBracket
(seeSafetyInstructions)
3,5
surface
Cooting
Lighti~
Imtructions
Standing Pilot Model
JGAS02PK
The surfaceburnerson yourrange
havestandingsurfaceburnerpilots
thatmustbe lit initially.Tolight
them:
1. Be suresurfaceburnercontrol
knobsare in the OFF position.
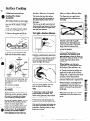
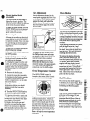
HowtQ SelectFlameSk
The knobsthatturn thesurface
burnerson and offare locatedon
the controlpanelon the frontof
the range.
Thetwoon the leftcontrolthe left
frontandlefirear burners.Thetwo
on therightcontrolthe rightfront
andrightrear burners.
The flamesizeon a gas burner
shouldmatchthe cookwareyou
are using.
Pushthecontrolknobin andturn it
to LITE.Onelectricignitionmodels,
youwillheara littleclickingnoise—
thesoundoftheelectricignition
sparkthatlightsthe.burner.
Pilot
adjustment
—
~—
❑=
—
-~
——
-
NEVERLET THEFLAME
~i
EXTENDUP THESIDESOF
~
—“
THE COOKWARE.Anyflame
largerthan the bottomof the
cookwareis wastedand onlyserves
to heatthe handles.
m
3. Locatethetwopilotportsand
lighteachof themwitha match.
-
—.
ToLi@ta SurfaceBurner
2. Removethe gratesandlifithe
cooktopup or off (seepage14).
—
SurfaceBurnerControk
When using aluminum or
aluminum-clad stainlesssteel
pots and pans, adjustthe flameso
the circleit makesis about 1/2inch
smaller than the bottom of the
cookware.
When boi~ing,usethis same
flamesize—1/2inchsmallerthan
the bottomof thecookware—no
matter what the cookware is made
r
M
panel
pipe
4. If the pilotsneedadjusting,turn
the adjustingscrewlocatedon the
pilotfilter.
—
—
5. Lowerthe cooktop.
Afiertheburnerignites,turnthe
knobto adjustthe flamesize.
Electric Ignition Model
JGAS02EK
Surfaceburnerson yourrangeare
lightedby electricignition,ending
theneedfor standingpilotlights
withconstantlyburningflames.
Note:
~Alwayshavea panon thegrate
beforeturningon a burner.The
finishon thegratemaychipwithout
a panto absorbtheheat.
h case of a power outage, youcan
lightthe pilotlessignitionsurface
burnerson yourrangewitha
match.Hold alighted matchto the
burner,then turn the knobto the
LITEposition.Toavoidgetting
burned, use extreme caution
when lighting burners this way.
@Checkto be suretheburneryou
turnedon is the oneyouwantto use.
~Be surethe burnersand gratesare
coolbeforeyouplaceyourhand, a
potholder,cleaningclothsor other
materialson them.
7
of. Foodscookjust as quicklyat a
gentleboil as theydo at a furious
rollingboil. A highboil cooksaway
moisture,flavorand nutrition.
Avoidit exceptforthe fewcooking
processeswhichneeda vigorousboil. =~ —
When frying or warming foods
~_
in sbinless steel, cast iron or
W
~
enamelware, keepthe flamedown —
lower—toabout 1/2the diameter
~of the pan.
——
When frying in glass or ceramic =
~
cookware, lowerthe flameeven
~
~
more.
-=
usi~ Your oven
AirAdjwtment
To~-of-Ra~eCookware
An air adjustmentshutterforeach
surfaceburnerregulatesthe flowof
air to the flame.
Aluminum: Medium-weight
cookwareis recommendedbecause
it heatsquicklyandevenly.Most
foodsbrownevenlyin analuminum
skillet.Mineralsin foodandwater
willstainbutwillnotharm
aluminum.A quickscourwitha
soap-filledwoolpad aftereachuse
keepsaluminumcookwarelooking
shinynew.Use saucepanswith
tight-fittinglidsfor cookingwith
minimumamountsof water.
When the right amount of air
flowsinto the burner, the flame
willbe steady,relativelyquietand
haveapproximately3/4”sharpblue
cones.Thisis usuallythe casewith
factorypresetshuttersettings.
With too much air, the flamewill
be unsteady,possiblywon’tbum all
the wayaround,andwillbe noisy,
soundinglikea blowtorch.
W~thnot enoughair, youwon’tsee
anysharpblueconesin the flame,
youmayseeyellowtips, andsoot
mayaccumulateon potsandpans.
Air adjustmentshutter
Toadjust the flowof air to the
burners, rotatethe shuttersto
allowmoreor lessair intothe
burnertubesas needed.
Yourovenburnerhasa standing
pilotport that mustbe lit initially.
Tolightit:
1. Be sureOVENTEMPknobis in
the OFF position.
2. Removethe ovenbottom(see
page 16)and the burnerbaffle.
Cast Iron: If heatedslowly,most
skilletswillgivesatisfactoryresults.
Enamelware: Undersome
conditions,the enamelof some
cootiare maymelt.Followcookware
manufacturer’srecommendations
for cookingmethods.
Glass: Thereare twotypesof glass
cookware-those for ovenuseonly
andthosefor top-of-rangecooking
(saucepans,coffeeandteapots).
Glassconductsheatveryslowly.
Heatproof Glass Ceramic: Can
be usedfor eithersurfaceor oven
cooking.It conductsheatvery
slowlyandcoolsveryslowly.Check
cookwaremanufacturer’sdirections
tobesureitcanbeusedongasranges.
$taidess Steel:Thismetalalonehas
poorheatingproperties,andisusually
combinedwith copper,aluminum
or othermetalsfor improvedheat
distribution.Combinationmetal
skilletsgenerallyworksatisfactorily
if usedat mediumheatasthe
manufacturerrecommends.
8
——
Standing Pilot Model
JGAS02PK
3. Locatethe pilotporton the side
of theburnerat thebackof theoven.
Usingalong matchor matchholder,
reachin and lighttheovenpilot.
4. Replacethe burnerbaffleand
ovenbottomand closethe door.
Yourovenand broilerare now
readyfor use.
Poweroutage?
An electricalpowerfailurewillnot
affectalighted standingovenpilot.
AirAdjtiment
Eieetric Ignition Model
JG.N02EK
The ovenburneron this rangeis
lightedbyelectricignition.The
ovenandbroilercannotbeoperated
in theeventof a powerfailure.
Tolightthe ovenburner, turn the
OVENTEMPknobto thedesired
temperature.Theburnershould
ignitewithin60 seconds.
Wwer outage?
A burnerin use whenan electrical
powerfailureoccurswillcontinue
to operatenormally.Yourovenmay
be usedduringan electricalpower
outagebycarefullyfollowingthe
stepsbelow:
—
—
Tolightthe ovenpilot during an
electricalpoweroutage:
1. BesureOVENTEMP knobis in
the OFFposition.
2. Openboththe ovenand broiler
doorsandwait5 minutesto allow
anypilotgasto dissipate.
3. Unplugthe rangefromthe wall
outlet,tum off the circuitbreaker,
or removethefuseto avoidaccidenti
ignitionof theovenif electricpower
is restoredwhileyouare lighting
thepilot.
4. Removethe broilerpan.
5. Locatethe ovenpilotassembly
bylookingintothe broileropening.
The pilotis at the backof the
broilercompartment,on the right
sideof theburner.
Note:Theovenmust beat room
temperaturebeforeyou should
attemptto lightthe ovenpilot
manually.
6. TurntheOVENTEMP knobto
the desiredtemperaturesetting.
7. Lightthepilotwith a matchand
withdrawyourarm immediately
becausethe ovenburner maylight
in as littleas 20 seconds.
8. Replacethe broilerpan and
closethe ovenand broilerdoors.
Note:It is necessaryto lightthe
pilotmanuallyeachtime the oven
is usedduringa poweroutage.
OvenShelves
An air adjustmentshutterforthe
ovenburnerregulatesthe flowofair
to theflame.You’llfindtheshutter
againstthebackwallbehindthe
broilerdrawer.Toreachit, remove
theovenbottom(page16)andthe
burnerbaffle.
~ Loosen
I Air
i ‘ adjustment
H shutter
Toadjust the flowof air, loosen
the Phillipsheadscrewandrotate
the shutterto allowmoreor lessair
intotheburnertubeas needed.
When the right amount of air
flowsinto the burner, theflame
shouldbe steady,withapproximately
I/2°blue cones, and shouldnot
extendoutoverthebaffleedges.
OvenTempemtureControI
TheOVENTEMPcontrolis
locatedat thecenterofthe control
panelon the frontof the range.
—
—
_
— -—~
—.
The shelvesare designedwith stoplockssowhenplacedcorrectlyonthe
shelfsupports,theywill stopbefore
comingcompletelyoutoftheovenand
willnottilt whenyouare removing
foodfromthemor placingfood
on them.
Whenplacingcookwareon a shelf,
pullthe shelfoutto the “stop”
position.Placethe cookwareon
the shelf,then slidethe shelfback
intotheoven.Thiswilleliminate
reachingintothehot oven.
Toremovethe shelvesfromthe
oven,pullthemtowardyou, tilt
frontendupwardandpullthemout.
Toreplace,placeshelfon shelf
supportwithstop-locks(curved
extensionundershelf)facingup and
towardrear ofoven.Tiltup front
andpushshelftowardbackof oven
untilit goespast “stop”on oven
wall.Thenlowerfrontof shelfand
pushit allthe wayback.
——
==
~
~
❑
~;=
SheWPositions
Theovenhas fourshelfsupports—
A (bottom),B, C and D (top).Shelf u@—.
positionsfor cookingare suggested --.
on Bakingand Roastingpages.
-!
OvenVent
Simplyturn the knobtothe desired
cookingtemperatures,whichare
markedin 25”F.incrementson the
dial. It will normallytake30 to 60
secondsbeforethe flamecomeson.
Afterthe ovenreachesthe selected
temperature,theovenburnercycles—
offcompletely,thenon witha fill
flame-to keeptheoventemperature
controlled.
9
Yourovenis ventedthrougha duct
at the rear of the range.Do not
blocktheopeningof this duct—itis
importantthat the flowof hot air
fromtheovenand fresh air to the
ovenburnerbe uninterrupted.
Avoidtouchingthe ventopenings
or nearbysurfacesduringovenor
broileropemtions-theymaybe hot.
=
—–
~–
—
-–
—.
—---
-
Howto Set YourRange
forBaking
1. Positionthe shelfor shelvesin
theoven.
2. Closeovendoor,turn OVEN
TEMPknobto desiredtemperature
andpreheatovenfor at least 15
minutesif preheatingis necessary.
3. Placefoodin ovenon center
of shelf.Allowat least2 inches
betweenedgeofbakewareandoven
wallor adjacentcookware.
If cookingon twoshelvesat the
sametime, placeshelvesabout4
inchesapartand staggerfoodon
them.
4. Checkfoodfor donenessat
minimumtimeon recipe.Cook
longerif necessary.Switchoff
heatandremovefood.
Reheating
Preheatingisimportantwhenusing
temperaturesbelow225°F.and
whenbakingfoodssuchasbiscuits,
cookies,cakesandotherpastries.
Preheatingis notnecessarywhen
roastingor forlong-timecookingof
wholemeals.
ShelfPositions
Mostbakingis doneon the second
shelfposition(B)from thebottom.
Whenbakingthreeor fouritems,
usetwoshelvespositionedon the
secondand fourthsetsof supports
(B& D) frombottomof oven.
Bakeangelfoodcakeson first shelf
position(A) frombottomof oven.
Bating mps
*FO11OW
a testedrecipeand
measuretheingredientscarefilly.
Ifyouareusinga packagemix,
followlabeldirections.
e If moistureis noticeableonthe
frontoftheoven(or on theoven
windowor blackglassdooron
modelssoequipped)whenfirst
turningontheoven,leavetheoven
doorajarfora fewminutesor until
theovenis warm.
. Do notopentheovendoorduring
a bakingoperation—heat
willbelost
andthebakingtimemightneedto
beextended.Thiscouldcausepoor
bakingresults.If youmustopenthe
door,openitpartially-only 3or
4 inches—andcloseitas quickly
aspossible.
o Do not disturb the heat circulation
intheovenwiththeuseofaluminum
foil.If foilis used,placea small
sheetofit, about10by 12inchesat
themost,ona lowershelfseveral
inchesbelowthefood.Donotplace
foilon theovenbottom.
CommonBakingProblems
andPossibleSolutions
PIES
Burning around edges
@Oventoofull;avoidovercrowding.
oEdgesofcrusttoothin.
@Incorrectbakingtemperature.
Bottomcrust soggyand unbaked
@Allowcrustand/orfillingtocool
sufficientlybeforefillingpieshell.
maybetoothinorjuicy.
e Filling
allowedto standinpieshell
. Filling
beforebaking.(Fillpieshellsand
bakeimmediately.)
~Ingredientsandpropermeasuring
affectthequalityofthecrust. Usea
testedrecipeandgoodtechnique.
Makesuretherearenotinyholesor
tearsin abottomcrust. “Patching”
a piecrust couldcausesoaking.
Mefiliingruns over
@Topandbottomcrustnotwell
sealedtogether.
@Edgesofpiecrustnotbuiltup
highenough.
~Toomuchfilling.
@Checksizeofpieplate.
Rstry is tough; crust not flaky
@Toomuchhandling.
~Fattoosoftor cutin toofine.
Rolldoughlightlyandhandleas
littleaspossible.
10
cAm
Cakeriseshigher on oneside
~Batterspreadunevenlyinpan.
~Rangenotlevel.
*Usingwarpedpans.
~Incorrectpansize.
Cakescracking on top
e Oventemperaturetoohigh.
@Battertoothick,followrecipe
or exactpackagedirections.
@Checkforpropershelfposition.
e Checkpansizecalledforin recipe.
e Impropermixingofcake.
Cakefalls “
e Toomuchshortening,sugaror
liquid.
~Checkleaveningagent,baking
powderor bakingsodatoassure
freshness.Makea habitto note
expirationdatesofpackaged
ingredients.
e Cakenotbakedlongenoughor at
incorrecttemperature.
e Ifaddingoilto a cakemix, make
certaintheoilisthetypeand
amountspecified.
Crust is hard
oChecktemperature.
oCheckshelfposition.
Cakehas soggylayeror streaks at
bottom
o Undermining ingredients.
e Shorteningtoosoftforproper
creaming.
e TOO muchliquid.
COO- & BISC~~
Doughycenter; heavycrust on
surface
e Checktemperature.
oCheckshelfposition.
e FO11OW bating instructions
carefullyasgivenin reliablerecipe
or on conveniencefoodpackage.
e Flatcookiesheetswillgivemore
evenbakingresults.Don’tovercrowd
foodsona bakingsheet.
oConveniencefoodsusedbeyond
theirexpirationdate.
Browningmore noticeableon
oneside
e Ovendoornotclosedproperly,
checkgasketseal.
oCheckshelfposition.
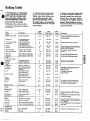
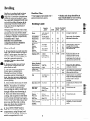
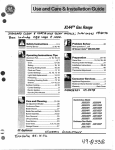
Bating Guide
~
1. Preheating is very important
when using temperatures below
225°F.and when baking foods
such as biscui~, cookies,cakes
and other pastries. Preheatthe
ovenfor at least 15minutes.
Preheatingis not necessarywhen
roastingor for long-timecookingof
wholemeals.
3. Darkor non-shinyfinishes,also
glassand Pyroceram@
cookware,
generallyabsorbheatwhichmay
resultin dry,crispcrusts.Reduce
ovenheat25°F.if lightercrustsare
desired.Rapidbrowningof some
foodscanbe achievedbypreheating
castiron cookware.
2. Alumrnumpansconductheat
quickly,For mostconventional
baking,light, shinyfinishesgive
bestresultsbecausetheyhelp
preventoverbrowning.For best
browningresults,we recommend
dullbottomsurfacesfor cakepans
andpie plates.
Shelf
Positions
Oven
Temperatures
Time,
Minutes
ShinyCookieSheet
B,C
400°-4750
15-20
B,A
350°-4000
20-30
B
B
400°-4500
350°
20-40
45-55
Preheatcastironpanforcrispcrust.
Muffins
Popovers
ShinyMetalPanwith
satin-finishbottom
CastIronor GlassPan
ShinyMetalPanwith
satin-finishbottom
ShinyMetalMuffinPans
DeepGlassor CastIronCups
A, B
B
400°-4250
375°
20-30
45-60
Quickloafbread
Yeastbread(2 loaves)
Metalor GlassLoafPans
Metalor GlassLoafPans
B
A, B
350°-3750
375°-4250
45-60
45-60
Dwreaseabout5 minutesformuffinmix.
Or bakeat 450”F.for25 minutes,thenat
350”F.for 10to 15minutes.
Darkmetalor glassgivesdeepest
browning.
Plainrolls
Sweetrolls
Cakes
(withoutshortening)
Angelfood
Jellyroll
Sponge
Cakes
Bundtcakes
Cupcakes
Fruitcakes
ShinyOblongor MuffinPans
ShinyOblongor MuffinPans
A, B
B,A
375°-4250
350°-3750
10-25
20-30
Forthinrolls,ShelfB maybeused.
Forthinrolls,ShelfB maybeused.
A
B
A
325°-3750
375°-4000
325°-3500
30-55
10-15
45-60
Wo piecepanis convenient.
Linepanwithwaxedpaper.
Metalor CeramicPan
ShinyMetalMuffinPans
Metalor GlassLoafor
~be Pan
ShinyMetalPanwith
satin-finishbottom
ShinyMetalPanwith
satin-finishbottom
Metalor GlassLoafPans
A, B
B
A, B
325°-3500
350°-3750
275°-3000
45-65
20-25
2-4hrs.
B
350°-3750
20-35
B
350°-3750
25-30
B
350°
40-60
Metalor GlassPans
CookieSheet
B, C
B, C
325°-3500
350°-4000
25-35
10-20
CookieSheet
CookieSheet
B, C
B,C
400°-4250
375°-4000
6-12
7-12
Food
<read
Biscuits(%-in.thick)
Coffeecake
Cornbreador muffins
Gingerbread
.ayer
~ayer,chocolate
Loaf
Cookies
Brownies
Drop
Refrigerator
lolled or sliced
Fruits,
lther Desserts
~akedapples
~ustard
‘uddings,rice
ndcustard
Yes
‘rozen
deringue
)necrust
‘Wocrust
~stryshell
Miscellaneous
akedpotatoes
callopeddishes
;ouffles
Cookware
Aluminum~be Pan
MetalJellyRoilPan
MetalorCeramicPan
Glassor MetalPans
GlassCustardCupsor
casserole(setinpanof hotwater)
GlassCustardCupsor
c asserole
Foil PanonCookieSheet
Spreadtocrustedges
G1assor Satin-finishMetalPan
Glassor Satin-finishMetalPan
G]assor Satin-finishMetalPan
Seton OvenShelf
Glassor MetalPan
GlassPan
A, B,C
B
350°-4000
300°-3500
30-60
30-60
B
325”
50-90
A
B
400°-4250
325°-3500
45-70
15-25
A, B
B
B
400°-4250
400°-4250
450°
45-60
40-60
13-16
A, B, C
A, B, C
B
325”-400°
325°-3750
300°-3500
60-90
30-60
30-75
11
Comments
Canned,refrigeratedbiscuitstake2 to4
minuteslesstime.
-—.
—.
—
~
-.
------
-’
Paperlinersproducemoremoistcrusts.
Use300”F.andShelfB forsmallor
individualcakes.
If bakingfourlayersuse
shelvesBandD.
Barcookiesfrommixusesametime.
UseShelfC andincreasetemperature
25 to50°F.formorebrowning,
Reducetemperatureto 300”F.for large
custard.
Cookbreador rice puddingwithcustard
base80to 90minutes.
Largepiesuse400”F.andincreasetime.
Toquicklybrownmeringueuse400°F.for
9 to 11minutes.
Custardfillingsrequirelowertemperature,
longertime.
Increasetimefor largeamountor size.
=
Roasting
Roastingis cookingby dry heat.
Tendermeator poultrycanbe
roasteduncoveredin youroven.
Roastingtemperatures,which
shouldbe lowand steady,keep
spatteringto a minimum.When
roasting,it is notnecessaryto sear,
baste,cover,or add waterto your
meat. Roastingis easy,just follow
thesesteps:
Step 1. Positionovenshelfat
secondfrombottomposition(B)
forsmallsizeroast(3~o5 lbs.)“~dat
bottomposition(A)forlargerroasts.
Step 2: Checkweightof roast.
Placemeatfat-side-upor poultry
breast-side-upon roastingrackin a
shallowpan. Themeltingfatwill
bastethe meat. Selecta panas
closeto the sizeofmeatas possible.
(Broilerpan withrackis a good
Panfor this.)
“
Step 3: ~rn OVENTEMPcontrol
to desiredtemperature.Checkthe
RoastingGuidefor temperatures
and approximatecooki~gtimes.
Step 4: Mostmeatscontinueto
cook slightlywhilestandingafter
beingremovedfromthe oven.For
rare or mediuminternaldoneness,
youmaywishto removemeatfrom
the ovenjust beforeit is doneif it is
to stand 10to 20 minuteswhileyou
make~ravvor attendto otherfoods.
If no shn~ingis planned,cook
meatto suggestedtemperature.
Frozenroastsofbeef, pork,
lamb,etc., canbe startedwithout
thawing,but allow10to 25 minutes
per poundadditionaltime (10
minutesper poundfor roastsunder
5 pounds,moretimefor larger
roasts).
Thawmostfrozenpoultrybefore
roastingto ensureevendoneness.
Somecommercialfrozenpoultry
can be cookedsuccessfullywithout
thawing. Follow directions given
on packer’s label.
RoastingGuide
Oven
Temperature
Meat
Tendercuts;rib,highquality
sirlointip, rumpor topround*
Approximate
RoastingTime
in MinutesperWund
Donen~
Lamblegor bone-inshoulder*
325°
Vealshoulder,legor loin*
Porkloin,ribor shoulder*
Ham,pre-cooked
325°
325°
325°
Rare:
Medium:
WellDone:
Rare:
Medium:
WellDone:
WellDone:
WellDone:
ToWarm:
Ham,raw
*Forbonelessrolledroastsover6-inches
thick,add5 to 10minutesper lb. to times
givenabove.
325°
WellDone:
Poultry
Shickenor Duck
2hickenpieces
325°
375°
WellDone:
WellDone:
hrkey
325°
WellDone:
3 to5-lbs.
6 to 8-lbs.
24-30
18-22
30-35
22-25
35-45
28-33
21-25
20-23
25-30
24-28
30-35
28-33
35-45
30-40
35-45
3040
10minutesper lb. (anyweight)
Under10Ibs.
10to 15-lbs.
20-30
17-20
3 to5-lbs.
35-40
35-40
10to15-lbs.
20-25
12
Over5 Ibs.
30-35
Over15lbs.
15-20
Internal
Temperature“F
130°-1400
150°-160°
170°-185°
130°-1400
150°-1600
170°-1850
170°-180°
170°-180°
125°-1300
170°
185°-190°
185°-1900
In thigh:
185°-1900
I
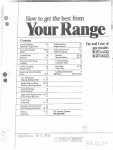
Broili~
Broilingis cookingfoodbydirect
heatfromabovethe food.Your
e Steaks and chopsshould be at
e Use tongs to turn meat over—
rangehasa convenientcompartment
least l-inch thick for bestbroiling
piercedmeatlosesjuices.
belowtheovenfor broiling.It also
results.Panbroilthinnerones.
hasa speciallydesignedbroilerpan
andrack thatallowdrippingfatto
drainawayfromthe foodsandbe
Broil@ Guide
keptawayfromthe highheatof
thegasflame.
Quantity
1st
Side tndSide
Distancefromthe heatsourcemay
andlor
Broil Time, Time,
Thicknm
Wsition Minu@ Minutes Comments
Food
bechangedbypositioningthebroiler
pan andrack on oneof threeshelf
Arrangein singlelayer.
B
‘A-1b.
(about8
Bacon
thinslices)
positiolisinthebroil~rcompartment—
A (bottomofbroilercompartment),
Spaceevenly.Upto 8 patties
l-lb.(4patties)
GroundBeef
1Ato ~ in. thick
5
takeaboutthesametime.
A
6-8
B (middle)andC (top).
MediumRare
4-6
A
6-9
Medium
Both the ovenand broiler
6-7
A
7-1o
WellDone
compartment doors should be
BeefSteaks
closedduring broiling.
3-5
A
6
Steakslessthanl-inchcook
l-in. thick
Rare
II
How to Broil
1. If meathas fator gristlenear the
edge,cutverticalslashesthroughit
about2 inchesapart, but don’tcut
intomeat. Werecommendthatyou
trim fatto preventexcessive
smoking,leavinga layerabout
l/8-inchthick.
2. Removebroilerpanand rack
frombroilercompartmentand
placefoodon rack.
3. Pull outdrawerandposition
broilerpan in compartment.
Placingfoodcloserto flame
increasesexteriorbrowningof
food,butalso increasesspattering
andthe possibilityof fatsandmeat
.juicesigniting.
4. Closebroilerdoorand, for most
foods,turn OVENTEMPknobto
BROIL.Exceptionsare chicken
andhamwhichare broiledat a
ilowersettingin order to cookfood
1throughwithoutover-browningit.
I
,5. Turnmostfoodsonceduring
;ooking;(theexceptionis thinfdlets
{offish; oil one side,placethatside
iownonbroilerrackandcookwithout
:urninguntildone). Timefoodsfor
iboutone-halfthe totalcooking
:ime,turn food, thencontinueto
~ookto preferreddoneness.
$.~rn OVENTEMP knobto
3FF. Removebroilerpan from
compartment,usinghot pad, and
;ervefoodimmediately.Leavepan
]utsidecompartmentto cool.
I
Medium
WellDone
Rare
Medium
WellDone
(1-l filbs.)
Chicken(450°)
1whole
(2to 2%-lbs.),
splitlengthwise
A
2-4slices
1pkg.(2)
2-split
B
BakeryProduct
Bread(Toast)or
ToasterPastries
EnglishMuffins
I%-in.thick
(2-2%lbs.)
A
A
A
A
A
4-5
6-7
4-6
8-10
8-12
throughbeforebrowning.
Panfryingis recommended.
Trimoffexcessfat.
30-35 25-30
Reducetimesabout5 to 10
minutespersideforcut-up
chicken.Brusheachsidewith
meltedbutter.Broilwithskin
sidedownfirstandbroilwith
doorclosed.
7
9
8
9
11
‘/2-1
‘/2
Spaceevenly.PlaceEnglish
muffinscut-side-upandbrush
withbutter,if desired.
+B
2-3
Lobstertails
(6to 8-oz.each)
2-4
A
10-14
Donot
turn
over.
Cutthroughbackofshell,spread
open.Bmshwithmeltedbutter
beforeandafterhalftime.
Fish
l-lb.fillets %to
IA-in.thick
A
5
5
Handleandturnverycarefully.
Brushwithlemonbutterbefore
andduringcooking,if desired.
Preheatbroilertoincrease
browning.
B
8
8
Inc= times5to 10min.perside
for 1%-inchthickor home
cured.
Hamslices(450° l-in. thick
Precooked
Porkchops
WellDone
Lambchops
Medium
WellDone
Medium
WellDone
Wieners,
similarpmooked
sausages,
bratwurst
2(% in.)
2 (l-in. thick),
about1lb.
II
A
A
10
13
4-5
10-12
2(1 in.)
about10-12oz.
2 (1%in.),
about1lb.
B
B
B’
B
17
4-7
10
4-6
12-14
l-lb. pkg.(10)
B
6
1-2
13
8
10
10
—-
Trimoffexcessfat.
Trimoffexcessfit.
If desired,splitsausagesin half
lengthwise;cutinto5 to 6-inch
pieces.
~
m“.
—
—
—
—.
——
—
--- .
m-
=
Propercare andcleaningare
importantso yourrangewillgive
youefficientandsatisfactory
service.Followthesedirections
carefullyin caringfor it to help
assuresafeandpropermaintenance.
W YOURWGE HAS
ELECTWC IGNITION, BE
SUm ELECT~C POWER IS
OFF BEFO~ CLEA~G
ANYPARTOF IT.
EnamelHtih
Whentherangeis cool, washthe
enamelfinishwithmild soapand
wateror a mildabrasivecleanser
appliedwith a dampcloth. Rinse
the surfacewithcleanwaterand
dry witha soficloth.If youwish,
occasionallyapplya thin coatof
mildcleaningwaxto help protect
the finish.
Thereare a numberof precautions
youcan taketo avoidmarringthe
surfaceof the rangeand to prevent
it frombecomingdull. Don’tslide
heavypansacrossit. If youspill
foodswitha lot ofacid (tomatoes,
sauerkraut,fruitjuices,etc.)or
foodswithhighsugarcontent,
cleanthemup as soonas possible.
If allowedto set, thesefoodscould
causea dullspot.Also,no matter
howstubbornthefoodstain, never
useharshabrasivecleansers.They
couldpermanentlydamagethe
enamelsurface.
Lift-up/off cooktop
It’sa goodideato wipethecontrol
panelcleanafiereachuseof the
oven.Fora morethoroughcleaning,
theknobscanbe removedby
pullingthemoffthe knobstems.
Cleanwith mildsoapandwater,
rinsewithcleanwaterandpolish
dry witha softcloth.
Do notuse abrasivecleansers,
strongliquidcleanersor oven
cleanerson thecontrolpanelas
theywilldamagethe finish.
Cleanthe area underthe cooktop
ofien.Built-upsoil, especially
grease,maycatchfire.
BurnerGmtes
Tomakecleaningeasier,the
cooktopmaybe lifiedup or off.
Gratesshouldbe washedregularly
and, of course,afier spillovers.
Washthemin hot, soapywaterand
rinsewithcleanwater.Dry the
grateswitha cloth—don’tput them
backon the rangewet. When
replacingthegrates,be surethey’re
lockedintopositionovertheburners.
Toget rid of burned-onfood,soak
thegratesin a slightlydiluted
liquidcleanser.
Althoughthey’redurable,the
grateswillgraduallylosetheir
shine,regardlessof the bestcare
youcan givethem. Thisis dueto
their continualexposureto high
temperatures.
Do notoperatea burnerfor an
extendedperiodof timewithout
cookwareon thegrate. Thefinish
on thegratemaychipwithout
cookwareto absorbthe heat.
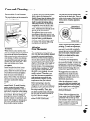
Whenreplacinga
pair ofgrates,
the irregular
sidesshould
meetin the
middleas shown+
at right.
Be sure all burners are turned
off before raising the cooktop.
Thenremovethe grates.Graspthe
twofrontburner wellsand lift the
cooktopup or off. Becarefulofthe
pilotswhenthe cooktopis up.
Aftercleaningunderneaththe
cooktopwithhot, soapywaterand
a cleancloth, loweror replacethe
cooktop.Be carefulnot to pinch
yourfingers.
~
,0
1
.—
—
______
- ._ .&
I..—
I
Toreplacethe cooktopif youhave
removedit, insert thetwotabsat
the backof the cooktopinto slotsat
the baseof the backguard.Lower
cooktopintoplace, applying
pressureuntiltab on underside
snapsintocatchat top frontcenter
of range.
14
~
I
I
The holesin the burnersofyour
rangemustbe keptcleanat all
timesfor properignitionandan
even,unhamperedflame.
Youshouldcleantheburners
routinelyandespeciallyafterbad
spilloverswhichcouldclogthese
holes.Burnerslifi rightoutfor
cleaning.
oven shelves
PorcelainOvenIntirior
Ovenshelvesmaybe cleanedwith
a mildabrasivecleanserfollowing
manufacturer’sdirections.Afier
cleaning,rinsetheshelveswithclean
wateranddry witha dry cloth.To
removeheavy,burned-onsoil,soapy
metalpadsmaybeusedfollowing
manufacturer’sdirections.After
scrubbing,washwithsoapywater,
rinseanddry.
Withpropercare,the porcelain
enamelinteriorwillretainitsgood-lookingfinishformanyyears.
Soapandwaterwillnormally
do thejob. Heavyspatteringor
spilloversmayrequirecleaning
witha mildabrasivecleanser.
Soapy,wetpadsmayalsobe used.
Do notallowfoodspillswitha high
sugaror acidcontent(suchas milk,
tomatoes,sauerkraut,fruitjuices
or pie falling)to remainon the
surface.Theymaycausea dull
spotevenaftercleaning.
Householdammoniamaymakethe
cleaningjob easier.Place 1/2cup in
a shallowglassor potterycontainer
in a coldovenovernight.The
ammoniafumeswillhelp loosen
theburned-ongreaseandfood.
If necessary,youmayuse a caustic
cleaner.Followthepackage
directions.
Brotier~n &Rack
Note: A screwholdseachof
theburnersin placeto keepthem
from wobblingaroundduring
shipment.Removeand discardthe
shippingscrew.Tiltthe burnerto
oneside at the end closestto the
igniterand moveit towardtheback
of the range.Thisdisengagesit
fromthe gas valveat the frontof
therange,and it lifisout easily.
Toremoveburned-onfood, soak
theburner in a solutionof a product
usedfor cleaningtheinsideofcoffee
makers.Soakthe burner for20 to
30 minutes.If the fooddoesn’t
rinseoff completely,scrub it with
soapand wateror a mildabrasive
cleanserand a dampcloth.
Beforeputtingthe burnerback, dry
it thoroughlyby settingit in a wafi
ovenfor 30 minutes.Thenplaceit
backin the range,makingsureit is
properlyseatedand level.
—
—
Afierbroiling,removethe broiler
rackandcarefillypouroffthe
grease.Washandrinsethe rack
in hot, soapywater.
If foodhasburnedon, sprinkle .
therackwhilehotwithdetergent
andcoverwithwetpapertowelsor
a dishcloth. Thatway,burned-on
foodswillsoakloosewhilethe
mealis beingserved.
Do notstorea soiledbroilerpan
andrack in the ovenor broiler
compartment.
BroilerDrawer
Toremove:Whenbroileris cool,
removerack andpan.
Then, withdrawerout about
halfway,pull metalcliplocatedin
centerof drawerbottomupwardas
far as it willgo (about2 inches).
The drawercan nowbe pulledall
the wayout of thecompartment.
Toreplace:Slidegroovesat topof
drawerontoguiderails at sidesof
broilercompartmentandpush
drawerinto close.
15
——.
—
-
Cautions about using
spray-on ovencleaners:
Becarefil wherethe ovencleaner
is sprayed.
-@Do not sprayon the electrical
controlsand switches(onmodelsso
equipped)becauseit couldcausea
shortcircuitandresultin sparking
or fire.
e Do not allowa fdm fromthe
cleanertobuilduponthetemperature
sensingbulb—itcouldcausethe
ovento heatimproperly.(Thebulb
is locatedat the topof the oven.)
Carefullywipethebulbcleanafier
eachovencleaning,beingcareful
notto movethe bulbas a change
in its positioncouldaffecthow
the ovenbakes.
e Do not sprayanyovencleaner
on the ovendoor,handlesor any
exteriorsutice oftie oven,wood
or paintedsurfaces.The cleaner
can darnagethesesurfaces.
RemovableOvenBottom
Theovenbottomcan be removedto
makecleaningeasier.
Toremove:
Whenovenis cool, removeoven
shelves.Loosen(butdo not remove)
twoscrewsat frontofovenbottom.
Slidescrewsbackto releasefrontof
ovenbottom.Lifi the ovenbottom
up andpullforwarduntilrear tabs
releasefromrear ovenwall.Then
takeovenbottomoutof oven.
Toreplace:
Inserttwotabsintoslotsin rear
ovenwall. Lowerbottominto
place.Slidetwoscrewsat frontof
ovenbottomforwardand tighten
themto secureovenbottomin
place.Note:If the ovenbottomis
replacedincorrectly,it maywarp
andcauseundesirablebaking
results.
Theovenbottomhasa porcelain
enamelfinish. Tomakecleaning
easier,protectthe ovenbottom
fromexcessivespillovers.Thisis
particularlyimportantwhenbaking
a fruitpie or other foodswithhigh
acidcontent.Hot fruit fillingsor
foodsthat are acid in contentsuch
as milk, tomatoor sauerkraut,and
sauceswith vinegaror lemonjuice,
maycausepittingand damageto
the porcelainenamelsurface.
Toprotectthe ovenbottomsurface,
placeapiece of aluminumfoil
slightlylargerthanthebakingdish
or a smallcookiesheeton a lower
shelfor underthebakingdishto
catchanyboilovers.It shouldnot
completelycoverthe shelfas this
wouldcauseunevenheatin the
oven.Aluminumfoilshouldnotbe
placedon the ovenbottom.
If a spilloverdoesoccuron the
ovenbottomallowthe ovento cool
first. Youcan cleanthebottomwith
soapand water,a mildabrasive
cleanser,soap-filledabrasivepads
or causticovencleanerfollowing
manufacturer’sdirections.
Adjmting
OvenThermos~t
Thetemperaturecontrolin your
newovenhasbeencarefu~yadjusted
to provideaccuratetemperatures.
However,if thisovenhasreplaced
oneyouhaveusedfor severalyears,
youmaynoticea differencein the
degreeof browningor the lengthof
timerequiredwhenusingyour
favoriterecipes.Oventemperature
controlshavea tendencyto “drift”
overa periodof yearsandsince
thisdrift is verygradual,it is not
readilynoticed.Therefore,you
mayhavebecomeaccustomedto
yourpreviousovenwhichmay
haveprovideda higheror lower
temperaturethanyouselected.
Beforeattemptingto havethe
temperatureof yournewoven
changed,be sureyouhavefollowed
thebakingtimeandtemperatureof
therecipecarefilly.Then, after
youhaveusedthe ovena fewtimes
andyoufeelthe ovenis toohotor
toocool, thereis a simple
adjustmentyoucan makeyourself
on the OVENTEMPknob.
16
Pullthe knoboffthecontrolshaft
and lookat thebackside.Thereis
a discin the centerof the knobskirt
witha seriesof marksoppositea
pointer.
Notec)ositionof
pointerto marks
beforeadjustment
~~sE-Lo . ..
9+
WI
\
k + ,’J
‘\\ +80
PER
~0~
\
(0
@
Loosenonlvthe
lockingscrews
Noteto whichmarkthe pointeris
pointing.Tomakean adjustment,
carefullyloosen(approximately
oneturn), butdo notcompletely
removethe twoscrewsthatholdthe
skirtto the knob.Holdthe knob
bladein onehandandthe outer
skirt in the otherhand.
Toraisetheoventemperature,
movethe pointerin thedirectionof
the arrowfor RAISE.Tolowerthe
temperature,movethepointerin
the directionof arrowfor LOWER.
Eachmark willchangethe oven
temperatureapproximately25”F.
Wesuggestthatyoumakethe
adjustmentonemarkfromthe
originalsettingandcheckoven
performancebeforemakingany
additionaladjustments.
Afterthe adjustmentis made,
press skirt andknobtogetherand
retightenscrewsso theyare snug,
but be carefi,dnotto overtighten.
Re-installknobon rangeand
checkperformance.
Note: Afteran adjustmenthas
been made,the OFF and BROIL
positionswillnot lineup with
the indicatormark on the contro~
panelas theypreviouslydid.
This conditionis normaland
will notcreatea problem.
~
cleaning
Guide
Note:Let range/ovenpartscoolbeforetouchingor handling.
PART
MATERIALS
~ USE
BroilerPanandRack
●
GENERALDIREC1’IONS
SoapandWater
Soap-FilledScouringPad
s CommercialOvenCleaner
Drainfat,coolpanandrackslightly.(Donotletsoiledpanandrackstandin broiler
compartmenttocool.)SprinMedetergenton rackandpan.Fillthe panwithwarmwater
andspreadclothor papertoweloverthe rack.Let panandrackstandfora fewminutes.
Wash;scourif necessary.Rinseanddry.OPTION:Thebroilerpanandrackmayalsobe
cleanedin a dishwasher.
ControlKnobs
*MildSoapandWater
Pulloffknobs.Washgentlybutdo notsoak. Dryandreturncontrolsto range-making
sure
to matchflatareaontheknobandshaft.
Metal
s SoapandWater
Wash,rinse,andthenpolishwitha drycloth.DON~ USEsteelwool,abrasives,
ammonia,acids,or commercialovencleanerswhichmaydamagethefinish.
OuterPorcelain
EnamelFinish
o PaperTowel
@DryCloth
* SoapandWater
Avoidcleaningpowdersor harshabrasiveswhichmayscratchthe enamel.If acidsshould
spillontherangewhileit is hot, usea drypapertowelor clothto wipeuprightaway.
Whenthesurfacehascooled,washandrinse.Forotherspills,suchasfatspatirings, etc.,
washwithsoapandwaterwhencooledandthenrinse.Polishwithdrycloth.
SoapandWater
Usea mildsolutionof soapandwater.Donotuseanyharshabrasivesor cleaningpowders
whichmayscratchor marsurface.
●
PaintedSurfaces
●
OvenLiner*
~SoapandWater
@Soap-FilledScouringPad
e CommercialOvenCleaner
Coolbeforecleaning.
FORLIGHTSOIL:Frequentwipingwithmildsoapandwater(especiallyaftercooking
meat)willprolongthetimebetweenmajorcleaning.Rinsethoroughly.N~E: Soapleft
on linercausesadditionalstainswhenovenis reheated.
FORHEAVYSOIL:Choosea non-abrasivecleanerandfollowlabelinstructions,using
thinlayerofcleaner.Useofrubberglovesis recommended.Wipeor rublightlyon
stubbornspots.Rinsewell.Wipeoffanyovencleanerthatgetsonthermostatbulb.When
rinsingovenaftercleaningalsowipethermostatbulb.
[nsideOvenDoor*
e SoapandWater
. Soap-FilledScouringPad
● Commercial
OvenCleaner
Usethe samedirectionsforcleaningas givenabovefor OvenLiner.
RemovableOven
Bottom
SoapandWater
Soap-FilledScouringPad
(Non-metallic)
Theovenbottompanelcanbe removedforeasycleaning.Usethesamedirectionsfor
cleaningas givenaboveforOvenLiner.
SurfaceBurner
Grates
●
SoapandWater
Soap-FilledScouringPad
(Non-metallic)
Liftoutwhencool.Soak5 to 10minutesif desiredin warmsolutionofdishwasher
detergent.Scourwithmaterialsmentionedhereto removeburned-onfoodparticles.
Burners
OSolutionfor Cleaning
InsideofCoffeeMakers
o SoapandWater
● MildAbrasiveCleanser
s DampCloth
Wipeoffburnerheads.If heavyspilloveroccurs,removeburnersfromrange(seepage 15)
andsoakthemfor20to30minutesin solutionof hotwaterandproductforcleaninginside
ofcoffeemakers,suchas Dip-Itbrand.If soildoesnotrinseoffcompletely,scrubburners
withsoapandwateror a mildabrasivecleanseranda dampcloth.Dryburnersin a warm
ovenfor30minutesbeforereturningthemtothe range.
Shelves
~SoapandWater
~ Soap-FilledScouringPad
@CommercialOvenCleaner
Yourshelvescanbecleanedbyusinganyandall mentionedmaterials.Rinsethoroughlyto
removeallmaterialsafiercleaning.NOTE:Somecommercialovencleanerscausedarkening
anddiscoloration.Whenusingforfirsttime,testcleaneronsmallpartofshelfandcheckfor
discolorationbeforecompletelycleaning.
●
●
●
*Spillageof marinades,fruitjuices, andbastingmaterialscontainingacidsmaycausediscoloration,Spillovemshouldbe wipedupimmediately,withcare
beingtakennottotouchanyhotportionoftheoven.Whenthesurfaceis cool, cleanandrinse,
—
17
~.
——
—.
—
w
—.
—.
-~
~.
—.
~
—.
—.
—
-
—.
~—.
~
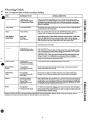
Questiom?
UseThk Roblem Solver
PROBLEM
POSSIBLE CAUSEAND/ORWHATTO DO
Eyouneedmorehelp.. call, toll free:
GE Answer Center”
800.626.2000
conswner information service
---
18
If YouNeedSertice
Toobtainservice,seeyourwarranty
on the backpageof thisbook.
We’reproudof our serviceand
wantyouto be pleased.If for some
reasonyouare nothappywiththe
serviceyoureceive,hereare three
stepsto followfor furtherhelp.
FIRST,contactthepeoplewho
servicedyourappliance.Explain
whyyouare notpleased.Inmost
cases,thiswill solvetheproblem.
NEXT,if youare stillnotpleased,
writeallthe details-including
yourphonenumber—to:
Manager,ConsumerRelations
GEAppliances
AppliancePark
Louisville,Kentuc@40225
FINALLY,if yourproblemis still
not resolved,write:
MajorAppliance
ConsumerActionPanel
20 NorthWackerDrive
Chicago,Illinois60606
—.
-
m!—
~
—.
-
—
—
—.
—.
19
..
.-.
..-.-—
——
YOURGENERALELE~RIC RANGE
WARRAN~
Saveproofof originalpurchasedatesuchasyoursalesslip or cancelledcheckto establishwarrantyperiod.
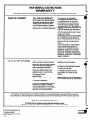
WHATIS COVERED
FULLONE-YEARWARRANTY
Foroneyearfromdateof original
purchase,wewill provide,freeof
charge,partsandservicelabor
in yourhometo repairor replace
anypafi of therangethat fails
becauseof a manufacturingdefect.
QServicetrips to yourhometo
WHAT
Is Nm COVERED
teachyou howto usethe product.
ReadyourUseandCammaterial.
If youthen haveanyquestions
aboutoperatingthe product,
pleasecontactyourdealeror our
ConsumerAffairsofficeat the
addressbelow,or call,toll free:
GEAnswerCenter@
800.626.2000
consumerinformationservice
Thiswarrantyis extendedto
the originalpurchaserand any
succeedingownerfor products
purchasedfor ordinaryhomeuse
in the 48 mainlandstates,Hawaii
andWashington,D.C.InAlaskathe
warrantyis the sameexceptthatit is
LIMITEDbecauseyoumustpayto
shipthe producttothe serviceshop
or forthe servicetechnician’stravel
coststo your home.
All warrantyservicewill be provided
byour FactoryServiceCentersor
byour authorizedCustomerCare@
servicersduringnormalworking
hours.
Lookinthe Whiteor YellowPages
of yourtelephonedirectoryfor
GENERALELECTRICCOMPANY,
GENERALELECTRICFACTORY
SERVICE,GENERALELECTRICHOTPOINTFACTORY
SERVICEor
GENERALELECTRICCUSTOMER
CARE@SERVICE.
e ReDiacementof housefusesor
rese~tingof circuitbreakers.
~
. Failureof the productif it is used
for otherthan its intendedpurpose
or usedcommercially.
● Damageto productcaused
by accident,fire,floodsor acts
of God.
WARRAN~R ISNOTRESPONSIBLE
FORCONSEQUENTIALDAMAGES.
@Improperinstallation.
If youhavean installationproblem,
contactyourdealeror installer.
Youareresponsiblefor providing
adequateelectrical,gas,exhausting
andotherconnectingfacilities.
Somestatesdonotallowthe exclusionor limitationof incidentalor consequentialdamages,sotheabovelimitationor exclusion
maynotapplyto you.Thiswarrantygivesyouspecificlegalrights,andyoumayalsohaveotherrightswhichvaryfromstateto state.
Toknowwhatyourlegalrightsarein yourstate,consultyourlocalor stateconsumeraffairsofficeor yourstate’sAttorneyGeneral.
Warrantor:GeneralElectricCompany
If furtherhelpis neededconcerningthiswarranty,write:
Manager—Consumer
Affaim,GE Appliances,Louisville,KY40225
—
JGASO
JGAS02