1
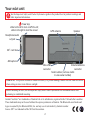
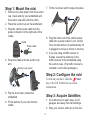
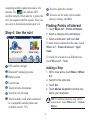
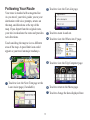
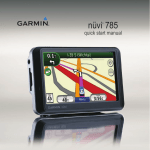
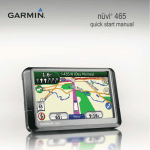
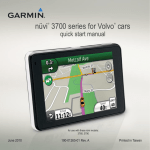
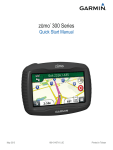
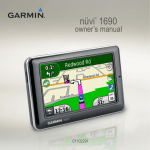
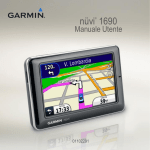
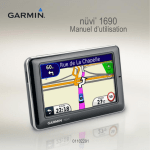
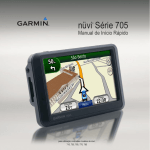
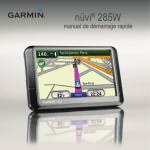
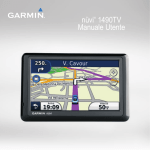
nüvi 705 series
®
quick start manual
for use with these nüvi models:
715, 755, 765, 775
Your nüvi unit
S ee the Important Safety and Product Information guide in the product box for product warnings and
other important information.
Power key:
slide to the left to turn on/off the unit;
slide to the right to lock the screen
GPS antenna
Speaker
Headphone/audio
out jack
SD™ card slot
Microphone
Mini-USB
connector
External antenna
connector
Serial number (remove cradle
to view serial number)
Warning: This product contains a lithium-ion battery. To prevent damage, remove the unit from the vehicle
when exiting or store it out of direct sunlight.
Before mounting the nüvi, see the Important Safety and Product Information for information about laws
pertaining to windshield mounting.
Garmin® and nüvi® are trademarks of Garmin Ltd. or its subsidiaries, registered in the USA and other countries.
These trademarks may not be used without the express permission of Garmin. The Bluetooth® word mark and
logos are owned by the Bluetooth SIG, Inc. and any use of such marks by Garmin is under
license. SD™ is a trademark of the SD Card Association.
Step 1: Mount the nüvi
7. Tilt the nüvi back until it snaps into place.
1. Remove the clear plastic from the suction
cup. Clean and dry your windshield and
the suction cup with a lint-free cloth.
2. Place the suction cup on the windshield.
3. Plug the vehicle power cable into the
power connector on the right side of the
cradle.
8. Plug the other end of the vehicle power
cable into a power outlet in your vehicle.
Your unit should turn on automatically if it
is plugged in and your vehicle is running.
9. If you are using a traffic receiver in
Europe, secure the antenna on the
traffic receiver to the windshield using
the suction cups. (The traffic receiver is
included in some nüvi packages.)
Cradle
Power cable
4. Snap the cradle onto the suction cup
arm.
Suction cup mount
Step 2: Configure the nüvi
To turn on your nüvi, slide the Power
key to the left. Follow the on-screen
instructions.
5. Flip the lever back, toward the
windshield.
6. Fit the bottom of your nüvi into the
cradle.
Step 3: Acquire Satellites
1. Go outdoors to an open area, out of
garages, and away from tall buildings.
2. Stop your vehicle, and turn on the nüvi.
Acquiring satellite signals may take a few
minutes. The
bars indicate GPS
satellite strength. When one bar is green, the
nüvi has acquired satellite signals. Now you
can select a destination and navigate to it.
Step 4: Use the nüvi
➊ ➋
➌
➎
➑Touch to adjust the volume.
➒Touch to use the tools such as media
players, settings, and Help.
Finding Points of Interest
1. Touch Where to? > Points of Interest.
2. Select a category and a subcategory.
3. Select a destination, and touch Go!.
➍
To enter letters contained in the name, touch
Where to? > Points of Interest > Spell
Name.
➏
➐
➑
To search for a location in a different area,
touch Where to? > Near.
➒
➊GPS satellite strength.
➋Bluetooth® technology status.
➌Battery status.
➍Current time.
➎Touch to find a destination.
➏Touch to view the map.
➐Touch to make a call when connected
Adding a Stop
1. With a route active, touch Menu > Where
to?.
2. Search for the extra stop.
3. Touch Go!.
4. Touch Add as via point to add this stop
before your destination.
Tip: To add more than one stop, edit the
current route. Touch Where to? > Custom
Routes.
to a compatible mobile phone (not
available on nüvi 755).
Following Your Route
➋Touch to view the Turn List page.
Your route is marked with a magenta line.
As you travel, your nüvi guides you to your
destination with voice prompts, arrows on
the map, and directions at the top of the
map. If you depart from the original route,
your nüvi recalculates the route and provides
new directions.
➌Touch to zoom in and out.
➍Touch to view the Where Am I? page.
Touch and drag the map to view a different
area of the map. A speed limit icon could
appear as you travel on major roadways.
➋
➊
➌
➎Touch to view the Trip Computer page.
➍
➎
➏
➐
➊Touch to view the Next Turn page or the
Lane Assist page (if available).
➏Touch to return to the Menu page.
➐Touch to change the data displayed here.
Using FM TMC Traffic
shortest time. You might still be routed
through traffic if no alternative roads exist.
If a severe traffic delay occurs on your
route while you are navigating, the nüvi
automatically recalculates the route.
Note: Garmin is not responsible for the
accuracy of the traffic information.
The FM traffic receiver, which is integrated
in the vehicle power cable, is included in
some nüvi packages.
When you receive traffic information, a
traffic icon appears in the top left corner of
the Map page. The traffic icon changes color
to indicate the severity of traffic conditions
on your route or the road you are currently
traveling. Touch the icon to view the Traffic
menu.
The traffic receiver and the nüvi must be
in data range of an FM station transmitting
TMC (Traffic Message Channel) data to
receive traffic information. For information
about traffic receivers and coverage areas,
go to www.garmin.com/traffic.
Viewing Advertisements
Note: Heated (metallized) windows
could degrade the performance of the
traffic receiver.
In North America, if your nüvi package
includes a traffic receiver, you will receive
advertisements and coupons. Touch the
advertisement on the screen to search
for the nearest location related to that
advertisement.
Note: You do not need to activate the
subscription included with your FM
traffic receiver (if it came with one). The
subscription activates automatically after
your nüvi receives traffic signals from the
pay service provider.
caution: Do not attempt to write down
the coupon codes while driving.
When calculating your route, the
nüvi examines the current traffic and
automatically optimizes the route for the
Making Hands-Free Phone
Calls
6. Enter the nüvi Bluetooth PIN (1234) in
your phone.
Receiving a Call
Bluetooth wireless technology is not
available on nüvi 755 models. Using
Bluetooth wireless technology, your nüvi
can wirelessly connect to your mobile phone
to become a hands-free device. To pair and
connect, your phone and your nüvi must be
turned on and be within 10 meters of each
other.
When you get a call, the Incoming Call
window opens. Touch Answer to answer the
call. The internal microphone is in the front
of the nüvi. Speak normally.
Making a Call
When your phone is connected to your nüvi,
you are ready to make phone calls. Touch
Phone to access the Phone menu.
Pairing the nüvi with Your
Mobile Phone
Note: Not all phones support all features
of the nüvi Phone menu.
1. Confirm that your phone is supported by
the nüvi. (Go to www.garmin.com
/bluetooth.)
2. From the Menu page, touch Tools >
Settings > Bluetooth > Add.
3. Enable the Bluetooth component on your
phone and enable Find Me/Discoverable/
Visible mode. These settings might be in
a Bluetooth, a Connections, or a Handsfree menu.
4. Touch OK on the nüvi.
5. Select your phone, and touch OK.
Calling a Number
1. Touch Phone > Dial.
2. Enter the number, and touch Dial.
3. To end the call, touch
> End Call.
Resetting the nüvi
If the nüvi screen stops functioning, turn the
nüvi off and on again. If this does not help,
slide the Power key to the left and hold
it for 8 seconds. Turn the nüvi back on. The
nüvi should operate normally.
Using the FM Transmitter
Before using the FM transmitter in your area, see
the FM transmitter legal notice in the owner’s
manual.
You can listen to your nüvi through the
speakers in your vehicle. From the Menu
page, select Volume > Audio Output > FM
Transmitter > OK. Select an FM channel
with a lot of static, and select the same
channel on the nüvi.
Locking Your nüvi
1. Touch Tools > Settings > Security.
2. Touch the button below Garmin Lock.
3. Enter a 4-digit PIN and drive to a security
location.
NOTE: If you forget your PIN and your
security location, you must send your nüvi
and valid product registration or proof
of purchase to Garmin to get your nüvi
unlocked.
February 2009
Listening to MP3 Files
1. Touch Tools > Media Player.
2. Touch Source to open the MP3 player.
3. Touch Browse.
4. Touch a category.
5. Touch Play All.
nüMaps Guarantee™
To receive one free map update (if
available), register your nüvi at
http://my.garmin.com within 60 days of
acquiring satellites and driving with your
nüvi. You are not eligible for the free map
update if you register by phone or wait
longer than 60 days after the first time you
drive with your nüvi.
More Information
For more information about your nüvi, touch
Tools > Help. Download the latest version
of the owner’s manual from www.garmin
.com. For information about accessories,
go to http://buy.garmin.com or contact your
Garmin dealer.
Part Number 190-00955-01 Rev. B
Printed in Taiwan