1
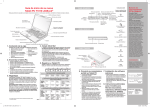
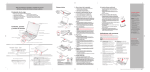
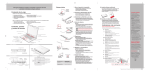
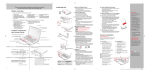
Getting started with your new
Fujitsu LifeBook® N6460 notebook
RIGHT PANEL
ExpressCard Eject Button
Memory Stick/SD/xD Card Slot
This convenient guide will lead you through the start-up process in seven easy steps and will also offer some valuable tips.
IEEE 1394 Port
Quick Tips
Headphone Jack
It takes approximately 3 hours to
charge a battery if the notebook
is turned off or is in suspended
mode. In battery mode the
processor runs at half speed to
conserve battery life. SpeedStep
is always on. CPU speed will
change depending on the load.
Microphone Jack
Display Panel Latch
Volume Control
USB 2.0 Port
Display Panel
Sub Woofer Air Chamber (bottom of unit)
Wireless LAN Switch
ExpressCard Slot
Keyboard
Visual Optimizer
Button
Touchpad Pointing Device
Fingerprint Recognition
Sensor/Also works as
Scroll Button
PC Card Slot
PC Card Eject Button
LEFT PANEL
Application/Media
Player Buttons
Optical Drive
Optical Drive Eject Button
Power/Suspend/
Resume Button
Stereo Speakers
Status Indicator Panel
DC Power Jack
1. What’s in the Box
Check to see that all of the following are in the box:
❍ LifeBook notebook
❍ Lithium ion battery, pre-installed
❍ AC adapter with power cord
❍ Phone/modem (RJ-11) telephone cable
❍ Drivers and Applications Restore disc
❍ Recovery and Utility disc
❍ User’s Guide
❍ International Limited Warranty Booklet and Registration
❍ Microsoft ® associated product materials
❍ Microsoft ® Applications Software CD
Depending upon your configuration, the following
may also be included:
❍ PowerDVD (for Blu-Ray configuration)
❍ CyberLink MakeDisc (for Genuine Windows Vista™
Home Premium)
❍ Additional Lithium ion battery
❍ Remote control and IR Reciever (for Genuine Windows Vista™
Home Premium and Genuine Windows Vista™ Ultimate)
❍ TV Tuner Express card and software CD (for Genuine Windows
Vista™ Home Premium)
2. Turn on Your Notebook
• Plug the AC adapter into your notebook.
• Plug the power cord into the AC adapter.
• Connect the power cord to an electrical outlet.
• Connect the phone cable or an ethernet cable (with internet access)
to your notebook and to a wall jack.
• Press the power button.
• The notebook is now on and the battery is being charged.
• The notebook will begin a power-on self test. Once successfully completed,
the operating system will begin the initialization process.
3. Start Genuine Windows Vista™
the first time
• Select Country of Region, Time and Currency, and Keyboard Layout,
then click next.
• Read and accept the End User License Agreements (EULAs).
• When prompted, enter your User Name, Password and select
an icon for your account.
• On next screen, name your computer and choose a desktop background.
• When “Help protect Windows automatically” appears,
choose one of the settings.
• On next screen, set time and date.
• The “Thank you” screen follows, with an offer for free Norton
software. After Windows checks the system performance,
it will boot up for the first time.
• Important: During the setup procedure, do not disconnect the
power supply, press any buttons, or use any peripheral devices
such as a mouse, keyboard, or remote control.
NOTE: Steps 4 and 5 will cause the display to go blank for a
period of time. This is normal. DO NOT attempt to interface
with your LifeBook in any way while the display is blank.
5. Activate Additional Utilities
If you have the wireless LAN configuration, please ensure the
wireless LAN switch is ON.
The first time you boot up your system, you will see a “Primary
Settings for the PC” window. This window explains the installations
which will be performed by the Click Me! utility. If you click [Execute],
Click Me! will begin installing. If after clicking the button you receive
a “User Account Control” window, you will be asked for permission
to continue. Click [Yes] to continue. If you cancel, the “Click Me!”
icon will appear on your desktop for later installation.
CLICK ME
6. Install Additional Software if needed
Insert application disc into media drive and follow on-screen instructions.
7. If you purchased the TV Tuner Option
Please see the TV Tuner User’s Guide for detailed instructions.
Adjusting display brightness
• Fn + F6 to decrease brightness
• Fn + F7 to increase brightness
BACK PANEL
HDMI Port
USB Port
Drivers
Lock Slot
Modem Port
Look for the latest drivers on the
Drivers and Applications Restore
Disk. Right-click the FDU
icon
and select “update”, or go to
us.fujitsu.com/computers.
External Video Port
S-Video Out Port
4. Registering Genuine Windows
Vista™ with Microsoft
• After Genuine Windows Vista initial boot, the “Welcome Center”
will appear. If the “Register Windows Online” icon is not seen in the
window, click on “Show all 14 items”.
• Click on “Register Windows Online” and follow the instructions.
Optimizing Battery Life
• Set power management setting
to Maximize Battery Life
• Adjust display brightness levels
to lowest comfortable setting
• Remove PC Cards and ExpressCards when not needed
• Utilize Suspend mode when
not using your notebook
• Turn off Wireless LAN
when not in use
• Close unused programs
• Remove unused USB
powered devices
• Read the Power Management
section in your User’s Guide
for additional features
Air Vents
LAN Port
USB Ports
Note: When using Windows Vista™ Media Center
Edition 2005 in full screen mode, the function
keys’ status cannot be seen on the LCD panel.
If you “minimize” or “restore down” (shrink) the
window, the function keys’ status will appear.
Following are some common indicators.
Status Indicators
Battery Charging
Green, solid: Fully charged
or no battery installed.
Orange, solid: Being
charged.
Orange, blinking: Charging
suspended because battery
temperature too high.
Off: Not charging because
AC adapter is not connected.
Battery Status
Green, solid: Between
50% and 100% charged.
Orange, solid: Between
13% and 49% charged.
Red, solid: Between 0%
and 12% charged.
Number Lock
Visible: Activated.
Red, blinking: There is a
problem with the battery.
Caps Lock
Visible: Activated.
Off: No battery is installed
or the system is shut off.
Scroll Lock
Visible: Activated.
Hard Drive/Optical
Drive Access
Lets you know if your internal
hard drive or optical drive
are being accessed.
Email
Shows when you have
received new email.
Top of Keyboard
Status Indicator
Popular Accessories
Memory modules
• 1 GB DDR2 667 MHz SDRAM
• 2 GB DDR2 667 MHz SDRAM
USB 2.0 docking station
USB optical mouse
Additional Lithium ion battery
Additional AC adapter
Notebook Guardian™ lock
External USB Floppy Disk Drive
External TV Tuner
Remote Control for Windows Vista™ Home Preview
Carrying cases
• Diplomat (ballistic nylon)
• Workstation Plus
Fujitsu extended service plans available.
Visit us.fujitsu.com/computers
to purchase any of these accessories
or to get more information.
Have questions or need help?
• Visit our website at us.fujitsu.com/computers
• Call us anytime at 1.800.8FUJITSU
• Email us at [email protected]
Want more information on Fujitsu products?
• Visit our website at www.shopfujitsu.com
• Call us anytime at 1.800.FUJITSU
Record your notebook serial number here:
Serial #______________________
(see bottom of computer)
Fujitsu Computer Systems Corporation
1250 E. Arques Avenue M/S 122
Sunnyvale, CA 94085
Fujitsu, the Fujitsu logo, and LifeBook are registered trademarks of Fujitsu Limited.
Microsoft and Windows are registered trademarks of Microsoft Corporation.
The ExpressCard wordmark is owned by the PCMCIA and any use of this word
mark by Fujitsu is under license. All other trademarks mentioned herein are
the property of their respective owners. Product description data represents
Fujitsu design objectives and is provided for comparative purposes; actual
results may vary based on a variety of factors. Specifications are subject to
change without notice.
©2007 Fujitsu Computer Systems Corporation. All rights reserved.
Getting Started
Get Started with your
®
LifeBook N6460 Notebook