1
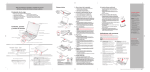
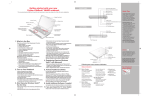
This convenient guide will lead you through the start-up
process and will also offer some valuable tips.
What’s in the Box
Check to see that all of the following items are in the box:
❏
❏
❏
❏
❏
❏
LifeBook notebook
Lithium ion battery, pre-installed
AC adapter with power cord and core
Phone/modem (RJ-11) telephone cable
Drivers and Applications Restore (DAR) disc
User’s Guide
1. Open the Display Panel
Initial Start Up
❏ International Limited Warranty
❏ Genuine Windows Vista® recovery
and Registration booklet
and utility disc
❏ Microsoft® associated product materials ❏ Genuine Windows® XP Professional
❏ Microsoft® application CDs
recovery disc (For Genuine Windows
❏ End User License Agreement
Vista® Business Operating System)
• Ensure that your LifeBook is on a hard level surface and that
the air vents are not blocked.
• Lift the display, being careful not to touch the screen.
• Adjust the display until it is at a comfortable viewing angle.
Display
Panel
Latch
Button
2. Connect AC Power
• Plug the AC adapter into your notebook.
• Plug the power cord into the AC adapter.
• Connect the power cord to an electrical outlet.
3. Connect to Internet or Network
DC Power
Jack
Depending upon your configuration, the following items may also be shipped with your notebook:
❏ CyberLink PowerDirector disc
❏ CyberLink MakeDVD disc (Only with Genuine
Windows Vista® Home Premium)
❏ Additional Lithium ion battery
❏ Webcam Software disc
❏ Remote Control, Remote Control manual,
batteries, and USB IR receiver
(for Genuine Windows Vista® Home
Premium operating system only)
❏ ExpressCard Hybrid (Digital/Analog) TV Tuner
(For Genuine Windows Vista® Home Premium
operating system only)
AC
Adapter
Wall Jack
Web Camera
4. Booting the System
Display Panel Latch Button
The Lithium ion battery is not charged upon purchase.
Initially you will need to connect either the AC adapter
or the Auto/Airline adapter to use your notebook.
Digital Microphone
Controls, Connectors,
and Access Points
Telephone Jack
Display Panel
Touchpad Pointing Device
Scroll Button or Fingerprint Sensor
5. Installing Click Me!
LAN Jack
• Check to be sure the WLAN switch is on.
For Genuine Microsoft® Windows® XP: The first time you boot up
your system, you will see an icon called Click Me! in the Start menu.
For Genuine Windows Vista®: In addition to an icon on the
desktop, a dialog box will automatically open that prompts you
to run Click Me!. If you choose not run ClickMe! at this time,
the ClickMe! icon will appear on your desktop.
• When you click the Click Me! icon, your system will automatically
build the icon tray in the bottom right of the screen. These icons
provide links to utilities that you will frequently access.
Status Indicator Panel
Stereo Speaker
Power/Suspend/Resume Button
Wireless LAN/Bluetooth On/Off Switch
Headphone Jack
Microphone Jack
Keyboard
Stereo Speaker
RIGHT PANEL
BACK PANEL
Gigabit LAN (RJ-45) Jack
ExpressCard Eject Button
Power/Suspend/Resume
Button
ExpressCard Slot
Memory Stick/SD/xD Card Slot
DC-In
Jack
PC Card Eject Button
PC Card Slot
IEEE 1394 Port
USB Port
USB 2.0 Ports
WLAN
Switch
External Video Jack Modem Jack
USB Ports
BOTTOM PANEL
LEFT PANEL
Optical Drive Release Button
Lithium ion Battery
Bay
Optical Drive
Emergency Optical Tray Release
Memory Upgrade
Compartment
For
Additional
Utilities
CLICK ME
Fujitsu
Driver
Utility Icon
“Click Me!”
6. Register
For Genuine Microsoft® Windows® XP:
• After the operating system has initialized, enter the information
as prompted to personalize your notebook and configure your
modem to dial.
For Genuine Windows Vista®:
• Accept the Microsoft ® Windows® Licensing Agreement and the
Fujitsu End User License Agreement to proceed.
• Select your User ID and Password during the “Welcome Screen.”
• Keep a record of your User ID and password stored in a secure place.
• THE SCREEN WILL GO DARK FOR APPROXIMATELY TWO MINUTES.
• Do not attempt to turn power on or off during this stage.
Anti-Theft
Lock Slot
S-Video Out Port
Air Vents
Be careful when you select the language.
The only way to change the language
is to do a recovery process.
• Press the Suspend/Resume/Power button (above the keyboard) to
turn on the notebook. When you do this for the first time, it will display
a Fujitsu logo on the screen. If you do nothing the system will load
the operating system, and then the Windows Welcome will begin.
LifeBook Application Panel with Support Button
Status Indicator Panel
• Connect either a phone cord to the modem jack or an Ethernet
cable to the LAN jack on your notebook and to a wall jack
or to an Ethernet router.
Important:
• During the setup procedure, do not disconnect the power supply,
press any buttons, or use any peripheral devices such as a
remote control.
• You should not attach any external devices and do not put a DVD/CD in
your drive until you have gone through the initial power on sequence.
If you have a:
You will need to install
the following software:
Webcam
Arcsoft WebCam
Companion
Dual-Layer Multi-Format
DVD Writer
CyberLink PowerDirector
7. Registering Your LifeBook notebook
• Register your notebook with Fujitsu Service and Support via our
website at us.fujitsu.com/computers.
• You will need to be set up with an Internet Service Provider (ISP)
to register online.
8. Install Additional Software
• Close any open programs, applications or utilities Insert software
application disc into media drive.
• Open the application folder, select the set-up icon, and load
desired software, as shown in the table.
• Restart your computer.
9. If you purchased the TV Tuner Option
• Please see the TV Tuner User’s Guide for detailed instructions.
10. Access your User’s Guide
• To take advantage of all the features of your new Fujitsu LifeBook
notebook, it is highly recommended that you read your electronic
User’s Guide. It contains important detailed information about
your new computer. You can access your User’s Guide
by selecting its icon from the screen desktop.
• If you are using Genuine Windows Vista®, Click [Allow]
in the User Account Control (UAC) box.
• Click [Continue]
• Select “I Agree” and click [Continue] in the License Agreement box.
• Select “User’s Guide” from the “Utilities/Applications” category.
• Click [Install Selected Subsystems]
• The User’s Guide will be copied to your hard drive in the
C:\Fujitsu\Manual directory. Shortcuts to the Users Guide
will be placed on your desktop and in the Start menu.
11. Restoring your System
• If the need arises, you can safely recover back to the factory image
by following a straight-forward procedure in your User’s Guide.
Common Indicators
Status Display Panel
The Status Indicators represent specific components of
your Fujitsu LifeBook notebook. The LEDs below each
symbol tell you how each of those components
are operating.
Power Indicator
The Power indicator glows blue when
your system is turned on.
Battery Charge/DC-In Indicator
Orange, solid: AC adapter and battery
are available and system is charging.
Green, solid: AC adapter and battery
are available and system is fully
charged, or AC adapter is plugged
in but battery is not installed.
Orange, blinking: AC adapter and battery
are available and waiting to charge battery
(battery is out of thermal range).
Off: AC adapter is not plugged in.
Battery Level Indicator
If the battery is installed while the power
is off, the battery level indicator will
display the charge levels for five
seconds after it blinks orange.
Caution If the AC adapter is not connected or the
battery pack is not fully charged when
the computer is switched to stand
by mode, the indicator will blink.
Batteries subjected to shocks, vibrations
or extreme temperature can be
permanently damaged.
A shorted battery is damaged and
MUST be replaced.
Quick Tips
It takes approximately 4 hours to
charge a fully discharged single
battery with unit off or in
suspend mode.
Optimizing Battery Life
• Set power management setting
to Maximize Battery Life.
• Adjust display brightness levels
to lowest comfortable setting.
• Remove PC Cards and ExpressCards when not needed.
• Utilize Suspend mode when
not using your notebook.
• Read the Power Management
section in your electronic User’s
Guide for additional features.
Adjusting Display Brightness
• Fn + F6 to decrease brightness
• Fn + F7 to increase brightness
Adjusting Volume
• Fn + F8 to decrease volume
• Fn + F9 to increase volume
* Mono microphone jack or stereo
microphone/line in jack depending
on configuration.
* * Stereo headphone/Optical Digital
Audio out jack or stereo headphone/Line Out/Optical Digital
Audio out jack.
Caution: Your system is
configured with Trusted
Platform Module (TPM)
Hard Drive/Optical Drive
Access Indicator
The Hard Drive/Optical Drive Access
indicator glows green when your
internal hard drive is being accessed.
Note that flickering is normal.
NumLk Indicator
The NumLk indicator states that the
integral keyboard is set in ten-key
numeric keypad mode.
CapsLock Indicator
The CapsLock indicator states that your
keyboard is set to type in all capital letters.
ScrLk Indicator
The ScrLk indicator states that your scroll
lock is active.
Before you activate TPM, be sure
you fully understand how it works
by following the directions included
on the TPM applications CD. If you
choose to enable TPM, your TPM
password will be critical to the
operation of your computer and
MUST be remembered.
Drivers
Look for the latest drivers on the
Drivers and Applications Restore
CD. Right-click the FDU icon and
select “update”, or download
them at us.fujitsu.com/computers.
SAVE THESE INSTRUCTIONS
All repairs must be accomplished by an Authorized Repair Technician.
HANDLING THE CORD ON THIS PRODUCT WILL EXPOSE YOU TO LEAD, A CHEMICAL KNOWN TO THE STATE OF
CALIFORNIA TO CAUSE BIRTH DEFECTS OR OTHER REPRODUCTIVE HARM. WASH HANDS AFTER HANDLING.
Warning
DECLARATION OF CONFORMITY according to FCC Part 15 Responsible Party Name: Fujitsu Computer Systems
Corporation Address: 1250 E. Arques Avenue, M/S 122 Sunnyvale, CA 94085 Telephone: (408) 746-6000 Declares
that product: Base Model Configuration: LifeBook A6120 notebook Complies with Part 15 of the FCC Rules.
This device complies with Part 15 of the FCC rules. Operations are subject to the following two conditions:
(1) This device may not cause harmful interference, (2) This device must accept any interference received,
including interference that may cause undesired operation.
IMPORTANT SAFETY INSTRUCTIONS
This unit requires an AC adapter to operate. Use only UL Listed I.T.E. Class II Adapters with an output rating of 19 VDC, with a current of 4.22 A (80 W).
AC adapter output polarity:
+
When using your notebook equipment, basic safety precautions should always be followed to reduce the risk of fire, electric
shock and injury to persons, including the following:
• Do not use this product near water for example, near a bathtub, washbowl, kitchen sink or laundry tub, in a wet
basement or near a swimming pool.
• Avoid using the modem during an electrical storm. There may be a remote risk of electric shock from lightning.
• Do not use the modem to report a gas leak in the vicinity of the leak.
• Use only the power cord and batteries indicated in this manual. Do not dispose of batteries in a fire. They may
explode. Check with local codes for possible special disposal instructions.
• To reduce the risk of fire, use only No. 26 AWG or larger UL Listed or CSA Certified Telecommunication Line Cord.
• For TV tuner use: To protect from overvoltages and transients on the Cable Distribution System, be sure that the
outer shield of the coaxial cable is connected to earth (grounded) at the building premise as close to the point of
cable entrance as practicable, as required per NEC Article 820.93, ANSI/NFPA 70: 2005. If you have questions
about your CATV installation, contact your service provider.
Popular Accessories
Memory Modules
• 1 GB SDRAM, DDR2-6667
• 2 GB SDRAM, DDR2-6667
Main Lithium ion Battery
Auto/Airline Adapter
Additional AC Adapter
USB Universal Docking Station/w Video
USB 2.0 Docking Station
External USB Floppy Disk Drive
USB Optical Mouse
Wireless Keyboard and Mouse
Remote Control for Genuine
Windows Vista® Premium
Carrying Cases
For Authorized Repair Technicians Only
Warning
DANGER OF EXPLOSION IF LITHIUM (CLOCK) BATTERY IS INCORRECTLY REPLACED. REPLACE ONLY WITH
THE SAME OR EQUIVALENT TYPE RECOMMENDED BY THE MANUFACTURER. DISPOSE OF USED
BATTERIES ACCORDING TO THE MANUFACTURER’S INSTRUCTION.
Have questions or need help?
• Visit our website at us.fujitsu.com/computers
• Call us anytime at 1.800.8FUJITSU
• Email us at [email protected]
Want more information on Fujitsu products?
• Visit our website at www.shopfujitsu.com
• Call us anytime at 1.800.FUJITSU
Fujitsu Extended Service Plans available.
Visit us.fujitsu.com/computers
to purchase any of these accessories
or to get more information.
• Diplomat
• Workstation Plus
• Mobile Lite Wheeled Case
• Mobile Max Wheeled Case
Notebook Guardian™ Lock
FOR CONTINUED PROTECTION AGAINST RISK OF FIRE, REPLACE ONLY WITH THE SAME TYPE
AND RATING FUSE.
Caution
Record your notebook serial number here:
Serial #______________________
(see bottom of computer)
System Disposal
LAMP(S) INSIDE THIS PRODUCT CONTAIN MERCURY AND MUST BE RECYCLED OR DISPOSED
OF ACCORDING TO LOCAL, STATE, OR FEDERAL LAWS.
Recycling your battery
Over time, the batteries that run your mobile computer will begin to hold a charge for a shorter amount of time;
this is a natural occurrence for all batteries. When this occurs, you may want to replace the battery with a fresh
one*. If you replace it, it is important that you dispose of the old battery properly because batteries contain
materials that could cause environmental damage if disposed of improperly.
Fujitsu is very concerned with environmental protection, and has enlisted the services of the Rechargeable
Battery Recycling Corporation (RBRC)**, a non-profit public service organization dedicated to protecting
our environment by recycling old batteries at no cost to you.
RBRC has drop-off points at tens of thousands of locations throughout the United States and Canada.
To find the location nearest you, go to www.RBRC.org or call 1-800-822-8837.
If there are no convenient RBRC locations near you, you can also go to the EIA Consumer Education Initiative
website (http://EIAE.org/) and search for a convenient disposal location. Remember—protecting the environment is a cooperative effort, and you should make every effort to protect it for current and future generations.
* To order a new battery for your Fujitsu mobile computer, go to the Fujitsu shopping site at
www.shopfujitsu.com in the US or www.fujitsu.ca/products/notebooks in Canada.
** RBRC is an independent third party to which Fujitsu provides funding for battery recycling;
RBRC is in no way affiliated with Fujitsu.
Fujitsu Computer Systems Corporation
1250 E. Arques Avenue M/S 122
Sunnyvale, CA 94085
Fujitsu, the Fujitsu logo, and LifeBook are registered trademarks of Fujitsu Limited.
Microsoft, Windows, and Genuine Windows Vista are registered trademarks of
Microsoft Corporation in the United States and/or in other countries. All other
trademarks mentioned herein are the property of their respective owners.
Product description data represents Fujitsu design objectives and is provided
for comparative purposes; actual results may vary based on a variety of
factors. Specifications are subject to change without notice.
©2007 Fujitsu Computer Systems Corporation. All rights reserved.
Getting Started
Get Started with your
®
LifeBook A6120 Notebook
This guide will lead you through the start-up process for your new LifeBook notebook and will also provide
some valuable tips. To learn about all the exciting features that your new LifeBook notebook has to offer,
please see the User’s Guide that can be accessed after completing the start-up procedure.