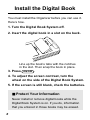
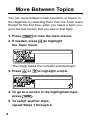
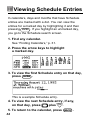
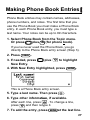
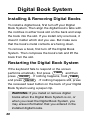
1
For Use with the Franklin Digital Book System Electronic Publishers F IC-107 DIGITAL BOOK S C H E D U L E JUNE 7 8 9 4 5 6 1 2 3 0 X ÷ 12 3 9 6 = Personal ORGANIZER Electronic Publishers Mt. Holly, NJ 08060 User’s Manual FCR-28007-00 A PN 7201665 Printed in China FOLD License Agreement READ THIS LICENSE AGREEMENT BEFORE USING THE DIGITAL BOOK. YOUR USE OF THE DIGITAL BOOK DEEMS THAT YOU ACCEPT THE TERMS OF THIS LICENSE. IF YOU DO NOT AGREE WITH THESE TERMS, YOU MAY RETURN THIS PACKAGE WITH PURCHASE RECEIPT TO THE DEALER FROM WHICH YOU PURCHASED THE DIGITAL BOOK AND YOUR PURCHASE PRICE WILL BE REFUNDED. DIGITAL BOOK means the software product and documentation found in this package and FRANKLIN means Franklin Electronic Publishers, Inc. LIMITED USE LICENSE All rights in the DIGITAL BOOK remain the property of FRANKLIN. Through your purchase, FRANKLIN grants you a personal and nonexclusive license to use the DIGITAL BOOK on a single FRANKLIN Digital Book System at a time. You may not make any copies of the DIGITAL BOOK or of the data stored therein, whether in electronic or print format. Such copying would be in violation of applicable copyright laws. Further, you may not modify, adapt, disassemble, decompile, translate, create derivative works of, or in any way reverse engineer the DIGITAL BOOK. You may not export or re-export, directly or indirectly, the DIGITAL BOOK without compliance with appropriate governmental regulations. The DIGITAL BOOK contains Franklin’s confidential and propriety information which you agree to take adequate steps to protect from unauthorized disclosure or use. This license is effective until terminated. This license terminates immediately without notice from FRANKLIN if you fail to comply with any provision of this license. 1 Contents Getting Started ......................................... 5 Install the Digital Book ............................... 6 Select the Organizer .................................. 7 Move Between Topics ............................... 8 Learn About Special Menus ..................... 11 Learn About Searches .............................. 12 Explore the Tutorials ................................. 14 Clock ........................................................ 16 Setting the Clock ...................................... 17 Schedule .................................................. 19 Making Schedule Entries .......................... 20 Finding Schedule Entries .......................... 23 Changing Schedule Entries ...................... 28 Calendar .................................................. 30 Finding Calendars .................................... 31 Viewing Schedule Entries ......................... 34 Phone Book ............................................. 36 Making Phone Book Entries ..................... 37 Finding Phone Book Entries ..................... 39 2 Contents Changing Phone Book Entries ................. 43 World Time .............................................. 45 Finding Locations ..................................... 46 Adding Locations ...................................... 48 Changing Locations .................................. 50 Calculator ................................................ 53 Making Calculations ................................. 54 Saving Results .......................................... 56 Using Previous Results ............................ 57 Other Functions ...................................... 59 Gauging Memory ...................................... 60 Naming Cards ........................................... 61 Copying Cards .......................................... 62 More Functions ......................................... 63 Appendixes ............................................. 65 Digital Book System ................................. 66 Specifications ........................................... 70 Key Guide ................................................. 72 Index ......................................................... 74 3 Introduction Congratulations. You now have a powerful, portable new way to be organized. The Franklin Personal Organizer has six main functions, or topics: Clock, Schedule, Calendar, Phone Book, World Time, Calculator. The Organizer can store up to 128 kilobytes of information that you enter. And its built-in, on-card battery protects your entries between sessions. To acquaint yourself with all the topics, scan this User’s Manual before using the Organizer. Then read each section for in-depth instructions. ■ About User Notes Like This Throughout this User’s Manual, gray-boxed user notes provide you with tips and advanced uses of the Organizer. Look for them. 4 Getting Started If you’re using the Organizer for the first time, read this section. 5 Install the Digital Book You must install the Organizer before you can use it. Here’s how. 1. Turn the Digital Book System off. 2. Insert the digital book in a slot on the back. Line up the book’s tabs with the notches in the slot. Then snap the book in place. 3. Press ON/OFF . 4. To adjust the screen contrast, turn the wheel on the side of the Digital Book System. 5. If the screen is still blank, check the batteries. ■ Protect Your Information Never install or remove digital books while the Digital Book System is on. If you do, information that you entered in those books may be erased. 6 Select the Organizer Once it’s installed, you can select and start using the Organizer. 1. Press 2. Press 3. Press CARD . or ENTER to outline ORG. . 4. If you see the above message, press E . If you’ve never used this Organizer before, the Clock appears. See “Setting the Clock,” p. 17. ■ Resuming Where You Left Off After your first session, you go to the last screen that you saw when you start using the Organizer again. 7 Move Between Topics You can move between main functions, or topics, in the Organizer by selecting them from the Topic menu. Except for the first time, when you select a topic you go to the last screen that you saw in that topic. 1. Press MENU to view the main menus. 2. If needed, press the Topic menu. to highlight The check marks the currently selected topic. 3. Press or to highlight a topic. 4. To go to a screen in the highlighted topic, press ENTER . 5. To select another topic, repeat Steps 1 through 4. 8 Move Between Topics ■ Follow the Arrows The blinking arrows at the bottom of the screen show which arrow keys you can press to move around menus and other screens. ■ Zooming Between Topics You can move more quickly between topics by pressing these Gold key combinations at any screen except a help message. Simply hold while pressing the other key. To Zoom To. . . Press. . . Phone Book + B Clock + C Calendar (dates) + D World Time (foreign) + Calculator (math) + M Schedule + F S To view your next Schedule entry, if any, press plus N . Then, press BACK . 9 Move Between Topics ■ Viewing Full Menu Items Some menu items are too long to be fully displayed on a menu. In that case, the item is followed by ellipses, like this: To view a full menu item, first press or to highlight the item, as above. Then press To return to the menu, press 10 BACK . ?* . Learn About Special Menus All six topics have special menus. Special menus let you perform special tasks in a topic. You can view a special menu, if available, by pressing SPEC . This is a special menu. Later in this User’s Manual, you’ll learn how to use every special menu. But note these general instructions. ● To select an item on a special menu, press or to highlight the item. Then press ENTER . ● To exit a special menu, press BACK . NOTE: You can’t go to special menus from main menus or help messages. 11 Learn About Searches All topics except the Clock and Calculator have search screens. At search screens, you can enter searches to find information in a topic. You can go to a search screen, if available, by pressing CLEAR . This is a search screen. At any search screen, use these keys to enter searches. To. . . Press. . . type letters A B type capital letters SHIFT + type a space + Q move the cursor 12 A ... SPACE type numbers erase characters BACK clear the search screen CLEAR search C ... ENTER W E Learn About Searches ■ Typing Punctuation Marks At search screens and other screens at which you can type characters, press MORE to view special punctuation marks not appearing on the keyboard. Next, press the arrow keys to highlight a punctuation mark. Then press ENTER to type it. You can also type these special punctuation marks, with or without pressing MORE , by pressing plus SHIFT plus one of the keys shown above. 13 Explore the Tutorials For convenient instruction, the Organizer has a builtin tutorial for each topic as well as a general tutorial. 1. Press 2. Press MENU . to highlight the Other menu. 3. If needed, press Tutorial. or to highlight 4. With Tutorial highlighted, press ENTER 5. To view a tutorial, press and then ENTER . To move down, press or DN . 6. To view the next or previous tutorial, press plus DN or UP . 7. To return to the Other menu, press BACK repeatedly. 14 . Explore the Tutorials ■ Help is Always at Hand At any screen, you can view a help message appropriate to your situation. To... view a help message move down the message exit the message Press... HELP or DN BACK To zoom to the top or bottom of a help message, press plus or . NOTE: To view a help message about all the Gold key combinations in the Organizer, press plus HELP . ■ Viewing MORE Help When you’re viewing certain help messages, you can view more help about your situation by pressing MORE . A note near the end of the help message indicates if more help is available. 15 Clock This section shows you how to use the Clock. The Clock can be set to any U.S. time zone, standard or daylight savings time, or any time zone used in a World Time location. The Organizer’s on-card battery keeps the Clock running when the Organizer is removed from the Digital Book System. 16 Setting the Clock You should set the Clock before using other topics, following these steps. You can change Clock settings later, in any order, from the Clock special menu. 1. If the Clock is not in view, Select the Clock from the Topic menu. Or press plus C (for clock). 2. Press . SPEC This is the Clock special menu. 3. If needed, press to highlight Set Time Zone. 4. With Set Time Zone highlighted, press 5. To select a time zone, press Then press ENTER . 6. Press SPEC or ENTER . . 7. Press and then Daylight Savings. ENTER to select 17 . Setting the Clock 8. Press or and then ENTER to select Summer Time or Standard Time. 9. Press 10. Press SPEC . and ENTER to select Set Date/Time. 11. Type a month, day, year, and time. To type numbers, press the numbered keys. To change a line, press and then retype it. 12. Press ENTER at the last line. Or press plus ENTER at any line. ■ Setting the Clock to World Times You can also set the Clock to any time zone in a World Time location. To learn how, see “Other Location Changes,” p. 52. 18 Schedule This section shows you how to use the Schedule. The Schedule is an electronic date book. Using the Schedule, you can enter and find meetings, things to do, annual events, and more. 19 Making Schedule Entries Schedule entries are events—appointments, meetings, things to do—scheduled on a particular day. The first time that you use the Schedule, you must make a Schedule entry. In each Schedule entry, you must type an event description of up to 99 characters. 1. Select the Schedule from the Topic menu. Or press plus S (for schedule). If you’ve never used the Schedule, you go directly to the Schedule entry screen. (See Step 3 below.) 2. Press MENU . 3. If needed, press New Entry. plus to highlight 4. With New Entry highlighted, press ENTER . This is a Schedule entry screen. 5. Type a month, day, or year. Or press . You need to type only the first letters of the month. To type numbers, press the numbered keys. 20 Making Schedule Entries 6. Type a time. Or press . Type a for a.m. or p for p.m. 7. Type an event description. To change a line, press and then retype it. 8. To add the entry to the Schedule, press ENTER at the last line. Or press plus ENTER at any line. This is a sample Schedule entry. 9. Press MENU to view the Schedule menu. The Schedule entry is listed by date and time. 21 Making Schedule Entries ■ Making Annual Entries You can add birthdays, anniversaries, and other annually recurring events to the Schedule. First, with the Schedule selected, press CLEAR . Next, press SPEC . Then press or to highlight New Annual Entry. Press ENTER and make your entry. ■ Saving or Discarding Changes At any Schedule entry screen, you can save or discard your most recent changes. First, press SPEC . Then press or to highlight an item. To select the highlighted item, press ENTER . Or, to exit the special menu, press BACK . 22 Finding Schedule Entries Once you’ve made Schedule entries, you can find them using the Schedule search screen, the Locate menu in the Schedule, or by scanning the Schedule or Matches menus. Searching for Entries At the Schedule search screen, you can find Schedule entries by date or other searches (see p. 24). 1. With the Schedule selected, press CLEAR . You go to the Schedule search screen. 2. Type a date or other Schedule search. To type numbers, press plus numbered keys. 3. To view the first matching entry, press ENTER 4. To view more matches, if any, press plus DN . 23 . Finding Schedule Entries To view a list of all matching entries, press 5. To clear your search, press CLEAR MENU . ■ Other Schedule Searches Here are the other searches that you can enter at the Schedule search screen. Search By Examples days today, yesterday, tomorrow months jan, feb, mar years 1993 or 93 a next or previous previous week next month, next year time period the first words in event descriptions* Lunch , ski trip dates followed by the first words* Feb 93 ski trip , *NOTE: You can search for only the first words in event descriptions. Your search words must exactly match the first words, except for case. 24 . Finding Schedule Entries Locating Entries You can also find Schedule entries by entering a date at the Locate menu in the Schedule. The current date is pre-entered. 1. With the Schedule selected, press 2. Press 3. Press MENU . to highlight the Locate menu. ENTER . 4. Type a month, day, and year. Or press . To type numbers, press the numbered keys. 5. At the last line, press ENTER . 6. To view more matching entries, if any, DN press plus . To view a list of all matching entries, press 7. To clear your search, press CLEAR MENU . 25 . Finding Schedule Entries Scanning Entries You can scan matching Schedule entries after searching for or locating them. Or you can scan all your Schedule entries by selecting the Schedule, pressing CLEAR , and then following these steps. 1. With the Schedule selected, press MENU . After searching for or locating entries, the Matches menu appears. Otherwise, the Schedule menu does. 2. Press or DN to highlight an entry. To zoom to the bottom or top of the list, press plus or . 3. To view a highlighted entry, press ENTER . 4. To view the next or previous listed entry, press plus DN or UP . 5. To return to the main menus, press 26 BACK . Finding Schedule Entries ■ Viewing Your Next Appointment You can view your next appointment, the next Schedule entry from the current time, by pressing plus N at any screen except a menu or help message. To exit the appointment, press BACK . You can also view your next appointment by pressing SPEC at the Schedule search screen. Then press to highlight Show Next Appointment. To view the next appointment, press ENTER . Or, to exit the special menu, press BACK . 27 Changing Schedule Entries Using the Schedule entry special menu, you can change, delete, undelete, or make new Schedule entries. You can also make annual entries or delete a range of old entries. These steps show how to change entries. To learn about your other options, see p. 29. 1. Find any Schedule entry. See “Finding Schedule Entries,” p. 23. 2. Press SPEC . This is the Schedule entry special menu. 3. If needed, press to highlight Change Entry. 4. With Change Entry highlighted, press . ENTER This is a sample Schedule entry screen. 5. Type your changes. 6. To save the changes, press 28 plus ENTER . Changing Schedule Entries ■ Other Schedule Changes Here are the other items on the Schedule entry special menu. To select an item, press and then ENTER . To exit the menu, press BACK . ● Delete Entry deletes the current entry from the Schedule. If you have only one entry and delete it, you must make a new Schedule entry before continuing. ● Undelete Entry restores the most recently deleted Schedule entry, even if you deleted it during a previous session. ● New Entry lets you make a new Schedule entry. ● New Annual Entry lets you make a new Schedule entry that repeats every year. After typing an annual entry, press ENTER . ● Delete All Older than deletes all Schedule entries older than a date that you type. After typing a date, press ENTER . ● Show Next Appointment displays the next Schedule entry from the current time. To exit the appointment, press BACK . 29 Calendar This section shows you how to use the Calendar. The Calendar covers every month from 1990 to 2052. The Calendar also marks the days and months with Schedule entries, so you can instantly view them. 30 Finding Calendars You can find monthly calendars using the Calendar search screen or the Locate menu in the Calendar. Searching for Calendars At the Calendar search screen, you can find calendars by month, year, or other searches (see p. 32). If you search for only a month, you go to the next occurrence of that month. If you search for only a year, you go to January of that year. 1. Select the Calendar from the Topic menu. Or press plus D (for dates). 2. Press CLEAR . You go to the Calendar search screen. 3. Type a month, year, both, or other search. To type numbers, press plus numbered keys. You need to type only the first three letters of a month. You don’t need to type capital letters. 4. To find the calendar, press ENTER . 31 Finding Calendars 5. To view the next or previous month, press DN or UP . 6. To view the next or previous year, press plus DN or UP . 7. To clear to the Calendar search screen, press CLEAR . ■ Other Calendar Searches Here are other searches that you can enter at the Calendar search screen. 32 Search By Examples days of the week monday , tuesday a next or previous day or time period next monday, previous week next year other terms yesterday tomorrow , , today , Finding Calendars Locating Calendars You can also find calendars using the Locate menu in the Calendar. Simply select a month or year. If you select a month, you go to that month in the selected year. If you select a year, you go to that year. 1. With the Calendar selected, press 2. Press 3. Press or ENTER MENU . to highlight Month or Year. . The check marks the current selection. 4. Press or or year. to highlight a month 5. To view its calendar, press ENTER . To view the next or previous month, press or UP . DN 33 Viewing Schedule Entries In calendars, days and months that have Schedule entries are marked with a dot. You can view the entries for a marked day by highlighting it and then pressing ENTER . If you highlight an unmarked day, you go to the Schedule search screen. 1. Find any calendar. See “Finding Calendars,” p. 31. 2. Press the arrow keys to highlight a marked day. 3. To view the first Schedule entry on that day, press ENTER . This is a sample Schedule entry. 4. To view the next Schedule entry, if any, on that day, press plus DN . 5. To return to the calendar, press 34 BACK . Viewing Schedule Entries ■ Making Schedule Entries From Calendars At any monthly calendar, you can make new Schedule entries without selecting the Schedule. First, highlight any day in a calendar. Next, press SPEC to view the Calendar special menu. Then press or to highlight New Schedule Entry. Press ENTER . Then make a Schedule entry for the day that you highlighted on the calendar or any other day (see p. 20). To return to the calendar, press BACK . NOTE: You can view Schedule entries for a highlighted calendar using the Calendar special menu above. First, press or to highlight View Schedule . Then press ENTER . 35 Phone Book This section shows you how to use the Phone Book. The Phone Book is an electronic phone and address book. Using the Phone Book, you can save home and business phone numbers and addresses. Then you can find your Phone Book entries by any entered item. 36 Making Phone Book Entries Phone Book entries may contain names, addresses, phone numbers, and notes. The first time that you use the Phone Book you must make a Phone Book entry. In each Phone Book entry, you must type a last name. Your notes can be up to 99 characters. 1. Select Phone Book from the Topic menu. Or press plus B (for phone book). If you’ve never used the Phone Book, you go directly to the Phone Book entry screen (Step 3). 2. Press MENU . 3. If needed, press New Entry. plus to highlight 4. With New Entry highlighted, press ENTER . This is a Phone Book entry screen. 5. Type a last name. Then press . 6. Type other information, if available. After each line, press . To change a line, press and then retype it. 7. To add the entry, press ENTER at the last line. 37 Making Phone Book Entries Or press plus ENTER at any line. This is a sample Phone Book entry. 8. To return to the menu, press BACK . The entry is listed alphabetically by last name. 38 Finding Phone Book Entries Once you’ve made Phone Book entries, you can find them using the Phone Book search screen, the Locate menu in the Phone Book, or by scanning the Phone or Matches menus. Searching for Entries At the Phone Book search screen, you can find Phone Book entries by first name, last name, or any line in an entry (see p. 40). Your search must exactly match the first letters or numbers of an item in a Phone Book entry. 1. With the Phone Book selected, press CLEAR . This is the Phone Book search screen. 2. Type a name or other Phone Book search. 3. To view the first matching entry, press . ENTER 4. To view more matching entries, if any, press plus DN . To view a list of all matching entries, press 5. To clear your search, press CLEAR MENU . . 39 Finding Phone Book Entries ■ Other Phone Book Searches Here are the other searches that you can enter at the Phone Book search screen. Search By Examples company XYZ, city Anytown state ny , ca country usa area code 212, 804 first words in notes client , relative Inc. Whatever your search, it must exactly match the first letters or numbers of an item in a Phone Book entry, except for case. For example, if the state in a Phone Book entry is N.Y., you must enter N.Y. or n.y. to match it. NOTE: You don’t need to enter all the letters or numbers in a Phone Book entry item. For example, you can enter smit to find Smiths, Smithsons, etc. But you do need to enter backslashes and dashes to match full phone numbers (see p. 13). 40 Finding Phone Book Entries Locating Entries You can also find Phone Book entries by first name, city, and state by selecting items from the Locate menu in the Phone Book. You can select up to 10 items in each category or items from more than one category. 1. With the Phone Book selected, press 2. Press MENU . to highlight the Locate menu. 3. To select a category, press and then ENTER . This is a sample list of states. 4. To select items, press and then ENTER . To deselect an item, press ENTER . To select items from other categories, press BACK and go to Step 3. 5. To view the list of matches, press To scan the list, see p. 42. To clear, press . CLEAR . 41 Finding Phone Book Entries Scanning Entries You can scan matching Phone Book entries after searching for or locating them. Or you can scan all your Phone Book entries by selecting the Phone Book, pressing CLEAR , and then following these steps. 1. With the Phone Book, press MENU . After searching for or locating entries, the Matches menu appears. Otherwise, the Phone menu does. 2. Start typing a last name. As you type, names are highlighted. To erase letters, press BACK . 3. To move up or down, press Or press UP or of the list, press DN or . . To zoom to the top or bottom plus or . 4. To view a highlighted entry, press ENTER . 5. To view the next or previous listed entry, press plus UP or DN . 6. To return to the main menus, press 42 BACK . Changing Phone Book Entries Using the Phone Book entry special menu, you can change, delete, undelete, or make new Phone Book entries. This example shows how to change a Phone Book entry. To learn about the other options, see p. 44. 1. Find any Phone Book entry. See “Finding Phone Book Entries,” p. 39. 2. Press SPEC . This is the Phone Book entry special menu. 3. If needed, press to highlight Change Entry. 4. With Change Entry highlighted, press ENTER . This is a sample Phone Book entry screen. 5. Type your changes. 6. To save the changes, press plus ENTER . 43 Changing Phone Book Entries ■ Other Phone Book Changes Here are your other items on the Phone Book entry special menu. To select an item, press and then ENTER . To exit the menu, press BACK . ● Delete Entry deletes the current entry in the Phone Book. If you have only one Phone Book entry and delete it, you must make a new entry before continuing in the Phone Book. ● Undelete Entry restores the most recently deleted Phone Book entry, even if you deleted it during a previous session. ● New Entry lets you make new entries. ■ Saving or Discarding Changes At any Phone Book entry screen, you can save or discard your most recent changes. First, press or to highlight an item. SPEC . Then press To select a highlighted item, press Or, to exit the special menu, press 44 . ENTER BACK . World Time This section shows you how to use the World Time. The World Time lets you find the current time and date in more than 270 pre-entered locations around the world. You can also add your own locations for customized reference. 45 Finding Locations You can find the times and dates of locations using the World Time search screen or scanning the Locations or Matches menus. The Clock must be set for world times and dates to be current (see p. 17). Searching For Locations At the World Time search screen, you can find worldwide times and dates by location. 1. Select World Time from the Topic menu. Or press plus F (for foreign). 2. Press CLEAR . 3. Type a location name (city, country, or both). This is the World Time search screen. 4. Press ENTER to view a matching location. 5. To view more matches, if any, press plus DN . To clear the search, press 46 CLEAR . Finding Locations Scanning Locations You can scan matching locations after searching for them. Or you can scan all the locations by selecting World Time, pressing CLEAR , and following these steps. 1. With World Time selected, press . MENU After searching, the Matches menu appears. Otherwise, the Locations menu does. 2. Start typing a location name (city, country). As you type, locations are highlighted. To erase letters, press BACK . 3. To move up or down, press or . To zoom to the top or bottom of the list, press plus or . 4. To view a highlighted location, press 5. To return to the main menus, press ENTER BACK . . 47 Adding Locations You can add your own locations to the World Time. Times at new locations must be set relative to Greenwich Mean Time (GMT). The names of your locations (city, country, etc.) can be up to 99 characters. 1. With World Time selected, press 2. If needed, press New Entry. plus MENU . to highlight 3. With New Entry highlighted, press ENTER . This is a Location entry screen. 4. Type a location. Then press . 5. Select Subtract or Add by pressing or and then SPACE . Then press Or type S or A and then press . . 6. Type hours added or subtracted from GMT. 7. To add the location, press ENTER at the last line. Or press plus ENTER at any line. The new location appears. 8. To return to the main menus, press 48 MENU . Adding Locations ■ Understanding GMT Greenwich Mean Time (GMT) is the time at Greenwich, England, the site of the prime meridian (0o longitude). By convention, the 24 world time zones are calculated from Greenwich Mean Time. To find how many hours a time zone is from GMT, see an atlas, almanac, or encyclopedia. ■ Selecting U.S. Time Zones At any Location entry screen, you can set a location to a standard U.S. time zone. First, press SPEC . Then, if needed, press to highlight Standard Time Zones . Next, press ENTER . Then press and then ENTER to select a time zone. NOTE: The Clock must be set to the correct U.S. time zone for the above steps to set an accurate time (see p. 17). 49 Changing Locations Using the Location special menu, you can change, delete, undelete, and add new locations. You can also set the Clock to any World Time Zone. This example shows you how change World Time locations. To learn about your other options, see p. 52. 1. Find a World Time location. See “Finding Locations,” p. 46. This is a sample location. 2. Press SPEC . 3. If needed, press to highlight Change Entry. This is the Location special menu. 4. With Change Entry highlighted, press ENTER . 50 Changing Locations 5. Type your changes. See “Adding Locations,” p. 48. 6. To update the location, press ENTER at the last line. Or press plus ENTER at any line. Or press Changes CLEAR or SPEC , highlight Save , and press ENTER . 7. To return to the main menus, press MENU . ■ Saving or Discarding Changes At any Location entry screen, you can save or discard your most recent changes. First, press SPEC . Then press to highlight an item. To select a highlighted item, press Or, to exit the special menu, press . ENTER BACK . 51 Changing Locations ■ Other Location Changes Here are the other items on the Location special menu. To select an item, press and then ENTER . To exit the menu, press BACK . ● Delete Entry deletes the current location from the World Time list. ● Undelete Entry restores the most recently deleted location, even if you deleted it during a previous session. ● New Entry lets you add a new location to the World Time list. ● Set Clock to this Time Zone sets the Clock to the time zone of the current location. First, press to highlight this menu item. Then, to set the Clock, press ENTER . ■ About Changing Locations In locations that you’ve added, you can change the location name or time. In pre-entered locations, you can change the time only. If you change the name of a preentered location, a new location is added and the pre-entered location remains unchanged. 52 Calculator This section shows you how to use the Calculator. The Calculator performs basic math operations, squares, square roots, and reciprocals. You can also save your results and use them in later calculations. 53 Making Calculations Using the Calculator, you can add, subtract, multiply, and divide numbers of up to 10 digits. You can also calculate squares, square roots, and reciprocals. 1. Select the Calculator from the Topic menu. Or press plus M (for math). This is the Calculator screen. 2. To type numbers, press the numbered keys. To type a negative number, press SHIFT plus , - . To type decimals, press . ’ . To erase numbers, press BACK . 3. To type +, -, x or ÷, press the keys under the math symbols. 4. Type another number. 5. To calculate the result, press 54 ENTER . Making Calculations 6. To repeat a previous operation, press ENTER . Or type more numbers and do more calculations. 7. To clear the current calculations, press CLEAR . ■ Squares, Square Roots, Reciprocals To. . . Press. . . square a number + J find a square root + K find a reciprocal + L ■ Scanning Calculations To. . . Press. . . + scroll up or down + page up or down UP or DN 55 Saving Results Using the Calculator special menu, you can save the result of any calculation and use it in later calculations. You should name each result before you save it. 1. Make a calculation. See “Making Calculations,” p. 54. 2. Press SPEC . 3. If necessary, press Save this Result. to highlight This is the Calculator special menu. 4. Press ENTER . If you don’t want to save it, press BACK now. 5 Type a name of up to 10 characters. To erase characters, press 6. To save the result, press 56 BACK . ENTER . Using Previous Results Using the Calculator special menu, you can use previously saved results in your current calculations. 1. At the Calculator screen, press 2. Press 3. Press 4. Press SPEC . to highlight Use Previous Result. ENTER . to highlight a result. 5. To use the result, press ENTER . The result appears on the Calculator screen. ■ Deleting Saved Results Using the Calculator special menu, you can also delete saved results. First, press SPEC at the Calculator screen. Next, press and then ENTER to select Delete Previous Result . Then press to highlight a result in the list. To delete the result, press ENTER . 57 Using Previous Results ■ A Quick Way to Use Saved Results Simply type the name of a saved result directly at the Calculator screen. For example, if you had saved a result named “subtotal,” you would type subtotal at the Calculator screen. Then press ENTER to use it in your calculations. NOTE: To type Q, W, E, R, T, Y, U, I, O, or P at the Calculator screen, you must press while pressing the letter keys. Also, you can’t type a name at the Calculator screen that begins with a number. 58 Other Functions This section shows you how to use the functions under the Other menu. Using the Other menu, You can gauge the memory, name and copy your Organizer, set the shutoff timing, and reset the Organizer. 59 Gauging Memory Using the Memory Gauge, you can check how much of the Organizer’s 128 kilobytes of memory is available for more entries. 1. Press MENU . 2. Press to highlight the Other menu. 3. Press or 4. Press ENTER to highlight Memory Gauge. . 1 5. To return to menus, press BACK . ■ About the Organizer’s Memory The Organizer’s memory is dynamically allocated. That means that the number of entries that you can make in any Topic depends on the number of entries in the other Topics. 60 Naming Cards You must name an Organizer digital book, or card, before copying to or from it. To learn how to copy Organizer cards, see p. 62. 1. Press MENU . 2. Press to highlight the Other menu. 3. Press or 4. Press ENTER to highlight Name this Card. . 5. Type a name of up to 8 characters. To erase characters, press 6. To save the name, press BACK ENTER . . 61 Copying Cards To share information or provide extra protection, you can copy all the entries from one Organizer card to another. Before you copy, you must have two named Organizers installed in your Digital Book System (see p. 61). WARNING: When you copy to an Organizer card, all previous entries on that card are overwritten. 1. Press . MENU 2. Press to highlight the Other menu. 3. Press or 4. Press ENTER to highlight Copy the Card. . These are sample names. 5. To select a copy direction, press Then press ENTER . or 6. To exit without copying, press BACK . To copy the Organizer, press E . 62 . More Functions Using the Other menu, you can also set the automatic shutoff timing, view the copyright, do a factory reset, and verify the Phone Book. First, press MENU and then to highlight the Other menu. Next, press and then ENTER to select an item. ● Set Shutoff Time lets you adjust how long the Digital Book System stays on when you forget to turn it off. Select a shutoff time by pressing or and then ENTER . ● Copyright lets you view copyright information about the Organizer. To exit it, press BACK . ● Factory Reset WARNING: Factory Reset permanently erases all the information entered in an Organizer .Use it only if you want to erase erase all your entries. To exit Factory Reset, press any key but E . To reset, press E . ● Verifying Phone Book verifies your Phone Book entries and repairs any damaged entries. WARNING: Use Verifying Phone Book only if your Phone Book entries appear to be damaged due to static electricity or low batteries. Used otherwise, this item may damage your Phone Book entries. 63 More Functions ■ About the On-Card Battery The Organizer has its own built-in, 3-volt, CR1220 lithium battery. This means that you can remove an Organizer from the Digital Book System without fear of losing any information that you entered in it. This on-card battery uses little power, so you rarely, if ever, need to change it. When the battery runs low, a warning appears on screen. WARNING: Unless you see the low battery warning, do not change the on-card battery or remove the battery cover on the back of the Organizer card. If you must change the on-card battery, do so only with the Organizer installed in the Digital Book System. If you change the on-card battery when the Organizer is not installed, you will permanently erase all the information that you entered in the Organizer. To change the on-card battery, first unscrew the battery cover on the back of the Organizer. Then install a new battery, plus sign facing up, and replace the cover. 64 Appendixes This section reviews how to use the Digital Book System and the Organizer. 65 Digital Book System Installing & Removing Digital Books To install a digital book, first turn off your Digital Book System. Then align the digital book’s tabs with the notches in either book slot on the back and snap the book into the slot. If you install only one book, it doesn’t matter which slot you use. But make sure that the book’s metal contacts are facing down. To remove a book, first turn off the Digital Book System. Then compress the book’s tab and lift the book from the slot. Restarting the Digital Book System If the keyboard fails to respond or the screen performs erratically, first press CLEAR and then press ON/OFF . If nothing happens, hold CLEAR and press ON/OFF . If nothing happens still, press the recessed reset button on the back of your Digital Book System using a paper clip. WARNING: If you install or remove digital books when the Digital Book System is on, or when you reset the Digital Book System, you may erase information that you entered in the installed digital books. 66 Digital Book System Switching Between Digital Books 1. With two digital books installed, press CARD . 2. Highlight a symbol by pressing Then press ENTER . or . To return to the first book, repeat these steps. Sending Words Between Books Some digital books can send and receive words from other digital books. 1. Highlight a word in a digital book. Read its User's Manual to learn how. 2. Hold and press CARD . 3. Highlight the other digital book’s symbol. ENTER Then press . You see its main display. You may need to press ENTER again to look up the word. 67 Digital Book System Replacing the Batteries Your Digital Book System uses CR2032 lithium batteries. Have four new batteries ready before following these steps. 1. Turn the Digital Book System off. 2. Press and slide the battery cover off the back of the unit. Then remove all batteries. 3. Place a battery, with its plus (+) sign up, at the bottom of each battery cavity. 4. Place a battery, plus sign up, at the top of each cavity. The metal clip must contact the top battery. 5. Replace the battery cover. WARNING: To prevent deleting information from installed digital books: • Always replace the batteries before they lose all power, and never remove the batteries while the Digital Book System is on. • Never mix old and new batteries. And, once batteries have been removed, install new ones within two minutes. 68 Digital Book System Protecting the Digital Book System • Don't touch the metal contacts on the back of your digital books or the rubber contacts in the book slots of the Digital Book System. CAUTION: Touching the contacts with statically charged objects, including your fingers, could erase information that you entered in your installed digital books. • Don't put excessive pressure or weight on your digital books or Digital Book System. • Don't expose your digital books to extreme or prolonged heat, cold, or other adverse conditions. When you're not using your Digital Book System, keep two digital books or dummy books in its slots to prevent dust build-up. Cleaning the Digital Book System To clean the digital books, apply isopropyl alcohol with cotton swab. To clean the Digital Book System, apply a mild household cleaner onto a soft cloth. CAUTION: Spraying liquids directly on your Digital Book System could damage its circuitry. 69 Specifications Product Features • Topics: Phone Book, Schedule, Calendar, Calculator, World Time, Clock • Entries: Times and dates; Schedule entries, or appointments; Phone Book entries; World Time locations; calculations • Word Searches: in the Schedule—by date or event description; in the Phone Book—by name, city, state, or words in entries; in World Time—by location. • Alpha-searching of listed Schedule entries, Phone Book entries, or World Time Locations • Calculator functions: addition, subtraction, multiplication, division, squares, square roots, reciprocals, and saving results • Data copying to other Organizer cards • Entry browsing • Intercard communication • Memory gauge • adjustable shutoff timing • context-sensitive help and built-in tutorials • On-card 3-volt, CR1220 lithium battery • On-card RAM: 128 kilobytes • Size: 58 x 31 x 7 (2-1/4” x 1-1/4” x 1/4”) • ROM size: 2 megabits Copyrights, Trademarks and Patents © 1993 Franklin Electronic Publishers, Inc. All rights reserved.. Patents Pending. ISBN 1-56712-025-3 70 Limited Warranty (U.S. only) FRANKLIN warrants to you that the DIGITAL BOOK will be free from defects in materials and workmanship for one year from purchase. In the case of such a defect in your DIGITAL BOOK, FRANKLIN will repair or replace it without charge on return, with purchase receipt, to the dealer from which you made your purchase or Franklin Electronic Publishers, Inc., 122 Burrs Road, Mt. Holly, NJ 08060, within one year of purchase. Alternatively, FRANKLIN may, at its option, refund your purchase price. Data contained in the DIGITAL BOOK may be provided under license to FRANKLIN. FRANKLIN makes no warranty with respect to the accuracy of data in the DIGITAL BOOK. No warranty is made that the DIGITAL BOOK will run uninterrupted or error free. You assume all risk of any damage or loss from your use of the DIGITAL BOOK. This warranty does not apply if, in the sole discretion of FRANKLIN, the DIGITAL BOOK has been tampered with, damaged by accident, abuse, misuse, or misapplication, or as a result of service or modification by any party, including any dealer, other than FRANKLIN. This warranty applies only to products manufactured by or for FRANKLIN. Batteries, corrosion or battery contacts and any damage caused by batteries are not covered by this warranty. NO FRANKLIN DEALER, AGENT, OR EMPLOYEE IS AUTHORIZED TO MAKE ANY ADDITIONAL WARRANTY IN THIS REGARD OR TO MAKE ANY MODIFICATION OR EXTENSION OF THIS EXPRESS WARRANTY. THE FOREGOING WARRANTY IS EXCLUSIVE AND IS IN LIEU OF ALL OTHER EXPRESS OR IMPLIED WARRANTIES, WRITTEN OR ORAL, INCLUDING, BUT NOT LIMITED TO, WARRANTIES OF MERCHANTABILITY OR FITNESS FOR A PARTICULAR PURPOSE. YOUR SOLE AND EXCLUSIVE REMEDY SHALL BE FRANKLIN’S OBLIGATION TO REPLACE OR REFUND AS SET FORTH ABOVE IN THIS WARRANTY. Some States do not allow the exclusion of implied warranties, or limitations on how long a warranty lasts. This warranty gives you specific rights; you may also have additional rights which vary from State to State. This warranty shall not be applicable to the extent that enforcement of any provision may be prohibited by applicable law. FRANKLIN SHALL IN NO EVENT BE LIABLE TO YOU OR TO ANY OTHER PERSON FOR ANY SPECIAL, INCIDENTAL, OR CONSEQUENTIAL DAMAGES, OR ANY OTHER INDIRECT LOSS OR DAMAGE, ARISING OUT OF YOUR PURCHASE, THE MANUFACTURE OR SALE OF THE DIGITAL BOOK, THIS LICENSE, OR ANY OBLIGATION RESULTING THEREFROM OR THE USE OR PERFORMANCE OF THE DIGITAL BOOK UNDER ANY LEGAL THEORY, WHETHER BREACH OF CONTRACT, TORT, STRICT LIABILITY OR ANY OTHER CAUSE OF ACTION OR PROCEEDING, WHICH DAMAGES SHALL INCLUDE, BUT NOT BE LIMITED TO, LOST PROFITS, DAMAGES TO PROPERTY, OR PERSONAL INJURY (BUT ONLY TO THE EXTENT PERMITTED BY LAW). FRANKLIN’S ENTIRE LIABILITY FOR ANY CLAIM OR LOSS, DAMAGE, OR EXPENSE FROM ANY SUCH CAUSE SHALL IN NO EVENT EXCEED THE PRICE PAID FOR THE DIGITAL BOOK. THIS CLAUSE SHALL SURVIVE FAILURE OF AN EXCLUSIVE REMEDY. This license and warranty is governed by the laws of the United States and the State of New Jersey. 71 Key Guide Function Keys CLEAR Start a search. Or clear current calculations. MENU Go to main menus. MORE At search and entry screens, type special punctuation marks. At some help messages, view more help. CARD Exit the Organizer. ENTER Select an item. Search. Or calculate. SPEC View a special menu. BACK Back up. Or erase typed characters. HELP View a help message. Direction Keys Move in the indicated direction. UP DN Page up or down. Gold Key Combinations* + HELP + + 72 View help about Gold key combinations. Zoom to top/bottom. In Calculator, scroll. DN UP Go to the next/previous entry/tutorial. * Hold while pressing the other key. Key Guide + B Go to the Phone Book. + C Go to the Clock. + D Go to the Calendar (dates). + F Go to World Time (foreign). + M Go to the Calculator (math). + N View the next appointment. + S Go to the Schedule. + ENTER Save an entry or changes. + SHIFT + A Type special punctuation marks. In the Calculator SHIFT + J Square a number (n2). + K Make a square root (√n). + L Make a reciprocal (1/n). + ,- Type a negative number Other Keys At menus, view highlighted item in full. ?* SHIFT + A SPACE Type capital letters. Type a space. 73 Index Annual Schedule entries 22, 29 Arrow keys, using 9 Auto-resume feature 7 Batteries replacing Digital Book System 68 Organizer cards 64 Calculator clearing calculations 55 deleting results 57 making calculations 54 reciprocals 55 saving results 56 scanning calculations 55 squares/square roots 55 typing decimals 54 math symbols 54 negative numbers 54 using saved results 57, 58 Calendar locating calendars 33 making Schedule 74 entries 35 searching 31 viewing Schedule entries 34 Clock Daylight Savings Time 17 selecting 17 setting current time 17 U.S. time zones 17 to world times 18, 52 Copying Organizers 62 Copyright information 63 Cursor 12 Daylight Savings Time 17 Decimals, typing 54 Digital Book System cleaning 69 restarting 66 Digital books installation 6, 66 selecting 67 Ellipses 10 Index Finding calendars 31 Phone Book entries 39 Schedule entries 23 world times by location 46 Gold key combinations making calculations 55, 58 typing numbers at search screens 12 typing special punctuation 13 zooming between topics 9 Help messages 15 Installing digital books 6 Key Guide 72 Locate menu in Calendar 33 in Phone Book 41 in Schedule 25 Locations menu 47 Matches menu in Phone Book 42 in Schedule 23, 26 in World Time 46, 47 Memory capacity 4, 60 gauge 60 Menus highlighting/selecting items 8 main menus selecting 8 viewing 8 special menus 11 viewing full items 10 Naming Organizers 61 Negative numbers, typing 54 Next appointment, viewing 27, 29 Organizer cards copying 62 naming 61 resetting 63 Other menu 14, 59 Patents 70 Phone Book changing entries 43 deleting/undeleting entries 44 discarding entries 38 75 Index locating entries 41 making entries 37, 44 saving changes 38 scanning entries 42 searching by last name 39 by other items 40 selecting 37 verifying entries 63 Product specifications 70 Punctuation marks 13 Reciprocals 55 Resetting Organizer cards 63 Schedule annual entries 22, 29 changing entries 28 deleting/undeleting entries 29 discarding changes 22 event descriptions 20, 21 locating entries 25 making entries 20, 29 from Calendar 35 saving changes 22 scanning entries 26 76 searching by date 23 by other items 24 selecting 20 viewing from calendars 34 viewing next appointment 27, 29 Searches clearing 12 general instructions 12 typing characters 12 Selecting Organizer 7 topics using Gold key combinations 9 using the Topic menu 8 Shutoff time, changing 63 Special menus 11 Specifications 70 Squares/square roots 55 Summer/Standard Time 18 Index Time zones in Clock 17 Topic menu 8 Topics moving between 8 overview 4 zooming between 9 Tutorials 14 Typing decimals 54 letters at search screens 12 in the Calculator negative numbers 54 numbers at search screens 12 in the Calculator 58 punctuation 13 tutorials 14 Warranty (U.S. only) 71 World Time adding locations 48, 52 changing locations 50 deleting/undeleting locations 52 discarding changes 51 Locations menu 47 saving changes 51 scanning locations 47 searching by locations 46 setting Clock by 52 Verifying Phone Book 63 Viewing full menu items 10 help messages 15 main menus 8 more help 15 special menus 11 special punctuation 13 77 For Use with the Franklin Digital Book System Electronic Publishers F IC-107 DIGITAL BOOK S C H E D U L E JUNE 7 8 9 4 5 6 1 2 3 0 X ÷ 12 3 9 6 = Personal ORGANIZER Electronic Publishers Mt. Holly, NJ 08060 User’s Manual FCR-28007-00 A PN 7201665 Printed in China FOLD