1
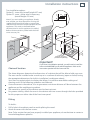
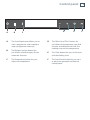
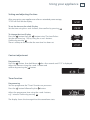
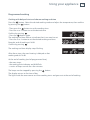
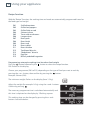
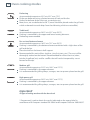
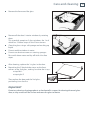
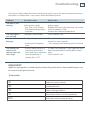
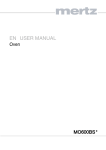
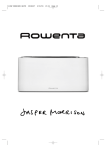
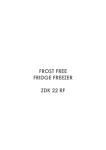
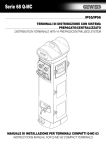
Compact oven
OB60N8DTX models
Installation instructions
and User guide
NZ AU GB IE
Contents
Safety and warnings
Installation instructions
Choice of location
Fitting
Electrical specifications
Electrical connection
Introduction to your oven
Control panel
Display
Using your appliance
Setting and adjusting the time
Contrast adjustment
Timer function
Child safety
Operation
Instant cooking
Programmed cooking
Recipe function
Oven cooking modes
Care and cleaning
Troubleshooting
Warranty and service
Important!
SAVE THESE INSTRUCTIONS
The models shown in this User Guide may not be available in all markets and are
subject to change at any time. For current details about model and specification
availability in your country, please visit our local website listed on the back cover
or contact your local Fisher & Paykel dealer.
1
3
5
5
6
6
7
9
10
11
11
11
12
12
13
14
16
18
20
23
24
Safety and warnings
3
Important!
Keep this user guide with your appliance. If the appliance is ever sold or transferred to another
person, ensure that the new owner receives the user guide. Please become familiar with these
recommendations before installing and using your oven. They were written for your safety and
the safety of others.
Important safety instructions
■
■
■
■
■
■
■
■
■
■
■
■
This appliance is not designed to be used by people (including children) with reduced physical,
sensorial or mental capacity or people lacking in experience or knowledge, except if they have
the benefit, through the intermediary of a person responsible for their safety, of preliminary
supervision or instruction concerning the use of the appliance.
This oven was designed for use by private persons in their homes. It is intended solely for cooking
foodstuffs. This oven does not contain any asbestos-based components.
Please make sure children do not play with the appliance.
When you receive the appliance, unpack it or have it unpacked immediately. Give it an overall
inspection. Make note of any concerns or reservations on the delivery slip and make sure to keep
a copy of this form.
Your appliance is intended for standard household use. Do not use it for commercial or industrial
purposes or for any other purpose than that for which it was designed.
Do not modify or attempt to modify any of the characteristics of this appliance. This would be
dangerous to your safety.
WARNING: accessible parts may be hot when in use. It is advisable to keep small children away
from the appliance.
Never pull your appliance by the door handle.
Before using your oven for the first time, heat it while empty for approximately 15 minutes. Make
sure that the room is sufficiently ventilated. You may notice a particular odour, or a small release
of smoke. All of this is normal.
WARNING: accessible parts may become hot when the grill is used. It is advisable to keep children
away from the apppliance.
When in use, the appliance becomes hot. Be careful not to touch the heating elements located
inside the oven.
Installation should only be performed by installers and qualified technicians.
4
Safety and warnings
IMPORTANT SAFETY INSTRUCTIONS
■
■
■
■
■
■
■
■
■
■
■
■
■
■
■
When placing dishes inside or removing them from the oven, do not place your hands close to the
upper heating elements, use heat-protective kitchen gloves.
At the end of cooking, do not pick up dishes (grills, rotisserie...) with bare hands.
Never place aluminium foil directly in contact with the oven shelf (see the chapter on oven
description), the accumulated heat may cause deterioration of the enamel.
Do not place heavy weights on the open oven door, and make sure that children are able neither
to climb nor sit on it.
The oven must be turned off when cleaning inside the oven.
This appliance is not intended to be used by persons (including children) with reduced physical,
sensory or mental abilities, or persons lacking experience or awareness, unless using it with the
help of a person responsible for their safety, or under supervision and with prior instruction in its
use.
Additionally to the accessories supplied with your oven, only use dishes which resist high
temperatures (follow the manufacturer’s instructions).
After using your oven, make sure that all the controls are in their stop position.
Do not use your oven as a larder or to store any items after use.
Never use steam or high-pressure devices to clean the oven (electrical safety requirement).
All types of cooking are done with the door closed.
(According to model) For your safety, your oven is equipped with an AUTOMATIC STOP, if you
forget to turn off your oven by mistake. After 23 hours and 30 minutes of continuous use, the AS
(Automatic Stop) feature will be activated and your oven will turn itself off. AS or Auto Stop will
be displayed instead of the time and a series of successive beeps will be emitted for a short time.
Caring for the environment
This appliance’s packing materials are recyclable. Recycle them and play a role in protecting the
environment by depositing them in municipal containers provided for this purpose.
Your appliance also contains many recyclable materials. It is therefore marked with this logo to
indicate that used appliances must not be mixed with other waste. Recycling of the appliances
organised by your manufacturer will thus be undertaken in optimum conditions, in accordance
with European directive EC/2002/96 relating to electrical and electronic equipment
waste. Consult your local authority or your retailer to find the drop-off points for
used appliances that is nearest to your home.
We thank you for your help in protecting the environment.
Installation instructions
50
20
10
50
Two installation options:
Option ‘A’ - oven only (overall height 457 mm)
Option ‘B’ - oven + lower trim kit accessory
(overall height 478 mm)
5
Note: If you are installing an appliance directly
over another, you have the option of using the
supplied black metal shelf cover to conceal the
shelf front that would be visible between the two
appliances. This needs to be fitted before
the lower trim kit and/or appliance is installed.
Refer to the instructions packed with the shelf
cover accessory kit.
550
547
23
450
(option 'A')
595
470
470
550 min.
55
560
0m
445
450
(option 'A')
378
(option 'B')
in.
Lower trim
(optional accessory,
purchased separately)
478
(option 'B')
457
560
(option 'A')
(option 'B')
Important!
Choice of location
If you choose Installation option B, you will need to install the
lower trim kit BEFORE you install the appliance. Refer to the
instructions packed with the lower trim kit.
The above diagrams determine the dimensions of a cabinet that will be able to hold your oven.
The oven can be installed under a work top or in a column of cabinetry (open or closed) having
the appropriate dimensions for built-in installation (see diagram above).
Your oven has optimised air circulation that allows it to achieve remarkable cooking and
cleaning results if the following guidelines are followed :
Centre the oven in the cabinet so as to guarantee a minimum distance of 10mm between the
appliance and the neighbouring cabinet.
The material or coating of the cabinet must be heat-resistant.
For greater stability, attach the oven in the cabinet with two screws through the holes provided
for this purpose on either side of the front inner panel.
Fitting
1
2
To do this :
Drill a hole in the cabinet panel to avoid splitting the wood.
Attach the oven with the two screws.
Note: To be certain that you have properly installed your appliance, do not hesitate to contact a
household appliance specialist.
6
Installation instructions
Electrical specifications
Electrical connection rating: 3.135 kW
Voltage/frequency: 220-240 V/ 50 Hz
Current: 16 A
Electrical connection
The appliance must be fitted correctly to guarantee electrical safety. During fitting and
maintenance operations, the appliance must be disconnected from the electrical grid; fuses must
be switched off or removed. The electrical connections are made before the appliance is installed
in its housing. Ensure that:
the electrical installation has sufficient voltage,
the electrical wires are in good condition,
the diameter of the wires complies with the installation requirements.
the oven is connected to a single phase 220-240 V 50 Hz supply using a 1.5 mm2 cable and
connected to earth. The supply must be protected by a suitably rated circuit breaker in
accordance with the installation regulations.
a suitable isolating switch providing full disconnection from the mains power supply is
incorporated in the permanent wiring, mounted and positioned to comply with the local wiring
rules and regulations. The isolating switch must be of an approved type and provide a 3 mm air
gap contact separation in all poles (or in all active [phase] conductors if the local wiring rules
allow for this variation of the requirements)
the isolating switch will be easily accessible to the customer with the oven installed.
Important!
The safety wire (green-yellow) is connected to the appliance’s terminal and must be connected to
the earth terminal of the electrical set-up.
If the power cable is damaged, it should be replaced by the manufacturer, its after-sales service
department or a similarly qualified person to avoid danger.
We cannot be held responsible for any accident resulting from inexistent, defective or incorrect
earthing.
If the electrical installation in your residence requires any changes in order to hook up your
appliance, call upon a professional electrician.
If the oven malfunctions in any way, disconnect it from the power supply or remove the fuse
corresponding to the sector where the oven is hooked up.
Introduction to your oven
A
B
C
A Display
B Controls
C Wire shelf supports
7
8
Introduction to your oven
Accessories supplied
Shelf
The shelf can be used to hold all dishes and
moulds containing foodstuffs to be cooked or
browned.
It can be used for barbecues
(to be placed directly on the shelf ).
Rear
Front
Shelf
Enamel tray
When inserted in the supports under the shelf,
it collects juice and fat from grilling, and can be
used half-filled with water as a double-boiler.
Avoid placing roasts or meat directly in the
tray because this is certain to cause significant
spattering on the oven walls.
Enamel tray
Control panel
A
B
A
The Start/Stop button allows you to
start a programme, and suspend or
stop a programme underway.
B
The Recipe Function button lets
you choose a food category for the
automatic function.
C
D
C
The Temperature button lets you
adjust the temperature.
E
9
F
D
The “Minus” and “Plus” buttons let
you choose the programme type and
increase and decrease the time, the
cooking time and the temperature.
E
The Clock button lets you set the time
and the cooking time.
F
The Start/Pause button lets you start
or pause an operation and lock the
control panel.
10
Display
The display helps you to programme the various settings Time, Cooking time, Food weight
(grammes), Recipe Function.
A
B
J
I
C D
E
K
F
H
A
Child safety
F
Cooking modes
B
Recipe function
G
Shelf support indicator
C
Fast pre-heat function
H
Programme time
D
Time
I
End of cooking indicator
E
Temperature/food weight
J
Cooking time indicator
K
Temperature rise indicator
G
Using your appliance
Setting and adjusting the time
After connecting your appliance or after an extended power outage,
“12:00” will flash on the display.
To set the time on the clock Display
Set the time using the + and - buttons, then confirm by pressing
To change the time Display
Press the
button then the
button twice. The time flashes.
Set the new time (e.g. 7:30) by using the + and - buttons.
Confirm by pressing
.
There is a beep to confirm that the new time has been set.
Contrast adjustment
Programming
Press the
button, then hold down
for a few seconds until “CO” is displayed.
Adjust the contrast using the + and - buttons and
confirm by pressing the
button.
Timer function
Programming
You can programme the “Timer” function on your oven.
Press the
button followed by the
button.
Adjust the programme time using the + and - buttons,
e.g. 1 minute. Confirm by pressing
.
The display shows the time again but the countdown starts.
12:00
06:30
06:30
07:30
11
12
Using your appliance
Child safety
You can activate the “CHILD SAFETY” function to prevent unauthorised use of your oven.
Programming
Press the
button for 3 seconds. There are two beeps to
confirm that your oven is temporarily locked.
The symbol appears in the top left-hand corner of the display.
No programmes are available.
To cancel:
Follow the same procedure:
Press the
button for 3 seconds. The symbol disappears and the clock is displayed.
Two beeps are sounded to confirm the procedure.
Operation
Your appliance is now connected and the correct time is set.
Open the door using the handle. Place the food inside, then close the door.
If the door is not closed properly, the appliance will not work.
Opening the door during operation does not cancel the current programme but just interrupts it.
To restart the oven, close the door.
Press the
button when the door is closed to interrupt the programme and press it again to
resume cooking.
To cancel a programme, press the
button.
There are three beeps to indicate the end of each programme and the time is again displayed in
the display panel.
Using your appliance
13
Instant cooking
Programming
The programmer should display only the time. It should not be flashing.
Press the
button, then select your cooking programme using the + and - buttons.
Example: TRADITIONAL, shelf support 1 or 2, 200 °C recommended.
Place your dish in the oven based on the recommendation indicated in the display.
– Confirm by pressing
.
The oven begins heating.
Your oven recommends the optimum temperature for the
chosen cooking mode.
It is, however, possible to adjust the temperature.
After you have chosen your cooking programme, press the
button and adjust the temperature using the + and - buttons,
then confirm by pressing the
button.
Example: 220 °C
The temperature rise indicator is activated and indicates the temperature increase in the oven.
A series of beeps will sound when the oven reaches the selected temperature.
To stop cooking, press the
button.
Important!
After a cooking cycle, the cooling fan continues to operate for a period of time in order to ensure
optimum oven reliability.
All types of cooking are done with the door closed.
14
Using your appliance
Programmed cooking
Cooking with immediate start and programmed duration
Press the
button. Select the desired cooking mode and adjust
the temperature (see instant cooking section), then confirm by
pressing the
button.
- Then press the
button and the cooking time indicator flashes.
You can then set a cooking time.
Press the + or - buttons to set the desired time.
Example: 30 min cooking time.
– Confirm by pressing
.
The cooking time display stops flashing.
– Confirm again by pressing the
button..
Your oven starts.
The countdown begins immediately.
After these steps, the oven heats up:
A series of beeps will sound when the oven reaches the selected temperature.
At the end of cooking (end of programmed time),
- the oven stops,
- the cooking time indicator and 0:00 flash
- a series of beeps sounds for a few minutes.
The beeps can be stopped by pressing the
button.
Using your appliance
15
Programmed cooking
Cooking with delayed start and chosen cooking end time
Press the
button. Select the desired cooking mode and adjust the temperature, then confirm
by pressing the
button.
- Then press the
button to set the cooking time.
- Press the + or - buttons to set the desired time.
Confirm by pressing
.
- Press the
button again.
The cooking end time flashes to indicate that it can now be set.
- Press the + or - button to set the desired cooking end time.
Example: end of cooking at 18:00.
Confirm by pressing
.
The cooking end time display stops flashing.
After these steps, the oven heating is delayed so that
cooking ends at 18:00.
At the end of cooking (end of programmed time),
- the oven stops,
- the cooking time indicator and 0:00 flash.
- a series of beeps sounds for a few minutes.
The beeps can be stopped by pressing the
button.
The display returns to the time of day.
The light inside the oven comes on when cooking starts and goes out at the end of cooking.
16
Using your appliance
Recipe function
With the “Recipe” function, the cooking time and mode are automatically programmed based on
the food type and weight.
P01
P02
P03
P04
P05
P06
P07
P08
P09
P10
P11
P12
P13
P14
P15
Stuffed tomatoes
Grilled red peppers
Grilled hake or cod
Salmon in beer
Trout with mushrooms
Langoustines
Roast pork
Roast lamb
Roast veal
Roast rabbit
Roast chicken
Traditional biscuits
“Madeleines” biscuits
Egg flan
Bread: prebaked baguettes
Programming automatic cooking time based on food weight
Press the
button followed by the
button to select the recipe function.
P01 flashes on the display.
Choose your programme (P01 to P15) depending on the type of food you want to cook by
pressing the + or - button, then confirm by pressing the
button.
Example: Salmon (P04)
The minimum weight flashes on the display (here 1.5 kg).
Adjust the weight (for example 1.6 kg) using the + and - buttons.
Confirm by pressing
.
The necessary programme time is calculated automatically and
this time is depicted on the display by 2 flashing squares.
This cooking time can be changed by pressing the + and buttons. See table below:
Using your appliance
Recipe function
The cooking time is reduced by 15% compared to the
suggested cooking time.
This is the suggested cooking time.
The cooking time is increased by 15% compared to the
suggested cooking time.
The cooking time is increased by 30% compared to the
suggested cooking time.
Example: You want to increase the cooking time by 15%
compared to the initial time, i.e.
Press the + button and then confirm by pressing the
button.
The time calculated is then 12 minutes at a temperature of 218°C.
In this recipe, the Fast pre-heat symbol (preheating) flashes and
the cooking time countdown starts after preheating is complete.
Note: During cooking, pressing
displays the number of your
recipe and the cooking time depicted by the number of squares.
After a few seconds, the display once again displays the temperature and the cooking time.
17
18
Oven cooking modes
Defrosting
(recommended temperature 35°C min 35°C max 75°C)
Dishes are defrosted using a limited amount of heat and the fan.
Perfect for delicate dishes (fruit tart, custard pie, etc.).
Meat, buns, etc. are defrosted at 50 °C (meat should be placed under the grill with
a dish underneath to catch drips from the defrosting which are not edible).
Traditional*
(recommended temperature 200°C min 35°C max 250°C)
Cooking is controlled by the upper and lower heating elements.
Preheating recommended.
Fan assisted bottom element
(recommended temperature 180°C min 75°C max 250°C)
Cooking is controlled by the bottom element combined with a slight dose of the
grill and the fan.
Place the shelf on the lowest shelf support.
Recommended for moist dishes (quiches, juicy fruit tarts, etc.). The crust will be
thoroughly cooked on the bottom. Recommended for dishes that rise (cakes,
brioche, kugelhopf, etc.) and for soufflés that will not be hampered by a crust
formed on the top..
Medium grill
(recommended temperature 210°C min 100°C max 275°C)
Cooking is controlled by the upper element.
It is recommended for grilling chops, sausages, toast or prawns placed on the grill.
High-power grill
(recommended temperature 230°C min 100°C max 275°C)
Cooking is controlled by the upper element.
It is recommended for grilling chops, sausages, toast or prawns placed on the grill.
Important!
All types of cooking are done with the door closed.
* Programme(s) used to obtain the results indicated on the energy label in
accordance with European standard EN 50304 and European Directive 2002/40/EC.
Oven cooking modes
19
Fan assisted grill
(recommended temperature 190°C min 100°C max 250°C)
Cooking is controlled simultaneously by the upper element and by the fan.
Preheating is unnecessary. Succulent roasts and poultry that are crisp all over.
Slide the enamel tray onto the bottom shelf support.
Recommended for all roasted poultry or meat, for sealing and thoroughly cooking
a leg or a rib of beef. To retain the moist texture of fish steaks.
Turbo plus*
(recommended temperature 190°C min 35°C max 250°C)
Cooking is controlled by the heating element located at the back of the oven and
by the fan.
Quick heat: some dishes can be placed in the oven while it is still cold.
Recommended for keeping white meat, fish and vegetables moist.
Traditional fan assisted
(recommended temperature 180°C min 35°C max 220°C)
Cooking is controlled by the upper and lower heating elements and by the fan.
Important!
All types of cooking are done with the door closed.
* Programme(s) used to obtain the results indicated on the energy label in
accordance with European standard EN 50304 and European Directive 2002/40/EC.
20
Care and cleaning
Cleaning the outer surfaces
To clean both the electronic programmer window and the oven door, use a window washing
product applied to a soft cloth. Do not use abrasive creams or scouring sponges.
Cleaning the inside of the door
Disassembling the door
Before removing the glass window,
Open the door completely and block it open using
the two red stops. They are supplied with your oven
in the plastic pack.
To remove the frame and glass assembly, proceed as
follows:
Insert the two red stops in the A slots designed for
this.
Lever the assembly to detach
the frame and the glass.
A
Care and cleaning
21
Remove the frame and the glass.
Remove all the door’s interior windows by rotating
them.
This assembly comprises 2 glass windows, the 1st of
which has 2 rubber stops on the 2 front corners.
Clean the glass using a soft sponge and washing-up
liquid.
Do not soak the window in water.
Do not use abrasive creams or scouring sponges.
Rinse with clean water and dry off with a lint-free
wiper.
After cleaning, replace the 1st glass in the door.
Reposition the 2 black rubber stops on the front
corners of the 2nd glass, making sure that the it says:
at top left: L
at top right: R
L
Then replace the door and the 2nd glass,
positioning it on the first.
Important!
Do not use abrasive cleaning products or hard metallic scrapers for cleaning the oven’s glass
door, as they could scuff the surface and cause the glass to shatter.
R
22
Care and cleaning
Place the glass frame assembly back in the door.
- Take care to correctly slot the frame under the
spigot next to the hinge.
- Attach the frame by tightening it with the door.
CLAC
CLAC
Do not press on the frame alone.
Your appliance can now be used again.
Important!
Do not use abrasive cleaning products or hard metallic scrapers for cleaning the oven’s glass
door, as they could scuff the surface and cause the glass to shatter.
Troubleshooting
23
If you have a doubt about the correct functioning of your oven, this does not necessarily mean
that there is a malfunction. In any event, check the following items:
Problem
The oven is not
heating
The oven light is
not working.
Your oven starts
beeping.
The cooling fan
continues to
operate after the
oven stops.
Possible causes
The oven is not connected
to the power supply.
- Your fuse is out of order.
- The selected temperature
is too low.
The light is out of order.
What to do
Make sure that the oven is connected to the
power supply.
Replace the fuse in your electrical set-up and
check its capacity (16A).
Increase the selected temperature.
Call Customer Care.
During cooking.
The recommended temperature of your
choice has been reached.
- Your programmed cooking cycle is finished.
- At the end of a cooking
cycle.
- The fan should work for a
maximum of one hour
after cooking, or when the
oven temperature is
greater than 125°C.
If it does not stop after 1 hour, open the oven
door to accelerate the cooling down of the
oven
Call Customer Care.
Important!
Repairs to your appliance should only be performed by professionals. Non-standard repairs can
be a source of danger for the user.
Error codes
F01
Probe error (oven centre)
F02
Overheated oven
F05
Other cooking problems
F10
Information: Power cut during cooking
AUTO
Auto Stop: cooking time too long
24
Warranty and service
Before you call for service or assistance ...
Check the things you can do yourself. Refer to the ‘Installation instructions’, and your ‘User guide’
and check that:
1
2
your product is correctly installed
you are familiar with its normal operation.
If after checking these points you still need assistance, please see you ‘Service and warranty’
booklet for warranty information and Customer Care contact details, or contact us through our
website listed on the back cover.
Fisher & Paykel Appliances
Model no
Serial no.
Copy this from the serial label of your oven.
The label is located on the inside frame bottom right.
Date of purchase
Contact details
Dealer name
www.fisherpaykel.co.nz
www.fisherpaykel.com.au
www.fisherpaykel.co.uk
www.fisherpaykel.ie
Copyright © Fisher & Paykel 2011. All rights reserved.
The product specifications in this booklet apply to the specific products
and models described at the date of issue. Under our policy of continuous
product improvement, these specifications may change at any time. You
should therefore check with your Dealer to ensure this booklet correctly
describes the product currently available.
NZ AU GB IE
F&P PN - 590344 B
CZ5701066
11.2011