1
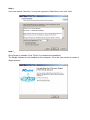
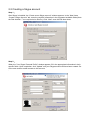
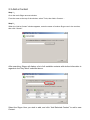
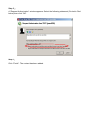
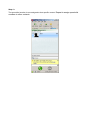
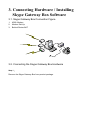
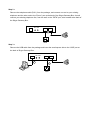
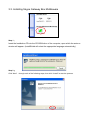
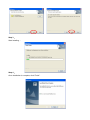
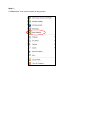
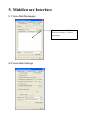
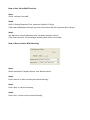
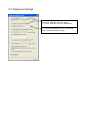
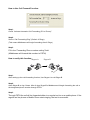
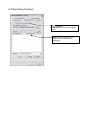
Skype Gateway Box
VO-4500SK V2.0
User’s Manual
2005/11/15 (Ver:1.0.2.4b)
Table of Contents
1. Introduction
1.1 Features
1.2 Package Contents
1.3 System Requirements
2. Install Skype Software
2.1 Downloading and Installing Skype
2.2 Creating a Skype Account
2.3 Adding Accounts
2.4 Assign a Speed-Dial Number
3. Connecting Hardware/Installing
3.1 Skype Gateway Box Connecting
3.2 Connecting the Skype Gateway Box Hardware
3.3 Installing Skype Gateway Box Driver
3.4 Installing Skype Gateway Box Software
3.5 Skype Sound and Audio Set-Up
4. Using Skype Gateway Box
4.1 Make a speed-dial call
4.2 Make a Phone Call with Skype Out
4.3 Make a Regular Phone Call
5. Middleware Interface
5.1 Voice Mail Messages
5.2 Voice Mail Settings
5.3 Telephone Settings
5.4 Recording Function
5.5 Magic Voice
1. Introduction
1.1. Features
•
•
•
•
•
•
•
•
•
•
•
•
•
Support USB 1.1/2.0
Plug and play
Support PC-PC, PC-Phone, Phone-PC, Phone-Phone
Make/receive Skype call and regular PSTN call
Talk through Phone or MIC/SPK
Hold and Switch between PC and PSTN
Call forward function
Voice Mail function
Echo Cancellation and Noise reduction
No external Power needed
FXO (PSTN) inbound password protection
Windows driver ( WinXP, 2000) supported
Windows management utility (Middleware)
1.2. Package Contents
When you buy a set of Skype Gateway Box, the Package must have the
z
z
z
z
z
following:
Skype Gateway Box
USB cable
Telephone cable(RJ11)
Quick Start Guide
Skype Gateway Box Installation CD-ROM
1.3. Minimum System Requirements:
.
.
.
.
Windows 2000/XP
Computer running at 400 MHz or Higher
128 MB RAM
15 MB free disk space on your hard drive
LAN or modem-based Internet connection
Recommended:
.
.
.
.
.
Windows 2000/XP/2003
Computer running at 1 GHz or better
256 MB RAM or better
30 MB free disk space on your hard drive
Broadband Internet connection
2. Install Skype Software
Before using Skype Gateway Box and Middleware, please download and install Skype on
your computer or notebook.
2.1. Downloading and Installing Skype
Step 1:
Go to WWW.SKYPE.COM Website to get the Skype Installation File.
Step 2:
.
When the Skype web page appears, click Download Skype now, It’s free. When the Download
page appears, click this item to download.
.
Step3:
Download the Skype Installation file to your PC.
Step 4:
After download, double-click on the “SkypeSetup.Exe” icon to start installing Skype.
Step 5:
When the window appears, select a language, then click “Next”.
Step 6:
In the next window, Check the “I accept the agreement” Radio Button, then click “Next”.
Step 7:
Once Skype is installed. Click “Finish” to complete the installation.
The Skype software is now installed on the computer. Go to the next section to create a
Skype account.
2.2 Creating a Skype account
Step 1:
After Skype is installed, the “Create a new Skype account” window appears. In the “New Users
-Create a Skype Account” tab, enter the required information in the suggested available fields (Note
the Red Asterisk “*” are required to be filled in). Click “Next” once this has been done.
Step 2:
When the “Your Skype Personal Profile” window appears, fill in the appropriate information in their
specific fields. Upon completion, click “Update” and your Skype account will have been created. Go
to the next section to add contacts to this account.
.
2.3 Add a Contact
Step 1:
Go to the main Skype account window.
From the menu at the top of the window, select Tools, then Add a Contact….
Step 2:
When the “Add a Contact” window appears, enter the name of another Skype user in the text box,
then click “Search”.
After searching, Skype will display a list of all available contacts with similar information in
regards to the “Key Word” searched above.
Select the Skype User you wish to add, and click “Add Selected Contact” to add a new
Contact.
Step 3:
A “Request Authorization” window appears. Select the following statement (Circled in Red
below) then click “OK”.
Step 4:
Click “Finish”. The contact has been added.
2.4 Assign Speed-Dial Number
Step 1:
From the main Skype window, select the Contact tab.
Step 2:
Right-click on a contact name then Select “Assign Speed-Dial”.
Step 3:
In the next window, enter a speed-dial number, then click “OK”.
Step 4:
The speed-dial number is now assigned to that specific contact. Repeat to assign speed-dial
numbers to other contacts.
3. Connecting Hardware / Installing
Skype Gateway Box Software
3.1. Skype Gateway Box Connection Figure
1.
ADSL Modem
2.
Modem Dial-Up
3.
Behind Router/NAT
3.2. Connecting the Skype Gateway Box Hardware
Step 1:
Remove the Skype Gateway Box from product package.
Step 2:
Remove the telephone cable (RJ11) from the package, and connect one end to your existing
telephone and the other end to the “Phone” port at the back of the Skype Gateway Box. As well
connect your existing telephone line, from the wall, to the “PSTN” port, also located at the back of
the Skype Gateway Box.
USB
PSTN
Phone
MIC SPK
1
Wall
Step 3:
Remove the USB cable from the package and insert the small square side to the “USB” port at
the back of Skype Gateway Box.
USB
PSTN
Phone
MIC SPK
2
1
Wall
3.3. Installing Skype Gateway Box Middleware
Step 1:
Insert the Installation CD into the CD-ROM drive of the computer, upon which the autorun
window will appear. (InstallShield will select the appropriate language automatically)
Step 2:
Click “Next”
through each of the following steps, then click “Install” to start the process.
Step 3:
Start Installing …
Step 4:
Once installation is complete, click “Finish”.
Step 5:
A “Middleware” Icon is also created in the process.
3.4. Start Using Skype Gateway Box
Step 1:
Starting Skype on your PC.
Double-Click the “Skype” Icon and make sure your Skype is running with the Skype icon appearing
on the bottom-right hand of your screen.
Step 2:
Click the “Middleware” Icon. A Window will immediately appear, indicating that Skype has detected
another program (Middleware) that is try to access it please select “Allow this program to use
Skype” to integrate “Middleware” with Skype.
Step 3:
Right Click Middleware Icon, Click “Advance Setting”.
When the Skype Gateway Box is ready, the
Middleware Icon will appear in color as
above.
When the Skype Gateway Box is not ready
or when Skype is not running, the
Middleware Icon will appear Gray.
Step 4:
The Middleware application as shown on your Screen.
Step 5:
You may use the functions and settings on the Middleware application.
3.5. Skype Audio Setup
Step 1: Start Skype, and Select the Tools menu. Click on “Options” .
Step 2:
z
Find the Sound Devices tab, and click on it.
z
In the Audio In/Out drop down menu select the USB device
z
Click the Save button
Step 3:
Click on the Start button and continue to the Settings section within the Start menu.
Click on the Control Panel tab within the Settings submenu.
In the Control Panel window find the “Sounds and Audio Devices” icon, and click on it.
Step 4:
Find the Audio tab (within the selections on top line), and click on it to display the Audio Settings
section.
Within the Sound Playback drop down menu, select the default Windows device. Click “OK”.
4. Using Skype Gateway Box
4.1 Make a Speed-Dial Call
1. Pick up the handset. (Hear the Dial Tone Generated from PSTN)
2. Press the * button to switch to Skype mode. (Hear the Dial Tone Generated from
Middleware)
3. Dial your contact's assigned speed-dial number.
4. Press the * button again to start the call.
4.2 Make a Phone Call with Skype Out
1. Pick up the handset. (Hear the Dial Tone Generated from PSTN)
2. Press the * button to switch to Skype mode. (Hear the Dial Tone Generated from
Middleware)
3. Dial the number (Format: 00 + Country Code + City Code + Local Phone or Cell Phone
Number)
4. Press the * button again to start the call.
4.3 Make a Regular Phone Call
1. Pick up the handset. (Hear the Dial Tone Generated from PSTN)
2. Dial the Phone Number.
5. Middleware Interface
5.1 Voice Mail Messages
Select and press “Play”
Button to listen to Voice
Message.
5.2 Voice Mail Settings
How to Use Voice Mail Function:
Step1.
Check “Activate Voice Mail”.
Step2.
Set the “Setting Response Time” parameter (Default: 6 Rings)
(This means Middleware will start the voice mail function and pick up phone after 6 Rings.)
Step3.
Set “Maximum Incoming Message time” parameter (Default: 30 sec)
(This means the max. voice message recording time will be 30 seconds)
How to Record Voice Mail Greeting:
Step1.
Select the desired “Playback Device” and “Record Device”.
Step2.
Press “Record” to start recording the desired Greeting.
Step3.
Press “Stop” to end the recording.
Step4.
Press “Play” to listen to the recorded Greeting.
5.3 Telephone Settings
When picking up the Phone
If checked: Hear Dial Tone from PSTN
If uncheck: Hear Dial Tone from Middleware
You can set the desired button (* or #) used to
switch between PSTN and Skype.
How to Use Call Forward Function:
Step1.
Check “Activate Automatic Call Forwarding (PC to Phone)”.
Step2.
Set the “Call Forwarding Ring” (Default: 6 Rings)
(This means Middleware will begin forwarding after 6 Rings)
Step3.
Fill in the “Forwarding Phone number setting” field.
(Middleware will forward this number to PSTN)
How to verify this function:
Skype-A
Skype-B
Step1.
After setting up the call forwarding function, Use Skype-A to call Skype-B.
Step2.
Allow Skype-B to ring 6 times. After 6 rings Skype-B’s Middleware will begin forwarding the call to
the designated phone number through PSTN.
Step3.
Through PSTN the call will be forwarded either to a regular lan line or a mobile phone. If the
regular lan line phone or Mobile Phone starts ringing, the test is successful.
How to use Skype through accepting an incoming PSTN call:
Step1.
Check “Activate Automatic Call Forwarding (Phone to PC)”
Step2.
Set the “Call Forwarding Ring” (Default: 6 Rings)
Step3.
Set the “Call Forwarding Transfer Password” (Default: 0000)
How to verify this function:
Skype-A
Skype-B
Step1.
After all the parameters have been set. Try making a call to your PSTN Line.
Step2.
If there is no answer on Skype-A after 6 rings, Middleware will pick up this call and play a greetings
message.
Step3.
Enter the 4 digits “Call Forwarding Transfer Password” on your phone. If password is correct,
Middleware will play another greetings message confirming the access.
Step4.
You may begin trying to make Speed-Dial Call or Skype-out call.
5.4 Recording Function
If checked:
Middleware will record every Skype
calls
Select Item and press “Play” to
listen to the recorded Voice
Messages.
5.4 Magic Voice
User can use this magical function to change to either a male or female voice.
Select “Men” to
lower your voice
tone.
Select “Female” to
heighten your voice
tone.