1
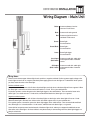
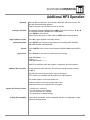
XDVD1002CM INSTALLATION/OWNER'S MANUAL XDVD1002CM PREPARATION Table of Contents Safety Information...................................... 2-3 DVD Operation............................................ 12-13 Before You Begin........................................ 3 CD Operation............................................. 14 Package Contents....................................... 4 MP3 Operation........................................... 15 Wiring Diagram............................................. 5 DivX Operation............................................ 16 Mounting................................................. 6 Warranty..................................................... 17 Control Locations........................................... 7-8 Troubleshooting............................................ 18 General Operation...................................... 9 Notes....................................................... 18 Setup Menu................................................. 10-11 Specifications............................................ 19 Safety Information Please read all instructions carefully before attempting to install or operate. Due to its technical nature, it is highly recommended that your DUAL XDVD1002CM is installed by a professional installer or an authorized dealer. This product is only for use in vehicles with 12VDC negative ground only. Disconnect the vehicle battery's negative terminal before starting installation to prevent short circuits. (consult a qualified technician for instructions if you are unsure) Avoid installing the main unit where it would be subject to high temperatures, or where it would be subject to dust, dirt or excessive vibration. CAUTION TO REDUCE THE RISK OF ELECTRIC SHOCK, DO NOT REMOVE COVERS. NO USER-SERVICEABLE PARTS ARE INSIDE. REFER SERVICING TO QUALIFIED SERVICE PERSONNEL ONLY. 2 XDVD1002CM PREPARATION Before You Begin Cautions To prevent damage or injury: 1. Make sure to ground the unit securely to the vehicle chassis ground. 2. Do not remove the top cover of the unit. 3. Do not install the unit in a spot exposed to excessive heat or the possibility of water splashing. 4. Do not subject the unit to excessive shock. 5. When replacing a fuse, only use a new one with the prescribed rating. Using a fuse with the wrong rating may cause the unit to malfunction. 6. To prevent short circuits when replacing a fuse, disconnect the wiring harness first. 7. Do not use any screws except the ones provided. 8. If you experience problems during installation, consult your nearest DUAL dealer. 9. To clean the monitor, wipe only with a dry silicone cloth or soft cloth. Do not use a stiff cloth, or volatile solvents such as paint thinner and alcohol. They can scratch the surface of the panel and/or remove the printing. 10. When the temperature of the unit falls (as in winter), the liquid crystal inside the screen will become darker than usual. Normal brightness will return after using the monitor for a while. Additional Warnings To prevent injury and/or fire, take the following precautions: 1. Ensure that the unit is securely installed. 2. When extending the ignition, battery or ground cables, make sure to use automotive-grade cables or other cables with an area of 0.75mm (AWG 18) or more to prevent voltage drops and wire deterioration. 3. Do not touch the liquid crystal fluid if the LCD is damaged or broken. The liquid crystal fluid may be hazardous to your health or fatal. If the liquid crystal fluid from the LCD contacts your body or clothing, wash it off with soap immediately. DVD Region Management Some DVD discs can be played only in certain playback modes according to the intentions of the software products. As this player plays discs according to their intentions, some functions may not work as intended by you. Please be sure to read the instructions provided with each disc. This player has been designed to play back the DVD software that has been encoded for specific region areas. It cannot play back the DVD software encoded for other region areas than the region areas for which is has been designed. The XDVD1002CM will play discs labeled “region 1” or "all". DVD region codes are: 1. USA, Canada 2. Japan, Europe, South Africa, Middle East 3. Asia 4. Australia, New Zealand, Mexico, South America 5. Russia, India 6. China 3 XDVD1002CM PREPARATION Contents Main Unit Wiring Harness and Hardware Remote Control Mounting Bracket 2 Pair Headphones Recommended Tools and Equipment • Upholstery hook tool (for removal of panels, if necessary) • #1 and #2 Phillips screwdrivers • Utility knife, razor knife, or shears • Misc. electrical connectors (to connect to vehicle power source – requirement will vary form vehicle to vehicle) • Wire strippers • Electrical tape • Masking tape • Multi-meter (to verify correct voltages and continuity ; It is not reccomended to use a test light or logic probe for this purpose) 4 XDVD1002CM INSTALLATION Wiring Diagram - Main Unit Yellow Connect to battery circuit or constant 12 volt source Black Connect to chassis ground Red Connect to ignition circuit or switched 12 volt source Brown Dome light See notes below Brown/Black Dome light + See notes below A/V Output Green AUX2 Input Dome light trigger See notes below Aux 2 Input (Red Jacket) Connect to audio left, audio right, and composite video of external source A/V Output (Black Jacket) Connect to audio left, audio right, and composite video of external monitor Wiring Notes: There are two common types of dome light circuits, positive or negative switched. Positive systems supply voltage to the interior lights to turn them on, negative switched systems apply ground to turn the lights on. To determine which system you have, locate the wires at the dome light. Positive switched system: On a positive switched system, with all doors closed and lights out, both wires at the dome light will rest at ground. When the dome light is activated, one of these wires will switch to +12 vdc. This is your switched wire. For positive systems, connect the green wire (dome light trigger) to the switched wire. Then connect the brown wire (dome light -) to a fused constant + 12 vdc source, and the brown/black wire (dome light +) to a ground. Negative switched system: On a negative switched system, with all doors closed and lights out, both wires at the dome light will rest at +12 vdc. When the dome light is activated, one of these wires will switch to ground. This is your switched wire. For negative systems, connect the green wire (dome light trigger) to the switched wire. Then connect the brown/black wire (dome light +) to a fused constant + 12 vdc source, and the brown wire (dome light -) to a ground. Some vehicles incorporate transistorized control of the dome light circuit, and may not support the additional current draw of the unit's dome lights. On these vehicles it may be necessary to connect the green wire (dome light trigger) to a door pin switch wire. 5 XDVD1002CM INSTALLATION Mounting 1. Test fit the mounting bracket and unit on the ceiling of the vehicle, verifying that it is not going to interfere with the safe operation of the vehicle and is physically safe for the driver and passengers. 2. Once the mounting location is determined, carefully mark the location with masking tape. 3. Lower the vehicle's headliner down to see if a roof support beam is available to screw the mounting bracket to. If a support beam is not available, use a 3/4" piece of plywood cut to the appropriate size. Attach the plywood to the roof of the vehicle using silicone, allowing adequate drying time before proceeeding. 4. Screw the mounting bracket into the vehicle with installer supplied screws (not included). NOTE: Double check the length of the screws prior to mounting the bracket to avoid penetration of the vehicle's roof. 5. Cut a 1" hole in the headliner along the backside of the mounting bracket for the cables to pass through. Route cables and wire from wire harness through the hole. 6. Plug in the wire harness to the back of the unit. 7. Carefully hold the unit to the mounting bracket aligning the mounting holes while screwing in the mounting screws (included). NOTE: Make sure that all wires and cables are out of the way while mounting the unit. 8. Connect all cables and wires (see page 5 for details). NOTE: Make sure to keep the ground wire (black) of the unit as short as possible to help prevent unwanted audio noise pickup from the vehicle's systems. WARNING: Failure to properly follow these instructions could result in damge to the vehicle, it's electronic system, other property, personal injury and/or death. 6 XDVD1002CM OPERATION Control Locations - Main Unit 1 12 2 11 3 10 4 9 5 8 6 7 1 Power 7 Rear IR Sensor 2 Source Select 8 Motorized Disc Slot 3 Chapter/Track Down 9 Front IR Sensor/Transmitter 4 Dome Light Switch 10 Chapter/Track Up 5 Screen Release 11 Play/Pause 6 Aux1 Inputs 12 Disc Eject 7 XDVD1002CM OPERATION Control Locations - Remote 1 32 2 31 3 30 4 29 5 28 6 27 1 Power 2 Return 3 Fast Reverse 4 Enter 5 Chapter/Track Down 6 Root Menu 7 Setup Menu 8 Step 9 Subtitle 10 Dimmer 11 Angle 12 Shuffle 13 Goto 14 Video/Source 15 Repeat 7 26 16 LCD Screen Menu 17 Program 8 25 9 24 10 23 11 22 18 Screen Mode 19 Screen Zoom 12 21 13 8 14 15 16 17 18 19 20 20 FM Transmitter 21 Title 22 Repeat A-B 23 Mute 24 Audio 25 Volume Up/Down 26 Display 27 Stop 28 Play/Pause 29 Chapter/Track Up 30 Fast Forward 31 Clear 32 Eject XDVD1002CM OPERATION General Operation Power On/Off Monitor Open/Close Overhead Dome Lights IR Transmitter To turn on the unit, press the power button on the main unit or on the remote. Press again to turn the unit off. Pressing the screen release lock will unlock the LCD screen, and it will drop down slightly. Move the screen to the desired viewing angle, and the internal hinge assembly will hold the screen in position. Remember to turn the unit off and move the LCD Screen into the closed position when not in use. The lights integrated into the main unit are controlled by a push-button switch. Do not leave the vehicle unattended with the dome light switch on, as this could result in a discharged battery. There is an Infrared sensor located on the front of the main unit. This transmitter sends audio wirelessly to the included IR Headphones. Wireless Headphones Two pair of Infrared wireless headphones include built-in sensors to receive audio signals sent from theIR transmitter located on the main unit. These headphones are designed to operate within line of sight from the transmitter as infrared transmissions, like visible light travel only in a straight line, Headphone power and volume controls are located on the bottom of the right ear cup. NOTE: The headphone will auto power off after 2 minutes. FM Transmitter This unit is equipped with an RF Modulator that allows you to listen to an audio signal through your existing FM radio. You can do this by tuning your vehicle's FM radio to any frequency between 88.3 and 90.1. Press the FMTX button on the remote control to select the frequency at which the unit will transmit to your FM radio. NOTE: The current frequency that is being transmitted will appear in the lower left of the LCD screen as you press the FMTX button on the remote. This frequency must match the frequency on your FM radio to receive audio signal. Auxiliary Inputs There are two sets of auxiliary inputs on this unit, both of which can be used to display an external audio/video source onto the main unit. Hook the external source up through the RCA jacks located on the back of the unit (AUX1), or on the installation wire harness (AUX2). Accessing these inputs is easily done by pushing SOURCE on the main unit, or by pressing SOURCE on the remote control. Audio/Video Outputs There is one set of audio/video outputs located on the installation wire harness. These can be used to get an audio/video signal from the main unit to external LCD monitors or video displays. 9 XDVD1002CM OPERATION General Operation - Setup Menu Selecting Sources - Main Unit Selecting Sources - Remote Volume Mute Display Display Mode Press SOURCE on the main unit to select between the following sources: AUX1 > AUX2 > DVD. Press SOURCE on the remote to select between AUX1 > AUX2 > DVD. Adjust volume using VOLUME / on the remote (0-16). Press MUTE on the remote to silence the audio. Press MUTE or VOLUME / to cancel. Press DISPLAY on the remote to select the status of each operating mode (elapsed time, etc). Press MODE on the remote to select between the following screen modes: Full screen displaying 16:9 image. Zoom display of 4:3 image Normal display of 4:3 image in the center. Setup Menus Press SETUP on the remote to select setup menu main page. Press or to select between menu options and press button on remote NOTE: To access the Preferences menu, DVD playback must be stopped. General Setup In the GENERAL SETUP menu, the following menus are availble: NOTE: Select MAIN PAGE from any of the menus to go back to the MAIN PAGE Select ANGLE MARK from the GENERAL SETUP menu. Press to make selection. Press or to adjust (ON/OFF). Select CAPTIONS from the GENERAL SETUP menu. Press to make selection. Press or to adjust (ON/OFF). Select SCREEN SAVER from the GENERAL SETUP menu. Press to make selection. Press or to adjust (ON/OFF). Speaker Setup In the SPEAKER SETUP menu, the following is availble: Select DOWNMIX from the SPEAKER SETUP menu. Press to make selection. Press or to adjust (LT/RT/STEREO). DIVX (R) Registration In the DIVX (R) REGISTRATION menu, the following is availble: Your unit will display a registration code for DivX Video On Demand. Go to www.divx.com/vod for additional details. Select DONE to return to the MAIN PAGE. 10 XDVD1002CM OPERATION General Operation - Setup Menu Audio Setup In the AUDIO SETUP menu, the following menus are availble: Select SPDIF from the AUDIO SETUP menu. Press to make selection. Press or to adjust (ON/OFF). Select OP MODE from the AUDIO SETUP menu. Press to make selection. Press or to adjust (LINE OUT/RF REMOD). Select DUAL MONO from the AUDIO menu. Press to make selection. Press or to adjust (STERE/L-MONO/R-MONO/MIX-MONO). Select COMPRESSION from the AUDIO menu. Press to make selection. Press or to adjust (OFF-FULL). Preferences Setup In the PREFERENCES SETUP menu, the following menus are availble: Select TV DISPLAY from the PREFERENCES SETUP menu. Press to make selection. Press or to adjust (NORMAL-PS/NORMAL-LB/WIDE). Select TV TYPE from the PREFERENCES SETUP menu. Press to make selection. Press or to adjust (MULTI. SYSTEM/NTSC/PAL). Select AUDIO from the PREFERENCES SETUP menu. Press to make selection. Press or to adjust (ENGLISH/FRENCH/SPANISH/CHINESE/JAPANESE). Select SUB TITLE from the PREFERENCES SETUP menu. Press to make selection. Press or to adjust (ENGLISH/FRENCH/SPANISH/CHINESE/JAPANESE/OFF). Select DISC MENU from the PREFERENCES SETUP menu. Press to make selection. Press or to adjust (ENGLISH/FRENCH/SPANISH/CHINESE/JAPANESE). Select PARENTAL from the PREFERENCES SETUP menu. Press to make selection. Press or to adjust (G/PG/PG13/PG-R/NC-17/ADULT/NO PARENTAL). Select PASSWORD from the PREFERENCES SETUP menu. Press to change password, then press . Enter the old password, then the new password, confirm. NOTE: Default password is "0000". 11 XDVD1002CM OPERATION DVD Operation DVD Mode Press SOURCE on the remote or the main unit to select DVD mode. Insert Disc Press EJECT on the remote control or on the main unit to open the motorized disc slot, insert disc. Eject Disc Selecting DVD Root Menu Stop/Start Play/Pause Chapter Select Direct Title/Chapter Select Direct Title/Time Select Fast Forward and Reverse Press EJECT on the remote control or on the main unit to eject the disc. Press ROOT on the remote control to select DVD root menu. Press or or to select between menu settings. Press ENTER to select/confirm. Press on the remote control to stop playback and retain last position memory. Press II on the remote or main unit to restart playback from the last position. Press twice to stop all playback without last position memory. Press , then press II to restart playback from the beginning. Press II to temporarily stop playback. Press II again to resume playback. Press I on the remote or main unit to skip to the beginning of the next chapter. Press I to return to the beginning of the current chapter. Pressing I again skips to the beginning of the previous chapter. Press GO TO on the remote once to show "TITLE --/-- CHAPTER ---/---". Press or to select between direct Title and Chapter. Using 0~9 , enter the desired Title or chapter. Press ENTER to confirm. Press GO TO on the remote twice to show "TITLE --/-- TIME --:--:--". Press or to select between direct title and time. Using 0~9 , enter the desired title or time. Press ENTER to confirm. Press I or I from the main unit for more than 2 seconds to fast forward FF 2X, 4X, 8X, 16X, 32X, 64X or reverse FR 2X, 4X, 8X, 16X, 32X, 64X a chapter. Press I or I again to cancel. Press or on the remote to fast forward FF 2X, 4X, 8X, 16X, 32X, 64X or reverse FR 2X, 4X, 8X, 16X, 32X, 64X a chapter. Step (frame-by-frame) Repeat 12 Press STEP on the remote to frame the current image; press STEP again to show the next image. Press II to resume playback. Press REPEAT on the remote once to repeat the current chapter. Press REPEAT twice to repeat the current title. Press REPEAT three times to cancel repeat function. XDVD1002CM OPERATION DVD Operation Repeat A-B Zoom Audio Language Press A-B on the remote for more than 2 seconds to set point “A”. Press A-B for more than 2 seconds to set point “B”. The points between “A” and “B” will continually repeat. Press A-B to cancel repeat A-B. Press ZOOM on the remote to select between ZOOM X1.5, X2, X3 and OFF (normal). Press AUDIO on the remote while playing to switch between available languages. Notes: This function is only available when there are two or more audio languages recorded on the disc. The language function may not work with some discs and it may require some time to select between different audio languages. Subtitle Language Press SUBTITLE on the remote while playing to switch between available subtitle languages. Notes: This function is only available when there are two or more subtitle languages recorded on the disc. The subtitle function may not work with some discs and it may require some time to select between different subtitle languages. View Angle Press ANGLE on the remote while playing to switch between available viewing angles. Notes: This function is only available when there are two or more view angles recorded on the disc. The view angle function may not work with some discs and it may require some time to select between different view angles. Display Status Press DISPLAY on the remote to select between the following: TITLE --/-- CHAPTER ---/--- with Elapsed Time TITLE REMAIN --:--:-CHAPTER ELAPSED --:--:-CHAPTER REMAIN -:--:-OFF DVD-R/DVD+R Compatibility Some DVD-Rs and DVD+Rs may be incompatible with this unit, depending on media type and recording method. This model does not support DVD-RAM, DVD-RW or DVD+RW discs. 13 XDVD1002CM OPERATION CD Operation CD Mode Insert Disc Press SOURCE on the remote or the main unit to select DVD mode. Press EJECT on the remote control or on the main unit to open the motorized disc slot, insert disc. Eject Disc Press EJECT on the remote control or on the main unit to eject the disc. Stop/Start Press on the remote control to stop playback and retain last position memory. Press II on the remote or main unit to restart playback from the last position. Press twice to stop all playback without last position memory. Press , then press II to restart playback from the beginning. Play/Pause Track Select Direct Time Select Fast Forward and Reverse Press II on the remote or main unit to temporarily stop playback. Press II again to resume playback. Press I on the remote or main unit to skip to the beginning of the next track. Press I to return to the beginning of the current track. Pressing I again skips to the beginning of the previous track. Press GO TO on the remote to show “GO TO _ _:_ _". Using 0~9, enter the desired track time in minutes and seconds. Press ENTER to confirm. Press I or I on the main unit for more than 2 seconds to fast forward FF 2X, 4X, 8X, 16X or reverse FR 2X, 4X, 8X, 16X a track. Press II to cancel. Press or on the remote to fast forward FF 2X, 4X, 8X, 16X or reverse FR 2X, 4X, 8X, 16X a track. Press II to cancel. Repeat Repeat A-B Program Mode Display Status Press REPEAT on the remote once to repeat the entire disc. Press REPEAT twice to repeat the current track. Press REPEAT three times to cancel repeat function. Press A-B on the remote for more than 2 seconds to set point “A”. Press A-B on the remote for more than 2 seconds to set point “B”. The points between “A” and “B” will continually repeat. Press A-B on the remote to cancel repeat A-B. Press PROGRAM on the remote to access the program mode. Enter the desired Title and Chapter using 0-9 on the remote control. Press II to begin programmed playback. Press DISPLAY on the remote to select between the following: SINGLE ELAPSED --:--:-SINGLE REMAIN --:--:-TOTAL ELAPSED --:--:-TOTAL REMAIN --:--:-OFF 14 XDVD1002CM OPERATION Additional MP3 Operation MP3 Mode Selecting a File/Folder Begin Playback from ROOT Selecting Play Modes Random Display Status When an MP3 encoded disc is first inserted, SMART NAVI will show on screen. The disc will automatically begin playback. NOTE: It may take a few seconds for the unit to read disc. Disc playback must be stopped by pressing on the remote. Press or or to select between ROOT, FOLDER, FILE or PLAY MODE. Press ENTER to select/confirm. Move cursor to desired file or folder and press ENTER or II to begin playback. Press II to begin playback in the ROOT directory. Press REPEAT on the remote to select between the following modes: DISC REP, REP-ONE, FOLDER, and FOLDER REP. Press SHUFFLE on the remote to select between FOLDER, RANDOM and SHUFFLEON. Press DISPLAY on the remote to select between the following: CHAPTER REMAIN --:--:-TRACK --/-CHAPTER ELAPSED --:--:-NOTE: Pressing display while disc playback is stopped will show file properties. Additional MP3 information: A high-performance ESP (Electronic Shock Protection) buffer virtually eliminates skipping. Only MP3 files with filename extension (.mp3) can be played. (This model is not compatible with MP3 PRO format or MP3 playlists.) This models supports 8.3 filename display only. Playback sequence is based on recorded order of files. Any folders that do not include MP3 files are skipped. Supports the Following Formats: CD-R/CD-RW Compatibility • ISO9660 level 1 and level 2 • 44.1 kHz sampling rate frequency • Constant rates from 64 ~ 320 kbps * This model does not display ID3 tags. Some CD-Rs and CD-RWs may be incompatible with this unit, depending on media type and recording method. 15 XDVD1002CM OPERATION DivX Operation ® DivX Mode When a DivX encoded disc is first inserted, playback will begin with the first file automatically, To access the SMART NAVI menu screen, stop playback by pressing on the remote. Selecting a File/Folder Disc playback must be stopped by pressing on the remote. Press or or to select between ROOT, FOLDER, FILE or PLAY MODE. Press ENTER to select/confirm. Move cursor to desired file or folder and press ENTER or II to begin playback. Begin Playback from ROOT Selecting Play Modes Random Display Status Press II to begin playback in the ROOT directory. Press REPEAT on the remote to select between the following modes: DISC REP, REP-ONE, FOLDER, and FOLDER REP. Press SHUFFLE on the remote to select between FOLDER, RANDOM and SHUFFLEON. Press DISPLAY on the remote to select between the following: CHAPTER REMAIN --:--:-TRACK --/-CHAPTER ELAPSED --:--:-NOTE: Pressing display while disc playback is stopped will show file properties. What is DivX? Often called the MP3 of video, DivX is an advanced compressed digital media format used for Internet distribution of movies. This unit is a DivX certified product. DivX lets you download, create, and play digital video by turning bulky videos into DivX files. The DivX codec (short for compressor/decompressor) can compress video to a convenient size without losing any noticeable quality. For example, an MPEG2/DVD file can be compressed to nearly one-tenth its original size. This compression technology is so powerful, that a full-length, DVD quality 90 minute video will fit on one CD-R/RW. DivX movies can also be burned to a DVD+R/RW, or DVD-R/RW media. Go to the DivX official website for additional information: www.divx.com 16 XDVD1002CM WARRANTY Limited One-Year Warranty This warranty gives you specific legal rights. You may also have other rights which vary from state to state. Dual Electronics Corp. warrants this product to the original purchaser to be free from defects in material and workmanship for a period of one year from the date of the original purchase. Dual Electronics Corp. agrees, at our option, during the warranty period, to repair any defect in material or workmanship or to furnish an equal new, renewed or comparable product (whichever is deemed necessary) in exchange without charges, subject to verification of the defect or malfunction and proof of the date of purchase. Subsequent replacement products are warranted for the balance of the original warranty period. Who is covered? This warranty is extended to the original retail purchaser for products purchased and used in the U.S.A. What is covered? This warranty covers all defects in material and workmanship in this product. The following are not covered: installation/removal costs, damage resulting from accident, misuse, abuse, neglect, product modification, improper installation, incorrect line voltage, unauthorized repair or failure to follow instructions supplied with the product, or damage occurring during return shipment of the product. What to do? 1. Before you call for service, check the troubleshooting guide in your owner’s manual. A slight adjustment of any custom controls or connections discussed in your instruction booklet may save you a service call. 2. If you require service during the warranty period, you must carefully pack the product (preferably in the original package) and ship it by prepaid transportation with a copy of the original receipt from the retailer to an authorized service center. 3. Please describe your problem in writing and include your name, a return UPS shipping address (P.O. Box not acceptable), and a daytime phone number with your shipment. 4. For more information and for the location of the nearest authorized service center please contact us by one of the following methods: Call us toll-free at 1-866-382-5476 Email us at [email protected] Exclusion of Certain Damages: This warranty is exclusive and in lieu of any and all other warranties, expressed or implied, including without limitation the implied warranties of merchantability and fitness for a particular purpose and any obligation, liability, right, claim or remedy in contract or tort, whether or not arising from the company’s negligence, actual or imputed. No person or representative is authorized to assume for the company any other liability in connection with the sale of this product. In no event shall the company be liable for indirect, incidental or consequential damages. 17 XDVD1002CM OPERATION Troubleshooting Unit has no power at main unit Unit has power but no video Picture has occasional distortion Brightness unstable The DVD does not start playback Remote control not working 1. Verify +12VDC power at 20pin wire harness. 2. Verify ground connection by conducting a continuity test from known ground to ground wire at 20pin wire harness. 1. Verify that the correct A/V source is selected (DVD, AUX1, AUX2). 2. Verify connections at both ends of any external source component harness used. 1. A small amount of picture distortion may appear because of a poor quality video/sound transfer to disc. 1. Physical defect in media. Check media for scratches. 1. Disc is loaded backwards. Place the disc in the unit with the mirrored side facing forward. 2. Make sure the disc is free from scratches and fingerprints. 3. Press the SETUP button to turn off the menu screen. 4. Cancel the parental lock function or change the parental lock level. (The default password is 0000) 5. Use discs labeled “Region 1” or “All” only. 1. Check for obstructions in front of the IR sensors on the main unit. 2. Replace the battery. Copyright Notes This product incorporates copyright protection technology that is protected by method claims of certain U.S. patents and other intellectual property rights owned by Macrovision Corporation and other rights owners. Use of this copyright protection technology must be authorized by Macrovision Corporation, and is intended for home and other limited viewing uses only unless otherwise authorized by Macrovision Corporation. Reverse engineering or disassembly is prohibited. DivX, DivX Certified, and associated logos are trademarks of DivXNetworks, Inc. and are used under license. Manufactured under license from Dolby Laboratories. “Dolby” and the double-D symbol are trademarks of Dolby Laboratories. Confidential unpublished works. ©1992-1997 Dolby Laboratories, Inc. All rights reserved. 18 XDVD1002CM OPERATION Specifications Player Monitor IR Headphones General Signal-to-noise: >92dB Dynamic range: >85dB Frequency response: 20Hz-20kHz Panel size: 10.2” Diagonal measurement Format: Widescreen 16:9 View area: 8.74” x 5.24” (222 x 133 mm) Display system: Color TFT active matrix LCD View angle (up/down/left/right): 50/65/65/65 Resolution: 800 x 480 Pixel pitch: 0.278 mm Brightness (cd/m2): 450 Contrast ratio: 400:1 Left IR audio frequency: 2.3Mhz Right IR audio frequency: 2.8Mhz Operating voltage: 11-16 VDC, negative ground Audio line output voltage: 2 Volts Video system: NTSC/PAL Main unit dimensions: 9.92" x 9.92" x 1.49" (252 x 252 x 38 mm) Design and specifications subject to change without notice 19 Dual Electronics Corp. 21318 64th Ave. South Kent, WA 98032 Toll Free: 1-866-382-5476 www.dualav.com ©2005 Dual Electronics Corp. All rights reserved. NSA0805-V01