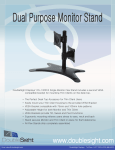
1
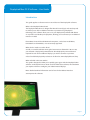
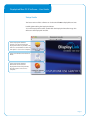
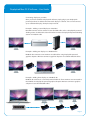
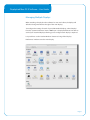
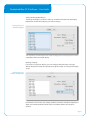
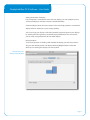
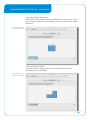
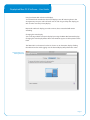
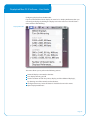
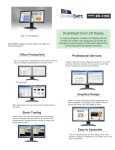
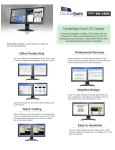
Smart USB Monitors
DS-70U/DS-90U/DS90UC
DisplayLink Mac OS X Software
DS-90UC (9” Wide Screen)
User Guide
Version: 1.0
Date: 1 October 2008
DisplayLink Mac OS X Software - User Guide
Contents
Contents
Introduction
What is the DisplayLink Mac Dr iver?
What else do I need to use this dr iver?
What will I f ind in this User Guide?
Setup Guide
I nst alling/ Uninst alling the DisplayLink Dr iver
Connecting displays to your Mac
Managing Multiple Displays
Setting the Display Resolutions
Rot ating a Display
Setting the Position of Displays
Display Positions
Setting the Display to Mirror mode
Setting the Display to Extend
Using both extended and mirrored displays
Changing the main display
Conf igur ing Displays from the Menu Bar
Known Issues
1
2
2
2
2
3
3
4
5
6
6
7
7
8
8
9
9
10
11
Page 1
DisplayLink Mac OS X Software - User Guide
Introduction
This guide applies to software version 1.0 and above of the DisplayLink software.
What is the DisplayLink Mac Driver?
The DisplayLink Mac driver is designed for Mac OS X 10.4 (Tiger) and 10.5 (Leopard)
to enable you to add an additional monitor to your Mac using DisplayLink
technology. This software allows you to run your DisplayLink-powered USB devices
on any Intel based desktop or laptop Mac, allowing you to connect up to 4 additional
monitors via USB.
Please Note: Power PC-based Macintosh computers, such as late-model iMacs,
PowerBooks and PowerMacs, are not currently supported.
What else do I need to use this driver?
As well as an Intel based Mac running the latest versions of Mac OS X 10.4 or 10.5,
you will need a DisplayLink powered device. One DisplayLink powered device is
required for each of the additional displays you wish to connect to your Mac.
A list of available DisplayLink products can be found at: www.displaylink.com/shop
What will I find in this User Guide?
This guide is designed to allow you to quickly get to grips with the DisplayLink Mac
software. It will explain how to obtain and install the latest software, what hardware
you require and how to configure your USB connected displays.
More detailed technical information can be found in the Release Note that
accompanies this software.
Page 2
DisplayLink Mac OS X Software - User Guide
Setup Guide
The latest version of this software can be obtained from:
www.displaylink.com/mac
Installing/Uninstalling the DisplayLink Driver
To run the DisplayLink Installer, double-click the DisplayLink Installer image: this
will mount the DisplayLink installer.
Select ‘DisplayLink Software
Installer ’ to begin installing the
DisplayLink Driver on your Mac. This
will run a standard Mac installer and
will require a restart once complete.
Select ‘User Guide’ to view the User
Guide.
Select ‘DisplayLink Software
Uninstaller ’ to uninstall the
DisplayLink Driver from your Mac.
This will require a restart once
complete.
Page 3
DisplayLink Mac OS X Software - User Guide
Connecting displays to your Mac
Once you have installed the DisplayLink software, simply plug in your DisplayLinkpowered products via USB and connect each display to a device. You can now connect
up to 4 additional displays. Example setups include:
Example 1: Adding a second display to a Mac Mini
Mac Mini connects to first monitor via standard DVI cable, and to a DisplayLink-powered
docking station via USB cable. Second monitor connects to DisplayLink-powered docking
station via VGA/DVI cable.
Example 2: Adding two displays to a MacBook Pro
MacBook Pro connects to two monitors via USB cables using DisplayLink-powered
graphics adapters. Monitors connect to graphics adapters via standard VGA/DVI cables.
Example 3: Adding three displays to a MacBook Air
MacBook Air connects to a standard powered USB hub. Three monitors are connected to
the USB hub via DisplayLink-powered graphics adapters. Monitors connect to graphics
adapters via standard VGA/DVI cables.
Page 4
DisplayLink Mac OS X Software - User Guide
Managing Multiple Displays
When attaching a display that the software has not seen before, the display will
default to being extended to the right of the main display.
To configure the settings for each of your USB attached displays, select ‘Displays’
from the ‘System Preferences’ menu. This
will open a ‘Display Preferences’ window on
each of your attached displays allowing you to configure each display as required.
It is possible to use the ‘Gather Windows’ button to bring all the ‘Display
Preferences’ windows onto the main display.
Page 5
DisplayLink Mac OS X Software - User Guide
Setting the Display Resolutions
To change the display’s resolution, select an available resolution from the Display
Preferences window of the display you wish to change:
Display Preferences:
Resolution Options
The resolutions available depend on both the DisplayLink enabled product and the
capabilities of the connected display.
Rotating a Display
If you wish to rotate your display, you can configure the orientation using the
‘Rotate’ drop down. Select the appropriate angle of rotation to match your display’s
set up:
Display Preferences:
Rotation Configuration
Each time the user rotates, any settings made to the mode, resolution, frequency or
depth are remembered the next time the user switches back to that angle of
rotation.
Page 6
DisplayLink Mac OS X Software - User Guide
Setting the Position of Displays
If your computer is connected to more than two displays, you can specify that some
are mirrored displays and others show the extended desktop.
A mirrored display shows the same content as the main display whereas an extended
display will be an extension to your existing desktop.
You can arrange your displays so that they match the physical layout of your displays
by selecting the ‘Arrangement’ pane within Display Preferences. This ensures that
you can easily navigate between all connected displays.
Display Positions
To move the position of a display, click and hold the display you wish to move then
drag it to the desired position. The display will be highlighted with a red border
whilst you are moving the display to its new position.
Display Preferences:
Moving Display Positions
Page 7
DisplayLink Mac OS X Software - User Guide
Setting the Display to Mirror mode
When in Mirror mode, additional displays will display what is being shown on the
primary display. Checking the “Mirror Display” on the ‘Arrangement’ pane enables
this feature.
Display Preferences:
Displays set to Mirror
Setting the Display to Extend
To extend connected displays, make sure that the “Mirror Display” on the
‘Arrangement’ pane is unchecked.
Display Preferences:
Display set to Extend
Page 8
DisplayLink Mac OS X Software - User Guide
Using both extended and mirrored displays
To work with both extended and mirrored displays, turn off mirroring then in the
Arrangement pane press and hold 'cmd' and 'alt' and drag and drop the display you
wish to mirror over the primary display.
Repeat this with each display you wish to mirror, those untouched will remain
extending.
Changing the main display
You can change which is the main display by moving the Menu Bar between displays.
Changing the main display affects where new windows appear and the position of the
Dock.
The ‘Menu Bar’ can be moved so that it is shown on an alternative display. Clicking
the white menu bar and dragging it to the desired display will perform this action.
Display Preferences:
Moving Menu Bar
Page 9
DisplayLink Mac OS X Software - User Guide
Configuring Displays from the Menu Bar
If you have checked the “Show displays in menu bar” in Display Preferences then you
can configure displays by clicking the display icon in the menu bar. This will show a
menu similar to the following:
Displays Menu Bar
This menu allows you to perform the following actions:
Detect all displays connected to the Mac.
Turn display mirroring on/off
Set the resolution of both the primary display, and the additional display(s),
by selecting one of the recently used resolutions.
Configure how many ‘recent resolutions’ should be shown in this menu.
Open ‘Display Preferences’.
Page 10
DisplayLink Mac OS X Software - User Guide
Known Issues
This release does not support OpenGL acceleration (3D hardware acceleration) so
therefore applications and features that require OpenGL, Quartz Extreme, Quartz
Composer and other framework based on OpenGL will not be fully supported.
Examples of such features are Keynote Presentations, iPhoto Slideshows and iMovie.
The most up to date information about known issues and FAQs can be found at:
www.displaylink.com/mac
Smart USB Monitor - Product Support
Additional support for your DoubleSight Displays Smart USB Monitor can be
found by visiting www.doublesight.com or by calling DoubleSight Customer
Service at 888.897.8869
DisplayLink believes the information in this publication is correct as of its publication date. Such information is subject to change without prior notice. DisplayLink is not responsible for any inadvertent
errors. All company and product names mentioned are the trademarks of their respective holders.
Apple, iMac, MacBook, Macintosh, Mac, Mac OS, Leopard and Tiger are trademarks of Apple Inc., registered in the U.S. and other countries. MacBook Air is a trademark of Apple Inc.
© Copyright 2008 DisplayLink. All rights reserved.
Page 11