1
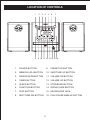
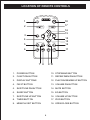
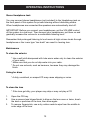
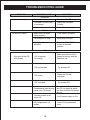
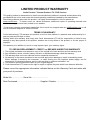
MODEL NO. iP1500UK
iPOD RADIO CD MICRO SYSTEM
OWNER'S MANUAL
PLEASE READ BEFORE OPERATING THIS EQUIPMENT
WARNING AND PRECAUTIONS
TO PREVENT FIRE OR SHOCK HAZARDS, DO NOT EXPOSE THIS
UNIT TO RAIN OR MOISTURE.
This symbol, located on back or bottom of the unit, is intended to alert the
user to the presence of uninsulated “dangerous voltage” within the product’s
enclosure that may be of sufficient magnitude to constitute a risk of electric
shock to persons.
This symbol, located on back or bottom of the unit, is intended to alert the
user to the presence of important operating and maintenance (servicing)
instructions in the literature accompanying the appliance.
Any use of the controls or an adjustment to the procedures other than those
specified herein may result in hazardous radiation.
DANGER:
Invisible and hazardous laser radiation when open and interlock failed or
defeated. Avoid direct exposure to beam.
CAUTION: TO PREVENT ELECTRIC SHOCK, MATCH WIDE
BLADE OF PLUG TO WIDE SLOT, FULLY INSERT.
To reduce the risk of electric shock, do not remove cover (or back). There are
no user-serviceable parts inside. Please refer any servicing to qualified service
personnel.
WARNING: Changes or modifications to this unit not expressly approved by
the party responsible for compliance could void the user’s authority to operate
the equipment.
1
PREPARATION FOR USE
Power Sources
This portable audio system is designed to operate on
either 230V AC, 50Hz house current.
AC Operation
Unwind the AC cord and extend it to its full length. Insert the small end of the AC cord into the AC
socket on the rear of the unit. Insert the other end of the AC cord into any convenient 230V AC,
50Hz household outlet.
Connecting the Speakers
Place the speakers on either side of the main unit.
Connect the speaker on the left side of the main unit to the "L" speaker jack on the
back panel.
Connect the speaker on the right side of the main unit to the "R" speaker jack on
the back panel.
Speaker wire with white strip will connect to "Red" speaker jack and speaker wire without
the white strip will insert to "Black" speaker jack
Make sure the speaker wires are fully inserted and locked into the speaker jacks on the
back panel of the main unit.
Right Side Speaker
Left Side Speaker
2
LOCATION OF CONTROLS
1
2
3 4
5
6
7
8
9 10 11 12 13 14 15 16
1.
POWER BUTTON
9.
2.
MEM/CLK ADJ BUTTON
10. SKIP/TUNE UP BUTTON
3.
REPEAT/M-DN BUTTON
11. VOLUME DN BUTTON
4.
TIMER BUTTON
12. VOLUME UP BUTTON
5.
SLEEP BUTTON
13. STOP/BAND BUTTON
6.
FUNCTION BUTTON
14. OPEN/CLOSE BUTTON
7.
IPOD BUTTON
15. HEADPHONE JACK
8.
SKIP/TUNE DN BUTTON
16. PLAY/PAUSE MEM-UP BUTTON
3
PRESET EQ BUTTON
LOCATION OF REMOTE CONTROLS
EJECT
POWER
1
18
2
iPOD
16
15
VOL
3
EQ
FM ST
4
MUTE
VOL
TUNE/SKIP
BAND
MEM-UP
CLK SET
MEM DN
5
6
REPEAT
7 8
17
14
13
12
11
9 10
1.
POWER BUTTON
10. STOP/BAND BUTTON
2.
FUNCTION BUTTON
11. REPEAT/MEM DN BUTTON
3.
DISPLAY BUTTONS
12. PLAY/PAUSE/MEM UP BUTTON
4.
FM ST BUTTON
13. VOLUME DN BUTTON
5.
SKIP/TUNE DN BUTTON
14. MUTE BUTTON
6.
SLEEP BUTTON
15. EQ BUTTON
7.
SKIP/TUNE UP BUTTON
16. VOLUME UP BUTTON
8.
TIMER BUTTON
17. IPOD BUTTON
9.
MEM/CLK SET BUTTON
18. OPEN/CLOSE BUTTON
4
POWER SOURCES
(FOR REMOTE CONTROL)
BATTERIES
NOTE:
The button cell battery contains mercury, don't put in the trash. Recycle or
dispose as hazardous waste.
NOTE:
You may need to remove a protective covering from the remote's battery
compartment before using the remote control.
5
OPERATING INSTRUCTIONS
Setting up your radio
Checking AM Radio reception
Your clock radio has a built-in antenna for AM radio. To improve
reception, you need to rotate your unit.
Unpacking And Set Up
• Remove the main unit, the speakers, and the remote control unit
from the display carton. Remove all packing materials from the
components.
• Unwind the AC power cord and extend it to its full length.
• Unwind the external FM wire antenna and extend it to its full length.
• Remove the twist-ties from the speaker wires.
Placement of the System
The system should be placed on a stable, level surface such as a
table, desk, or shelf, convenient to an AC outlet, away from direct
sunlight, and sources of excess heat, dust, moisture, humidity,
vibration, or strong magnetic fields.
The speakers may be placed next to the main unit or as far apart as
the speaker wires allow. We recommend that you leave a gap of
approximately 1/2 inch between the main unit and the speakers so
that any vibration from the speakers will not interfere with the CD
player in the main unit.
6
OPERATING INSTRUCTIONS
Using your radio
1.
2.
3.
4.
5.
6.
7.
Plug the AC Power cord into a power outlet.
Press the POWER button on the main unit or remote control to turn the
system "On".
If necessary, press the FUNCTION button to select the Radio mode and
the display shows: FM 87.5 MHz.
To switch between FM and AM bands press the STOP/BAND button on
the front panel or remote.
Automatic Tuning - Depress and hold the TUNING / SKIP UP or DN buttons
until the display begins to move, then release the buttons. The tuner will
scan up or down the band until it finds the first strong station, and then
stop on that station. Repeat this process until the tuner stops on your
desired station.
If you tune to an FM Stereo station the "(ST)" indicator appears in the
display.
Manual Tuning - Press theTUNING / SKIP UP or DN buttons repeatedly
until the display is showing the frequency of your desired station. Use the
manual tuning method to tune to weaker stations that are bypassed during
Automatic Tuning.
Setting the time
To set the time on your radio:
1.
2.
3.
4.
5.
6.
With the power off.
Press and hold the MEM/CLK ADJ Button; "12Hr" will blink.
Press the SKIP/TUNING Button to set the unit to the 24 hour (24Hr) mode
or 12 hour (12Hr) mode.
Press the MEM/CLK ADJ Button and the hours will blink.
Press the SKIP/TUNING Button to set the current hour, then press the
MEM/CLK ADJ again; the minute digits will blink. Press the SKIP/TUNING
to set the current minutes.
Press the MEM/CLK ADJ Button to confirm the time.
7
OPERATING INSTRUCTIONS
Programming radio station presets:
You can program as many as 10 FM and 10 AM radio station presets. After you
program a station, you can tune to the station by pressing one of the SKIP/TUNE
Buttons.
To program a radio station:
1.
2.
3.
4.
5.
6.
7.
8.
Press the POWER Button to turn on your radio.
Press the FUNCTION Button one or more times until TUNER appears
on the display.
Press the BAND Button to select AM or FM.
Press and hold one of the SKIP/TUNE Buttons to select a radio station.
Press and hold the MEM/CLK ARJ Button to activate the programming
mode.
Press one of the SKIP/TUNING Buttons to select the preset number you
want to assign the station to.
Press and hold the MEM/CLK ARJ Button to store the station with the
preset number you selected.
Repeat Steps 4 through 7 to program additional presets.
8
OPERATING INSTRUCTIONS
To tune to a radio station preset:
1.
2.
3.
4.
Press the POWER Button to turn on your radio.
Press the FUNCTION button one or more times until TUNER appears on
the display.
Press the STOP/BAND Button to select AM or FM.
Press the MEM DN or MEM UP Button one or more times until the preset
number you want appears on the display.
To select an equalizer mode:
Press the EQ Button one or more times to select the mode you want
You can select:
* Classic
* Jazz
* Rock
* Pop
Listening to a CD
Your radio can play audio CDs, CD-Rs and CD-RWs. CD-Rs and CD-RWs
must be finalized before you can play them on your unit.
To listening to a CD:
1.
2.
3.
4.
5.
6.
7.
8.
Press the POWER Button to turn on your radio.
Press the FUNCTION Button one or more times until CD track "--" appears
on the display.
Press the OPEN/CLOSE Button to open the CD tray.
Place a CD with the label side up into the CD tray.
Press the OPEN/CLOSE Button to close the CD tray.
Press the PLAY/PAUSE Button to start playback.
To control the CD during playback:
* Press the PLAY/PAUSE Button to pause playback. Press the button
again to resume playback.
* Press one of the SKIP/TUNING Buttons to go to the next or previous
track on the CD.
* Press and hold one of the SKIP/TUNING Buttons to search for a track
on the CD.
Press the STOP Button to stop playback.
9
OPERATING INSTRUCTIONS
To active Timer function:
In power off mode, you depress the TIMER button 2 seconds, the "TIMER" appear
on the display, that the unit will auto on at "TIMER on" time and will auto off at
"TIMER off" time
If you depress the TIMER button again, the TIMER function will be cancel.
1.
2.
3.
Press the TIMER button and the "TIMER on" will appear on the display.
Hold the TIMER button 2 seconds and the hour will blink. Press
SKIP/TUNING buttons to set the "TIMER on" hour time, then press TIMER
button again, the minute digitals will blink. Press the SKIP/TUNING buttons
to set the "TIMER on" minutes.
After the "TIMER on" setting, press the TIMER Button once, the
"TIMER off" appear on the display and the "TIMER off" hour will blink.
Press SKIP/TUNING button to set the "TIMER off" hour time, the press
TIMER button again, the minutes digits will blink. Press the SKIP/TUNING
buttons to set the "TIMER OFF" minutes. Finally press the TIMER button to
confirm the setting.
To start Sleep function:
1.
2.
Press the SLEEP button and "90" will appear and set the unit to turn off
after 90 minutes. Each time you press the SLEEP button, the length of
time decreases by 10 minutes.
After five seconds, the Sleep function will activate and the SLEEP
indicator will light solid. Pressing the SLEEP button again unit "OFF"
appears and turns off the sleep function.
10
OPERATING INSTRUCTIONS
To set up a CD playlist:
1.
2.
3.
4.
5.
6.
7.
Press the POWER Button to turn on your unit, then Press the FUNCTION
Button one or more times until CD track "--" appears on the display.
Insert a CD into the CD tray. If the CD starts playing, press the STOP Button.
Press the MEM/CLK ARJ Button. "PROG 0" appears on the display.
Press one of the SKIP/TUNING Buttons one or more times to select the first
track you want to program.
Press the MEM/CLK ARJ Button to confirm your selection.
Repeat Step 4 and 5 to add more tracks to your playlist.
When you have finished creating your playlist, press the PLAY/PAUSE
Button to start playing your playlist.
To edit a CD playlist:
1.
2.
3.
4.
While the CD is playing, press the STOP Button to stop playback.
Press the MEM/CLK ARJ Button to select one of the programmed tracks.
Press one of the SKIP/TUNING Buttons one or more times to select a new
track you want to program.
Repeat Steps 2 and 3 to edit additional track selections.
To cancel a playlist:
While the CD is playing, do one of the following:
* Press the STOP Button twice.
* Press the FUNCTION Button.
* Press the OPEN/CLOSE Button to open the CD tray.
* Press the POWER Button to turn off your radio.
To repeat a track or an entire CD:
1.
2.
3.
4.
5.
6.
7.
Press the POWER Button to turn on your radio.
Press the FUNCTION Button one or more times until CD track appears on
the display.
Press the OPEN/CLOSE Button to open the CD tray.
Place a CD with the label side up in the tray, then press the OPEN/CLOSE
button to close the tray.
Press the PLAY/PAUSE Button to start playback.
Press the REPEAT/M-DN once, "REP" will appear on display. The selected
track will play and repeat until you press the STOP button control.
Press the REPEAT/M-DN twice, "REPEAT ALL" will appear on the display.
All tracks of the disc will be repeated. To stop the disc play, press the STOP
button control.
11
OPERATING INSTRUCTIONS
iPod® Inserts
Your unit comes with removable inserts* to ensure your iPod® fits properly in the dock on
the top of the unit.
®
Mini Insert
Use with iPod®
Mini
Thin iPod®s Insert
iPod® 3Gen 10-15 GB
iPod® 3Gen 20 GB
iPod® 4Gen 20 GB
iPod® Photo 30 GB
Thick iPod®s Insert
iPod® 3Gen 30 GB
iPod® 3Gen 40 GB
iPod® 4Gen 40 GB
iPod® Photo 40 GB
iPod® Photo 60 GB
Nano Insert
iPod® Nano 2 GB
iPod® Nano 4 GB
To Place an Insert
Select the insert for your iPod® (see chart above). Using the correct insert ensures the
proper fit for your iPod®.
Gently press the iPod® insert into the dock.
Carefully place your iPod® into the dock.
To remove/replace an insert, first remove your iPod®, then grip the insert and pull gently
upwards.
Listening to your iPod®
When the iPod® is docked and in standby mode, press the IPOD Button on the unit to
play it. The iPod® icon will appear on the display.
Charging your iPod®
When you docked your iPod® and it recharges (until fully charged).
Note: iPod® Shuffles will NOT charge.
AUX In:
The AUX in jack can be used to playback alternate audio signal sources on
the unit speakers.
Make sure that your radio is turned off and unplugged from the power outlet.
Plug the audio connectors on 3.5mm audio cable into the clock radio.
Plug the other end of the audio cable into the Audio out jack on the audio input device.
Slide the FUNCTION button to iPod/AUX and display will appears AUX icon.
Turn on the external audio device and use the device's controls to control playback.
Note: 3.5mm audio cable is not included.
12
OPERATING INSTRUCTIONS
Stereo Headphone Jack
You may connect stereo headphones (not included) to the Headphone jack on
the front panel of this system for private listening without disturbing others.
When headphones are connected the speakers are automatically shut off.
IMPORTANT: Before you connect your headphones, set the VOLUME control
of this system to a low level. Then connect your headphones, put them on and
gradually increase the volume to a comfortable listening level.
Remember that prolonged listening to loud music at high volume levels through
headphones or the in-ear type "ear-buds" can result in hearing loss.
Maintenance
To clean the exterior
* Use a soft cloth dampened with luke warm water only to clean the exterior
of your radio.
* Make sure that you do not drip water into your radio.
* Do not use solvents, such as benzene, because they may damage the
finish.
Caring for discs
* A dirty, scratched, or warped CD may cause skipping or noise.
To clean the lens
* If the lens get dirty, your player may skip or may not play a CD
1.
2.
3.
Open the CD tray.
Use a camera lens blower/brush to blow on the lens once or twice, brush
the dust or particles off the lens, then blow again.
To remove fingerprints, use a dry cotton swab to wipe from the middle to
outer edge of the lens.
13
TROUBLESHOOTING GUIDE
PROBLEM
POSSIBLE CAUSE
SOLUTION
GENERAL
No sound is heard.
No sound is heard.
Power is not on.
Press the POWER button.
VOLUME Control is set
to minimum.
Adjust the VOLUME
Control.
Mute is on.
Press Mute on remote.
RADIO
Station has not been
tuned properly.
Tune station properly
.
FM reception is weak.
Extend the FM cord.
Wrong function is
selected.
Press the FUNCTION
button to the radio
position.
CD
All or part of the CD
will not play.
CD is inserted
incorrectly.
CD is scratched.
Make sure that the CD is
placed in the tray with the
label side up.
Try another CD.
CD is dirty
Clean the CD with
soft cloth
CD is warped
Try another CD.
Condensation has formed
inside your CD player.
Remove the CD and leave
the CD tray open for about
one hour to let the CD player
dry out.
Function swtich is not
set to CD.
Set Function switch to CD
CD compartment not
closed
Close CD compartment
door.
14
TROUBLESHOOTING GUIDE
PROBLEM
®
iPod does not
dock properly
iPod
®
does not
POSSIBLE CAUSE
Using no or wrong iPod
®
insert.
Make sure the dock insert is the
®
proper fit for your iPod .
iPod
®
didnít install properly.
Remove your iPod from the dock
and check for obstruction on the
connectors in the dock and on your
®
iPod . Then reseat it in the dock.
®
iPod
®
is not installed properly.
Remove your iPod from the dock
and check for obstruction on the
connectors in the dock and on your
®
iPod . Then reseat it in the dock.
iPod
®
is locked up.
Please make sure your iPod is
working properly before docking into
®
the unit. Please refer to your iPod
manual for details.
®
respond to the
unit
®
®
Using 1st or 2nd generation iPod ,
iPod didnít
®
Unit cannot control those iPod s or
®
other devices.
®
Remove your iPod from the dock
and check for obstruction on the
connectors in the dock and on your
®
iPod . Then reseat it in the dock.
iPod Shuffle or other devices.
®
SOLUTION
iPod is not installed properly.
charge up
SPECIFICATION
Power Requirement:
AC ~ 230V 50Hz
Frequency Range:
FM 87.3 - 108 MHz
AM 522 - 1620 KHz
Power Consumption:
16W
Max Output:
5W
15
®
LIMITED PRODUCT WARRANTY
Audio Product / Telecom Product / TV / DVD Product
This quality product is warranted to be free from manufacturer’s defects in material and workman-ship,
provided that the unit is used under the normal operating conditions intended by the manufacturer.
Should any problems arise with this product, it is highly recommended to visit our website at
www.curtisint.com To better serve our valued customers, additional copies of operating manuals and
trouble shooting tips have been posted on our website.
If your query remains unresolved, please feel free to email our support team at: [email protected] or call
our UK Customer helpline at: 0 800 032 5264
TERMS OF WARRANTY
Curtis International LTD warrants this product to be free from defects in materials and workmanship for 1
year on parts and 90 days on labor.
Nothing within this warranty shall imply that Curtis International LTD will be responsible or liable for any
damage to any items placed in this product, whether due to any defect of the product, or its use, proper or
improper.
This warranty is in addition to, and in no way impacts upon, your statutory rights.
TO OBTAIN REPLACEMENT / CREDIT / or REPAIRS UNDER THIS WARRANTY
1. The original purchaser must present a copy of the original bill of sale and this service warranty card.
2. Any alterations, abuse, misuse, battery corrosion or accidental damage voids the warranty.
3. The warranty does not cover cabinets and non essential accessories.
4. No warranty or insurance contained or set out shall apply when damage or repair is caused by power
failure; damage in transit by the consumer , or when moving the unit; improper power supply; use for
commercial or industrial purposes; service calls resulting in customer education, etc.
5. The defective product should be taken to your original supplier
6. Curtis International LTD reserves the right to repair or replace the parts which have become defective.
Please record the appropriate information indicated below on this Warranty Card and retain with
your proof of purchase.
Model No……………… Serial No……………………..
Date Purchased……………………………… Supplier / Retailer ………………………..