1
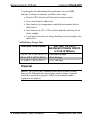
Crestron TPS-6X-BTP
Battery Pack for TPS-6X
Installation Guide
This document was prepared and written by the Technical Documentation department at:
Crestron Electronics, Inc.
15 Volvo Drive
Rockleigh, NJ 07647
1-888-CRESTRON
All brand names, product names and trademarks are the property of their respective owners.
©2008 Crestron Electronics, Inc.
Crestron TPS-6X-BTP
Battery Pack for TPS-6X
Contents
Battery Pack for TPS-6X: TPS-6X-BTP
1
Introduction ............................................................................................................................... 1
Features and Functions ................................................................................................ 1
Specifications .............................................................................................................. 2
Physical Description.................................................................................................... 3
Setup .......................................................................................................................................... 4
Removal ...................................................................................................................... 4
Installation ................................................................................................................... 8
Charging .................................................................................................................... 11
Storage....................................................................................................................... 11
Disposal..................................................................................................................... 12
Resources................................................................................................................................. 13
Industry Compliance ................................................................................................. 13
Reference Documents................................................................................................ 13
Further Inquiries ........................................................................................................ 13
Future Updates .......................................................................................................... 14
Return and Warranty Policies .................................................................................................. 15
Merchandise Returns / Repair Service ...................................................................... 15
CRESTRON Limited Warranty................................................................................. 15
Installation Guide – DOC. 6740A
Contents • i
Crestron TPS-6X-BTP
Battery Pack for TPS-6X
Battery Pack for TPS-6X:
TPS-6X-BTP
Introduction
The Crestron® TPS-6X-BTP is a replacement NiMH rechargeable battery
pack for the TPS-6X Wireless Touchpanel. One TPS-6X-BTP is included
with each TPS-6X. Installation of the TPS-6X-BTP battery pack requires
tools and should be performed by a qualified technician.
Features and Functions
• Replacement NiMH rechargeable battery pack for the TPS-6X
Wireless Touchpanel
• Fast charging Nickel Metal Hydride batteries
• Can be charged when the TPS-6X is mounted in the
TPS-6X-DS or TPS-6X-DS-C Docking Station
(TPS-6X-DS-C sold separately)
NOTE: For more information on the TPS-6X Wireless Touchpanel,
refer to the latest version of the TPS-6X Operations Guide (Doc. 6575),
which is available from the Crestron website
(www.crestron.com/manuals).
NOTE: For more information on the TPS-6X-DS or TPS-6X-DS-C
Docking Stations, refer to the latest version of the TPS-6X-DS or
TPS-6X-DS-C Operations Guides (Doc. 6576 and Doc. 6707
respectively).
Installation Guide – DOC. 6740A
Battery Pack for TPS-6X: TPS-6X-BTP • 1
Battery Pack for TPS-6X
Crestron TPS-6X-BTP
Specifications
Specifications for the TPS-6X-BTP are listed in the following table.
TPS-6X-BTP Specifications
SPECIFICATION
Output Voltage
Capacity
Composition
Usage Per Charge
Charging Time
Optimal Operating
Temperature
Weight
DETAILS
4.8 Volts DC
2000 mAh
Nickel Metal Hydride (NiMH)
~2 hours continuous, ~24 hours
under normal use (10% active duty
cycle with standby/powerdown
activated
~2.5 hours
(~2.5 to 3 hours when in use)
32º to 112º F (0º to 45º C)
50º to 104º F (10º to 40º C) when
charging
4.3 oz (120.2 g)
NOTE: The batteries will not charge when they are warmer than the
maximum charging temperature. This may occur due to extended use of
the panel while on the TPS-6X-DS (or TPS-6X-DS-C) Docking Station.
To cool the batteries, turn off power to the touchpanel using the left
trigger key. The touchpanel will cool faster if it is removed from the
TPS-6X-DS (or TPS-6X-DS-C) before it is turned off. The panel will be
cool in approximately 20 minutes.
2 • Battery Pack for TPS-6X: TPS-6X-BTP
Installation Guide – DOC. 6740A
Crestron TPS-6X-BTP
Battery Pack for TPS-6X
Physical Description
The TPS-6X-BTP consists of two battery cells, along with the integrated
wiring. It has a multi-pin connector for attachment inside the TPS-6X.
TPS-6X-BTP Physical View
Installation Guide – DOC. 6740A
Battery Pack for TPS-6X: TPS-6X-BTP • 3
Battery Pack for TPS-6X
Crestron TPS-6X-BTP
Setup
Removal
NOTE: The TPS-6X Wireless Touchpanel contains ESD (electrostatic
discharge) sensitive devices. To avoid damaging the unit, perform the
following procedure while wearing a grounding strap that is properly
grounded or on a grounded workstation.
NOTE: To prevent damage to the multi-pin connector and wiring, use
care when handling the TPS-6X-BTP.
Perform the following procedure to remove the existing TPS-6X-BTP
from a TPS-6X touchpanel. A #1 Phillips screwdriver and a small slot
head screwdriver are required.
1. Remove power from the touchpanel, use the included T-pin to
slide the battery switch on the rear to the OFF (down) position and
place the touchpanel face down on a clean, padded work surface.
(Refer to illustration below.)
Bottom View Showing Battery Switch and Screw Locations
Screws
Screws
UP
4 • Battery Pack for TPS-6X: TPS-6X-BTP
Installation Guide – DOC. 6740A
Crestron TPS-6X-BTP
Battery Pack for TPS-6X
2. Remove the four screws that secure the front bezel to the
touchpanel and return the unit to its normal, face-up position. (Use
care and hold the bezel to the rest of the touchpanel. If the bezel
separates from the rest of the touchpanel while rotating the unit to
its normal position, the internal parts of the panel may spill out.)
3. Lift the front bezel from the touchpanel, then place the touchpanel
assembly face down on the work surface.
4. Carefully remove the rear of the enclosure from the touchpanel by
grasping the support frame at the left and right edges, gently
spreading them (as shown in the illustration below) and lifting the
assembly. It will snap out of the enclosure.
Removing Rear Enclosure from TPS-6X
Installation Guide – DOC. 6740A
Battery Pack for TPS-6X: TPS-6X-BTP • 5
Battery Pack for TPS-6X
Crestron TPS-6X-BTP
5. Remove the orange tape securing the battery pack wires to the
circuit board and the two pieces of clear tape on each battery cell.
(Refer to illustration below.)
TPS-6X Assembly (Removed from Enclosure)
6 • Battery Pack for TPS-6X: TPS-6X-BTP
Installation Guide – DOC. 6740A
Crestron TPS-6X-BTP
Battery Pack for TPS-6X
6. Using the flat end of a small slot head screwdriver, gently separate
the multi-pin connector from the corresponding connector on the
circuit board of the TPS-6X. (Refer to illustration below.)
TPS-6X-BTP Connector on TPS-6X
7. Remove battery cells with the connecting wires attached, from
either side of the assembly.
Installation Guide – DOC. 6740A
Battery Pack for TPS-6X: TPS-6X-BTP • 7
Battery Pack for TPS-6X
Crestron TPS-6X-BTP
Installation
NOTE: The TPS-6X Wireless Touchpanel contains ESD (electrostatic
discharge) sensitive devices. To avoid damaging the unit, perform the
following procedure while wearing a grounding strap that is properly
grounded or on a grounded workstation.
After completing removal of the old TPS-6X-BTP from the TPS-6X
touchpanel (refer to “Removal” on page 4), perform the following
procedure to install the new TPS-6X-BTP. A #1 Phillips screwdriver is
required.
1. Orient the TPS-6X-BTP so the black and white wires are on the
left side bottom and the red and yellow wires are on the right side
bottom, as shown in the illustration below.
TPS-6X-BTP Orientation
2. Place the battery cells in their compartments on the left and right
sides of the TPS-6X assembly, ensuring the ridge that runs along
the length of each cell is facing inward, toward the center of the
assembly and the rounded side of each cell is facing outward.
8 • Battery Pack for TPS-6X: TPS-6X-BTP
Installation Guide – DOC. 6740A
Crestron TPS-6X-BTP
Battery Pack for TPS-6X
3. Carefully connect the multi-pin connector of the TPS-6X-BTP
with the corresponding connector on the circuit board of the
TPS-6X.
4. Dress the cables of the TPS-6X-BTP as shown in the illustration
below and apply the 2-inch (50 mm) piece of orange tape that
came with the TPS-6X-BTP to hold the wires in place.
5. Apply the two 1 inch (25 mm) pieces of orange tape that came
with the TPS-6X-BTP to each battery cell, extending the tape to
the black tab of the battery housing support on each side, as shown
in the illustration below. These replace the clear tape that held the
original cells in place.
NOTE: Ensure the tape does not wrap around to the front of the
touchpanel, where it could contact the light fibers on either side of
the screen.
TPS-6X Assembly (Cables Dressed, Orange Tape Applied)
Installation Guide – DOC. 6740A
Battery Pack for TPS-6X: TPS-6X-BTP • 9
Battery Pack for TPS-6X
Crestron TPS-6X-BTP
6. Carefully turn the assembly over, returning it to its normal, face-up
position. Then place the assembly into the rear half of the TPS-6X
enclosure, hinging it so the top of the assembly is in place first (as
shown in the illustration below). Then settle the bottom of the
assembly into place and with your thumbs on the black plastic at
the left and right edges, press and snap the assembly into place.
Installation (Showing Top of Assembly in Place)
7. Position the front bezel over the exposed touchpanel, ensuring the
ribbon cables remain tucked in place and the fiber optic cables
remain inboard of the posts located next to each of the bottom
screw holes.
8. Hold the bezel to the rest of the touchpanel and carefully rotate the
entire panel onto its face once more.
9. Reinstall the four screws to secure the bezel to the touchpanel.
Tighten the screws, being careful not to strip the threads.
10. Re-connect power, slide the battery switch on the rear to the ON
(up) position.
10 • Battery Pack for TPS-6X: TPS-6X-BTP
Installation Guide – DOC. 6740A
Crestron TPS-6X-BTP
Battery Pack for TPS-6X
Charging
NOTE: A Nickel Metal Hydride (NiMH) battery typically provides 500
charge/discharge cycles.
To charge the TPS-6X-BTP, install the TPS-6X-BTP in a TPS-6X
touchpanel and mount the touchpanel on a powered TPS-6X-DS or
TPS-6X-DS-C Docking Station/Charger (TPS-6X-DS-C sold separately).
NOTE: The battery pack may take up to three hours to charge in a
powered touchpanel if the panel is in use during charging.
Storage
Over time, the capacity and voltage of rechargeable Nickel Metal
Hydride (NiMH) batteries will decrease if the batteries are not recharged
at regular intervals. This is caused by a chemical reaction that takes place
within the batteries, commonly known as “self-discharge”.
Temperature is a major factor affecting the rate of self-discharge of the
battery when placed in storage. Higher temperatures will increase the rate
of self-discharge. The storage time table on the following page shows
how long it will take NiMH batteries to self-discharge at different storage
temperatures. After the allotted time in storage, the batteries will need to
be cycled (charged and discharged) to prevent permanent damage to the
batteries.
NiMH batteries and packs can be stored at any state of charge. The
information in the storage time table is valid for batteries in any state of
charge. A fully discharged battery will last as long in storage as a fully
charged battery. Storing the battery in a charged state will not increase
the maximum storage period in the storage time table.
• The energy storage capability of the battery negative electrode will
be decreased if the battery is allowed to completely self-discharge.
Therefore, it is important to cycle NiMH batteries that have been
stored for extended periods before use.
• If the batteries are cycled (charged and discharged), the storage
capability will be restored up to 95% of its initial rated capacity
after the second or third cycle.
Installation Guide – DOC. 6740A
Battery Pack for TPS-6X: TPS-6X-BTP • 11
Battery Pack for TPS-6X
Crestron TPS-6X-BTP
To prolong the life and maintain the performance of your NiMH
batteries, Crestron recommends you follow these steps:
• Practice FIFO (First In and First Out) inventory rotation.
• Never store batteries under load.
• Store batteries in a temperature controlled environment (refer to
table below).
• Store batteries at 65% (± 20%) relative humidity and keep out of
direct sunlight.
• Cycle batteries at least one charge/discharge cycle according to the
table below.
NiMH Battery Storage Time
TEMPERATURE RANGE
BATTERY OR PACK
MAXIMUM STORAGE PERIOD
(CYCLE INTERVAL)
104º to 122º F (40º to 50º C)
86º to 103º F (30º to 39º C)
-4º to 85º F (-20º to 29º C)
Less than 30 days
30 to 90 days
91 to 180 days
Disposal
NOTE: The TPS-6X-BTP contains Nickel Metal Hydride (NiMH)
battery cells. When the unit can no longer retain a charge, it must be
recycled or disposed of properly. Follow local ordinances and/or
regulations for disposal.
12 • Battery Pack for TPS-6X: TPS-6X-BTP
Installation Guide – DOC. 6740A
Crestron TPS-6X-BTP
Battery Pack for TPS-6X
Resources
Industry Compliance
As of the date of manufacture, the TPS-6X-BTP has been tested and
found to comply with specifications for CE marking and standards per
EMC and Radiocommunications Compliance Labelling.
Reference Documents
The latest version of all documents mentioned within the guide can be
obtained from the Crestron website (www.crestron.com/manuals). This
link will provide a list of product manuals arranged in alphabetical order
by model number.
List of Related Reference Documents
DOCUMENT TITLE
TPS-6X Isys® 5.7” Wireless Touchpanel
TPS-6X-DS Docking Station for the TPS-6X
TPS-6X-DS-C Docking Station for the TPS-6X
Further Inquiries
If you cannot locate specific information or have questions after
reviewing this guide, please take advantage of Crestron's award winning
customer service team by calling Crestron at 1-888-CRESTRON
[1-888-273-7876].
You can also log onto the online help section of the Crestron website
(www.crestron.com/onlinehelp) to ask questions about Crestron products.
First-time users will need to establish a user account to fully benefit from
all available features.
Installation Guide – DOC. 6740A
Battery Pack for TPS-6X: TPS-6X-BTP • 13
Battery Pack for TPS-6X
Crestron TPS-6X-BTP
Future Updates
As Crestron improves functions, adds new features and extends the
capabilities of the TPS-6X-BTP, additional information may be made
available as manual updates. These updates are solely electronic and
serve as intermediary supplements prior to the release of a complete
technical documentation revision.
Check the Crestron website periodically for manual update availability
and its relevance. Updates are identified as an “Addendum” in the
Download column.
14 • Battery Pack for TPS-6X: TPS-6X-BTP
Installation Guide – DOC. 6740A
Crestron TPS-6X-BTP
Battery Pack for TPS-6X
Return and Warranty Policies
Merchandise Returns / Repair Service
1.
No merchandise may be returned for credit, exchange or service without prior authorization
from CRESTRON. To obtain warranty service for CRESTRON products, contact an
authorized CRESTRON dealer. Only authorized CRESTRON dealers may contact the factory
and request an RMA (Return Merchandise Authorization) number. Enclose a note specifying
the nature of the problem, name and phone number of contact person, RMA number and
return address.
2.
Products may be returned for credit, exchange or service with a CRESTRON Return
Merchandise Authorization (RMA) number. Authorized returns must be shipped freight
prepaid to CRESTRON, 6 Volvo Drive, Rockleigh, N.J. or its authorized subsidiaries, with
RMA number clearly marked on the outside of all cartons. Shipments arriving freight collect
or without an RMA number shall be subject to refusal. CRESTRON reserves the right in its
sole and absolute discretion to charge a 15% restocking fee plus shipping costs on any
products returned with an RMA.
3.
Return freight charges following repair of items under warranty shall be paid by CRESTRON,
shipping by standard ground carrier. In the event repairs are found to be non-warranty, return
freight costs shall be paid by the purchaser.
CRESTRON Limited Warranty
CRESTRON ELECTRONICS, Inc. warrants its products to be free from manufacturing defects in materials
and workmanship under normal use for a period of three (3) years from the date of purchase from
CRESTRON, with the following exceptions: disk drives and any other moving or rotating mechanical
parts, pan/tilt heads and power supplies are covered for a period of one (1) year; touchscreen display and
overlay components are covered for 90 days; batteries and incandescent lamps are not covered.
This warranty extends to products purchased directly from CRESTRON or an authorized CRESTRON
dealer. Purchasers should inquire of the dealer regarding the nature and extent of the dealer's warranty, if
any.
CRESTRON shall not be liable to honor the terms of this warranty if the product has been used in any
application other than that for which it was intended or if it has been subjected to misuse, accidental
damage, modification or improper installation procedures. Furthermore, this warranty does not cover any
product that has had the serial number altered, defaced or removed.
This warranty shall be the sole and exclusive remedy to the original purchaser. In no event shall
CRESTRON be liable for incidental or consequential damages of any kind (property or economic damages
inclusive) arising from the sale or use of this equipment. CRESTRON is not liable for any claim made by a
third party or made by the purchaser for a third party.
CRESTRON shall, at its option, repair or replace any product found defective, without charge for parts or
labor. Repaired or replaced equipment and parts supplied under this warranty shall be covered only by the
unexpired portion of the warranty.
Except as expressly set forth in this warranty, CRESTRON makes no other warranties, expressed or
implied, nor authorizes any other party to offer any warranty, including any implied warranties of
merchantability or fitness for a particular purpose. Any implied warranties that may be imposed by law are
limited to the terms of this limited warranty. This warranty statement supersedes all previous warranties.
Trademark Information
All brand names, product names and trademarks are the sole property of their respective owners. Windows is a registered trademark
of Microsoft Corporation. Windows95/98/Me/XP/Vista and WindowsNT/2000 are trademarks of Microsoft Corporation.
Installation Guide – DOC. 6740A
Battery Pack for TPS-6X: TPS-6X-BTP • 15
Crestron Electronics, Inc.
15 Volvo Drive Rockleigh, NJ 07647
Tel: 888.CRESTRON
Fax: 201.767.7576
www.crestron.com
Installation Guide – DOC. 6740A
(2022218)
10.08
Specifications subject to
change without notice.