1
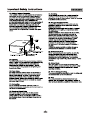
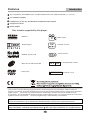
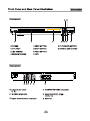
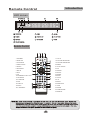
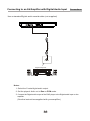
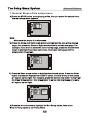
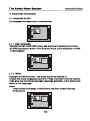
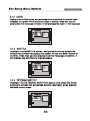
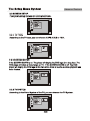
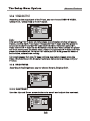
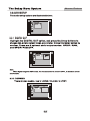
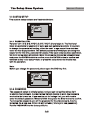
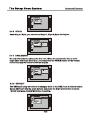
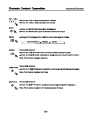
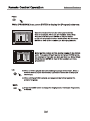
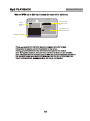
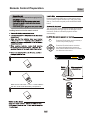
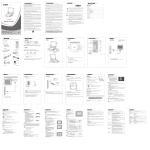
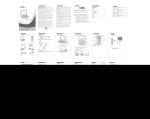
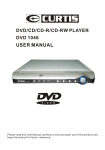
DVD-320
Content
Introduction
Safety Precautions
2
Important Safety Instructions
3
Caution
5
Features
6
Front Panel and Rear Panel Illustration
7
Remote Control
8
Connections
Connecting to a TV set
9
Connecting to an AV Receiver with Digital Audio Input
11
Advanced Features
Mode and Features Setup
12
Remote Control Operation
20
MP3 Playback
25
Others
Troubleshooting
26
Remote Control Preparation
27
Specifications
29
1
AVIS
RISQUE CHOC ELECTRIQUE NE
PAS OUVRIR
2
3
4
5
Features
Introduction
Full compatibility with MPEG4, DVD, CD, MP3, KODAK Picture CD, CD-R and CD-RW ( f i n a l i z e d )
5.1 CH Audio Output
Component (Y, Pb, Pr), S-Video and composite video output
Progressive Scan
Scart Output
Disc formats supported by this player:
MPEG4
9
Multi-angle
Dolby Digital
32
Subtitle choices
KODAK picture CD
8
Audio choices
16:9 LB
MP3 files on CD-R/CD-RW
TV Aspect Ratio modes
DVD video
R RESTRICTED Parental Lock
This product incorporates copyright protection technology that is protected by method claims of
certain U.S.patents and other intellectual property rights owned by Macrovision Corporation and other
rights owners. Use of this copyright protection technology must be authorized by Macrovision
Corporation, and is intendedfor home and other limited viewing uses only unless otherwise authorized
by Macrovision Corporation. Reverse engineering or disassembly is prohibited.
The product complies with the KODAK Picture CD format and will display KODAK Picture CDs. The "KODAK
Picture CD Compatible" logo is a trademark of Eastman Kodak Company and is used with permission.
Manufactured under license from Dolby Laboratories. "Dolby" and the double-D symbol are trademarks of
Dolby Laboratories. Confidential Unpublished Works. c 1992-1997 Dolby Laboratories, Inc. All rights reserved.
6
9 10
1
2
1 POWER
3
5 PREV BUTTON
2 DVD TRAY
6 STOP BUTTON
3 LED SCREEN
7 NEXT BUTTON
4 REMOTE SENSOR
8 USB
4 5 6 7
9 PLAY/PAUSE BUTTON
10
OPEN/CLOSE BUTTON
100-240V ~
50/60Hz
1 2 3
4
5
1 2.0 CH Audio output
6
2 COMPOSITE VIDEO output jack
(L, R )
3
S-VIDEO output jack
4 Component Video output
(Y, Pb, Pr)
5 Digital Audio COAXIAL output jack
6 Scart out
7
8
Introduction
Remote Control
LED screen
dts
VCD
PBC
10
DVD DISC
2 VCD
PLAY
PAUSE
DISC PLAY
PLAY TIME
REPEAT
MP3 DISC
PBC
10 DOLBY DIGITAL
Remote Control
1.STANDBY
2.SUBTITLE
OPEN/
STANDBY
CLOSE
SUBTITLE LANGUAGE
TITLE
ANGLE
VOL+
17.TITLE
18.VOLUME INCREASE
19.VOLUME DECREASE
3.LANGUAGE
MENU
20.MENU
4.OPEN/CLOSE
5.ANGLE
6.PROGRAM
VOL-
PROG
PLAY/
PAUSE
SETUP
7.SETUP
24.RIGHT
9.L/R
L/R
10.NUMBERICA KEY PAD
1
STOP
2
25.DOWN
26.STOP
3
GOTO
4
5
6
10+
7
8
9
0
14.DISPLAY
REV
FW D
PREV
NEXT
15.MUTE
PBC
DISPLAY
ZOOM
USB
16. A-B REPEAT
MUTE
A-B
REPEAT
27.GOTO
28.10+
12.FORWARD
13.PBC
22.UP
23.ENTER
ENTER
8.LEFT
11.REVERSE
21.PLAY/PAUSE
VIDEO/
MODE
29. NEXT
30. PREVIOUS
31.USB
32.ZOOM
33.VIDEO/MODE
34.REPEAT
8
Connections
CONNECTING THE DVD PLAYER TO THE TV USING AN AV CABLE
Connect the DVD player s FR and FL Phono to the audio input Phono on the TV
TV
VIDEO
IN
AUDIO
IN
L
R
Audio cable
Video cable
100-240V ~
50/60Hz
CONNECTING THE DVD PLAYER TO THE TV USING AN S-VIDEO CABLE
Use an S-VIDEO cable ( not supplied) to connect the player to your TV.
Use a standard stereo Phono lead (not supplied) to connect the audio.
TV
S-VIDEO
IN
VIDEO
IN
AUDIO
IN
L
S-Video cable
Audio cable
100-240V ~
50/60Hz
9
R
Connections
CONNECTING THE DVD PLAYER TO THE TV USING A SCART CABLE
Use the SCART cable (not supplied) to connect the DVD player and your TV.
Set the [Video Type] to [TV-RGB].
TV
VIDEO
IN
AUDIO
IN
L
R
Scart
100-240V ~
50/60Hz
CONNECTING THE DVD PLAYER TO THE TV USING A Y/Pb/Pr CABLE
Use the COMPONENT Cable(not supplied) to connect the DVD player to your
TV. Set the [Video Type] to [YUV]. For Progressive Scan, set to [Y,Pb,Pr].
The [YUV] and [Y,Pb,Pr] signal is transfered through the same leads. If the TV
set supports P-scan, you can set [Video Type] to [Y,Pb.Pr]. If not, set [Video
Type] to [YUV].
Use a standard stereo Phono lead (not supplied) to connect the audio.
TV
Y
AUDIO
IN
Pb
Pr
Component Cable
Audio cable
100-240V ~
50/60Hz
10
L
R
Connecting to an AV Amplifier with Digital Audio Input
Connections
Use a standard Digital audio coaxial cable (not supplied)
100-240V ~
50/60Hz
Coaxial cable
Coaxial
Digital Amplifier
VOLUME
INPUT SELECTOR
POWER
BYPASS
PRO LOGIC
3 STEREO
MODE
TEST
CHANNEL
KARAOKE
MUTE
UP
DOWN
BASS
1
MIC
2
1
MIC VOL
2
MIC
TREBLE
ECHO
EXCITE
Notes:
1. Select the Coaxial digital audio output.
2. Set the player's Audio out to Raw or PCM mode .
3. Connect the Digital audio output of the DVD player to the Digital audio input on the
amplifier.
(See the instructions supplied with your amplifier)
11
Advanced Features
1. General Steps of the setup menu
A) Press the STOP button when playing a disc, then you press the setup button,
the main setup menu appears.
Note:
Make sure the player is in stop mode.
B) Press the Down and Right arrow buttons to highlight the icon of the desired
page, then press the Down or Right arrow button to activate that page. For
example, if you want to setup the screen setup page, press the arrow button
Down to highlight the screen setup icon, the screen setup page will be
d isplayed o n t he s creen.
C) Press the Down arrow button to highlight the desired option. Press the Enter
button or press the Right arrow button to select. The sub-menu of that option
will appear on the right. For example, press the Down arrow button to highlight
the Video Output option, then press Enter to select, the brightness sub-menu
will appear on the right.
CVBS+S-Video
CVBS+YUV
CVBS+RGB
YUV P-SCAN
A)Press the Arrow buttons to highlight the Exit Setup option, then press
Enter or Setup again to exit Setup Menu .
12
Advanced Features
2. Setup Items Introduction
2.1 LANGUAGE SETUP
The language setup options are illustrated below:
2.1.1 OSD LANGUAGE
Highlight the OSD LANGUAGE option, and press the Arrow buttons to choose
the OSD language you prefer. Press Enter to confirm, and it will display the OSD
in that language.
English
French
Spanish
German
Dutch
2.1.2
MENU
Highlight the MENU option, and press the Arrow buttons to
choose the menu language you prefer. Press the Enter button to confirm.
If the disc you are playing has that Language available. It will display the
menu in that language.
Notes:
If your preferred language is not available, the discs
disc s default language
w ill b e p layed.
English
French
Spanish
German
Dutch
13
Advanced Features
2.1.3 AUDIO
Highlight the AUDIO option, and press the Arrow buttons to choose the audio
language you prefer. Press the Enter button to confirm. If the disc you are
playing has that language available, it will playback the audio in that language.
English
French
Spanish
German
Dutch
2.1.4 SUBTITLE
Highlight the SUBTITLE option, and press the Arrow buttons to
choose the subtitle language you prefer. Press the Enter button to
confirm. If the disc you are playing has that language available, it
will display the subtitles in that language.
English
French
Spanish
German
Dutch
Off
2.1.5 EXTERNAL SUBTITLE
Highlight the EXTERNAL SUBTITLE option, and press the Arrow
buttons to choose the supported subtitle language when playing
MPEG4 format discs.
Western European
Central European
External Subtitle
14
Advanced Features
2.2 SCREEN SETUP
The system setup options are illustrated below:
2.2.1 TV TYPE
According to the TV type, you can choose 4:3PS,4:3LB or 16:9 .
2.2.2 SCREEN SAVER
If the SCREEN SAVER is on. The player will display the DVD logo for a long time. The
DVD player will show a lively image on TV . If the SCREEN SAVER is off. The DVD
player will display the DVD logo all the time when there is no disc or when playback has
been finished.
2.2.3 TV SYSTEM
According to the Color System of the TV, you can choose the TV System.
15
Advanced Features
2.2.4 VIDEO OUTPUT
According to the output jack of the TV set, you can choose CVBS+S-VIDEO,
CVBS+YUV , CVBS+RGB or YUV P-SCAN.
CVBS+S-VIDEO
CVBS+YUV
CVBS+RGB
YUV P-SCAN
Note:.
After selecting YUV P-Scan via setup-menu a confirmation window will popup.
Please, confirm it with 'Yes' if your TV supports YUV P-Scan and if the player is
connected to the TV via the YUV cable (3x RCA RGB). Otherwise select 'No'.
If you select YUV P-Scan via the Remote Control Button 'Video / Mode' the player
will force you to press the button twice. If your TV supports YUV P-Scan and if the
player is attached to the TV via the YUV cable (3x RCA RGB) press the button a
second time, otherwise do nothing.
If it should happen that your TV does not show any picture, please press the
Video / Mode button on the Remote Control one time or several times until your
TV does.
2.2.5 BRIGHTNESS
According to the Brightness, you can choose Normal, Bright or Soft .
2.2.6 CONTRAST
Use the Up and Down arrow buttons to scroll and adjust the contrast.
16
Advanced Features
2.3 AUDIO S ETUP
The audio setup options are illustrated below:
Downmix
2.3.1 DIGITAL OUT
Highlight the DIGITAL OUT option, and press the Arrow buttons to
choose the audio output mode you prefer. Press the Enter button to
confirm. There are 3 optional audio output modes: SPDIF / RAW,
and SPDIF/ PCM,OFF.
A
C
B
Downmix
Note:
When digital output is NOT in use, It is recommended to select OFF , to minimize circuit
interference.
2.3.2 DOWNMIX
There are two modes, one is LO/RO, the other is LT/RT.
A
C
B
Downmix
LO/RO
LT/RT
17
Advanced Features
2.4 CUSTOM SETUP
The custom setup options are illustrated below:
Style
Angle Mark
2.4.1 PARENTAL CTRL
Parental Ctrl:1,2:G,3:G,4:PG13,5,6:R,7:NC17,8 level eight is. The first level
discs are available to people of all ages and only suitable for adults. If you want
to change the parental ctrl setting, enter the user s age control item and then
enter the four digit password. The default password is 6666(if you are using this
player for the first time, just enter this code).If the input code has been confirmed ,
the level set up menu will appear. Move the cursor to choose the expected level
and press the ENTER button to confirm press the ENTER button to confirm and
withdraw to the user setup menu or press the setup button to directly stop
with the operation.
Note:
Before you change the password, please open the DVD tray first.
Style
Angle Mark
5
6
7
8
off
2.4.2 PASSWORD
The password option is initially locked, and you can not set the ratings limit
or change the password. In order for the Ratings feature to work, the password
mode must be turned on. If you want to set the ratings limit, you will need to
enter the default password. Which is 6666. then press the Enter button to confirm.
To change the password, you will be prompted for the old password, then be
prompted for a new one. Enter a 4-digit number ( this is your new password).
Put the PASSWORD to the factory defaults.
18
Advanced Features
Style
Angle Mark
2.4.3 STYLE
According to Style, you can choose Style 1, Style 2,Style 3 or Style 4 .
Style
Angle Mark
Style 1
Style 2
Style 3
Style 4
2.4.4 ANGLE MARK
On and off are the two choices for this item. When the content of a disc is multiangle shot, and angle mark is on, you may press the ANGLE button on the remote
control to enjoy the scene in different angles.
Parental Ctrl
Style
2.4.5 DEFAULT
The DEFAULT setup will resfore all changes made to the OSD, back to factory default.
Select DEFAULT with the arrow buttons and press the Right arrow button to select
READ and press the ENTER button to confirm.
Password
Style
19
Advanced Features
DISPLAY
During playback, press DISPLAY to show the current time counter position.
GOTO
During playback, press GOTO to show the current time counter position.
Enter the title number
to choose the title
Total Chapters
Chapter
Enter the chapter number to
choose the Chapter.
Enter the title number
to choose the title
_:__:__
Enter the play time number to
choose the Play time.
20
Advanced Features
STANDBY
OPEN/
CLOSE
Press the STANDBY button to switch between normal mode and standby mode.
To open the disc tray, press the OPEN/CLOSE button.
To close the disc tray, press the OPEN/CLOSE button again.
0-10+ keys
These keys are used to manualy enter the time, as well as the title, chapter and
track numbers.
When a numeric item is displayed on the screen, press the 0-10+ keys to
select the desired entry, press SELECT to confirm.
A-B
During playback, press the A-B button to select point A.
Press it again to select point B. The player will repeat the section from A to
B automatically.
Press the A-B button a third time to cancel A-B repeat and clear points A and B.
Note: 1. During CD playback, points A and B must be within the same track.
During DVD playback, points A and B can be selected from different chapters.
2. This function is subject to the disc.
F WD
During DVD or CD playback, press and hold to scan forward. The player will
review the disc at 2, 4, 8, 16 and 32 times the normal speed as follows:
Press PLAY to resume normal playback.
REV
During DVD or CD playback, press and hold to scan in reverse. The player will
review the disc at 2, 4, 8, 16 and 32 times the normal speed as follows:
Press PLAY to resume normal playback.
21
Advanced Features
PREV
Press the PREV button to skip to the previous chapter or track.
NEXT
Press the NEXT button to skip to the next chapter or track.
STOP
Press the STOP button once during playback to stop and hold playback.
Press the PLAY button to resume playback from the point you pressed STOP.
Press the STOP button twice to stop playback completely.
PLAY/
PAUSE
Play/Pause
In pause state or stop state, press the button, the player will be
in playing state.
In play state, press the button the player will be in pause state.
MENU
During DVD playback, press MENU to return to the program menu.
Note: This function is subject to the disc.
TITLE
During DVD playback, press TITLE to display the DVD title menu or to play the
first title.
Note: This function is subject to the disc.
REPEAT
Press REPEAT to select Repeat Title, Repeat chapter, Repeat off
During DVD playback.
Press the REPEAT button to select Repeat Single, Repeat all and Repeat off (CD
or Other).
22
Advanced Features
VOL- VOL+
Press the < VOL+> button to increase the Volume.
Press the < VOL-> button to reduce the Volume.
MUTE
Press the MUTE button to mute the Audio output.
Press the MUTE button again to resume normal Audio output.
ZOOM
During DVD playback, press ZOOM to magnify the image as follows:
ZOOMx1(NORMAL)
ANGLE
ZOOMx2
ZOOMx4
During DVD playback
Press the ANGLE button to view scenes from different camera angles.
Press the ANGLE button repeatedly to change from one camera angle to another.
Note: This function is subject to he disc.
During DVD playback
LANGUAGE
Press the LANGUAGE button repeatedly to select up to 8 Audio language/formats.
Note: This function is subject to the disc.
SUBTITLE
During DVD playback
Press the SUBTITLE button repeatedly to select up to 32 subtitle languages.
Note: This function is subject to the disc(languages will vary).
23
Advanced Features
PROG
White [PROGRAM] is on, press ENTER to display the [Program] submenu:
Enter the track numbers in the order you would like
them to be played. When you are finished, select [Play
Program] and then press ENTER to play the tracks
in the new programmed order. Select [Clear All] and press
ENTER to clear all the numbers you have programmed..
6
7
6
7
L/R
Enter the title number and the chapter number in the desired
order. Then select [Play Program] and press ENTER to play
the chapters in the order you have set them up. Select [Clear
All] and press ENTER to clear all the numbers you have
programmed.
When a DVD is played, the active dubbing language will be shown. When a
SVCD or VCD is played the left track, right track or stereo will be displayed
accordingly.
When a bilingual VCD is played, you may press the button to select the
prefered language.
MODE
Press the MODE button to change the display mode; Interlaced, Progressive,
S-VIDEO.
24
Mp3 PLAYBACK
Advanced Features
When an MPEG and an Mp3 disc is loaded, the scre en will be as follows:
Queen
Current
directory
name
1/17
ROOT
CLOUD
01. Was Bor
1
02. Let me li
2
03. You are my
3
04. Under pre
001-1
4
5
ROOT
ROOT
Show files contents
00:17:00
44.1KHz 128Kbps
The playing file
is a Mp3 audio
file.
The playing file is
a JPEG picture file.
04:49
Press
to select the file when the cursor appears in the file window.
Press select to play the current file selected by the cursor.
Press
to switch between the directory window and the file window.
Note: During Mp3 playback, Forward Scan and Reverse Scan are not available.
Note: The player will not identify or play an MP3 disc under the following conditions:
the recording format is not supported(make sure the files are in MP3 format),the
disc is badly scratched, damaged or dirty, the disc is not finalized.
25
Make sure the Main unit s POWER button is on
Ensure the batteries of the remote are working.
enter
26
Remote Control Preparation
Read this owner s manual thoroughly before
Loading batteries into the remote control
Other
Press the OPEN/CLOSE button on the remote control
(or front panel) to eject the disc tray. Load a disc, label
side up, into the disc tray and press the OPEN/CLOSE
button.
The unit will take a few seconds to load the disc s initial
data, display the disc type logo on the left upper corner
on screen, and then it will start playback the disc
automatically.
Press the PLAY button on the remote( or
on the unit) to start playing.
direction
ENTER
OK
1
1. Open the cover.
2
2. Insert batteries.
Press the Direction buttons to select
the desired feature in the menu and
then press the ENTER button to confirm
the selection in the menu.
OPEN/
CLOSE
STANDBY
SUBTITLE LANGUAGE
Make sure to match the "+" and "-" of the batteries
TITLE
ANGLE
VOL+
MENU
with the marks inside the battery compartment.
VOL-
PROG
PLAY/
PAUSE
SETUP
ENTER
3
3. Close the cover.
L/R
STOP
1
2
4
5
6
7
8
9
3
GOTO
27
REV
FW D
PREV
PBC
DISPLAY
ZOOM
MUTE
A-B
REPEAT
10+
0
NEXT
USB
VIDEO/
MODE
Remote Control Preparation
Other
The following message will be displayed on the screen when there is a problem with the loaded disc:
Production qualities of DVD disc s vary, some disc s might deviate from the industrial standard. Some
correctly formatted discs may playback on the player. However, the playback and operational quality
of those discs may be substandard.
28
Specifications
Power requirements: AC 100-240 Volt, 50/60Hz
Power consumption: 15W
Video standard: NTSC/PAL/AUTO
Unit Weight: 1.7kg
Video out
Video out: 1.0V(p-p)/75 , sync, negative polarity, RCA pin jack x 1
S-video output connector(separate Y C signal output connector):
Y output: 1.0V(p-p)/75 , sync, negative polarity
C output: 0.286V(p-p)/75
Audio out
2.0 channel out: RCA pin jackx6
Coaxial out: 0.5V(p-p75 ,RCA pin Jack x l
Frequency response: 20Hz to 20kHz
S/N ratio:>90dB
Total harmonic distortion: <0.0025%
[Accessories]
Video/ Audio cable x 1
Remote Control x 1
User s Manual x 1
Battery x 2
Specifications are subject to change without prior notice.
Weight and dimensions are approximate.
If at any time in the future you should need to dispose of this product please note
that: Waste electrical products should not be disposed of with household waste.
Please recycle where facilities exist. Check with your Local Authority or retailer for
recycling advice. (Waste Electrical and Electronic Equipment Directive)
29